SEARCH FINESCALE.COM

Enter keywords or a search phrase below:

251 Halftracks GB 1 October '08 - 8 June '09

129676 views
1459 replies
1 rating 2 rating 3 rating 4 rating 5 rating
  • Member since
    March 2008
  • From: Cheney, WA
Posted by FastasEF on Wednesday, October 22, 2008 11:48 PM

You know, while i'm building, I keep thinking of questions to ask. And then when I come on here to post I find myself answering them before I even finish typing it out, lol.

Mainly color questions but I think so far, i've got it figured out. I have a feeling that when an actual question comes up, it's gonna be along the lines of, "how do I undo this?".

Josh

  • Member since
    November 2006
  • From: Coastal Maine
Posted by dupes on Thursday, October 23, 2008 9:30 AM

Josh - got any pics of your progress we can take a look at?

Wingy - Ouch. what sort of recovery time are you looking at? You know, you should really have your wife handle rough tasks like that...we can't have you getting sidelined from modeling. That would be very bad. Laugh [(-D]

  • Member since
    April 2005
  • From: Piscataway, NJ!
Posted by wing_nut on Thursday, October 23, 2008 11:15 AM

FastasEF.. didn't Yoda say something like..."There is do or don't...there is no undo."Wink [;)]

Dupes I am looking at a couple of months.  Got about 60% use of the arm.  Being right handed its a good thing it's my left that's messed up.

It doesn't hurt to paint thoughBig Smile [:D]  Got the gun all done, still need to do the platform.  Interior is mostlt done.  Some dry brushing in the back and a wash still to do.  And WOW what a PITA the PE screen was for thew spent casing catcherDead [xx(]


Marc  

  • Member since
    November 2006
  • From: Coastal Maine
Posted by dupes on Thursday, October 23, 2008 11:25 AM

Couple of MONTHS? Yowzors. That must have been one big ladder. Shock [:O]

Your 251, however, is looking pretty spectacular! I'm guessing that shell-catcher is 6 or 7 individual pieces you have to bend into circular form? Dang. Thumbs Up [tup]

  • Member since
    April 2003
  • From: 41 Degrees 52.4 minutes North; 72 Degrees 7.3 minutes West
Posted by bbrowniii on Thursday, October 23, 2008 6:09 PM
 wing_nut wrote:

FastasEF.. didn't Yoda say something like..."There is do or don't...there is no undo."Wink [;)]

Dupes I am looking at a couple of months.  Got about 60% use of the arm.  Being right handed its a good thing it's my left that's messed up.

It doesn't hurt to paint thoughBig Smile [:D]  Got the gun all done, still need to do the platform.  Interior is mostlt done.  Some dry brushing in the back and a wash still to do.  And WOW what a PITA the PE screen was for thew spent casing catcherDead [xx(]


Marc,

Awesome work!!!  I HATE YOU!!! Angel [angel]  You, you, you aircraft guycomin' over here and kickin' butt on armor...  Better than anything I've ever done....  Did I mention that I hate you??? Smile,Wink, & Grin [swg]

'All that is necessary for the triumph of evil is for good men to do nothing' - Edmund Burke (1770 ??)


  • Member since
    October 2004
  • From: League City, Texas
Posted by sfcmac on Thursday, October 23, 2008 6:14 PM
 And with only 1 good arm as well!  Got a bit sidetracked with mine but I will be back on track by this weekend!
  • Member since
    April 2005
  • From: Piscataway, NJ!
Posted by wing_nut on Thursday, October 23, 2008 6:43 PM
So Boyd... what is it you are trying to sayConfused [%-)]

Marc  

  • Member since
    March 2008
  • From: Cheney, WA
Posted by FastasEF on Thursday, October 23, 2008 6:43 PM

I don't have any pics as of yet but will try and post some by this weekend.

I did think of a question though. What color will the suspension be? I'm gonna guess black, but i'm thinking it could also be the same gray as the exterior color. Doesn't say anything on the instructions.

Josh


  • Member since
    April 2006
  • From: LaValle, Wisconsin
Posted by Hermesminiatures on Thursday, October 23, 2008 10:45 PM

Hey guys, some really nice work getting done here! Sorry for my lack of participation, I've been super busy lately.

So far I've assembled the chassis and lower hull of my 251, and put together all those fun, tiny tracks. Then I filled all the locating holes for parts I won't use (meaning most of them), thinned the sidewalls down to correct thickness (LOTS of sanding) and added the relevant interior parts from the LionRoar 251 set. I'm waiting to get some sheet styrene on my next trip down south to Madison - my LHS recently closed and I can't justify a 2 hour trip both ways just for $7 in plastic Wink [;)]

Should be getting down there next week, after that, the real fun begins - scratchbuilding a functional interior. Dead [xx(]

Here is one hastily taken, poor quality progress pic:

Jonathan

For every modeling technique that works, I have three that don't.

  • Member since
    February 2007
  • From: Bournemouth UK
Posted by Luftwoller on Friday, October 24, 2008 3:13 AM

Great work Marc, really coming together now.

Im struggling to get the inclination to do anything at the mo. I know that the top and bottom half of mine is an awfull fit and i cant work out why. I havent been at the bench all week. Doh!

I need a plane to do, to ease my frustration.

...Guy

..'Your an embarrassment to the human genus, makes me ashamed to call myself Homo'.
  • Member since
    April 2005
  • From: Piscataway, NJ!
Posted by wing_nut on Friday, October 24, 2008 7:30 AM
 Luftwoller wrote:

I need a plane to do, to ease my frustration.

...Guy

Thnaks guy.  But you better be careful what you say out loud.  last guy the that only heard 3 words after that...

READY  AIM   FIRE

Marc  

  • Member since
    November 2006
  • From: Coastal Maine
Posted by dupes on Friday, October 24, 2008 10:03 AM
 Hermesminiatures wrote:

Hey guys, some really nice work getting done here! Sorry for my lack of participation, I've been super busy lately.

Looks like you've got a good chunk done, Hermes...what else have you been working on? Bummer about your LHS. Sad [:(]

Josh - Panzer Gray should be fine for a base - you're going to muck it up quite a bit with dust and dirt eventually anyway I'm sure. Thumbs Up [tup]

Lufty - you can do it man! Just sit down and glue some plastic!  Wink [;)]


  • Member since
    December 2002
  • From: Reno, NV
Posted by espins1 on Friday, October 24, 2008 10:48 AM
That's some awesome work there Marc and Jonathan!  Cool [8D] Thumbs Up [tup] Thumbs Up [tup]

Scott Espin - IPMS Reno High Rollers  Geeked My Reviews 

  • Member since
    April 2006
  • From: LaValle, Wisconsin
Posted by Hermesminiatures on Friday, October 24, 2008 12:11 PM
 dupes wrote:

Looks like you've got a good chunk done, Hermes...what else have you been working on? Bummer about your LHS. Sad [:(]

Why don't you just find that photo of my stash I posted somewhere here, and I'll give you the list of what I'm not working on? It'll be quicker Big Smile [:D]

The projects I have worked on in the past two months include my Jagdtiger for the Panzer Aces GB, the base and figures for the Jagdpanzer IV A-0 from the Hunters GB, my ages-old Firefly, and a T-34 for Red Storm GB. And kinda sorta the Henschel I was building for Mud Movers GB, but I started going crazy on the detailing and kinda sorta gave up on finishing it by the end of the year. Maybe the cockpit and engines by then.

[/end off-topic infomercial on my current workbench status]

Jonathan

For every modeling technique that works, I have three that don't.

  • Member since
    February 2007
  • From: Bournemouth UK
Posted by Luftwoller on Friday, October 24, 2008 4:33 PM

Well i got home and decided, im either going to get some more of this thing done or bag it and come back to it later. Luckily i chose the former.

My main mission was to get the top and bottom buttoned up. Before i put glue to plastic i had to take a couple of interior shots before it gets hidden totally by the top half.

Well the top and bottom went on and there was a huge gap down the centre of the body on both sides. I tried everything including thinning the 'Bins' insde but still there was a small gap. I went with Superglue in the end and the finished result is liveable with. (Forgot to take a pic of the thing together.]

Oh this may help anyone having probs holding the tracks to paint them. I used a roll of 3" tape with some wide tamiya tape turned back to front on it. Works a treat.

...Guy

..'Your an embarrassment to the human genus, makes me ashamed to call myself Homo'.
  • Member since
    October 2004
  • From: League City, Texas
Posted by sfcmac on Friday, October 24, 2008 5:21 PM
Oh yeah Guy ! I can see your having a hard time staying on task...... Geeze that looks pretty darn good. I do hear the flying clog  overhead though.
  • Member since
    April 2005
  • From: Piscataway, NJ!
Posted by wing_nut on Friday, October 24, 2008 5:22 PM
Guy the interior looks really sweet.  The radio gear looks great as does that rifle.

Marc  

  • Member since
    November 2006
  • From: Coastal Maine
Posted by dupes on Friday, October 24, 2008 5:22 PM

VERY glad you decided to snap some pics before closing her up...that interior is awesome, Guy! Tons of good work in there. Thumbs Up [tup]Thumbs Up [tup] I'm assuming that you can't see those big ejector pin marks in the rifle stowage boxes once the rest of the upper hull is attached...? Whistling [:-^]

I won't tell if you won't. Wink [;)]

I have no idea how accurate your radio wiring is...but sure looks spot on to me!

  • Member since
    May 2006
  • From: Queensbury,NY
Posted by panzer88 on Saturday, October 25, 2008 9:21 AM
That's some beautiful work there. Great job on that interior. I love those K98 rifles!!! They look like the real deal, are they the kit supplied ones and if so I'm sending mine to you so you can work your magic on my set. Great jobBow [bow]


  • Member since
    February 2007
  • From: Bournemouth UK
Posted by Luftwoller on Saturday, October 25, 2008 12:56 PM
 dupes wrote:

I'm assuming that you can't see those big ejector pin marks in the rifle stowage boxes once the rest of the upper hull is attached...? Whistling [:-^]

I have no idea how accurate your radio wiring is...but sure looks spot on to me!

LOL, Im one of those modellers who build stuff for my shelves. Not for comps. I also wouldnt dream of weathering parts that you wont ever see.

As for the wiring. As far as i can see so far its pretty accurate..ish. Theres still a couple of headphones, a speaker and a morse controller to go in yet.

...Guy

..'Your an embarrassment to the human genus, makes me ashamed to call myself Homo'.
  • Member since
    November 2006
  • From: Coastal Maine
Posted by dupes on Saturday, October 25, 2008 1:04 PM

No, no, that wasn't a criticism, that was a question! Laugh [(-D]

Can you really not see into the storage boxes once the upper hull is attached (or at least the side with the pin marks)? If not, then trust me, I'm with you. Wink [;)]

  • Member since
    September 2007
  • From: Relocating
Posted by Mobious on Saturday, October 25, 2008 1:17 PM

 panzer88 wrote:
That's some beautiful work there. Great job on that interior. I love those K98 rifles!!! They look like the real deal, are they the kit supplied ones and if so I'm sending mine to you so you can work your magic on my set. Great jobBow [bow]

 Just came home from the gun store. Your absolutely right. Those K98's looked just like the ones that were hangin' in the case. Nice job!

 Mobious

"It's a problem of applied physics" Roy Brown

  • Member since
    May 2006
  • From: Queensbury,NY
Posted by panzer88 on Saturday, October 25, 2008 8:11 PM
A plea for HELP!! Anybody by any chance have any pics of the 251/1 Falke and possibly any pics of the interior and wiring of the night vision devices? I have a couple of pics of the exterior but that's about it. Any help would be a god send. Thanks. Everyones's builds are looking great, made me finally get off my butt and start mine. Thanks again.Big Smile [:D]


  • Member since
    March 2008
  • From: Cheney, WA
Posted by FastasEF on Sunday, October 26, 2008 3:42 AM

First pics. Not much to show as of yet. Sides aren't glued on yet and neither is the front suspension setup. I hope to have some good progress shots tomorrow cause i'll be home all day watching football and modelling!


Josh

  • Member since
    April 2005
  • From: Piscataway, NJ!
Posted by wing_nut on Sunday, October 26, 2008 8:11 AM

Looks good Josh.  What color did you use for the tires?


The rest of this post should be titled.. "WARNING...DANGER Will Robinson"  (arms flailing widly)

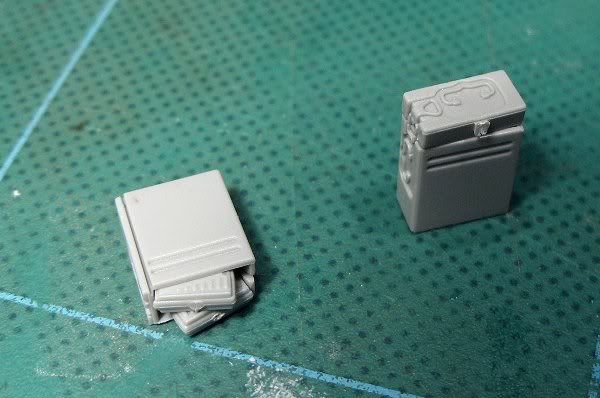
1st a question.  The extra ammo boxes for the Flak38 can be open or closed.  Does the top hinge at the back or would it come off completely?


Now the Angry [:(!] stuff.  Things I missed that, if you have not gotten this far yet, keep an eye out for.  BTW this is the Dragon kit and may be different depending on what parts are common.

(Note to self  PAY ATTENTION!!!!)


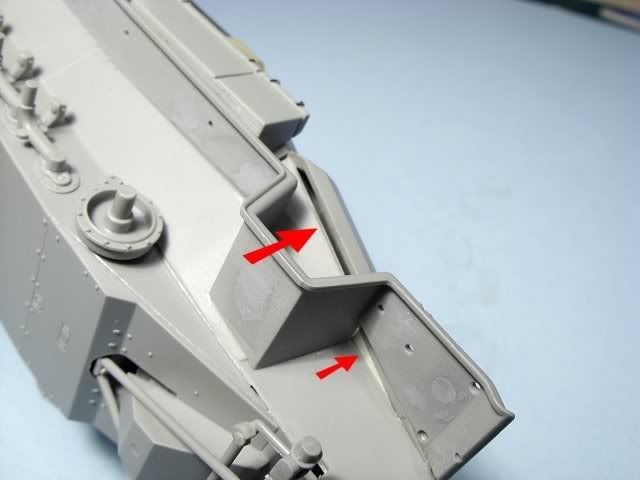
I totally missed this gap when test fitting.  The left side is fine so the right side was mounted the same way.  i would have had to remove the guide lugs on the fender to get the gap to disappear.


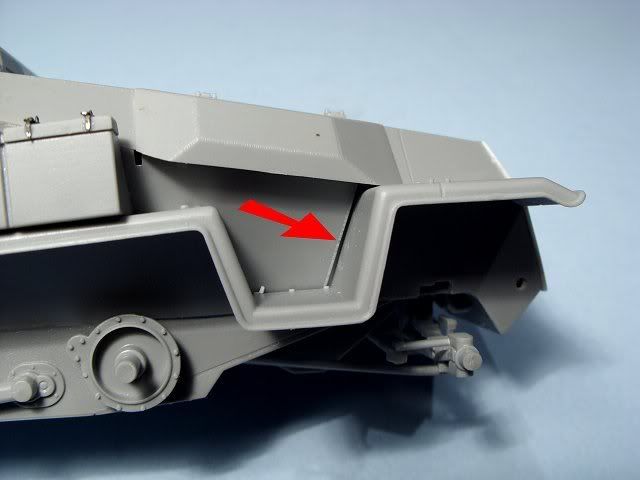
I saw the tiny gap that needed to be filled in the front wheel well. How did I miss the BIG one behind itConfused [%-)]


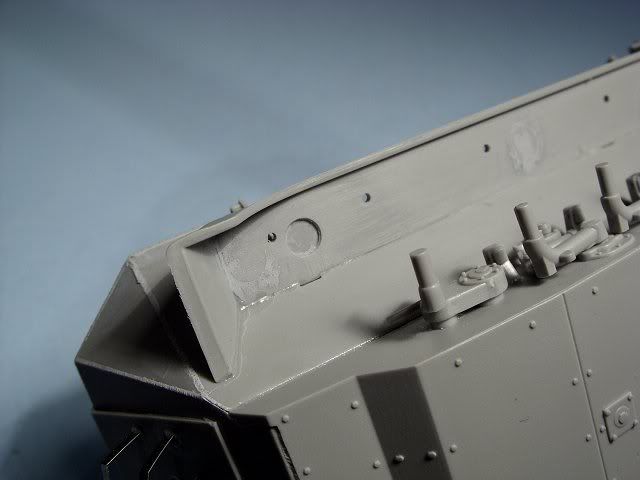
And look at all the holes here and in the pic above.  All the holes for alignment pins for stuff attached to the top of the fender go through. THROUGH??? WHY?Boohoo [BH]  And what's with the one in the back that as deep as the Snake River Canyon.... wait... I think I see a tiny little Evel Knievel trying to jump across it... darn, missed again... that's 0 for 2.   I thought surelythat must be for a part to fit in... so deep... so round... so perfect.  But no Sigh [sigh]   I need a bigger tube of putty.


YOU HAVE BEEN WARNEDBig Smile [:D]

Marc  

  • Member since
    November 2007
  • From: Wisconsin Rapids, WI
Posted by moose421 on Sunday, October 26, 2008 8:28 AM
wing_nut   Just a word on your gap filling.  I think the one behind the fenders on your third picture is the air intake.  On the C version I think that would be open?  Someone might be able to confirm or say otherwise.  But for missing things, the camera has a way of pointing out flaws.  As I have learned with my recent build.
  • Member since
    March 2008
  • From: Cheney, WA
Posted by FastasEF on Sunday, October 26, 2008 11:35 AM
 wing_nut wrote:

Looks good Josh.  What color did you use for the tires?

ColorPlace interior/exterior fast dry flat black spray paint.

I'll post a picture of the can with the next round of pics.

Josh

  • Member since
    April 2005
  • From: Piscataway, NJ!
Posted by wing_nut on Sunday, October 26, 2008 11:47 AM
 FastasEF wrote:
 wing_nut wrote:

Looks good Josh.  What color did you use for the tires?

ColorPlace interior/exterior fast dry flat black spray paint.

I'll post a picture of the can with the next round of pics.

Josh


Really?  Is just doesn't look like plain old flat black. has a nice "rubber" color to it.

Marc  

  • Member since
    February 2007
  • From: Bournemouth UK
Posted by Luftwoller on Sunday, October 26, 2008 1:13 PM

Marc, stand away from the model. Sit down and relax my friend.

I think your panicking over nothing major.

In the 1st pic, Easy fix. Spot filler and wiped down with some acetone.

2nd Pic, that as has been said is supposed to be there. If you wanted to be 100% accurate, you could thin it down, but really, Why?

3rd Pic, You are never going to see those ejector marks EVER!!! once wheels and tracks are on.

If you want this build to be judged at competitions, you still neednt worry as they wont pick the thing up and im pretty sure they dont use tiny mirrors on sticks.

Its looking freekin fantastic mate.

...Guy

..'Your an embarrassment to the human genus, makes me ashamed to call myself Homo'.
  • Member since
    December 2002
  • From: Bury St Edmunds, Suffolk, England
Posted by Bish on Sunday, October 26, 2008 2:24 PM
wing_nut- i think moose is right, thats the air intake for the engine.

I am a Norfolk man and i glory in being so


On the bench: Airfix 1/72nd Harrier GR.3/Fujimi 1/72nd Ju 87D-3

JOIN OUR COMMUNITY!

Our community is FREE to join. To participate you must either login or register for an account.

SEARCH FORUMS
FREE NEWSLETTER
By signing up you may also receive reader surveys and occasional special offers. We do not sell, rent or trade our email lists. View our Privacy Policy.