SEARCH FINESCALE.COM

Enter keywords or a search phrase below:

FINISHED PICS!--Page 10--DML HORNISSE

52459 views
193 replies
1 rating 2 rating 3 rating 4 rating 5 rating
  • Member since
    December 2005
  • From: Syracuse, NY
Posted by lexesbenz on Thursday, January 22, 2009 9:31 PM

hmmm, Yeah I'll be up, I need some more vallejo anyway, see you tomorrow!

P.S. I cant wait to see you rock that Bison!!

The flying hamster of doom rains coconuts on your pitiful city!!!!
  • Member since
    January 2007
Posted by the doog on Thursday, January 22, 2009 6:20 PM

 lexesbenz wrote:
Dont make me come over and finish this kit for ya!!Wink [;)]
Hey Tony; I'm going up to Walt's tomorrow between 11-12:00--you gonna be around? 

I'll be picking up that PE....

  • Member since
    December 2005
  • From: Syracuse, NY
Posted by lexesbenz on Thursday, January 22, 2009 3:21 PM
Dont make me come over and finish this kit for ya!!Wink [;)]
The flying hamster of doom rains coconuts on your pitiful city!!!!
  • Member since
    January 2007
Posted by the doog on Thursday, January 22, 2009 3:20 PM
 acmodeler01 wrote:
Yeah, I'll agree with Manny, this is your best to date. The top-down view showing the interior with the map case on page 6... it just looks real. Very impressed with this one. What kind of base do you have planned for it?
Thanks, Jon!--no base, just a shelf Queen. I don't have much room for building bases under my models--only a few ever get that distinction.
  • Member since
    January 2008
  • From: Tulsa, OK
Posted by acmodeler01 on Thursday, January 22, 2009 1:23 PM
Yeah, I'll agree with Manny, this is your best to date. The top-down view showing the interior with the map case on page 6... it just looks real. Very impressed with this one. What kind of base do you have planned for it?
  • Member since
    January 2007
Posted by the doog on Thursday, January 22, 2009 1:10 PM
 bbrowniii wrote:

 lexesbenz wrote:
Gahhh..can't take it....need UPDATE Banged Head [banghead]


Sign - Ditto [#ditto]Banged Head [banghead]Sign - Ditto [#ditto]Banged Head [banghead]Sign - Ditto [#ditto]Banged Head [banghead]Sign - Ditto [#ditto]Banged Head [banghead]

PS  Nice work, Karl!!

Calm down, you kids! Daddydoog is workin on it! LOL!
  • Member since
    April 2003
  • From: 41 Degrees 52.4 minutes North; 72 Degrees 7.3 minutes West
Posted by bbrowniii on Thursday, January 22, 2009 12:22 PM

 lexesbenz wrote:
Gahhh..can't take it....need UPDATE Banged Head [banghead]


Sign - Ditto [#ditto]Banged Head [banghead]Sign - Ditto [#ditto]Banged Head [banghead]Sign - Ditto [#ditto]Banged Head [banghead]Sign - Ditto [#ditto]Banged Head [banghead]

PS  Nice work, Karl!!

'All that is necessary for the triumph of evil is for good men to do nothing' - Edmund Burke (1770 ??)


  • Member since
    December 2005
  • From: Syracuse, NY
Posted by lexesbenz on Thursday, January 22, 2009 10:40 AM
Gahhh..can't take it....need UPDATE Banged Head [banghead]
The flying hamster of doom rains coconuts on your pitiful city!!!!
  • Member since
    December 2005
  • From: Syracuse, NY
Posted by lexesbenz on Sunday, January 18, 2009 11:17 PM
Karl, What do you clean your brush with after using the acrylic resin?
The flying hamster of doom rains coconuts on your pitiful city!!!!
  • Member since
    July 2004
  • From: Texas
Posted by wbill76 on Sunday, January 18, 2009 11:08 PM
Cool deal Karl, glad it helped and you were able to fix. Thumbs Up [tup]
  • Member since
    December 2003
  • From: Colorado
Posted by psstoff995 on Sunday, January 18, 2009 9:38 PM
wow... very well done! I like the build up weathering process. Now you're updating too fast for me to catch up?! Big Smile [:D] haha

-Chris

US Army Infantryman

  • Member since
    November 2005
Posted by Anonymous on Sunday, January 18, 2009 9:08 PM
No doubt now...your best AFV (IMO) to date...Track sag is spot-on, weathering is just right (not too heavy handed, not too light), interior is awesome...nice touch w/ the map case...shells are about the best I've seen in this scale...Make a Toast [#toast]...I love your "Horny-Z" and want to marry it...
  • Member since
    January 2007
Posted by the doog on Sunday, January 18, 2009 8:38 PM
 wbill76 wrote:

Karl the lower hull weathering has "stacked' very nicely...I think the foundation you laid before was ideal for the end result you were looking for. Thumbs Up [tup] The other little details for the interior are nice touches too, especially the limp map case cover.

On the front driver's port, I believe that the armored glass block would've been removed when it was open to allow for the driver to have a better view. The holder would remain but the block itself stowed to allow the driver a mostly unobstructed view. Take a look at this pic from Allied&Axis #16, the portion sticking down at an angle is much smaller than what you've got on yours. Not sure if you're able to address it or not by perhaps cutting it down? It also looks like it opens upward at a higher angle as well vs. a 90-degree angle the way you've got it installed now, probably has a locking mechanism on the extender?


Thanks all--and Bill, that was a most excellent, astute observation! It has been properly rectified, and I will post photos tomorrow! Thanks again for your sharp eyes!Cool [8D]

Mike, thanks for the props! If ou look at ref photos, most of these seemed to keep prety toght tracks, therefore the negligible sag.

Marc-- Ifeel your pain about the weathering that is now mostly covered;I hated to do it, but it ust didn't look complete without some dirt stuck up there. And then, the bottom of the hull wouldn't have looked right if I'd left that bare. Oh well. Choices, choiices! 

Thanks too, panzerguy, and Tony

More pics tomotrrow! 

  • Member since
    July 2006
  • From: New Jersey
Posted by redleg12 on Sunday, January 18, 2009 8:19 PM

Karl - Looks like the drive is using your opti-visor!!!!

Nice dirt, grunge look. You have settled in on those MIG pigments and have their use down pat. nice when you layer them and you did a great job. They are great!!

You may have gone easy on the sag on the tracks but there is no sag in your work.

Very nice. Good of you to give the under view. Most (including me) don't usaully show how the underside is weathered.

Rounds Complete!!

"The Moral High Ground....A Great Place to Emplace Artillery."

  • Member since
    July 2004
  • From: Texas
Posted by wbill76 on Sunday, January 18, 2009 5:05 PM

Karl the lower hull weathering has "stacked' very nicely...I think the foundation you laid before was ideal for the end result you were looking for. Thumbs Up [tup] The other little details for the interior are nice touches too, especially the limp map case cover.

On the front driver's port, I believe that the armored glass block would've been removed when it was open to allow for the driver to have a better view. The holder would remain but the block itself stowed to allow the driver a mostly unobstructed view. Take a look at this pic from Allied&Axis #16, the portion sticking down at an angle is much smaller than what you've got on yours. Not sure if you're able to address it or not by perhaps cutting it down? It also looks like it opens upward at a higher angle as well vs. a 90-degree angle the way you've got it installed now, probably has a locking mechanism on the extender?


  • Member since
    April 2005
  • From: Piscataway, NJ!
Posted by wing_nut on Sunday, January 18, 2009 4:46 PM
 the doog wrote:

Real men paint their road wheels individually with a paintbrush, LOL! 


I'm with you brother! (he say's flexing in some type of oiled up Schwarzeneggeresque pose) I haven't used a mask yet on a road wheel yet. And to compensate for that similarity... I am totally on the other end of the hair spectrumDisapprove [V]

It is a shame to have covered that lower hull weathering.  I really liked the look of that and will be happy to get remotely close to that... even though it will be covered by schurzen.

Marc  

  • Member since
    October 2007
  • From: N.H.
Posted by panzerguy on Sunday, January 18, 2009 4:42 PM

    Fantastic work KarlBow [bow]. The build up of wet and dry mud on the lower hull looks perfect.

  I used to paint road wheels by hand but now that I use a template I don't dread tackling them anymoreBig Smile [:D]

"Happiness is a belt fed weapon"

  • Member since
    December 2005
  • From: Syracuse, NY
Posted by lexesbenz on Sunday, January 18, 2009 4:21 PM
Wow that looks great!
The flying hamster of doom rains coconuts on your pitiful city!!!!
  • Member since
    January 2007
Posted by the doog on Sunday, January 18, 2009 4:06 PM
 Huxy wrote:


 ...what shampoo do you use?

-Huxy 

Pantene Pro-V Extra Moisture--the only serious choice for serious modelers! Tongue [:P]

OK, here's a small weathering update--I have added some MIG dirt and mud on thelower hull. I knwo, I know--y'all liked that paint job, but I just intended it for a "base" for the rest of the mud.It never looks right to me to see mud pigments or dirt on an otherwise-pristine hull, so I wanted to get a good base to work upon. 

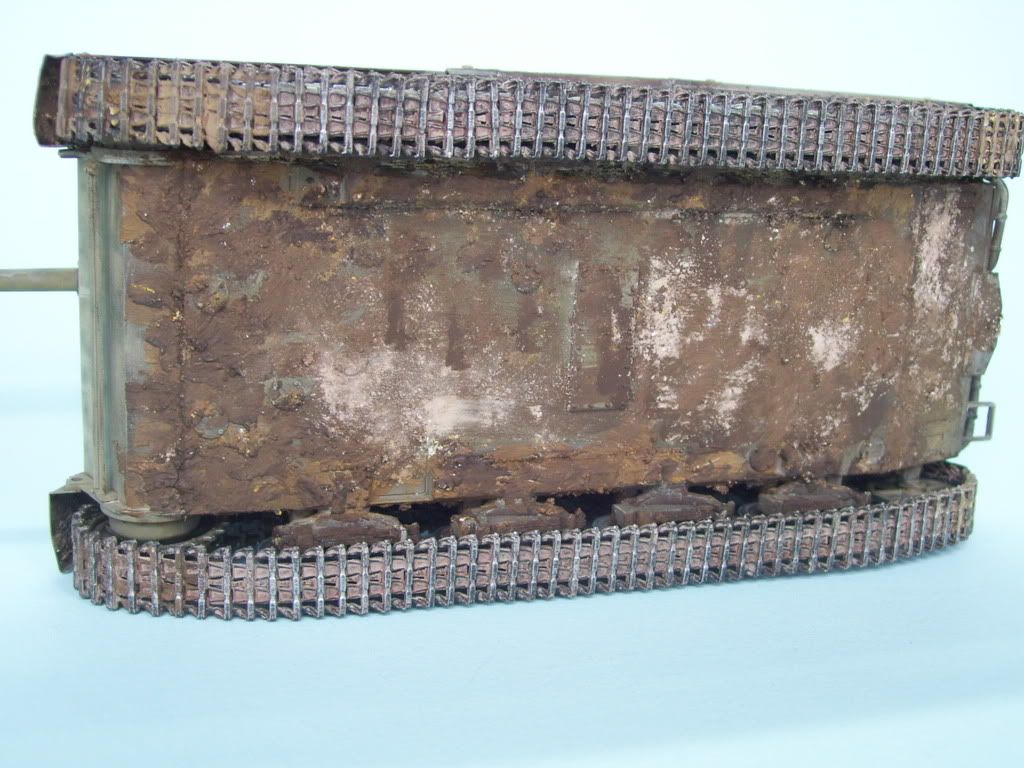
What I did was use a little bit of MIG Acrylic Resin, and mix a little paint in, and then some MIG powders of about 4 different shade. I put the darker colors in first, applied a layer of that, and then mixed up some lighter colors, and put them over the first. This gave some depth to the look.
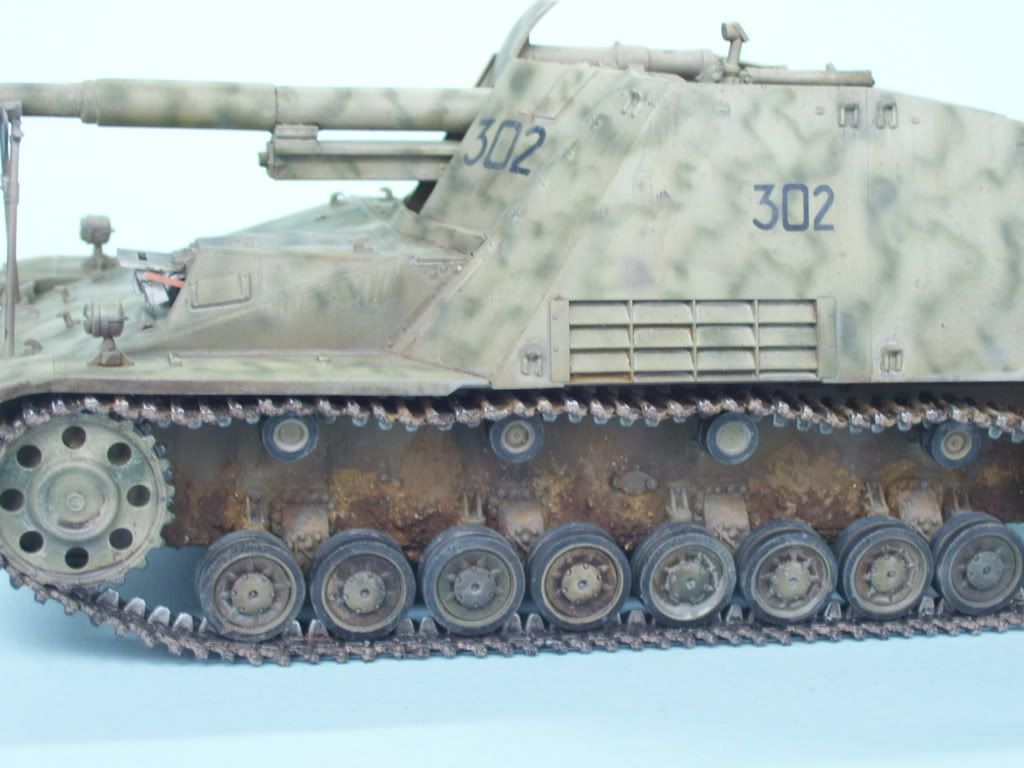
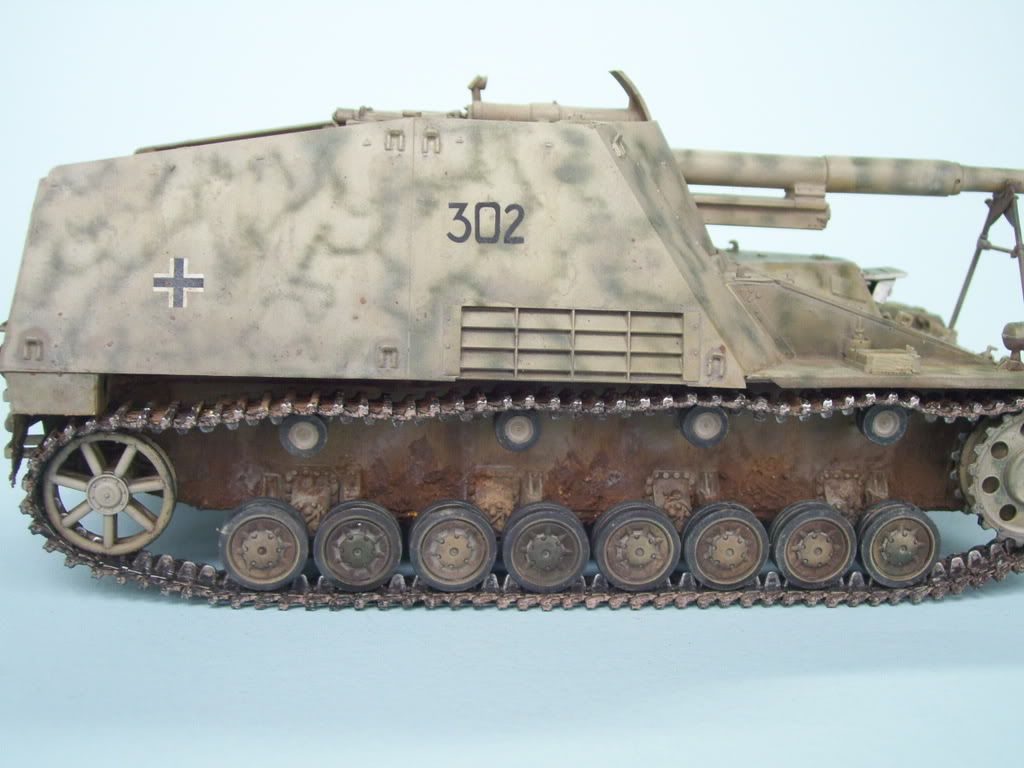
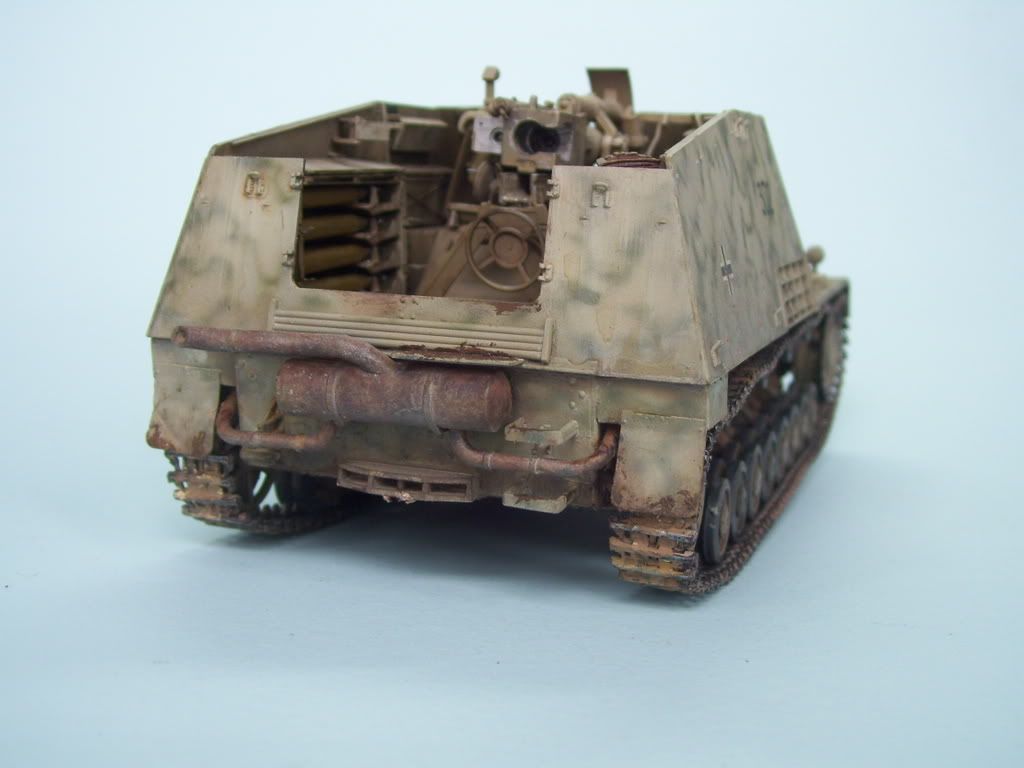
The rear mudgaurds also got some, as well as the steps and crew step.
The bottom so far--I plan on adding a little more "dry" pigments here to even it out a bit...
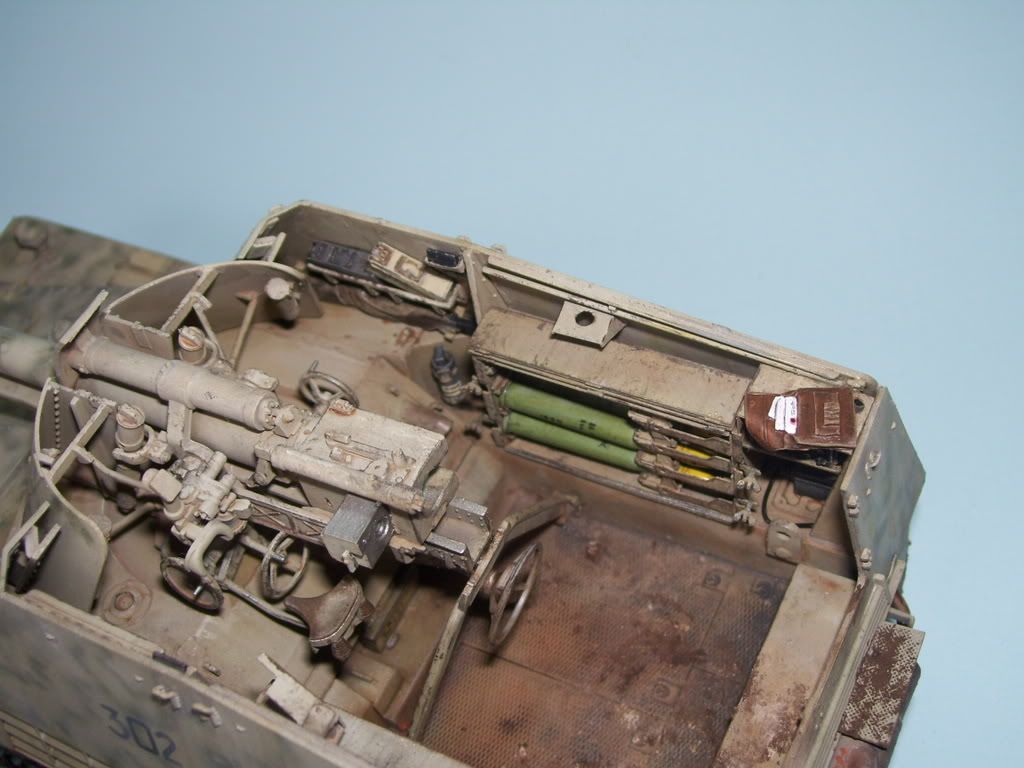
Some more items and details have been added to the interior--the shrouded MG, and cases above it in the racks. Fire extingushers and an open resin map case, which was bent using some heat from a soldering iron.
And lastly, I've attached the driver's visor after painting, and added a PE hinge.
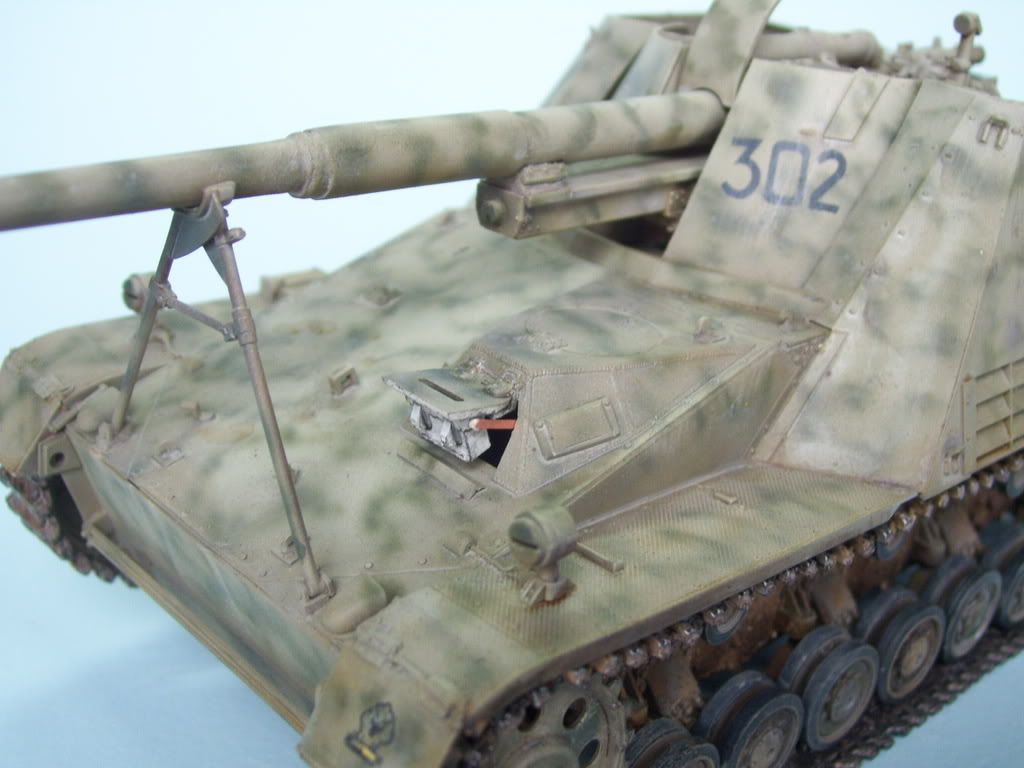
Time to work on the main exterior weathering now. I'm going to go rather light here; not too much chipping or rust.

Hopefully, another update soon! Big Smile [:D]

  • Member since
    April 2008
  • From: Kristiansund, Norway
Posted by Huxy on Saturday, January 17, 2009 8:12 PM
 the doog wrote:

Real men paint their road wheels individually with a paintbrush, LOL! 


No, Doog... Only you paint roadwheels individually.... Disapprove [V]


Seriously tough, Looking great! I really like the look..     What shampoo do you use? Laugh [(-D] Laugh [(-D] Laugh [(-D] Laugh [(-D]


hahah!!    But the model, good. Looks really good!


-Huxy 

"Every War Starts And Ends With An Invasion".

  • Member since
    January 2007
Posted by the doog on Saturday, January 17, 2009 8:06 PM

Thanks, dupes, and Billl!

You guys are gonna hate me though--I just got done weathering the tracks and hull with pigments, and I covered most of that work up! Whistling [:-^] Oh well, it doesn't hurt to have a great base on which to put the pigments!

Pictures tomorrow! Big Smile [:D]

  • Member since
    January 2012
Posted by I make stuff on Saturday, January 17, 2009 6:34 PM

That undercarriage weathering is just amazing.  Really, the results you get are an inspiration, at least for me, and your sharing of techniques is just unreal.


I do feel a bit like the USSR when we rolled out the Stealth, I couldn't even copy that if you gave it to me.

Something to aspire to, though. Thanks as always for sharing. 


  • Member since
    November 2006
  • From: Coastal Maine
Posted by dupes on Saturday, January 17, 2009 2:10 PM
Doog - really like the looks of the undercarriage - that "drawn up" wash technique is pretty sweet. Going to have to try that one! Thumbs Up [tup]
  • Member since
    January 2007
Posted by the doog on Saturday, January 17, 2009 11:06 AM
 wbill76 wrote:

Making good progress Karl...got to admire the dedication of an Optivisor and hand-painting the wheels...but you really ought to give the circle template method a try....you'll be amazed at the amount of time it saves you...not to mention no risk of hair entanglement! Laugh [(-D]

You've created a monster...the mob now demands regular sacrific...errr....updates now to keep them under control. Wink [;)] Propeller [8-]

LOL! You're right, Bill--NOW YOU KIDS SETTLE DOWN AND LEAVE MY HAIR OUT OF THIS! lol!

I meant to try the template method, I really DID! But before I'm even thinking about painting, I'm assembling the wheel halves, as per instructios, and I just don't thik of it until it's too late!

It doesn't relaly bother me though--I'm a very patient person, and there's an almost zen-like quality to the process for me!  Whistling [:-^]....Big Smile [:D]

Thanks guys, for the enthusiasm, and the comments! 

  • Member since
    August 2008
  • From: S.W. Missouri
Posted by Pvt Mutt on Saturday, January 17, 2009 9:54 AM

"Hair Entanglement"

Now that is funny, you just got my day off to a great start.Laugh [(-D]

Shoot Low Boys They're Ridin Ponys

  • Member since
    December 2005
  • From: Syracuse, NY
Posted by lexesbenz on Saturday, January 17, 2009 12:52 AM
Coming along great, love the sides of the hull.
The flying hamster of doom rains coconuts on your pitiful city!!!!
  • Member since
    July 2004
  • From: Texas
Posted by wbill76 on Saturday, January 17, 2009 12:11 AM

Making good progress Karl...got to admire the dedication of an Optivisor and hand-painting the wheels...but you really ought to give the circle template method a try....you'll be amazed at the amount of time it saves you...not to mention no risk of hair entanglement! Laugh [(-D]

You've created a monster...the mob now demands regular sacrific...errr....updates now to keep them under control. Wink [;)] Propeller [8-]

  • Member since
    June 2005
  • From: San Tan Valley,AZ
Posted by smokinguns3 on Friday, January 16, 2009 10:12 PM

 detailfreak wrote:
ever gotten your hair tangled up in a roadwheel? LOL. not funny,did it on a creeper under a semi-truck once ,but never under a panzer IV... been a very informative build.thanks doog.

i did the same thing except i was under car and had tranny fluid in my hair when it got cought, talk about painful.

buy the way the weathering looks great.

Rob I think i can I think i can
  • Member since
    December 2006
  • From: t.r.f. mn.
Posted by detailfreak on Friday, January 16, 2009 7:09 PM
ever gotten your hair tangled up in a roadwheel? LOL. not funny,did it on a creeper under a semi-truck once ,but never under a panzer IV... been a very informative build.thanks doog.

[View:http://s172.photobucket.com/albums/w1/g-earl828/]  http://i158.photobucket.com/albums/t104/cycledupes/1000Roadwheels4BuildBadge.jpg

  • Member since
    January 2007
Posted by the doog on Friday, January 16, 2009 6:34 PM

Thanks, JMart! Thanks for looking in, and for your comments!

OK,OK! Here's a small update--tracks and lower hull stuff...

Real men paint their road wheels individually with a paintbrush, LOL! 

I used 502 oil color "Buff" to give the hull an overall wash, and and then used a combination of Medium Rust, Wash Brown, and Black on the bottom of the hull, which I drew upward with a clean brush. I also did the undergarriage the same way.

The muffler is coming alomg--still needs pigment though....

I went easy on the sag...

Coming along....

I'm working on the tracks now-should have them on tonight if I don't fall asleep first! LOL!

Watch this space! Big Smile [:D]

JOIN OUR COMMUNITY!

Our community is FREE to join. To participate you must either login or register for an account.

SEARCH FORUMS
FREE NEWSLETTER
By signing up you may also receive reader surveys and occasional special offers. We do not sell, rent or trade our email lists. View our Privacy Policy.