SEARCH FINESCALE.COM

Enter keywords or a search phrase below:

FINISHED PICS!--Page 10--DML HORNISSE

52458 views
193 replies
1 rating 2 rating 3 rating 4 rating 5 rating
  • Member since
    January 2007
Posted by the doog on Wednesday, December 31, 2008 5:16 PM

 tigerman wrote:
You should've entered this in the 1000 roadwheel GB. Kicks off tomorrow. Oh well, this should be a treat to watch.
Yeah, I saw that, but I was already started when you posted your announcement. Besides, I prefer to share it here in the general Armor forums, as I'm not sure how many guys actually go into the GB's if they're not participating?

Thanks for looking in and commenting, guys! Smile [:)]

  • Member since
    July 2007
  • From: Ohio
Posted by Geist on Wednesday, December 31, 2008 3:55 PM

Looking good Doog. I built this same kit minus the details for the hunters GB. It was a fun build.


Erik

On the bench: Italeri Leopard 1A2 correction build with Perfect Scale turret and Eduard PE

  • Member since
    March 2003
  • From: Rain USA, Vancouver WA
Posted by tigerman on Wednesday, December 31, 2008 3:45 PM
You should've entered this in the 1000 roadwheel GB. Kicks off tomorrow. Oh well, this should be a treat to watch.

   http://i7.photobucket.com/albums/y269/wing_nut_5o/PANZERJAGERGB.jpg

 Eric 

  • Member since
    February 2004
  • From: Weymouth, Dorset, UK
Posted by chris hall on Wednesday, December 31, 2008 3:10 PM

I glued them in position on my Nashorn:

I think it looks better that way.

Cheers,

Chris. 


Cute and cuddly, boys, cute and cuddly!
  • Member since
    January 2007
Posted by the doog on Wednesday, December 31, 2008 3:01 PM

Huxy, it's not wood--it's wrapped in canvas, to protect against dust and Russian bees.

I did glue in that stupid set of templates to both of my Hummels! Banged Head [banghead] I can't believe that DML hasn't corrected that in the directions! a LOT of work went into those models, but there's no way to get them out now without ruining the interior! 

  • Member since
    April 2008
  • From: Kristiansund, Norway
Posted by Huxy on Wednesday, December 31, 2008 2:24 PM

It looks great so far!! Big Smile [:D]

Why is the muzzle made of wood?  It atleast looks wood... :P


And did you glue the template on on the Hummel you did a while ago as well??  Laugh [(-D]

HAPPY NEWYEAR! Party [party] 


-Huxy 

"Every War Starts And Ends With An Invasion".

  • Member since
    January 2007
Posted by the doog on Wednesday, December 31, 2008 2:08 PM
 T26E4 wrote:

Doog: I'm pretty sure this kit (and the Hummel kits) has the vague directions about mounting the internal gun travel lock.  DML provides a huge template in order for you to correctly emplace the gun travel lock.  Bad thing is that lots of guys assume that this template was meant to be glued in.......

DON'T GLUE THEM IN!!!!

Uh....Censored [censored]!!

Well, in case anyone here thinks that I really DO know what I'm doing...? 

Yup, I did glue them in Roy! AAAARRRRGH!!!

Here's the parts, for anyone wondering, or building either a Hummel. Nashorn, or Hornisse!

And here's what they look like when you have to pry them out like a total amateur! Sigh [sigh]...Blush [:I]

As you can see, I have totallly ruined the interior sides! So I'll have to make some replacement templates to cover the sides out of .010 plastic card.


It took me about 13 tries (not kidding! Black Eye [B)]) to align the 5 parts of the resin Verlinden gun. I used the first three parts from Verlinden--breech, main tube, and long collar, and then I used the kit's barrel because the Verlinden gun actually scaled out to about 3-4 real mm's short (got my "Rivet Counter" merit badge for that one Wink [;)]). Lastly I used a Tank Workshop Panther gun muzzle cover--it was the perfect size--on the end. Man---I thought I'd never get the damned thing straight! 
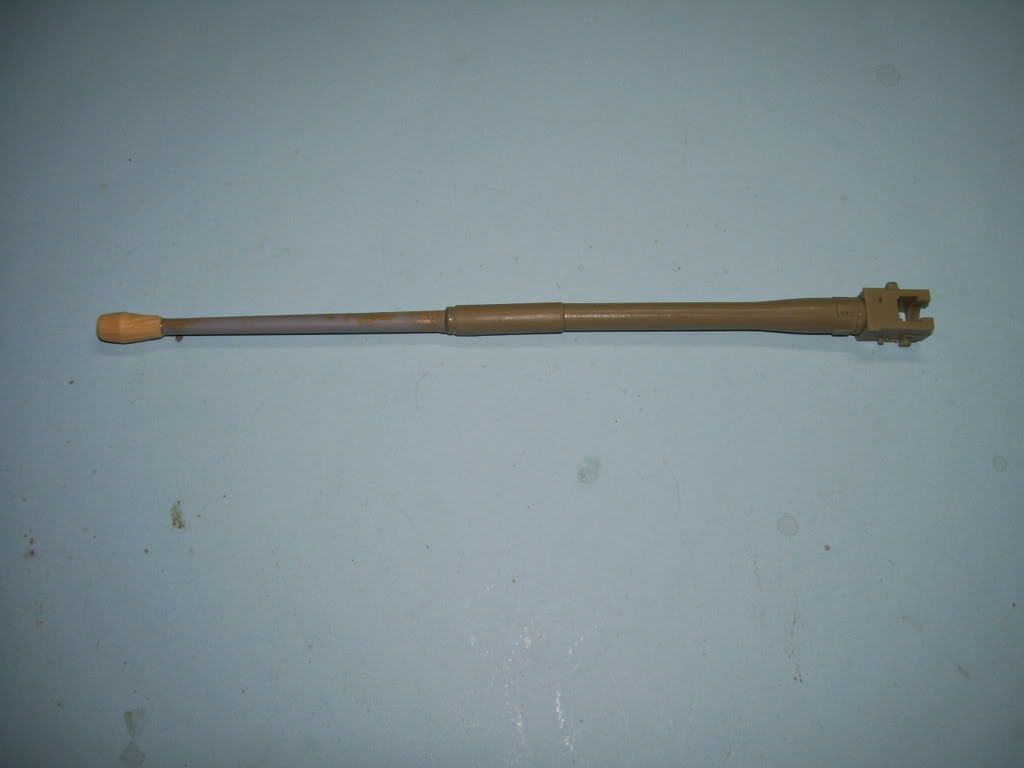
And here's where I am so far--the gun is about 70% finished, and I will of course build the sides off of the tank, to be attached after painting. And I still have to assemble the PE ammo stowage.
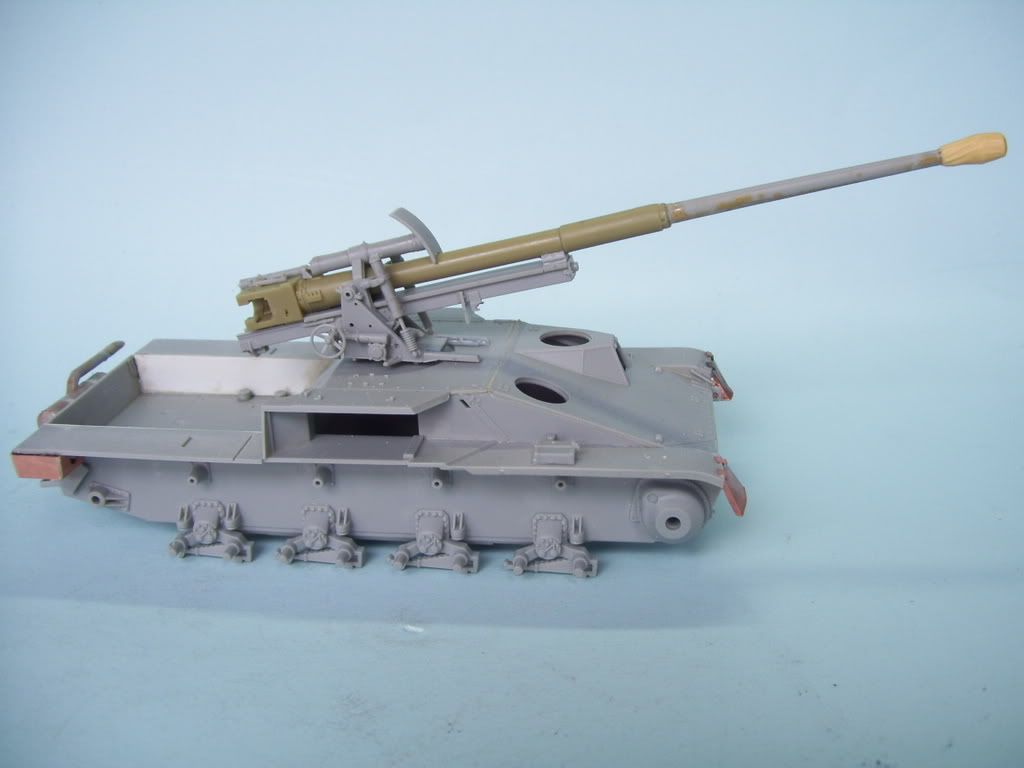
You can see the VErlinden PE exhaust boxes, and the fenders too. The exhaust has been textures with liquid glue--the weird color is because I used an old paint brush to do it which had paint dried in the base of it.

That's where I am so far...just brappin along into 2009....


  • Member since
    April 2003
  • From: Crestview, Florida
Posted by MQM107 on Wednesday, December 31, 2008 10:49 AM

There is some pretty good info on DML's Nashorn's here. Also kit # 6166


http://www.perthmilitarymodelling.com/reviews/vehicles/dragon/dr6165.htm


Mike

  • Member since
    July 2004
  • From: Texas
Posted by wbill76 on Tuesday, December 30, 2008 11:54 AM
Welcome back from PA Karl! Looking forward to seeing what you do with this one. Thumbs Up [tup]
  • Member since
    November 2005
Posted by Anonymous on Tuesday, December 30, 2008 11:45 AM
Dinner [dinner]
  • Member since
    November 2005
Posted by T26E4 on Tuesday, December 30, 2008 11:35 AM

Doog: I'm pretty sure this kit (and the Hummel kits) has the vague directions about mounting the internal gun travel lock.  DML provides a huge template in order for you to correctly emplace the gun travel lock.  Bad thing is that lots of guys assume that this template was meant to be glued in.  This mistake has happened on SEVERAL articles that were published by some of the best AFV magazines.  I no longer have any Nashorn kits but the templates are the big rectangles with notches at top and bottom that are fitted to the lower side fighting compartment walls.  DON'T GLUE THEM IN!!!!


HTH


Roy Chow 

Join AMPS!

http://www.amps-armor.org


  • Member since
    January 2012
Posted by I make stuff on Tuesday, December 30, 2008 11:29 AM

Nice, I have eyed the premium kit, I don't know what has gotten into me, but TDs, SPs are on my mental need to build list. 


Looking forward to seeing your magic unfold.

  • Member since
    April 2008
  • From: Kristiansund, Norway
Posted by Huxy on Tuesday, December 30, 2008 11:18 AM

Can't wait to see this one, Doog! Big Smile [:D]


Make it great! You da man!

-Huxy 

"Every War Starts And Ends With An Invasion".

  • Member since
    January 2007
FINISHED PICS!--Page 10--DML HORNISSE
Posted by the doog on Tuesday, December 30, 2008 11:07 AM

Hi guys,

Just back from Pa. for Christmas; starting in on the ol' DML Hornisse Early model, which does NOT come with the latter open ammo bins and additional detail of the late kit. So Verlinden had made a detail kit for it, which I'll be using on this build. Here's the contents of that.


I'lb be going with a summer camo scheme, and using the MIG stuff again, to see how a DY/green scheme goes with their stuff. I think I'm going to go two-tone here; DY+Green.

Not much progress yet; I'll be posting as soon as I get something to report!

JOIN OUR COMMUNITY!

Our community is FREE to join. To participate you must either login or register for an account.

SEARCH FORUMS
FREE NEWSLETTER
By signing up you may also receive reader surveys and occasional special offers. We do not sell, rent or trade our email lists. View our Privacy Policy.