SEARCH FINESCALE.COM

Enter keywords or a search phrase below:

Zvezda M-3 Scout Car ~FINISHED Pg. 9~

26151 views
149 replies
1 rating 2 rating 3 rating 4 rating 5 rating
  • Member since
    March 2004
  • From: Kincheloe Michigan
Posted by Mikeym_us on Sunday, May 17, 2009 6:39 PM
 mg.mikael wrote:

Dre- Yes, it would be nice to see one of the more higher-end companies like Dragon or Bronco release a new mold of this kit, but then again I guess it's false hope. Since it doesn't look like any company will be releasing a new mold anytime soon.Disapprove [V]

wbill76- Thanks for lookin' in.Smile [:)] Hope to make some progress this week by attaching the hull parts to the frame.

Dragon already has the M3 cab all they need is a new chassis and fighting compartment and they are all set.

On the workbench: Dragon 1/350 scale Ticonderoga class USS BunkerHill 1/720 scale Italeri USS Harry S. Truman 1/72 scale Encore Yak-6

The 71st Tactical Fighter Squadron the only Squadron to get an Air to Air kill and an Air to Ground kill in the same week with only a F-15   http://photobucket.com/albums/v332/Mikeym_us/

  • Member since
    May 2009
  • From: Las vegas, NV
Posted by newarmorman on Sunday, May 17, 2009 9:31 PM
Hi mg,
Maybe my terminology is wrong but I have four resources Osprey, Schiffer, Squadron signal, Wikipedia that say it did ? not to mention the side of the Tamiya kit that suggests the towed German 88 mm flak 36/37( sold separately) as an add on kit. Of course the Dragon instructions allow you to build as a type 36 or 37 or a type 18. I'm not sure without further research off the top of my head but I think it is Wikipedia that actually shows a picture of the Sd.kfz. 7 towing a Flak. Most of my research talks about it towing the venerable and powerful 88 once the engines were upgraded in 1939 to the Maybach Hl 57 engine and was used to haul the s. FH 18 the s.10 cm Kanone 18 and the 88 mm Flak. and it was used in both N. Africa and the Eastern front. I also was watching Patton 360 and they complained about the Flak 88 and showed the 7 towing them. So what part of the equation am I missing. Please I'm not being a wise guy, but a collector asked me to build them for him for $1200 and I don't want to make a mistake with an inaccurate build. I researched his request and it seemed right, I do this all the time and they (my customers) are very often incorrect however this one seemed OK? I was even more at ease when I saw the side of the Tamiya kit suggesting the flak as a towed vehicle, but please if you can tell me something I do not know I would appreciate it! Thank you!

Awaiting inspiration and information,

Newarmorman
  • Member since
    December 2007
  • From: Bridgeview, Illinois
Posted by mg.mikael on Sunday, May 17, 2009 10:40 PM

 newarmorman wrote:
Hi mg,
Maybe my terminology is wrong but I have four resources Osprey, Schiffer, Squadron signal, Wikipedia that say it did ? not to mention the side of the Tamiya kit that suggests the towed German 88 mm flak 36/37( sold separately) as an add on kit. Of course the Dragon instructions allow you to build as a type 36 or 37 or a type 18. I'm not sure without further research off the top of my head but I think it is Wikipedia that actually shows a picture of the Sd.kfz. 7 towing a Flak. Most of my research talks about it towing the venerable and powerful 88 once the engines were upgraded in 1939 to the Maybach Hl 57 engine and was used to haul the s. FH 18 the s.10 cm Kanone 18 and the 88 mm Flak. and it was used in both N. Africa and the Eastern front. I also was watching Patton 360 and they complained about the Flak 88 and showed the 7 towing them. So what part of the equation am I missing. Please I'm not being a wise guy, but a collector asked me to build them for him for $1200 and I don't want to make a mistake with an inaccurate build. I researched his request and it seemed right, I do this all the time and they (my customers) are very often incorrect however this one seemed OK? I was even more at ease when I saw the side of the Tamiya kit suggesting the flak as a towed vehicle, but please if you can tell me something I do not know I would appreciate it! Thank you!

Awaiting inspiration and information,

Newarmorman

Confused [%-)]Hmmmmm......I think you mis-read my post newarmorman. Because I said if you're having the Flak towed, you'll have no problems.

"A good plan executed now is better than a perfect plan next week." - George S. Patton

  Photobucket 

  • Member since
    May 2009
  • From: Las vegas, NV
Posted by newarmorman on Sunday, May 17, 2009 11:05 PM
Hi mg.

I'm sorry, I did misunderstand what you wrote, oops, my bad! I am sorry, my wife has been in the hospital for a week now and my son is leaving for his third tour this week as you know from reading my new guy intro. I am trying to keep myself busy running my business, building kits and turning custom parts for people, but my wife has been in the hospital 2 + months total already between last year and now, and with my son leaving for Afghanistan for seven months, I guess I am a little twitchy!
Thanks for your patience! I know you are right about this being my first big German armor build, but I signed into the forums for help and advice just in case, but this customer is paying well for these two to be built, and he has already ordered and payed for 11 models from me in the past so I need to keep him happy! He usually wants modern allied armor, but he read a review of the Dragon kit of the Flak and got excited, soooo..... here I am he called and I said, " I would give them a shot " I don't make them pay until they receive their items and are happy anyway! He is a good customer, I built him an M1A1 AIM about a year ago and the crate got damaged, he flew me to CA to repair it at his expense, he has BUCKS and pays for what he wants, and likes my style of build. So its all good. Thanks again! Please be patient with me I'm old and slow sometimes, but I mean well!

Your Friend,

Newarmorman
  • Member since
    December 2007
  • From: Bridgeview, Illinois
Posted by mg.mikael on Monday, May 18, 2009 10:25 AM

No worries, hope your wife recovers from her aliment and your son stays safe in Afghanistan.Smile [:)]

Now the real question is where do you meet people that will pay thousands of dollars for a kit, fly you out, and continue buying finished kits from you. That is quite the good customer and in my books you are one lucky modeler to have found a customer with such deep pockets.Wink [;)]

"A good plan executed now is better than a perfect plan next week." - George S. Patton

  Photobucket 

  • Member since
    December 2007
  • From: Bridgeview, Illinois
Posted by mg.mikael on Wednesday, May 20, 2009 6:40 PM

Progress is moving along, sadly I see some major scratching, modifying, and fixing in my future just to make the build presentable.Ashamed [*^_^*] Nevertheless here's what I've gotten done so far. 

I've put on the rear step plate and drybrushed it. Along with putting on the rear bumper. Zvezda doesn't tell you which way is right side up(for correct placement) nor what to paint the tail lights Thumbs Down [tdn].....so after doing some research I found the left tail light was a normal light and the right was a black out light. Good thing I looked into it, because Zvezda tells you nothing in the instructions. Thus it took a little work but the tailights are correctly painted now. For those wondering the blackout light was simply done with an extra fine sharpie.  By the way if you see some copper wire, that's the tailight wiring I put in place for some added detail(probably won't be seen though.)

I also did some work on the jerry cans. After gluing them in place, I applied the first wash. I also made some straps out of masking tape. Though I still have to weather a bit more and add some fuel drippage from the caps.

All comments, questions, and suggestions welcome!Smile [:)]

"A good plan executed now is better than a perfect plan next week." - George S. Patton

  Photobucket 

  • Member since
    January 2012
Posted by I make stuff on Wednesday, May 20, 2009 7:07 PM

Coming along, interesting subject and a nicely done build.

Bill

  • Member since
    December 2007
  • From: Bridgeview, Illinois
Posted by mg.mikael on Wednesday, May 20, 2009 8:51 PM
 Citadelgrad87 wrote:

Coming along, interesting subject and a nicely done build.

Bill

Thanks for the comments, Citadelgrad87! Lookin' forward to seein' how your Panther comes along.Smile [:)]

"A good plan executed now is better than a perfect plan next week." - George S. Patton

  Photobucket 

  • Member since
    July 2004
  • From: Texas
Posted by wbill76 on Thursday, May 21, 2009 10:43 AM

Making progress, the masking tape straps are a nice touch. Thumbs Up [tup]

  • Member since
    December 2007
  • From: Bridgeview, Illinois
Posted by mg.mikael on Thursday, May 21, 2009 1:13 PM
 wbill76 wrote:

Making progress, the masking tape straps are a nice touch. Thumbs Up [tup]

Thanks for the comments, wbill76!

"A good plan executed now is better than a perfect plan next week." - George S. Patton

  Photobucket 

  • Member since
    March 2005
  • From: Georgia
Posted by gpal on Friday, May 22, 2009 11:41 AM

Looking good, keep us posted.

George

  • Member since
    December 2007
  • From: Bridgeview, Illinois
Posted by mg.mikael on Friday, May 22, 2009 1:00 PM
 gpal wrote:

Looking good, keep us posted.

George

Thanks for checkin' out my build, gpal!

"A good plan executed now is better than a perfect plan next week." - George S. Patton

  Photobucket 

  • Member since
    December 2007
  • From: Bridgeview, Illinois
Posted by mg.mikael on Saturday, May 23, 2009 7:26 PM

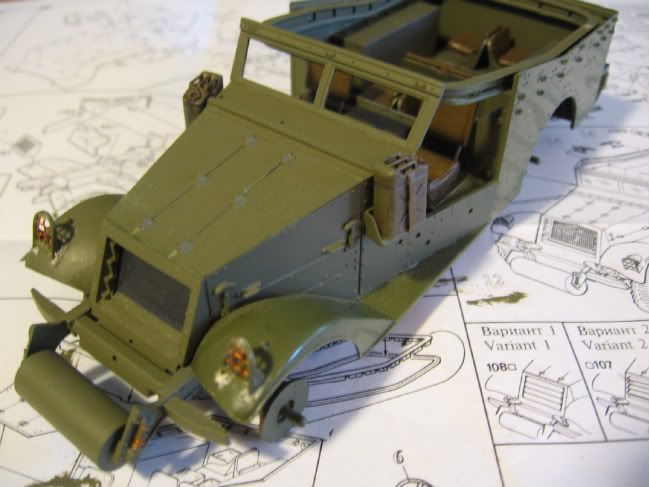
Today was quite a good day, got a big update, since I finished up alot of scratching and so there's obviously alot of pics.Wink [;)] Not to mention, I just learned I recieved a General Assembly Scholarship!!! That means my total tution for my first year of college at University of Illinois-Chicago is completley covered.Cool [8D] How sweet it is. Now onto the update.

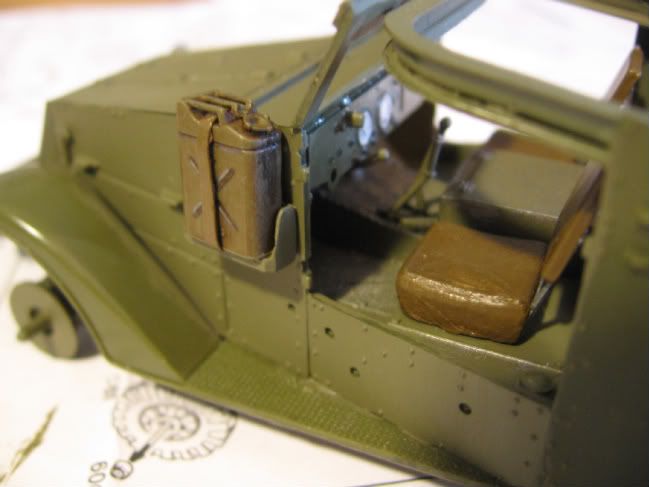
The jerry cans are pretty much finished, with strap and all glued on. Weathered using a simple wash, and some fuel stains added near the cap were made using ModelMaster Graphite Metalic(it actually makes a greasy appearance if you use it in moderation.Thumbs Up [tup]) Though I still have to do some more weathering later for finishing touches.

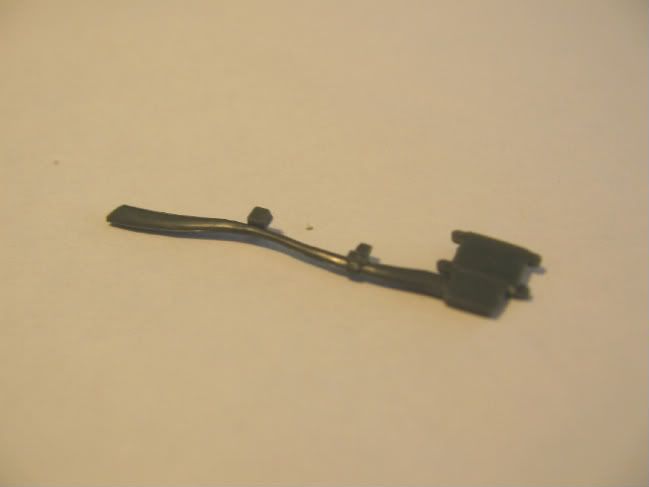
The axe sheath(protective area for blade) that orginally came in the kit was pre-attached to the axe. Thus it meant the detail was pretty sub-par, so I took it and sliced and diced until I had my very own axe. Then I scratched my own sheath(ok not really a sheath) out of some spare stryene and contour putty. Using the axe as reference for size and location.

  Then on a spur of a moment I also decided to scratch the light guards out of copper wire.(mainly because the original pieces look a bit too chunky in detail) Took the original light guards cut out the detail(I cracked one pretty badly, it's the one you see to the right.Banged Head [banghead])Then I sanded the inside the best I could after doing repairs. Then I took some copper wire and cut to size. Curving it slighty to give a better appearance. After finishing the pieces off, I took a tip from Dre and filled in the locating "trenches." I did this with Testor's Contour putty, but before it dried I inserted the light guards in the putty. That way the pieces are on and the putty conforms around the piece. Still haven't sanded away the excess so it may look a bit crude.

All comments, questions, and suggestions welcome!Smile [:)]

"A good plan executed now is better than a perfect plan next week." - George S. Patton

  Photobucket 

Dre
  • Member since
    June 2007
  • From: here, not over there
Posted by Dre on Saturday, May 23, 2009 8:20 PM

MG- solid props on the scholarship!  That is truly awesome. 

I like those brush guards- that's a subtle touch as is the axe sheath.  This is really coming together nicely.  Seeing what you are doing to your M-3 makes mine blush.

  • Member since
    June 2006
  • From: Netherlands
Posted by Grem56 on Sunday, May 24, 2009 12:51 AM

Nice work on the guards ! Coming along very nicely.

Julian


illegal immigrants have always been a problem in the United States. Ask any Indian.....................

Italeri S-100: http://cs.finescale.com/FSMCS/forums/t/112607.aspx?PageIndex=1

Isu-152: http://cs.finescale.com/FSMCS/forums/t/116521.aspx?PageIndex=1


  • Member since
    December 2007
  • From: Bridgeview, Illinois
Posted by mg.mikael on Sunday, May 24, 2009 9:27 AM

Dre- Thanks for the comments on the build and the scholarship(I'm still suprised I got it!Big Smile [:D])

Grem56- Thanks for the comments on the light guards. Glad the extra work I put into them paid off.Thumbs Up [tup]

"A good plan executed now is better than a perfect plan next week." - George S. Patton

  Photobucket 

  • Member since
    October 2007
  • From: N.H.
Posted by panzerguy on Sunday, May 24, 2009 1:34 PM

  Looking good there MgThumbs Up [tup]. I like the little extras, brush guards, axe sheath, springs and tape straps. It's those little things that make a build jump out at ya.

"Happiness is a belt fed weapon"

  • Member since
    December 2007
  • From: Bridgeview, Illinois
Posted by mg.mikael on Sunday, May 24, 2009 2:40 PM
 panzerguy wrote:

  Looking good there MgThumbs Up [tup]. I like the little extras, brush guards, axe sheath, springs and tape straps. It's those little things that make a build jump out at ya.

Thanks for the comments and glad you like all the scratch detail!Big Smile [:D]

"A good plan executed now is better than a perfect plan next week." - George S. Patton

  Photobucket 

  • Member since
    July 2004
  • From: Texas
Posted by wbill76 on Sunday, May 24, 2009 3:10 PM

Congrats on the scholarship! Not having to worry about your first year's tuition ought to be a huge relief...just don't forget there's 3 (or more) to go afterwards. Wink [;)]

Nice work on the scratch details for the light guard, impressive work with the wire.

  • Member since
    May 2009
  • From: RI
Posted by TheNakedModeler on Sunday, May 24, 2009 3:59 PM
Looking real good and it's painted by hand right. Is this kit able to be built in american service or just as in use by russian?
I am a einherjar on midgard preparing for the events of Ragnarök. Then to Asgard and into Valhöllfor some mead with odin.
  • Member since
    December 2007
  • From: Bridgeview, Illinois
Posted by mg.mikael on Sunday, May 24, 2009 4:00 PM
 wbill76 wrote:

Congrats on the scholarship! Not having to worry about your first year's tuition ought to be a huge relief...just don't forget there's 3 (or more) to go afterwards. Wink [;)]

Nice work on the scratch details for the light guard, impressive work with the wire.

Thanks for the congrats on the scholarship and for the comments on the build! Now with first year tution paid, I won't go into debt untill my second year.Big Smile [:D]Wink [;)]

"A good plan executed now is better than a perfect plan next week." - George S. Patton

  Photobucket 

  • Member since
    December 2007
  • From: Bridgeview, Illinois
Posted by mg.mikael on Sunday, May 24, 2009 4:02 PM

 TheNakedModeler wrote:
Looking real good and it's painted by hand right. Is this kit able to be built in american service or just as in use by russian?

Yep, it's hand-painted(well at least what I started to paint). And yes, this kit can be built in US service since Zvezda includes US decals(but I have doubts about their qualityBlindfold [X-)].)

"A good plan executed now is better than a perfect plan next week." - George S. Patton

  Photobucket 

  • Member since
    January 2005
  • From: in the tank factory in my basement
Posted by biffa on Sunday, May 24, 2009 7:27 PM
Glad to see you are still beating this one into submission Mikael i like the extra's you are doing the kit definatly can use a little extra and seems to me you are in control keep it coming Thumbs Up [tup] i have one to build one of these days.
Ron g.
  • Member since
    December 2007
  • From: Bridgeview, Illinois
Posted by mg.mikael on Sunday, May 24, 2009 8:58 PM

 biffa wrote:
Glad to see you are still beating this one into submission Mikael i like the extra's you are doing the kit definatly can use a little extra and seems to me you are in control keep it coming Thumbs Up [tup] i have one to build one of these days.

Yeah I'm still laboring away on this build, took a break from it for about two months and built a Tamiya 1/48 Universal Carrier Mk.II in that time span(I believe one of my best builds yetBig Smile [:D]). After that build was finished I came back to this build, thus that's why it may seem alot of work hasn't been done. 

Thanks for the comments!

"A good plan executed now is better than a perfect plan next week." - George S. Patton

  Photobucket 

  • Member since
    December 2007
  • From: Bridgeview, Illinois
Posted by mg.mikael on Tuesday, May 26, 2009 4:14 PM

Still haven't got the doors on permanetly. I've been doing some sanding, filling in of bad gaps, and painting of the base coat. However I did get some work done that's worth mentioning.

I've went ahead and scratched the headlights lens out of clear plastic. The Zvezda kit supplies lens but their out of thick green stryeneDisapprove [V]....thus pretty much useless. Luckily the headlights are hollow aka already drilled out, so time is saved there. I simply cut the clear plastic lens in the size needed from the plastic casing from a Tamiya kit. Most 1/48 Tamiya kits come with a cast hull packaged in plastic, thinking ahead I saved some from my last build. I did this because I realized the plastic was perfectly clear, strong, perfect thickeness, not brittle, and cheap. Thus a great product to make lens out of.Thumbs Up [tup]


I also started work on getting one of the doors to fit properly. There's too big of a space between the door and the hull.(Yet small enough some flash could have filled it in. Geez!Banged Head [banghead]) So I took some stryene scraps I had and after trimming to the miniscule size needed I glued it the side of the gap. The hinges had to go, since fitting would have been alot more difficult(I did save them nevertheless they could be easily scratched.) That's why their's gaps between the styrene pieces I added. Now I just have to putty, trim, sand, and slice the parts I added untill I get it matching the door.

All comments & questions welcome!Smile [:)]

"A good plan executed now is better than a perfect plan next week." - George S. Patton

  Photobucket 

  • Member since
    December 2007
  • From: Bridgeview, Illinois
Posted by mg.mikael on Saturday, May 30, 2009 6:18 PM

Been getting some work done, slowly but surely. The hinges for the doors(I'm scratching) are still not on, because their taking a bit more work then I expected. Nevertheless, I finished quite a bit elsewhere on the build. The steering wheel is in, the foot pedals were scratched(simply two rectangles, nothing more since its next to impossible to see them clearly), the lower half of the doors are on(luckily the drivers side fit nicely, unlike the passenger side which needed alot of work of which I showed in the last update.) I also finished the armor slats covering the radiator/engine.

The headlights are also on permanetly now. With the wiring for the headlights also done and painted. Simply used some copper wiring and glued one side to the headlight and put a dab of putty on the other end(sticking that end right onto the fender).

All comments, questions, and suggestions welcome!Smile [:)]

"A good plan executed now is better than a perfect plan next week." - George S. Patton

  Photobucket 

  • Member since
    July 2004
  • From: Texas
Posted by wbill76 on Saturday, May 30, 2009 10:53 PM
Looking good Michael, your idea about using plastic shell packaging for the lenses is a good one. What did you use for glue?
  • Member since
    December 2007
  • From: Bridgeview, Illinois
Posted by mg.mikael on Sunday, May 31, 2009 10:05 AM

 wbill76 wrote:
Looking good Michael, your idea about using plastic shell packaging for the lenses is a good one. What did you use for glue?

Glad you like the tip/idea, and thanks for the the comments!Smile [:)] As for the glue I personally used Testors Clear Parts Glue, but if you don't have that Elmer's works fine.

"A good plan executed now is better than a perfect plan next week." - George S. Patton

  Photobucket 

  • Member since
    May 2009
  • From: Las vegas, NV
Posted by newarmorman on Sunday, May 31, 2009 1:59 PM
Mg.

Looks absolutely fantastic! Wish I had the time to build right now, but with my wife just out of the hospital, it would hurt her feelings to tell her I am going to build a model or as she says " YOUR TOYS!" Ouch! I love her, so I let it be. I so want to cut some barrels on my Taig lathe! Let me know if you need anything to complete your build! I would love to help, but so far it looks fantastic, reeaally!!

Your Friend,

Newarmorman
  • Member since
    December 2007
  • From: Bridgeview, Illinois
Posted by mg.mikael on Sunday, May 31, 2009 9:29 PM

 newarmorman wrote:
Mg.

Looks absolutely fantastic! Wish I had the time to build right now, but with my wife just out of the hospital, it would hurt her feelings to tell her I am going to build a model or as she says " YOUR TOYS!" Ouch! I love her, so I let it be. I so want to cut some barrels on my Taig lathe! Let me know if you need anything to complete your build! I would love to help, but so far it looks fantastic, reeaally!!

Your Friend,

Newarmorman

Thanks for the comments! Also glad to here your wife's out of the hospital.Smile [:)]

"A good plan executed now is better than a perfect plan next week." - George S. Patton

  Photobucket 

JOIN OUR COMMUNITY!

Our community is FREE to join. To participate you must either login or register for an account.

SEARCH FORUMS
FREE NEWSLETTER
By signing up you may also receive reader surveys and occasional special offers. We do not sell, rent or trade our email lists. View our Privacy Policy.