SEARCH FINESCALE.COM

Enter keywords or a search phrase below:

Zvezda M-3 Scout Car ~FINISHED Pg. 9~

26151 views
149 replies
1 rating 2 rating 3 rating 4 rating 5 rating
  • Member since
    December 2007
  • From: Bridgeview, Illinois
Posted by mg.mikael on Tuesday, June 9, 2009 3:35 PM

Got around to my building my scout car again, been sidetracked by another build I'm scratching parts for too.

About ninety-five percent of all the hull portions are completely on, by that I mean sanded, modified, and painted. Thus soon my work will be moving into the more detailed parts like the guns, gun mounts, tools, tarps, and other random accesories. However here's whats done with the main hull parts. The windshield is in(terrible fit, by that I mean gaps left all over the place.Thumbs Down [tdn]) So I used Testor's Clear parts glue to put the winshield in and to slightly fill in the gaps the best I could on the sides. I also masked off the wiper area(that's why their's some blue-ish tape on the winshield) for weathering that will happen at a future time(will be too hard to mask properly later, so be sure to do it beforehand.)

The upper armor plate on the passenger side is also in place with the scratched hinges also in place. As for the drivers side(it's not in place yet), I'll be leaving the armor plate in the down position. (NOTE: I pretty much have to leave the driver's side armor plate down since it wouldn't fit properly in the up-armored position due to the skate rail. However the passenger side did fit properly up-armored so that's why that side is up. I know strange fit issues.Alien [alien])

As for other parts, I've glued the two gun mounts for the skate rail together. However their fit just isn't bad its non-existent! The pieces look like garbage, so I'm gonna have to putty, sand, and slice till they look presentable. As for the tools they have all had the seams removed and the shovels handle area was drilled out(it was a solid piece of plastic where the opening should have been.Dunce [D)])

All comments, questions, and suggestions welcome!Smile [:)]

"A good plan executed now is better than a perfect plan next week." - George S. Patton

  Photobucket 

  • Member since
    January 2009
  • From: Everett, WA
Posted by Schnobs on Wednesday, June 10, 2009 10:17 AM

Great work Mike!  I really like the masking off of the windshield area to outline the wiper glaze.  I am really interested what that process looks like end to end.  I bet it will end up looking very cool.

The glued copper wire off the baxk of the headlight and then glued straight to the fender is a great realistic touch as well.  It's amazing how really simple things like that add to the the overall complexity and tapestry of the final look.

I can't wait to see this one unfold!

"There is a principle which is a bar against all information, which is proof against all arguments and which cannot fail to keep a man in everlasting ignorance. That principle is contempt prior to investigation." Herbert Spencer
Dre
  • Member since
    June 2007
  • From: here, not over there
Posted by Dre on Wednesday, June 10, 2009 11:38 AM
Looking good so far, Mg.  It's kind of funny that you had fit issues with the windshield- that's probably the 1 piece that fit perfectly on mine!  I think that the wiper's are a little on the small side for such a large expanse of glass, but that's what they gave us to work with.  Those MG mounts... <shudder>.. I left them off of mine.  The kit tarps and whatnot could use replacement or a lot of work to look right, but given what you've done with this so far you should be OK.Thumbs Up [tup]
  • Member since
    June 2006
  • From: Netherlands
Posted by Grem56 on Wednesday, June 10, 2009 12:56 PM

Great progress MgM, looking good and you evidently have Zvezda's offering under control.

Julian Thumbs Up [tup]


illegal immigrants have always been a problem in the United States. Ask any Indian.....................

Italeri S-100: http://cs.finescale.com/FSMCS/forums/t/112607.aspx?PageIndex=1

Isu-152: http://cs.finescale.com/FSMCS/forums/t/116521.aspx?PageIndex=1


  • Member since
    October 2007
  • From: N.H.
Posted by panzerguy on Wednesday, June 10, 2009 4:06 PM
 

  Looking good MichaelThumbs Up [tup] glad to see this guy isn't getting the best of you.

  I'm in the process of building a Zvezda BA3 armored car so I know how much fun these Zev kits can be. Especially those doorsBanged Head [banghead]!

"Happiness is a belt fed weapon"

  • Member since
    December 2007
  • From: Bridgeview, Illinois
Posted by mg.mikael on Wednesday, June 10, 2009 9:24 PM

Schnobs- Thanks for noticing the little details like the headlight wiring(which suprisingly didn't take that long to actually do.) Glad you like the build so far and thanks for the comments!Thumbs Up [tup]

Dre- You lucky dog, I wish my winshield fit properly.....would have saved me from some smudging glue and what not. As fot the tarps, guns, bags, and etc, a majority of those parts will be coming from other kits(thankfullyWink [;)].)

Grem56- Thanks for the comments and the support.

panzerguy- The Zvezda doors........the horror, the horror.Blindfold [X-)] The nightmares persist even now. Thanks for the comments and I'll be looking forward to seeing your Zvezda build!

"A good plan executed now is better than a perfect plan next week." - George S. Patton

  Photobucket 

  • Member since
    April 2005
  • From: Piscataway, NJ!
Posted by wing_nut on Thursday, June 11, 2009 7:23 AM

I think I missed this one entirely.  gettin caught up on all my missied posts and threads.

Looks good MG.

Marc  

  • Member since
    December 2007
  • From: Bridgeview, Illinois
Posted by mg.mikael on Thursday, June 11, 2009 10:05 AM

wing_nut- Thanks for the comments and for checkin' out my WIP!Cool [8D]

"A good plan executed now is better than a perfect plan next week." - George S. Patton

  Photobucket 

  • Member since
    December 2007
  • From: Bridgeview, Illinois
Posted by mg.mikael on Wednesday, June 17, 2009 2:58 PM
Here's my next update.......unfortunatley, won't be home the next two days so I won't get any bench time till Saturday. Along with no computer access till Friday night at the earliest(so I'll be absent from the forums.Boohoo [BH])

Anyways I'm here now and here's the work, all the accesories are comin' along. Base coats and some dry-brushing done. The two helmets are from a Revell kit, along with one of the guns, a PPSh-41.

The SMG "grease gun" is the only kit supplied gun I'm using. The .30 cal and .50 cal are from Tamiya's US Infantry Weapons Set. These Tamiya molds are pretty old too, but their a hundred times better then the Zvezda ones. The .50 cal mount was scavenged from the kit supplied .50 cal. (It's mount is pre-attached to the Zvezda gun, but a little bit of snipping can take it off.)

The kit supplied ammo cans lack detail, so I decided to use those just as stowage in the cabin. I replaced them with a .30 cal ammo box and .50 cal ammo box from Tamiya's US Infantry Weapons Set. The .50 cal ammo tray had to be replaced though,  since the kit supplied ammo tray is too small for a correct .50 cal ammo box, so I had too scratch the tray for the new ammo box I was using. The .30 cal ammo box fit the kit supplied tray without a hitch.

Yes the ammo boxes are open, but I'll be putting an ammo belt in there that feeds to the gun.

All comments, questions, and suggestions welcome!Smile [:)]

"A good plan executed now is better than a perfect plan next week." - George S. Patton

  Photobucket 

  • Member since
    February 2009
  • From: mass,USA
Posted by scratchmod on Wednesday, June 17, 2009 3:13 PM

I'm not much into the olive drab vehicles (yet) but this one is looking pretty cool. The weapons and boxes are nice. That's the part I hate painting the most, the lttle things. I just might venture over to the OD stuff sooner than I planned.

Keep up the good work, I keep watching.


Rob

  • Member since
    December 2007
  • From: Bridgeview, Illinois
Posted by mg.mikael on Wednesday, June 17, 2009 6:46 PM
 scratchmod wrote:

I'm not much into the olive drab vehicles (yet) but this one is looking pretty cool. The weapons and boxes are nice. That's the part I hate painting the most, the lttle things. I just might venture over to the OD stuff sooner than I planned.

Keep up the good work, I keep watching.


Rob

Thanks for the comments, scratchmod! Glad you're enjoying my OD build.Wink [;)]

"A good plan executed now is better than a perfect plan next week." - George S. Patton

  Photobucket 

  • Member since
    May 2005
  • From: Dublin Rep Of Ireland
Posted by terry35 on Saturday, June 20, 2009 2:28 PM

WOW, mikael, that progress is really rapid everything looks great so far and those headlights are stunning work. I wasn't expecting to seeing you having made so much progress after all the delays caused so early on in the project.

Terry. 


  • Member since
    December 2007
  • From: Bridgeview, Illinois
Posted by mg.mikael on Saturday, June 20, 2009 7:19 PM
 terry35 wrote:

WOW, mikael, that progress is really rapid everything looks great so far and those headlights are stunning work. I wasn't expecting to seeing you having made so much progress after all the delays caused so early on in the project.

Terry. 


Thanks for the comments and for checkin' in Terry!Cool [8D] Yeah, progress had been comin' along at a steady pace. Trying to get this one finished soon, because I gotta a few kits I'm really itchin' to get started on in the stash, plus I have my scratch multiplane that I want to get finished in the coming weeks(preferably before college in the fall.Wink [;)]) But I know their's not much chance of me finishin' that build anytime soon.

"A good plan executed now is better than a perfect plan next week." - George S. Patton

  Photobucket 

  • Member since
    December 2007
  • From: Bridgeview, Illinois
Posted by mg.mikael on Sunday, June 28, 2009 3:49 PM

Okay here's my update, would have had it up yesterday but I went to Cabela's thus that took a bit of time. I did however pick up a new Gerber pocketknife so I'm happy about that.Cool [8D] Then when I did try to get some pics up, my computer was so damn slow. I finally figured out it was the new anti-virus software that made my computer a snail. Thankfully I solved the problem, got the pics uploaded, and now here's the long delayed update.

The .50 cal is permanently in place along with the box and scratch ammo tray. The ammo belt itself will go in at a later time(already painted). The antenna is in place, along with all four wheels. Also put down some future on the hull sides so I can get the decals on soon.

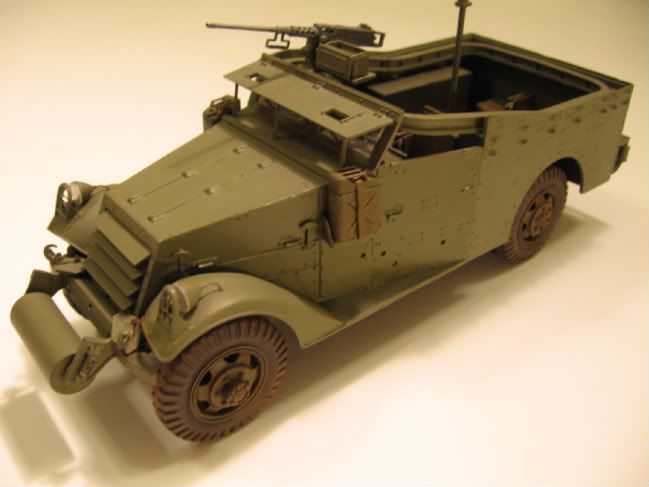
The antenna base is the kit supplied one, just a little bit of sanding is necessary. As for the top antenna wire, I used some copper wire. The kits instructions say to use stretch sprue(no kit supplied part), but its entirely your choice of what material you want to use.

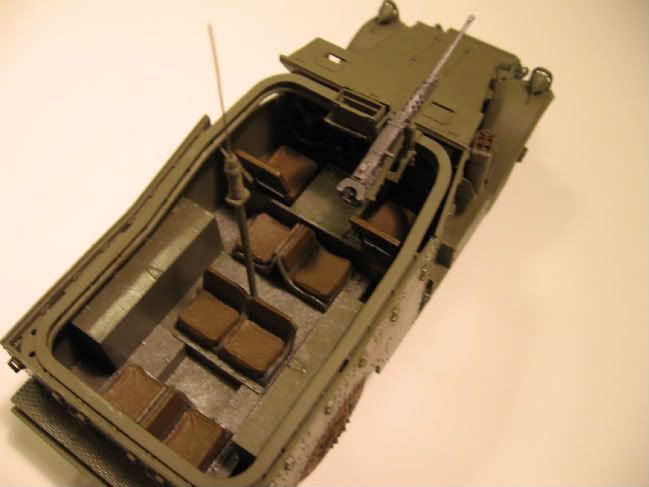
The .50 cal is in place, painted a base color of Testor's Steel mixed w/Black. Then some drybrushing of a lighter shade of Testor's steel also darkened w/black. I drilled out the cooling holes a bit just to give some depth, along with the barrel.
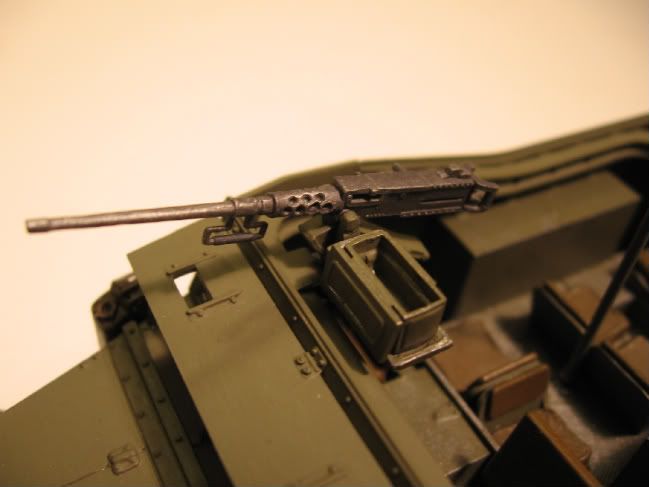
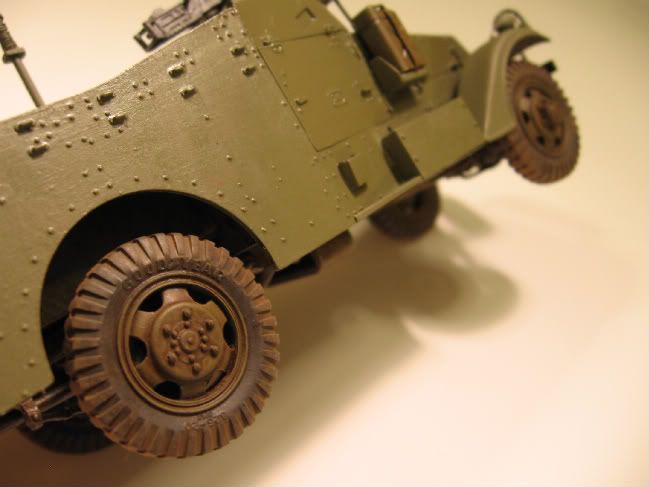
The wheels are all on......finally.Wink [;)] Put down a burnt umber wash then sealed them with some Krylon Matte acrylic finish from a rattle can. I also sealed the wheel wells, so I could move onto the pastels with worrying about them dissapering. I then rolled the wheels in a mixture of pastel colors like sepia, burnt umber, and vandyke brown. Yes the hull sides are super shiny but that's the Future.

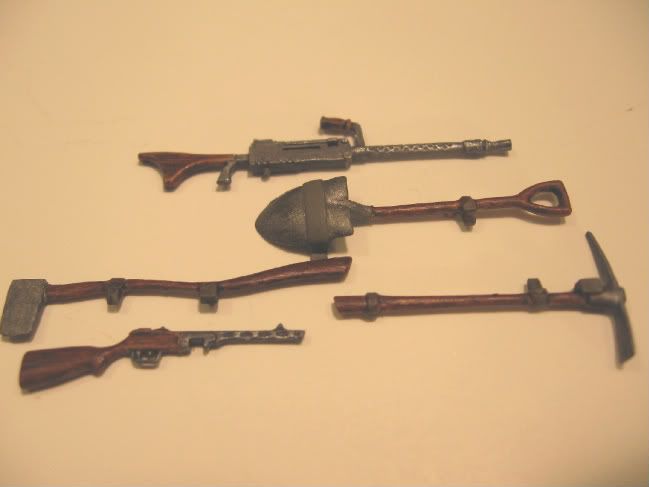
Yeah, I know this pic is sorta bad so I'm sorry about that. All the tools and guns have got their wooden parts finished off. Used Testor's wood for the base coat, then applied some Tamiya acrylic clear orange, and finally some washes of burnt umber(to darken the color and to get the wood grain.)

All comments, questions, and suggestions welcome as always.Smile [:)]

"A good plan executed now is better than a perfect plan next week." - George S. Patton

  Photobucket 

  • Member since
    January 2009
  • From: Everett, WA
Posted by Schnobs on Sunday, June 28, 2009 7:59 PM

Michael it is turning out great and I love the wood on the tools!  I will have to try that thanks.  I use MM Acryl wood color and then some burnt umber washes as well but would not have thought of applying a Tamiya clear orange.  Very clever and cool I must say.

I have gotten lost in Cabella's more than a few times!

"There is a principle which is a bar against all information, which is proof against all arguments and which cannot fail to keep a man in everlasting ignorance. That principle is contempt prior to investigation." Herbert Spencer
  • Member since
    October 2007
  • From: N.H.
Posted by panzerguy on Sunday, June 28, 2009 9:01 PM
 

   Hey Michael these Z-kits are a real blast huhBanged Head [banghead]? Yours is really coming out great thoughThumbs Up [tup].

  It amazes me that they add extra stuff like engines and rubber tire's with lettering but leave off hull details no clear lenses for headlights and fit issues that will give you fits.

"Happiness is a belt fed weapon"

  • Member since
    December 2007
  • From: Bridgeview, Illinois
Posted by mg.mikael on Sunday, June 28, 2009 10:28 PM

Schnobs- Thanks for the comments! As for the Tamiya Acrylic Clear Orange I can't take credit for it(I picked up that tip somewhere on the forums,) though I'm glad I can offer up some new techniques anyways.Smile [:)]

Yeah, Cabella's is a great place to browse and to shop. Only place I like better is my LHS....(if I didn't say that, I'd be comitting modeling blaspehemy.Wink [;)])

panzerguy- Oh yeah, these kits are so much fun. They clearly leave out the detail so the modeler can have fun replacing it.Big Smile [:D]

It does suprise me too, the weird cases of some extra's and detailed parts like the Goodyear tires with PSI numbers on my build. Yet other prominent parts like guns are lacking detail that shouldn't be missing.


"A good plan executed now is better than a perfect plan next week." - George S. Patton

  Photobucket 

  • Member since
    June 2009
Posted by Guney on Monday, June 29, 2009 4:51 AM

I hate Z-Kits....:)

But you are working very fine...It'll be amazing...:)

Dre
  • Member since
    June 2007
  • From: here, not over there
Posted by Dre on Monday, June 29, 2009 11:14 AM
Mg, man that is looking better and better!
  • Member since
    December 2007
  • From: Bridgeview, Illinois
Posted by mg.mikael on Monday, June 29, 2009 12:19 PM
Guney & Dre, thanks for checkin' out the build and for the comments!Cool [8D]

"A good plan executed now is better than a perfect plan next week." - George S. Patton

  Photobucket 

  • Member since
    July 2004
  • From: Texas
Posted by wbill76 on Monday, June 29, 2009 4:27 PM
Making some great progress with this one Michael! The tires in particular are looking good and the little bits here and there are dressing this one up nicely. Thumbs Up [tup]
  • Member since
    December 2007
  • From: Bridgeview, Illinois
Posted by mg.mikael on Monday, June 29, 2009 8:25 PM

 wbill76 wrote:
Making some great progress with this one Michael! The tires in particular are looking good and the little bits here and there are dressing this one up nicely. Thumbs Up [tup]

Thanks for checkin' in on the WIP and for the comments, wbill76!Smile [:)] Glad you like all the little detail parts I'm throwin' in......that said I got the .30 cal installed and the ammo feeding in. Should have a another update up in a day or so.

"A good plan executed now is better than a perfect plan next week." - George S. Patton

  Photobucket 

  • Member since
    April 2005
  • From: Piscataway, NJ!
Posted by wing_nut on Tuesday, June 30, 2009 8:51 AM
I'm with Bill on those tires... nicely done.  The tools looks great too. Heck... it ALL looks good!

Marc  

  • Member since
    June 2006
  • From: Netherlands
Posted by Grem56 on Tuesday, June 30, 2009 9:41 AM

Nice going MgM. Looking good.

Julian


illegal immigrants have always been a problem in the United States. Ask any Indian.....................

Italeri S-100: http://cs.finescale.com/FSMCS/forums/t/112607.aspx?PageIndex=1

Isu-152: http://cs.finescale.com/FSMCS/forums/t/116521.aspx?PageIndex=1


  • Member since
    December 2007
  • From: Bridgeview, Illinois
Posted by mg.mikael on Tuesday, June 30, 2009 2:00 PM
wing_nut & Grem56, glad your lovin' the build and thanks for the comments!!Smile [:)]

"A good plan executed now is better than a perfect plan next week." - George S. Patton

  Photobucket 

  • Member since
    December 2007
  • From: Bridgeview, Illinois
Posted by mg.mikael on Wednesday, July 1, 2009 4:20 PM

This build is finally starting to near completion.....believe it or not.Big Smile [:D] I'll get up only one more  update after this one. Soooooo, finished pics should be up on Saturday or so.

As for this update, the decals are on. The red star and numbers are from the Zvezda kit. They were actually quite nice, but they kept curling in the corners. Thus one must be carfull not to put down the decal with the corners stuck underneath. The flag/wreath decal on the door was from a Revell kit spare. It went on nicely with just a little bit of vinegar to help it go over some raised detail.(Gotta thank Hans von Hammer for the great tip about using vinegar in place of Micro-Sol!Thumbs Up [tup]) The instructions did say one more decal of a red star in white circle goes on the hood, but I felt it subtracted from the builds appearance so I let that one off.

Another view of the decals. Also I put the axe permanently in place inside the scratch axe sheath.

Yep the .50 cal has finally got it's ammo belt feedin' in. This belt of bullets came from Tamiya's US Infantry Weapons set. I put half the belt inside the can, with the other half of the belt feedin' in. Just some slight cutting was neccessary to get the ammo belt to curve. Note: the guns are not yet finished more weathering will be coming soon.

The .30 cal is now also permanetly in place. This ammo belt also came from Tamiya's US Infantry Weapons set. Placement was straightforward(just some shortening), since this belt didn't have to curve at all.

Finally the tarps and bags that will be along the hull. I decided to replace all the kit supplied one's with much better detailed ones from Tamiya's Allied Vehicles Acessory Set. The kit supplied ones are okay in front, but as soon as you look to the side of them their completley void of any detail. (I guess you could scribe in fabric folds, but that would take a while, and I was a bit lazy to do all that Wink [;)].) The dark green tarps are Zvezdas and the very light green ones are Tamiyas. I think this pics says it all in just a simple comparison.

The bags and all will be getting more texture ala tissue paper, so I gotta get workin' on that soon.

All comments and questions welcome!Smile [:)]

"A good plan executed now is better than a perfect plan next week." - George S. Patton

  Photobucket 

Dre
  • Member since
    June 2007
  • From: here, not over there
Posted by Dre on Wednesday, July 1, 2009 4:59 PM

Now that you're in the final efforts on this it is really looking sharp.  Nice work on the guns.

  • Member since
    January 2009
  • From: Everett, WA
Posted by Schnobs on Wednesday, July 1, 2009 5:55 PM

Hey Mike,

I really like how all the details add to the overall presentation and the paint job is phenomenal,

Great Job Sir!!  You make plain green look cool!

"There is a principle which is a bar against all information, which is proof against all arguments and which cannot fail to keep a man in everlasting ignorance. That principle is contempt prior to investigation." Herbert Spencer
  • Member since
    December 2007
  • From: Bridgeview, Illinois
Posted by mg.mikael on Wednesday, July 1, 2009 7:53 PM

Dre- Thanks for the comments!Smile [:)]

Schnobs- Glad your enjoyin' the build and think it's cool!Wink [;)]

"A good plan executed now is better than a perfect plan next week." - George S. Patton

  Photobucket 

  • Member since
    December 2007
  • From: Bridgeview, Illinois
Posted by mg.mikael on Thursday, July 2, 2009 6:50 PM

This is a first for me.......back to back updates.Tongue [:P]

As for those tarps and bags I gave them the tissue-treatment inorder to improve texture and creases. Scratched straps will be made very soon.

After that was on and dry, I applied a mixture of paints(black, tan, brown) to make a dirty kahki color. I will be going back though, to lighten up the color on one or two bags to make them have contrast(that whey their not all the same color.)

Some of the goodies I'll be throwin' inside the cabin, will include scratch maps and a one page document. For the maps I just size down some regular maps(nothing to fancy) of major cities I find on the web(one is of Paris and the other of Kiev) As for the document (I just took some russian writing and sized that down to size#2 font.) Then I take the maps and document and simply weather them with coffee. I personally use some regular brewed coffee and that's it. I find it makes the perfect effect on paper to make something look old and used.

All comments and questions welcome!!Cool [8D] Finished pics will more then likely be up sometime this weekend.

"A good plan executed now is better than a perfect plan next week." - George S. Patton

  Photobucket 

JOIN OUR COMMUNITY!

Our community is FREE to join. To participate you must either login or register for an account.

SEARCH FORUMS
FREE NEWSLETTER
By signing up you may also receive reader surveys and occasional special offers. We do not sell, rent or trade our email lists. View our Privacy Policy.