This week I finished up the 6 recoilless rifles and then move on to the main hull. It was time for PE.
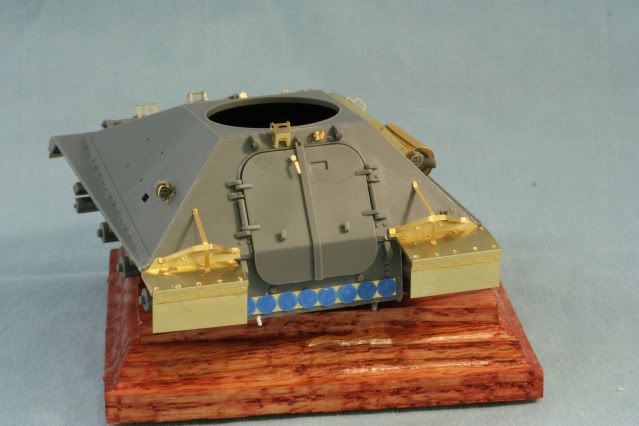
In the rear I used the MV PE fenders and the PE fender supports. The MV PE is good quality and bends nicely. The fenders have all the required bolt holes and the fret includes a bunch of PE bolt heads. So besides bending and shaping the fender, then each one need about a dozen PE bolt heads added. Then inside two bolt heads on the attachment flap can be added prior to the PE support but the support goes over the two end holes, after which those bolts can be attached.
The PE box on the top left is an antenna base for an RT-524 style radio antenna. The PE door latch is more to scale than the kit. The handle is supposed to be raised from the surface. To raise the PE handle, I used some .040 rod. On the right top is an additional bracket from the MV set.
Lastly at the bottom is a PE rack of stored 106mm rounds. Since this is a nice brass PE, I covered the casings with punched painters tape until finishing is completed.
Here is the completed rear view

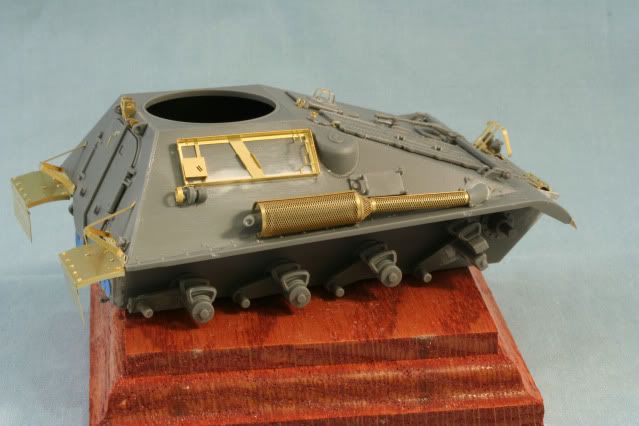
The right side of the vehicle was a bit of work. I replaced the styrene tool holder with the PE holder from the MV fret. The styrene holder was designed to fit into a “depression” molded into the hull. That had to be filled and sanded prior to mounting the PE tool holder. The PE tool holder is actually quite complicated and made up of 3 parts but fits together nicely when completed.
The exhaust is covered by a screen from the kit supplied PE fret. I must admit this is a PITA to assemble and time, care and patience to get everything to line up. The exhaust pipe end is molded solid from the kit and requires drilling out at the exit end.
The tail lights have a guard which is supplied on the MV PE fret. What I have here is mounted a bit behind the light. Actual photos have it closer to the light end. I decided not to rip off and state again….I’ll stay with this arrangement….beat me later!!
Where the exhaust meets the body has a poor fit and required a bit of putty work.

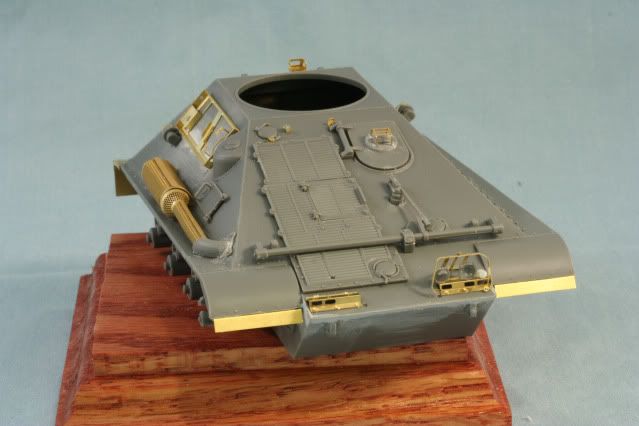
Now, I moved on to the front of the vehicle. After mounting most of the larger kit supplied parts last week I began with the PE. Near the top are a few PE tie towns from the MV fret. The kit supplies a styrene diver vision block guard. The also supply a PE guard on their fret and the MV fret has one. I had to fill the mounting holes for the styrene guard and I used the PE guard from the kit as it was less “fiddly” than the MV guard.
The MV fret has a complete front fender with mud guard which requires you to cut/grind off the styrene molded guard on the upper hull. I though the styrene fender looked fine but was missing the mud guard. I used the PE fenders and cut off the mud guard with a bit of excess which I folded into an attachment lip to secure them to the styrene.
Then there are the lights and the mounts. The kit supplied lights are pre mounted on a styrene rail. The MV PE set has a rail mount which you see alone on the left. After this is mounted, it needs to be bolted in place with 5 PE bolts. The lights need to be cut from the styrene rail. You will need to shave and shape the bottom pin to fit the mounting holes in the PE. The headlight is drilled out for later attachment of an MV .116 Headlight after painting. The white BO light was due to the kit supplied light flying off to the twilight zone while handling!! A little scratch work to make a new one.
After the lights are mounted the PE light guard is mounted. Here again you have a styrene guard, a kit supplied PE guard and another PE guard on the MV fret. The guard here is from the MV fret and still requires 4 more PE bolts to finish it.

The mounted items on the left side consist of the 5 gallon can and holder, the spare track cleats, and though not supplied with the kit but on many Ontos, a 30 cal MG tripod for which the MV PE fret has two mounting holders. Since all of these items along with the tools require detail painting, I left them off until the base color is completed on the hull.
The other thing to note is this kit has a bit of Italeri diesease....you need to check every part closely as there are lots of pin marks and mold seams!!
I need to finish up the lights on the left side and then it is time to power up the paint booth. That will be in next week’s installment as it is time to take care of the “mom” in the house!!
As always your comments either good or bad are appreciated.
Rounds Complete!!