SEARCH FINESCALE.COM

Enter keywords or a search phrase below:

1/35 DML T19 105mm HMC, WIP, 01/02/11, Complete

34588 views
150 replies
1 rating 2 rating 3 rating 4 rating 5 rating
  • Member since
    September 2007
  • From: Truro Nova Scotia, Canada
Posted by SuppressionFire on Tuesday, October 5, 2010 5:55 AM

Looks like a good start to a cool project!

In WWII the US designed & manufactured three machines that had longevity beyond their original purpose. The Sherman tank, half tracks & the B-26 Invader bomber. All three were still fighting into the 70's. The B-26's airframes became tired and had to be re-manufactured to soldier on in Vietnam. The Sherman reached its ultimate lethality in the 80's as a up-gunned conversion in Israel. Modern footage of battle groups in Israel show the half tracks still serving along side the lethal Merkava battle tank transporting troops, proving a sound design, easy maintenance and accessible replacement parts never becomes obsolete.

http://i6.photobucket.com/albums/y211/razordws/GB%20Badges/WMIIIGBsmall.jpg


  • Member since
    July 2006
  • From: New Jersey
Posted by redleg12 on Tuesday, October 5, 2010 6:09 AM

Surpression Fire - Great designs go on forever.....look after the was ....the M113, B52 or the C130. And lets not forget the M109....the M115 and M114 which both lasted from WWII to the 80s....the list goes on!

Thanks for stopping by and for the comments

Rounds Complete!!

"The Moral High Ground....A Great Place to Emplace Artillery."

  • Member since
    October 2009
  • From: South Carolina
Posted by jetmodeler on Tuesday, October 5, 2010 6:37 AM

Looks like your off to a good start. I was so close to getting this kit this weekend. But I ended up getting something else.


  • Member since
    August 2003
  • From: Connecticut, USA
Posted by Nachtflieger on Tuesday, October 5, 2010 7:20 AM

Good start Mike.Big Smile I'm looking forward to watching your progress. I haven't seen one of these built up yet.

Nate


  • Member since
    April 2005
  • From: Piscataway, NJ!
Posted by wing_nut on Tuesday, October 5, 2010 7:32 AM

And prep for Amps East '11 gets underway.

Marc  

  • Member since
    July 2006
  • From: New Jersey
Posted by redleg12 on Tuesday, October 5, 2010 8:18 AM

Jetmodeler - Well....this will be a good way to decide on your next trip  Wink. Thanks for stopping in

Nate - I have a cool feeling Cool.....then again artillery in general does that to me!! Thanks

Marc - Well.....not exactly.....most likely AMPS International next April.....that looks like a great show!!

Thanks for stopping in

Rounds Complete!!

"The Moral High Ground....A Great Place to Emplace Artillery."

  • Member since
    November 2008
  • From: Jefferson City, MO
Posted by iraqiwildman on Tuesday, October 5, 2010 9:06 AM

A question a little off topic, what are you using for a background on your photos? I usually see white paper, but I like this light blue. I also like you using a wood display stand.


Tim Wilding

  • Member since
    December 2002
  • From: Valrico, FL
Posted by HeavyArty on Tuesday, October 5, 2010 9:23 AM

Looks like it is off to a great start.  Another winner in the works!!

Gino P. Quintiliani - Field Artillery - The KING of BATTLE!!!

Check out my Gallery: https://app.photobucket.com/u/HeavyArty

"People sleep peaceably in their beds at night only because rough men stand ready to do violence on their behalf." -- George Orwell

  • Member since
    July 2006
  • From: New Jersey
Posted by redleg12 on Tuesday, October 5, 2010 9:34 AM

IWM - To see my photo are look at the photos of my Bench  You will see the photo booth. The background is a cheap blue fabric ($2/yd), cut to fit. It is on a spring rod hanging down and then along the shelf. The base is a 3 x 3 Maple.....made from an ooops while making a model base....waste not want not. 

Thanks for stopping by

Gino - Always a welcome visit to the mortor pool!!

Rounds Complete!! 

"The Moral High Ground....A Great Place to Emplace Artillery."

  • Member since
    April 2009
  • From: Carmel, IN
Posted by deafpanzer on Tuesday, October 5, 2010 12:59 PM

Now you have caught my attention... will be following you.  Looks like its a fun kit to build especially that it is a DML kit. 

Good luck!Yes

Andy

  • Member since
    August 2008
  • From: S.W. Missouri
Posted by Pvt Mutt on Tuesday, October 5, 2010 1:24 PM

Yeah DP this even interest me.Surprise I guess this falls into the SPG class Hmm

Get with it MikeToast

Tony LeeSmile

Shoot Low Boys They're Ridin Ponys

  • Member since
    July 2006
  • From: New Jersey
Posted by redleg12 on Tuesday, October 5, 2010 1:37 PM

Andy - All you DML Germaholic fans are looking at a DML US kitSurprise....LOL....Yep....DML make  nice kit....they always have something screwed up in th directions!! But a nice detailed kit.

Just the bit I have worked with it so far, it makes the Monogram half tracks look like something from the stone age and the Tamiya like a rotary phone

Thanks for stopping by

Tony - Now....it is called a T19 Howitzer Motor Carriage.  Further....as I state on slide 12 of my artillery presentation.... “Self Propelled artillery is either tracked, half track or wheeled.  A self propelled unit has an integral engine to propel the weapon. Early self propelled artillery had open fighting compartment. More modern versions used closed fighting compartments. “   Whistling (I know blowing my own horn)

Thus yes, it is a SP weapon!!Wink

Tony, you are always welcome!!

Rounds Complete!!.

"The Moral High Ground....A Great Place to Emplace Artillery."

  • Member since
    August 2008
  • From: S.W. Missouri
Posted by Pvt Mutt on Tuesday, October 5, 2010 1:41 PM

Yep, the engine and tracks are a dead give away.Big Smile

Tony LeeSmile

Shoot Low Boys They're Ridin Ponys

  • Member since
    July 2006
  • From: New Jersey
Posted by redleg12 on Tuesday, October 5, 2010 1:47 PM

Pvt Mutt

Yep, the engine and tracks are a dead give away.Big Smile

Tony LeeSmile

Yes ..... LOL

Rounds Complete!!

"The Moral High Ground....A Great Place to Emplace Artillery."

  • Member since
    March 2010
Posted by shoot&scoot on Tuesday, October 5, 2010 4:39 PM

Mike, you can't fool me!  I know at least one of  these was used in Europe 'cause I saw it in Kelly's Heroes and every one knows Hollywood would never lie!  Looks like you have the start to another great one here, I'll be watching.

                                                                             Pat 

  • Member since
    June 2005
  • From: Massachusetts
Posted by minimortar on Tuesday, October 5, 2010 6:59 PM

redleg12

Just the bit I have worked with it so far, it makes the Monogram half tracks look like something from the stone age and the Tamiya like a rotary phone


LOL! Having been there and done that/those. Good Looking kit details so far... another WIPpy to keep an eye on.

Wink

Thanks,
Kevin Keefe

Mortars in Miniature
A Scale Model (Plus!) Collection of the Infantryman's Artillery

  • Member since
    July 2006
  • From: New Jersey
Posted by redleg12 on Tuesday, October 5, 2010 9:09 PM

Pat - as per Hunnicutt, there was a group of the T19s which saw use in the Italy campaign. The T19 was an early war stop gap until the M7 was produced. The 105mm was too heavy and too much recoil for the M3 frame and suspension to take.

Thanks for peeking in

Kevin - I know you know what a rotary phone is...and you have used one, along with a slide ruler, gum eraser, teletype, and of course that modern instrument....the electric typewriter!!! Wink....OK...now I feel old Tongue Tied

Thanks for the peek

Rounds Complete!!

"The Moral High Ground....A Great Place to Emplace Artillery."

  • Member since
    June 2005
  • From: Massachusetts
Posted by minimortar on Wednesday, October 6, 2010 7:07 AM

redleg12

Kevin - I know you know what a rotary phone is...and you have used one, along with a slide ruler, gum eraser, teletype, and of course that modern instrument....the electric typewriter!!! Wink....

Thanks for not including the stone tablet and chisel. Tongue Tied

redleg12

OK...now I feel old Tongue Tied

Ah... yep... and thanks again... pal.  Wink

Thanks,
Kevin Keefe

Mortars in Miniature
A Scale Model (Plus!) Collection of the Infantryman's Artillery

  • Member since
    July 2004
  • From: Texas
Posted by wbill76 on Wednesday, October 6, 2010 4:50 PM

Looks to be the start of a fun ride Mike, looking forward to this one. Beer

  • Member since
    August 2008
  • From: S.W. Missouri
Posted by Pvt Mutt on Wednesday, October 6, 2010 5:22 PM

Hey Mike ever hear of using the "Right Tool for the Job"? I know I know,a man got to do what a man got to do.Whistling

You know I love you buddyBig Smile

Tony LeeSmile

Shoot Low Boys They're Ridin Ponys

  • Member since
    July 2006
  • From: New Jersey
Posted by redleg12 on Wednesday, October 6, 2010 6:43 PM

Kevin - LMAO!!

Bill - Thanks for stopping in......a nice WWII model!!! I know...but its green (damm I love green)Whistling

Thanks for stopping by Wink

Tony - We are both from the viagra and flowmax generation.....just because it is old, does not mean it is bad.

Most times those "old tools" work a lot better than the new ones.....have you ever seen the batteries die on a slide ruler.....that old typewriter never suddenly ran out of ink.....and the rotary phone NEVER died.....old is good!!

Thanks guys

Rounds Complete!!

"The Moral High Ground....A Great Place to Emplace Artillery."

  • Member since
    December 2007
  • From: Bridgeview, Illinois
Posted by mg.mikael on Friday, October 8, 2010 8:36 AM

Well let me just say that the fit of those parts looks perfect! Can't wait to see paint on them.Smile Now only if Dragon would release an M-3 Scout Car, I would be happy. Plus it's not like it's an entirely different kit, you omit the tracks/suspension from the back, add two more wheels and few other odds and ends and one would have a scout car.

"A good plan executed now is better than a perfect plan next week." - George S. Patton

  Photobucket 

  • Member since
    December 2002
  • From: Valrico, FL
Posted by HeavyArty on Friday, October 8, 2010 8:52 AM

mg.mikael
 Now only if Dragon would release an M-3 Scout Car, I would be happy. Plus it's not like it's an entirely different kit, you omit the tracks/suspension from the back, add two more wheels and few other odds and ends and one would have a scout car.

Actually, it is very different.  The only usable parts from the M2 kits would be the front end from the windshield forward.  Everything else from there back would have to be redone.  It would basically be a totally new tooled kit.

Gino P. Quintiliani - Field Artillery - The KING of BATTLE!!!

Check out my Gallery: https://app.photobucket.com/u/HeavyArty

"People sleep peaceably in their beds at night only because rough men stand ready to do violence on their behalf." -- George Orwell

  • Member since
    December 2007
  • From: Bridgeview, Illinois
Posted by mg.mikael on Friday, October 8, 2010 8:58 AM

HeavyArty

 mg.mikael:
 Now only if Dragon would release an M-3 Scout Car, I would be happy. Plus it's not like it's an entirely different kit, you omit the tracks/suspension from the back, add two more wheels and few other odds and ends and one would have a scout car.

Actually, it is very different.  The only usable parts from the M2 kits would be the front end from the windshield forward.  Everything else from there back would have to be redone.  It would basically be a totally new tooled kit.

True, but it wouldn't be like trying to transform a Tiger II into a Scout Car. Since in a sense, it would be half-done for the Dragon engineers.

"A good plan executed now is better than a perfect plan next week." - George S. Patton

  Photobucket 

  • Member since
    May 2007
  • From: Taxachusetts
Posted by camokid on Friday, October 8, 2010 9:03 AM

HeavyArty


Actually, it is very different.  The only usable parts from the M2 kits would be the front end from the windshield forward.  Everything else from there back would have to be redone.  It would basically be a totally new tooled kit.


Actually Gino the scout car is dimensionally different in the front end as well, to be accurate the half track nose wouldn't work. The half track may have been based off the scout car but ask any restoration guy who's tried to fit hood parts, side armor etc. from one vehicle to the other and he will tell you they aren't the same.

It would have to be a completely new kit (except for maybe the roller and bumper type parts) but I'm all for Dragon doing it, I would love nothing more than to finally be able to ditch my old scout cars for something new.

Ken

Build how you like, like how you build


  • Member since
    July 2006
  • From: New Jersey
Posted by redleg12 on Friday, October 8, 2010 9:14 PM

MG - Thanks for stopping in......and starting the M3 discussion

It would be great to see that done and for AFV to finish the rest of the WC series......someday....most likely after I build the old ones in the stash!!

If you build it ...it will come!!

Rounds Complete!!

"The Moral High Ground....A Great Place to Emplace Artillery."

  • Member since
    December 2006
  • From: t.r.f. mn.
Posted by detailfreak on Saturday, October 9, 2010 8:39 AM

Cool looking build here,been contemplating one of these halftracks as a stash addition. Plan on superdetailing the engine compartment? That is the Continental engine yes/no ? will be checking in from time to time btwn my home overhauls.Cool   later, Greg"Detailfreak"Rowley

[View:http://s172.photobucket.com/albums/w1/g-earl828/]  http://i158.photobucket.com/albums/t104/cycledupes/1000Roadwheels4BuildBadge.jpg

  • Member since
    July 2003
  • From: On my kitchen counter top somewhere in central North Carolina.
Posted by disastermaster on Saturday, October 9, 2010 12:55 PM

http://i1040.photobucket.com/albums/b409/thehotmommas/smileys/lurking.gif

http://i375.photobucket.com/albums/oo194/gupshupp/Lurking.gif

               http://i20.photobucket.com/albums/b232/gluetank/Decorated%20images/th_T1-4-copy.jpg

 https://i.imgur.com/LjRRaV1.png


  • Member since
    March 2003
  • From: Western North Carolina
Posted by Tojo72 on Saturday, October 9, 2010 2:40 PM

It looks real good Mike,those Dragon Half-tracks build up nice,I did an M-16.All that detail you are adding should look great !!

  • Member since
    May 2009
  • From: Poland
Posted by Pawel on Saturday, October 9, 2010 2:42 PM

Well well, 12 is firing again! And already there are the first splashes right on target! I'll be watching, good luck with your project, have a nice day

Pawel

All comments and critique welcomed. Thanks for your honest opinions!

www.vietnam.net.pl

  • Member since
    July 2006
  • From: New Jersey
Posted by redleg12 on Saturday, October 9, 2010 4:42 PM

Detalfreak - Yep....as I remember...I am not going nuts with the engine as I am not intending to have the hood open but.....it is well detailed. Just needs some wires and hoses. Thanks for stopping by

Steve - If you need help

Always welcome!!

Tony - Thanks for stopping by and for the comments

Pawel - Beginning registration......always need a good starting point!!  Thanks

Thanks everyone.

Rounds Complete!!


"The Moral High Ground....A Great Place to Emplace Artillery."

  • Member since
    January 2007
Posted by the doog on Sunday, October 10, 2010 8:24 AM

A very cool project here, Mike. I hope I have the time to watch it develop!  I know you'll "Swayze": this build as you've done to your others!

Just don't thrown your back out, lol. Big Smile

  • Member since
    May 2007
  • From: Taxachusetts
Posted by camokid on Sunday, October 10, 2010 12:12 PM

detailfreak
That is the Continental engine yes/no ? 

later, Greg"Detailfreak"Rowley

Hi Greg,

To answer your question, no. All White, Autocar and Diamond T half tracks (T 19's were built by Diamond T Motor Car Co. exclusively IIRC) were powered by the White 160AX, 6 cylinder, 4 cycle, in-line gasoline engine.

All International Harvester half tracks were powered by the International Harvester RED-450-B, 6 cylinder, 4 cycle, in-line gasoline engine.

I'm not sure what a Continental engine is?

Ken

Build how you like, like how you build


  • Member since
    July 2006
  • From: New Jersey
Posted by redleg12 on Sunday, October 10, 2010 8:19 PM

This has been a slow week with not a lot of bench time. Here are the few things I was able to move forward.

Moving on to step 6, which is the last step for the frame assembly. This step is essentially the front bumper and roller, along with mounting the tracks which I will do later. The roller is two piece split in half and a couple of coats of Mr. Surfacer 500 makes the seam disappear. Here is the frame ready for priming and painting.

I skipped over to step 13 to begin assembly of the fighting compartment. The fighting compartment is 3 flat side panels and the bottom hull. First I assembled the two side panels. I clamped them in the correct straight position, the applied some liquid cement to the seams and let dry overnight

After the sides I repeated the same operation with the rear panel and let dry overnight.

I then installed the seats and the front cargo boxes. The ready ammunition, gas cans and 50 cal will go in later.

As I said this was a short week. Nest up will be the driver’s compartment.

As always thanks for stopping by. Your comments good or bad are always appreciated.

Rounds Complete!!

"The Moral High Ground....A Great Place to Emplace Artillery."

  • Member since
    August 2003
  • From: Connecticut, USA
Posted by Nachtflieger on Sunday, October 10, 2010 9:19 PM

Looking good Mike, you've made good progress. I built the M-3 tank destroyer version of this kit, and it was a relatively easy build except for the tracks which were a little fiddly going on the running gear.

Nate


  • Member since
    July 2006
  • From: New Jersey
Posted by redleg12 on Monday, October 11, 2010 5:39 AM

Nate - Thanks for stopping by and for the comments!!

Rounds Complete!!

"The Moral High Ground....A Great Place to Emplace Artillery."

  • Member since
    July 2004
  • From: Texas
Posted by wbill76 on Monday, October 11, 2010 11:36 PM

Rolling right along with this one Mike, looking forward to the next chapter. Beer

  • Member since
    July 2006
  • From: New Jersey
Posted by redleg12 on Tuesday, October 12, 2010 5:35 AM

Thanks Bill, glad your reading along!!

Rounds Complete!!

"The Moral High Ground....A Great Place to Emplace Artillery."

  • Member since
    May 2007
  • From: Taxachusetts
Posted by camokid on Tuesday, October 12, 2010 8:11 AM

Very clean and precise assembly Mike, which is what I've come to expect from you. Nice job so far.

Knowing your enjoyment of accuracy in your builds, it's a shame that Dragon molded those fictional brackets on the front bumper though. I know you have the Hunnicutt book and if you spend some time thumbing through it, you wont find a single picture with those big, flat brackets with the eight large bolts in any of them. The roller mounts were held on by a single nut and bolt through the top and bottom of the bumper.

Although at this point, it may be too late to address them?


Ken

Build how you like, like how you build


  • Member since
    July 2006
  • From: New Jersey
Posted by redleg12 on Tuesday, October 12, 2010 7:14 PM

To be honest, I was more worried cleaning the center seam on the drum. Yes, I do agree the attachment is a bit different!! As I said.....I missed that one....fortunatly its not a "big" one. Trying to catch all the DML fubars is a game!!

Thanks for pointing that out....I will ponder if I can...."enhance" the attachment befor painting. I will admit the bumper in general does not fit well. Just a little tight here and a little off there....

Thanks for hanging in there with me.....and thans for pointing out the details. Nice constructive comment!!

Rounds Complete!!

"The Moral High Ground....A Great Place to Emplace Artillery."

  • Member since
    July 2006
  • From: New Jersey
Posted by redleg12 on Wednesday, October 13, 2010 6:13 PM

Wayne - Thanks for stopping in....

USMC used some T30 HMCs 75mm pack (I think) but the T19 was a limited production and only saw service in N Africa and Italy with the Army. Once the M7 Priest came out, many of the remaining were stripped of the gun and refitted as a half track!!

Rounds Complete!!

"The Moral High Ground....A Great Place to Emplace Artillery."

  • Member since
    August 2008
  • From: S.W. Missouri
Posted by Pvt Mutt on Wednesday, October 13, 2010 6:26 PM

YEEEEAaaaaaa that's one more for the SPGsBig Smile

Sorry,it just popped out.Embarrassed

Tony LeeSmile

Shoot Low Boys They're Ridin Ponys

  • Member since
    October 2007
  • From: N.H.
Posted by panzerguy on Wednesday, October 13, 2010 7:56 PM

   I"m BACK! Did you miss me? lol

  Not wasting any time I see Mike. Looking forward to seeing you get this one up and ready for a fire mission.

 Hopefully I'll get to stop in more frequently


"Happiness is a belt fed weapon"

  • Member since
    October 2009
Posted by PANZERWAFFE on Wednesday, October 13, 2010 8:19 PM

I know this is a different variant, an early M2, but could the bumper carry over to your build?  I am not sure with these half-tracks.  Really enjoy your work by the way.

Either way enjoy the photo's.

Rob

Rob

  • Member since
    July 2006
  • From: New Jersey
Posted by redleg12 on Thursday, October 14, 2010 5:23 AM

Tony - Hummmm...GMC...ah. HMC.....ummm..SPG....all = big gun strapped to an engine!! Stick out tongue

Steve - WOW....this must be old homecoming week.....always great to have to around....Hopefully you can stay and have some fun Wink

Rob - Thanks for posting the pics. It is always appreciated.

Thanks to everyone for stopping by and for the comments!!

Rounds Complete!!

"The Moral High Ground....A Great Place to Emplace Artillery."

  • Member since
    May 2007
  • From: Taxachusetts
Posted by camokid on Thursday, October 14, 2010 8:02 AM

I've never seen any pictures, or read any info regarding T19's or T30 half tracks in Marine use. The Marines did however use many M3 75mm GMC half tracks.

In fact I researched one for Archers Dry Transfers here: http://www.archertransfers.com/AR35323.html You can find several pictures of the actual vehicle by clicking the link at the bottom of  that page.


Nice picture of Tinman, is that something you took yourself? I've 'known' the owner via a restoration forum for years, he seems like a nice guy. As far as the bumper being the same, yes all unditching roller bumpers are the same, regardless of vehicle. None of them have those brackets that Dragon have molded in place.


Before the roller is fitted it's a simple fix, simply sand them away, now it would be mighty tricky.


Ken

Build how you like, like how you build


  • Member since
    July 2006
  • From: New Jersey
Posted by redleg12 on Sunday, October 24, 2010 11:15 PM

It has been a busy time so getting to the bench has been tough these past few weeks.

 Step 10 assembles the howitzer barrel, recoil system, metal barrel end and rails. The top of the recoil cylinder has a nice mold seam the length of the cylinder which needed attention. The breech and breech block are also assembled in this step but I left them separate for ease of painting.

The breech is molded in 2 parts with a seam in the middle. After taking care of the seam with Mr. Surfacer, I check the seam using a silver calligraphy pen from Michael’s. I love using these pens for this and it is a handy little tool.

Step 11 assembles the sled and gears with mounts. The sled is in two halves and has a nice seam in the middle. Since I plant to have the weapon elevated, I needed to seal up the bottom half. The top half of the seam is inside the C shaped sled. I used a strip of .010 styrene to cover the seam and some Mr. Surfacer to seal it in place.  I finished the assembly leaving off the sights to be painted separate and mounted once the elevation is set.

The rest of my time has been spent cleaning up the mold seam on all the road wheels in preparation for painting and roughing up the tracks.

Next up the PE for the suspension and then onto the cab.

As always thanks for stopping by. Your comments good or bad are always appreciated.

Rounds Complete!!


"The Moral High Ground....A Great Place to Emplace Artillery."

  • Member since
    August 2003
  • From: Connecticut, USA
Posted by Nachtflieger on Monday, October 25, 2010 2:41 AM

Nice to see progress on this one Mike.Smile

Nate


  • Member since
    July 2006
  • From: New Jersey
Posted by redleg12 on Monday, October 25, 2010 6:27 AM

Nate - Thanks for stopping in. Fall projects and chores are kicking my butt...getting bench time is tough right now.....trying to squeeze in where I can!!

Thanks for stopping in....hope the knee is much better!!

Rounds Complete!!

"The Moral High Ground....A Great Place to Emplace Artillery."

  • Member since
    October 2009
  • From: South Carolina
Posted by jetmodeler on Monday, October 25, 2010 6:39 AM

Looks good so far.You've done a good bit since I last posted to this thread.


  • Member since
    January 2007
Posted by the doog on Monday, October 25, 2010 8:37 AM

A very cool, informative thread so far, Mike---that silver calligraphy pen-trick is a new one on me. Smile

  • Member since
    July 2006
  • From: New Jersey
Posted by redleg12 on Monday, October 25, 2010 8:48 AM

Jetmodeler - Thanks for stopping by and for the comments

Karl - Thanks, I always try to give back!!

The clligrapghy pen was something I picked up to do some small chips and metal spots and found I love it for checking a seam. Use it all the time. Thinner than paint, also don't have to charge up the air brush. Allows a quick check after sanding and dries in seconds.

Plus it is at your favorite place...Michaels Big Smile    Thanks for stopping by

Rounds Complete!!

"The Moral High Ground....A Great Place to Emplace Artillery."

  • Member since
    July 2004
  • From: Texas
Posted by wbill76 on Monday, October 25, 2010 8:49 AM

Moving right along with this one Mike, won't be long before you're slinging paint! Yes

  • Member since
    December 2002
  • From: Valrico, FL
Posted by HeavyArty on Monday, October 25, 2010 9:32 AM

She's looking great Mike.  The cradle is a little gem.  Keep up the good work.

Gino P. Quintiliani - Field Artillery - The KING of BATTLE!!!

Check out my Gallery: https://app.photobucket.com/u/HeavyArty

"People sleep peaceably in their beds at night only because rough men stand ready to do violence on their behalf." -- George Orwell

  • Member since
    July 2006
  • From: New Jersey
Posted by redleg12 on Monday, October 25, 2010 2:22 PM

Bill - Hummm...I'm beginning to smell some thinner!! Thanks for stopping by

Gino - Thanks, the DML Howitzer actually is a nice little kit......I have to squeeze the towed unit in soon!!

Thanks again for the comments and for stopping by

Rounds Complete!!

"The Moral High Ground....A Great Place to Emplace Artillery."

  • Member since
    October 2007
  • From: N.H.
Posted by panzerguy on Monday, October 25, 2010 9:56 PM

 Just want you to know tomorrow I'm hitting my local MichaelsWink.

 Looking good buddyYes

"Happiness is a belt fed weapon"

  • Member since
    June 2005
  • From: Massachusetts
Posted by minimortar on Monday, October 25, 2010 10:01 PM

Doin' real good there Mike! Stick out tongue

Thanks,
Kevin Keefe

Mortars in Miniature
A Scale Model (Plus!) Collection of the Infantryman's Artillery

  • Member since
    July 2006
  • From: New Jersey
Posted by redleg12 on Tuesday, October 26, 2010 5:50 AM

Steve - I love that store.....you can always find something that you can use.  Come in handy for checking!! Glad you stopped by, always a pleasure!!

Kevin - Thanks, you are alway welcome!!

Rounds Complete!!

"The Moral High Ground....A Great Place to Emplace Artillery."

  • Member since
    July 2006
  • From: New Jersey
Posted by redleg12 on Sunday, November 7, 2010 9:50 PM

Well we set the clock back….cleaned up some leaves and here is my latest progress on the T19!

I now went back to step 8 to build the last major assembly, the cab. This step installs most of the interior driving items. I also started to use the griffon PE set. I used the PE set drivers floor and pedals as the kit just has some bumps on the floor. I also used the fire extinguisher bracket and a few other cab items. I left the seats out to allow ease of painting.

The Griffon set has a nice “few” items but is mostly floor panels to replace the kit diamond plate which IMO looks just fine. Also the set has PE hinges to replace the molded door hinges, again which I thought were just fine. With that in mind most of the Griffon set will go into the spares box and IMO is not worth the money for use on the Dragon halftracks.

Here I have mounted the body side panels from step 9 but give you a look into the cab. The dashboard and seats are left out for ease of painting.

Continuing to step 9, I assembled the body panels and front end of the cab section. The kit PE though small is nice. You can see the grilles for the headlights and the shields for the viewing porthole in the armored windshield.  Fit was good but does require some rubber bands and clamps to keep it in place while gluing


The front grill is a choice of a completely closed and all styrene molded or open using kit supplied PE slats. It is a bit delicate but looks nice and will allow someone to look in and see the radiator

Now I moved back to the wheels and track section and it was time to charge up the air brush. All the wheels were first given a coat of 50/50 Tamiya Flat Black and NATO Black. Then the old circle template came out and the rims were painted with Poly Scale OD Green.  The shot below shows the road wheels assembled in their dual assembly.

Next, I put the bogie assemblies together and the upper support roller assemblies. I used Alclad Burnt Metal to cover the support rollers and on the drive and idler rollers where they will contact the track. As you can see all the parts are pre painted. I am using this method to allow for better painting of the wheels and tracks as opposed to complete assembly then painting

Lastly was the assembly of the suspension assembly steps 2 and 3. Again using pre painted parts. I also added the Griffon PE kit for the halftrack suspension. This kit is small and most of the parts are for the “later” halftracks. Since the T19 was an early halftrack the main item used is the exhaust support bracket. I will get another halftrack out of the PE since I used so little here. You can see the assemblies with the few items of PE and some touch up required but essentially complete.


I also put a base coat on the frame assembly. First an undercoat of Tamiya Flat Black then Poly Scale OD Green. The radiator fins were painted with Alclad Burnt Metal. The brake pads were painted with Alclad Jet Exhaust. The boot on the steering shaft was painted with my 50/50 Black mix. The exhaust was painted with Poly Scale Rust and then spot sheeted using Winston Oils Burnt Sienna. Here is theframe at this point.

That’s it for now. Next will be the tracks and mounting the suspension and wheels to the frame

As always thanks for stopping by. Your comments good or bad are always appreciated.

Rounds Complete!!


"The Moral High Ground....A Great Place to Emplace Artillery."

  • Member since
    December 2006
  • From: N. Georgia
Posted by Jester75 on Sunday, November 7, 2010 9:52 PM

Links arent working for me Mike

Eric


  • Member since
    July 2006
  • From: New Jersey
Posted by redleg12 on Sunday, November 7, 2010 9:58 PM

OOPS......fixed

Rounds Complete!!

"The Moral High Ground....A Great Place to Emplace Artillery."

  • Member since
    December 2006
  • From: N. Georgia
Posted by Jester75 on Sunday, November 7, 2010 10:01 PM

Working now and wow, nice progress!! Those bogey assemblies look soo fragile on US halftracks to me.

Eric


  • Member since
    July 2006
  • From: New Jersey
Posted by redleg12 on Sunday, November 7, 2010 10:19 PM

Jester - Thanks for stopping in and for the catch on the photos. In 1/35 those bogies are pretty fiddly.....I will admit the Dragon kit does a good job with them!

Rounds Complete!!

"The Moral High Ground....A Great Place to Emplace Artillery."

  • Member since
    May 2007
  • From: Taxachusetts
Posted by camokid on Monday, November 8, 2010 12:03 AM

Very nice progress Mike, I really like the looks of things so far.  There's a lot of PE work there. Yes


Just a note for the next one you do, as it's probably tough to get in there now. It looks like you have the bogie tire rubber painted on the inside surface, the inside of those bogie wheels should be OD or even better yet, worn steel like you've painted the sprocket surface.

If you look carefully at the kit parts, Dragon do have the demarcation line where the tire and rim meet, the rim wraps up to about the tire face in order to ride on the steel track guides down the center of the track.


I'm not trying to take anything away from your work, Just some food for thought for a detail oriented guy like yourself. This is one of those small details that may never be seen depending on how much weathering you do, or it could be one of those details that jump out at you at a show when they break out those little flashlights. Wink


As for the bogie assemblies being fragile, they certainly are a bit but once you've done a few you get used to them. I even assemble them and disassemble them for painting/weathering throughout the build process.


Ken

Build how you like, like how you build


  • Member since
    July 2003
  • From: On my kitchen counter top somewhere in central North Carolina.
Posted by disastermaster on Monday, November 8, 2010 1:07 AM

'Ya got my attention up Mike.

http://img.photobucket.com/albums/v445/iftk2/07/79963644.jpg

http://i20.photobucket.com/albums/b232/gluetank/Decorated%20images/th_T1-4-copy.jpg

 https://i.imgur.com/LjRRaV1.png


  • Member since
    August 2003
  • From: Connecticut, USA
Posted by Nachtflieger on Monday, November 8, 2010 3:29 AM

Making real good progress on this one Mike!

Nate


  • Member since
    July 2006
  • From: New Jersey
Posted by redleg12 on Monday, November 8, 2010 5:30 AM

Ken - OK....it may not be easy but I think it is doable....I will give it a go...Thanks for the tip. The video is great, I was thinking through how to get the track on...that was great help. Thanks

Steve - Hummm, as long as we are not looking for winter nuts.....he is welcome!!

Thanks for stopping in!

Nate - Thanks for stopping by and the comments.

Rounds Complete!!

"The Moral High Ground....A Great Place to Emplace Artillery."

  • Member since
    August 2008
  • From: S.W. Missouri
Posted by Pvt Mutt on Monday, November 8, 2010 10:41 AM

So Mike you think I should save my money when it comes to the PE?

Tony LeeSmile

Shoot Low Boys They're Ridin Ponys

  • Member since
    July 2006
  • From: New Jersey
Posted by redleg12 on Monday, November 8, 2010 11:56 AM

Tony - Well....I try not to. The older kit benifit more from PE than the newer kits...IMO

Rounds Complete!!

"The Moral High Ground....A Great Place to Emplace Artillery."

  • Member since
    July 2004
  • From: Texas
Posted by wbill76 on Tuesday, November 9, 2010 2:27 PM

Nice work on the interior details and the suspension Mike. I hear you about the Griffon PE sets...sometimes they fall into the trap of "kitchen sink" sets in terms of what they create for the DML kits and the end result is that some of the sets are over-stuffed with things that don't truly need to be there per se. Wink

  • Member since
    July 2006
  • From: New Jersey
Posted by redleg12 on Tuesday, November 9, 2010 11:35 PM

Bill- Thanks for stopping by. I normally stay away from the "super" kit PEs but I figured I would give it a shot Crying.....Won't do that again!!!....Lots of metal in a drawer

Thanks for stopping by. I know time is short for you these days so it is really appreciated....

Rounds Complete!!

"The Moral High Ground....A Great Place to Emplace Artillery."

  • Member since
    June 2005
  • From: Massachusetts
Posted by minimortar on Wednesday, November 10, 2010 7:21 AM

Sorry Mike... no words to describe this latest project of yours... I can only drool...

Thanks,
Kevin Keefe

Mortars in Miniature
A Scale Model (Plus!) Collection of the Infantryman's Artillery

  • Member since
    April 2005
  • From: Piscataway, NJ!
Posted by wing_nut on Wednesday, November 10, 2010 8:46 AM

Mike, great work.  You always manage to remind me of the next upcoming show.  I just thought to myself, " OH baby, can't wait to see that at M-Con."


Kevin, great pic.  Wait 'til he realizes he will look like that again in 80 years.  that will wipe the smile right off his face.

Marc  

  • Member since
    July 2006
  • From: New Jersey
Posted by redleg12 on Wednesday, November 10, 2010 9:03 AM

Kevin - LMAO......yep..the Mrs. does call me drooly somtimes Stick out tongue   Thanks for stopping by, always love your comments

Marc - Thanks....now as far as shows....MCon is a question I will be leaving for AMPS Internation the Tues the following week!!!! Sorry Crying

Rounds Complete!! 

"The Moral High Ground....A Great Place to Emplace Artillery."

  • Member since
    July 2006
  • From: New Jersey
Posted by redleg12 on Sunday, November 28, 2010 9:20 PM

Well…it has been a few weeks. Work is killing my bench time and finally the big bird day came. After all the festivities, I was finally able to get some time in the studio.

With the frame painted and the wheels and tracks painted, it was time to finish up the drive train. The bogie mount was assembled and mounted, minus the bogies. The idler was glued on. The track halves were assembled. Then the drive wheel was glued into position within the tracks. Now the tracks are worked into place over the idler and carefully pulled until the drive wheel is in position and can be pushed onto the axel. Repeat for the other side and then mount the front tires

Hummm….daughter use camera……changed white balance…..excuse the color!!

Afterward the bogie sets were mounted. Fixed up the bogies on the inside by using Dark Sienna oil, dry brushed for that rusty rim look. The metal center teeth of the track were painted with Alclad Burnt Metal. After drying, then dry brushed with some Dark Sienna. As some pre-weathering to get at some of the hard to get areas, I used MIG Grey for Green wash to give that some what sandy look. It is visible on the tracks

Moving on the cargo section was primed and painted with OD. I will have the model in position with the rear door open. Here is the cargo section mounted to the frame.

Also primed and painted the cab section

Most of the remaining assembly is around the howitzer and details. I worked on the cab dashboard. There are no decals for the dash and the PE set was…..IMO….a waste of time so after base coating with OD, I hand painted the white gauges with black or red insides. The placards are Archer transfers. The shifter knobs and horn on the steering wheel is black marker. The fire extinguisher is Tamiya Flat Red and Alclad Brushed Aluminum for the handle.  Seats still have to be mounted.

Besides what is shown, I accomplished painting many of the howitzer assemblies which will be used later. Also began work on some of the other details like the Gerry cans, tools, etc.

Next up will be to finish the seats and get the cab mounted….then work the details until it is time for the howitzer.

As always thanks for stopping by. Your comments good or bad are always appreciated.

Rounds Complete!!

"The Moral High Ground....A Great Place to Emplace Artillery."

  • Member since
    October 2009
  • From: South Carolina
Posted by jetmodeler on Monday, November 29, 2010 6:40 AM

Its good to see some progress on this one. I like the pre-weathering in the tracks.

I'm actually hoping to get this kit for x-mas.


  • Member since
    May 2007
  • From: Taxachusetts
Posted by camokid on Monday, November 29, 2010 8:33 AM

Looking good so far Mike. I'm really waiting on seeing that weapon all done up and pictures posted. I use Archers dash transfer set for the gauges as I can't paint stuff that small, especially with all of those shifters and the steering wheel in the way.

RE: the rusting on the track surface though, the only exposed steel on the tracks was on the inside where it met with the sprocket teeth and inner surface of the road wheel, the rest of the tracks were completely covered in vulcanized rubber. You might want to paint over that?


Good to see some progress but don't take too long to post that boom stick. Cool

Ken

Build how you like, like how you build


  • Member since
    July 2006
  • From: New Jersey
Posted by redleg12 on Monday, November 29, 2010 12:12 PM

Jetmodeler - Thanks, you will enjoy the kit!! Thanks for stopping in

Ken - You are keeping me honest on these half tracks. I had see some tracks where you could see some rust/metal in the mid section......but it could be bad karma.....

The good thing is it is an easy fix!!

Now.....as for the gun.....as soon as I can finish and finalize the basic half track assembly, next up is the 105....soon...very soon

Thanks for all your help with this one. The video on mounting the tracks is great. Using that method allows the finishing as seperate assemblies and make painting soooooo much eaiser for the track/road wheels

Rounds Complete!!

"The Moral High Ground....A Great Place to Emplace Artillery."

  • Member since
    August 2008
  • From: S.W. Missouri
Posted by Pvt Mutt on Monday, November 29, 2010 12:49 PM

Stay Frosty Mike maybe he'll get a short in his bionic eye.Black Eye

Tony LeeBig Smile

Shoot Low Boys They're Ridin Ponys

  • Member since
    May 2007
  • From: Taxachusetts
Posted by camokid on Monday, November 29, 2010 2:50 PM

redleg12

Ken - You are keeping me honest on these half tracks. I had see some tracks where you could see some rust/metal in the mid section......but it could be bad karma.....

Mom always said honesty was the best policy.

Besides, I'm quite certain you'd offer the same guidance on an artillery piece wouldn't you? Oh wait, you already have in response to some email questions a few times.

Wink


As for seeing the metal in the center section, it's fairly common on 60+ year old museum pieces, or junks sitting around and such to see the rubber breaking down and chipping off but during the vehicles relatively short lifespan it would be pretty odd to see and fairly troublesome in the eyes of the crew I would think.


Ken

Build how you like, like how you build


  • Member since
    July 2004
  • From: Texas
Posted by wbill76 on Monday, November 29, 2010 4:47 PM

Moving along nicely after the Turkey Day interruptions Mike, looking good! Beer

  • Member since
    April 2009
  • From: Carmel, IN
Posted by deafpanzer on Monday, November 29, 2010 5:40 PM

Looking real good Mike!  I have been following you with interest because I have similar DML kit in the stash... thanks for doing this!

Andy

  • Member since
    July 2006
  • From: New Jersey
Posted by redleg12 on Monday, November 29, 2010 7:47 PM

Tony - Now, I feel honored to have Ken give his tips.......as I try to give mine when in the back of the breech block!! Wink Always a pleasure to have you stop in!!

Ken - Ahhhh.....thats what I remember.....nice and ugly.....even the metal on the inside of the bogie's was clean on your original photo. I am contemplating a fix.......maybe some rubber/some metal as the sand in the desert would wear the rubber Cool. Thanks for all the help

Bill - Yep....looking forward to knocking the Stuffing out of this one soon!!

Andy - Thanks. I am glad this will be of help to you....especially some of the tips from Ken.

Rounds Complete!!


"The Moral High Ground....A Great Place to Emplace Artillery."

  • Member since
    August 2008
  • From: S.W. Missouri
Posted by Pvt Mutt on Monday, November 29, 2010 8:37 PM

Mike, Kenny has been my bosom buddy since the first day of my modeling career. He helps to keep me pumped up and in return I keep his feet on the ground when he ain't working on a roof.Wink

He ain't heavy he's my brother

Tony LeeSmile

Shoot Low Boys They're Ridin Ponys

  • Member since
    June 2005
  • From: Massachusetts
Posted by minimortar on Tuesday, November 30, 2010 9:33 AM

Looks great Mike. I've always liked this combo but can't figure out if it's because of the vehicle or because of the weapon itself. Both are classics. Watching your progress on this for sure!

Thanks,
Kevin Keefe

Mortars in Miniature
A Scale Model (Plus!) Collection of the Infantryman's Artillery

  • Member since
    April 2009
  • From: Carmel, IN
Posted by deafpanzer on Tuesday, November 30, 2010 10:58 AM

Mike, I agree about those great tips from Ken.  I hope he will be around to help me when I build mine! Big Smile  Looking forward to your next update... Yes

Andy

  • Member since
    October 2007
  • From: N.H.
Posted by panzerguy on Tuesday, November 30, 2010 2:36 PM

 Mike it's been a little while for me but I had to stop in and see whats up around here. Apparently a lot! Lots of new names and tons of stuff to get caught up on. Of course I had to make this my first stop thoughWink 

  This ones taking shape nicely. The feed back from Ken is really helping our do this one justice.

  One thing about pe sets I've learned you never use all of it. I'm lucky if I use 2/3rds of one and I've never used a whole set. Also some times the molded detail looks better than the pe part.

  Now I think I'll wander around and catch up on thingsBeer

"Happiness is a belt fed weapon"

  • Member since
    April 2005
  • From: Piscataway, NJ!
Posted by wing_nut on Tuesday, November 30, 2010 6:10 PM

I see you and I are on a similar pace these days.  Hard to be believe I did 21 or 22 models a few years ago.

But progress is progress and yours is good.

Marc  

  • Member since
    January 2007
Posted by the doog on Tuesday, November 30, 2010 6:44 PM

Hey Mike, looking good so far, but you know that i have to tell you to put some weathering in that cab there--some burnished steel on the shift levers where they'd wear and some wear and chipping on the cab floor followed by a layer of dirt or old mud. These guys didn't exactly clean their boots when hopping in and out!

Make the cab look "loved in" Mike! Wink

EDIT--OOPS! I mean "LIVED" in--ha ha hahaha! What the hell was I thinking?!  Left HugKissRight Hug........Whistling

  • Member since
    July 2006
  • From: New Jersey
Posted by redleg12 on Tuesday, November 30, 2010 7:48 PM

Kevin - Thanks.....at our age we love the classics!!Wink

Andy - Glad you are enjoying this. I'm sure Ken will lend a helping hand.

Steve - Thanks. As far as PE, I agree....why replace perfectly good looking molded parts. I have basically stopped buying PE. The only thing I seem to use is tie downs and headlight protectors. Someone highly recommended these sets for the half track. Nice.....but frankly a waste!! Live and learn

Glad to see you around these parts. Hopefully see some fire missions from your way soon!!

Marc - This year has been hard but the past few months have been off the chart NUTS. This build sloowwedd wayyyyyyy downnnnnnn. Hopefully I can make a rebound and finish during the xmas holiday.

Soooo many kits sooo little time

Karl - Always a pleasure. I think of building this way. I am still in the "factory" mode. this is what it looks like coming off the line. My intent is to desert weather as these were used mostly in the North Africa battles. The soft lead is ready....the bottle of graphite on the table.....sand and dust pigments ready......there won't be any green on the high spots of the diamond plate......

Yep...well won't have the wash rack look....nice and dusty...that's the plan

Thanks guys....I appreciate you all dropping by

Rounds Complete!!

"The Moral High Ground....A Great Place to Emplace Artillery."

  • Member since
    July 2006
  • From: New Jersey
Posted by redleg12 on Sunday, December 12, 2010 9:38 PM

Well here is the latest update…

First I sprayed the underside with Tamiya Buff at a distance to create a dusty sandy look to the underside

Here is the underside of the cargo compartment with the Buff dusting

After the dusting, I did some color modulation using Tamiya OD as the darker shade and hit all the high and shadowed areas.  Once the initial modulation was complete, I created stencils using painters tape and Lion Roar Star stencils. I use the PE to size and assist in cutting out the stars from the tape. Then I apply the tape to the model to use for painting.  The stars are painted with 4 light coats of Tamiya Flat White.

With everything dry I assembled the cargo compartment, cab and grille to the frame. The seam between the cab and the cargo compartment required some work to fill some gaps. The fit was not the greatest and even with sanding and working it I still needed filling.  I very cautiously applied some Mr. Surfacer 500 to fill in. With an overnight dry and some carful sanding, I touched up with Tamiya OD since this was a high spot which received the darker shade. Here is the completed assembly.

 Here is a front view

While I had the Buff in the air brush, I also “dusted” the interior floors of the cab and the cargo compartment and gave them an initial rub with a pencil for ware on the diamond plate. You can also see the cab with the seats mounted. Cushions were painted Tamiya Khaki.

Ok next up is mounting the howitzer

As always thanks for stopping by. Your comments good or bad are always appreciated.

Rounds Complete!!

"The Moral High Ground....A Great Place to Emplace Artillery."

  • Member since
    October 2009
  • From: South Carolina
Posted by jetmodeler on Monday, December 13, 2010 6:10 AM

Looking good.Yes I like the color modulation.

Can't wait to see the Howitzer setting in it.Big Smile


  • Member since
    July 2006
  • From: New Jersey
Posted by redleg12 on Monday, December 13, 2010 6:19 AM

Jetmodeler - Thanks for stopping by and for the comments

Rounds Complete!!

"The Moral High Ground....A Great Place to Emplace Artillery."

  • Member since
    April 2005
  • From: Piscataway, NJ!
Posted by wing_nut on Monday, December 13, 2010 6:31 AM

Again i am amazed at what you can do with green.Stick out tongue   You do know there are 16 million colors.. right? Whistling 

Looks nice Mike.

Marc  

  • Member since
    July 2006
  • From: New Jersey
Posted by redleg12 on Monday, December 13, 2010 6:44 AM

Marc - Thanks....yep, I know.....see, here is my color chart

Pictures Of Shades Of Green

Plenty of colors....Big Smile

Rounds Complete!!

"The Moral High Ground....A Great Place to Emplace Artillery."

  • Member since
    July 2004
  • From: Texas
Posted by wbill76 on Monday, December 13, 2010 10:13 AM

Moving along nicely with this one Mike, looking forward to seeing it with the gun mounted. Beer

  • Member since
    July 2006
  • From: New Jersey
Posted by redleg12 on Monday, December 13, 2010 10:28 AM

Bill - Thanks.....meeeeee toooo.....working on it now. Next update should have it......need to get around the clubhouse trun and head for home with this one.

Rounds Complete!! 

"The Moral High Ground....A Great Place to Emplace Artillery."

  • Member since
    August 2008
  • From: S.W. Missouri
Posted by Pvt Mutt on Monday, December 13, 2010 11:55 AM

Oh yes the shading is going to work out nicely with the weathering process.Yes

Tony LeeSmile

Shoot Low Boys They're Ridin Ponys

  • Member since
    January 2007
Posted by the doog on Monday, December 13, 2010 12:53 PM

Mike, Love it, love it, LOVE it!

The shading looks perfect. 

 Is the the first time you've done the shading/modulation thing? It really looks good in raw form right now.

I'm really looking forward to see how you weather it!

  • Member since
    July 2003
  • From: On my kitchen counter top somewhere in central North Carolina.
Posted by disastermaster on Monday, December 13, 2010 2:04 PM

redleg12

Marc - Thanks....yep, I know.....see, here is my color chart

http://www.cross-stitch-centre.co.uk/acatalog/d-stranded3.jpg

Plenty of colors....Big Smile

Rounds Complete!!

You mean you don't have the other 15,999,896 ?

http://i20.photobucket.com/albums/b232/gluetank/Decorated%20images/th_T1-4-copy.jpg

 https://i.imgur.com/LjRRaV1.png


  • Member since
    June 2005
  • From: Massachusetts
Posted by minimortar on Monday, December 13, 2010 6:19 PM

...diggin' it!

Thanks,
Kevin Keefe

Mortars in Miniature
A Scale Model (Plus!) Collection of the Infantryman's Artillery

  • Member since
    July 2006
  • From: New Jersey
Posted by redleg12 on Monday, December 13, 2010 7:10 PM

Tony - thanks....soon as I mount the weapon and a few details the weathering will be up next.....ahhh the pressure of waiting  Indifferent

Karl - Not really....the first time was on my M40. Though I like the way it turned out I was a bit more cautious. This time as you can see I went for a bit more contrast in the raw state. The second time you are always a bit more comfortable. As I told Tony after finishing up mounting items, I will begin the blending with some dots!!!   Glad you like it....you know I am normally not the artistic type but OD does need a bit of zest added!!  Wink   Thanks

Steve - Well the only other colors are white, black, sand, brown and primer!!! (OK....that takes care of camo, NATO, winter and desert)....Yep thats it!!! Big Smile. Hey.....if nothing else, I am consistant!!  Thanks again

Kevin - Yep...lol......thanks for stopping by and putting a smile on my face Big Smile

Rounds Complete!!

"The Moral High Ground....A Great Place to Emplace Artillery."

  • Member since
    December 2002
  • From: Valrico, FL
Posted by HeavyArty on Monday, December 13, 2010 7:14 PM

She's coming along great Mike.  Another winner as usual.

Gino P. Quintiliani - Field Artillery - The KING of BATTLE!!!

Check out my Gallery: https://app.photobucket.com/u/HeavyArty

"People sleep peaceably in their beds at night only because rough men stand ready to do violence on their behalf." -- George Orwell

  • Member since
    July 2006
  • From: New Jersey
Posted by redleg12 on Tuesday, December 14, 2010 5:42 AM

Gino - Thanks for stopping by....always a pleasure

Rounds Complete!!

"The Moral High Ground....A Great Place to Emplace Artillery."

  • Member since
    October 2009
Posted by PANZERWAFFE on Tuesday, December 14, 2010 9:16 PM

Great job on the green shades.  She's looking very nice cant wait for the 105 to be droped inYes

Rob

Rob

  • Member since
    July 2006
  • From: New Jersey
Posted by redleg12 on Wednesday, December 15, 2010 5:38 AM

Rob - Thanks for stopping in and the comments are appreciated.

Rounds Complete!!

"The Moral High Ground....A Great Place to Emplace Artillery."

  • Member since
    January 2005
  • From: in the tank factory in my basement
Posted by biffa on Wednesday, December 15, 2010 3:50 PM

Glad i caught this one Mike i have a couple of the HT's in the pile and almost pulled one out this time but it got nudged out by a flak panzer but im seriously planning it for my next build, yours is coming along great i will be following from here.


Ron g.
  • Member since
    July 2006
  • From: New Jersey
Posted by redleg12 on Wednesday, December 15, 2010 7:59 PM

Ron - First let me say it is great to see you back. I hope, now that things are better for you that you can again find your passion which in the past has inspired many here. You were deeply missed and had the "old" gang worried. It is great to see your smiling face with you beautiful wife again in the avatar spot.

Next, thanks, a complement from you is golden. Thanks for stopping in. You are always welcome!

Rounds Complete!! 

"The Moral High Ground....A Great Place to Emplace Artillery."

  • Member since
    May 2005
  • From: Dublin Rep Of Ireland
Posted by terry35 on Saturday, December 18, 2010 5:54 PM

Excellent work there Mike.

Merry Christmas to you and your Family.


Terry.

  • Member since
    July 2006
  • From: New Jersey
Posted by redleg12 on Sunday, December 19, 2010 7:08 AM

Terry - Thanks, always great to hear from you.

Rounds Complete!!

"The Moral High Ground....A Great Place to Emplace Artillery."

  • Member since
    July 2006
  • From: New Jersey
Posted by redleg12 on Sunday, December 19, 2010 10:08 PM

I was able to get in some work this weekend. First I airbrushed the model with future to prepare for decals and washes. After the future dried I applied the US flag decal and decided to go with the 3ID in Morocco marking pattern. Once the decals were set, I applied another coat of future to seal the decals.

Before setting the weapon I wanted to get the interior filter done with the weapon out of the way. While filtering, I also completed the outside filters. I used MIG Grey for Green filter. Using vertical strokes and cleaning up with a damp mineral sprits brush. This gave a nice sandy dust effect with nice dust buildup on the details.


Besides the filter on the interior wall, the floor received two coats and then the I rubbed the diamond plate with pencil for ware marks. The two flat plates in the forward end of the compartment are the weapon lower mounting brackets.

With the weapon assembled, it was time. The breech is painted with Alclad Steel, the block, and rails with Alclad Brushed Aluminum. The elevating and traversing gears are also dry brushed with Alclad Brushed Aluminum.

During all this drying and waiting I have been working on all the other little details. I also loaded 4 jerry cans. The kit supplied cans were incorrect with the wrong caps and lacked detail. I substituted 4 from a Tamiya jerry can set. These were painted with Polyscale Tactical Dark Green. The corners and top were rubbed with pencil for scratches. I used Floquil Bright Oil to simulate leakage on the cans and a bit onto the bed.

This is also a good view of the weapon

Next I have to mount the shield and fire control sights and finish filters then on the weapon. That’s it for now.

As always thanks for stopping by. Your comments good or bad are always appreciated. Merry Xmas….next update after a trip to the North Pole!!

Rounds Complete!!

"The Moral High Ground....A Great Place to Emplace Artillery."

  • Member since
    April 2009
  • From: Carmel, IN
Posted by deafpanzer on Sunday, December 19, 2010 10:34 PM

Wow It has been fun watching your WIP... who wants to sit next to jerry cans unless it is just for water?  They sure wanted to let everybody know they are Americans with the flag painted painted that big!  You are almost there... Yes

Andy

  • Member since
    January 2007
Posted by the doog on Sunday, December 19, 2010 10:49 PM

That looks really good, Mike! The interior rocks; the weathering is well-presented. I'm diggin' it! Yes

  • Member since
    February 2010
  • From: Berkeley CA/St. Paul MN
Posted by EBergerud on Sunday, December 19, 2010 11:41 PM

Keep building: I've got the same kit which arrived yesterday (along with the Dragon El Alamein Sherman and a Zvezda T-34). Make all likely mistakes please and point them out. And all advise on keeping olive drab more interesting than olive drab is appreciated.

Do have to quibble here. I think the jeep lived on a little longer than 1945. And thanks to the nomenclature used in late WWII and after, the B-26 Marauder is often confused with the completely different late war A-26 Invader: they shared nothing but engines. Actually the A-26 was really thought more in terms of a robust A-20 than a medium bomber. At 350 MPH (on a good day) one can see why. Invaders also served for a while with the Forrest Service. My brother used to fly for them and said A-26s were not very good at fire fighting but the pilots loved anything that fast and neat looking. A Forrest Service A-26 shows up in Steven Spielberg's "Always" - a good airplane movie with no plot to get in the way of the story, but a must for Holly Hunter fans. Spielberg must like airplanes - the late scene in Empire of the Sun is incredible.)

Eric


A model boat is much cheaper than a real one and won't sink with you in it.

  • Member since
    July 2006
  • From: New Jersey
Posted by redleg12 on Monday, December 20, 2010 5:30 AM

Andy - Thanks, believe it or not there is a photo in Hunnicut of the 3ID with these big flags on their HTs. As for sitting next to "gas cans"....after being around a group of guys who have not fully showered in maybe a month or two....anything smells better!!!

Karl - Thanks, I am glad the floor passes the Karl "used and dirty" test Big Smile. Trying to keep the ball rolling.

Eric - Thanks for stopping by and for the comments.

Rounds Complete!!

"The Moral High Ground....A Great Place to Emplace Artillery."

  • Member since
    April 2005
  • From: Piscataway, NJ!
Posted by wing_nut on Monday, December 20, 2010 7:29 AM

You are up to your usual standards here Mike.  Real nice..  Looks great with the gun.

Marc  

  • Member since
    May 2007
  • From: Taxachusetts
Posted by camokid on Monday, December 20, 2010 10:31 AM

Mike, looks good! Nice to see this coming together. It wont be long now as that light at the end of the tunnel is getting brighter.


As for the large US flag, that would be for Operation Torch. When looking at pictures of US vehicles landing in North Africa, you will see many with these large flags on vehicles. The idea was that the Vichy French still held a grudge against  the British for the destruction of much of the French navy at Mers-el-Kebir but they wouldn't fire on the Americans, who were instructed not to fire unless they were fired upon. By placing these large flags in an obvious manner, they hoped to avoid conflict .


While I agree that the jerry can flip style lids part # G26 or # D8 lack any detail, I wouldn't call them 'wrong'. The flip style top was normally used for water while the twist style was used for fuel. Also, part # D35 flip top style has a bit of the detail that should be there, not sure why Dragon made two styles but if one wanted to portray water cans, those would be accurate.


...and as far as earlier comments about future half track threads, I would be more than glad to help if I can. I can usually sniff out a half track related thread a mile away but occasionally one may slip past me. If anyone ever has questions, feel free to ask. I'm always interested in talking about these things.

Ken

Build how you like, like how you build


  • Member since
    July 2006
  • From: New Jersey
Posted by redleg12 on Monday, December 20, 2010 10:39 AM

Marc - Thanks....everything looks better with the gun in place!!

Ken - Yep.....wanted to have spare fuel cans rather than water. I would assume for a crew they would maybe carry one 5 gallon can of water but fuel is more likely to have the 4 cans. Thanks for the photo.

Also thanks for the great explanation of the flag on the side. Like the look of the flag version.....helps break up the OD!!

Yep....getting near the end....looking at all the little add-ons

Rounds Complete!!

"The Moral High Ground....A Great Place to Emplace Artillery."

  • Member since
    May 2007
  • From: Taxachusetts
Posted by camokid on Monday, December 20, 2010 10:42 AM

redleg12
Also thanks for the great explanation of the flag on the side. Like the look of the flag version.....helps break up the OD!!


Lets just hope it only has 48 stars.


Stick out tongue

Ken

Build how you like, like how you build


  • Member since
    July 2004
  • From: Texas
Posted by wbill76 on Monday, December 20, 2010 12:13 PM

Getting closer and closer to the finish line with this one Mike, love what you're doing with the interior so far and of course adding the gun is a big step towards completion. Merry Christmas and don't pull the lanyard early! Wink

  • Member since
    July 2006
  • From: New Jersey
Posted by redleg12 on Monday, December 20, 2010 4:35 PM

Ken - Hummm..now I have to check!!! Thanks

Bill - Thanks.....never worry....I am always Safe and Ready but always prepared with Misfire Procedures!! Indifferent

May Santa bring you a new lot of ammunition for 2011.....Hopefully the holidays will be like styrene Viagra for your bench time  Wink

Rounds Complete!!

"The Moral High Ground....A Great Place to Emplace Artillery."

  • Member since
    July 2006
  • From: New Jersey
Posted by redleg12 on Sunday, January 2, 2011 12:33 PM

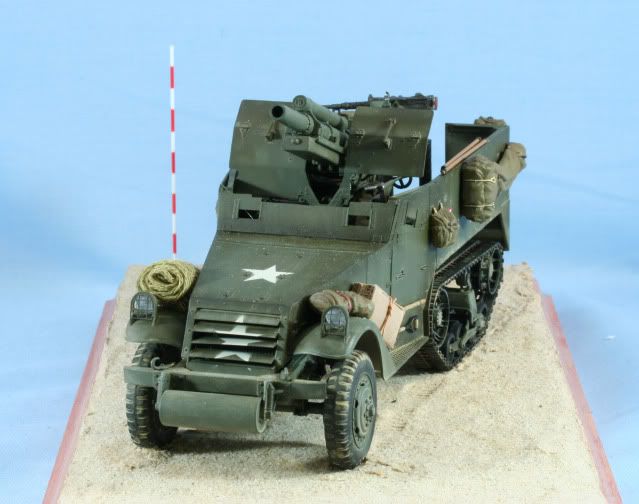
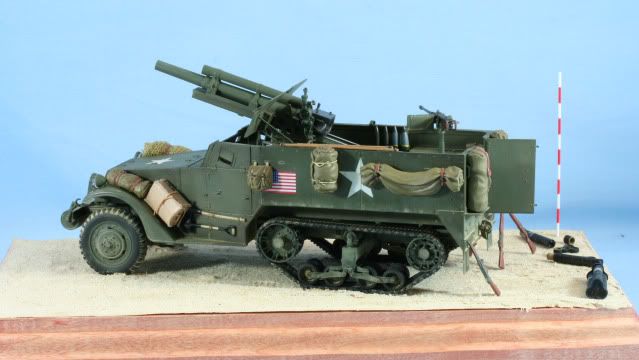
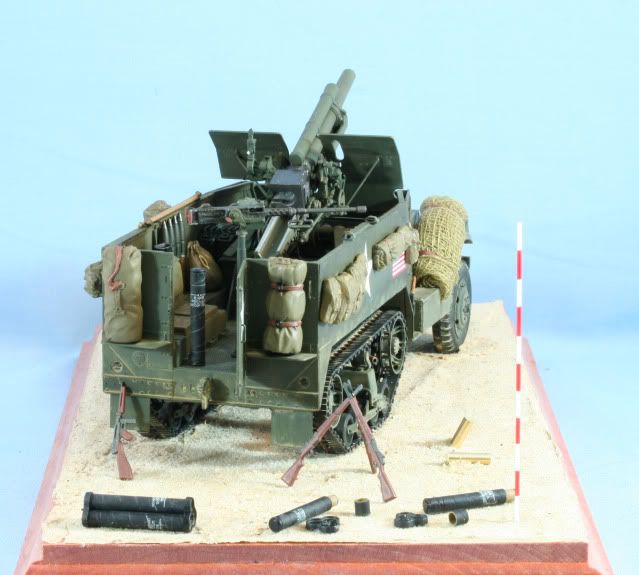
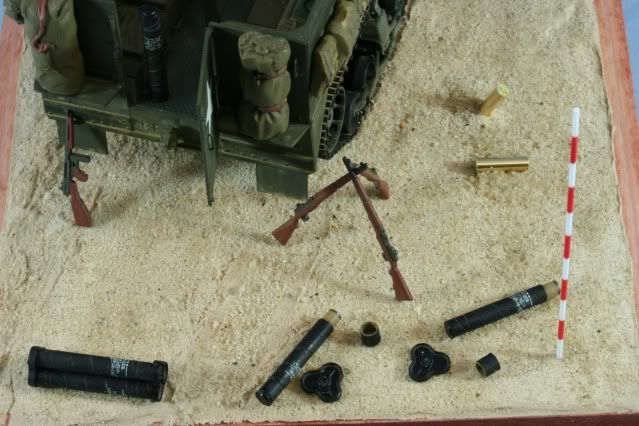
Well, I have returned from the North Pole!! During the vacation I decided to push through and complete the build so I could give a final update.

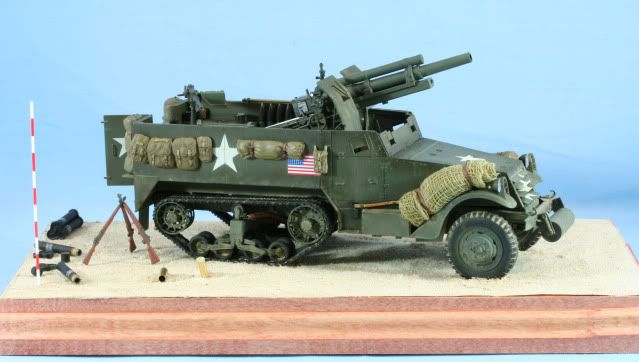
A quick set of bullets to recap all the additions and to get you to the finished photos

·         Gun shield with color modulation same as the rest of the model

·         Panoramic telescope, overall PS Dark Tactical Green with FB knobs and Alclad Aluminum optics

·         Quadrant and elbow telescope, overall PS Dark Tactical Green with FB knobs and Alclad Aluminum optics

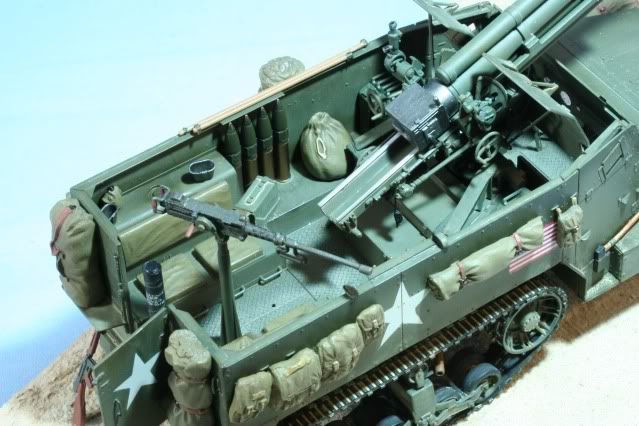
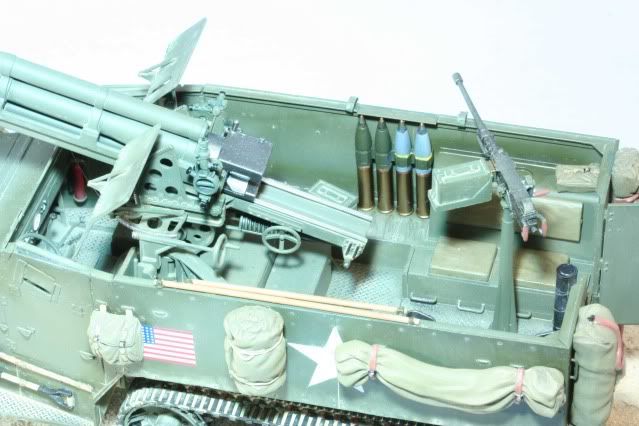
·         M2 .50cal MG, I replaced the kit supplied weapon and mounts with an Academy set which I felt had better detail and mounted better than the kit unit. Painting overall using my parkerized paint mix, ammo box holder, & gun mount PS OD, ammo box PS Dark Tactical Green, .50 cal rounds Alclad Gold and wood handles Vallejo Saddle Brown .

·         The pouches and bed rolls are from both Tamiya and Academy detail sets.  They were painted with Tamiya Khaki, Straps with Tamiya Dark Yellow and Tamiya FB Buckles. Straps were PS US Tan then all were pin washed with MIG Dark wash and Filtered with MIG Grey for Green

·         The camouflage net is gauze soaked in 80/20 Alcohol and Tamiya OD. After drying the net was folded and rolled. The straps are lead strips painted with PS US Tan.

·         C rations box is tied in place with ship rigging string which is painted with Tamiya desert Sand.

·         Spare .50 cal ammo box from Academy painted with PS Dark Tactical Green

·         Ammunition in the racks. Racks are PS OD. HE ammunition is Alclad Gold casings, Tamiya Copper for the rotating band, Tamiya OD for the shell, Alclad Burnt Metal for the fuse and Alclad Gold for the fuse tip. The HC smoke rounds are the same except the shell is Tamiya Light Grey and the marking band is Tamiya Dark Yellow.

·         Canteen is Tamiya Khaki with Tamiya FB cap. Canteen cups are Alclad steel. Both were resin from the parts box.

·         Both gas tank fill caps show spills using Floquil Bright Oil

·         The ammunition fibers are from the AFV Club Ammunition Storage kit. Fibers are painted with Tamiya FB. Open fibers have cardboard internals painted with Tamiya Desert Sand and metal band top using Alclad Steel. Decals are from the kit. Gloss caps and holders using Future.

·         Aiming Stake made from .040 styrene rod. Painted with Tamiya Flat White and Flat Red.

·         Since the aiming stakes are deployed, I replaced the kit supplied clamed stake set with empty clamps made from lead strips and painted with PS OD.

·         Personal weapons from Tamiya weapons set. Wood is painted with Vallejo Saddle Brown and metal parts painted with my parkerized mix.

·         Ramming Staffs are painted with PS US Tan then dry brushed with Burnt Sienna oil. Clamps are done in PS OD.

·         Shell casings are from AFV 105 Howitzer Ammunition Kit. Insides painted with Tamiya NATO Black for the powder burns

·          Overall the model was filtered with MIG Grey for Green. MIG Desert Sand pigment was used to dust the tracks, wheels, under carriage and lower sections of the vehicle.

·         The base is Celluclay colored using a sand color cheap acrylic. After application to the base and while still sticky, I salted with fine mesh sand which gives the color variation and hopefully realistic look.

I think that covers everything to get to the finish line. Here are the finished pictures.
As always thanks for stopping by. Your comments good or bad are always appreciated.

Rounds Complete!!

EOM!

"The Moral High Ground....A Great Place to Emplace Artillery."

  • Member since
    January 2007
Posted by the doog on Sunday, January 2, 2011 12:38 PM

Let me be the first to say "Congrats!" once again, Mike. Another stunner. Your base really looks great, and it's a great way to show off the accessories and to really put them model into context.

Another winner! YesBeerBig Smile

  • Member since
    January 2005
  • From: in the tank factory in my basement
Posted by biffa on Sunday, January 2, 2011 12:50 PM

Excellent Mike you have used more accessories in one build than i have ever used period this is something i am definatly going to work on this year, a beautiful build and great blog Beer happy new year i look forward to more.

Ron g.
  • Member since
    July 2004
  • From: Texas
Posted by wbill76 on Sunday, January 2, 2011 1:18 PM

Nice to see this one cross the threshold for the new year Mike! Congrats on another very thorough build and base artillery combo. Beer

  • Member since
    July 2006
  • From: New Jersey
Posted by redleg12 on Sunday, January 2, 2011 3:42 PM

Karl - WOW...he like the base!! Big Smile LOL....Thanks....I did not want to go hog wild but I thought there was just enough

Ron - Thanks...I love my accessories. It give the feeling of context as Karl stated....looks lived inWink Thanks again

Bill - Thanks....felt like I had to drag this one accross the line. Time to clean up the bench and get a fresh start. Thanks again

Rounds Complete!!

"The Moral High Ground....A Great Place to Emplace Artillery."

  • Member since
    May 2005
  • From: Dublin Rep Of Ireland
Posted by terry35 on Sunday, January 2, 2011 6:58 PM

Congrats Mike she looks superb, excellent work..

Terry.

  • Member since
    March 2005
  • From: Des Moines IA.
Posted by Jeebus on Sunday, January 2, 2011 7:05 PM

Looks real good except for one small but noticable thing, the cocking handle on the MaDeuce is upside downOops

  • Member since
    July 2006
  • From: New Jersey
Posted by redleg12 on Sunday, January 2, 2011 7:26 PM

Terry - Thanks for stopping by and for the comments

Jeebus - You caught me. That is actually handle #2....Handle #1 flew off to the outer limits while mounting the M2. Than #2 gave me a hell of a time......yep.....needs some turning.....it was the last thing fixed prior to the pictures.  I have to give myself an With Stupid...change the "with" to "am"

Thats why I do this.....back to the bench for rotation!! Thanks for picking that up....so far in the woods....where are the trees?

Rounds Complete!!

"The Moral High Ground....A Great Place to Emplace Artillery."

  • Member since
    April 2009
  • From: Carmel, IN
Posted by deafpanzer on Sunday, January 2, 2011 7:33 PM

This has been a great WIP with a great outcome. Yes Two thumbs UP! Yes  I am tempted to buy this kit next time I shop but I promised myself to build few first.  But it is on my wish list for now...  

Looking forward to your next WIP... maybe a Tiger or Panther? Wink

Andy

  • Member since
    July 2006
  • From: New Jersey
Posted by redleg12 on Sunday, January 2, 2011 8:14 PM

Andy - It is a great kit, you will love it when ever you pick it up.

Now as for a Tiger or Panther Surprise.....as big as my stash is, there is not one tank and the only German item is a V-2 missile.....which I will do as the US captured bumper WAC someday Surprise. Strictly US my friend and not a Sheman in the bunch.....Artillery, AFVs and Support Equipment Only.  So much artillery....so little time Wink

Now....Wbill is my alter ego!!

Rounds Complete!!

"The Moral High Ground....A Great Place to Emplace Artillery."

  • Member since
    June 2005
  • From: Massachusetts
Posted by minimortar on Sunday, January 2, 2011 9:40 PM

Another beauty Mike! Love the stowage and the extras and your base works are getting better and better with each new build. Yeah, I saw the charging handle too but that's a minor fix... NO SWEAT!

Keep it up wildman!!!

Thanks,
Kevin Keefe

Mortars in Miniature
A Scale Model (Plus!) Collection of the Infantryman's Artillery

  • Member since
    July 2006
  • From: New Jersey
Posted by redleg12 on Monday, January 3, 2011 6:01 AM

Kevin - LMAO.....I seem to ave a lot of te last line of te certificate.Wink

Thanks old buddy......I will be rotating Surprise.....my handle tonigt!! Always a pleasure to ave you stop in.

Rounds Complete!!

"The Moral High Ground....A Great Place to Emplace Artillery."

  • Member since
    October 2009
  • From: South Carolina
Posted by jetmodeler on Monday, January 3, 2011 6:12 AM

Excellent job Mike.Bow Down

Another top notch build to add to your collection.Toast


  • Member since
    April 2005
  • From: Piscataway, NJ!
Posted by wing_nut on Monday, January 3, 2011 9:36 AM

Hey Mike... We took a family trip out to Lahaska, PA last Thursday.  As we pass Flemington on 202 I swear I heard orders being barked out about deadlines and making sure the stowage was secure and final preparations etc.  Now I know what that was all about.  Another beauty Mike.

Marc  

  • Member since
    August 2008
  • From: S.W. Missouri
Posted by Pvt Mutt on Monday, January 3, 2011 11:48 AM

My Man My ManYes

What a way to start off the New Year.

Tony LeeSmile

Shoot Low Boys They're Ridin Ponys

  • Member since
    May 2007
  • From: Taxachusetts
Posted by camokid on Monday, January 3, 2011 12:50 PM

Great to see this one completed Mike, nice job.

Cool

Ken

Build how you like, like how you build


  • Member since
    July 2006
  • From: New Jersey
Posted by redleg12 on Monday, January 3, 2011 1:51 PM

Jetmodeler - Thanks for stopping by and for the comments

Marc - No, that wasn't me working on the model....It was me keeping the neighbors in line

Thanks for stopping by. Stop by the house anytime...Devil

Tony - Oh how I love my artillery....thanks

Ken - Coming from you....Mr. 1/2 Track, it is appreciated, Thanks

Rounds Complete!!

"The Moral High Ground....A Great Place to Emplace Artillery."

  • Member since
    May 2009
  • From: Poland
Posted by Pawel on Monday, January 3, 2011 4:38 PM

Mike, somehow I ws always too much in a rush recently to track your WIP, but now I took a closer look and I have to tell you I like your build a lot, as usualBig Smile Any idea what's comin' next? Have a happy new year 2011 and good luck with your future projects

Paweł

All comments and critique welcomed. Thanks for your honest opinions!

www.vietnam.net.pl

  • Member since
    April 2005
  • From: Piscataway, NJ!
Posted by wing_nut on Monday, January 3, 2011 6:16 PM

Great pic Mike. Big Smile Hey!  That really is you... isn't it?

Marc  

  • Member since
    July 2006
  • From: New Jersey
Posted by redleg12 on Monday, January 3, 2011 6:52 PM

Pawel - Thanks for stopping in. I know how busy someone can get!!. Tanks for te comments. Originally I was planning an M4 HST with the M115 8 inch howitzer. I also have to do a M108 for a client but also was thinking of a quick build like the M1004 CUCV......I will decide this weekend. For now I need to update some things on my web site.

Marc - Yep...thats me on my M.004 tractor pulling my M.025 lawn howitzer.....I told you I am an artilleryman!!! Indifferent

Works great to keep the neighbors in line Big Smile

Rounds Complete!!

"The Moral High Ground....A Great Place to Emplace Artillery."

  • Member since
    July 2006
  • From: New Jersey
Posted by redleg12 on Monday, January 3, 2011 6:54 PM

Marc....PS, notice the color of the tractor.....plus who else wares camo on their lawn!!

Rounds Complete!!

"The Moral High Ground....A Great Place to Emplace Artillery."

  • Member since
    May 2009
  • From: Poland
Posted by Pawel on Monday, January 3, 2011 7:12 PM

Mike, it's almost strange there's no national star of a largest practicable size pointing to the front of the vehicle on the hood of your tractorBig Smile... Nuthin' worse than out-of-line neighbours around! My neighbours are awright, but once, after a birthday party they chopped down my five robinia trees while drunkDevil. Maybe a little arty support would distract them them... 'Till next time

Paweł

All comments and critique welcomed. Thanks for your honest opinions!

www.vietnam.net.pl

  • Member since
    December 2002
  • From: Valrico, FL
Posted by HeavyArty on Monday, January 3, 2011 9:58 PM

It came out great Mike.  Another masterpiece.  I love the canteen cups.  Where did you get them from?

Gino P. Quintiliani - Field Artillery - The KING of BATTLE!!!

Check out my Gallery: https://app.photobucket.com/u/HeavyArty

"People sleep peaceably in their beds at night only because rough men stand ready to do violence on their behalf." -- George Orwell

  • Member since
    July 2006
  • From: New Jersey
Posted by redleg12 on Tuesday, January 4, 2011 8:31 PM

Gino - Thanks.....the canteen cups are from the parts box but originally from an old Verlinden set.

As always you are welcome to recon!!

Rounds Complete!! 

"The Moral High Ground....A Great Place to Emplace Artillery."

  • Member since
    November 2004
  • From: Essex England
Posted by spacepacker on Wednesday, January 5, 2011 12:09 PM

I'm....well I'm "Gobsmacked"...cheers....Kenny

  • Member since
    July 2006
  • From: New Jersey
Posted by redleg12 on Wednesday, January 5, 2011 6:42 PM

Kenny - "Gobsmacked"....please don't hurt yourself!!!  Surprise  Thanks for stopping by and for te great comment.

Rounds Complete!!!!

"The Moral High Ground....A Great Place to Emplace Artillery."

  • Member since
    December 2006
  • From: N. Georgia
Posted by Jester75 on Thursday, January 6, 2011 10:01 AM

Nicely done Mike! All of your attention to detail with all the extras has really paid off. Nice little base its one too, adds alot to the model.

Eric


  • Member since
    July 2006
  • From: New Jersey
Posted by redleg12 on Thursday, January 6, 2011 2:17 PM

Eric - Thanks for stopping by. I love the little details, it make it look "used". Always like some kind of base....need it to spread out my details.

Thanks again

Rounds Complete!!

"The Moral High Ground....A Great Place to Emplace Artillery."

JOIN OUR COMMUNITY!

Our community is FREE to join. To participate you must either login or register for an account.

SEARCH FORUMS
FREE NEWSLETTER
By signing up you may also receive reader surveys and occasional special offers. We do not sell, rent or trade our email lists. View our Privacy Policy.