SEARCH FINESCALE.COM

Enter keywords or a search phrase below:

1/35 DML T19 105mm HMC, WIP, 01/02/11, Complete

34587 views
150 replies
1 rating 2 rating 3 rating 4 rating 5 rating
  • Member since
    July 2006
  • From: New Jersey
Posted by redleg12 on Tuesday, November 30, 2010 7:48 PM

Kevin - Thanks.....at our age we love the classics!!Wink

Andy - Glad you are enjoying this. I'm sure Ken will lend a helping hand.

Steve - Thanks. As far as PE, I agree....why replace perfectly good looking molded parts. I have basically stopped buying PE. The only thing I seem to use is tie downs and headlight protectors. Someone highly recommended these sets for the half track. Nice.....but frankly a waste!! Live and learn

Glad to see you around these parts. Hopefully see some fire missions from your way soon!!

Marc - This year has been hard but the past few months have been off the chart NUTS. This build sloowwedd wayyyyyyy downnnnnnn. Hopefully I can make a rebound and finish during the xmas holiday.

Soooo many kits sooo little time

Karl - Always a pleasure. I think of building this way. I am still in the "factory" mode. this is what it looks like coming off the line. My intent is to desert weather as these were used mostly in the North Africa battles. The soft lead is ready....the bottle of graphite on the table.....sand and dust pigments ready......there won't be any green on the high spots of the diamond plate......

Yep...well won't have the wash rack look....nice and dusty...that's the plan

Thanks guys....I appreciate you all dropping by

Rounds Complete!!

"The Moral High Ground....A Great Place to Emplace Artillery."

  • Member since
    July 2006
  • From: New Jersey
Posted by redleg12 on Sunday, December 12, 2010 9:38 PM

Well here is the latest update…

First I sprayed the underside with Tamiya Buff at a distance to create a dusty sandy look to the underside

Here is the underside of the cargo compartment with the Buff dusting

After the dusting, I did some color modulation using Tamiya OD as the darker shade and hit all the high and shadowed areas.  Once the initial modulation was complete, I created stencils using painters tape and Lion Roar Star stencils. I use the PE to size and assist in cutting out the stars from the tape. Then I apply the tape to the model to use for painting.  The stars are painted with 4 light coats of Tamiya Flat White.

With everything dry I assembled the cargo compartment, cab and grille to the frame. The seam between the cab and the cargo compartment required some work to fill some gaps. The fit was not the greatest and even with sanding and working it I still needed filling.  I very cautiously applied some Mr. Surfacer 500 to fill in. With an overnight dry and some carful sanding, I touched up with Tamiya OD since this was a high spot which received the darker shade. Here is the completed assembly.

 Here is a front view

While I had the Buff in the air brush, I also “dusted” the interior floors of the cab and the cargo compartment and gave them an initial rub with a pencil for ware on the diamond plate. You can also see the cab with the seats mounted. Cushions were painted Tamiya Khaki.

Ok next up is mounting the howitzer

As always thanks for stopping by. Your comments good or bad are always appreciated.

Rounds Complete!!

"The Moral High Ground....A Great Place to Emplace Artillery."

  • Member since
    October 2009
  • From: South Carolina
Posted by jetmodeler on Monday, December 13, 2010 6:10 AM

Looking good.Yes I like the color modulation.

Can't wait to see the Howitzer setting in it.Big Smile


  • Member since
    July 2006
  • From: New Jersey
Posted by redleg12 on Monday, December 13, 2010 6:19 AM

Jetmodeler - Thanks for stopping by and for the comments

Rounds Complete!!

"The Moral High Ground....A Great Place to Emplace Artillery."

  • Member since
    April 2005
  • From: Piscataway, NJ!
Posted by wing_nut on Monday, December 13, 2010 6:31 AM

Again i am amazed at what you can do with green.Stick out tongue   You do know there are 16 million colors.. right? Whistling 

Looks nice Mike.

Marc  

  • Member since
    July 2006
  • From: New Jersey
Posted by redleg12 on Monday, December 13, 2010 6:44 AM

Marc - Thanks....yep, I know.....see, here is my color chart

Pictures Of Shades Of Green

Plenty of colors....Big Smile

Rounds Complete!!

"The Moral High Ground....A Great Place to Emplace Artillery."

  • Member since
    July 2004
  • From: Texas
Posted by wbill76 on Monday, December 13, 2010 10:13 AM

Moving along nicely with this one Mike, looking forward to seeing it with the gun mounted. Beer

  • Member since
    July 2006
  • From: New Jersey
Posted by redleg12 on Monday, December 13, 2010 10:28 AM

Bill - Thanks.....meeeeee toooo.....working on it now. Next update should have it......need to get around the clubhouse trun and head for home with this one.

Rounds Complete!! 

"The Moral High Ground....A Great Place to Emplace Artillery."

  • Member since
    August 2008
  • From: S.W. Missouri
Posted by Pvt Mutt on Monday, December 13, 2010 11:55 AM

Oh yes the shading is going to work out nicely with the weathering process.Yes

Tony LeeSmile

Shoot Low Boys They're Ridin Ponys

  • Member since
    January 2007
Posted by the doog on Monday, December 13, 2010 12:53 PM

Mike, Love it, love it, LOVE it!

The shading looks perfect. 

 Is the the first time you've done the shading/modulation thing? It really looks good in raw form right now.

I'm really looking forward to see how you weather it!

  • Member since
    July 2003
  • From: On my kitchen counter top somewhere in central North Carolina.
Posted by disastermaster on Monday, December 13, 2010 2:04 PM

redleg12

Marc - Thanks....yep, I know.....see, here is my color chart

http://www.cross-stitch-centre.co.uk/acatalog/d-stranded3.jpg

Plenty of colors....Big Smile

Rounds Complete!!

You mean you don't have the other 15,999,896 ?

http://i20.photobucket.com/albums/b232/gluetank/Decorated%20images/th_T1-4-copy.jpg

 https://i.imgur.com/LjRRaV1.png


  • Member since
    June 2005
  • From: Massachusetts
Posted by minimortar on Monday, December 13, 2010 6:19 PM

...diggin' it!

Thanks,
Kevin Keefe

Mortars in Miniature
A Scale Model (Plus!) Collection of the Infantryman's Artillery

  • Member since
    July 2006
  • From: New Jersey
Posted by redleg12 on Monday, December 13, 2010 7:10 PM

Tony - thanks....soon as I mount the weapon and a few details the weathering will be up next.....ahhh the pressure of waiting  Indifferent

Karl - Not really....the first time was on my M40. Though I like the way it turned out I was a bit more cautious. This time as you can see I went for a bit more contrast in the raw state. The second time you are always a bit more comfortable. As I told Tony after finishing up mounting items, I will begin the blending with some dots!!!   Glad you like it....you know I am normally not the artistic type but OD does need a bit of zest added!!  Wink   Thanks

Steve - Well the only other colors are white, black, sand, brown and primer!!! (OK....that takes care of camo, NATO, winter and desert)....Yep thats it!!! Big Smile. Hey.....if nothing else, I am consistant!!  Thanks again

Kevin - Yep...lol......thanks for stopping by and putting a smile on my face Big Smile

Rounds Complete!!

"The Moral High Ground....A Great Place to Emplace Artillery."

  • Member since
    December 2002
  • From: Valrico, FL
Posted by HeavyArty on Monday, December 13, 2010 7:14 PM

She's coming along great Mike.  Another winner as usual.

Gino P. Quintiliani - Field Artillery - The KING of BATTLE!!!

Check out my Gallery: https://app.photobucket.com/u/HeavyArty

"People sleep peaceably in their beds at night only because rough men stand ready to do violence on their behalf." -- George Orwell

  • Member since
    July 2006
  • From: New Jersey
Posted by redleg12 on Tuesday, December 14, 2010 5:42 AM

Gino - Thanks for stopping by....always a pleasure

Rounds Complete!!

"The Moral High Ground....A Great Place to Emplace Artillery."

  • Member since
    October 2009
Posted by PANZERWAFFE on Tuesday, December 14, 2010 9:16 PM

Great job on the green shades.  She's looking very nice cant wait for the 105 to be droped inYes

Rob

Rob

  • Member since
    July 2006
  • From: New Jersey
Posted by redleg12 on Wednesday, December 15, 2010 5:38 AM

Rob - Thanks for stopping in and the comments are appreciated.

Rounds Complete!!

"The Moral High Ground....A Great Place to Emplace Artillery."

  • Member since
    January 2005
  • From: in the tank factory in my basement
Posted by biffa on Wednesday, December 15, 2010 3:50 PM

Glad i caught this one Mike i have a couple of the HT's in the pile and almost pulled one out this time but it got nudged out by a flak panzer but im seriously planning it for my next build, yours is coming along great i will be following from here.


Ron g.
  • Member since
    July 2006
  • From: New Jersey
Posted by redleg12 on Wednesday, December 15, 2010 7:59 PM

Ron - First let me say it is great to see you back. I hope, now that things are better for you that you can again find your passion which in the past has inspired many here. You were deeply missed and had the "old" gang worried. It is great to see your smiling face with you beautiful wife again in the avatar spot.

Next, thanks, a complement from you is golden. Thanks for stopping in. You are always welcome!

Rounds Complete!! 

"The Moral High Ground....A Great Place to Emplace Artillery."

  • Member since
    May 2005
  • From: Dublin Rep Of Ireland
Posted by terry35 on Saturday, December 18, 2010 5:54 PM

Excellent work there Mike.

Merry Christmas to you and your Family.


Terry.

  • Member since
    July 2006
  • From: New Jersey
Posted by redleg12 on Sunday, December 19, 2010 7:08 AM

Terry - Thanks, always great to hear from you.

Rounds Complete!!

"The Moral High Ground....A Great Place to Emplace Artillery."

  • Member since
    July 2006
  • From: New Jersey
Posted by redleg12 on Sunday, December 19, 2010 10:08 PM

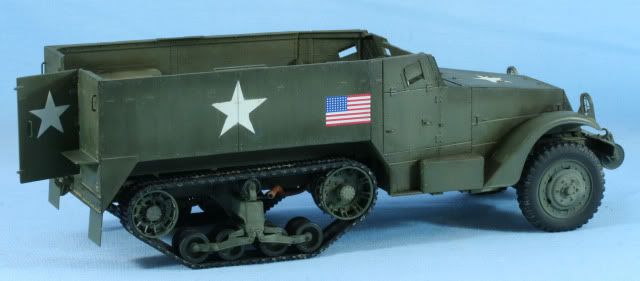
I was able to get in some work this weekend. First I airbrushed the model with future to prepare for decals and washes. After the future dried I applied the US flag decal and decided to go with the 3ID in Morocco marking pattern. Once the decals were set, I applied another coat of future to seal the decals.
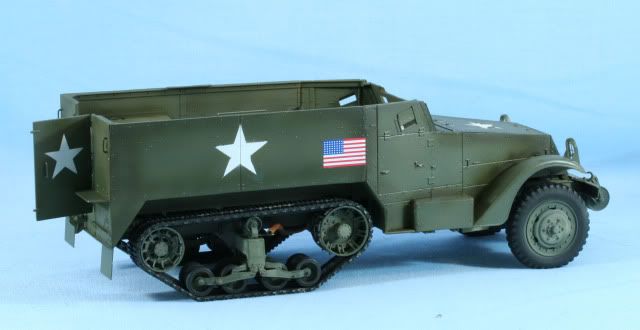
Before setting the weapon I wanted to get the interior filter done with the weapon out of the way. While filtering, I also completed the outside filters. I used MIG Grey for Green filter. Using vertical strokes and cleaning up with a damp mineral sprits brush. This gave a nice sandy dust effect with nice dust buildup on the details.
 

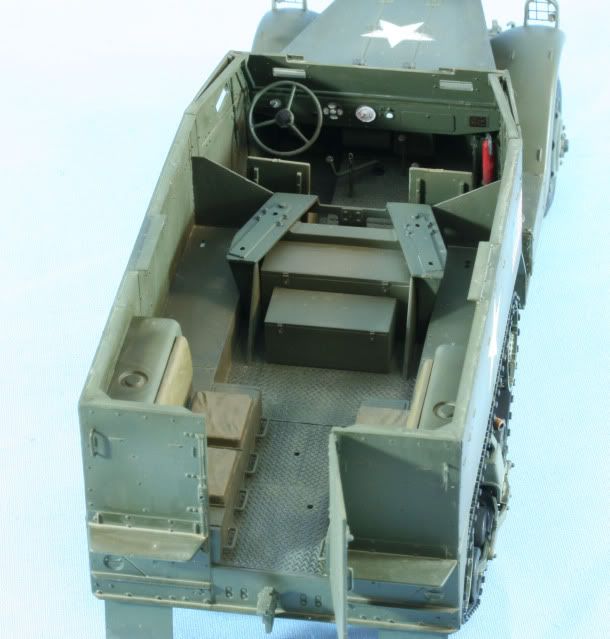
Besides the filter on the interior wall, the floor received two coats and then the I rubbed the diamond plate with pencil for ware marks. The two flat plates in the forward end of the compartment are the weapon lower mounting brackets.
With the weapon assembled, it was time. The breech is painted with Alclad Steel, the block, and rails with Alclad Brushed Aluminum. The elevating and traversing gears are also dry brushed with Alclad Brushed Aluminum.
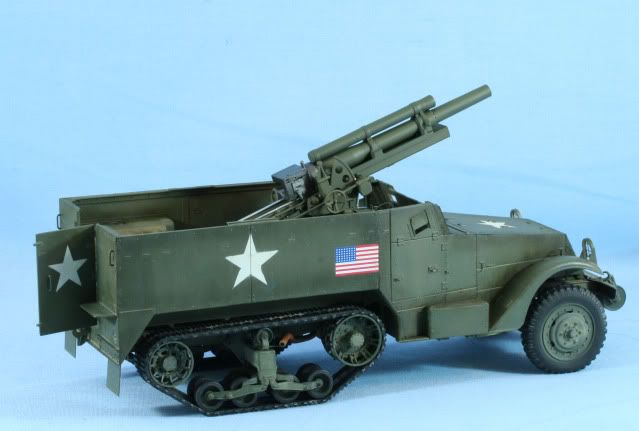
During all this drying and waiting I have been working on all the other little details. I also loaded 4 jerry cans. The kit supplied cans were incorrect with the wrong caps and lacked detail. I substituted 4 from a Tamiya jerry can set. These were painted with Polyscale Tactical Dark Green. The corners and top were rubbed with pencil for scratches. I used Floquil Bright Oil to simulate leakage on the cans and a bit onto the bed.

This is also a good view of the weapon
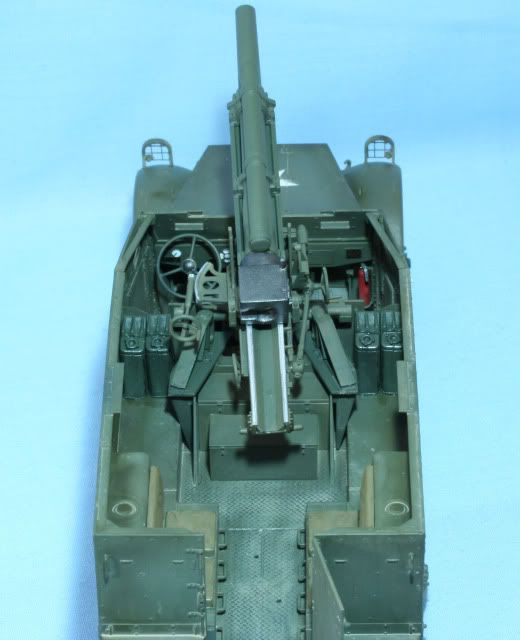
Next I have to mount the shield and fire control sights and finish filters then on the weapon. That’s it for now.

As always thanks for stopping by. Your comments good or bad are always appreciated. Merry Xmas….next update after a trip to the North Pole!!

Rounds Complete!!

"The Moral High Ground....A Great Place to Emplace Artillery."

  • Member since
    April 2009
  • From: Carmel, IN
Posted by deafpanzer on Sunday, December 19, 2010 10:34 PM

Wow It has been fun watching your WIP... who wants to sit next to jerry cans unless it is just for water?  They sure wanted to let everybody know they are Americans with the flag painted painted that big!  You are almost there... Yes

Andy

  • Member since
    January 2007
Posted by the doog on Sunday, December 19, 2010 10:49 PM

That looks really good, Mike! The interior rocks; the weathering is well-presented. I'm diggin' it! Yes

  • Member since
    February 2010
  • From: Berkeley CA/St. Paul MN
Posted by EBergerud on Sunday, December 19, 2010 11:41 PM

Keep building: I've got the same kit which arrived yesterday (along with the Dragon El Alamein Sherman and a Zvezda T-34). Make all likely mistakes please and point them out. And all advise on keeping olive drab more interesting than olive drab is appreciated.

Do have to quibble here. I think the jeep lived on a little longer than 1945. And thanks to the nomenclature used in late WWII and after, the B-26 Marauder is often confused with the completely different late war A-26 Invader: they shared nothing but engines. Actually the A-26 was really thought more in terms of a robust A-20 than a medium bomber. At 350 MPH (on a good day) one can see why. Invaders also served for a while with the Forrest Service. My brother used to fly for them and said A-26s were not very good at fire fighting but the pilots loved anything that fast and neat looking. A Forrest Service A-26 shows up in Steven Spielberg's "Always" - a good airplane movie with no plot to get in the way of the story, but a must for Holly Hunter fans. Spielberg must like airplanes - the late scene in Empire of the Sun is incredible.)

Eric


A model boat is much cheaper than a real one and won't sink with you in it.

  • Member since
    July 2006
  • From: New Jersey
Posted by redleg12 on Monday, December 20, 2010 5:30 AM

Andy - Thanks, believe it or not there is a photo in Hunnicut of the 3ID with these big flags on their HTs. As for sitting next to "gas cans"....after being around a group of guys who have not fully showered in maybe a month or two....anything smells better!!!

Karl - Thanks, I am glad the floor passes the Karl "used and dirty" test Big Smile. Trying to keep the ball rolling.

Eric - Thanks for stopping by and for the comments.

Rounds Complete!!

"The Moral High Ground....A Great Place to Emplace Artillery."

  • Member since
    April 2005
  • From: Piscataway, NJ!
Posted by wing_nut on Monday, December 20, 2010 7:29 AM

You are up to your usual standards here Mike.  Real nice..  Looks great with the gun.

Marc  

  • Member since
    May 2007
  • From: Taxachusetts
Posted by camokid on Monday, December 20, 2010 10:31 AM

Mike, looks good! Nice to see this coming together. It wont be long now as that light at the end of the tunnel is getting brighter.


As for the large US flag, that would be for Operation Torch. When looking at pictures of US vehicles landing in North Africa, you will see many with these large flags on vehicles. The idea was that the Vichy French still held a grudge against  the British for the destruction of much of the French navy at Mers-el-Kebir but they wouldn't fire on the Americans, who were instructed not to fire unless they were fired upon. By placing these large flags in an obvious manner, they hoped to avoid conflict .


While I agree that the jerry can flip style lids part # G26 or # D8 lack any detail, I wouldn't call them 'wrong'. The flip style top was normally used for water while the twist style was used for fuel. Also, part # D35 flip top style has a bit of the detail that should be there, not sure why Dragon made two styles but if one wanted to portray water cans, those would be accurate.


...and as far as earlier comments about future half track threads, I would be more than glad to help if I can. I can usually sniff out a half track related thread a mile away but occasionally one may slip past me. If anyone ever has questions, feel free to ask. I'm always interested in talking about these things.

Ken

Build how you like, like how you build


  • Member since
    July 2006
  • From: New Jersey
Posted by redleg12 on Monday, December 20, 2010 10:39 AM

Marc - Thanks....everything looks better with the gun in place!!

Ken - Yep.....wanted to have spare fuel cans rather than water. I would assume for a crew they would maybe carry one 5 gallon can of water but fuel is more likely to have the 4 cans. Thanks for the photo.

Also thanks for the great explanation of the flag on the side. Like the look of the flag version.....helps break up the OD!!

Yep....getting near the end....looking at all the little add-ons

Rounds Complete!!

"The Moral High Ground....A Great Place to Emplace Artillery."

  • Member since
    May 2007
  • From: Taxachusetts
Posted by camokid on Monday, December 20, 2010 10:42 AM

redleg12
Also thanks for the great explanation of the flag on the side. Like the look of the flag version.....helps break up the OD!!


Lets just hope it only has 48 stars.


Stick out tongue

Ken

Build how you like, like how you build


JOIN OUR COMMUNITY!

Our community is FREE to join. To participate you must either login or register for an account.

SEARCH FORUMS
FREE NEWSLETTER
By signing up you may also receive reader surveys and occasional special offers. We do not sell, rent or trade our email lists. View our Privacy Policy.