SEARCH FINESCALE.COM

Enter keywords or a search phrase below:

T-26 / BT-2 "WIP"

23677 views
88 replies
1 rating 2 rating 3 rating 4 rating 5 rating
  • Member since
    October 2009
Posted by PANZERWAFFE on Monday, January 17, 2011 10:12 PM

F Matthews - Thanks for the help on this one Beer

Andy - Think your right, was worth it in the end.  Glad it is the end of the riveting though.  Now on too better things Stick out tongue

Tigerman - Thank you for the words.

W Bill - Thanks for the help, accuracy is what I was looking for. Beer

Psstoff995's - Thanks for stopping in Big Smile

The goal for today was too lay down a good base coat / foundation for the upcomeing weathering.  Here were the steps taken:

put some pigments on to the primer

spray coat of Braunviolett for a base leaving some of the primer / pigment showing.

mask areas I wanted some of those colors to show through with salt.

After removing the salt this is what she looked like.

Next applied Engine Gray on selected areas.  Here are a few shots.

After all of that, used a cut down stiff brush to scrub and blend the paint togther in selected areas.

Turret is close to this point but still a little more to do to it.  A bit camera happy on this post.  Spent the last two hours trying to adjust the camera in order to take better pictures, hopefully they are.

Thanks too all for stopping in

More to come soon

Rob

Rob

  • Member since
    December 2008
  • From: Northern Va
Posted by psstoff995's lbro on Monday, January 17, 2011 5:27 PM

I believe he "riveted" it...        Big Smile  


great work!

-Will young modeler Test fit master
  • Member since
    July 2004
  • From: Texas
Posted by wbill76 on Monday, January 17, 2011 1:10 PM

Looking good Rob, the revisions you've made will keep it in the realm of accuracy and the primer definitely shows off all the rivet work to good effect. Yes

  • Member since
    March 2003
  • From: Rain USA, Vancouver WA
Posted by tigerman on Monday, January 17, 2011 11:29 AM

Looks marvelous. Love the bolts. Definitely worth the sweat labor.

   http://i7.photobucket.com/albums/y269/wing_nut_5o/PANZERJAGERGB.jpg

 Eric 

  • Member since
    April 2009
  • From: Carmel, IN
Posted by deafpanzer on Monday, January 17, 2011 8:22 AM

WOW!  Now the bolts are more visible after its prime job... it was worth the sweat and blood you put into this little tank. Yes

Andy

  • Member since
    May 2009
Posted by F Matthews on Sunday, January 16, 2011 9:35 PM

U nailed it!

  • Member since
    October 2009
Posted by PANZERWAFFE on Sunday, January 16, 2011 12:08 PM

TigerEP1 - Thanks for the suggestions I used some of them.  In the end did not use the jerry cans.  I do believe they would be picked up by anyone (country) that saw them available but think if so they would just be thrown on somewhere, not a rack made for them.  Cut the axe down and even sharpened it a little.  Sledge is gone.  After looking at it now I do like it more than before.

F Mattews - Once again you have given my great advice and it is much apreceated.  What has been explained above was greatly influenced by W Bill pointing out the problem and you explaining the problem. These mistakes were me going out on a limb and I fell, thanks for helping me get back up.   Also did not know, in your last post, about the jerry cans, very intresting will be helpful in future builds.  Thanks again Big Smile

This is where she's at, primed, all track links have been cleaned and ready, and have one track almost complete you can see it in the background.

Thanks for looking

Rob

Rob

  • Member since
    May 2009
Posted by F Matthews on Sunday, January 16, 2011 11:20 AM

Jerry cans had three bars on the handles, not two.  That was so they could be carried by one person, or two-part of the genius in the design.  The cans you are using don't do your build justice-I think you've done a great job and put a lot of impressive work into it and the 70s-era Tamiya incorrect jerry cans take away from that.  The tool clips are ones that only appeared on German armor and look off.  Removing the "clip" part would improve them a lot I think as would either sourcing newer, better cans (also, the cans in use at the time of Barbarossa when any surviving T-26/BT-2s might have been around) had a straight "X" pattern on them, not the open rectangle with the radiating "X".


As I said before, please don't get me wrong I really like your build a lot!

  • Member since
    January 2011
  • From: Springfield, MA
Posted by TigerEP1 on Thursday, January 13, 2011 11:28 AM

Rob,

I know that Allied tankers would steal/take German jerry cans all the time, they were just a better design and heck they were free..lol

I say keep them but dress them up more or replace with a better molded version.

Keep the axe but as Bock said, keep it sharp.  Lose the sledge, and make a saw like was suggested.


This is of course if you still have your sanity after those tracks!


Looking forward to more!

On the bench:

1/35th Tamiya Willi's MB


  • Member since
    February 2010
  • From: Ontario, Canada
Posted by Bockscar on Wednesday, January 12, 2011 9:14 PM

Lose the axe if you must, pal

but if you keep the axe,

IT MUST BE SHARP!

Pal...

No German xoffficio I ever met went around with a dull axe.

  • Member since
    October 2009
Posted by PANZERWAFFE on Wednesday, January 12, 2011 8:43 PM

SprueOne - Thanks for the words and happy you stopped in.

F.Mattews - Thank you very much for the honest comments.  I was looking for comments such as this to help keep me on track, I need them in order to help me improve.  Have not built many Russian tanks nor do I have a lot of refs on them.  They are the second largest subject in my stash and am intrested in any info I can receive.  I am glad you like it over all and it's good to hear that the rivets are about right, they were my biggest worry.  The tools it sounds as if something will have to be done about them.  No, do not want this to be a captured German tank.  Want it to be Russian.  Can lose the sledge hammer and the axe.  Will cut the handle down or try to make an axe that is correct.  Will have to find a good picture of one.  Would I be able to use the same style bracket or is it completly different for the axe / hatchet?  The shovel might have to stay, had problems making it stay on so I took care of that and now it's really on there Sad  The jerry cans I knew were German but went with the assunption that if you were a Russian tanker and you saw them available you would grab them, I would.  Could try to find some better looking cans or dress these ones up to hopefully make them look better.  Think I have some spare road wheels and maybe will make a saw.  I'll see how that goes and think about how to go about this while cleaning the track links.  Thanks again for the helpful information.

What does everyone think about the fuel cans?  Keep them or los them?

Rob

Rob

  • Member since
    May 2009
Posted by F Matthews on Wednesday, January 12, 2011 4:01 PM

You've done a great job with a kit that needs a good bit of work and it looks great.  I would add a second to the tool issue though-the ones you've added (shovel, sledge and axe) are all distinctly German and the tool retaining clips on the sledge are as well-you'd never see them on a Soviet tank.  The Soviet axes carried on tanks were smaller-more like hand axes.  They didn't carry sledges either.  Typically just an axe, spare wheels, a jack, leaf springs, a shovel and a saw.  Unless you're going to finish this one as a captured German tank, I wouldn't use the jerry cans either.  Unfortunately, those are probably the things that stand out more like a sore thumb than anything else.  The Russians rarely had these and the ones you have are not very well molded, which takes away from what I thought was a stunning build up to that point.

The rivets look fine to me for the most part.  I have tons of material on the T-26 series and have built at least a half dozen from that series between the Polish Vickers and the Russian T-26s both by Zvezda/Italeri and Mirage.

I'm not one to be critical of anything unless someone asks, so I apologize for any perceived negativity in my comments.  I have been following this one since I really like these tanks and you've done a really nice job with this one.

  • Member since
    January 2006
  • From: California
Posted by SprueOne on Tuesday, January 11, 2011 10:46 PM

outrageous detail touches on this model. I'm also about to do the individual track link clean up an prep too soon 


Anyone with a good car don't need to be justified - Hazel Motes


Iron Rails 2015 by Wayne Cassell Weekend Madness sprueone

  • Member since
    October 2009
Posted by PANZERWAFFE on Tuesday, January 11, 2011 8:24 PM

Andy - Glad you like.  The clamps I made by bending .010 x .040" styrene strip with different size pliers, was frustrating at times Bang Head

Bockscar - Forgot to sharpen the axe now have to start over.  Thanks for the good words and for stopping in.  Oh yes, that is an M4A1

3rdLAV and G - Thanks for the great comments.  More is on the way.

Biffa - Thanks much for those great comments.  Now the trick will be the painting / finish.  Have really been watching and looking at your last few builds.  Your style is what I would like to have on this for its finish.  That is what I will TRY for but might be a bit past my skill level, going to try anyway.  Will be refering to your pics quite a bit I you dont mind.

Wild Bill - Always good to hear your input.  When I was making these brackets was not real sure myself if it would be the correct style or not?  End result decided to go with what you see and think I will stay with them.  If you ever find out any differently please would still like to know for any future builds.  Always appreciate the comments.

Tony - Good to hear from you.  Think maybe some of that part time workmanship may have rubbed off on me Surprise  Good question, was waiting for someone to ask.  Of course not sure but by looking at different refs there should be two primary rivet / bolt sizes.  I only used one size which I represented with .020" rod.  Think that is a close match for the majority.  Those actually stood fairly high up from what have seen.  The ones on the glacis plate, engine deck and turret roof look as if they should have been smaller.  Wanted to use .010" rod for these areas but had none nor did the LHS.  Running down the fenders should of had the .010" rod / rivets also but decided to put nothing, thought the .020" rod would look to far out of scale.  Thanks for stopping in, even if it's not an SPG Smile, your suggestions and comments are always helpful.

Will probably be a while before next post.  Next step that is being worked on is cleaning all of the individual links for the tracks.  Time consuming and not to fun, there is a lot to clean.  Here is what they look like.
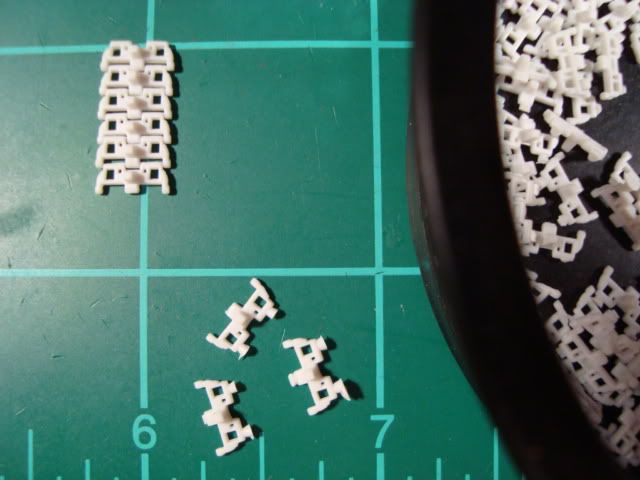
Have a few of them cleaned and the good thing is they fit togther nicely and should make good tracks.  You can see the ones that are finished on the left, dry fitted togther.  Thats it, will post when I have tracks.  Thanks again for everyones comments.

Rob

Rob

  • Member since
    August 2008
  • From: S.W. Missouri
Posted by Pvt Mutt on Tuesday, January 11, 2011 5:41 PM

Hey Rob she looks pretty good for a part time worker.Wink

Just one question because I really don't know. Were the rivets really that proud?

Tony LeeSmile

Shoot Low Boys They're Ridin Ponys

  • Member since
    July 2004
  • From: Texas
Posted by wbill76 on Tuesday, January 11, 2011 4:44 PM

Making good progress with this one Rob! The brackets look sharp, the only thing I'm not too sure about are the style you've chosen for the axe in terms of accuracy...I honestly don't know what type the Russians used on their vehicles and whether or not they resembled the German style of clamps, but that aside they do look good! Beer

  • Member since
    January 2005
  • From: in the tank factory in my basement
Posted by biffa on Monday, January 10, 2011 11:15 PM

brackets look good to me so does everything else in fact better than good that is some awesome scratch work, great job.

Ron g.
  • Member since
    November 2008
Posted by 3rdlav on Monday, January 10, 2011 11:03 PM

Looks great,i can't believe all the rivets.Tongue Tied I don't think i could even attempt such feat.Cant what to see more.

  • Member since
    February 2010
  • From: Ontario, Canada
Posted by Bockscar on Monday, January 10, 2011 9:44 PM

Panzerwaffe:

You could have been a watch maker. I hope you sharpen that axe, though.

Seriously, looks great lad!

Your Avatar has a mean looking Sherman, M4A1, or are my eyes gettin' old?

  • Member since
    April 2009
  • From: Carmel, IN
Posted by deafpanzer on Monday, January 10, 2011 9:40 PM

It looks great. Yes How did you make those clamps?

Andy

  • Member since
    October 2009
Posted by PANZERWAFFE on Monday, January 10, 2011 9:35 PM

Looking for some opinions Indifferent  Made the tool brackets, never made tool brackets before and was wondering what all of you think.  Yes or no?

All opinions are more than welcome.

Thanks

Rob

  • Member since
    October 2009
Posted by PANZERWAFFE on Saturday, January 8, 2011 11:12 PM

TigerEP1 - Thanks for the great comments.  For the rivets, after they are dry just go back and trim them down with my sprue cutters.  Use a scrap piece of .010 sheet styrene to lay up against the rivets then sand until flush with the sheet styrene.  The places I could not get a styrene guide into place, uh.. had to guess at getting them right.

Pawel - Thanks for stopping in and thanks for the comment.  Still hope all really is fixed.  Will be able to tell real soon when the paint goes on.

Here's the update, almost there.

Not much left to do before the paint goes on.  Things left to do: tool brackets, wingnut for the fuel can bracket, tow cable, put light in, make tracks, and finish work on the bogies..

Until then Thanks for stopping in.

Rob

Rob

  • Member since
    May 2009
  • From: Poland
Posted by Pawel on Thursday, January 6, 2011 3:07 PM

Title fixed again!

All comments and critique welcomed. Thanks for your honest opinions!

www.vietnam.net.pl

  • Member since
    January 2011
  • From: Springfield, MA
Posted by TigerEP1 on Thursday, January 6, 2011 5:15 AM

Panzer i have to say that your dedication to fixing this tank to be better than it was intended and not jsut "make it work" is inspiring. Love the rivets, quick question tho, how do you assure each is exactly the same length and what do you use to cut them before sanding?

Thanks,

Dave

On the bench:

1/35th Tamiya Willi's MB


  • Member since
    October 2009
Posted by PANZERWAFFE on Wednesday, January 5, 2011 7:50 PM

Been awhile for haveing time to sit at the bench but work has now resumed.  Not much of an update but here it is.

In my time away from the bench did manage to look through some FSM mags and in the DEC 2010 issue was an article on updating the T-26, perfect timing.  So I used a few ideas.  Started work on the fenders.  Put some reenforcements with bolts on each of them and just finished making the fender brackets.  Just as in the article, made wood templates wraped strip styrene around held with pliers and diped in boiling water.  Worked out real easy and think they came out well.  Also dressed up the box lid with strip styrene, added brass hinges and angle at the bottom to hold the box on and finally made a handle from wire and aluminium foil.

Not much I know but production has started again.  Will be posting with better updates soon. 

Hope everyone had a great Christas and New Year.

Rob

Rob

  • Member since
    October 2009
Posted by PANZERWAFFE on Thursday, December 30, 2010 10:28 PM

Hello too all and Happy New Year!  Hope all had a wonderful Christmas.  Sorry for the long response had work and travel over the holidays so there was no time for any work on the T-26.

Pat, Mike, DM, (and smilies), Jetmodeler and WC thanks for all the great words they are much appreciated Big Smile   Pawel thanks for the information about the model, I do find it to be intresting.

Will take some time to catch up on everything here and then work on the T-26 will start again tommorow morning.  Thanks again for all that stoped by.  Yes, Santa did leave me with new Armor for the new year, hope he did the same for everyone else Big Smile

Rob


Rob

  • Member since
    September 2005
  • From: beacon falls , Ct.
Posted by treadwell on Tuesday, December 28, 2010 5:06 PM

As all before me have said, the extraordinary work on the rivets is a mind blower and a great lesson on thinking 'outside the box' ..... pardon the pun.....beautiful...

Happy New Year

tread


  • Member since
    May 2009
  • From: Poland
Posted by Pawel on Tuesday, December 28, 2010 3:29 PM

Here, let me fix the title for you...

Very nice work on this one. Just a little OT, but it might be interesting for you to read about the history of this model kit - it was developed around 1985 by a Polish state-owned company called Plastyk-Pruszków and then it depicted the polish 7TP tank. After the political change in 1989 and several ownership changes the molds ended up in the Mirage company which, in order to stay in business, started to rebox the tank, but also introduced new variants - twin turret tanks, Vickers, T-26, C7P tractor, german captured versions, you name it. That's how it's going on...

Good luck with your build, and have a nice day

Paweł

All comments and critique welcomed. Thanks for your honest opinions!

www.vietnam.net.pl

  • Member since
    October 2009
  • From: South Carolina
Posted by jetmodeler on Thursday, December 23, 2010 6:05 AM

You might have too much time on your hands.Stick out tongue

Looks great so far.


  • Member since
    July 2003
  • From: On my kitchen counter top somewhere in central North Carolina.
Posted by disastermaster on Thursday, December 23, 2010 12:40 AM

Absolutely riveting...................

http://th224.photobucket.com/albums/dd5/lilmissmontana/smileys/th_smiley-dream.jpgA rivet counters perfect dream.

 https://i.imgur.com/LjRRaV1.png


JOIN OUR COMMUNITY!

Our community is FREE to join. To participate you must either login or register for an account.

SEARCH FORUMS
FREE NEWSLETTER
By signing up you may also receive reader surveys and occasional special offers. We do not sell, rent or trade our email lists. View our Privacy Policy.