SEARCH FINESCALE.COM

Enter keywords or a search phrase below:

1/6th scale Scratch built Initial Tiger I Project

51921 views
43 replies
1 rating 2 rating 3 rating 4 rating 5 rating
  • Member since
    April 2005
Posted by armourguy on Sunday, August 19, 2012 11:48 AM

More progress has been made to the model.

I have completed tooling up many new components, and I added them to the listings. http://www.eastcoastarmory.com/tiger.htm

Tiger I grill work set. These grills feature removable fuel and radiator filler caps that thread onto the to their receptacles.

Tiger I Metal rear fuel tank shroud/ air duct set. The Tiger I had it's rear fuel tanks covered by a sheet metal shroud. This shroud also acted as an air duct that would funnel the air into the radiators via the radiator fans.

New Tooling telescoping snorkel set. While working on this project I decided to retool the tiger's snorkel system. This new version of the snorkel is made to disassemble like the real one. The sections of snorkel tube are threaded and are able to screw together.

The grill work components were pre painted before they were mounted to the tank.

because the model has a smoke generator I needed a way to refuel the system from time to time. Rather than running a refuel tube through the tank'
s body and having to pull it out of a hatch I decided to utilize the fuel filler cover caps on the grill work instead.

The cover caps unscrew reveling the filler spout. Both left hand and right hand fillers can refuel the system. This was done in case the model is on display at a model show, or in a diorama I can get access to the refueling system from either the left or the right hand side.

The rest of the grill work was added

The radiator caps are also visible through the radiator fluid cover caps.

The fan grill actuator ram was completed and mounted. When the grill is lifted the actuator moves with the grill. As I mentioned earlier these actuators were designed but were never installed on production units, but the mounts on both the lower hull and grill remained.

I decided to add these parts to the tank is being built as a very early production unit, and it adds a unique detail element.

I will now be focusing on the tank's engine hatch. Once installed the tank's entire engine deck will be complete. The model's progress will also speed up as this area of the model was the most time consuming and difficult. Mopre to come!

  • Member since
    December 2010
  • From: T-34 Hunting
Posted by TheWildChild on Sunday, August 19, 2012 12:49 PM

wow..... that is absolutely top notch scratch work Yes hats off to you my friend!

1/35 XM77  "Sledgehammer", 1964 Chevy Impala Derby Car

Whats next? Aircraft for Ground Attack Group Build

"I dont just tackle to make a play, I tackle to break your will." -Ray Lewis

"In the end, we're all just chalk lines on the concrete, drawn only to be washed away"- 5 Finger Death Punch

"Ahh, my old enemy.......STAIRS"- Po, Kung Fu Panda

  • Member since
    September 2009
  • From: Rugby, England
Posted by Hinksy on Sunday, August 19, 2012 1:19 PM

Amazing work! Truly outstanding - your dedication to your builds is outstanding and your blog updates are always a treat.

Admittedly builds on this scale do not interest me (in as far as tackling one myself) but watching your builds grow and see the work you put in intersts me greatly AG!

Beautiful!

On the Bench - Dragon Pz. IV Ausf. G (L.A.H.) Yes

Your image is loading...


  • Member since
    April 2005
Posted by armourguy on Friday, August 24, 2012 6:23 PM

Thanks guys, I have fabricated, painted and mounted the tank's engine hatch thus completing the rear engine deck!

I used my standard engine hatch hinge plate, but I had to back date this part for a better fit for the initial tiger. To do This I removed the triangle access hatch which was added to this part on later production vehicles.

The snorkel mount was added permanently to the hinge plate, and the internal snorkel tube was added.

This tube connects to the lower conduits that are located on the bottom plate of the tank. This conduit supplies fresh air into the fighting compartment for the crew.

The engine hatch itself is fabricated out of lexan and styrene. The hatch was modeled as the initial / early production pattern with the main locking tabs and the secondary locking tabs that would be for snorkeling.

The hatch interior was also completed and painted.
*note the tape in the intake will be removed once the model is finished*

Another difference between the initial tiger and the later production units is the difference with the rear air intakes. The initial tigers used a simple elevated steel plate to cover up the square air intake. When the tank would snorkel the spacer lugs were removed and the plate would be bolted flush with the engine hatch.

Once the fifel system was developed this plate was replaced with the fifel intake, but the plate was stored on the top front deck in case the tank would again need to be able to snorkel, which it would replace the fifel intake.

After the fifel system production was dropped and snorkeling abilities terminated, the tiger had a new cast metal air intake developed that was closed on three sides and was only open towards the rear.

The round air intake is the early version. The later tanks had a smaller version of this part which had less internal intake holes. When the tank would snorkel this plate was designed to screw tight against the engine hatch closing it off making it watertight.

I will now be focusing on the tank's front hull detailing (front fenders, hatches, headlights...etc) More progress to follow!

  • Member since
    April 2005
Posted by armourguy on Friday, August 31, 2012 7:21 PM

I have made some more progress on the model completing the tank's front hull detailing. also some new parts have been added to the part listings.
http://www.eastcoastarmory.com/tiger.htm

The first batch of tigers featured several panel welds on the upper hull. These welds were phased out on the later production units.

The tank's early one piece front fenders were fabricated.

Unlike the later design fenders which were fabricated out of flat plate the earlier fenders were fabricated out of German pattern diamond plate. For the fender material I used the Photo etch German diamond plate from Mike Stannard.

The quality of the plate is excellent and most importantly the material is brass, which makes it very easy to bend and solder.

The early design fender was mush narrower than the track, and was mounted to the tank via two large hinges.

To secure the hinges to the hull the tiger had two jeep style hooks which secured the fender and kept it from bouncing around when the tank would drive.

Another component that was added was the water tight cover cap / tarpaulin mounts. for the bow MG.

In addition of adding the mounts I tooled up the bow MG snorkel cover cap. This cover cap would be mounted to the wing nut mounts and would create a water tight seal around the bow MG.

Earlier on the model I described that I made the Bow MG34 retractable so I can add this cap without having to make the gun barrel removable.

The tank's bow hatches was another detail that was added. For the hatches I used the resin set from Panzerwerks. The parts and casting quality are excellent.

The hatches assemble with ease and were painted prior to the installation.

The Panzerwerk hatches don't come with the upper periscope or the scope guard. For these parts I modified some spare puma hatch parts that I had on hand.

Another detail that was added to the hatches was the addition of the three bolt faces on the hatch top. These holes are where the fasteners where the hinge mounts to the hatch. The back end of the bolts would be visible through the hole. These three holes are also seen on the hull roof.

On the tiger I the hatches are not mounted flush with the upper hull, they sit on an elevated ring. Before I was able to mount the hatches I fabricated the rings out of machined PVC and added them to the hull. After the rings were mounted the upper hull welds were added.

The last bit of detail that was added to the model was the tank's bosch lights. For the head lights I used the set from Panzerwerk. Like the hatches the headlight castings are fantastic.

Like the tail light I decided to make the headlights functional. This was an easy mod in that the panzerwerk light is already hollow. An LED was machined down to fit snugly into the head light recess. After the LED was affixed I added one of my clear resin head light lenses to the light.

The headlight wire conduit and conduit mount was fabricated and added. The small wire was snaked through the conduit and the end cap like the rear tank.

The Blackout cover was made to be removable via a pivoting metal strap

The lighting is all connected and works well.

I will now be focusing on the tank's turret. More progress to follow!

  • Member since
    April 2005
Posted by armourguy on Thursday, September 13, 2012 9:32 PM

I have made a lot of progress on the tank's turret and gun details, and the tiger looks like well...a Tiger!

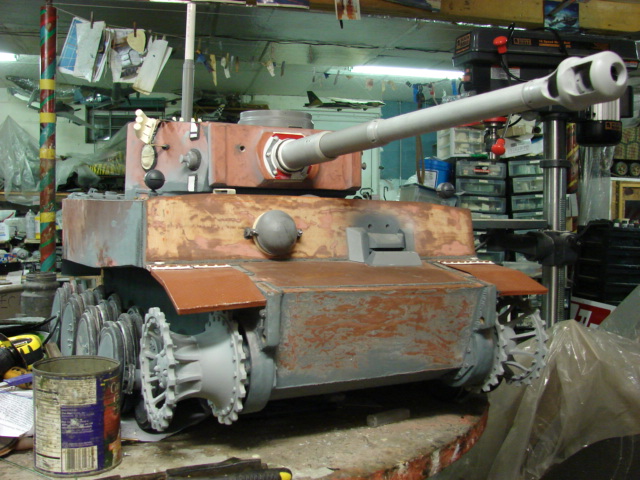
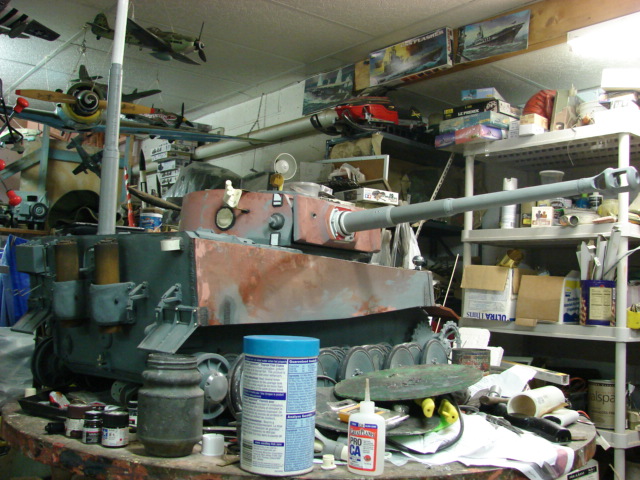
The turret's body work, side detailing, mantlet mounts and welds have been added

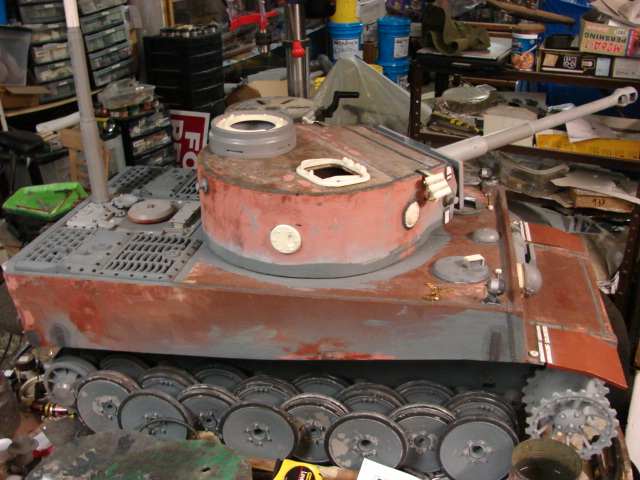
The cutouts for the side visors and pistol ports were cut into the sheet metal turret sides, Because this model is being built as an initial production vehicle the turret receives two pistol ports on either turret side.

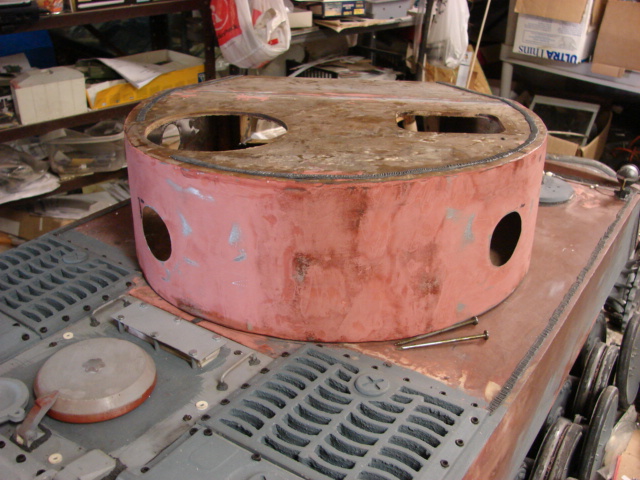
When the Tiger was first developed this was the configuration that the designers had in mind, This feature was only prevalent on the first production batch of tiger I. After this batch the loaders side pistol port was deleted and a large escape hatch was was mounted in it's place.

The turret's retaining bolt was also added. The bolt allows the turret to trun freely, but keeps it retained to the hull.

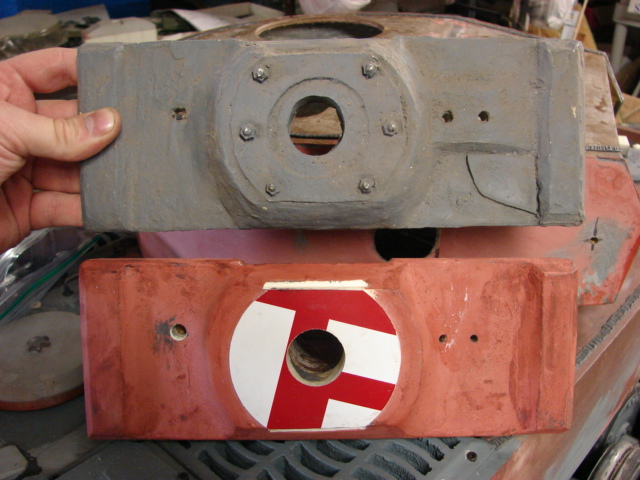
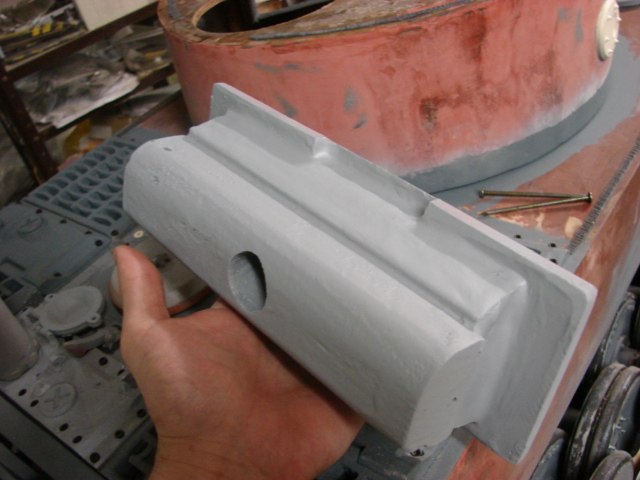
On the turret's front the mantlet mounts were refined and thickener blocks were added to the turret cheeks. Similar to what was added to the hull These blocks give the proper armor thickness, and the illusion that the entire turret is as thick as these portions.

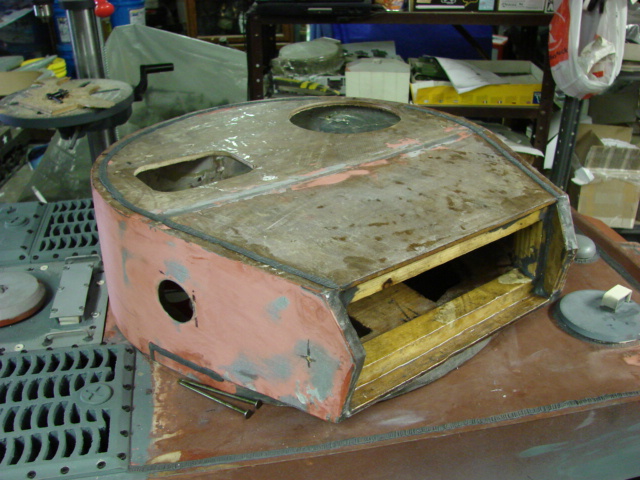
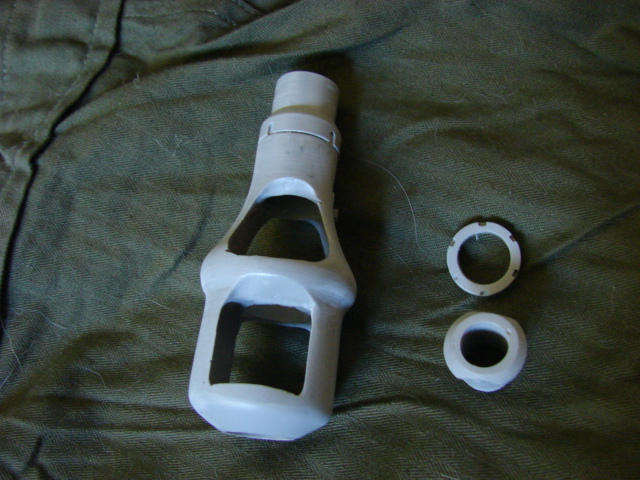
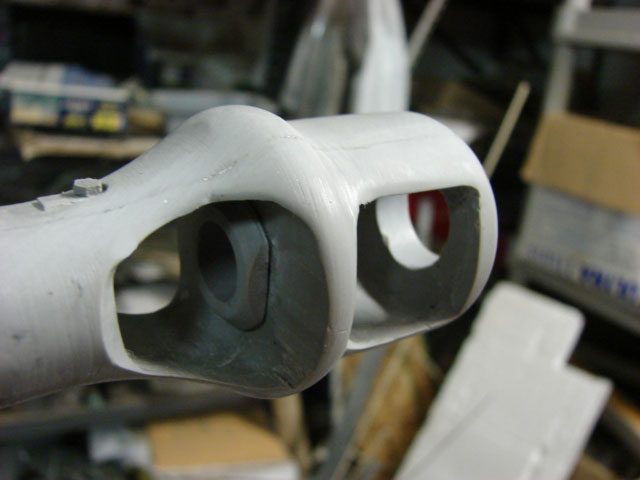
The tank's mantlet was also reworked before it was able to be mounted.

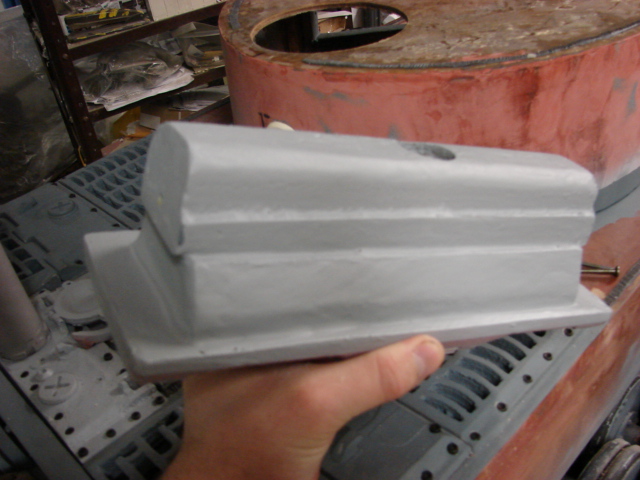
For the mantlet I used our the old resin mantlet that was designed to be used on this tank when they were first developed back in 2001. The old mantlet had the correct proportions, but had to be reworked because the original mantlet has the integral gunner's scope armor molded in. For the type of tank that I'm building the integral armor was not developed yet, so the molded in block was deleted via a mill. The molded in face plate, bolt were also deleted and were replaced. The mantlet itself was cleaned up a bit and new smoother casting was added.

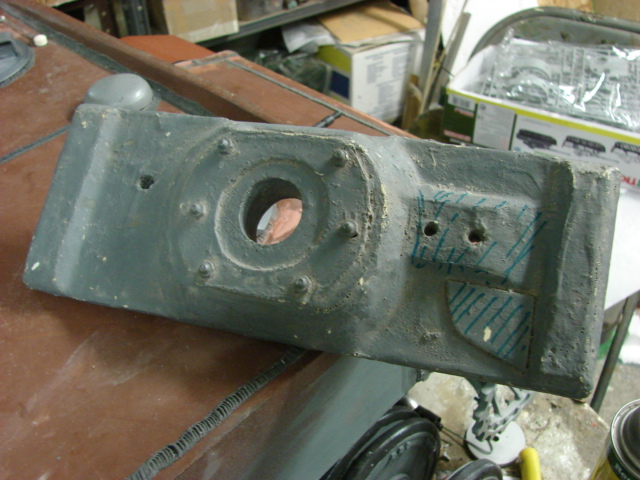
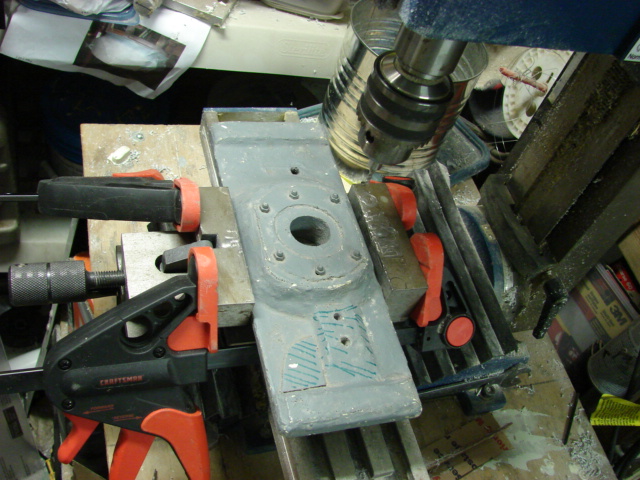
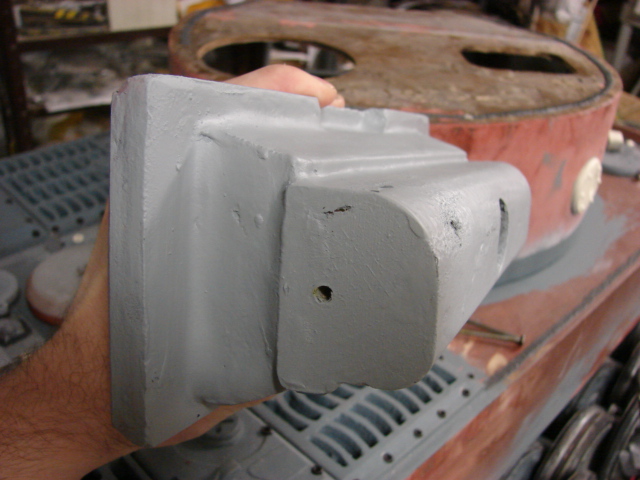
Besides the mantlet's front portion being cleaned up, I had to fabricate the rear portion of the mantlet's rotor. Wood was used for the fabrication, which was then coated with fiberglass resin the same way as the hull.

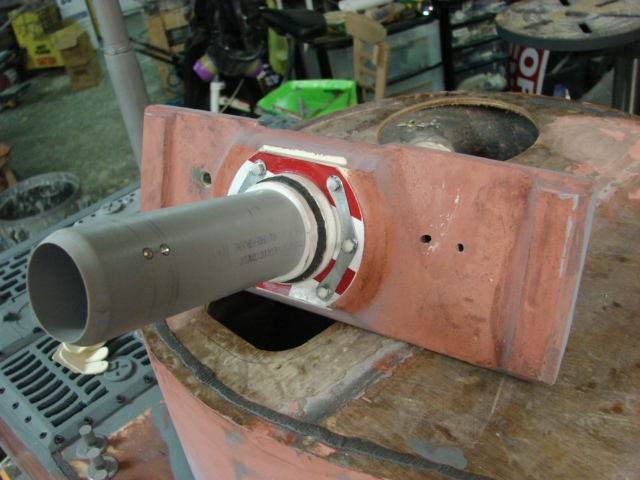
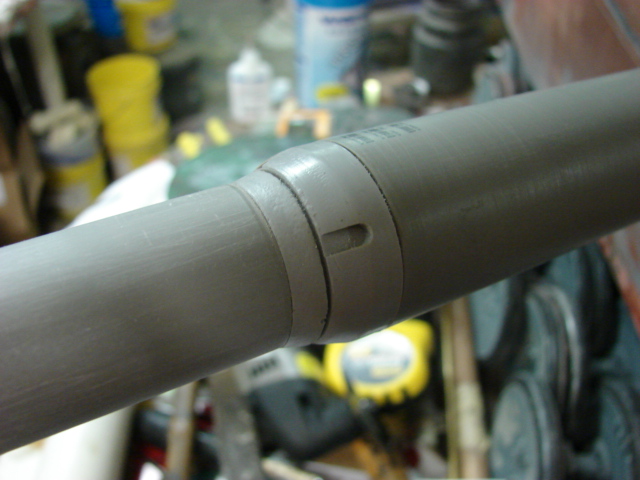
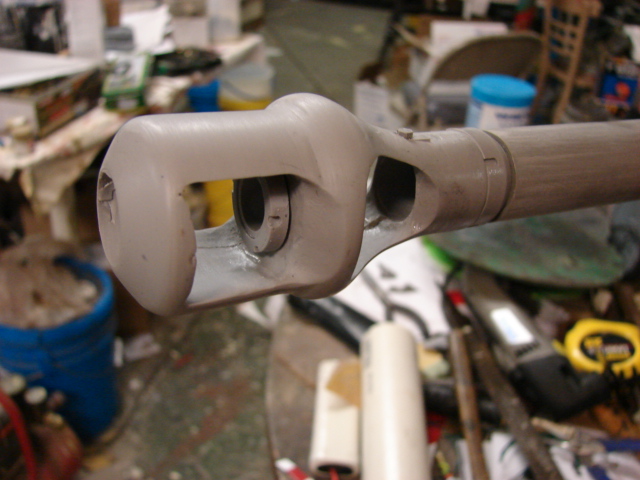
All of the mantlet's front details (main recoil tube, faceplate cone bolts, and bolt lock plates) were added prior to assembling the tank's 88mm.

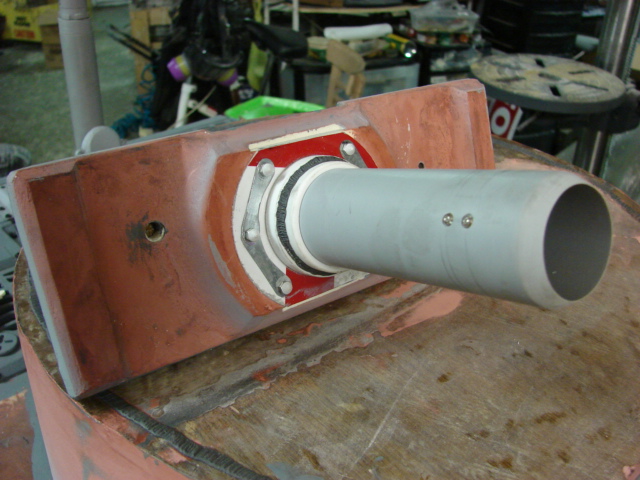
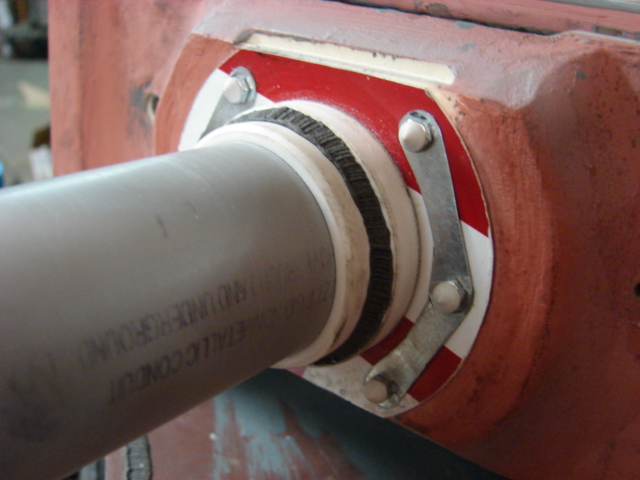
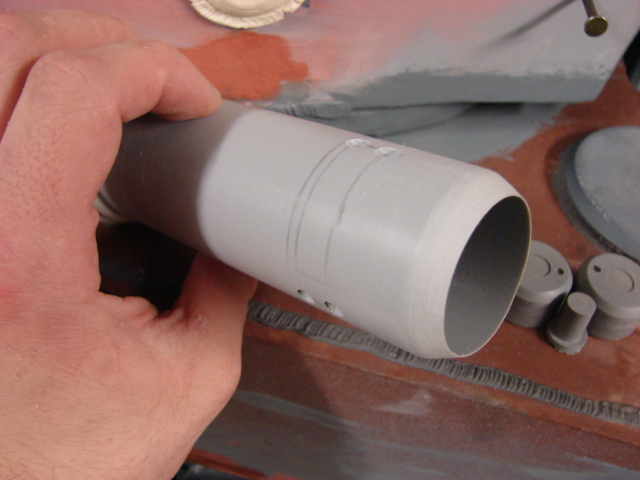
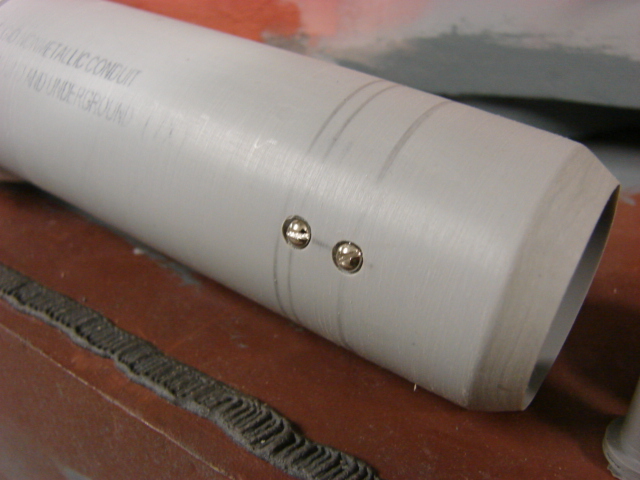
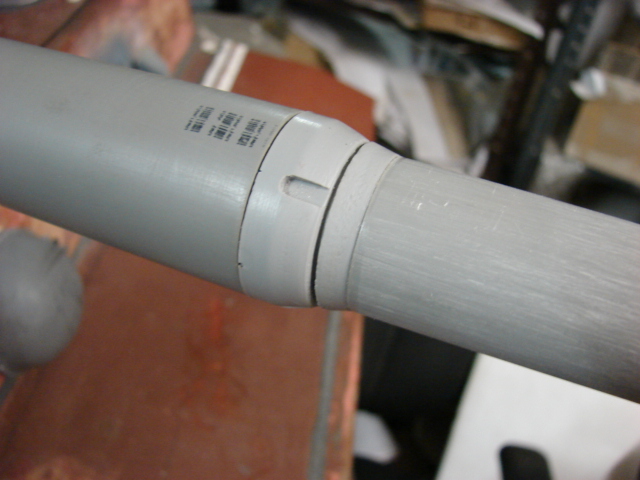
The recoil tube itself is all machined out of PVC, and features the counter sunk O ring screws.

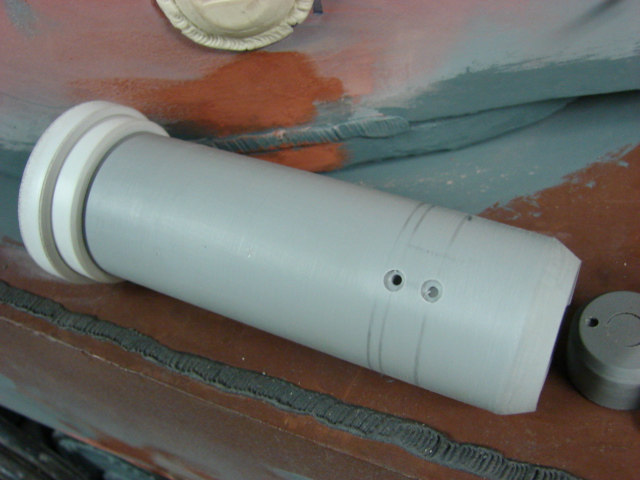
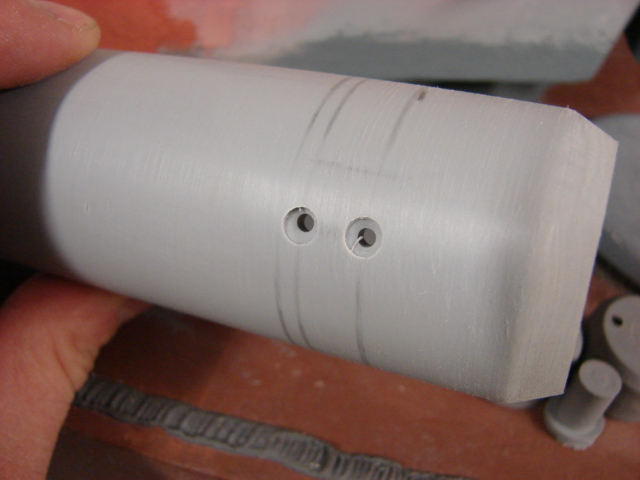
These slot screws are positioned around the tube in three locations, to on the top sides, and one set directly on the bottom.

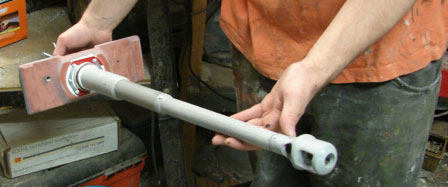
Once this was assembled I was then able to fabricate the gun.

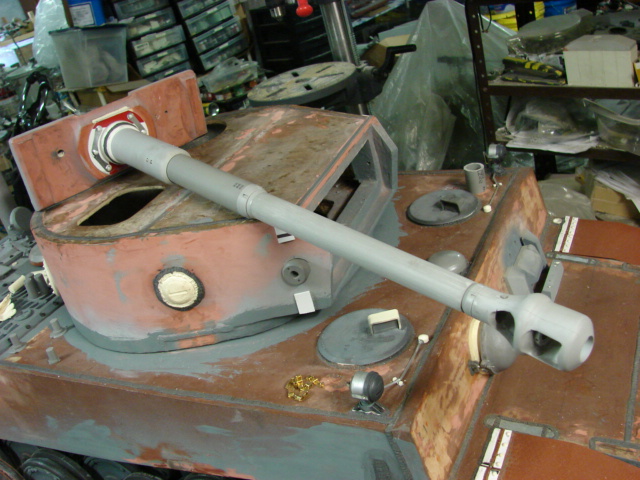
The gun itself is also made from lengths of PVC tubing.

While working on the gun I developed and added two new additions to the parts listings page http://www.eastcoastarmory.com/tiger.htm.

Resin Tiger I 88mm barrel adapter ring plug.

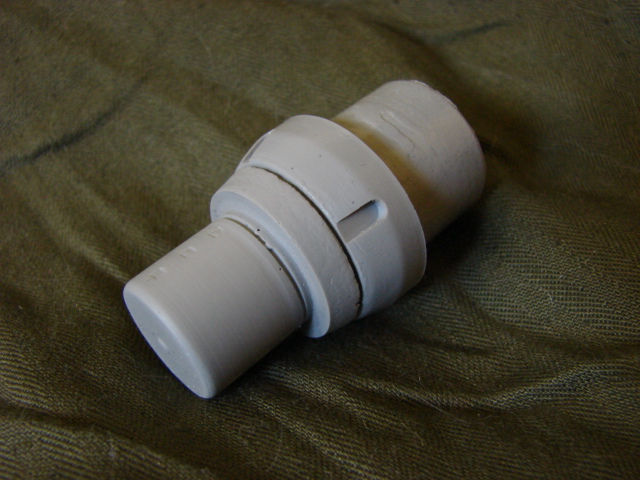
Resin early production Tiger I 88mm KwK 36 L/56 gun Muzzle brake. The later tiger used a smaller profile muzzle brake than the earlier versions.

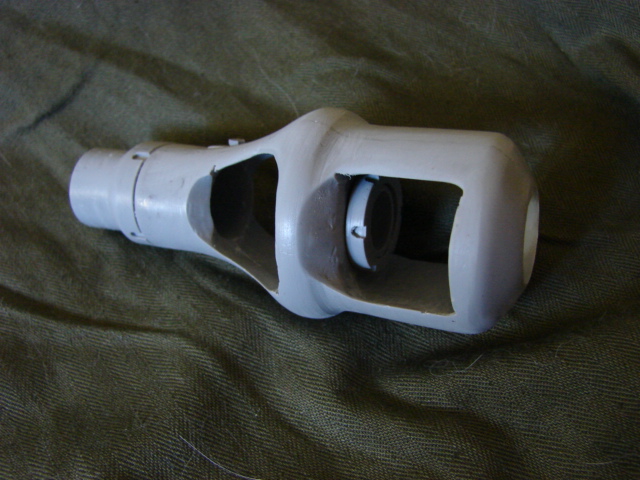
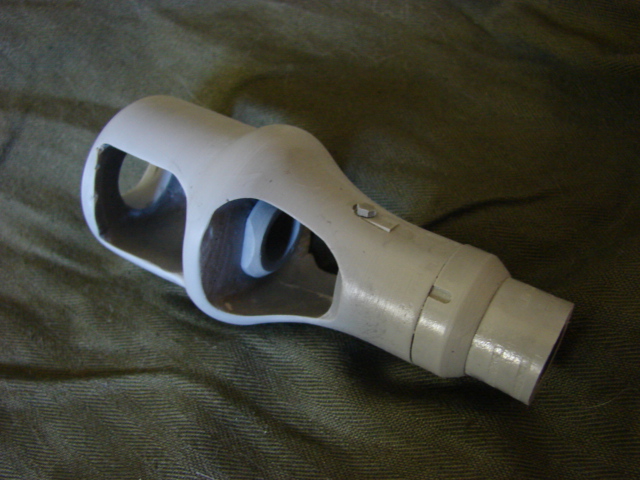
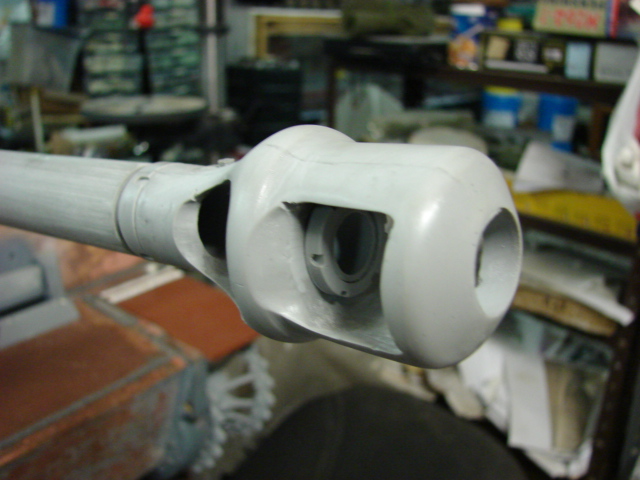
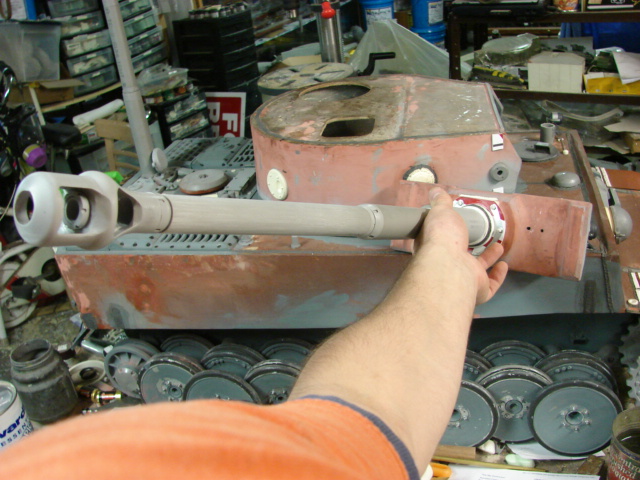
to lock the barrel to the mantlet a retaining ring was machined and mounted to the barrel assembly. Because the Tiger I has a long barrel, and a muzzle brake a spring system was added To prevent the gun barrel from drooping. The springs mount to eyelets mounted on the turret's interior.

Once added the whole assembly is then ready to be mounted to the turret.

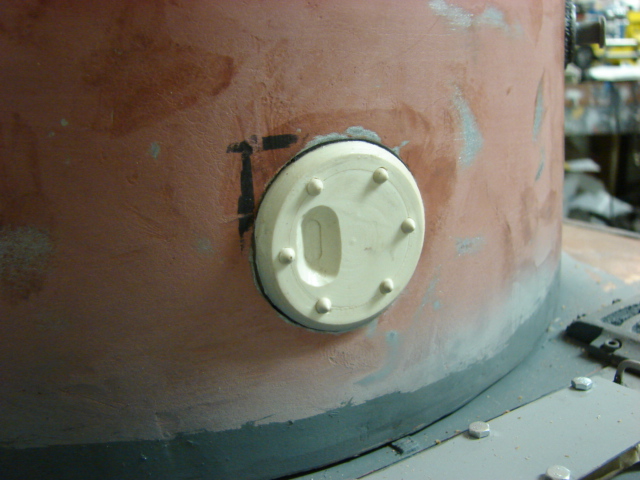
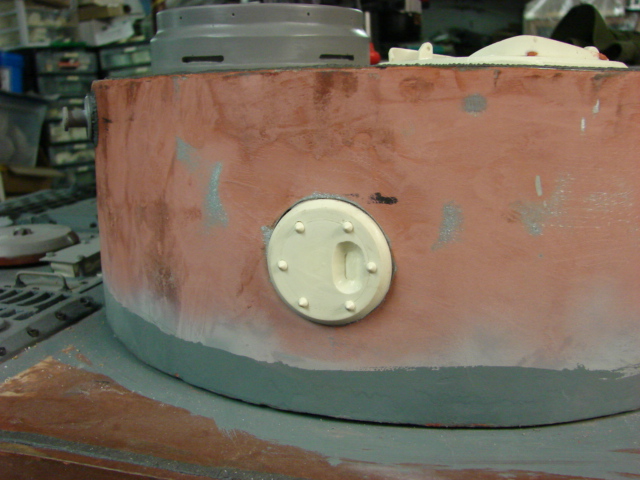
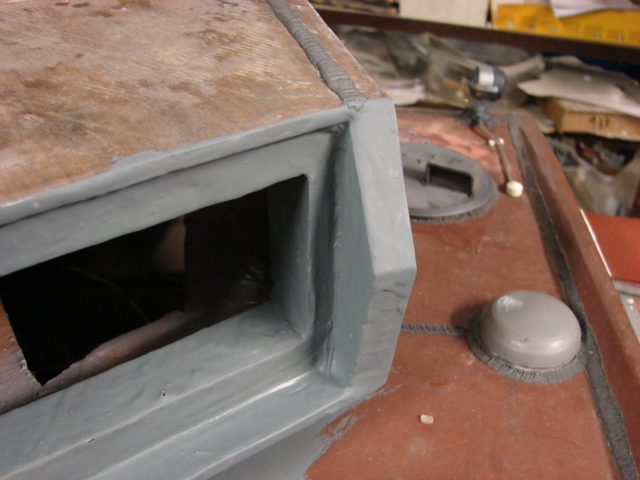
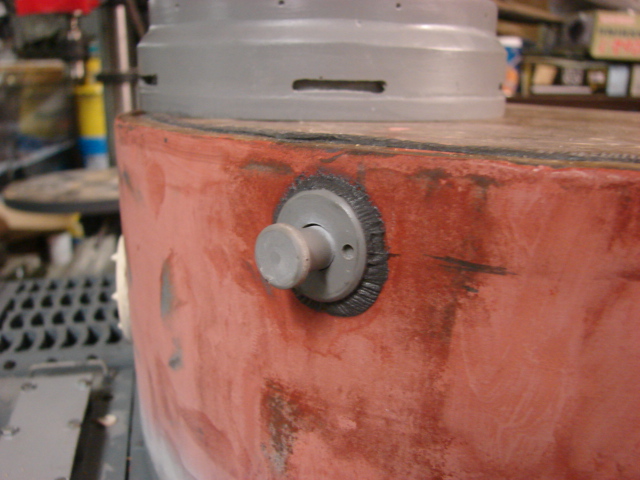
To mount the matlet to the turret I use two deck nails that connect to the rotor through the turret sides. The nail itself is concealed by the resin turret lift ring boss.

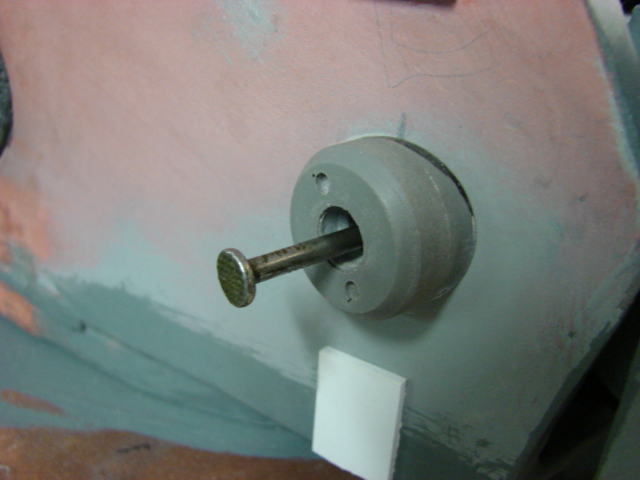
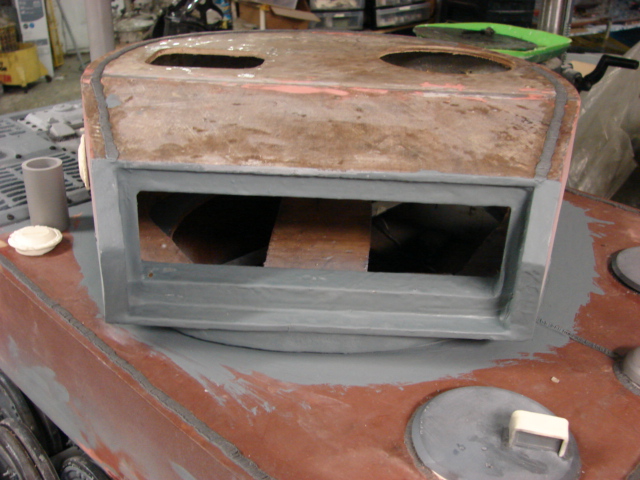
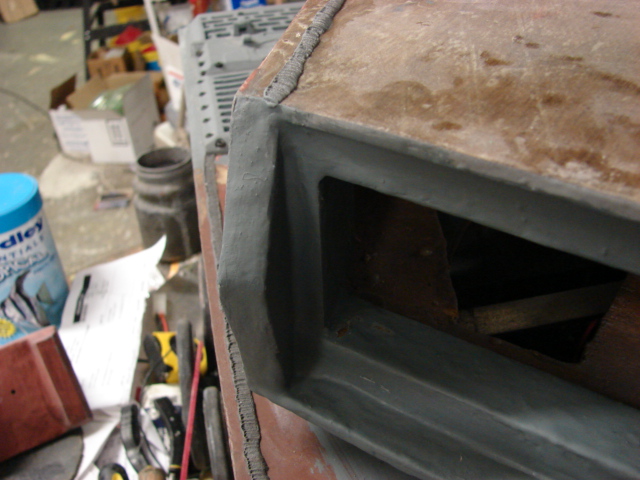
Once the detail cap is added the nail is covered up and is held in place via the lift boss. The Tiger used three lift bosses to lift the turret off the hull. Two were mounted on either turret side, and one was mounted in the center portion of the turret rear.

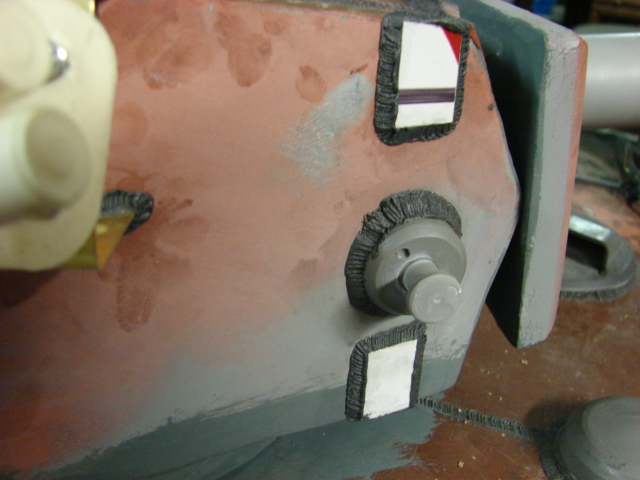
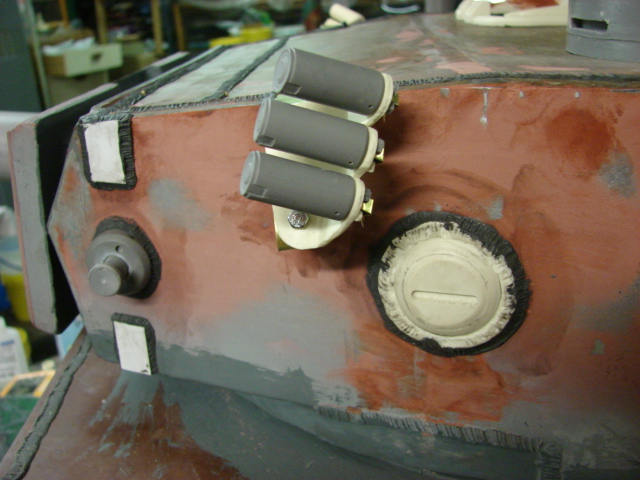
The tank's smoke grenade launchers and visors were added aswell.

I made two youtube videos which showcase the work that was recently made to the model.

http://youtu.be/XnA-ubF_Eg4

http://youtu.be/VUFwG39b5sw

I will now be focusing on the turret's top details like the Copula, loaders hatch, air cleaner, and bustle bins. Once done the turret will be complete!

  • Member since
    April 2005
Posted by armourguy on Monday, September 17, 2012 10:17 PM
I have completed the tank's turret detailing.
The copula and loader's hatch have been assembled and added. Both parts have their interior details.
The air filter cover has been mounted aswell. 
On the center of the tiger I turret there are 8 small holes drilled into the roof. These holes are for mounting a bracket that would be on the interior. Like the bow hatches the holes are plugged with flush bolts, but small indentation remain. These indentations were added to the model.
The last and most significant component that was added was the tanks storage bins. 
When the Tiger I was developed there was no design for a external storage unit. Because it was more of an afterthought there were several designs used until one design was settled on. Some of the first production units used the bustle bin from the PZIII, others had what would eventually evolve into the large rear two door bustle bin that was standardized and used on the tigers for the rest of their production.       
For this model I wanted to use the very unique and very early "saddlebag" style bustle bins. Rather than a single bin mounted to the rear of the turret, this design uses two smaller bins mounted to either side. 
Before the bins could be mounted I gave primmed them, and painted the rear of the bins and the spot on the turret with the base coat color. 
Once mounted they give this model a unique shape that is different from the norm, and will make it stand out from the pack. 
 
The turret wraps up the last of the major fabrication. With the turret complete I will now turn my attention to the tank's tool post mounts, then the model will be ready for paint!! More to come!
 

  • Member since
    April 2005
Posted by armourguy on Thursday, September 27, 2012 3:37 PM

The tool posts, and final electrical hookups were made and the tank was painted today!

Because this model is the initial version the tool post locations differ from that of the standard tiger Is, but I will go into this more in detail once the tools are added. The posts themselves are fabricated out of metal, brass and all have their weld beads added.

Before the tank went into painting it received it's final prime. All areas that I didn't want to be painted (grills, wheels, exhausts) were all masked.

Once the primer was dry the model received it's base coat of panzer grey.

After working on the model for months, it's very refreshing to see the model in one uniform color!

The model will now get it's markings and the weathering. More to come!

  • Member since
    April 2005
Posted by armourguy on Tuesday, October 2, 2012 2:04 PM

The model's markings and weathering has been added.

I made the tank's markings for the sPzAbt 502. The crosses and numbers are painted on via stencils, while the 502 woolly mammoth logo were hand painted.

Of all of the panzer divisions the 502 was one of my favorite because of their logo!

After the markings the tank's weathering was added.

In addition to the road wheels being touched up I was able at this point to add the zerk fittings. Before the zerk fittings were added the wells were painted red. These zerk fittings are included with the road wheels kits.

a youtube video was also made prior to the model being painted

http://youtu.be/ur0Fkt-YC-4

http://youtu.be/SjvW0EE6AaQ

The model is now ready for it's tools and other finishing details. More to come!

  • Member since
    April 2005
Posted by armourguy on Thursday, October 11, 2012 9:45 PM

The last of the model's components have been added and the model is now complete!

The tank's tools (shovel, axe, sledge hammer, wire cutters, telescoping gun cleaning kit, crow bars, and jack block) are all scratch built out of wood, metal and resin.

An armorpax fire extinguisher was mounted to the rear right hand side grill work.

The tank's snorkel has also been painted and weathered.

Sometime this weekend I will take the model outside for some nice outdoor shots, After that I will give the shop a nice long overdue cleaning after which it will be on to the next project! More to follow.

  • Member since
    April 2005
Posted by armourguy on Tuesday, October 16, 2012 4:36 PM
Today I took advantage of the nice weather today taking some out door diorama shots, along with a few figures and small vehicles. 

A youtube video was also made when the model was completed.
http://youtu.be/h_o8t_RBASs

I will now be working on the tank's gallery page, where once complete I will have more images posted. Once complete It will be off to my next project!

  • Member since
    April 2005
Posted by armourguy on Thursday, October 25, 2012 1:47 PM

I completed the tank's gallery webpage 1/6th scale German Initail production Tiger I #101.

On there I have more pictures of the model's out door shots, and all of the youtube videos posted. I also made some old style photos from several of the shots I took last.


I will be making one more end of project youtube video, once complete it will be added to the webpage.

I have also started on my next build and I already have new update parts fresh out of mold. More info to follow ;)

  • Member since
    September 2005
  • From: beacon falls , Ct.
Posted by treadwell on Thursday, October 25, 2012 3:18 PM

HI Armourguy Smile

Man that is one heck of a job !  You really went all the way with the detailing and engine,fans and all. Simply outstanding ! Beer Beer Yes

I am going to check out the videos on youtube !

best regards,

treadCool


  • Member since
    March 2004
  • From: Spartanburg, SC
Posted by subfixer on Friday, October 26, 2012 9:42 AM

The intricacies and realism of this work are simply astounding. Well done!

I'm from the government and I'm here to help.

JOIN OUR COMMUNITY!

Our community is FREE to join. To participate you must either login or register for an account.

SEARCH FORUMS
FREE NEWSLETTER
By signing up you may also receive reader surveys and occasional special offers. We do not sell, rent or trade our email lists. View our Privacy Policy.