SEARCH FINESCALE.COM

Enter keywords or a search phrase below:

1/35 Tamiya Tiger I -DONE!!! several pic's

14493 views
66 replies
1 rating 2 rating 3 rating 4 rating 5 rating
  • Member since
    January 2008
  • From: Austria
Posted by Byrden on Wednesday, May 23, 2012 12:06 PM

I wasn't sure of the shape of the brackets so I improvised.

35mm square, 4 of them, located under the bolts on the fender.

  • Member since
    April 2007
  • From: Schroon Lake, NY
Posted by SMJmodeler on Wednesday, May 23, 2012 1:52 PM

deafpanzer:  I buy the aluminum trays at the dollar store.  I buy the ones that are about 9" X  9" then I cut out and use the bottom only.  They can be easily smoothed with a metal ruler and they cut with a hobby knife.  The tubing was in the kit.

tigerman/bish/wbill76: Thanks guys!

Byrden: Thanks for the photo...I'll keep that in mind for the future.

  • Member since
    April 2007
  • From: Schroon Lake, NY
Posted by SMJmodeler on Thursday, May 31, 2012 8:02 AM

Guys: I dented the exhaust shroud and bent the fenders which completed the build portion. Then I began PAINTING....which for me is when the fun REALLYstarts! 

First a primer coat followed by acrylic flat black.  Then I used Tamiya Khaki XF-49 focusing on the center of all areas followed by a lightened shade of the same color highlighting areas most prone to sun exposure .  Next came Tamiya Khaki Drab XF-51 as post shading. 

Nex,t I plan to use the salt technique withTamiya XF-57 Buff to add a very worn/peeling paint effect.

Heres how she looks now:

Road wheels, tracks and tools with  flat black:

  • Member since
    March 2010
  • From: Democratic Peoples Republic of Illinois
Posted by Hercmech on Thursday, May 31, 2012 11:32 AM

You make your paint technique sound so easy to achive the look you got...I know better!  Fantastic paint job. Bow Down


13151015

  • Member since
    July 2004
  • From: Texas
Posted by wbill76 on Thursday, May 31, 2012 12:04 PM

Looks like a solid foundation to build off of Steve, looking forward to the next steps. Beer

  • Member since
    December 2002
  • From: Bury St Edmunds, Suffolk, England
Posted by Bish on Thursday, May 31, 2012 1:37 PM

Thats one sweet looking Tiger.

I am a Norfolk man and i glory in being so


On the bench: Airfix 1/72nd Harrier GR.3/Fujimi 1/72nd Ju 87D-3

  • Member since
    March 2003
  • From: Western North Carolina
Posted by Tojo72 on Thursday, May 31, 2012 4:52 PM

Really nice paint job there Steve,good to see your work again

  • Member since
    April 2009
  • From: Carmel, IN
Posted by deafpanzer on Thursday, May 31, 2012 5:30 PM

Beautiful paint job! Yes  That's something I need to try next time... post shading paint job!  You made it sound very easy! Big Smile

Andy

  • Member since
    April 2007
  • From: Schroon Lake, NY
Posted by SMJmodeler on Friday, June 1, 2012 8:33 AM

Hercmech/ wbill76/ Bish/ Tojo72/ deafpanzer:  Thanks for stopping by and thanks for the comments.  It's been a "blast" working on armor again!

  • Member since
    November 2006
  • From: Coastal Maine
Posted by dupes on Sunday, June 3, 2012 3:10 PM

Oooooh, nice stuff SMJ...can't wait to see how this turns out. Keep building!!!

  • Member since
    April 2005
  • From: Piscataway, NJ!
Posted by wing_nut on Sunday, June 3, 2012 5:49 PM

Yeah baby!  Paint and weathering comin' up.  Let the fun begin.

Marc  

  • Member since
    April 2007
  • From: Schroon Lake, NY
Posted by SMJmodeler on Friday, June 8, 2012 11:22 AM

dupes: Thanks man!

wing nut:  Yep, Paint and weathering...I feel like I'm in the ZONE! 

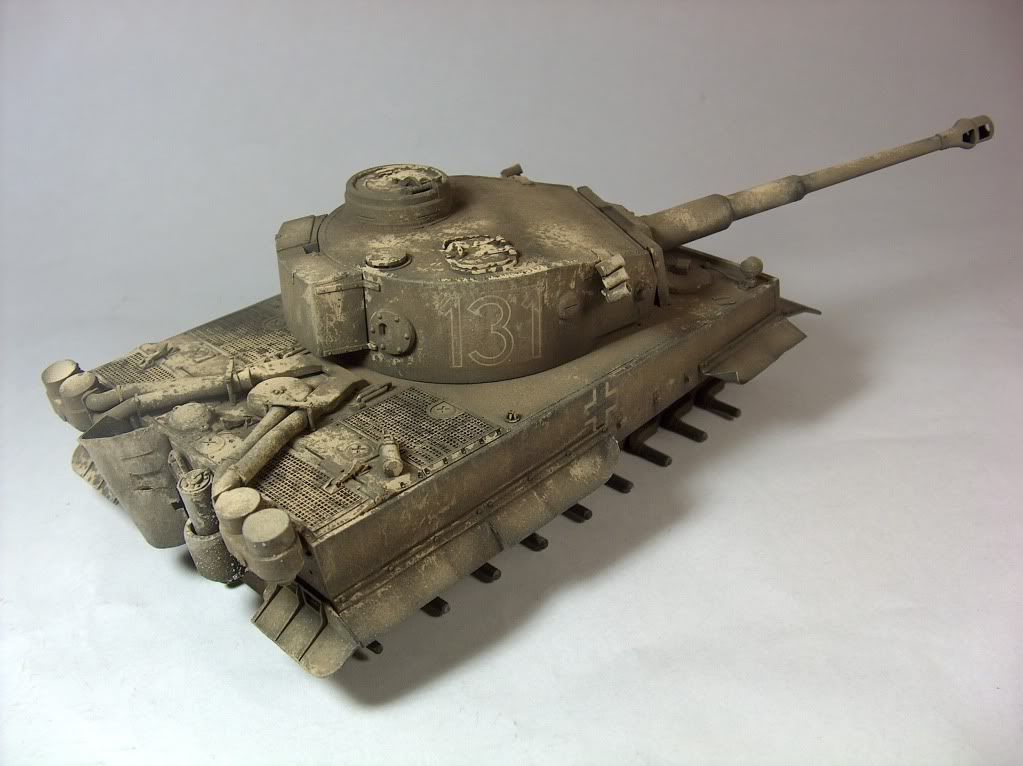
Salt Techinique explained:

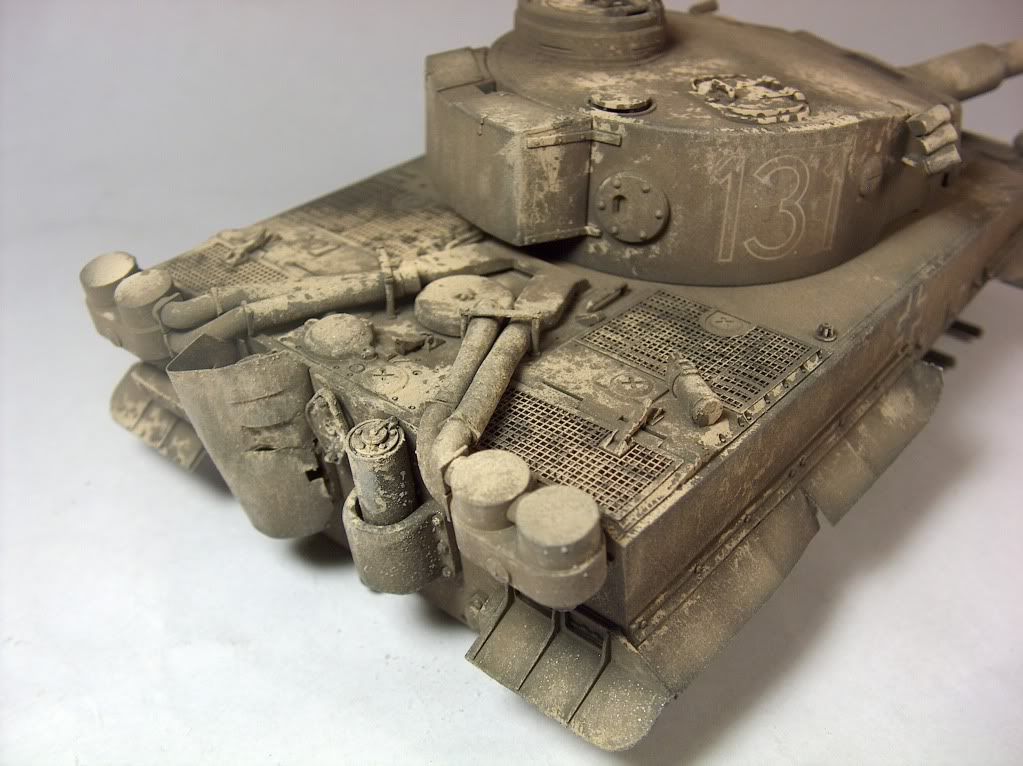
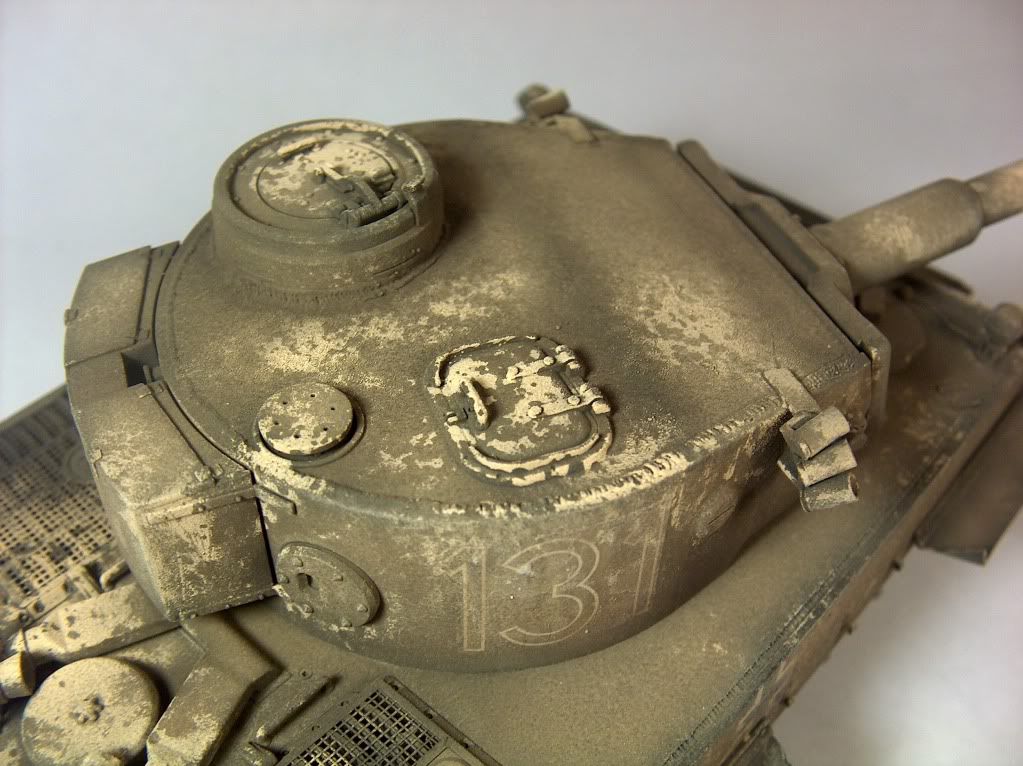
Guys: I used coarse salt (blue container at grocery store, about $2.50) to achieve the effect seen in the photos below.  I first sprayed the model HEAVILY with water then I hap-hazardly sprinkleda generous helping of salt everywhere, bunching it up in the "shadowed" areas with the opposite end of a paintbrush.   Then I sprayed water again.  With a 60%+ to40%- (rubbing alcohol to paint) dilution of Tamiya XF-57/Buff and cranked up airpressure I then sprayed the model.  I focused the spray on sun exposure areas and I let the pressure blow the salt off the model.  It makes a mess!  Note: If you alter the spraying distance of the airbrush (closer removes more salt and adds more pigment) from the model, you also will very the intensity of paint...which is a benefit.

I was VERY careful to NOT add too much paint!  I really liked my post-shading work and I wanted it to still stand out.... I originally intended to achieve a heavy wind-driven sand finish too.( Note: If I were to do this as a winter whitewash I would have added much more paint for newly applied wash, and a bit more for a well-worn finish)

While the paint and salt was still wet I used canned air spray (computer keyboard cleaning stuff) and blew off as much salt as I could. (Note: Do this outdoors!, and be careful around attached details).  Oh yeah, as you spray, direct it downward as much as possible...it adds to the streaking effect.  To remove the rest of the salt, I ran the model under lukewarm water at the kitchen faucet, again downward for steaking.

It takes quite a while for the model to dry so I put it in front a small fan overnight.  You can dry it in less time if you continually rotate the model.

When all is said and done there will probably be small bits of salt and a slight residue/light texture on the model.  Use a toothpick and air can to knock of what bits you can.   Leave the residue...trust me, the slightly rough texture in many places is a BENEFIT so don't sweat it... it picks up the paint during drybrushing fantastically and makes that ehaustive effort worthwhile. 

Below you'll see the final product of this technique.  At first I was disappointed that it was WAY to light (not color, but amount) AND I was afraid it looked more like thick powder and dust than a paint-tone variation BUT I decided to leave it well-enough alone.  I'm GLAD I DID!!!..you'll see in future pictures (I'm much  farther along on the model as of this writing) how subtle but effective this came out.

Finally, As you can tell this puts the model through its paces so keep off as many fragile details as possible...and if you know you're going to try this technique going-in, make sure to be attentive to strong gluing.

Thanks for looking:


  • Member since
    March 2003
  • From: Rain USA, Vancouver WA
Posted by tigerman on Friday, June 8, 2012 11:58 AM

That looks pretty cool and different.

   http://i7.photobucket.com/albums/y269/wing_nut_5o/PANZERJAGERGB.jpg

 Eric 

  • Member since
    April 2009
  • From: Carmel, IN
Posted by deafpanzer on Friday, June 8, 2012 12:11 PM

WOW!  I am really digging the paint job.  Thanks for the great toot... that's something I want to try one day.  That would be perfect for winter camo or Afrika Corps armor!!! 

Thank you for doing this! Yes

Andy

  • Member since
    March 2006
  • From: Right Side of a Left State
Posted by Shellback on Saturday, June 9, 2012 9:28 PM

I like doing new techniques . I've never tried this method . Looks like a lot of possibilities .Yes

  • Member since
    December 2002
  • From: Bury St Edmunds, Suffolk, England
Posted by Bish on Sunday, June 10, 2012 3:24 AM

Shellback

I like doing new techniques . I've never tried this method . Looks like a lot of possibilities .Yes

Ditto. Somthing else to think about adding to the wethering arsenal.

I am a Norfolk man and i glory in being so


On the bench: Airfix 1/72nd Harrier GR.3/Fujimi 1/72nd Ju 87D-3

  • Member since
    June 2012
Posted by ghostt180 on Sunday, June 10, 2012 6:51 PM

Looking good with the paint work. You deserve a lot of credit. Personally I am not up to that level yet! Can't wait for updates.

  • Member since
    April 2007
  • From: Schroon Lake, NY
Posted by SMJmodeler on Monday, June 11, 2012 9:14 AM

Tigerman/deafpanzer/Shellback/Bish/ghostt180:  Thanks for checking in...I apprecaite the comments.  Stay tuned, this baby should be done tonight!

  • Member since
    December 2004
  • From: ohio
Posted by vonryan on Monday, June 11, 2012 10:31 AM

AWESOME SMJ i do like tiger tanks and this one is coming along. very nice Yes 


Clay

  • Member since
    April 2007
  • From: Schroon Lake, NY
Posted by SMJmodeler on Tuesday, June 12, 2012 9:40 AM

Guys:  I'm calling this one done!  It was a real enjoyable build and I'm very pleased with the results.  Thanks for looking.


  • Member since
    December 2004
  • From: ohio
Posted by vonryan on Tuesday, June 12, 2012 11:37 AM

VERY NICEYes SMJ really like the weathering.

Clay

  • Member since
    March 2003
  • From: Rain USA, Vancouver WA
Posted by tigerman on Tuesday, June 12, 2012 11:47 AM

That's a really great finish Steven. Weathering is what separates the men from the boys. Just a great all-around effort.

Since you just finished your Tiger, I hope you don't burn out on them before the GB.

   http://i7.photobucket.com/albums/y269/wing_nut_5o/PANZERJAGERGB.jpg

 Eric 

  • Member since
    December 2010
  • From: T-34 Hunting
Posted by TheWildChild on Tuesday, June 12, 2012 11:52 AM

Wow that is an AWESOME finish!

Tigerman- what is this you speak of a Tiger GB?


1/35 XM77  "Sledgehammer", 1964 Chevy Impala Derby Car

Whats next? Aircraft for Ground Attack Group Build

"I dont just tackle to make a play, I tackle to break your will." -Ray Lewis

"In the end, we're all just chalk lines on the concrete, drawn only to be washed away"- 5 Finger Death Punch

"Ahh, my old enemy.......STAIRS"- Po, Kung Fu Panda

  • Member since
    March 2003
  • From: Rain USA, Vancouver WA
Posted by tigerman on Tuesday, June 12, 2012 12:16 PM

TheWildChild

Wow that is an AWESOME finish!

Tigerman- what is this you speak of a Tiger GB?


If you trot on over to the GB Forum, I'm kicking off a Steel Cats GB in September that will consist of any Panther or Tiger and their variants. Please feel free to join in.

   http://i7.photobucket.com/albums/y269/wing_nut_5o/PANZERJAGERGB.jpg

 Eric 

  • Member since
    April 2006
  • From: ON, Canada
Posted by jgeratic on Tuesday, June 12, 2012 1:03 PM

What a wonderful build, definitely have this bookmarked for future reference.

regards,

Jack

  • Member since
    July 2004
  • From: Texas
Posted by wbill76 on Tuesday, June 12, 2012 2:25 PM

Nicely done Steve, looks like you've got Tiger fever! Big Smile

  • Member since
    December 2002
  • From: Bury St Edmunds, Suffolk, England
Posted by Bish on Tuesday, June 12, 2012 2:35 PM

I knew there was something i missed about you not being around.

Bootiful Yes

I am a Norfolk man and i glory in being so


On the bench: Airfix 1/72nd Harrier GR.3/Fujimi 1/72nd Ju 87D-3

  • Member since
    November 2006
  • From: Coastal Maine
Posted by dupes on Tuesday, June 12, 2012 3:32 PM

Not only are you building again, but FINISHING models? The second SMJ era has begun! Toast

  • Member since
    July 2003
  • From: On my kitchen counter top somewhere in central North Carolina.
Posted by disastermaster on Tuesday, June 12, 2012 3:34 PM

  A beautiful piece of work Steve....  http://freeemoticonsandsmileys.com/3D%20Smileys/3D%20Emotion%20Smileys/my%20love.gif

 This is the kind of finish I just adore which you executed beautifully and placed on a simple but complimentary piece of groundwork.

  Just curious though, (maybe something http://www.facebooksmileysemoticons.com/wp-content/uploads/2009/05/yahoo-messenger-hidden-emoticons-scratch-head.gifI don't know) why did you put a rope on the port side instead of the track cable?

http://i156.photobucket.com/albums/t15/sjung_bucket/HPIM3347.jpg

 https://i.imgur.com/LjRRaV1.png


  • Member since
    April 2005
  • From: Piscataway, NJ!
Posted by wing_nut on Tuesday, June 12, 2012 5:21 PM

Well... not much point in building a tiger after that.  Kinda like going on stage to play an accordion after the Beatles were on.


Just stunning.

Marc  

JOIN OUR COMMUNITY!

Our community is FREE to join. To participate you must either login or register for an account.

SEARCH FORUMS
FREE NEWSLETTER
By signing up you may also receive reader surveys and occasional special offers. We do not sell, rent or trade our email lists. View our Privacy Policy.