SEARCH FINESCALE.COM

Enter keywords or a search phrase below:

DML Brummbar Mid COMPLETE 07-30-12

35388 views
195 replies
1 rating 2 rating 3 rating 4 rating 5 rating
  • Member since
    March 2003
  • From: Rain USA, Vancouver WA
Posted by tigerman on Monday, July 9, 2012 12:47 AM

That's crazy Bill, but glad to see that you've overcome it.

   http://i7.photobucket.com/albums/y269/wing_nut_5o/PANZERJAGERGB.jpg

 Eric 

  • Member since
    July 2004
  • From: Texas
Posted by wbill76 on Monday, July 9, 2012 12:14 PM

Carl,

Sounds as good as any other explanation at this point, normally DML styrene doesn't have any reaction to exposure to thinner in my experience but I suppose the circumstances were different this time around. Getting the gun installed put a lot of stress on the barrel sleeve not once but twice as the first time failed and required sanding and whatnot for the 2nd attempt...which was also a very tight fit. It could have been much worse if the cracks had gone all the way into the ball portion, that would've presented a much greater repair challenge!

Mike,

We'll blame it on sloppy techs at the assembly plant! Wink Thanks as always for stopping by.

Clay,

I replaced the kit Magic tracks with Model Kasten workable tracks. I make my own washes, yes, but use MM enamel paints as the start point. I'm not nearly good enough at chemistry to formulate my own paints! Stick out tongue Thanks for the comments!

Mark,

I've had some other things turn brittle when exposed to thinner but never something of this magnitude in 10 years of working with enamels and thinner for all my projects. First time for everything though I guess!

Eric,

Me too! I sacrificed some spare sprue in the back yard in thanksgiving for the narrowly averted disaster! Wink

  • Member since
    April 2007
  • From: Schroon Lake, NY
Posted by SMJmodeler on Wednesday, July 11, 2012 12:42 PM

Nice save Bill.  I had a similar problem on a T34 way back when and I think it was the result of several mediums applied over each other without allowing proper drying time. The disproportionate shrinkage caused some serious gaps.   Any chance your lovelyEmbarrassed Texas heat & humidity had the same effect?

  • Member since
    July 2004
  • From: Texas
Posted by wbill76 on Wednesday, July 11, 2012 12:51 PM

Hard to say for sure Steve...there was plenty of time for curing/drying in all the previous stages. The paint work sat for a full week before getting the Future treatment and the Future also sat for a full week before I applied the wash. I suspect the wash is the culprit as none of the cracking appeared before that stage and and the wash sat overnight with the cracks noticeable the following day. The temp in the house stays fairly constant at 77 degrees (the joys of refrigerated air conditioning!) but the humidity difference may have played a role...whatever the combination was, it all came together to produce it! Wink

  • Member since
    March 2006
  • From: Right Side of a Left State
Posted by Shellback on Wednesday, July 11, 2012 3:04 PM

Bill , i got Dr. Frankenstein on the case to find the cause .................Stick out tongue

  • Member since
    July 2004
  • From: Texas
Posted by wbill76 on Wednesday, July 11, 2012 7:19 PM

Just make sure we all get a nice glass of Ovaltine and that will solve everything! Wink

  • Member since
    July 2004
  • From: Texas
Posted by wbill76 on Sunday, July 15, 2012 7:25 PM

Didn't quite get as much done as I'd hoped...my wife forgot to put our outside cat who spends the night in the garage out on Friday and he must have fallen asleep in the engine. I went out in the afternoon to run an errand and started up the car and the engine belt must've caught him as he tried to get out...he lost quite a bit of fur (has a naked strip down one full side of his body!) but no serious injury and the fur caused the belt to come off...so I spent Saturday getting the car repaired instead of at the bench. Friday the 13th and a cat combined in a bizarre way!

Today had no such incidents and some progress can be reported. I started in on the weathering with the application of a dot filter using MM enamel Flat White, Raw Sienna, and Panzer Dunkelgelb. Since this finish has large zimmed surfaces, the dot filter approach has to be done a bit differently. Instead of downward strokes with a square tip brush, I applied the strokes in the direction of the zim pattern.

This takes more time and patience to get the desired result, so lots of time wearing the breather mask and working with clean thinner is required. The process blends the previous paint work together and also creates some shadows/depth to the zim and dirt/grime accumulations here and there in the pattern.

This process was repeated working in small sections at a time across the entire vehicle except for the lower hull. That area doesn't need dot filters since it will be weathered with pigments in a future step. 

Next up will be a pin wash to bring out some of the details before sealing it up and getting ready for the pigment process.

  • Member since
    July 2006
  • From: New Jersey
Posted by redleg12 on Sunday, July 15, 2012 9:21 PM

Bill - Looking good.... As for the cat....glad to hear it was OK. I am sure the cat will never go into the garage ever again..... 8 lives left

Rounds Complete!!

"The Moral High Ground....A Great Place to Emplace Artillery."

  • Member since
    March 2006
  • From: Right Side of a Left State
Posted by Shellback on Sunday, July 15, 2012 11:44 PM

Poor kitty !  I dont know how they survive such experiences ........................

I like the weathering Bill .That camo pattern is looking better also .Yes

  • Member since
    December 2004
  • From: ohio
Posted by vonryan on Monday, July 16, 2012 8:21 AM

OUCH CAT!!  i'm with Mike. no more GARAGES . as always Bill gerat work. i want to get started back to German armor but i've got to get these Sherman's done. or i should say ALL my U.S. armor done.

Clay

  • Member since
    July 2004
  • From: Texas
Posted by wbill76 on Monday, July 16, 2012 10:07 AM

Mike,

thanks...the cat has no choice about going into the garage, but maybe he'll stay away from the engine from now on! I think the biggest lesson learned wasy by my wife...Sharon's the one responsible for putting him out in the mornings and she kept saying "we almost killed him!" all weekend so I think she's been slightly traumatized by it.

Carl,

me neither! This particular cat has lived a long time for an outside cat, he's over 10 years old and still going strong but I wonder how many such scrapes he can avoid before his number comes up. Wink Glad youl ike the pattern and the effects so far!

BeerClay,

thanks for the comments as well. Nothing wrong with working on Shermans or Germans! So long as you enjoy what you're doing that's what counts. Smile
  • Member since
    July 2006
  • From: New Jersey
Posted by redleg12 on Monday, July 16, 2012 1:29 PM

Revenge

Rounds Complete!!

"The Moral High Ground....A Great Place to Emplace Artillery."

  • Member since
    December 2002
  • From: Bury St Edmunds, Suffolk, England
Posted by Bish on Monday, July 16, 2012 4:17 PM

Glad to hear the cats ok.

Nice work, as always from you. And i will second that on the Zimm weathering. I really need to get back to some armour.

I am a Norfolk man and i glory in being so


On the bench: Airfix 1/72nd Harrier GR.3/Fujimi 1/72nd Ju 87D-3

  • Member since
    March 2006
  • From: Right Side of a Left State
Posted by Shellback on Monday, July 16, 2012 6:07 PM

Mike LOL !

Dang hot engine cats anyway !

  • Member since
    July 2004
  • From: Texas
Posted by wbill76 on Monday, July 16, 2012 7:46 PM

Mike

That's a great photo, someone ticked that kitty off for sure! ROFLMAO!

Bish,

Thanks and glad you like the zim results. The dark side is calling to you, it's futile to resist! :)

  • Member since
    April 2007
  • From: Schroon Lake, NY
Posted by SMJmodeler on Tuesday, July 17, 2012 8:46 AM

Bill:  It seems like you're having one incident after another every time you plan to work on this one!!! Stick out tongue ...weird.  

FYI: Your explanation of the dot filter is great as always, but the effect is almost undetectable in the photos.  Not sure how to get this to show better...a close-up maybe?...slighty different lighting?...Confused

What I see looks great...love the zim'!

  • Member since
    December 2004
  • From: ohio
Posted by vonryan on Tuesday, July 17, 2012 8:52 AM

AAAAAAAAHAHAHA HEY Mike to funny. Bill better keep an eye on that cat buddy. :)

  • Member since
    October 2009
Posted by PANZERWAFFE on Tuesday, July 17, 2012 6:25 PM

Glad I made it back on here in time to see you put the finishing steps on this one. She is really looking good and is becoming one of my favorites. The weathering blended the camo together beautifully and the pattern looks great. The pattern you applied and the vehicle itself is just very eye-catching.

Strange with that crack on the gun showing itself but nice fix.  Now that the cats out of the bag or should we say the car  looking forward to see her cross the finish line.

Rob

  • Member since
    July 2004
  • From: Texas
Posted by wbill76 on Tuesday, July 17, 2012 7:20 PM

Steve

not all that strange...when I get to this stage in a build I have to have blocks of time and that can be tough...but I will admit that this particular build has had some "extra" unusual turns! Big Smile

PW

thanks and glad you were able to stop in! Hopefully this next weekend will see this grizzly bear across the finish line. Wink
  • Member since
    August 2008
  • From: S.W. Missouri
Posted by Pvt Mutt on Tuesday, July 17, 2012 8:35 PM

"Trippin Red Lights"Big Smile

That's FunnyToast

Come on weekend

Tony lee

Shoot Low Boys They're Ridin Ponys

  • Member since
    July 2004
  • From: Texas
Posted by wbill76 on Wednesday, July 18, 2012 5:03 PM

Ditto that Tony! Big Smile

  • Member since
    March 2003
  • From: El Dorado Hills, CA
Posted by IBuild148 on Saturday, July 21, 2012 11:40 AM

Know that I have read all 10 pages since I have this one in the stash and your WIP are always insightful all that's left is.....SPECTULAR!!!

And that cat is darn lucky!

IBuildOne48

Teach modeling to youth!

Scalefinishes.com

http://i712.photobucket.com/albums/ww122/randysmodels/NMF%20Group%20build%20II/Group%20Badge/NMFIIGBbadgesmall.jpg


  • Member since
    March 2003
  • From: Western North Carolina
Posted by Tojo72 on Saturday, July 21, 2012 2:36 PM

Sorry about the car and the cat,but that dot method on the Zimm is very effective

  • Member since
    July 2004
  • From: Texas
Posted by wbill76 on Saturday, July 21, 2012 3:59 PM

IB,

Glad to hear this will be helpful to you in the future, thanks for the comments! I agree with your assessment on the cat as wel. Big Smile

Tojo,

,

Could've been much much worse, fortunately all is right with the world again and time is available this weekend to keep the build moving. Wink

  • Member since
    July 2004
  • From: Texas
Posted by wbill76 on Sunday, July 22, 2012 5:55 PM

My goal of getting the Brummbar complete this weekend wasn't quite realized as I often underestimate just how much time some steps will take when this close to the finish line...but better to get it done right than rush things too quickly!

Picking up from the last update, the weathering continued with the application of a pin wash using thinned enamel MM Burnt Umber and a pointed detail brush.
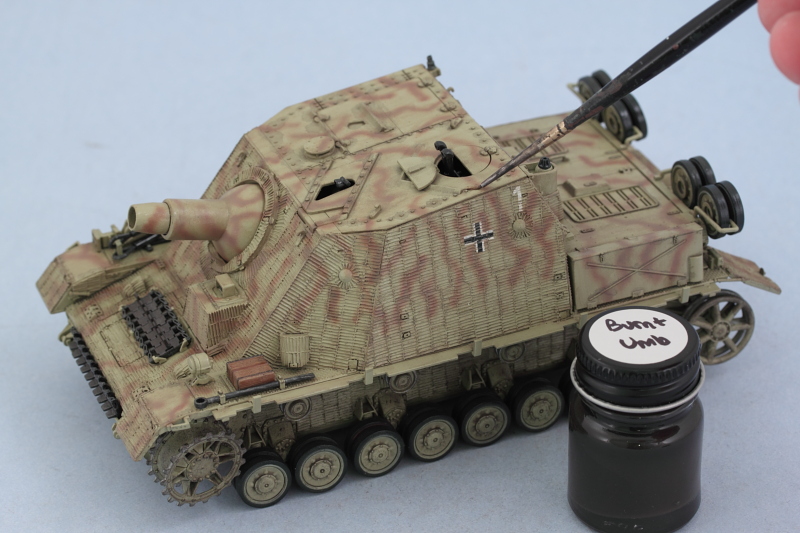
Because of the flat finish surface that the dot filters created, the pin wash has a tendency to "bloom", so that meant coming back with the same detail brush and some clean thinner to tighten things up.

With that step done, the entire vehicle received a sealing coat of MM Lusterless Flat in the spray can. I let that set for about an hour in the spray booth with the vent fans running to dry thoroughly before moving on to the pigment weathering.

The pigment weathering for the lower hull began with a wet application of Mig Dark Mud pigments. I use regular tap water with a drop of liquid Dawn dish washing soap added to break the surface tension and apply the mix with a medium round brush.

After the met mix has air dried, I use a stiff bristled brush (while wearing a dust mask to avoid inhaling the particles) to remove any loose/excess pigment. More pigment is removed and adjusted using wet q-tips until I get the look I want.

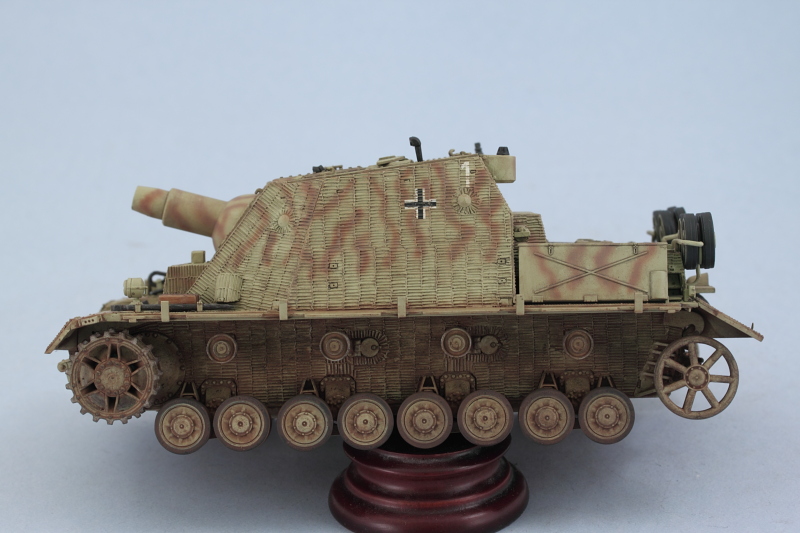
This process was applied to the lower hull and running gear on both sides as well as the hull front and rear. Next up will be giving the tracks their treatment and getting them ready for installation.

  • Member since
    July 2006
  • From: New Jersey
Posted by redleg12 on Sunday, July 22, 2012 6:47 PM

Bill - I know the feeling, at times it seems like things take 10 times longer than you expected. The worst part is we seem to have 10 times less time these days.

Rounds Complete!!

"The Moral High Ground....A Great Place to Emplace Artillery."

  • Member since
    August 2008
  • From: S.W. Missouri
Posted by Pvt Mutt on Sunday, July 22, 2012 7:25 PM

OH NO  makin us wait another week????Bang Head

Oh well you did pretty good with the weathering i'll let it slide another week.Wink

Tony lee

Shoot Low Boys They're Ridin Ponys

  • Member since
    July 2004
  • From: Texas
Posted by wbill76 on Sunday, July 22, 2012 8:12 PM

Mike,

you hit it right on the head sir! Still I can't complain too much, at least I'm getting in some progress on a consistent basis. Big Smile

Tony,

sorry my friend...but thanks for the pass...and in return I won't mention anything about certain line-ups that are yet-to-be-completed on your workbench! Propeller Wink
  • Member since
    October 2009
Posted by PANZERWAFFE on Sunday, July 22, 2012 8:40 PM

Looks real good Bill.  Do you ever seal the pigments and if so with what.

Rob

  • Member since
    December 2004
  • From: ohio
Posted by vonryan on Monday, July 23, 2012 7:06 AM

wow Bill i do like watching your work. you really turn this stuff into art!

Clay  

JOIN OUR COMMUNITY!

Our community is FREE to join. To participate you must either login or register for an account.

SEARCH FORUMS
FREE NEWSLETTER
By signing up you may also receive reader surveys and occasional special offers. We do not sell, rent or trade our email lists. View our Privacy Policy.