SEARCH FINESCALE.COM

Enter keywords or a search phrase below:

DML Brummbar Mid COMPLETE 07-30-12

35388 views
195 replies
1 rating 2 rating 3 rating 4 rating 5 rating
  • Member since
    July 2004
  • From: Texas
Posted by wbill76 on Monday, July 23, 2012 10:02 AM

PW

I do not seal the pigments as the use of the water as a "carrier" seems to do the trick well enough. Some care is still required in handling after but it's not the same as if the pigments were applied "dry" where they will come off at the slightest touch if not fixed in place. Thanks for the comments!

Clay

glad you're enjoying watching this one along with me, high praise indeed and thanks! Beer
  • Member since
    April 2007
  • From: Schroon Lake, NY
Posted by SMJmodeler on Wednesday, July 25, 2012 8:55 AM

Hey Bill: You've described this technique before but the pictures are especially helpful this time, thanks!

WOW!!!, this baby is head-to-toe zim'...I didin't notice the lower hull zim' in the previous pic's.  Looking forwad to seeing her completed!!!  (I bet you are tooWink

  • Member since
    July 2004
  • From: Texas
Posted by wbill76 on Wednesday, July 25, 2012 1:43 PM

Thanks Steve, glad the extra pics help show the process. You're right about the proliferation of zim...the Brummbar has one of the highest zim coverage foot prints of all the German designs, so lots of surface area to play with! Big Smile And yes, I'm looking forward to the completion...almost there! Wink

  • Member since
    July 2006
  • From: San Francisco Bay Area
Posted by bufflehead on Wednesday, July 25, 2012 11:26 PM

If Phil Jackson is the Zen Master, then Bill is the Zim Master!!  

OK, enough lame jokes!!  Clown  Its really coming together Bill!  I've been following your blogs for years and I admire how you've developed a building/painting/weathering method that you like and works for you, and you faithfully follow it all the way through with consistently great results!!  Yes

Ernest

Last Armor Build - 1/35 Dragon M-26A1, 1/35 Emhar Mk.IV Female


Last Aircraft Builds - Hobby Boss 1/72 F4F Wildcat & FW-190A8


  • Member since
    July 2004
  • From: Texas
Posted by wbill76 on Saturday, July 28, 2012 11:33 AM

Thanks Ernest! The style has evolved over time and I tinker with different things here and there on each build depending on what I'm trying to achieve. It is interesting to look back on some of the other build logs and see what has changed...some things have stayed fairly consistent and others have come and gone or improved. All part of the fun of making each build different from the last! Wink

  • Member since
    July 2004
  • From: Texas
Posted by wbill76 on Saturday, July 28, 2012 8:04 PM

Today was one of my more-productive sessions in a while. I started in on the pigment weathering for the tracks and this is where using a set of workable tracks really pays off in my view. I used the same water-and-dish soap approach here but used Mig Dry Mud pigments. It's a lighter pigment that works well with the dark color of the tracks and I applied it only to the bottom surfaces of the links. The intent here is to get it into the faces of the tracks but not as heavy an application as when I was working on the lower hull.

This is allowed to air dry, the result is much lighter than the wet mix would lead you to think, and I used a round stiff bristled brush to remove most of the pigment.

The reason I don't apply the wet mix to the top side of the track is that it's not necessary. The process of dealing with the bottom side translates into a light coating of fine pigment ending up on the top side due to the action of the stiff bristled removal from the bottom. Sounds a bit counter-intuitive but it is the result. Some adjustments with the same round brush on the top side and this is how the track run ends up.

I installed the tracks on both sides and glued the sprockets into position. Once the sprockets had set up, I used some dry Mig Dry Mud pigment to lightly dust the wheels and suspension as well as the hull side to create an additional layer effect and tie them in with the tracks.

Front hull received some dusting as well as did the spare track runs. I also applied some black artist pastels inside the muzzle of the 15cm gun to improve its look.

The rear hull and spare wheels were dusted along with the exhaust. Then I added the radio antennas using 2m brass rods from RB Models. I cut the rod down for the star antenna to the proper length and used CA gel and the kit-supplied "star" portion to assemble.
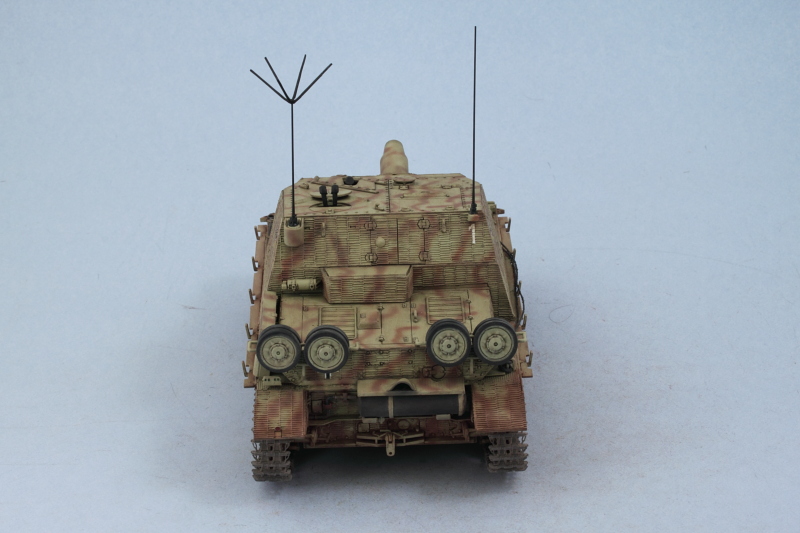
The fun part with the antennas was getting the tilt and alignment right on the different antennas. The impulse is to have them both straight and upright but that's not how they were due to the different bases and points of installation.

There are just a couple small things left to clean up like adding a little bit of bare metal wear to the track faces on the sprockets and idlers since the pigments largely removed what I'd put in place earlier. Tomorrow will see this one in the photo booth for the walk-around completion pics!

  • Member since
    December 2004
  • From: ohio
Posted by vonryan on Saturday, July 28, 2012 10:08 PM

GREAT LOOKING BUILD !!! as always Bill. i really liked looking in on this. can't wait to see your next ADVENTURE :).

Clay

  • Member since
    March 2003
  • From: Rain USA, Vancouver WA
Posted by tigerman on Saturday, July 28, 2012 11:15 PM

That's shaping up mighty finely Bill.

   http://i7.photobucket.com/albums/y269/wing_nut_5o/PANZERJAGERGB.jpg

 Eric 

  • Member since
    March 2006
  • From: Right Side of a Left State
Posted by Shellback on Sunday, July 29, 2012 12:10 AM

Tracks and antenna's came out spot on Bill !

  • Member since
    July 2006
  • From: New Jersey
Posted by redleg12 on Sunday, July 29, 2012 6:52 AM

Ahhh...across the finish line now headed to the winners circle!!

As usual a professorial explanation in text book style. The eloquence of your blogs and you unmatched photography are beyond reproach. As usual you set a standard that inspires all who read this. You are a credit to yourself, armor modeling, the hobby as a whole.

Now I present you with........naaa.....forgetaboutit......you don't need no stinking medal  Wink

Nice work Bill

Rounds Complete!!

"The Moral High Ground....A Great Place to Emplace Artillery."

  • Member since
    April 2009
  • From: Carmel, IN
Posted by deafpanzer on Sunday, July 29, 2012 9:50 AM

redleg12

Ahhh...across the finish line now headed to the winners circle!!

Now I present you with........naaa.....forgetaboutit......you don't need no stinking medal  

Right on!  He doesn't need one but what about those nice ladies awaiting at the finish line? 

Andy

  • Member since
    July 2004
  • From: Texas
Posted by wbill76 on Sunday, July 29, 2012 11:29 AM

Thanks guys, appreciate the comments!

Mike,

that's a fine speech sir...I'll have to steel some of those lines in the future. Big Smile

Andy,

you trying to get me in trouble with the wife??? Wink Beer
  • Member since
    April 2009
  • From: Carmel, IN
Posted by deafpanzer on Sunday, July 29, 2012 12:16 PM

Of course I am!  Getting your wife to have you grounded means more bench time... I am just trying to help you my buddy.  Wink Beer

Andy

  • Member since
    September 2005
  • From: beacon falls , Ct.
Posted by treadwell on Sunday, July 29, 2012 1:12 PM

Heya Bill ... fun ride !YesYes   It's just gorgeous !

yer pal,

treadCool

and it was early in the day !  lol


  • Member since
    July 2004
  • From: Texas
Posted by wbill76 on Sunday, July 29, 2012 2:38 PM

Andy

, I see...that's definitely some creative logic although I don't think it will be easy to build with broken fingers! Big Smile


Tread

, glad you enjoyed the ride with me!

As promised, here are the walk-arounds of the finished build.

  • Member since
    September 2006
  • From: Dripping Springs, TX, USA
Posted by RBaer on Sunday, July 29, 2012 3:51 PM

Spotless (so to speak), as always. Thumbs up!

Apprentice rivet counter.

  • Member since
    July 2004
  • From: Texas
Posted by wbill76 on Monday, July 30, 2012 10:49 AM

Thanks Rbaer!

  • Member since
    June 2006
  • From: Michigan
Posted by ps1scw on Monday, July 30, 2012 12:35 PM

Very nice

  • Member since
    December 2004
  • From: ohio
Posted by vonryan on Monday, July 30, 2012 3:08 PM

sometimes i wonder what size dios some of you guys would get if you put all your builds and your minds to it. Bill i know yours would be one of the finest out there i've peeked into your site and am just at an awe over your builds. now you can add another one .

Clay

  • Member since
    December 2002
  • From: Bury St Edmunds, Suffolk, England
Posted by Bish on Monday, July 30, 2012 3:16 PM

The only problem i have when we have builders who are this consistantly good is thati run out of things to say without constantly repeating myself.

Stunning as always. Always a pleasure to see what you do with a bit of plastic.

I am a Norfolk man and i glory in being so


On the bench: Airfix 1/72nd Harrier GR.3/Fujimi 1/72nd Ju 87D-3

  • Member since
    November 2005
Posted by Anonymous on Monday, July 30, 2012 3:24 PM

Very nice "Grizzly Bear", Bill...zimm looks great as does the painting. Woulda probably put a bit more sag into the tracks but the tension you chose certainly isn't wrong.  Two thumbs up...!!!

  • Member since
    July 2004
  • From: Texas
Posted by wbill76 on Monday, July 30, 2012 3:51 PM

Thanks psi1, Bish, and Manny!

Clay

, that would be interesting...a sort of FSM Dio collaborative effort. The logistics would be pretty staggering but cool if it could be pulled off. Thanks for hte comments!

  • Member since
    March 2003
  • From: Rain USA, Vancouver WA
Posted by tigerman on Tuesday, July 31, 2012 1:05 AM

Always liked the Brummbar. Well executed as usual Bill. I agree with Bish, I'm running out of "superlatives".

   http://i7.photobucket.com/albums/y269/wing_nut_5o/PANZERJAGERGB.jpg

 Eric 

  • Member since
    March 2006
  • From: Right Side of a Left State
Posted by Shellback on Tuesday, July 31, 2012 2:03 AM

Bill , another beaut .The camo ove rthe zim with your weathering ...............looks great .

  • Member since
    November 2004
  • From: Essex England
Posted by spacepacker on Tuesday, July 31, 2012 1:04 PM

Bill, Ive got to say it,,,, I'm 'Gobsmacked'...cheers....Kenny

  • Member since
    March 2003
  • From: Western North Carolina
Posted by Tojo72 on Tuesday, July 31, 2012 1:26 PM

Great finish Bill as usual,another great blog.

  • Member since
    July 2004
  • From: Texas
Posted by wbill76 on Tuesday, July 31, 2012 7:41 PM

Eric

, Carl, and Tojo, thanks as always for the kind words!

Kenny

, always a pleasure to receive your signature seal of approval! Beer
  • Member since
    April 2005
  • From: Piscataway, NJ!
Posted by wing_nut on Tuesday, July 31, 2012 7:55 PM

I'll see manny's 2 thumbs up and raise it 2 YesYes.  Oh heck... I'll go all in and do the big toes too!

Marc  

  • Member since
    April 2012
Posted by Reserve on Tuesday, July 31, 2012 10:44 PM

Sweet, as usual. Great contrast on the zimmerit, not too strong but one can see it. I can imagine that it can only look better in person, so to speak. Whatchya doin next?


Regards,

Mark

  • Member since
    July 2006
  • From: San Francisco Bay Area
Posted by bufflehead on Tuesday, July 31, 2012 10:49 PM

Another fine build Bill!  I agree with Mark above, great looking zimmerit, love the camo pattern and weathering is top notch! YesYes  I'm also eager to see your next project!

Ernest

Last Armor Build - 1/35 Dragon M-26A1, 1/35 Emhar Mk.IV Female


Last Aircraft Builds - Hobby Boss 1/72 F4F Wildcat & FW-190A8


JOIN OUR COMMUNITY!

Our community is FREE to join. To participate you must either login or register for an account.

SEARCH FORUMS
FREE NEWSLETTER
By signing up you may also receive reader surveys and occasional special offers. We do not sell, rent or trade our email lists. View our Privacy Policy.