SEARCH FINESCALE.COM

Enter keywords or a search phrase below:

1/35 Hobby Boss M4 18 Ton HST, WIP, 9/26/12, Complete

41239 views
189 replies
1 rating 2 rating 3 rating 4 rating 5 rating
  • Member since
    July 2006
  • From: New Jersey
Posted by redleg12 on Sunday, May 27, 2012 8:23 PM

Shell - Thanks for the peek. More to come....trust me!!

Tread - Thanks....tomorrow is my annual walk in the local parade!!

The OD primer could be used as a top coat as far as I can see. The color is a light OD, sort of brownish OD. What I like about it is it comes in a nice size jar for a decent price. Goes right from the jar to the AB with no problem.

Thanks guys

Rounds Complete!!

"The Moral High Ground....A Great Place to Emplace Artillery."

  • Member since
    April 2009
  • From: Carmel, IN
Posted by deafpanzer on Sunday, May 27, 2012 8:25 PM

Great process especially the engine! Yes  Enjoy the parade tomorrow... hope you are driving your lawnmower hauling the lawn cannon again? 

Will hug all veterans tomorrow if they allow me... Right Hug

Andy

  • Member since
    July 2004
  • From: Texas
Posted by wbill76 on Monday, May 28, 2012 12:10 PM

Happy Memorial Day to all who have and continue to serve!

Nice work on the details as usual Mike, looking good! Yes

  • Member since
    July 2006
  • From: New Jersey
Posted by redleg12 on Monday, May 28, 2012 5:25 PM

Thanks guys about Memorial Day....the weather was great, lots of hand shakes and hugs....they were older and younger and we were all brothers (& sisters). It is was a good day to remember all those who could not be there

Andy - Thanks for the peek.....more fun coming soon

Bill - Thanks for the peek...stop reading the economics.....modeling is not that expensive or complicated!!

Rounds Complete!!

"The Moral High Ground....A Great Place to Emplace Artillery."

  • Member since
    July 2004
  • From: Texas
Posted by wbill76 on Tuesday, May 29, 2012 6:47 PM

Mike,

First week as classes start up are always a bit reading heavy...but I managed to get through it today although I have to admit that I'm thinking about "elasticity" in a whole different light as a result! Propeller

  • Member since
    July 2006
  • From: Philippines
Posted by constructor on Monday, June 4, 2012 2:59 AM

For lack of instruction  (as is usually is) and illustration, I could not make out how to build the the chain block. Is there any illustration you can recommend. The slot on the block is to small for the chain included in the kit so I had to file it to enlarge the slot. My problem is how it goes around the block. Thanks for any help.

  • Member since
    April 2005
  • From: Piscataway, NJ!
Posted by wing_nut on Monday, June 4, 2012 7:38 AM

Need more picture.


And of course... Hi Mike.  How ya been?Wink

Marc  

  • Member since
    July 2006
  • From: New Jersey
Posted by redleg12 on Monday, June 4, 2012 9:54 PM

Constructor - Give me a day or so.....I know I have a picture somewhere.....

Marc - Nice of you to stop in and peek, thanks....all is well and hope the same for you

I'll be back!!

Rounds Complete!!

"The Moral High Ground....A Great Place to Emplace Artillery."

  • Member since
    March 2006
  • From: Right Side of a Left State
Posted by Shellback on Monday, June 4, 2012 10:07 PM

Ready and waitin ..................


  • Member since
    July 2006
  • From: Philippines
Posted by constructor on Tuesday, June 5, 2012 4:37 PM

redleg12

Constructor - Give me a day or so.....I know I have a picture somewhere.....

Marc - Nice of you to stop in and peek, thanks....all is well and hope the same for you

I'll be back!!

Rounds Complete!!

Thanks Redleg. I'll wait. The instructions just showed the assembly of the block but did not illustrate the putting of the chain. The drawing is not even clear about it. Thanks!

  • Member since
    July 2006
  • From: New Jersey
Posted by redleg12 on Tuesday, June 5, 2012 8:21 PM

constructor

 redleg12:

Constructor - Give me a day or so.....I know I have a picture somewhere.....

Marc - Nice of you to stop in and peek, thanks....all is well and hope the same for you

I'll be back!!

Rounds Complete!!


Thanks Redleg. I'll wait. The instructions just showed the assembly of the block but did not illustrate the putting of the chain. The drawing is not even clear about it. Thanks!

OK...the M4 18 ton HST had a chain hoist on a boom for the ammunition. I thought I had a good picture of the hoist but not for what you are looking for....BUT.....this should explain a manual chain hoist and how it works. Hopefully you will then understand how the chain goes on the hoist after watching this

 http://www.encyclopedia.com/video/3j55IAg3GgE-how-it-works-chain-hoist.aspx

HTH

Rounds Complete!!


"The Moral High Ground....A Great Place to Emplace Artillery."

  • Member since
    July 2006
  • From: New Jersey
Posted by redleg12 on Monday, June 11, 2012 8:30 PM

Well, the past couple of weeks have been a zoo at work and busy at home so progress slowed. Just a small update this time to keep your interest.

First I painted the interior components of the ammunition box section with Tamiya Flat White. After the paint dried I assembled the box. The fit of the side panel to the rear panel left a lot to be desired and all the seams needed a fair amount of putty and sanding.

Here is the current status of the ammunition box. I have removed the molded blobs for tie downs and I still have to replace them with PE tie downs.

The interior cushions looked like blobs of plastic. The seat cushions are totally wrong. So, to give the side and back cushions the look of cloth, I covered them in aircraft tissue. The seat cushions are long molded double seats with no character. The interior photos in High Speed Tractors by Doyle shows single seat cushions, which look like old used pillows.

To create these I used two-part epoxy putty rolled out to about the right thickness then cut to size. After they set up I also covered them with aircraft tissue. With all the cushions covered, the cushions were primed and then painted with Tamiya Drab Green.


I am in the process of scratching the benches that the seat cushions sit on. That’s it for now

As always all comments are welcome.

Rounds Complete!!


"The Moral High Ground....A Great Place to Emplace Artillery."

  • Member since
    September 2005
  • From: beacon falls , Ct.
Posted by treadwell on Monday, June 11, 2012 9:18 PM

Hi Mike  :  )

The ammo box looks pristine  and I am sure with the brass tie downs it will look just fantastic !

The seat cushions look really nice, but I am kind of wondering why you covered them instead of just painting them ?    I am guessing you made folds to make them look  like they were stitched. I am sure they will look terrific.

Looking forward to your continuing progress !

treadCool


  • Member since
    July 2006
  • From: New Jersey
Posted by redleg12 on Tuesday, June 12, 2012 5:47 AM

Tread thanks for the peek. The coverings, which may be hard to see in the picture, was my try to give the cushions the cloth covered look. Once I covered the kit blobs, I covered the seats to keep a uniform look.

Thanks again

Rounds Complete!!

"The Moral High Ground....A Great Place to Emplace Artillery."

  • Member since
    April 2007
  • From: Schroon Lake, NY
Posted by SMJmodeler on Tuesday, June 12, 2012 8:52 AM

Mike:  Cool idea on those cushions, they look great!  Hey, thanks for the commentary and comparisons to the actual vehicle and the book.  It'll be very helpful when I build my M4 18 Ton HST...better you be the guinea pig than me!Wink

  • Member since
    July 2004
  • From: Texas
Posted by wbill76 on Tuesday, June 12, 2012 2:18 PM

Any progress is good progress Mike! The improvement to the seat cushions will show up better once painted and weathered I'm sure. Beer

  • Member since
    July 2006
  • From: New Jersey
Posted by redleg12 on Tuesday, June 12, 2012 8:35 PM

Bill - thanks....as you get older you appreciate the little things....including progress, no matter how small!

Rounds Complete!!

"The Moral High Ground....A Great Place to Emplace Artillery."

  • Member since
    March 2006
  • From: Right Side of a Left State
Posted by Shellback on Tuesday, June 12, 2012 10:43 PM

Mike the ammo box really is a piece of pristine work . Yes

  • Member since
    July 2006
  • From: New Jersey
Posted by redleg12 on Thursday, June 14, 2012 5:20 AM

Carl - Thanks for the peek.

Rounds Complete!!

"The Moral High Ground....A Great Place to Emplace Artillery."

  • Member since
    July 2006
  • From: New Jersey
Posted by redleg12 on Sunday, July 1, 2012 8:24 PM

This summer has been busy and it has been hard to get bench time. I have some progress to report from our last update.

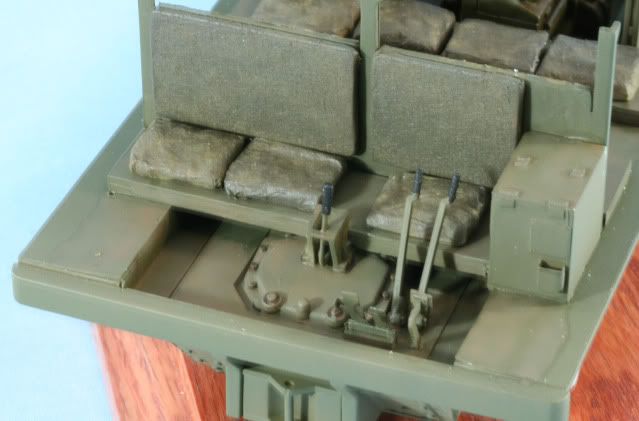
The benches were scratched from two sheets of .040 styrene, laminated together. After cutting and sanding the benches were primed and painted with Poly Scale OD. While working on the benches I weathered the floor of the cabin with AK Mud Effects. While I was in the weathering mode, all of the cushions were weathered with MIG Ochre Wash, then a pin wash using MIG dark wash for deep spots on the cushions. After installing the benches, I installed the back cushions on the divider panel and installed the divider panel.  Then I installed the rear cushions.
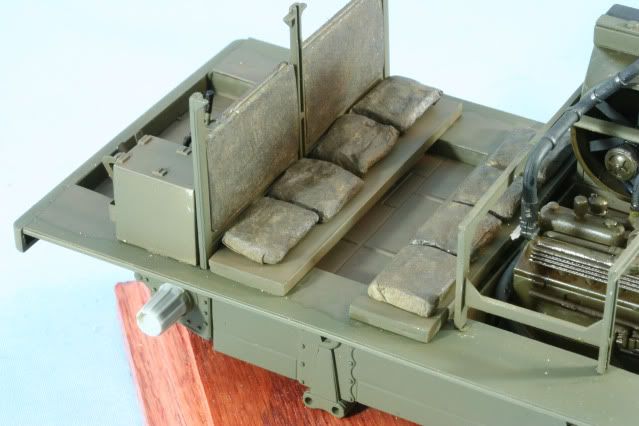
In the front section I used the PE set for the pedals, and installed the driving arms and clutch. The handles were painted black while the frames were Poly scale OD and some Alclad Steel dry brushed for wear on the track levers and pedals. Here is the view with the front seats installed.
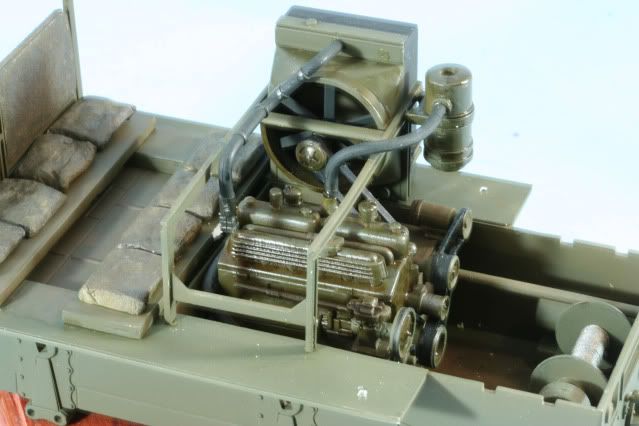
With all the weathering products open, the engine was coated and pin washed with AK Engine Grime
That’s it for now. Need to work on the fire extingushers and the dash board to finish up the cabin interior.

Hope everyone has a great July 4, stay cool and enjoy some tube steaks.

As always, all comments are welcome.

Rounds Complete!!

"The Moral High Ground....A Great Place to Emplace Artillery."

  • Member since
    September 2005
  • From: beacon falls , Ct.
Posted by treadwell on Sunday, July 1, 2012 8:53 PM

Hiya Mike :  )  cushions look dam good buddy and the AK engine grime pops out the detail while adding ..er..grime ! LOL

You have a nice 4th of July, too

looking good manYes

treadCool


  • Member since
    December 2004
  • From: ohio
Posted by vonryan on Sunday, July 1, 2012 10:22 PM

as always Mike outstanding build.

Clay

  • Member since
    March 2006
  • From: Right Side of a Left State
Posted by Shellback on Sunday, July 1, 2012 10:42 PM

I'm liking the engine details MikeYes

  • Member since
    July 2006
  • From: New Jersey
Posted by redleg12 on Monday, July 2, 2012 4:35 AM

Tread - Always a pleasure to have you stop by. Glad you like the cushions.....at our age it is always good to be comfy!!

Clay - Thanks for stopping by.

Shell - Just trying to earn my popcorn!!

Thanks guys

Rounds Complete!!

"The Moral High Ground....A Great Place to Emplace Artillery."

  • Member since
    April 2007
  • From: Schroon Lake, NY
Posted by SMJmodeler on Monday, July 2, 2012 9:23 AM

Mike: Looking real good, helpful descriptions too!   You might want to dry-brush some worn metal on the floor boards and that metal cover near the track levers and pedals, the engine feels a bit clean too.  You're making me want to build this one!

  • Member since
    July 2004
  • From: Texas
Posted by wbill76 on Monday, July 2, 2012 10:12 AM

Looking good Mike! I think it's fitting that you spent your bench time working on benches...seats look the part as does the engine. Yes

  • Member since
    July 2006
  • From: New Jersey
Posted by redleg12 on Monday, July 2, 2012 6:43 PM

Steve - Thanks for the peek. I still have to get my #2 pencil into the cabin before I button it up. Still have the seat belts fire extinguishers and dash to go inside. As for the engine....too oily says there is a problem..also afraid of going tooooo dark.

Bill - Yep finally was able to take a seat to make my seats!! Thanks

Rounds Complete!!

"The Moral High Ground....A Great Place to Emplace Artillery."

  • Member since
    July 2006
  • From: San Francisco Bay Area
Posted by bufflehead on Monday, July 2, 2012 9:19 PM
Whoa Redleg, how did I miss this? smj gave me a heads up about your blog in another thread. Excellent work sir! I luv all the extra work you're putting in, like those slick seat cushions! Another technique I'm storing away for future use!
BTW, how would you rate Hobby Boss's buildability vs other Mfgs like Tamiya, Dragon, etc?

Ernest

Last Armor Build - 1/35 Dragon M-26A1, 1/35 Emhar Mk.IV Female


Last Aircraft Builds - Hobby Boss 1/72 F4F Wildcat & FW-190A8


  • Member since
    March 2006
  • From: Right Side of a Left State
Posted by Shellback on Monday, July 2, 2012 10:44 PM

Hey Mike you earned it !

  • Member since
    July 2006
  • From: New Jersey
Posted by redleg12 on Tuesday, July 3, 2012 4:59 AM

Bufflehead - Thanks for the look. The kit is detailed, and in general assembles well. So from that aspect it is like a Tamiya kit with Dragon details. Where it totally falls on its face and in my opinion totally inhales is the molding. For a new kit it is molded like an early Italeri kit. Flash on almost all parts....huge ejector pin marks in areas which will show....for me it was a big downer on Hobby Boss. If they are the only game in town, well you have to deal with it. If someone else has the same kit, stay away from Hobby Boss......IMO

Shell - More butter please!!

Rounds Complete!!

"The Moral High Ground....A Great Place to Emplace Artillery."

JOIN OUR COMMUNITY!

Our community is FREE to join. To participate you must either login or register for an account.

SEARCH FORUMS
FREE NEWSLETTER
By signing up you may also receive reader surveys and occasional special offers. We do not sell, rent or trade our email lists. View our Privacy Policy.