SEARCH FINESCALE.COM

Enter keywords or a search phrase below:

1/35 Hobby Boss M4 18 Ton HST, WIP, 9/26/12, Complete

41199 views
189 replies
1 rating 2 rating 3 rating 4 rating 5 rating
  • Member since
    July 2004
  • From: Texas
Posted by wbill76 on Monday, August 6, 2012 12:51 PM

Great progress Mike, she's getting closer to the finish line! Nice job with the stars, nothing creates the "painted on look" like, well, paint! Wink

  • Member since
    July 2006
  • From: New Jersey
Posted by redleg12 on Monday, August 6, 2012 6:24 AM

Tread - Thanks for the peek. Yep, trying to get it done for the end of Sept...I'm hoping!

Shell - Pop another bag in the microwave!!! Sorry to keep you waiting....i am peddling as fast as I can  Wink

Rounds Complete!!

"The Moral High Ground....A Great Place to Emplace Artillery."

  • Member since
    March 2006
  • From: Right Side of a Left State
Posted by Shellback on Sunday, August 5, 2012 11:34 PM

Nice work with the stenciled stars Mike . Gives it the "real effect " .Yes Dang , i ate all of my pop corn waiting for this update .Bang Head

  • Member since
    September 2005
  • From: beacon falls , Ct.
Posted by treadwell on Sunday, August 5, 2012 10:32 PM

Hiya Mike

Nice progress my friend YesYes..... Cab, crane and ammo box are  looking topnotch.Stick out tongue...and nice work using the stencil...I know they are a pain in the butt ! I know the completion date you are shooting for...Big Smile

yer pal,

treadCool


  • Member since
    July 2006
  • From: New Jersey
Posted by redleg12 on Sunday, August 5, 2012 7:32 PM

Well it seems like I can never get enough bench time. Finally had some time this weekend. The ammo box was primed with Vallejo OD Primer and the painted with Poly Scale OD.

With paint on all the exterior major components I used some Tamiya OD mixed with about 10% Tamiya Dark Yellow for darker shadow lines. Here is the ammo box.

Here is the forward crew cabin

Next, using PE stencil set I created masks for 20-inch stars and a 12-inch star for the rear. The masks are created using 1-inch wide painters tape. After the masks are applied and the area is generally masked to prevent overspray, the stars were applied using Tamiya Flat White. Here is the ammo box and the roof of the engine compartment. The small star on the rear door of the ammo box is the 12-inch. All the rest are 20-inch stars.

Here is the forward crew cabin

In between all this painting I have begun working on the tools, toolboxes and the rear crane.

The rear crane is Primed with Vallejo OD primer then painted with Poly Scale OD. The metal contact surfaces are painted with Alclad Steel. The hoist roller, hoist chain, hoist hook are all also painted with Alclad Steel. Here is the finished rear ammunition crane

I will be working on the tools and toolboxes and the M2 50 cal. while I pin wash the hull and major exterior parts. Also will be adding decals.

As always all comments are welcome.

Rounds Complete!!


"The Moral High Ground....A Great Place to Emplace Artillery."

  • Member since
    July 2006
  • From: New Jersey
Posted by redleg12 on Thursday, July 26, 2012 6:29 PM

Gamera - You have to do what you feel will give you the most fun!!! Sometimes even I get bog down in all the details. Thanks for the peek and the comments

Rounds Complete!!

"The Moral High Ground....A Great Place to Emplace Artillery."

  • Member since
    November 2009
  • From: SW Virginia
Posted by Gamera on Thursday, July 26, 2012 10:15 AM

Coming along nicely! Great work, though I think you've convinced me that I'm going to build my kit mostly straight outta-the-box! Still all the extra detail you're adding looks fantastic!

"I dream in fire but work in clay." -Arthur Machen


  • Member since
    July 2006
  • From: San Francisco Bay Area
Posted by bufflehead on Wednesday, July 25, 2012 11:20 PM

redleg12

Very short update this week. Working with tiny PE is a PITA and time consuming. Well, I cut off the 16 tie down blobs on the ammo box and used the PE tie downs. As usual about 15% went into the “outer limits” before I was able to complete the set. The painted green is the headlight inserts. The seams on this were also a PITA as the overall shell did not fit well.
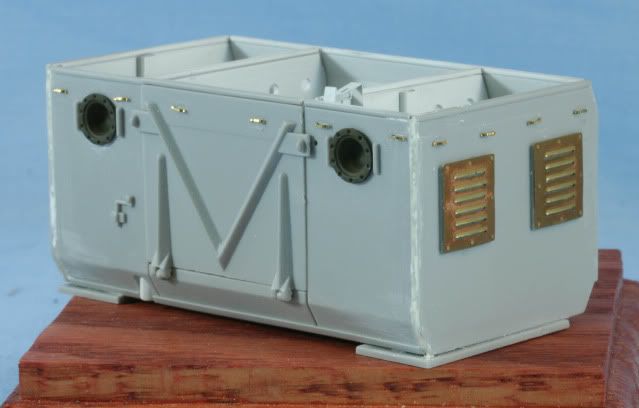
Off to the paint box for prime and finish coat. Also getting all the tools primed and beginning to work on PE tool boxes.

As always all comments are welcome.

Rounds Complete!!

I feel your pain Mike!!  I just prepped a few teeny tiny tie downs myself for a GAZ67B and I can barely see them on my mat!  And you did 16!!!  Confused  My eyese are spinning just thinking about that!

Ernest

Last Armor Build - 1/35 Dragon M-26A1, 1/35 Emhar Mk.IV Female


Last Aircraft Builds - Hobby Boss 1/72 F4F Wildcat & FW-190A8


  • Member since
    July 2006
  • From: New Jersey
Posted by redleg12 on Wednesday, July 25, 2012 6:28 PM

Marc - At my age naked is not a good thing!!  Surprise

Nope, this one requires paint as you go.Things like the engine area would be almost impossible to paint once assembled. Same for many of the internal areas.

Rounds Complete!!

"The Moral High Ground....A Great Place to Emplace Artillery."

  • Member since
    April 2005
  • From: Piscataway, NJ!
Posted by wing_nut on Wednesday, July 25, 2012 6:40 AM

Are you planning on leaving this unpainted for the "Naked Models" theme?

Marc  

  • Member since
    July 2006
  • From: New Jersey
Posted by redleg12 on Monday, July 23, 2012 6:27 PM

Clay - Thanks for stopping in. PE does add some nice detail, just frustrating working with the tiny bit of metal....I know, it's worth it!!

Rounds Complete!!

"The Moral High Ground....A Great Place to Emplace Artillery."

  • Member since
    December 2004
  • From: ohio
Posted by vonryan on Monday, July 23, 2012 7:02 AM

awesome work Mike as always. i do like PE work always brings out the build.

Clay

  • Member since
    July 2006
  • From: New Jersey
Posted by redleg12 on Monday, July 23, 2012 5:31 AM

Bill - Thanks, like you sooooo many models, sooooo little time. It is frustrating for a new kit, how much work is required for seams and pin marks.

Rounds Complete!!

"The Moral High Ground....A Great Place to Emplace Artillery."

  • Member since
    July 2004
  • From: Texas
Posted by wbill76 on Sunday, July 22, 2012 8:07 PM

Well worth the effort Mike, putty work on the seams looks good as well, looking forward to seeing paint start to fly!

  • Member since
    July 2006
  • From: New Jersey
Posted by redleg12 on Sunday, July 22, 2012 6:49 PM

Very short update this week. Working with tiny PE is a PITA and time consuming. Well, I cut off the 16 tie down blobs on the ammo box and used the PE tie downs. As usual about 15% went into the “outer limits” before I was able to complete the set. The painted green is the headlight inserts. The seams on this were also a PITA as the overall shell did not fit well.

Off to the paint box for prime and finish coat. Also getting all the tools primed and beginning to work on PE tool boxes.

As always all comments are welcome.

Rounds Complete!!

"The Moral High Ground....A Great Place to Emplace Artillery."

  • Member since
    March 2006
  • From: Right Side of a Left State
Posted by Shellback on Wednesday, July 18, 2012 8:50 PM

Mike Yes

  • Member since
    July 2006
  • From: New Jersey
Posted by redleg12 on Wednesday, July 18, 2012 8:00 PM

Shell - I'm back from Service Battery...all fueled up!!

Andy - I know how the traveling thing goes, it has been killing me this year too

Rounds Complete!!

"The Moral High Ground....A Great Place to Emplace Artillery."

  • Member since
    April 2009
  • From: Carmel, IN
Posted by deafpanzer on Wednesday, July 18, 2012 12:16 PM

redleg12

Andy - Nice of you to drop in. Yes....the seat cushions are from scratch. The kit comes with flat styrene...not even close. I explain making the cushions about two pages back.

Thanks Mike!  I have been on road for more than two weeks so I need to read your whole thread again.  Keep it coming buddy! 

Andy

  • Member since
    April 2007
  • From: Schroon Lake, NY
Posted by SMJmodeler on Wednesday, July 18, 2012 9:28 AM

redleg12

...if you go into Doyle, High Speed Tractors, the back cushions are somewhat like that. The seats are more...pillow like.

YesYes...will do!  I bought the book, per your recommendation, way-back-when...I'll go educate myself!

  • Member since
    March 2006
  • From: Right Side of a Left State
Posted by Shellback on Tuesday, July 17, 2012 4:59 PM

You guys aint going anywhere till you fuel up ...........the gauge says empty ...........Whistling

  • Member since
    July 2006
  • From: New Jersey
Posted by redleg12 on Tuesday, July 17, 2012 3:51 PM

Clay - LMAO.....you can ride in the .50 mount!! Thanks for the peek and the great comments

Rounds Complete!!

"The Moral High Ground....A Great Place to Emplace Artillery."

  • Member since
    July 2006
  • From: New Jersey
Posted by redleg12 on Tuesday, July 17, 2012 3:49 PM

Steve - Thanks, actually if you go into Doyle, High Speed Tractors, the back cushions are somewhat like that. The seats are more...pillow like. As for the Archer Transfer, set # AR35274 for M4 HST

Here is a review with a photo of the set

http://www.cybermodeler.com/hobby/decals/aft/decal_ar35274.shtml

Yes...the placards come with the set

Andy - Nice of you to drop in. Yes....the seat cushions are from scratch. The kit comes with flat styrene...not even close. I explain making the cushions about two pages back.

Always a pleasure to have you stop by.

Rounds Complete!!

"The Moral High Ground....A Great Place to Emplace Artillery."

  • Member since
    December 2004
  • From: ohio
Posted by vonryan on Tuesday, July 17, 2012 2:21 PM

great work Mike. now that you have the gauges connected are you going to use a dino to check the enigne or just start it up :) going to look awesome in the Memorial and independence day parade. hey can i ride SHOTGUN???  :)

Clay

  • Member since
    April 2009
  • From: Carmel, IN
Posted by deafpanzer on Tuesday, July 17, 2012 9:46 AM

WOW!  Loving the interior!!!!  Two thumbs up.  I read and read... sorry if I missed it... did those seat cushions come with the kit or you made those?  

Looking forward to your next update!

Andy

  • Member since
    April 2007
  • From: Schroon Lake, NY
Posted by SMJmodeler on Tuesday, July 17, 2012 9:00 AM

Fantastic work Mike!  The latest round of details really make this thing look real!  The belts were DEFINATELY worth the effort.  In fact, the cushions are so realistic they make the backrest cushions look a little flat/ plain...I'm not quite sure how to explain it.  Is it just me?

Are all those black & white data plates Archer transfers? 

BTW:  I need to make sure I talk with you at AMPS East so I can be on the lookout for the AM goodies and Archer transfers for my M4. 

Looking really good Mike...nice work with the #2 pencil on those floorboardsYesYes


  • Member since
    July 2006
  • From: New Jersey
Posted by redleg12 on Monday, July 16, 2012 8:29 PM

Tread - Thanks old buddy, as you know it's the little things. My wife came in while I was putting some of the small gauges on the dash. She insisted I must be out of my mind. Then when she saw the finished dashboard there was the well....it was worth it.   Those little guys are a PITA....but worth it

Panzer - The cushions at least have dimension as opposed to the kit supplied flat plastic.  Besides these seats are more accurate than the kit seats. They are easy to make and worth the time. Thanks again

Bill - Learning all the little details of the new and improved site......at least it is not the typical new and improved which is less content for more money!! Hopefully I am good now until the next change!!

Rounds Complete!!

"The Moral High Ground....A Great Place to Emplace Artillery."

  • Member since
    March 2006
  • From: Right Side of a Left State
Posted by Shellback on Monday, July 16, 2012 8:28 PM

Thanks Bill . I also was wondering why that would happen .Yes

  • Member since
    July 2004
  • From: Texas
Posted by wbill76 on Monday, July 16, 2012 7:49 PM

Mike,

The link vs. pic show issues depends on whether you use the Rich Formatting reply option or the quick reply box option. The quick option just activates the html as links while the Rich Formatting will go ahead and read the img tags and display the photos. HTH...I learned that one through trial and error myself last week. Big Smile

  • Member since
    October 2009
Posted by PANZERWAFFE on Monday, July 16, 2012 7:05 PM

Fine looking interior all around but those seats and data plates really bring things up a noch!  Will remember your seat cushion technique the next time I work on a cushion.  More please.

Rob

  • Member since
    September 2005
  • From: beacon falls , Ct.
Posted by treadwell on Monday, July 16, 2012 4:18 PM

Hi Mike ; )

the seat belts and small details look great ,man. Dashboard and all those Manufac. placs look really good .

It's really coming out a beauty !

treadCool


JOIN OUR COMMUNITY!

Our community is FREE to join. To participate you must either login or register for an account.

SEARCH FORUMS
FREE NEWSLETTER
By signing up you may also receive reader surveys and occasional special offers. We do not sell, rent or trade our email lists. View our Privacy Policy.