SEARCH FINESCALE.COM

Enter keywords or a search phrase below:

Br 52 WIP

61375 views
192 replies
1 rating 2 rating 3 rating 4 rating 5 rating
  • Member since
    September 2005
  • From: beacon falls , Ct.
Posted by treadwell on Sunday, November 18, 2012 2:27 PM

Hi Rob Smile

I am sorry man I missed responding to a couple of your updates, but my interest never waned. The job is truly gorgeous. In this new set of pictures I really love the steel look on the front truck where it rides the rail. All the weathering and piping are really great, but the look of that wheel,my o my ....small thing but it just looks so perfect.Wink

I really like the splinter type interrupting camo job also !

Great stuff RobToast

treadCool


  • Member since
    October 2009
Posted by PANZERWAFFE on Sunday, November 18, 2012 12:42 PM

Hey Bill, with some help from the guys on here believe my photobucket problems have been resolved so onto the pics Stick out tongue

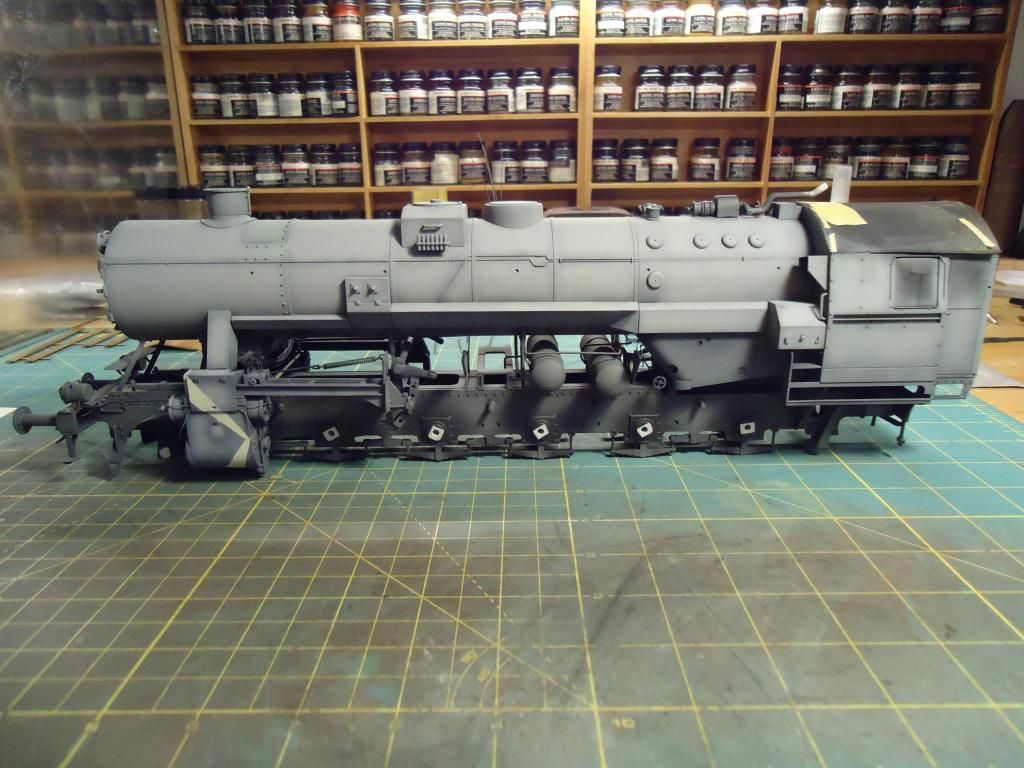
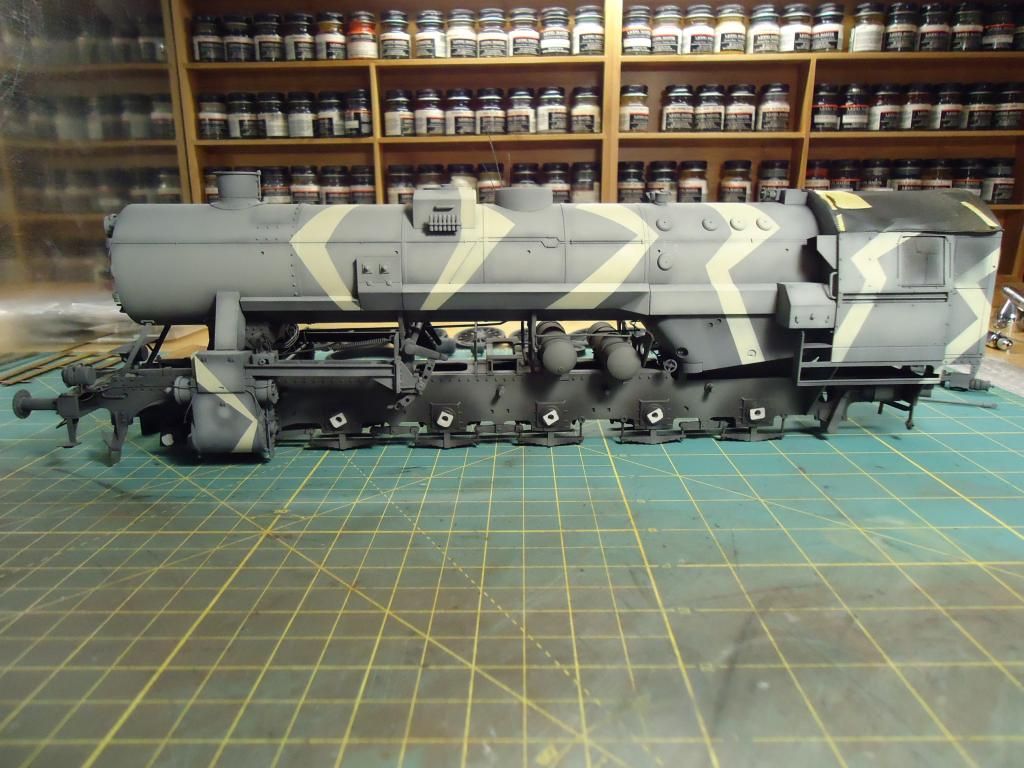
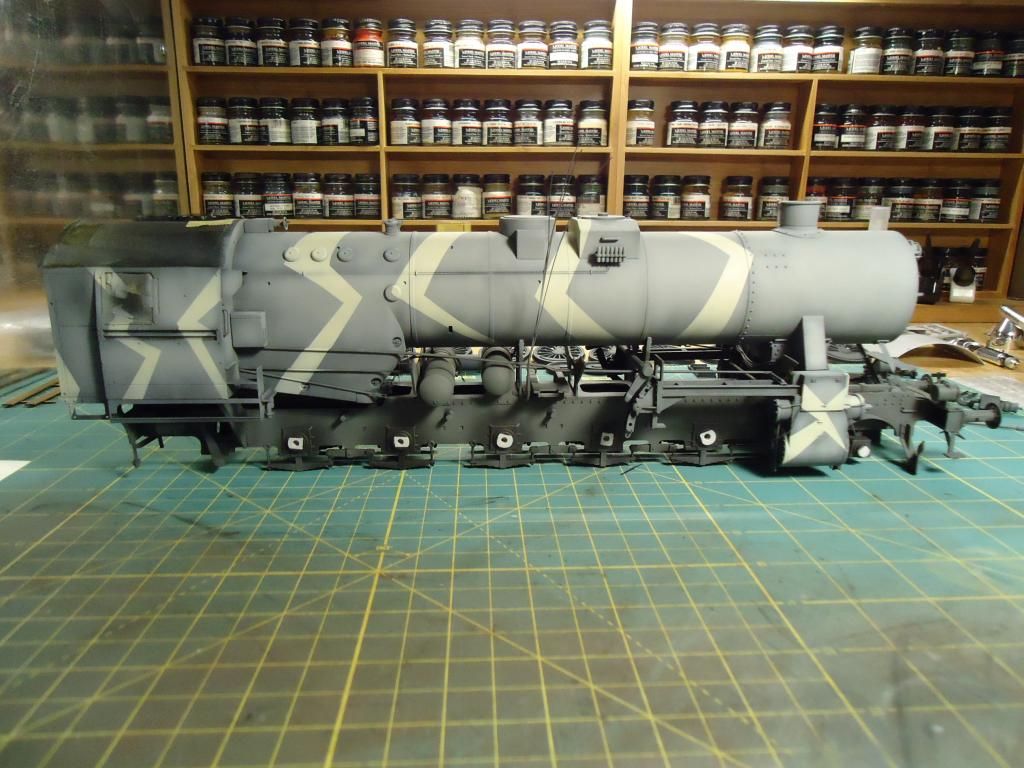
They are not the best pics, took them quickly and in poor lighting but until I get the wheels put on this beast this will have to do.  Without the wheels on it's hard to move and set it somewhere for pictures.  Cannot set it flat down any longer because of the sand lines.

Will start with the wind guides.  We had discussed that the outside of the guides should have minimum wear which I had agreed but the temptation was to great.  Have refined my method of putting on the "Art Masking Fluid" and believe it gives a better result to what I had before.

Masked and painted

Scrubbed of the mask with stiff bristle brush

Both of them

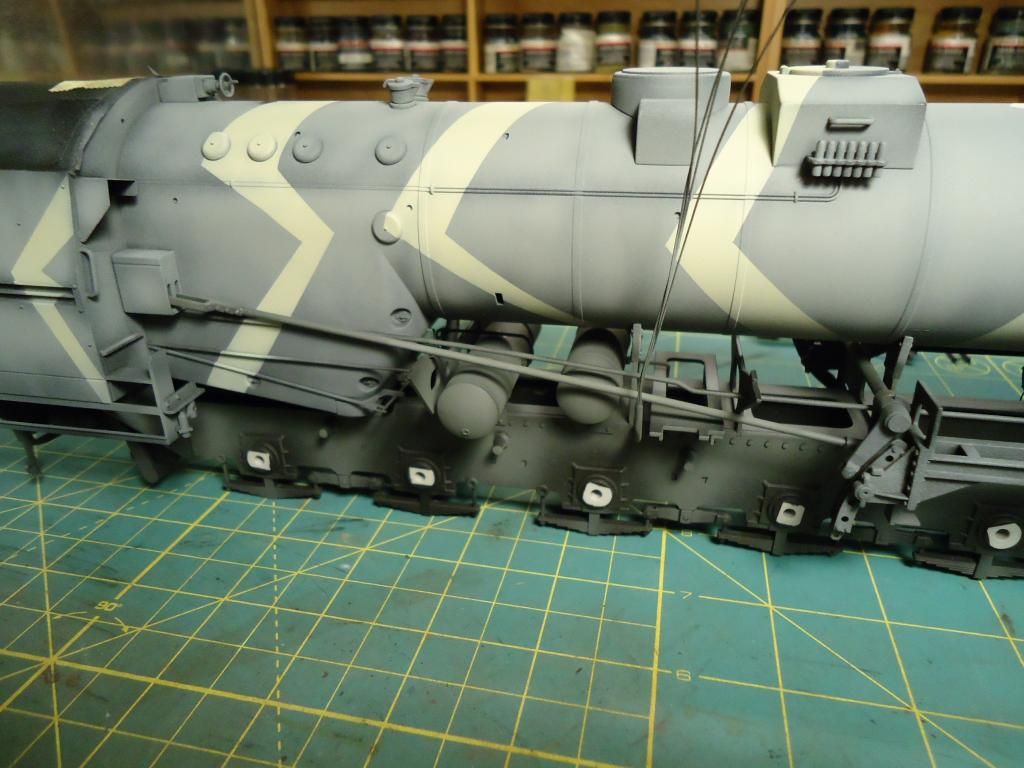
This is where the lighting did not show what things really look like.  Anyway began the weathering of the frame and added the sand lines.

Here was trying to put some light behind the loco to show everything going on under the boiler

Weathering up front, the whole frame looks more like this if I could just get the light on it.

I like how the frame weathered but my question now is should I add a dust effect to the lower portion of the frame?  Just on the very bottom like if the dust got kicked up from travel on the track.  If I do this, trying to figure what the best approach to this would be?  Wheels are soon to go on and any added effects need to happen before they do.

Thanks for looking all and I certainly hope it will not be so long for my next update.

Rob

  • Member since
    July 2004
  • From: Texas
Posted by wbill76 on Sunday, November 18, 2012 10:17 AM

Sorry to hear of the photobucket woes Rob, hope you get it resolved soon so we can see your progress! Smile

  • Member since
    October 2009
Posted by PANZERWAFFE on Sunday, November 18, 2012 7:59 AM

STEVE - Crank handle.....that's how they got this thing started Big Smile  That thing is actually an exhaust pipe, had drilled open the end of the pipe but just does not show in the pictures had posted.  Also believe it is incorrect for the pipe to be there, a mistake in the kit.  On the war trains, from studying pictures, there appears to be no pipe but instead just an exhaust opening with a screen over the opening.  Now on post war pictures the pipe is present there but the compressor itself is in a different location, it is mounted all the way forward on the locomotive with a different pipe set up.  I did not catch this until everything was installed and now believe I will just leave things as they are.  So glad you like it.

CLAY, CLINT - She only gets upset when I refuse to go back into my padded room or straight jacket Propeller

ANDY - This build is taking so long not because of the building itself but because of the lack of being able to get to the bench Sad  This is by far the longest that one has been on the bench but I will continue to work on it when ever I have the chance Yes

CARL - YesBig Smile

JACK - Thank you for that wonderful comment !  Locomotives as well as other large machinery has always fascinated me particularly the steam powered ones but it has never lead to my interest to build one until now.  Building this one has given me much respect to those that do model these elegant machines.

Your explanation of the camo and it's comparison to Naval ships is what I was trying to explain, you have summarized it very well.  Would have to agree, it's direction on a set rail must have been it's biggest disadvantage.


THANKS to ALL of you for stopping in, looking, and commenting.  All of your comments are very valued.  Please excuse my absence and long delay in responding to you all.  Have had many unfortunate events at the home-front and have not been able to get to the bench.  It is very nice coming back to all of your comments.  I have had a chance this weekend to finally sit and work at the bench and have done a bit more.  Was very excited to get some pics up for you guys but now photobucket is not working at all for me??????Angry  Can log into it, says my picture count is there but it keeps saying or trying to connect and none of my pictures or albums are there???? Don't know whats wrong, has been this way all weekend?

Rob

  • Member since
    April 2006
  • From: ON, Canada
Posted by jgeratic on Tuesday, November 6, 2012 10:51 PM

Rob, I have to say this is one of the most astounding builds I've ever seen.  Curious to know if locomotives in general are an interest to you?

That dazzle camou Yes reminds a lot of the type used by various navies.  For warships it helped confuse the attacker, supposedly making it difficult to guage the speed and as well as direction.  Although in the case of a train, I imagine it's heading can be determined just by following the rail track if it is not too obscured by trees.

regards,

Jack

  • Member since
    March 2006
  • From: Right Side of a Left State
Posted by Shellback on Tuesday, November 6, 2012 7:02 PM

Thats just beautiful details Rob !

  • Member since
    April 2009
  • From: Carmel, IN
Posted by deafpanzer on Monday, November 5, 2012 5:01 PM

Simply stunning work so far!  No details spared... it has to be one of your longest builds so far?  

Sorry about my absence as I have been traveling a lot during month of October but things are slowing down at work and no more trips for a long time hopefully.  Keep it coming buddy!

Andy

  • Member since
    August 2012
  • From: Parker City, IN.
Posted by Rambo on Monday, November 5, 2012 3:40 PM

vonryan

GOOD LORD Rob what a build OUTSTANDING!! hey dose your wife get upset when she has to take you out of your straitjacket to work on this kit?? AAAAAHAHAHAHA Stick out tongue

Clay

She starts getting upset when she has to open the door to his padded room

Clint

  • Member since
    December 2004
  • From: ohio
Posted by vonryan on Monday, November 5, 2012 9:26 AM

GOOD LORD Rob what a build OUTSTANDING!! hey dose your wife get upset when she has to take you out of your straitjacket to work on this kit?? AAAAAHAHAHAHA Stick out tongue

Clay

  • Member since
    August 2007
  • From: back country of SO-CAL, at the birth place of Naval Aviation
Posted by DUSTER on Sunday, November 4, 2012 1:50 PM

Spectacular work on the windshelds guides  and the "small up date added wire plumbing" is very cool.

I especially like the crank handle you show in picture 3.

 I assume that is for when the battery power goes out  ... OR not

Steve

Building the perfect model---just not quite yet  Confused

  • Member since
    October 2009
Posted by PANZERWAFFE on Saturday, November 3, 2012 11:06 PM

Carl, Bill thanks for the input.  Careful and easy does it seems to be the word, will see how the outside of the guides come out.  Just have the Dunkelgelb left to spray on then still contemplating doing a little dry-brushing, will see.

Small update, added wire plumbing..

Rob

  • Member since
    July 2004
  • From: Texas
Posted by wbill76 on Saturday, November 3, 2012 10:40 AM

I think the approach has worked...the key would be to determine just how much (and where) you want the paint to chip on the exterior. Since these guides were designed to channel air flow as well as improve things like the drafting on the smoke stack exhaust, it would make sense to me that there would be more chipping/wear on the inside vs. the outside of the guides. Less is more is probably the best approach when applying it to the exterior sides but the process you've used seems to have worked out very well Rob!

  • Member since
    March 2006
  • From: Right Side of a Left State
Posted by Shellback on Friday, November 2, 2012 9:55 PM

Rob , nice explanation about the "dazzle" camo .

This camo on your locomotive will make it really interesting .

I think the effect you created with the mask looks really good . Its one of those subjects that can be overdone easily so where do you stop before the results look unreal ? Some very careful drybrushing would inhance the look of the chipped paint ...but man that would be risky ! You could hit the edges of the boards and miss up the wood look IMO .

Good luck my friend .

  • Member since
    October 2009
Posted by PANZERWAFFE on Friday, November 2, 2012 9:33 PM

Carl, Bill thanks for taking a look in, appreciate the comments Yes  You are both kind of correct with what you say about the camo scheme.  This should make sense to you Carl being that you where one ships.  This type of scheme was to possibly to help hide but more so "eye catching".  Large vehicles and very common with naval ships, these things being so large would almost be impossible to hide with camouflage or anything else for that matter.  So the disruptive camo was to more or less hide the true shape or particular area of the vehicle / ship which would do a few things: 1. make it harder to identify exactly what kind of vehicle it was which would make it harder for the aggressor to decide if, where, and when to attack.  2. If the decision to attack was made, it made it harder to sight, lead and fire into a kill area of the vehicle wearing the camo scheme.  So hiding the vehicle by actually "catching the eye" is a very effective camouflage scheme.  Back to what you were saying Bill, flying in at 300 mph with the landscape flashing by and trying to look through the sight at a moving Zig-Zaged vehicle losing sight of front back and trying to judge speed and distance, could be a tough task indeed.  Also remember my train as with most real ones will be very well armed with AA guns making things that much harder on that pilot.  Funny Carl, I had also thought of the WWII films of the fighters going after the trains.

Glad you two like the scheme so far.  Think I'm pretty happy with it myself.

Wind Guides.  Had masked then sprayed them with the darker gray, Gunship Gray, let dry.  Put a coat of Dullcote, dry over night, and then a wash with Raw Umber W&N artist oil.  Anouther coat of Dullcote and after a few hours of drying went about scrubing the mask off with an old stiff short haired brush. 

This is the inside of the wind guides so left things a little on the darker side but on the outside before scrubbing off the mask will also spray the lighter shade of Gull Gray and the zig-zag then maybe drybrush around the mask hopefully leaving the edges highlighted?

Was seeing if anyone had any opinions of how well you think this first mask worked and if you think there is a better way to do the other side before I begin to work on it?

Again, thanks for taking a look.

Rob

  • Member since
    July 2004
  • From: Texas
Posted by wbill76 on Friday, November 2, 2012 7:32 PM

Tender looks sweet Rob! The 'dazzle' effect is on full display, can imagine what it would be like trying to aim at one moving at 50-60 km/h while in an aircraft travelling at 300 mph or more in a strafing or rocket run!

  • Member since
    March 2006
  • From: Right Side of a Left State
Posted by Shellback on Friday, November 2, 2012 1:23 AM

Man that camo is eye catching..................Hmm................... that dont sound right does it ?

I think of the film of the P-47's and P-51's attacking the locomotives in WW II .

Looking great !Yes

  • Member since
    October 2009
Posted by PANZERWAFFE on Thursday, November 1, 2012 6:19 PM

BILL, CARL thanks guys Beer  Think your right with the shade of the Gull Gray, should work well once weathered.  Funny I spend so much time on the wood in this case because most of it will be painted over with the gray.  Have masked and painted the gray but have yet to remove the mask. Hope it has not set to long to remove it?


Last night had painted the stripes onto the Tender was just to tired to post the pics until now.

Don't think I'm up to doing anything tonight, very tired, maybe tomorrow.  See ya then

Rob

  • Member since
    March 2006
  • From: Right Side of a Left State
Posted by Shellback on Wednesday, October 31, 2012 11:00 PM

Bow Down..........Toast............Yes.........Pizza.............Beer

  • Member since
    July 2004
  • From: Texas
Posted by wbill76 on Wednesday, October 31, 2012 1:27 PM

Glad to hear the paint mix combo worked out for your Rob, very nice job on the patterns! The wood finish you get is always stunning and the masking approach ought to work out as well, looking forward to that. On the issue of too much Gull Gray, I think you've gone just light enough to form the right foundation for weathering that's to come. Railroad engines were notoriously dirty beasts between all the grease and oil needed to keep them running and the soot from the engine exhaust, so it should tone down nicely once you get into that phase. Yes Yes

  • Member since
    October 2009
Posted by PANZERWAFFE on Wednesday, October 31, 2012 9:28 AM

Finished the base coat for the wind guides.  Wood boards and primed framing.

Not sure if this will work but am going to try to mask some of the wood and then paint the gray color on top then hopefully remove the mask leaving some of the wood showing through?  These masking procedures usually do not work with enamel paints, which is what I am using, but have run a few test on some scrap and seem to have some positive results.  So will go ahead and commit with the plan.  This is what I will be using as a mask.

Rob

  • Member since
    October 2009
Posted by PANZERWAFFE on Wednesday, October 31, 2012 5:23 AM

Hey Clint, thanks for the comments and for stopping in Yes 

Still working on the Wind Guides.  Have the wood and framing painted.  The framing was painted in my mix that I call "German Primer".  Now will try to mask using masking fluid, paint the finish colors, then hopefully be able to remove the mask leaving the wood showing through.  Hope to post the results maybe tonight? 

Rob

  • Member since
    August 2012
  • From: Parker City, IN.
Posted by Rambo on Tuesday, October 30, 2012 3:44 PM

wow every time you post on here things just keep getting better and better

Clint

  • Member since
    October 2009
Posted by PANZERWAFFE on Tuesday, October 30, 2012 3:23 PM

CARL - Beer Always good to have you stop in

STEVE - Glad you like.  Was hoping to get the multiple shade look (dark - light) without a drastic color change.  I think it looks better here in person then on the computer.  Here can see the different shades much easier.  Have sprayed the last gray coat (you will see below) and may have done too much losing some of the effect I had wanted.  It is still there, just not as prevalent as before, and believe it will show more with the weathering.  Thanks for looking in.

BILL - Yep, the "trial run" believe went well so went ahead with the remainder of the "Zig-Zag's".  Thanks for always posting your Dunkelgelb color mix!!  That's what I have used and seeing it here in person....that's an EXCELLENT color!  Cant wait to paint a panzer with it.

CLAY - Thanks man.  Dont't worry about missing this build though.  Believe it will take quit a bit of time to weather it when I get to that stage.  There are so many small details I want to "pick out" and highlight / weather that I believe it will take at least twice as long as normal.  Still long way to go........


Moving along

Sprayed final gray coat, used Dark Gull Gray (maybe to much?)
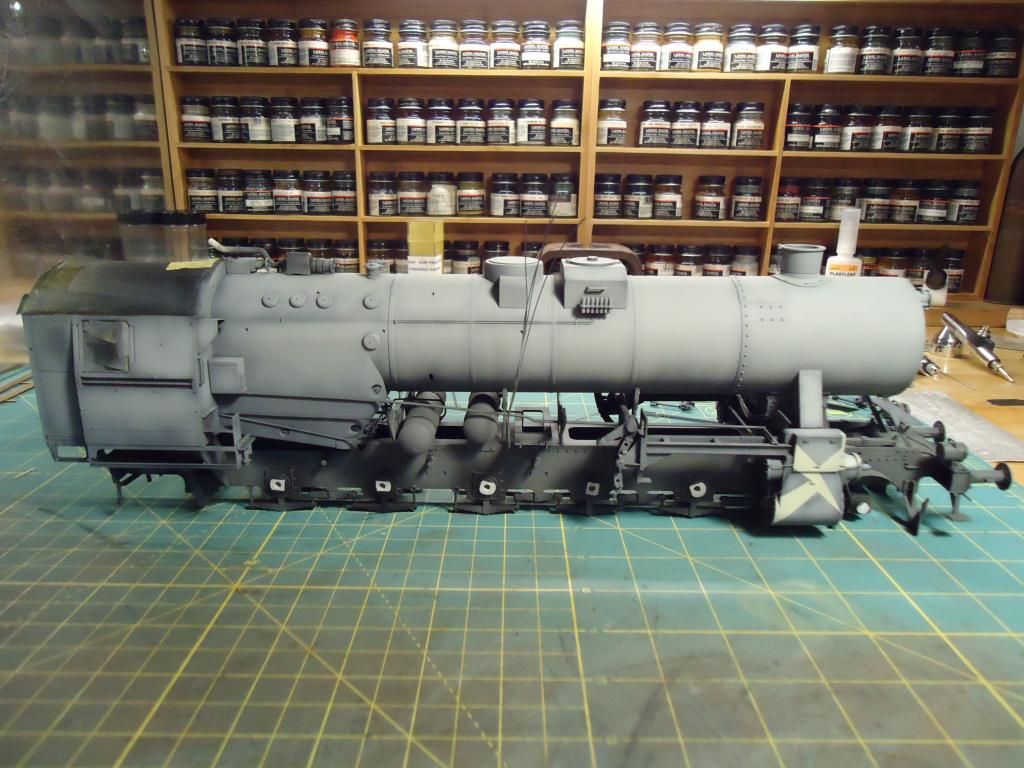
Then came the fun task of masking.  Used WBILL Dunkelgelb mix (50% dunkelgelb and 50% Light Gray, both MM enamels) sprayed the stripes.
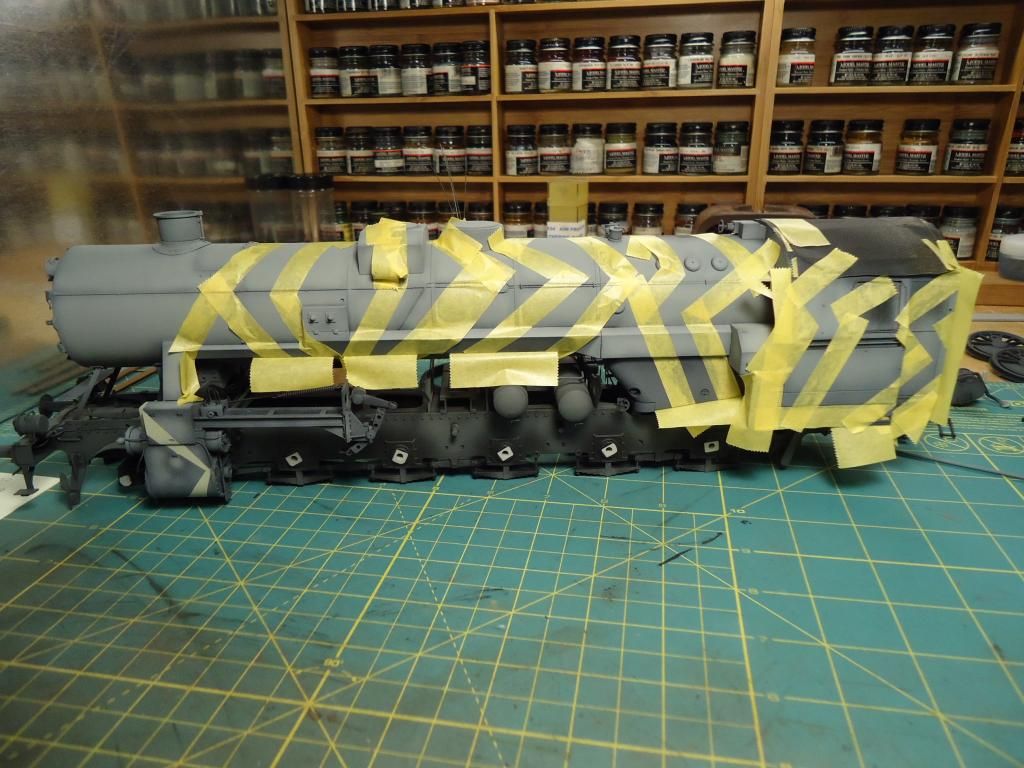
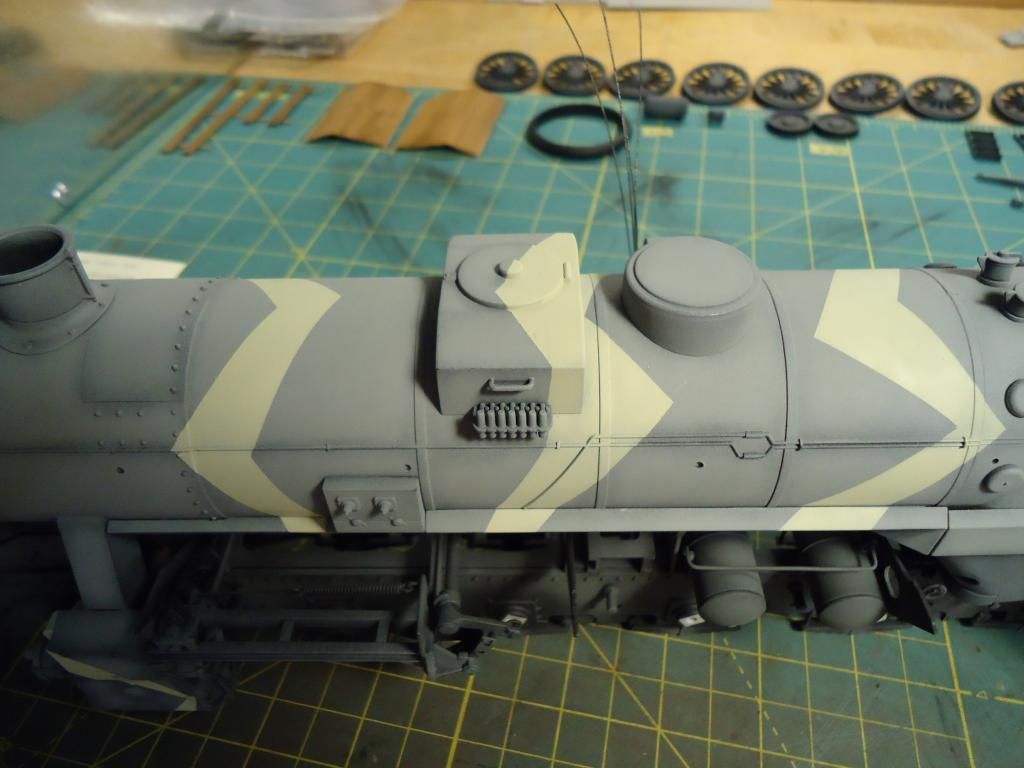
Mask removed Stick out tongue

The top stripe, the one going over the sand box,  had to be re-masked and adjusted.  This is the result of the correction.
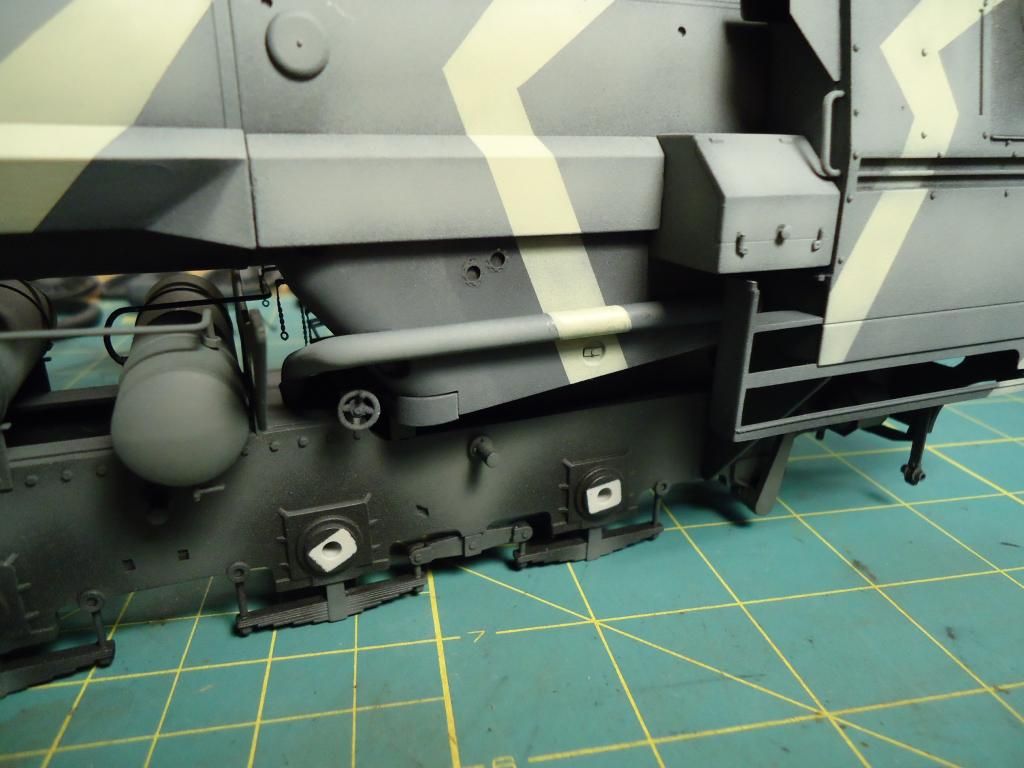
Had then added the large scratch pipe and the remainder of all the linkage arms, 3 being scratch, 1 kit supplied.  These will show better later with additional paint / weathering.
Here is an overview of how things are coming out.
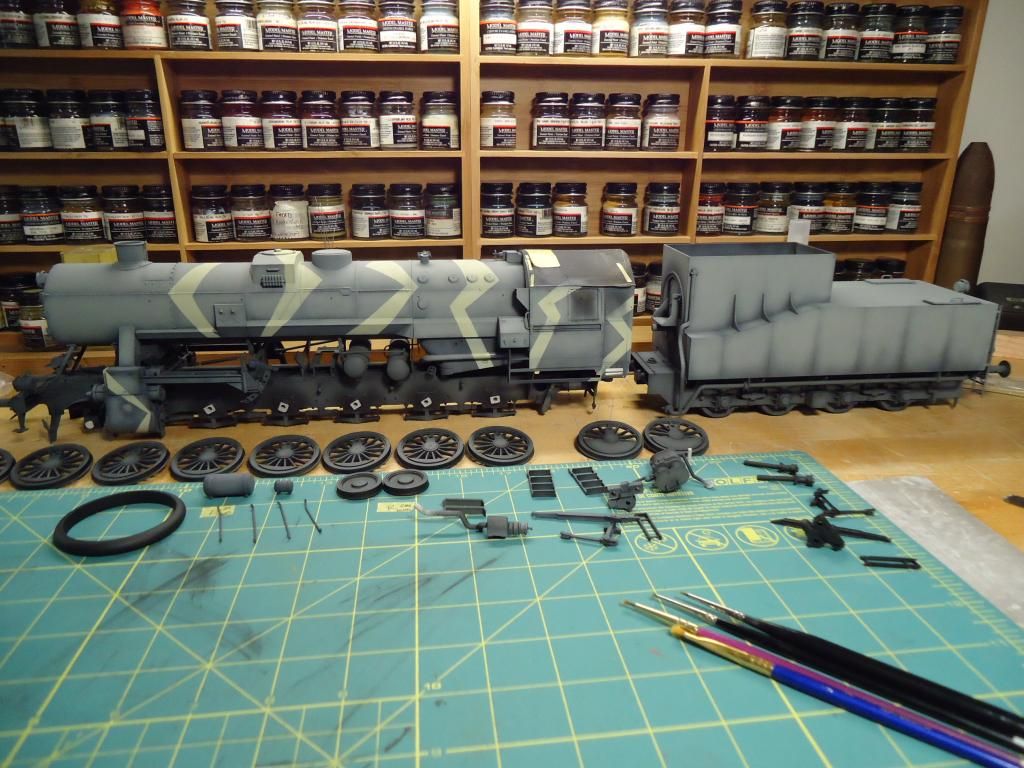
Things have slowed down again, need to paint and dry fit the front wind guides.  These will have the Zig-Zag patteren on them and the stripe will continue to the top of the boiler.  Once I have the wind guides done can figure out where the stripe on the boiler needs to be.  It is taking some time because of the long dry time of preping the wood color.  Gray will be sprayed on top of the wood but will have the paint worn with the wood showing through.  Will also be preping the tender for it's Zig-Zag's and will then weather it first to figure out how I'm going to do it for sure.

begining of wood
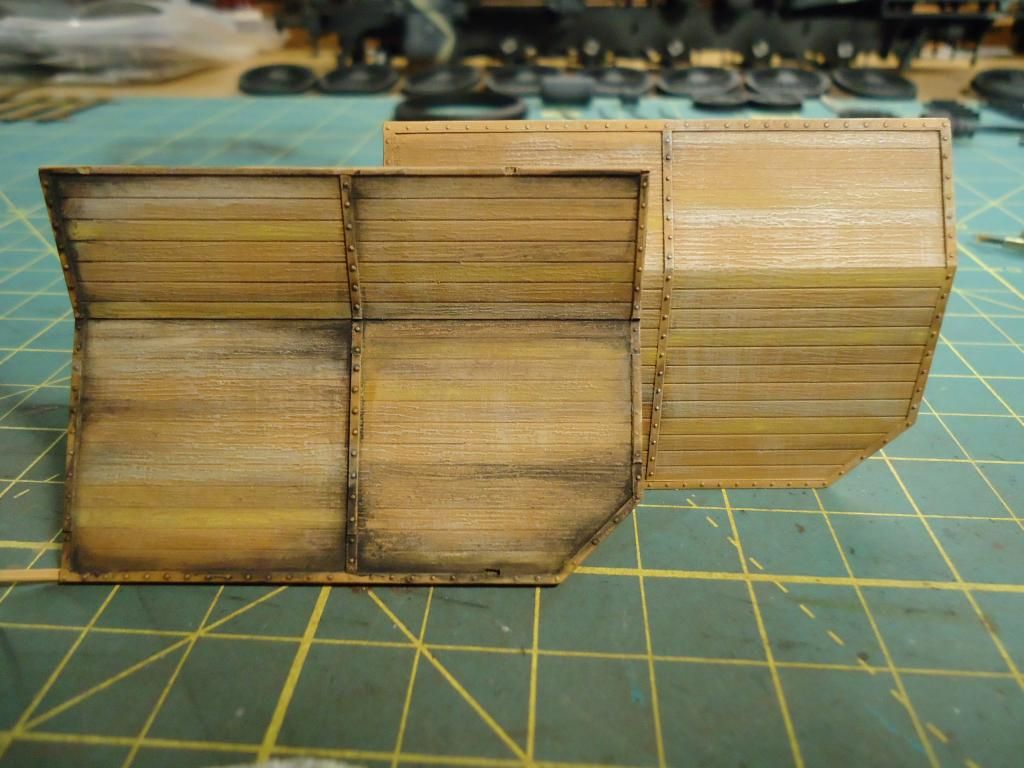
It's a long post but hope all enjoy.


Rob

  • Member since
    December 2004
  • From: ohio
Posted by vonryan on Tuesday, October 30, 2012 1:40 PM

man it's been sometime since i've looked in, and i must say DAMN Rob you are going all out on this build VERY NICEYes awesome paint work. must look in sooner. if not i'll miss an great build.


Clay 

  • Member since
    July 2004
  • From: Texas
Posted by wbill76 on Tuesday, October 30, 2012 10:40 AM

Paint work and added details for the front of the boiler are looking sharp Rob! Look forward to seeing it with the camo pattern applied as I see you've already done a couple of 'trial run' zig-zags. Beer

  • Member since
    August 2007
  • From: back country of SO-CAL, at the birth place of Naval Aviation
Posted by DUSTER on Tuesday, October 30, 2012 12:03 AM

PANZERWAFFE

...The next update should be a bit more exciting, will finally have some color added.  See ya then.

 
more exciting?!?
 
This thing is flaming AW-Some already.
 
 Really like the paint format you're using, keeps the shapes from being a big monochromatic blob .
 
  Looking forward to your next installment  

Steve

Building the perfect model---just not quite yet  Confused

  • Member since
    March 2006
  • From: Right Side of a Left State
Posted by Shellback on Monday, October 29, 2012 11:33 PM

Looking cool man ..........Cool.........Yes

  • Member since
    October 2009
Posted by PANZERWAFFE on Monday, October 29, 2012 10:41 PM

Hey Carl, great to have you and the Mrs stop by Yes  Good to hear you both are enjoying the build and it's nice to have her check things out Yes  Has been a great day with some movie watching and lots of bench time.  This thing is finally starting to look like a locomotive. 


Next up was to prep the boiler / cab for attachment to the frame.  To do this, painted the bottom section of the cab flat black and then painted the whole assembly with Gunship Gray on it's mid section.

If anyone is wondering about the bonding strength of these large pieces, before painting had masked off the glue attachment points.  These can be seen here after the mask had been removed.

The fit of the two assemblies was very poor and took some time to get things together. Here they are now permanently as one.

Once this sat for a little while had then filled the gaps with putty, sanded, and brush painted the patches with flat black.  Then moved to the front section and installed the boiler step and framing for it.

The next update should be a bit more exciting, will finally have some color added.  See ya then.

Rob

  • Member since
    March 2006
  • From: Right Side of a Left State
Posted by Shellback on Monday, October 29, 2012 8:58 PM

Hey man this is what i will call " model builders eye candy " !!!!

I called Janis over to have a look and her words ....." Wow, cool " !!!

  • Member since
    October 2009
Posted by PANZERWAFFE on Monday, October 29, 2012 6:50 PM

Hey Clint, thanks a bunch and good too hear you like.  Now go ahead and pull up that seat, more is on the way.

Some work on the frame was done to get it ready to attach to the boiler.  It was already painted with the flat black base / primer and next:

selected areas Euro Gray was applied

Then the same was done too the wheels.  This was one part that was nicer to do then doing the same on say...a panzer.

Work then went in the piston housings.  The color was built up the same way as with the tender: Flat black, Gunship Gray, Dark Gull Gray.  Then stripes were applied using Bill's Dunkelgelb mix (50% Dunkelgelb and 50% Light Gray).

Left housing

Right housing

Next up is to attach the boiler to the frame.

Rob

JOIN OUR COMMUNITY!

Our community is FREE to join. To participate you must either login or register for an account.

SEARCH FORUMS
FREE NEWSLETTER
By signing up you may also receive reader surveys and occasional special offers. We do not sell, rent or trade our email lists. View our Privacy Policy.