SEARCH FINESCALE.COM

Enter keywords or a search phrase below:

Br 52 WIP

61376 views
192 replies
1 rating 2 rating 3 rating 4 rating 5 rating
  • Member since
    August 2012
  • From: Parker City, IN.
Posted by Rambo on Monday, October 29, 2012 2:46 PM

Thats looking really sharp I really like your seat you made

Clint

  • Member since
    October 2009
Posted by PANZERWAFFE on Monday, October 29, 2012 12:47 PM

ANDY - Thanks buddy !  Good to hear from you again, more to come.

BILL - Glad you are not tired of seeing this one.  Me, have been enjoying this build but am tired of seeing it stagnant for so long on my bench.....time to get things moving again.

With that said, here is the PE that came with the kit.  There is not much but it looks and folds very nice.

4 pieces - two front visors and the 2 side ones.

The front visors dry fit in place

I should add that the kit supplied front windows were not used.  Did not like the fit and they were way thick.  Had cut new windows from some clear plastic sheet used for paper dividers found in the school / office supply sections of the store.

After shaping the PE, next came attaching the cab to the boiler and then the front visors.

Rob

  • Member since
    July 2004
  • From: Texas
Posted by wbill76 on Monday, October 29, 2012 10:54 AM

Never get tired of looking at this one Rob, very nice! Beer

  • Member since
    April 2009
  • From: Carmel, IN
Posted by deafpanzer on Monday, October 29, 2012 9:15 AM

Excellent work especially the seats and pre-shading!

Andy

  • Member since
    October 2009
Posted by PANZERWAFFE on Monday, October 29, 2012 9:02 AM

Thanks too all of you for your wishes and concerns.

Try to get back into things, still may be in and out though?

In my absence, my transfers had arrived.  Had ordered Archer BR 52 transfer set.

Painting of the Tender.  There will be more to come on this.

Flat black primer / base.  Sprayed Euro-1 Gray too the frame / wheels.

Gunship Gray for more shadow leaving some black.

Dark Gull Gray for what will be the last gray coat still leaving both the Gunship and balck showing through.

Set Tender aside to dry went back the interior.  Scratch the seat backs, painted and put in.

Scratch seat backs / seats installed

Interior with seats and both side walls permanent.  The rear bulkhead has also been permanently attached.


Rob

  • Member since
    March 2003
  • From: Rain USA, Vancouver WA
Posted by tigerman on Sunday, October 14, 2012 12:25 PM

Take care buddy. Look forward to more progress when you have the time.

   http://i7.photobucket.com/albums/y269/wing_nut_5o/PANZERJAGERGB.jpg

 Eric 

  • Member since
    April 2009
  • From: Carmel, IN
Posted by deafpanzer on Sunday, October 14, 2012 12:26 AM

Hope its not your wife again.  Hang in there and y'all will be in my thoughts.  Have you started saying "y'all" yet since you are in NC now?

Andy

  • Member since
    March 2006
  • From: Right Side of a Left State
Posted by Shellback on Saturday, October 13, 2012 10:48 PM

Rob , thanks for the explanation .......

  • Member since
    July 2004
  • From: Texas
Posted by wbill76 on Saturday, October 13, 2012 3:45 PM

Take care Rob, the lights will still be on for you here when you can get back! Beer

  • Member since
    September 2005
  • From: beacon falls , Ct.
Posted by treadwell on Saturday, October 13, 2012 3:30 PM

Rob Big Smile...

Get well soon my man ... health is THE most important thing. I wish you all the best for a speedy recovery.

No pics of my old steam engine sorry...,wish I had taken some .. the piston was very small. only 5/8 diameter I was only about 13 or so at the time ...Yikes 47 years ago Tongue Tied

get well man !Toast

treadCool


  • Member since
    October 2009
Posted by PANZERWAFFE on Saturday, October 13, 2012 2:11 PM

Hey guys sorry for the long delay but have had some emergency medical issues that took priority and may continue to do so for some time.  Thanks for all of your responses Yes  Not sure when I will be able to check back in?

RAMBO - Yes will keep at her.

CARL - I should have added Embarrassed that my grandfather was a master carpenter and machinist with much patience, making a great teacher and always helpful.

The hot air engine (Stirling) is my favorite.  To keep things simple, it has a expansion cylinder which stays hot creating the powerstroke, pushing the piston and fly.  Some hot air expands down to the compression cylinder, which is were the air cools, helping push this piston along with the momentum of the fly.  This in turn both pushes the expansion piston back and then pushes the cooler air back to the expansion cylinder to be reheated.  The copper tube seen is what would be called a regenerator in which the air travels back and forth for heating and cooling.  So in short it runs by the means of the expansion of air.

The power or heat source can practically be anything.  In this model the black stoves have a door which would open and a candle would be placed in there to create the heat.

My grandfather would often tell me, when he was a kid that there were some of these engines on the farms.  They would both clear the lands, and put ordinary household trash in to burn to power them.

Hope this explains your question.

EVO_LOVER - Thanks buddy

ANDY - Just playing with you, always good to hear from you.  Have been watching all of your builds in Steel Cats Yes  Thanks for stopping in.

WILLIAM - Thanks.  Do you still have your steam engine, would be nice to see it?  Would imagine the material, brass, lead, would be the main culprit for the leakage and not so much the seals?  The cool thing about steam is that the engine will almost always run.  May not be as efficient but it will run.  The bad thing is the danger to the person of the possible unseen steam that's leaking.

Rob

  • Member since
    September 2005
  • From: beacon falls , Ct.
Posted by treadwell on Tuesday, October 9, 2012 7:47 PM

Holy Smokes Rob ! Stick out tongue.... sorry for the long response, I was ' off grid'  awhile Devil . Your scratch built engines are so impressive I am at a loss for adjectives... the work and calculations that go into a ' running ' miniature engine, and casting  and milling and turning are just way too much for most to comprehend. Appreciate:yes, comprehend ? I am not so sure .  I had to read up on your Stirling cycle engine just to get brushed up !  I am in awe of your machinist ability !Bow Down  I love your lathe !... I too make special, albeit sometimes temporary tooling to do chores for me in the modeling world.  tools for cutting specific lengths and angle over and over and I have a simple jig that turns my DeWalt 1/2 " drill into a temporary lathe, 

As a teen I was able to build a 'double acting ' steam engine from brass and lead only but, sadly I could not make efficient seals and the piston leaked badly ,especially when steam was introduced on the side with the connecting rod...but it did run !Wink

Really tremendous work ,Rob and I am glad you went  'off-topic ' for a while Yeah

It was a true pleasure!Toast

tread Geeked (those are my geek glasses ... I wear them proudly )


  • Member since
    April 2009
  • From: Carmel, IN
Posted by deafpanzer on Tuesday, October 9, 2012 8:57 AM

PANZERWAFFE

ANDY - Hey man!  Haven't seen you around lately......Glade you stopped in and thanks for the comments.  Nice to hear you like Yes

Thanks for stopping in my friends, one for each of youBeer Beer (Andy if your gone to long I bet Carl will drink yours.....just sayin Whistling)

LOL!  Looks like you are correct... Carl didn't save me some.  I don't mind because somebody has to drive him home. Wink  Things have been so hectic at home and work... several trips scheduled this fall.  You can always find me at Steel Cats GB where I am building my Tiger I Initial at very slow pace as usual.   At least I didn't start late like I always do. 

Will be checking on your updates when I have the chance. Beer

Andy

  • Member since
    September 2012
  • From: Manila Philippines
Posted by evo_lover on Tuesday, October 9, 2012 5:53 AM

Wow I am speachless on the detail!!!! I envy your workbench.....sigh

on th bench:1/35 Tamiya Tiran 5

  • Member since
    March 2006
  • From: Right Side of a Left State
Posted by Shellback on Monday, October 8, 2012 10:39 PM

Rob , i am shocked ! I had no idea as to the depth of your talents ! No idea at all ...................making your own tools ! You are very talented indeed !Toast

I'm curiouse about the hot air machine .........what powers it ?

Toast

  • Member since
    August 2012
  • From: Parker City, IN.
Posted by Rambo on Monday, October 8, 2012 7:09 PM

looking great glad you didn't let that small disaster stop the build

Clint

  • Member since
    October 2009
Posted by PANZERWAFFE on Monday, October 8, 2012 2:35 PM

ANDY - Hey man!  Haven't seen you around lately......Glade you stopped in and thanks for the comments.  Nice to hear you like Yes

CARL - Now you know that black is just to develop shadow and depth to the overall finish of the build once finished painting.  There will be three different grays going on top of this so it will be going from very dark (black) to light gray.  The fun part will be to get the dunkelgelb zig-zag to do the same Tongue Tied  Will see if t works out??

That Cajon Pass looks pretty cool Yes  Had never heard of it before.

Thanks for stopping in my friends, one for each of youBeer Beer (Andy if your gone to long I bet Carl will drink yours.....just sayin Whistling)


OK, have started laying down the different grays on the tender, hope to have some progress pics up soon?  Back to painting.................

Rob

  • Member since
    October 2009
Posted by PANZERWAFFE on Monday, October 8, 2012 2:03 PM

Super Angry  Had post written, when ready to send lost power, rewrite Super Angry

WILLIAM - Thank you very much for your gracis comments!  I really value them especially coming from someone like you!  You (and others on here) have been one of my inspirations sence seeing your work and your willingness of explanations.  I still strive to accomplish the level of yours and others work here on the forum.

Mishaps with modeling always occure (at least with me) and they seem to happen when least expected.  As much as I do not like these mishaps, in the ever ending pursuit to become better, I value them.  Along with mishaps always comes resolutions, ingenuity, and the chance to learn from them.  So I do not mind and actually find it better to show problems and not just the success along the way.  I always hope I can learn from them as well as help others.  If it helps just one of you guys out, well then that means it wasn't really a mishap, right Big Smile

It sounds as if some of our interest are among the same lines and maybe Carl's too.  Armor, YES Yes but steam power also Yes  This is way off subject but thought you might like to see some pictures of some engines & boiler made from scratch some years back.  They are pictures of pictures so not the best quality.  All of these engines run and depending on which can produce quite a few horses and able to run small machinery.

Engine and boiler

Gas engine

Hot air engine (front)

hot air engine (back)

Steam engine after clean-up and assembly

When I say from scratch, well I had to build my own foundry: furnace, pattern & sand boxes, etc.  Then would go to the junkyard and they would give me old pistons and few other assorted items which would be melted down and cast into parts.  All the parts first had to be made from wood and/or resigns for a master.  Then once cast, filing, sanding, honing, drilling, plumbing, .........., and finally assembly was done.  These engines are all back home (different state then I'm in now) but can always send some new, better, more detailed pictures to you if your interested the next time I get back home to check on things.

I also build my own tools.  Here is a small modeling lathe, I do have this here with me, built using the methods as above. 

OH and she runs and works great for plastics, wood, and soft metals.

Not sure if I said everything but want to post before losing power again Beer

Rob

  • Member since
    March 2006
  • From: Right Side of a Left State
Posted by Shellback on Sunday, October 7, 2012 8:18 PM

Sad really , painting all of that sweet detail matt black . But i'm sure your skills at weathering will make it all stand out again Rob .Yes

Sidw note . Hey William my dad wad a HO scale model railroader . We used to go watch trains on the week end .............ever heard of Cajon Pass , So.Cal ? You tube it . Thats where we used to go .Yes

  • Member since
    April 2009
  • From: Carmel, IN
Posted by deafpanzer on Sunday, October 7, 2012 7:54 PM

Stunning work the interior!  Great save there.   Really dig the work on the coal by the burner.

Andy

  • Member since
    September 2005
  • From: beacon falls , Ct.
Posted by treadwell on Sunday, October 7, 2012 7:30 PM

Hi Rob Smile

Man o' man dude, she is just beautiful !  I love the big machinery (tanks) and as a kid always loved model railroad in H.O. scale ... you are just tweeking my head with the best of 2 of my worlds and even in 1/35 scale is just huge !  

Your piping and woodwork is perfect looking.YeahYes

It is much to your credit that a really good modeler like you writes about their mishaps. Tough as it might be . it give hope to new guys or kids just getting started that they are not alone...hell it gives me hope Big Smile

The finished job on the sliding glass came out so nice it's a shame you don't work for them so they could have your vision.

first classBeer

tread  (or Bill what ever you prefer, some people call me william, thats ok tooCool


  • Member since
    October 2009
Posted by PANZERWAFFE on Sunday, October 7, 2012 6:14 PM

RODOLFO - Yes

CARL - Beer Can your floors be sanded out?  Either way sounds like a job, if I was closer would give you a hand.  Remember when working, take many breaks and hydrate BeerBeer

THE NIGHT TRAIN

Rob

  • Member since
    March 2006
  • From: Right Side of a Left State
Posted by Shellback on Sunday, October 7, 2012 5:15 PM

Good ! You saved it !!! And it looks even better now with the added soot .

By the way , my floors are really a mess . This house is over a hundred yrs old and after remodeling and removing walls the original floor is scratched and gauged and pieced out with different looking boards . We had it covered with carpet about 25 yrs ago and just recently pulled all of the carpet up and trashed it . Low and behold the awful looking floor is still down there !!! am planning on putting in a laminated wood floor .

  • Member since
    May 2003
  • From: Mexico
Posted by rtvmodeler on Sunday, October 7, 2012 3:00 PM

Smile Excellent detail with this great monster!!

Regards!
Rodolfo

Current Project:

Figures from Dragon, "German 6th Army, Stalingrad 1942-1943", 1/35

  • Member since
    October 2009
Posted by PANZERWAFFE on Sunday, October 7, 2012 2:56 PM

Thanks Bill !  It was a relieve that the fix went well, that"s for sure.  Good to hear you like the coal debris, was looking for something a little bit extra and thought that would do it.

Presently typing with one hand and holding the boiler tube long enough for it to dry enough to set down.  Have given it a coat of flat black for a base primer, should of thought enough in advance to make some-kind of jig to set it on for drying.

Next will be to spray same flat black base on the frame, set both aside a let dry.  While these are drying may start working on the tender again.  Had given it it's base coat a few days ago and it is ready to start painting.

Rob

  • Member since
    July 2004
  • From: Texas
Posted by wbill76 on Sunday, October 7, 2012 2:19 PM

Sorry to hear about the mishap Rob but you've fixed it and done such a good job that no one will ever know the difference! Love the coal dust/debris detail around the fire box, nice touch. Yes

  • Member since
    October 2009
Posted by PANZERWAFFE on Sunday, October 7, 2012 11:05 AM

CARL - The wood technique used was the same as I had used and explained when building the "Typ Ommr Gondola Car" not that long ago.  Will do my wood in this method from now on.  You can also get many variations of wear, from new to old, using this technique just by using more or less of the colors involved.

As far as not being able to see the interior, that was the main reason I had originally wanted to put lights on this build.  Sense that idea was scrapped, I will be using BILL'S idea (looking at his build on his site, thanks Bill) and I will leave the overhead removable for future viewing pleasures.

OH....If your floors look like that....UH...You need to clean them.....Just saying Whistling

GUNEY - Thanks buddy and thanks for following along Yes

BILL - As always, really appreciate the comments my friend Beer

FLIRTING WITH DISASTER!

Well I had everything painted, weather and pleased with the results so went in for assembly.......that's when DISASTER struck!

Nothing would fit together, the cab, cap to the boiler, the sides, everything would not go together! After examining found that I had glued the boiler firewall in the wrong place, had glued it flush with the bulkhead it sits on. Here is a modified pic of what I'm talking about.  Not a very good one (did not think to take picture in the heat of the moment) but look down in the corner and you can see that the bottom are flush with each other.
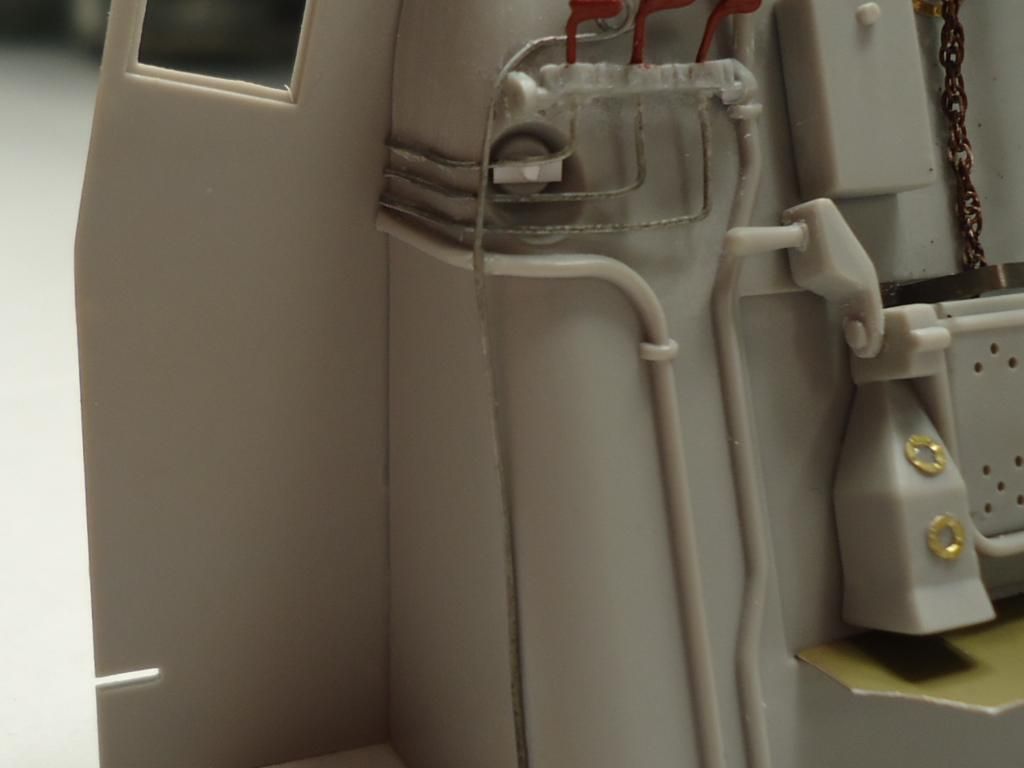
The problem is that the boiler firewall should be raised on that bulkhead about 1/16 and believe it or not, if it isn't nothing will work out!!!  OK, the reason this was a big deal to fix, the boiler face was glued to the bulkhead first using MM liquid cement and after drying had went back and more or less poured CA glue inside on the seam.  I new I would be handling this a lot doing the scratch work so wanted it to be strong.  So probably don't have to say, getting it apart was a Censored !!!  After a few hours, much patience, cutting and prying it finally came apart.
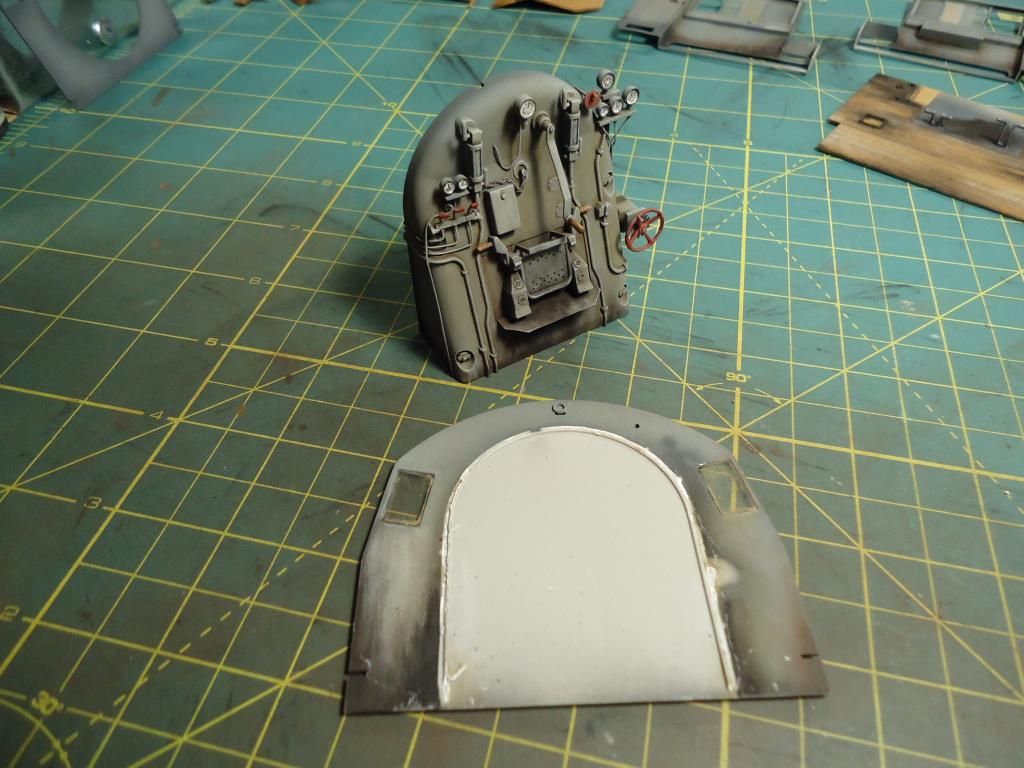
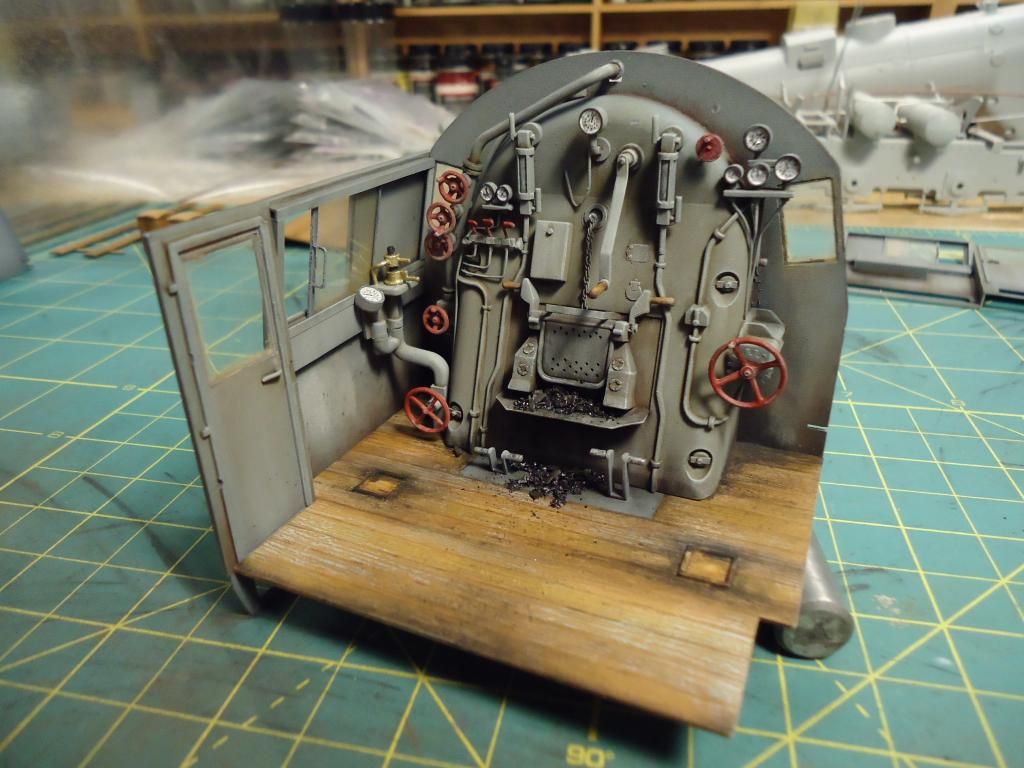
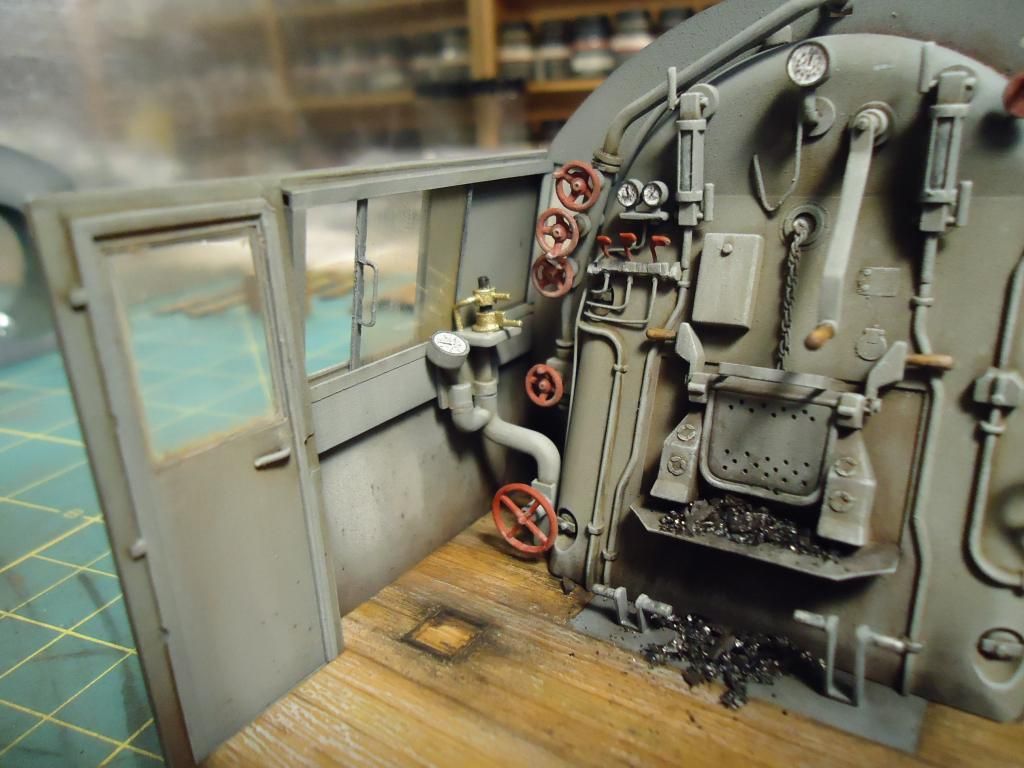
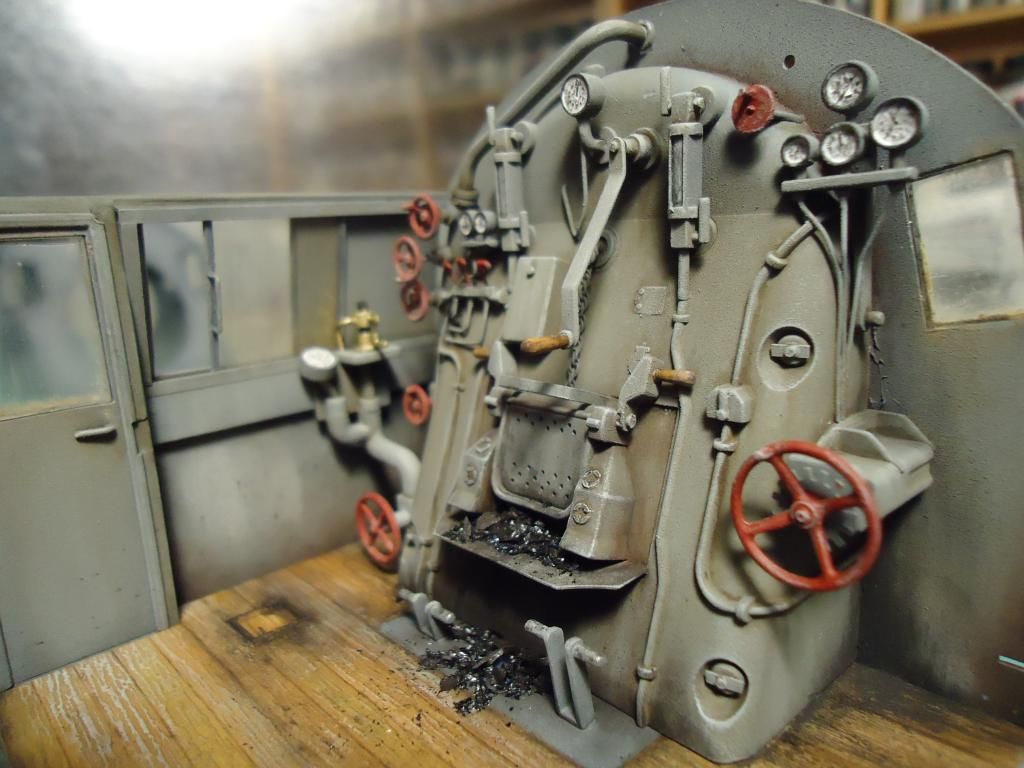
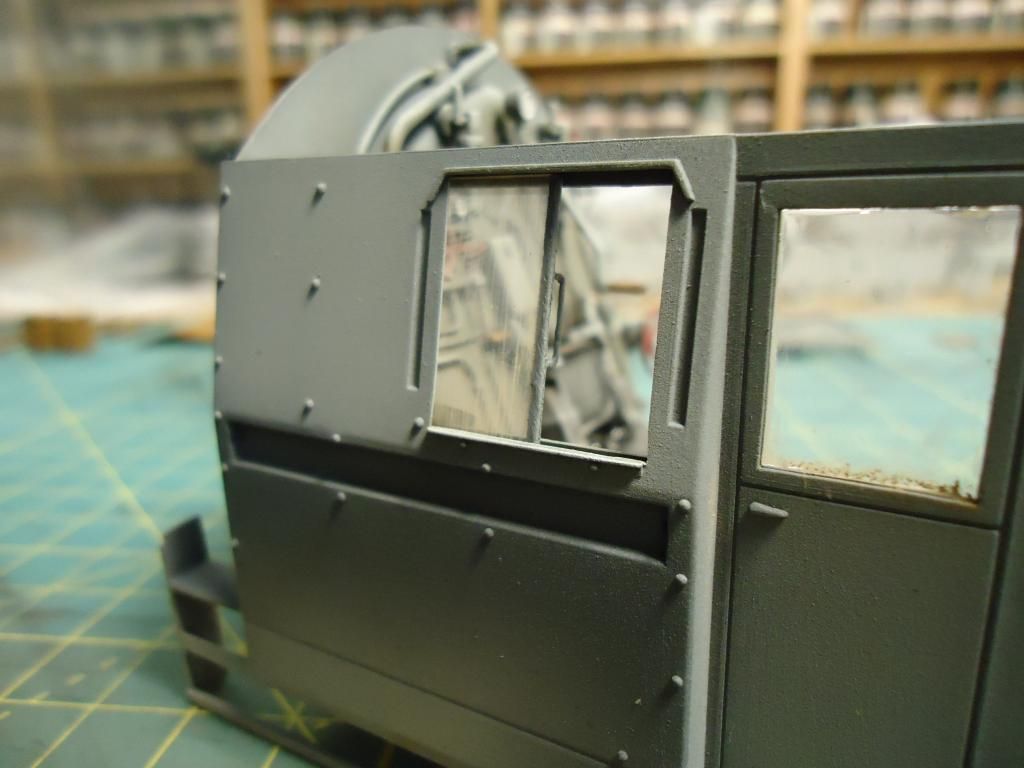
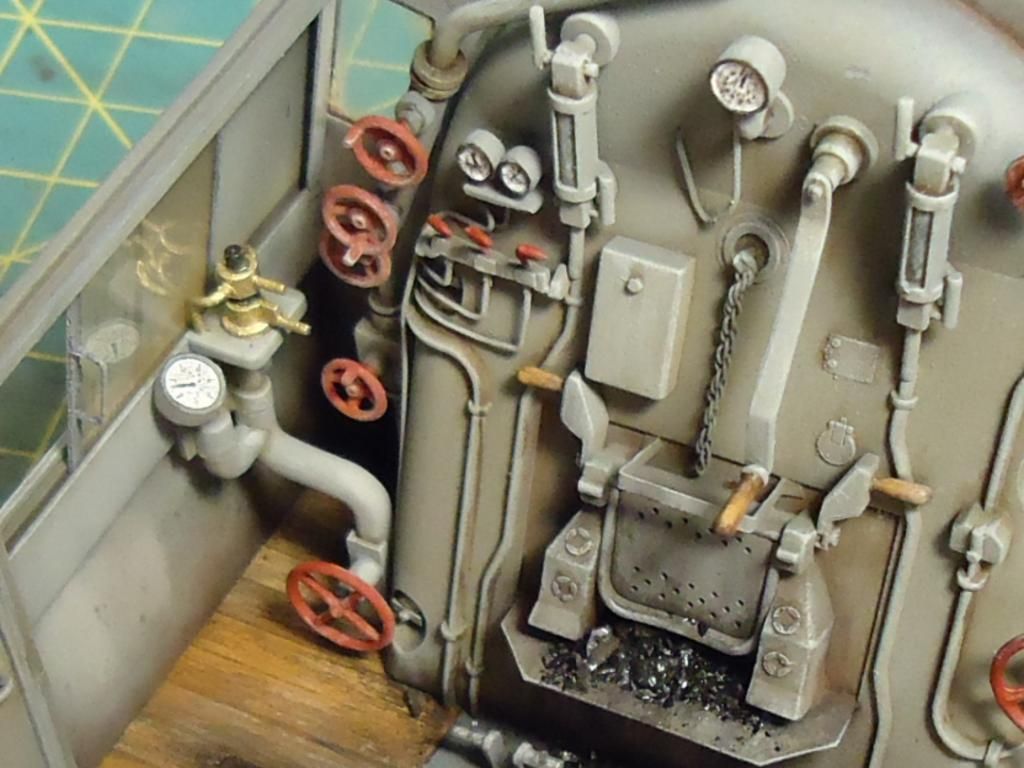
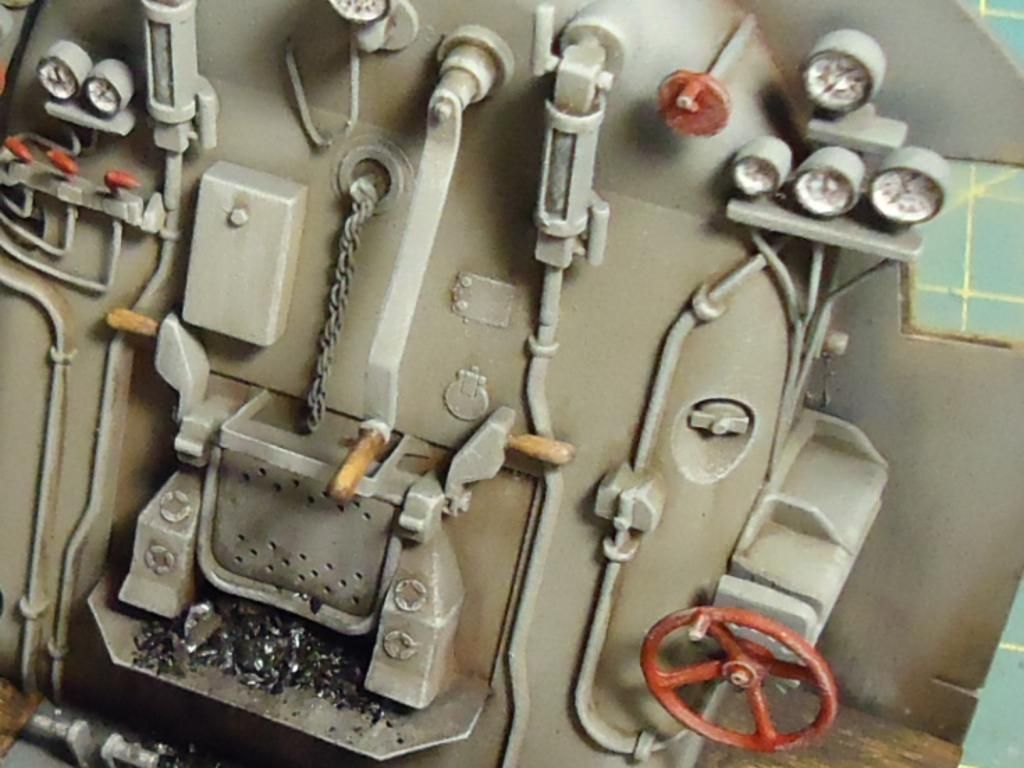
After getting it apart much careful sanding and scraping with knife blades got things back to order.  Then the paint repair and construction began Big Smile  This is now where she's at:

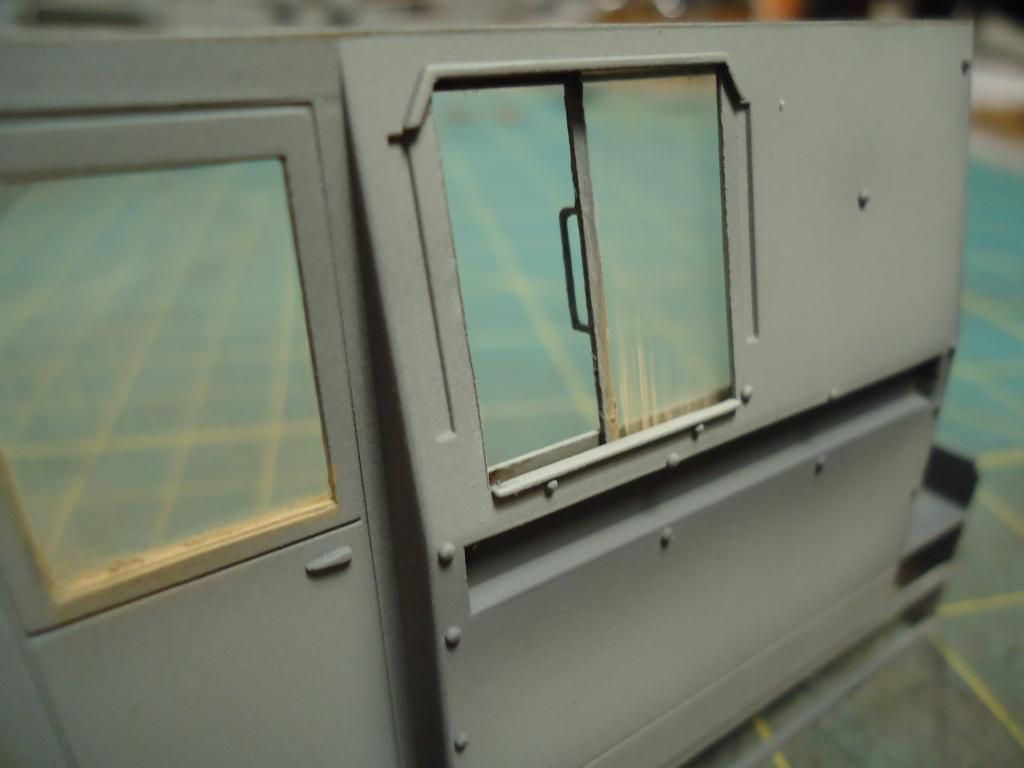
The right bulkhead is not attached yet and will remain off until I can get the seats put in.  That may take a little time because I plan on modifying the seat backs.  But here are some close ups of the right window.
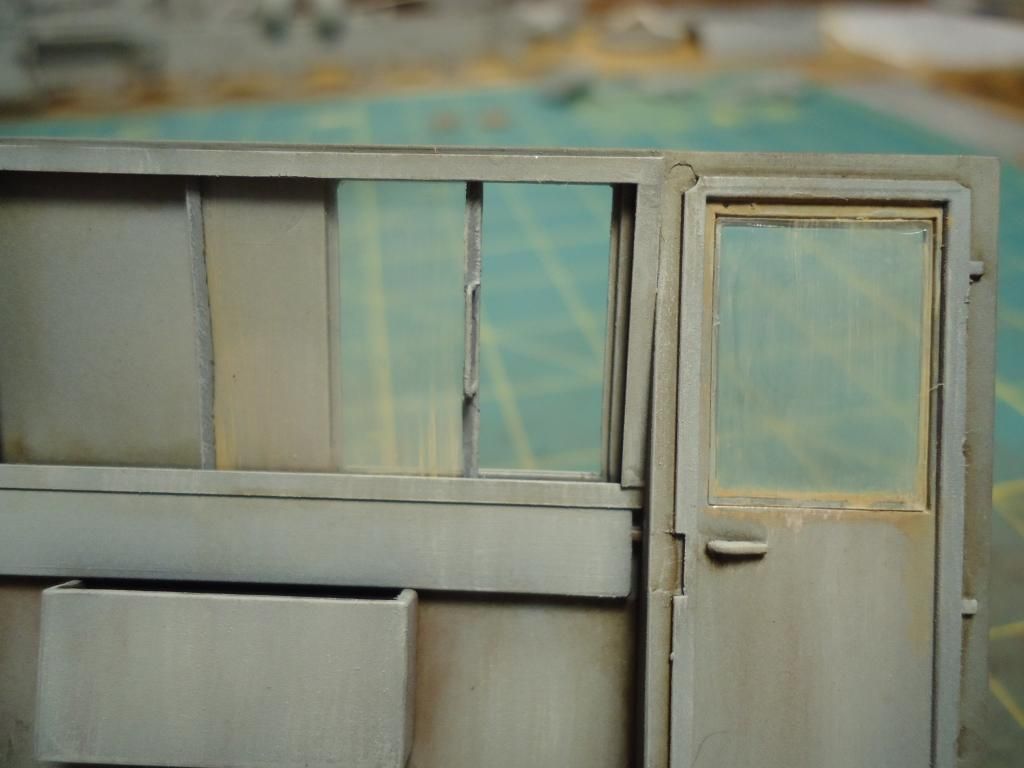
looking at that pic I see a pin mark that I need to go fix Tongue Tied

Left window

And last few pictures

Hope this was not to long but remember if anyone builds this kit, be careful with how that firewall joins together!

Until next time Beer

Rob

  • Member since
    July 2004
  • From: Texas
Posted by wbill76 on Saturday, October 6, 2012 6:54 PM

Nicely done finish on the wood! Rest of the detail painting isn't too shabby either! :)

  • Member since
    June 2009
Posted by Guney on Saturday, October 6, 2012 5:32 PM

Amazing....!

  • Member since
    March 2006
  • From: Right Side of a Left State
Posted by Shellback on Saturday, October 6, 2012 12:33 PM

Your wood floor looks more like wood than my floor Rob ! What ever technique you have developed is really working well ...............the details and weathering on the boiler wall is just perfect !Takes lots of pics of this because its going to be a shame when its covered up with the cab my friend .Toast

JOIN OUR COMMUNITY!

Our community is FREE to join. To participate you must either login or register for an account.

SEARCH FORUMS
FREE NEWSLETTER
By signing up you may also receive reader surveys and occasional special offers. We do not sell, rent or trade our email lists. View our Privacy Policy.