SEARCH FINESCALE.COM

Enter keywords or a search phrase below:

Neubau-Fahrzeug Nr. 3-5 Finished! 05-12-13

20010 views
146 replies
1 rating 2 rating 3 rating 4 rating 5 rating
  • Member since
    May 2005
  • From: Dublin Rep Of Ireland
Posted by terry35 on Sunday, December 16, 2012 8:33 PM
Excellent choice, I have the trumpeter one, wanted to do this vehicle for years, but the only choice was from Cromwell.
Well good luck with this build Bill.

Regards,

Terry.

  • Member since
    September 2005
  • From: beacon falls , Ct.
Posted by treadwell on Sunday, December 16, 2012 9:44 PM

Hi Bill Smile

This should be cool  Smile

I know the Germans only built about 5 of these guys, and it is very  'old school ' for their way of thinking and the way they actually progressed.  

In your WIP pictures, the unfinished hull resembles a Char B1  (not the B1 bis, but the earlier one )

Looking Good !

Gotta get back to the NFL...New England is getting their butt handed to them in a basket !

treadCool


  • Member since
    September 2006
  • From: Australia
Posted by Blitzwing on Monday, December 17, 2012 1:05 AM

I was dying to get this kit when it first came out but the thought of all those road wheels scared me off. I'm looking forward to seeing this one come together.

URL=http://picasion.com/]

  • Member since
    July 2004
  • From: Texas
Posted by wbill76 on Monday, December 17, 2012 11:02 AM

Terry

glad to have you on board! I never thought we'd see a single kit of this vehicle in styrene nevermind have 3 different kit makers fighting over it (Dragon, Trumpeter, Amusing Hobby)!

Tread

you're right, total of 5 vehicles with Nr 1 and Nr 2 having different designs while 3-5 were the same and represented by this particular kit. Easy to see why this one proved to be a dead-end...complex, heavy, but not well protected/armored and prone to mechanical troubles! It definitely has that mid-'30s 'land-ship' type of feel to it. The Pats-Niners game was a wild one and fun to watch...may be a preview of the Super Bowl, you never know!

Blitzwing

the suspension is definitely one that requires some thought and attention. I sat and fiddled with it for a good hour or so before deciding on the best course of action for assembly and painting. Hope I made the right call! Big Smile
  • Member since
    April 2007
Posted by tenthumbs on Monday, December 17, 2012 9:03 PM

Bill, thanks for braving new ground, It will be great to see you work your magic. Dan

  • Member since
    January 2007
Posted by the doog on Monday, December 17, 2012 9:38 PM

Good lord-and he's off and doing another one! No pause, no breath, onward, onward onward!!

WOW! You work quickly, Bill! Looking good already!

  • Member since
    April 2007
  • From: Schroon Lake, NY
Posted by SMJmodeler on Tuesday, December 18, 2012 8:46 AM

Hey Bill!:  Another TANK VARIANT!?!?!  How many did the Germans produce?  Cool looking build...just wanted to drop by so I could follow along.Yes

  • Member since
    March 2003
  • From: Western North Carolina
Posted by Tojo72 on Tuesday, December 18, 2012 8:59 AM

Well this is interesting,not one you see everyday.

  • Member since
    December 2002
  • From: Bury St Edmunds, Suffolk, England
Posted by Bish on Tuesday, December 18, 2012 9:19 AM

Looking forward to watching this. Still haven't got one of these kits yet. I think i need to add one soon.

64 wheels, makes a Pz IV look like a breeze.

I am a Norfolk man and i glory in being so


On the bench: Airfix 1/72nd Harrier GR.3/Fujimi 1/72nd Ju 87D-3

  • Member since
    May 2005
  • From: Dublin Rep Of Ireland
Posted by terry35 on Tuesday, December 18, 2012 10:23 AM
Hi, Bill just checking back, I need to check it out properly but I think that when these vehicles were sent to Norway it was the first numbers that were only mild steel prototypes and the other 3 armoured, another point is the secondary turrets, on some they only look like pz.I but are different in that they only have one MG.
I'm just rambling off the top of my head such is my interest in this wonderful vehicle, you know I love oddball stuff and it does not get any better than this baby, considering it was also called the panzer VI long before the Tiger, lord I could ramble on all day but the small screen on the iPhone puts manners on me.

Keep up the good work and pace.

Terry.

P.s the Main armament arrangement on the main turrets are also different I think between Alkett and Rhinemetal?

  • Member since
    July 2004
  • From: Texas
Posted by wbill76 on Tuesday, December 18, 2012 10:49 AM

DanBeer thanks for following along!

BeerKarl

It only seems fast because you caught this one and the T-34 in the same pass...but there's actually been a two week delay between the two projects and I've only managed to get 5 builds done in total this year, so definitely down from past years although an improvement over 2011 when I finished only 3! Smile

Steve

That's the beauty (or curse!) of German armor...so many different vehicle types and so little time to model them all!

Anthony

Yep, it's a wierd one...but at least it did see some combat even if it was limited and not very renowned!

Bish

This one will definitely put you in road wheel purgatory but worth it considering the uniqueness of the subject IMHO. You should get one!

Terry

It's a fascinating subject with a lot of info available unlike some of the other designs the Germans played around without throughout the course of things. The first 2 vehicles were mild-steel and had different turret designs and gun arrangements (one had an over-under design, the other a side-by-side but different from that on the 3-5 vehicles) while 3-5 were the same design and were armored.

The Krupp MG turrets are indeed a spin-off of the Pz I style turrets (Krupp designed those as well) being roughly the same size but only 1 MG and different hatch and viewport arrangements. It's one of my favorite oddball designs for many reasons...and the Pz VI designation definitely has caused some confusion among modelers over the years before the Neubau-Fahrzeug designation became accepted.

  • Member since
    July 2006
  • From: New Jersey
Posted by redleg12 on Wednesday, December 19, 2012 5:24 AM

Wait....wait....this was supposed to be the Bill Xmas build....sneaking out early....

Rounds Complete!!

"The Moral High Ground....A Great Place to Emplace Artillery."

  • Member since
    July 2012
Posted by Hasenpfeffer on Wednesday, December 19, 2012 9:26 AM

Hey Bill,

I'll be following along as I find this vehicle intriguing... nothing like a Christmas Neubau, right? Yes

I'll be particularly interested in how you pull off the construction/painting as this one looks quite challenging. 

(It looks like Dragon puts out one of these thru CyberHobby as well, but looks more expensive and harder to find. Strange since they are probably ~90%+ identical...)

  • Member since
    July 2004
  • From: Texas
Posted by wbill76 on Wednesday, December 19, 2012 10:58 AM

Guilty as charged Mike! Have to take advantage of bench time when it comes available! Smile

Dave

Glad to have you along! The CH kit is of vehicle Nr. 2 and has a different turret but otherwise it's pretty similar!  It's more expensive because of the 'white box' limited one-time production run nature of the kit and the fact that there was only 1 vehicle produced like this, making it a true 'one-off'! Beer
  • Member since
    December 2002
  • From: Bury St Edmunds, Suffolk, England
Posted by Bish on Wednesday, December 19, 2012 11:08 AM

I have just seen the white box CH kit on Hannants. I didn't realise it was the earlier one and was a bit confused. I think i will deffinatly get one of these Dragon ones. There seem to be a few on E-bay still.

I am a Norfolk man and i glory in being so


On the bench: Airfix 1/72nd Harrier GR.3/Fujimi 1/72nd Ju 87D-3

  • Member since
    July 2012
Posted by Hasenpfeffer on Wednesday, December 19, 2012 11:13 AM

Thanks for the explanation Bill. I don't think I would have ever realized the difference without a lot more research...

Bish, if your looking for the Dragon version, I saw that Dragon USA has it in stock for $40 (usually $65)...

  • Member since
    December 2002
  • From: Bury St Edmunds, Suffolk, England
Posted by Bish on Wednesday, December 19, 2012 11:40 AM

Thanks Dave, i will check it out. It will depend on the postage and if i get slapped by customs as to if its worth getting it from overseas.

I am a Norfolk man and i glory in being so


On the bench: Airfix 1/72nd Harrier GR.3/Fujimi 1/72nd Ju 87D-3

  • Member since
    July 2004
  • From: Texas
Posted by wbill76 on Friday, December 21, 2012 5:38 PM

Hope you're successful Bish! I've always had a soft spot for the pre-war/early-war tank designs myself and never ever thought I'd see the Neubau done in styrene...nevermind by three different kit makers! Smile

  • Member since
    December 2002
  • From: Bury St Edmunds, Suffolk, England
Posted by Bish on Saturday, December 22, 2012 1:56 AM

There seems to be a few on there, so hopefully shouldn't have a problem. And i know the feeling. I was rather pleased when i saw this released.

I am a Norfolk man and i glory in being so


On the bench: Airfix 1/72nd Harrier GR.3/Fujimi 1/72nd Ju 87D-3

  • Member since
    July 2004
  • From: Texas
Posted by wbill76 on Sunday, December 23, 2012 1:39 PM

After studying the rest of the hull construction steps and wanting to avoid having to do multiple paint-work sessions, I decided to go ahead and install as much as possible on the hull first before starting to paint.

So of course that lead me to continue on from the last update and add the details from Step 5. This includes all the driver's area hatches and the left side hull hatches as well as the front headlight. The option is given to pose it raised or lowered and since the kit provides a clear lens, I opted to pose it raised. The grab handle for the driver's hood hatch needed a little bit of putty help as the holes provided are slightly larger than the handle bases. The track installation called for in this step was skipped for now.

Steps 6-8 deal with the fenders and also adds details to the right hull side that more or less mirror what was already on on the left hull side. One little difference is the need to drill out a hole in the turret ring base to take the 2nd width indicator light, this is a little tricky as you have to guesstimate where the hole should go and you should NOT drill the hole all the way through the hull in order for the light to sit at the right depth to match the other side. I used a #76 finger drill for that purpose.

I cleaned up the fenders and did a test fit with some poster putty to see how they would sit and whether or not I could add the front mud flaps or not and still be able to install them over the tracks and idlers when those are added. The answer to that is no, so the front flaps had to be kept off for now. The fender tools and details will get added later after painting.

I went ahead and assembled the main twin muffler/exhausts for the right fender side. The exhaust ends only have depressions to represent their openings so I drilled them out to give them more depth. I also added the curved extension pipe that connects into the engine deck, the fit here needs to be precise to avoid issues with the fender and exhaust sitting correctly, so the dry-fit with the fender helped ensure that occurred. The full exhaust is removable for easier painting and detailing off the fender as a result.

Step 9 deals only with the front mud flaps. Those were assembled and set off to the side for separate painting.

Completing things for the hull is Step 10 which adds the details to the rear engine deck. I opted for the styrene air intake grill slats as the PE option was pretty fragile to work with and didn't offer much of a gain in the looks department. It's also worth noting that the diagram shows the grills (both the styrene and PE option) installing upside down, so be careful to get the orientation right prior to committing to glue on that part.

Next up will be working on the turrets.

  • Member since
    April 2007
Posted by tenthumbs on Tuesday, December 25, 2012 7:50 AM

This is a real interesting subject. Any of them survive to make it  into a museum or collection?

  • Member since
    December 2002
  • From: Bury St Edmunds, Suffolk, England
Posted by Bish on Tuesday, December 25, 2012 8:55 AM

From what i can gather, those that survived were scrapped in 1942. I believe a Museum in Norway does have some small parts.

I am a Norfolk man and i glory in being so


On the bench: Airfix 1/72nd Harrier GR.3/Fujimi 1/72nd Ju 87D-3

  • Member since
    July 2004
  • From: Texas
Posted by wbill76 on Tuesday, December 25, 2012 11:09 AM

Bish is correct. None of the Neubau's survived the war...so all that exists are the photos and plans of their construction as the basis for the models. I suspect that's a big part of the reason that DML chose not to provide any interior details on the turrets or engine compartments of this beast! Smile

  • Member since
    July 2004
  • From: Texas
Posted by wbill76 on Tuesday, December 25, 2012 12:33 PM

A special Merry Christmas update is in order for this project considering it is, after all, a Christmas present build! :)

Continuing on with the turrets, Step 11 addresses the twin MG turrets that are cousins of the type seen on the Pz I. I had no desire to display any of the view flaps in the open position so skipped the use of the interior parts and installed them all in the closed position. Curiously DML provides clear armored glass inserts for only the flat side flaps and not the curved flaps...for whatever reason, the curved flaps get an ordinary gray styrene insert. I opted for the hexagonal style of lifting hooks, parts D52, as those are the type commonly seen in the Nr. 3-5 vehicles based on the available reference photos. The MG13s were left off for now and will be installed later after painting. With care during assembly by avoiding getting any glue on part D16, the mantlets can be left movable although their range of movement/positioning is restricted by the turret design.

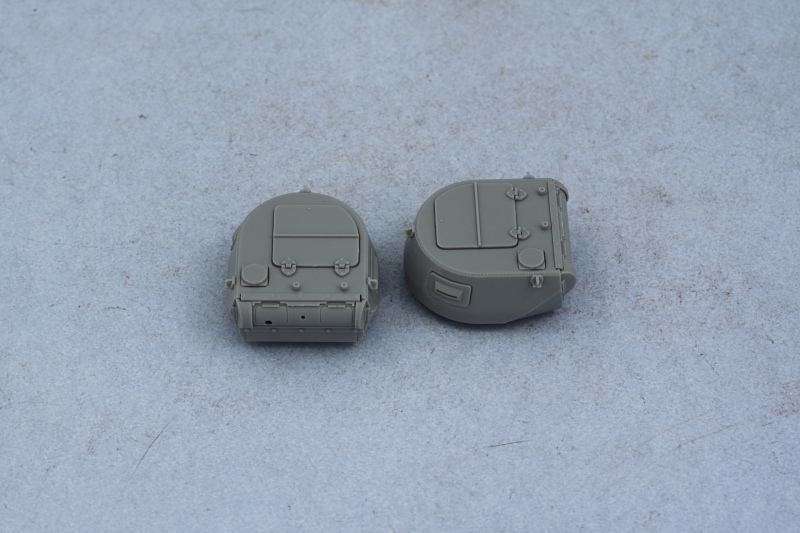
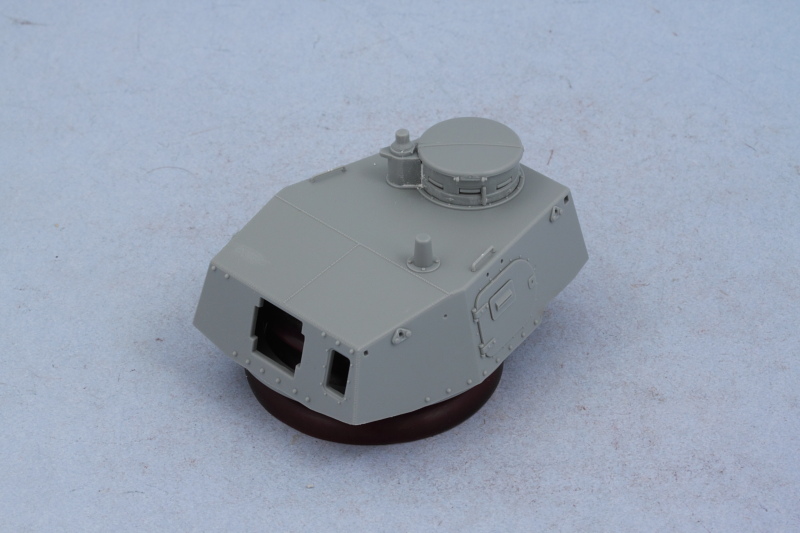
Step 12 begins work on the large main turret and attaches the base of the turret to the top, adds the side hatches, and installs the commander's cupola. The side hatches here also receive ordinary gray styrene vision blocks instead of clear parts and without any kind of interior provided, there's not much point to posing the doors open unless you're going to stuff a figure in there...so mine were closed up. The commander's cupola assembles as a 'stack' of multiple parts and some putty was needed to fill the gap between the cupola and the signal flag port extension that attaches to it.

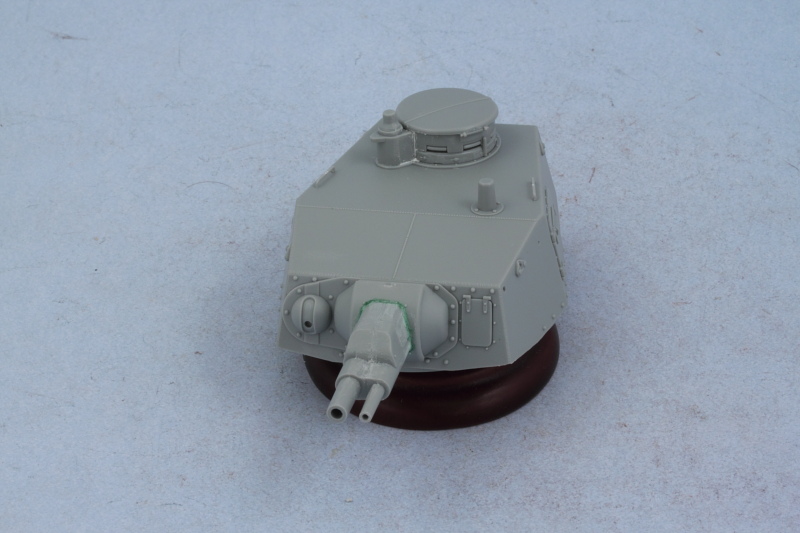
Step 13 adds a lot of delicate detail to the turret side so I bypassed it momentarily to work on Step 14 which assembles and adds the side-by-side main armament. The smaller 3.7cm antitank gun barrel was drilled out slightly to give the barrel a more in-scale diameter and thickness for the muzzle opening. The two guns are paired up in the mantlet as halves, so the resulting join seam needed to be carefully sanded away to create a seamless part. The base of the mantlet is a separate part and shouldn't have a gap, so some Squadron Green putty thinned with liquid glue was used to correct that issue. While the instructions don't indicate it, if you're careful with the assembly and get the alignment of the mantlet base plate and the swivel hub that attaches to it (part B4) correct, it will 'trap' the part sufficiently to allow the main armament to elevate and hold it's position.

Returning to Step 13, I added the lifting eyes, the antenna and holding tray, and the turret hatch latches. Two different styles of latch are offered and parts B45/44 are the correct style for Nr. 3-5 so those were installed accordingly.

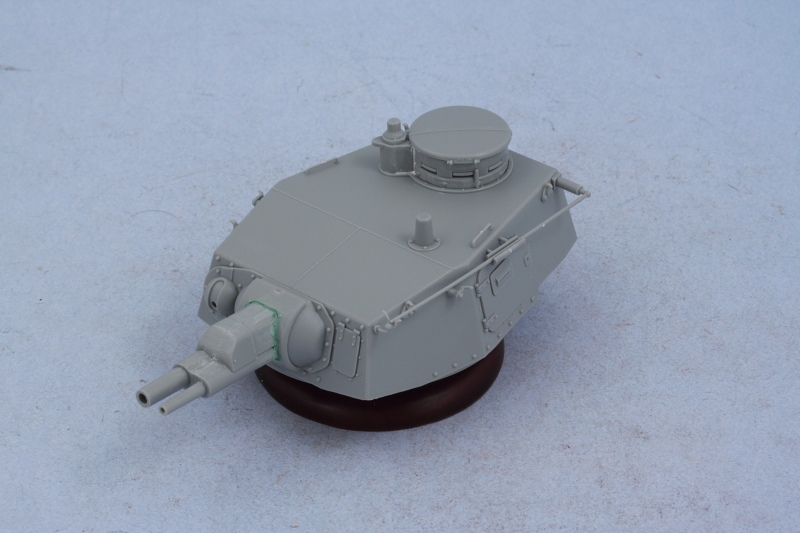
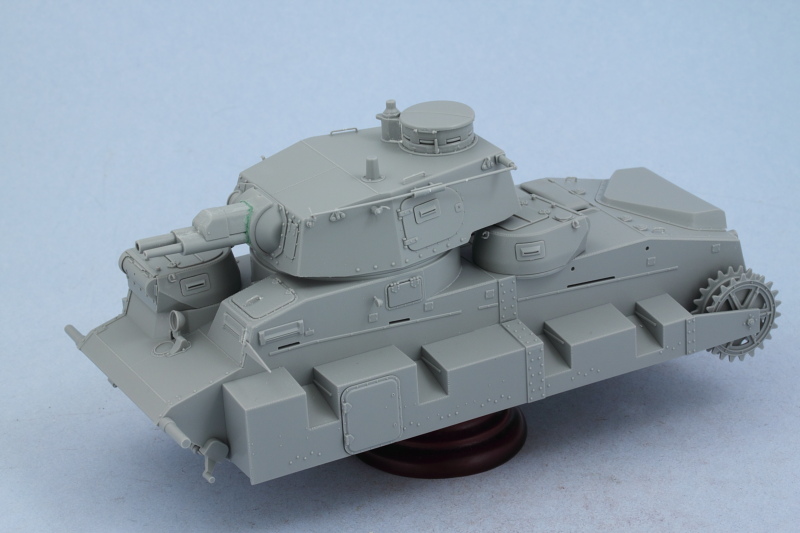
Last but not least, Step 15 adds the turrets to the hull so a sample shot of them in place was called for!

That concludes all the major construction so paint work will be up next!

  • Member since
    September 2005
  • From: beacon falls , Ct.
Posted by treadwell on Tuesday, December 25, 2012 8:15 PM

Nice update ,Bill Smile .....

and a very Merry Christmas to you and yours !

The fine detail on the main turret is very nice looking. I sure wonder what was going through the heads of tank designers of many countries when they came up with these complex , multi-turret ' land ships' . Surprise

A very interesting build !

tread[H]


  • Member since
    May 2005
  • From: Dublin Rep Of Ireland
Posted by terry35 on Tuesday, December 25, 2012 8:49 PM
Great progress Bill, that is a great shot of the Pz. I type turrets, definitely a close cousin of the Pz. I .

Merry Christmas,

Terry.

  • Member since
    December 2002
  • From: Bury St Edmunds, Suffolk, England
Posted by Bish on Wednesday, December 26, 2012 2:58 AM

Great work Bill. And ye, can deffinatly see the relation to Pz I turrets.

I am a Norfolk man and i glory in being so


On the bench: Airfix 1/72nd Harrier GR.3/Fujimi 1/72nd Ju 87D-3

  • Member since
    December 2004
  • From: ohio
Posted by vonryan on Wednesday, December 26, 2012 4:11 AM

well Bill AWESOME work as always. and Marry Chirtmas to you and your's. i look in from time to time here, too tired after Chemo but still working on my Shermans anyway Q. on the twin MG turrets can they be opened? i'd like to build one of these tanks with figures out the twin MG turrets

Clay

  • Member since
    July 2004
  • From: Texas
Posted by wbill76 on Wednesday, December 26, 2012 9:18 AM

Tread

Have to agree with you there...the 'on-paper' design must've seemed ideal...the best of all possible worlds in terms of vehicle capability! Reality proved to be very different though...this beast weighed in at 23 metric tons with a combat load, stood around 9 feet tall and 18 feet long, had a top speed of 30 km/hr, but only a maximum armor thickness of 20mm (roughly the same as a Pz I!). That meant big, heavy, slow, and very lightly protected...not a good recipe for combat survival! Stick out tongue

Terry

and Bish,  Thanks, appreciate the comments! I'm not 100% sure but I believe this same Pz-1 cousin type of turret showed up on the Minenraumer, so it got around!

Clay

Glad to hear you're able to stop in from time to time, keep strong! As for your question on the turrets, the large top hatches can be posed open if you choose to. Beer
  • Member since
    July 2011
  • From: Pittsfield, IL USA
Posted by novembergray on Thursday, December 27, 2012 7:32 PM

I like your models Bill. They're dirty and dusty and not beat all to hell. I can't wait to see this one finished.

Joe

It's not about how fast you get there or even where you're going. It's whether you enjoy the ride.

  • Member since
    July 2004
  • From: Texas
Posted by wbill76 on Saturday, December 29, 2012 12:55 PM

Thanks Joe! Glad to have you along for the ride. Beer

  • Member since
    May 2003
  • From: Mexico
Posted by rtvmodeler on Saturday, December 29, 2012 11:33 PM

Smile Excellent advance my friend.  The detail of the kit looks great!

Regards!
Rodolfo

Current Project:

Figures from Dragon, "German 6th Army, Stalingrad 1942-1943", 1/35

  • Member since
    July 2004
  • From: Texas
Posted by wbill76 on Sunday, December 30, 2012 10:03 AM

Thanks Rodolfo! A severe cold has set me back the last couple of days so have been unable to paint...that time of year I guess, hard to avoid the 'bugs' that circulate especially since my wife teaches at an elementary school. Sad

  • Member since
    July 2004
  • From: Texas
Posted by wbill76 on Sunday, December 30, 2012 6:47 PM

One of the downsides of the holiday season is that it's also cold season! I've been sidelined with a cold the last few days and that ruled out any possibility of painting, so I made use of the available time to take care of one of the less-glamorous-but-necessary tasks...cleaning up the tracks for this beast.

The kit supplies the individual links on sprues of 40 links with three attachment points per link.

The instructions call for 124 links per side so I removed and cleaned up a total of 250 links just to have a couple handy when the time comes to assemble the track runs. The links aren't handed so I only separated them into two bags in terms of the split of links necessary for each run.

Doing this kind of thing while listening or watching a football game makes the repetition less onerous...and I'm glad to have it out of the way! Hopefully next weekend will afford some time to get things back on track for the paintwork that needs to happen for the build to progress.

  • Member since
    July 2006
  • From: New Jersey
Posted by redleg12 on Sunday, December 30, 2012 7:20 PM

Ahhh yes....armor model knitting....at least you made progress. Hope you feel better

Rounds Complete!!

"The Moral High Ground....A Great Place to Emplace Artillery."

  • Member since
    December 2002
  • From: Bury St Edmunds, Suffolk, England
Posted by Bish on Sunday, December 30, 2012 7:27 PM

They look similar to Pz I link. Are they the same size.

I am a Norfolk man and i glory in being so


On the bench: Airfix 1/72nd Harrier GR.3/Fujimi 1/72nd Ju 87D-3

  • Member since
    July 2004
  • From: Texas
Posted by wbill76 on Sunday, December 30, 2012 7:49 PM

Mike

I'm taking comfort in the fact that the Niners won, the Packers lost, and am now hoping that the Redskins beat Dallas to make it a trifecta! Wink

Bish

These links are 38cm links similar to the type used on early Pz III/IV except that they have solid guide horns. HTH!
  • Member since
    December 2002
  • From: Bury St Edmunds, Suffolk, England
Posted by Bish on Sunday, December 30, 2012 8:00 PM

Right, i knew they looked familier, wrong tank. I thought it odd that such a big vehicle would have Pz I links.

I am a Norfolk man and i glory in being so


On the bench: Airfix 1/72nd Harrier GR.3/Fujimi 1/72nd Ju 87D-3

  • Member since
    May 2005
  • From: Dublin Rep Of Ireland
Posted by terry35 on Monday, December 31, 2012 2:25 PM
Nice progress Bill, just to back up an earlier statement you made, you stated that there is a possibility that the Pz.I type turrets showed up on the Minenraumer, I believe you may be correct, I remember reading something to that effect while I was building mine a couple of years ago.

Happy New Year,

Terry

  • Member since
    September 2005
  • From: beacon falls , Ct.
Posted by treadwell on Tuesday, January 1, 2013 5:49 PM

Happy New Year ,Bill Smile

Hope you feel better soon.  I was just thinking what a lot of work to to clean up three sprue points on each link. .....  and I was looking at the M/K tracks you sent me.....guess I will find out soon enough ! LOL

Football was great Sunday..the Packers/Viking game was great...feel bad for Dallas and Tony Romo[00ps]

tread[H]


  • Member since
    July 2004
  • From: Texas
Posted by wbill76 on Tuesday, January 1, 2013 7:08 PM

Thanks Terry!

tread

the clean-up's not so bad once you get into a rhythm...and with 250 links you have plenty of chance for that! Wink I don't feel bad for the Cowboys...I'm a Niners fan! Big Smile
  • Member since
    May 2003
  • From: Mexico
Posted by rtvmodeler on Friday, January 4, 2013 1:35 AM

Tongue Tied Yeah, cleaning the tracks is very tedious, but the final results is a great recompense! Toast.   Attentive to your progress my friend Computer

Regards!
Rodolfo

Current Project:

Figures from Dragon, "German 6th Army, Stalingrad 1942-1943", 1/35

  • Member since
    September 2006
  • From: Australia
Posted by Blitzwing on Friday, January 4, 2013 1:41 AM

It's times like this when I am grateful to find Dragon kits that come with magic tracks.

URL=http://picasion.com/]

  • Member since
    July 2004
  • From: Texas
Posted by wbill76 on Friday, January 4, 2013 9:45 AM

Thanks rodolfo!

Blitzwing

I hear you on that front. Normally if I'm going to do this kind of clean-up, I at least want the added bonus of the tracks being workable but that wasn't an available option for this particular kit unfortunately. Sad
  • Member since
    July 2012
Posted by Hasenpfeffer on Friday, January 4, 2013 9:53 AM

Bill - fun way to spend the Holidays! LOL. Hope you are feeling better. You could have indy tracks for that bad boy, but they are Friuls (ATL-119) and would likely double the cost of your build... 

  • Member since
    July 2004
  • From: Texas
Posted by wbill76 on Sunday, January 6, 2013 7:15 PM

Dave,

That's true! I am feeling much better, thanks! The NFL playoffs are stealing my benchtime for this and the next weekend so there will be a slight pause in the build as a result! :)

  • Member since
    July 2006
  • From: San Francisco Bay Area
Posted by bufflehead on Sunday, January 6, 2013 8:57 PM

Dang Bill, you beat me to it!Surprise  I received this same kit last year for Xmas and was planning on doing a Blog here sometime this year!!  Oh well, its still great to see you're doing one and I always learn something from your great Blog posts!  Sorry to hear that you've been under the weather, hope you get well soon and back to the bench.  None of my NFL teams did well this year Sad, but I guess that means I can spend more weekend time at the bench!! Big Smile

Are you planning on painting this in a two-tone scheme?  Most of the recent builds on this AFV depict it in gray/brown, but I've been wondering if these weren't repainted in overall panzer gray before being deployed.

Ernest

Last Armor Build - 1/35 Dragon M-26A1, 1/35 Emhar Mk.IV Female


Last Aircraft Builds - Hobby Boss 1/72 F4F Wildcat & FW-190A8


  • Member since
    July 2004
  • From: Texas
Posted by wbill76 on Sunday, January 6, 2013 10:28 PM

Hey there Ernest! Good to hear from you and sorry I stole your thunder! The Neubau's in Norway were pretty well photo-documented and there are some great shots that show them parked in a field with excellent lighting that shows the two-tone paint scheme very well. See below (it's also the basis for some of the markings options DML provides), but yes, to answer your question, I will do it in the grey/brown two-tone scheme when I get to the paint stage. Later on when they were brought back to Germany they were repainted solid grey but never saw any additional combat before they were scrapped. Beer 


  • Member since
    July 2006
  • From: San Francisco Bay Area
Posted by bufflehead on Monday, January 7, 2013 12:30 AM

Well, that's a photo I've not seen before!  Thanks Bill!  It does show the two-tone pretty well.  That's how I'll do mine.  I figured they would be repainted after 1940, but I didn't know what happened to them after Norway.  Too bad they were scrapped....they would have been awesome in a museum!

Ernest

Last Armor Build - 1/35 Dragon M-26A1, 1/35 Emhar Mk.IV Female


Last Aircraft Builds - Hobby Boss 1/72 F4F Wildcat & FW-190A8


  • Member since
    July 2004
  • From: Texas
Posted by wbill76 on Tuesday, January 8, 2013 8:05 PM

Have to agree with you there Ernest but that much quality steel just couldn't be left sitting with the war effort going on I guess. Smile

  • Member since
    January 2007
Posted by the doog on Wednesday, January 9, 2013 9:04 PM

Bill, you are the KING of Brown/Grey schemes! lol! This one should be no different!

Shame about those annoying track clean ups!

Glad to hear you're feeling better too--I go slammed with the flu over the Holidays too, and am just coming back from it. It seemed like a nasty one this year. I couldn't stop coughing.

  • Member since
    July 2004
  • From: Texas
Posted by wbill76 on Thursday, January 10, 2013 9:27 AM

Thanks Karl! Tracks are always a necessary evil and this beast has more than the usual share because of the hull size for sure! I was lucky in that it was only a cold and not the flu, my wife teaches elementary school music (aka the germ factory!) so I ALWAYS get a flu shot every year...even if the mix isn't all that much changed from the previous year.

This particular build has slowed down a little due to the NFL playoffs and of course the resumption of my MBA classes...sure will be glad when they are done at the end of March, almost there! Wink

  • Member since
    December 2002
  • From: Bury St Edmunds, Suffolk, England
Posted by Bish on Thursday, January 10, 2013 10:35 AM

Nice to hear your feeling better Bill. Thats a really good photo, it shows off the two tone scheme very well, somthign that most photo's don't seem to do.

Ernest, i hope your still going to do a WiP on this kit.

I am a Norfolk man and i glory in being so


On the bench: Airfix 1/72nd Harrier GR.3/Fujimi 1/72nd Ju 87D-3

  • Member since
    July 2004
  • From: Texas
Posted by wbill76 on Friday, January 11, 2013 3:55 PM

It also provides some nice inspiration for the weathering later on once the tracks and suspension are installed...but I don't want to get too carried away just yet! Smile

  • Member since
    July 2006
  • From: San Francisco Bay Area
Posted by bufflehead on Saturday, January 12, 2013 1:30 PM

Bish

Ernest, i hope your still going to do a WiP on this kit.

Not intending to hijack Bill's thread, but yes I will be doing a WIP on my kit.  Actually the kit was a gift from my coworkers and I promised them I'd do the WIP so they can follow the progress.  The only difference is I'm going to use some Friul metal tracks that I bought last year....the reason escapes me now why I'm not using the kit tracks!! Hmm

I am looking forward to see how Bill is going to do the tracks.  On most of the WIPs I've seen on this kit, the tracks are added during assembly and painted while on the suspension.

Ernest

Last Armor Build - 1/35 Dragon M-26A1, 1/35 Emhar Mk.IV Female


Last Aircraft Builds - Hobby Boss 1/72 F4F Wildcat & FW-190A8


  • Member since
    July 2004
  • From: Texas
Posted by wbill76 on Saturday, January 12, 2013 2:30 PM

My plan of attack with the tracks is to assemble them as runs (top and bottom) and paint off the vehicle then install after the suspension is in place. It's the main reason that I haven't been able to make any recent progress as I need a large block of time available to get the hull painting out of the way prior to getting the suspension in place. Wink

  • Member since
    December 2002
  • From: Bury St Edmunds, Suffolk, England
Posted by Bish on Saturday, January 12, 2013 2:43 PM

bufflehead

Bish

Ernest, i hope your still going to do a WiP on this kit.

Not intending to hijack Bill's thread, but yes I will be doing a WIP on my kit.  Actually the kit was a gift from my coworkers and I promised them I'd do the WIP so they can follow the progress.  The only difference is I'm going to use some Friul metal tracks that I bought last year....the reason escapes me now why I'm not using the kit tracks!! Hmm

I am looking forward to see how Bill is going to do the tracks.  On most of the WIPs I've seen on this kit, the tracks are added during assembly and painted while on the suspension.

I got a GB running that this would fit into nicely. Wink

A lot of guys seem to add the tracks before painting. I prefer to paint them off the vehcile and add them at the end. I just don't get how those guys do it.

I am a Norfolk man and i glory in being so


On the bench: Airfix 1/72nd Harrier GR.3/Fujimi 1/72nd Ju 87D-3

  • Member since
    July 2006
  • From: New Jersey
Posted by redleg12 on Monday, January 14, 2013 1:44 AM

This weeks update canceled due to PITA tracks!!

Rounds Complete!!

"The Moral High Ground....A Great Place to Emplace Artillery."

  • Member since
    July 2004
  • From: Texas
Posted by wbill76 on Monday, January 14, 2013 10:45 AM

Something like that Mike! Although the real culprits are NFL playoffs and having to read 6 chapters for my Marketing class. Smile

  • Member since
    July 2006
  • From: San Francisco Bay Area
Posted by bufflehead on Monday, January 14, 2013 10:43 PM

wbill76

My plan of attack with the tracks is to assemble them as runs (top and bottom) and paint off the vehicle then install after the suspension is in place. It's the main reason that I haven't been able to make any recent progress as I need a large block of time available to get the hull painting out of the way prior to getting the suspension in place. Wink


The NFL season has unexpectedly ended!!!  For some reason all the teams have decided to go home and watch Bill assemble the Neubaufahrzeug indy track links on the suspension, paint them and reinstall them.  Now THAT'S worth watching!!

Ernest

Last Armor Build - 1/35 Dragon M-26A1, 1/35 Emhar Mk.IV Female


Last Aircraft Builds - Hobby Boss 1/72 F4F Wildcat & FW-190A8


  • Member since
    July 2004
  • From: Texas
Posted by wbill76 on Tuesday, January 15, 2013 9:11 AM

Plasticsurgeon

, glad to have you along for the ride and hope it's useful for you! Yes

Ernest

LOL! The Niners are my team so not quite done yet...will be a very interesting Sunday this weekend!
  • Member since
    August 2008
  • From: S.W. Missouri
Posted by Pvt Mutt on Tuesday, January 15, 2013 3:04 PM

They should go all the way Bill.

That Sea Hawk coach sure did blow it for the team.Super Angry

Tony lee

Shoot Low Boys They're Ridin Ponys

  • Member since
    July 2004
  • From: Texas
Posted by wbill76 on Wednesday, January 16, 2013 6:19 PM

I hope you're right Tony! The Harbaugh brothers are both right where they were this time last year...will be interesting to see how the next chapter unfolds. Smile

  • Member since
    September 2005
  • From: beacon falls , Ct.
Posted by treadwell on Wednesday, January 16, 2013 10:09 PM

Heya Bill and Tony Smile

A little off topic , but I wish the 49ers good luck this weekend... it was one heck of a game against Seattle, I think after a gaff like Pete Carroll pulled he ought to get fired, but I was rooting for the Niners all the way. Fate and great gameplay were on the Niners side. Just when you thought it was over Carroll mis-timed his interuptive time out on the Niners kicker and gave them their destiny.  We shall see if they can follow through.

I just want anybody BESIDES New England !

Tony, your build is looking terrific and Bill I need an update.. ( I know you are very busy and need to pre paint some parts.. just bustin stones  Smile )

see you later

tread Cool


  • Member since
    July 2006
  • From: San Francisco Bay Area
Posted by bufflehead on Wednesday, January 16, 2013 11:43 PM

I don't care who plays or wins the Super Bowl.....I'd still rather watch Bill work on those Neu tracks!!

BTW, I think I remember why I got the Friul tracks.   I was basing the construction on the CyberHobby release of the Neubaufahrzeug, which I believe was an earlier mild steel version.  There is a brace on the front of the suspenson that runs from the front fender to the top of the sponson (see pic). 

That little brace was enough to dissuade me from using the kit tracks!  However I don't see the same brace on this kit.  ??

Ernest

Last Armor Build - 1/35 Dragon M-26A1, 1/35 Emhar Mk.IV Female


Last Aircraft Builds - Hobby Boss 1/72 F4F Wildcat & FW-190A8


  • Member since
    July 2004
  • From: Texas
Posted by wbill76 on Thursday, January 17, 2013 10:13 AM

Tread

I've been wanting to get back to the bench as well, I got spoiled over the holidays and with my current MBA class (Marketing) taking up a lot of time with reading and papers, it's been tough...but fingers crossed for this Saturday! Wink

Ernest

That little brace is present on this kit as well but it's just a small bit of PE that doesn't involve any real support or attachment function other than to 'be there' as a detail. It's something that won't get added until the very very end as a result.
  • Member since
    July 2004
  • From: Texas
Posted by wbill76 on Saturday, March 16, 2013 6:39 PM

Life has a way of getting in the way at times in terms of building models but for the first time in a long time I was able to get back to the bench and make some much-needed progress on this build.

I had done all the major construction with the initial plan of painting everything and then adding the suspension, tracks, and fenders but I decided to go a slightly different route instead. After looking at how the fenders install, I'm going to put in the suspension and tracks and then add the fenders and do the paint work for the vehicle in two stages. The first stage involves the lower hull, so I masked off the glue-line for the fenders so they will have a clean surface to mate up with for installation. I used MM Italian Dark Brown to lay down a primer coat by airbrush.

After primer, the base coat of MM enamel Panzer Schwarzgrau was applied by airbrush. One of the little side lights came off in the process, will add that back later on when it has less of a chance of getting knocked off again. The little sponson extensions that trap the idler were held in place with blue-tack and have not yet been glued in position. Camo pattern and some post-shading on the panzer gray will be done later when the rest of the hull is painted.

At the same time as I worked on the hull, I did all of the suspension components as well including the numerous road wheels. They were primered just like the hull and I airbrushed MM enamel Gunmetal for the rubber portions. Using a draftsman's circle template, the hubs were airbrushed with the Schwarzgrau to round things out.

Next up will be the fun of putting all the suspension components together and making sure it all sits level before tackling the tracks.

  • Member since
    December 2002
  • From: Bury St Edmunds, Suffolk, England
Posted by Bish on Saturday, March 16, 2013 6:56 PM

Glad to see this back bill.

I am a Norfolk man and i glory in being so


On the bench: Airfix 1/72nd Harrier GR.3/Fujimi 1/72nd Ju 87D-3

  • Member since
    December 2006
  • From: N. Georgia
Posted by Jester75 on Saturday, March 16, 2013 8:14 PM

Ditto

Eric


  • Member since
    August 2012
  • From: Parker City, IN.
Posted by Rambo on Saturday, March 16, 2013 9:37 PM

I was wondering when you was going to get back on this. Glad to see you had some time to get back to the bench.

Clint

  • Member since
    March 2003
  • From: Western North Carolina
Posted by Tojo72 on Sunday, March 17, 2013 12:16 AM

Welcome back Bill,lotsa wheels there !!

  • Member since
    January 2007
Posted by the doog on Sunday, March 17, 2013 4:42 AM

Best I can say Bill is that I'm vicariously enjoying your return to the bench---I know how good that feels. I'll be luxuriating in the glow myself in a few days when I'm back from the Urals. Let's hope that Aeroflot maintains their plane fleet with competence!

Looking fine, buddy!

  • Member since
    July 2004
  • From: Texas
Posted by wbill76 on Sunday, March 17, 2013 9:51 AM

Bish

, Eric, Clint, and Anthony, thanks for the comments!

BeerKarl

, you should be fine so long as you aren't Polish! Wink Travel safe! I'm soooo glad to be able to get back to a 'weekend'! I took my MBA final, passed it, and now am just counting down the remaining days to the 28th when the program officially ends. Been a long 18 months!
  • Member since
    August 2008
  • From: S.W. Missouri
Posted by Pvt Mutt on Sunday, March 17, 2013 12:21 PM

Way to go BillStarStarStarStarStar

And Paint tooYes

Tony lee

Shoot Low Boys They're Ridin Ponys

  • Member since
    July 2004
  • From: Texas
Posted by wbill76 on Sunday, March 17, 2013 7:03 PM

Thanks Tony, much obliged! Wink Beer

  • Member since
    May 2005
  • From: Dublin Rep Of Ireland
Posted by terry35 on Sunday, March 17, 2013 7:27 PM

Glad to see you got back to the bench Bill.

  • Member since
    July 2004
  • From: Texas
Posted by wbill76 on Monday, March 18, 2013 5:01 PM

Thanks Terry! For a moment I had to just sit at the bench and reorient myself as to where everything was, it had been that long! Big Smile

  • Member since
    July 2004
  • From: Texas
Posted by wbill76 on Sunday, March 24, 2013 3:03 PM

Work continued in the latest session on the lower hull and suspension. The design on this vehicle is a bit tricky and Dragon used a modular approach with a separate plate for the trucks to install to with the plate installing into the hull sponsons. The real challenge in this approach is getting all 10 wheels lined up correctly on either side by trapping them between the truck mounts. I made an attempt to leave the wheels able to rotate but found it necessary to glue them in place on their mount pins as the truck halves didn't have enough natural tension to keep them from popping out otherwise. Both sides were assembled and allowed to dry thoroughly before proceeding.

As already mentioned, the suspension on this vehicle is a complex design. After studying things for a bit, I determined the best route was to install the front idlers, tension wheels, and support plates first to ensure I had a straight alignment between them, the drive sprockets, and the return rollers that would install along the top run. The return rollers are similar to the road wheel trucks in that they trap the roller between two mount halves. The installation of the roller mounts into the sponsons must be precise as all four have to align perfectly for the track runs to come. Dragon molded a small step on either side of the sponson openings to help with the positioning and the fit tolerance here is tight. It was necessary to scrape paint with a needle file to get the right fit and the position of the outer half of the mount is the key since it has a small stop in its base to prevent it from sliding in too far on the position step.  After I had installed the rollers on both sides, some light touch-up with the panzer gray used earlier tied everything together. I also took the opportunity to create the sprocket teeth wear using some MM non-buffing Metalizer Steel and dry-brushed enamel Burnt Umber since this is the last time it would be easily accessible.

The next step was to assemble the track runs and test them for fit and sag. The instructions call for 124 links per side and that worked out perfectly for the right side but the left needed 1 more link to get things in shape. Each track side consists of 4 parts of 30-35 links that can be separated for painting and weathering off the vehicle. The runs will be allowed to set up thoroughly for 24 hours before moving on to the next phase.

  • Member since
    July 2004
  • From: Texas
Posted by wbill76 on Thursday, March 28, 2013 12:27 PM

The track saga continues with some more progress to report. After letting the 4 runs per side thoroughly set up for at least 24 hours, I carefully removed them from the suspension for painting. Since the two sides are not identical, it was essential to avoid any mix-ups between them, so I used an old MK track box with a divider and handy post-it note labels to keep things separate. I airbrushed a base coat of MM Burnt Umber as the foundation and let that cure for 24 hours before moving on to the next phase.

The track runs were further detailed by dry-brushing MM enamel Steel with a large round 0 sable brush followed by a light wash of MM enamel Raw Umber to tone down the Steel and tie things together. Once the wash had dried, the track runs were knitted together on both sides and installed.

Next up will be adding the fenders and continuing the paint work for the top side.

  • Member since
    December 2006
  • From: N. Georgia
Posted by Jester75 on Thursday, March 28, 2013 12:49 PM

Looks like a challenging build but your breezing right through it Bill. Your method always turns out some really good and realistic looking tracks.

Eric


  • Member since
    July 2004
  • From: Texas
Posted by wbill76 on Friday, March 29, 2013 12:02 PM

Thanks Eric! The complexity of the vehicle design presents some challenges but nothing that a little thinking ahead and lots of test-fitting can't handle.

  • Member since
    July 2004
  • From: Texas
Posted by wbill76 on Sunday, March 31, 2013 6:24 PM

Lots of progress to report so we'll get right to it. First order of business was to install the fenders. I used a combination of regular glue on the tab slots and liquid glue along the edges to get a good and level join. I also reinstalled the little side hull lights that had gotten knocked off earlier. While not visible in the photo, I took advantage of that opportunity to drill out their solid faces with a pin vise to allow for greater detail later on.

Prior to painting, I masked off the lower hull and tracks using a combination of thin strips of sheet styrene inserted under the fenders and blue painter's tape. Primer coat of Italian Dark Brown was applied by airbrush as the foundation. Three cardboard tubes and painter's tape created handles so I could easily paint the three turrets.

Base coat of MM Panzer Schwarzgrau came next.

Base coat highlights were added using an 80/20 mix of Schwarzgrau and Light Gray. Highlights were applied semi-randomly but with the main intent of creating a post-shade effect.

Then came the fun part, applying the disruptive camo pattern suitable for a vehicle in Norway in 1940. I used MM enamel Schokoladenbraun and applied the pattern free-hand.

Paint will get the chance to cure thoroughly over the course of the next week and attention will shift to the remaining equipment and fender details.

  • Member since
    December 2006
  • From: N. Georgia
Posted by Jester75 on Monday, April 1, 2013 5:39 AM

Wbill, the master of the two tone panzer grey scheme. Looks really nice in those colors! Such an interesting looking vehicle too.

Eric


  • Member since
    July 2004
  • From: Texas
Posted by wbill76 on Monday, April 1, 2013 9:41 AM

Thanks Eric! Can't argue with you there...definitely a 'unique' look to this multi-turret beast! Wink

  • Member since
    December 2002
  • From: Bury St Edmunds, Suffolk, England
Posted by Bish on Monday, April 1, 2013 2:02 PM

She is looking very nice. I still don't get how you guys can paint the tracks like that.

I am a Norfolk man and i glory in being so


On the bench: Airfix 1/72nd Harrier GR.3/Fujimi 1/72nd Ju 87D-3

  • Member since
    September 2006
  • From: Dripping Springs, TX, USA
Posted by RBaer on Monday, April 1, 2013 3:09 PM

Neat work, Bill.

Apprentice rivet counter.

  • Member since
    July 2004
  • From: Texas
Posted by wbill76 on Monday, April 1, 2013 7:08 PM

Bish

I don't normally do my tracks this way but was forced into it by the vehicle design and the use of static indies! Big Smile

thanks Russ much appreciated! Beer

  • Member since
    January 2007
Posted by the doog on Monday, April 1, 2013 10:19 PM

Bish

She is looking very nice. I still don't get how you guys can paint the tracks like that.

lol, I was going to say the same thing---I read your response, Bill! Big Smile I was like, "BIll painting his tracks on the model?!?!?! What have I missed here?!?!"!

It IS a wicked-looking tank, and the camo looks great!

  • Member since
    July 2004
  • From: Texas
Posted by wbill76 on Tuesday, April 2, 2013 9:45 AM

the doog

Bish

She is looking very nice. I still don't get how you guys can paint the tracks like that.

lol, I was going to say the same thing---I read your response, Bill! Big Smile I was like, "BIll painting his tracks on the model?!?!?! What have I missed here?!?!"!

It IS a wicked-looking tank, and the camo looks great!


Thanks Karl! But to be fair, I can't claim credit for painting them on the vehicle. The tracks were painted in sections off the vehicle after they had set up and then reinstalled once painted. Each track run was left in 4 pieces so I could remove them. I'm not that good! Big Smile

  • Member since
    December 2002
  • From: Bury St Edmunds, Suffolk, England
Posted by Bish on Tuesday, April 2, 2013 12:09 PM

wbill76

the doog

Bish

She is looking very nice. I still don't get how you guys can paint the tracks like that.

lol, I was going to say the same thing---I read your response, Bill! Big Smile I was like, "BIll painting his tracks on the model?!?!?! What have I missed here?!?!"!

It IS a wicked-looking tank, and the camo looks great!


Thanks Karl! But to be fair, I can't claim credit for painting them on the vehicle. The tracks were painted in sections off the vehicle after they had set up and then reinstalled once painted. Each track run was left in 4 pieces so I could remove them. I'm not that good! Big Smile

 Nice tip, not sure i wouyld have tought of that, will have to make a note of it.

I am a Norfolk man and i glory in being so


On the bench: Airfix 1/72nd Harrier GR.3/Fujimi 1/72nd Ju 87D-3

  • Member since
    July 2004
  • From: Texas
Posted by wbill76 on Sunday, April 7, 2013 5:08 PM

Latest round of effort focused on the details for the fenders. The Neubau has a lot of fender space for tools and such but doesn't use the 'normal' type of clamps for them, so I stayed with the kit-supplied clamps and made minor modifications in thinning a couple of the molded-on handles to be more in-scale. Reference pics showed that the crews added two sets of spare tracks to the right hand fender so I used some spare PE brass strip and some Lion Roar hex nuts to create some simple mounts along with two runs of 4 links from the left-over kit supplied tracks. I used a #76 finger drill to open up the pin holes on the first and last link for each spare run for added detail. Last but not least, using the same finger drill, I also opened up the threaded ends on the gun-cleaning rods and used a short length of white rod styrene to simulate the 'male' end of the rod with the cleaning swab.

All the tools were painted using various colors. Metal portions were base coated with MM non-buffing metalizer Gunmetal and lightly dry-brushed with MM Steel. Wood portions were given a base coat of 50/50 MM Dunkelgelb/Light Gray followed by a wash of MM Leather and then dusted with Burnt Umber artist pastels. For the mufflers, I applied a base coat of metalizer Gunmetal, followed by a wash of MM Leather, then stippled MM Rust to create a random pattern. This was followed up with some dry-brushed MM enamel Burnt Umber to blend things back together a bit and tone down the Rust.

Then the tools were installed in place on the vehicle. It's worth noting that the small MG turrets need to be in place before doing this as the front turret in particular can't clear the track tensioning wrench once it's installed. The rear turret also has clearance issues with the jack mount but can still rotate enough in the opposite direction to allow it to be removed. The turret MGs were painted and detailed in the same fashion as the metal tools and glued into place in their respective mounts.

I also used the available time to add some subtle variation to the Schokoladenbraun camo pattern applied last time around. I used MM Italian Dark Brown via airbrush to create some slight lightening and shadows here and there as further prep for the weathering work to come.

Although not shown clearly in the above photos, I also used some regular enamel Silver to paint the interior faces of the small side lights and the large front headlight. Tamiya Clear Red was used for the rear brake light as well to round things out in the detail department.

Next up will be sealing everything and applying the markings.

  • Member since
    January 2007
Posted by the doog on Monday, April 8, 2013 6:56 AM

Awesome work, Bill. The camo looks perfect.

Really nice to see something different here. Those tools look superb too! I like how you photographed them all laid out impeccably! Yes

  • Member since
    July 2004
  • From: Texas
Posted by wbill76 on Monday, April 8, 2013 11:12 AM

Thanks Karl! It's a fun little oddball project to work on. While an evolutionary dead-end in German design, it's still fascinating IMHO. Yes

  • Member since
    April 2005
  • From: Gothenburg
Posted by JohanT on Wednesday, April 10, 2013 2:06 PM

Hi Bill,

as allways there is so much to learn in your blog.

I will adopt to the track trick instantly.

Did you do a similar grey/brown scheme before?

The pictures in this thread are very convincing and I would like to try this on a mark II or 38?

VBR

JT

  • Member since
    September 2006
  • From: Dripping Springs, TX, USA
Posted by RBaer on Wednesday, April 10, 2013 3:29 PM

Spiffy neat, Bill. I always admire the attention to detail in your builds.

How dirty are you going to make it?

Apprentice rivet counter.

  • Member since
    July 2004
  • From: Texas
Posted by wbill76 on Wednesday, April 10, 2013 3:38 PM

Johan

thanks for the comments and glad the track trick will come in handy! This isn't the first time I've done this scheme. The most recent one was about a year ago on a Pz IV Ausf C. www.bpmodels.net/.../viewtopic.php FineScale published the article in their Dec 2012 issue. It's a neat scheme to do, perfect for a Pz II or 38(t) for sure!

Russ

this one's going to get fairly dusty particularly on the lower hull and tracks. Reference pics showed they got pretty dirty in the field due to the way the tracks run, so that will be my guide as far as the weathering goes. Wink
  • Member since
    July 2006
  • From: San Francisco Bay Area
Posted by bufflehead on Wednesday, April 10, 2013 9:01 PM

I totally forgot about your Neubau-Fahrzeug build log Bill! Surprise  I have to say its looking mighty fine and serves as an inspiration when I start working on mine. 

Ernest

Last Armor Build - 1/35 Dragon M-26A1, 1/35 Emhar Mk.IV Female


Last Aircraft Builds - Hobby Boss 1/72 F4F Wildcat & FW-190A8


  • Member since
    July 2004
  • From: Texas
Posted by wbill76 on Thursday, April 11, 2013 11:43 AM

Glad you stopped by Ernest! Beer I had to put the build on hold for a while but now it's back on a regular schedule. Hopefully I can finish it up here in the next couple of weeks depending on how things go. Wink Look forward to seeing yours when the time comes!

  • Member since
    March 2003
  • From: Western North Carolina
Posted by Tojo72 on Friday, April 12, 2013 6:40 PM

moving along nicely Bill,I used your track method on my E-10 and i loved the look

  • Member since
    July 2004
  • From: Texas
Posted by wbill76 on Saturday, April 13, 2013 2:03 PM

Thanks Anthony! Loved the look you got with that E-10, glad to hear the track method worked for you. Beer

  • Member since
    July 2004
  • From: Texas
Posted by wbill76 on Sunday, April 14, 2013 4:14 PM

One of the most interesting things about the Neubaus in my opinion is not just their rarity but their individuality. #10 has a special case of individuality and the kit provides for this with the decal markings. As you can see in the reference photo below (posted for discussion purposes only), the markings on this vehicle underwent different transformations depending on when in 1940 it is depicted. This particular photo is sometime after the end of April 1940 and includes what appears to be a crew-memorial dated 25.4.40 on the right rear turret. The #10 insignia have also been painted over but are still clearly visible on both the turret sides and rear.

The Dragon finishing guide provides for this but with the added twist that the decal markings are all in white...no panzer gray numbers are provided. So to recreate this particular look, some extra creativity is called for. I started by sealing the previous paint work with a coat of Future acrylic floor polish by airbrush and let that thoroughly dry before adding the markings. The vehicle doesn't have a lot of markings, but most are large/prominent. These were all applied using Walther's Solvaset to get them to snug down tight to the surface. The left side turret number had to be carefully cut at the top of the 0 to allow it to fit over the lifting eye but all the others fit perfectly.

Once the decals were set, they were sealed with another coat of Future by airbrush. Then the fun part began. Working with a fine detail brush and the lightened 80/20 Panzer Gray/Light Gray mix I'd sprayed earlier to create highlights, I hand painted over the white turret numbers. After the paint was dry, I added the three 'R' markings along with the Feldwebel Faulhaber memorial decal again using Solvaset. Once they were set, a final coat of Future sealed them all up and created a uniform surface for the weathering to come. 

Next weekend I will be at the AMPS show in Atlanta so this one may not get an update for a couple of weeks as a result, but the next step will be to start in on the weathering.

  • Member since
    July 2006
  • From: San Francisco Bay Area
Posted by bufflehead on Sunday, April 14, 2013 11:00 PM

Huh!  I never noticed that before about #10 Neubau!  Great attention to detail Bill and I love how you overcame the painted over markings situation!  Good stuff!  Looking forward the weathering of this steel beast!  Have fun at AMPS and with all the attending forum members! Beer

Ernest

Last Armor Build - 1/35 Dragon M-26A1, 1/35 Emhar Mk.IV Female


Last Aircraft Builds - Hobby Boss 1/72 F4F Wildcat & FW-190A8


  • Member since
    July 2003
  • From: Perth, Western Australia
Posted by madmike on Sunday, April 14, 2013 11:25 PM

Now that looks awesome!!

I have the 1/72 little brothers of these in my stash. Seeing your build progress to completion makes me want to get them out and start building!

"I do not feel obliged to believe that the same God who has endowed us with sense, reason, and intellect has intended us to forgo their use." - Galileo Galilei
  • Member since
    July 2003
  • From: On my kitchen counter top somewhere in North Carolina.
Posted by disastermaster on Monday, April 15, 2013 12:54 AM

 Wow, I've put out so many compliments on professional model results here on this site...  I wish I could come up with something new and original.

http://media-cache-ec4.pinterest.com/192x/0f/a8/6b/0fa86bfab19104f24fa8f625b24d77c1.jpg

How about "well built and well done", also very well planned out in the tracking strategy.

Sherman-Jumbo-1945

" I was so much older then I'm younger than that now "


  • Member since
    July 2004
  • From: Texas
Posted by wbill76 on Monday, April 15, 2013 10:44 AM

Ernest

yep #10 has some neat 'extra' features attached to it. The weathering is going to be fun on this one for sure. Looking forward to AMPS this weekend!

BeerMMBeer thanks for the comments! Would love to see you tackle one of these in 1/72. Yes

BeerDM

that's original enough for me Steve! Thank you kindly sir!
  • Member since
    May 2005
  • From: Dublin Rep Of Ireland
Posted by terry35 on Monday, April 15, 2013 5:01 PM

Great work Bill, it's been slow but worth it, to see this fascinating vehicle come to life.

Terry.

  • Member since
    December 2006
  • From: N. Georgia
Posted by Jester75 on Monday, April 15, 2013 7:06 PM

That is an interesting tidbit Bill! I love how it turned out on the model, looks great!

Eric


  • Member since
    January 2007
Posted by the doog on Monday, April 15, 2013 7:10 PM

Jester75

That is an interesting tidbit Bill! I love how it turned out on the model, looks great!

Agreed! It's a cool little storyline----a a good "catch" on the old markings there!

  • Member since
    July 2004
  • From: Texas
Posted by wbill76 on Monday, April 15, 2013 7:35 PM

Terry

, Eric, and Karl, glad you like the little 'history' behind this one. If it wasn't unique enough already, it is now! Big Smile
  • Member since
    July 2004
  • From: Texas
Posted by wbill76 on Sunday, April 28, 2013 6:26 PM

While I had a lot of fun at the AMPS show in Atlanta last weekend, the Neubau needed some more attention to keep it on track and not feel so lonely. I started in on the weathering stages but with a dark vehicle the process is a little different. Normally the weathering will darken a finish but as dark as the gray/brown scheme is already dark colors, in this case the weathering lightens it. My goal is to create a dusty look to this big machine, so I started by applying an overall wash of thinned MM enamel Raw Sienna with a large #1 round sable brush. It doesn't have to be neat/even at this stage because of the stages to follow. I also applied the wash more heavily to the fenders and lower sides to provide a sort of demarcation between areas that would get different degrees of dirt/dust exposure.

The Raw Sienna makes for a great foundation to apply dot filters over. The wash isn't sealed as it's not intended to remain as a separate layer but rather as an easier way to apply an 'earth tone' color that will be incorporated with the dot filters. I used MM enamel Panzer Schwarzgrau and Light Gray as my filter color choices. Small dots were applied with spotter brushes and then a square blender brush lightly dampened with thinner was used to blend away the dots and create a streaking/filter effect using repeated strokes in the direction I wanted the streaking to flow.

Here's the turret in the process of getting filters applied:

And how it looks after the filters are done:

This process was applied to the entire vehicle working small sections at a time. Because the enamel dots will dry much faster than oils, it's important to work small areas at a time but the advantage is that the faster drying time allows for a lot of progress in a relatively short space of time.

My experiment with the turret numbers also paid off handsomely. No issues whatsoever with the different layers playing nicely with each other during these weathering phases.

Next up will be a pin wash treatment to bring out some of the details and then on to the pigments!

  • Member since
    December 2002
  • From: Bury St Edmunds, Suffolk, England
Posted by Bish on Sunday, April 28, 2013 6:49 PM

Looking good Bill.I this uis the first time i have seen enamels used for weathering like this. I like the effects. I am guessing that if you doing doing a 3 tone scheme, you would use colours more like the 3 camo colours.

I am a Norfolk man and i glory in being so


On the bench: Airfix 1/72nd Harrier GR.3/Fujimi 1/72nd Ju 87D-3

  • Member since
    July 2004
  • From: Texas
Posted by wbill76 on Sunday, April 28, 2013 7:19 PM

Bish

Looking good Bill.I this uis the first time i have seen enamels used for weathering like this. I like the effects. I am guessing that if you doing doing a 3 tone scheme, you would use colours more like the 3 camo colours.

 
Thanks Bish! I use enamels for my dot filters and washes on a regular basis, glad you like the results! For a three-tone scheme I would use totally different colors. Typically start with a wash of Raw Umber and then apply various colors over that depending on how large the color patches are on the camo and what effects I'm trying to produce. Beer
  • Member since
    December 2006
  • From: N. Georgia
Posted by Jester75 on Sunday, April 28, 2013 9:52 PM

Man Bill, I don't think I have ever seen this two tone scheme as well done as you pull it off. The two colors blend together so well and if I remember correctly you've done black and whites of your builds and it looks just like the real deal. Awesome work as usual!

Eric


  • Member since
    March 2003
  • From: Rain USA, Vancouver WA
Posted by tigerman on Sunday, April 28, 2013 11:11 PM

Great work as always Bill. Sorry to chime in so late.

   http://i7.photobucket.com/albums/y269/wing_nut_5o/PANZERJAGERGB.jpg

 Eric 

  • Member since
    July 2004
  • From: Texas
Posted by wbill76 on Monday, April 29, 2013 10:12 AM

Eric (Jester)

thanks for the comments! Two-tone early-war schemes are always a lot of fun to work with. It's easy to see once you get a layer of dirt/dust on them, even in color, how hard it is to pick out the two different colors never mind once you convert it to gray-scale or b/w. Glad to have you along!

BeerEric (tigerman)

No worries, better late than never! Glad you've gotten caught up on this one. Yes
  • Member since
    April 2005
  • From: Gothenburg
Posted by JohanT on Monday, April 29, 2013 12:58 PM

Hi Bill,

Great link earlier, thank you.

This is excellent.
And you make it look so easy.
Keeps me coming back to this forum.

Thank you for sharing, please keep the good stuff coming:)

Very Best Regards

Johan.

  • Member since
    May 2005
  • From: Dublin Rep Of Ireland
Posted by terry35 on Wednesday, May 1, 2013 6:10 PM

Wow. We've waited along time for this project to mature and it certainly has even worth the wait . Super work Bill.

Terry.

  • Member since
    July 2004
  • From: Texas
Posted by wbill76 on Saturday, May 4, 2013 4:06 PM

Thanks Terry! Been a long few months but almost across the finish line with this one! Beer

  • Member since
    July 2004
  • From: Texas
Posted by wbill76 on Sunday, May 5, 2013 5:18 PM

Only a modest amount of progress to report in this session as bench time has been precious the past week. Still moving forward though and that's what counts! This round of effort dealt with applying a pin wash of MM enamel Burnt Umber to provide some depth to the raised details and add another layer to the finish. I used a small pointed brush to apply the wash and after it was dry, used the same brush and some clean thinner to make minor adjustments here and there.

Next up will be the pigment weathering for the lower hull and track runs.

  • Member since
    January 2007
Posted by the doog on Sunday, May 5, 2013 6:27 PM

Nice progress, no matter how small, Bill. Keep plugging away! I know the feeling--it takes me months to finish something sometimes when I"m in a touring cycle. Just don't lose momentum--that's the important thing!

  • Member since
    May 2003
  • From: Mexico
Posted by rtvmodeler on Sunday, May 5, 2013 7:20 PM

Smile Great build my friend!

Regards!
Rodolfo

Current Project:

Figures from Dragon, "German 6th Army, Stalingrad 1942-1943", 1/35

  • Member since
    July 2004
  • From: Texas
Posted by wbill76 on Sunday, May 5, 2013 8:58 PM

Karl

thanks as always for the comments/support! I hate it when a build stalls out completely so keeping this one moving especially since it's so close to the finish is important! Wink

Rodolfo

thanks for the comments as well my friend! Beer
  • Member since
    July 2004
  • From: Texas
Posted by wbill76 on Saturday, May 11, 2013 6:05 PM

With tomorrow being Mother's Day and all, this week's update takes place on a Saturday as a result!

Lots of great progress to report, the build is 99% complete. I picked up from the last round by applying a dull coat using MM Lusterless Flat in the spray can.

After that had dried, it was on to the pigment weathering. I selected Mig Dry Mud to produce the dusty effects as seen in the reference photo posted earlier in the build. This was applied as a wet mixture using ordinary tap water with a drop of liquid dish washing soap added to break the surface tension. It's applied liberally using a sable brush to get it into all the various nooks and crannies.

The wet mix is allowed to air dry and then the removal process begins. The first step is remove excess pigment using a round stiff bristle brush. I wear a dust mask during this process as inhaling the fine pigment powder is not a good idea. After the round brush, I use a series of smaller square and rectangular stiff bristle brushes to get into the harder to reach places and remove excess where necessary.

Next more of the pigment is removed/adjusted using dry cotton swabs. A pair of tweezers is kept handy to remove any snagged fibers that get loose from the swab in the process.

Because of the large hull sides on this vehicle, I wanted to show some dust streaking effects with the pigments. This was accomplished by using a water-dampened large sable brush and drawing the brush downward to pull the pigments into streak lines.

Last but not least, the final details were added for the large head lamp on the hull front in terms of the kit-provided clear lens. The smaller lights on the hull sides under the main turret received some 'lenses' of their own courtesy of small amounts of Testors Window-Maker glue added with a toothpick.

I also took a set of walk-around photos to see if there's anything amiss for final adjustment. Will check tomorrow to see if I need to tweak anything before declaring this one 'done'.

  • Member since
    July 2004
  • From: Texas
Posted by wbill76 on Sunday, May 12, 2013 5:13 PM

After a few tweaks and adjustments, this one was off to the photo booth for its final walk-around shots.

  • Member since
    April 2005
  • From: Gothenburg
Posted by JohanT on Sunday, May 12, 2013 5:24 PM

!

Very Best Regards

Johan

  • Member since
    September 2011
  • From: Iowa
Posted by David Maddog on Sunday, May 12, 2013 6:25 PM

Well done, very nice Bill.

  • Member since
    July 2004
  • From: Texas
Posted by wbill76 on Sunday, May 12, 2013 6:51 PM

Thanks Johan and David appreciate the comments! Beer

  • Member since
    April 2006
  • From: Denver, Colorado
Posted by waynec on Sunday, May 12, 2013 7:06 PM

hi bill

sweet build . i have the cyberhobby one from a few years ago in the bunker "i really want to build this" stash. the weathering is just the right amount, gives it character but isn't overdone. very hard to master the when to stop part.

i have a JGPZ-IV and an LVT(A)-4 base coated. i will be practicing my tri color camo this week, tape for one and silly putty for the other and, if all goes well, i will have 2 builds to use at my weathering demo class for my wood ship club on saturday. i intend to revisit this page and show your technique.

Никто не Забыт    (No one is Forgotten)
Ничто не Забыто  (Nothing is Forgotten)


MrT
  • Member since
    December 2010
Posted by MrT on Sunday, May 12, 2013 10:56 PM

Very good work!!

Terry

  • Member since
    March 2003
  • From: Western North Carolina
Posted by Tojo72 on Monday, May 13, 2013 7:14 AM

Nice Bill,the dust effect is very good

  • Member since
    December 2006
  • From: N. Georgia
Posted by Jester75 on Monday, May 13, 2013 7:39 AM

Sharp as a tack Bill! Wonderful work!!

Eric


  • Member since
    July 2004
  • From: Texas
Posted by wbill76 on Monday, May 13, 2013 9:58 AM

Wayne

appreciate the comments! You're right about the weathering, always tough to know 'when' to stop to avoid overpowering the finish. The Jagd IV and LVT are both excellent subjects for weathering given their physical dimensions, sounds like a great opportunity to demo on! Glad to know this one will help you with that, hope it goes well for you!

BeerTerry

,  Anthony, and Eric thanks for the support as well! Yes
  • Member since
    May 2013
Posted by KrashK on Monday, May 13, 2013 12:50 PM

wonderful job, the weathering is right on.

Glenn

  • Member since
    December 2002
  • From: Bury St Edmunds, Suffolk, England
Posted by Bish on Monday, May 13, 2013 1:18 PM

Bill, a pleasure as always, watching one of your builds, and always something to learn.

Its a real beaut.

I am a Norfolk man and i glory in being so


On the bench: Airfix 1/72nd Harrier GR.3/Fujimi 1/72nd Ju 87D-3

  • Member since
    July 2004
  • From: Texas
Posted by wbill76 on Monday, May 13, 2013 5:14 PM

Thanks Glenn!

Bish

I had a great time building this one despite the interruptions in the middle. Felt good to finally finish something in 2013. Wink
  • Member since
    July 2006
  • From: New Jersey
Posted by redleg12 on Monday, May 13, 2013 7:47 PM

Very nice.....another Bill masterpiece. Real Life is taking chunks out of our bench time. I know exactly how you feel. It feels like I work twice the hours I did 5 years ago. Hopefully the next one will go a bit faster!!

Rounds Complete!!

"The Moral High Ground....A Great Place to Emplace Artillery."

  • Member since
    August 2012
  • From: Parker City, IN.
Posted by Rambo on Tuesday, May 14, 2013 5:14 PM

Good to see this one done Bill it turned out great like always

Clint

  • Member since
    July 2004
  • From: Texas
Posted by wbill76 on Tuesday, May 14, 2013 5:53 PM

Mike

Sorry to hear you're being denied time at the bench, hope it's not a long-term condition! Thanks as always for the comments.

BeerClint

thanks for following along, definitely felt good to get this one on the books for 2013. Beer
  • Member since
    January 2007
Posted by the doog on Wednesday, May 15, 2013 9:19 AM

Bill,

A top-shelf job on this one, honestly. Great weathering and staining, etc. It looks PERFECTLY dusty an all "muted-toney". Big Smile

Really a slammer!

  • Member since
    November 2009
  • From: SW Virginia
Posted by Gamera on Wednesday, May 15, 2013 12:49 PM

Another great job there Bill! My hat's off to you for taking dull panzer grey and making it look great! Love the mud and weathering.  

"I dream in fire but work in clay." -Arthur Machen


  • Member since
    July 2004
  • From: Texas
Posted by wbill76 on Wednesday, May 15, 2013 4:58 PM

Karl

thanks for the comments as always! It was a delicate balancing act but I'm glad it created the 'muted-toney' result I was looking for. Big Smile

Gamera

glad you like how the beast turned out as well. Panzer gray schemes offer a lot of opportunity if you're not afraid to experiment a little bit along the way. Wink
  • Member since
    May 2004
  • From: Mount Bretherton Model Aircraft Observatory
Posted by f8sader on Wednesday, May 15, 2013 6:18 PM

I'll admit, I had to check out this post just to see what a Neubau-Fahrzeug Nr. 3-5 was!  I'm glad I did as that is a very good finish; nice work!

Lon-ski

  • Member since
    July 2004
  • From: Texas
Posted by wbill76 on Wednesday, May 15, 2013 8:04 PM

f8sader

I'll admit, I had to check out this post just to see what a Neubau-Fahrzeug Nr. 3-5 was!  I'm glad I did as that is a very good finish; nice work!

 
Glad you stopped in! Thanks for the comments. Beer
  • Member since
    July 2006
  • From: San Francisco Bay Area
Posted by bufflehead on Tuesday, June 4, 2013 12:19 AM

Sorry to be so late responding to the completed thread Bill!  Gotta say this is another BEAUTY!!  The markings came out perfect and the camo scheme and weathering are fantastic!  YesYes

Now that your Neubau is done I guess I better get cracking on the WIP blog of my Dragon Neubau....Whistling

Ernest

Last Armor Build - 1/35 Dragon M-26A1, 1/35 Emhar Mk.IV Female


Last Aircraft Builds - Hobby Boss 1/72 F4F Wildcat & FW-190A8


  • Member since
    July 2004
  • From: Texas
Posted by wbill76 on Tuesday, June 4, 2013 9:39 AM

Thanks Ernest! Now you no longer have any excuse for yours. Get cracking mister! Wink

JOIN OUR COMMUNITY!

Our community is FREE to join. To participate you must either login or register for an account.

SEARCH FORUMS
FREE NEWSLETTER
By signing up you may also receive reader surveys and occasional special offers. We do not sell, rent or trade our email lists. View our Privacy Policy.