SEARCH FINESCALE.COM

Enter keywords or a search phrase below:

1/35 M1009 CUCV, WIP, 02/17/13, Completed

28344 views
101 replies
1 rating 2 rating 3 rating 4 rating 5 rating
  • Member since
    July 2004
  • From: Texas
Posted by wbill76 on Thursday, February 14, 2013 8:50 PM

Rolling along nicely with this one Mike. Yes

  • Member since
    July 2006
  • From: New Jersey
Posted by redleg12 on Tuesday, February 12, 2013 6:39 PM

Pawel - Thanks for stopping in and for the comments

Rounds Complete!!

"The Moral High Ground....A Great Place to Emplace Artillery."

  • Member since
    May 2009
  • From: Poland
Posted by Pawel on Tuesday, February 12, 2013 12:47 PM

Mike, the machine is looking very good! One of the few US Army machines I've seen 1:1 when I've been in Kaiserslautern - and I can say your model is very realistic. Good luck with the weathering, have a nice day

Paweł

All comments and critique welcomed. Thanks for your honest opinions!

www.vietnam.net.pl

  • Member since
    July 2006
  • From: New Jersey
Posted by redleg12 on Monday, February 11, 2013 6:08 AM

Gino - Thanks for the peek and the comments. The blizzard was about 6 inches here...not too bad. a good excuse to stay in build models and make sauce!!

Rounds Complete!!

"The Moral High Ground....A Great Place to Emplace Artillery."

  • Member since
    December 2002
  • From: Valrico, FL
Posted by HeavyArty on Monday, February 11, 2013 5:14 AM

As always, it looks awesome Mike.  I love the wheels and the finish on it.  Great job.


Glad you guys made it through the blizzard OK as well.

Gino P. Quintiliani - Field Artillery - The KING of BATTLE!!!

Check out my Gallery: https://app.photobucket.com/u/HeavyArty

"People sleep peaceably in their beds at night only because rough men stand ready to do violence on their behalf." -- George Orwell

  • Member since
    July 2006
  • From: New Jersey
Posted by redleg12 on Sunday, February 10, 2013 9:15 PM

Finally found some bench time with some snow on the ground this weekend.

First I put the windows in the body. The kit calls for the door windows to be one solid window while the M1009 had a main window and a wing window. In order to allow view of the inside, I cut the window to create the wing window. Then I used a .010 strip painted black to create the window bar/gasket. With the windows in place I then installed the dashboard assembly.

Next was the assembly of the chassis to the body. This kit is well made but assembling the two halves is a PITA. After some sanding to relieve some tight fit, repairs after attempts would break loose one of the internal parts, and lots of colorful metaphors, the mating was complete!!

With that out of the way, I weathered the wheel wells first by using acrylic ceramic stucco mixed with burnt umber paint to create that chunky stuff stuck in the wells. After it dried I coated it with AK NATO Wash and then used MIG Dried Mud pigment to finish. The same was done to the wheel treads and the backside of the tires. With everything dry I then attached the tires.

Working now on some small details. The antenna base for the RT 524 is on the back and I used a resin base from the Pro Art Radio set. The antenna for the R442 is the short mast type from the Verlinden lights and antenna set. I used 24 gauge black wire to create the antenna wires for each of the antenna bases.

The rear light lenses were coated with Tamiya Clear Red. I masked off a small box on each lens for the reverse light. To create the reflective rear markers I coated decal paper with thin coats of Tamiya Clear Black, Alclad Chrome and Tamiya Clear Red. I then cut strips and applied to the rear tailgate.

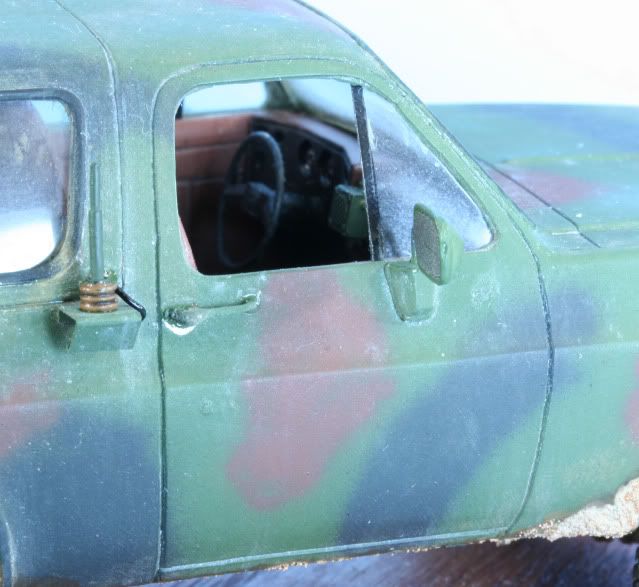
Next I installed the mirrors using some bent SS 24 gauge wire for the mounting band. This picture shows the mirror, the front R442 antenna & base and shows the completed wing window in the door.
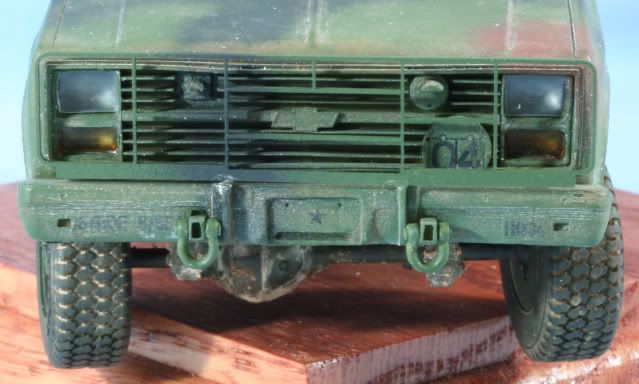
In the front the headlight and turn signal sockets were painted Black and then Alclad Polished Aluminum. The headlight lenses were installed. The turn lenses were painted on the inside with Tamiya Clear Orange and then installed. Then I installed the brush guard and the tow hooks. Here is the completed front view.
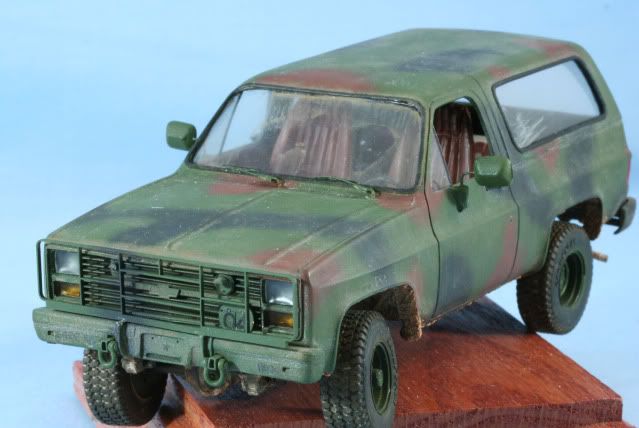
After installing the windshield wipers, I worked the model with AK NATO rainmarks to attain the “chalky” look. I have begun weathering the widows. Here is a look at the M1009 before final weathering.
And from the rear

I have also spent some time in the wood shop and started getting the base together. Next up is finishing the base and weathering on the M1009.

As always feel free to leave a comment either positive or negative

Rounds Complete!!


"The Moral High Ground....A Great Place to Emplace Artillery."

  • Member since
    July 2006
  • From: New Jersey
Posted by redleg12 on Thursday, January 24, 2013 6:58 PM

Wayne - Glad to hear I have helped bring back memories.... for me that's why I love modeling.

Jeepman - It was not built for comfort or quiet. At least you were able to "trade up". Many of the CUCVs lived on through many more lives. Thanks for the note and the peek.

Rounds Complete!!

"The Moral High Ground....A Great Place to Emplace Artillery."

  • Member since
    April 2003
Posted by jeepman on Wednesday, January 23, 2013 9:33 PM

When I was a reserve police officer in the 90,s,our dept obtained one of these from the govt for use as a patrol vehicle.It was repainted dept black,outfitted with light bar and radios.It was the dept,s first 4X4.It was used a backup vehicle when the regular Ford Crown Vic patrol cars were down for maintenence and for winter storm patrol.We found that it could make a smaller u turn than the Ford cars but it lacked much engine compartment insulation and was loud as h*** in the interior.One night when my partner and I were using it we were dispatched to a loud music compliant.When we arrived in the area we had to turn the engine off so we could hear where the music was coming from! It was used for about four years before the chief could convince the city to let him buy a brand new Ford Expedition.Under US govt rules the CUCV was passed on to another police dept.Enjoy your  build!

  • Member since
    April 2006
  • From: Denver, Colorado
Posted by waynec on Wednesday, January 23, 2013 6:48 PM

well that brings back memories. my first ride in FRG was in a CUCV from rhein main to kirch goens (3-33AR 1 BDE/3AD back in the day.

Никто не Забыт    (No one is Forgotten)
Ничто не Забыто  (Nothing is Forgotten)


  • Member since
    July 2006
  • From: New Jersey
Posted by redleg12 on Wednesday, January 23, 2013 6:34 PM

Pawel - Always a pleasure to have you stop by and thanks for the comments.  

During the  OD era thru Veitnam and after the bridge plates were always yellow background. As the US Army moved into the MERDC paint era in the 70s it was shaky. Since many vehicles were painted at the unit level, many markers were kept yellow and some units painted them to match the camo scheme. With the onset in the early 80s of the NATO camo, the markers matched the camo. The M1009 came from the factory either all NATO Green but mostly NATO tri-color. with their markers subdued to match the pain on the vehicle.

The camouflaged vehicles with yellow markers may have been the 70s MERDC camo. By the mid 80s it was extremely rare to see the old yellow marker and if you did it was on an older vehicle mostly in a rear area.  

HTH

Rounds Complete!!

"The Moral High Ground....A Great Place to Emplace Artillery."

  • Member since
    May 2009
  • From: Poland
Posted by Pawel on Wednesday, January 23, 2013 3:26 PM

Hello Mike!

Very nice progress on this one!. Please tell me - how come the bridging plates aren't yellow? I thought I've seen them in yellow even on camouflaged vehicles. Could you write something about that? Thanks in advance and good luck with your model, have a nice day

Paweł

All comments and critique welcomed. Thanks for your honest opinions!

www.vietnam.net.pl

  • Member since
    July 2006
  • From: New Jersey
Posted by redleg12 on Tuesday, January 22, 2013 5:37 AM

Tread -Thanks....yep Gino has me on clean black top....now cross country is another story!!

Bufflehead - Ahhh...the bubble car....now we could go for the other classics like the Ford Pinto and Chevy Vega....LOL

Rounds Complete!!

"The Moral High Ground....A Great Place to Emplace Artillery."

  • Member since
    July 2006
  • From: San Francisco Bay Area
Posted by bufflehead on Monday, January 21, 2013 10:44 PM

You guys and your muscle cars!!!   I drove a true American classic, an AMC Pacer.......Propeller

Ernest

Last Armor Build - 1/35 Dragon M-26A1, 1/35 Emhar Mk.IV Female


Last Aircraft Builds - Hobby Boss 1/72 F4F Wildcat & FW-190A8


  • Member since
    September 2005
  • From: beacon falls , Ct.
Posted by treadwell on Monday, January 21, 2013 7:07 PM

Hiya Mike Smile

Still coming along nicely,decals and transfers look great, but Gino is gonna get ya in the quarter mile. Wink !

Go Ravens !

tread Cool


  • Member since
    July 2006
  • From: New Jersey
Posted by redleg12 on Monday, January 21, 2013 6:54 PM

Gino - Humm...I could have guessed, the little contessa will be the belle of the ball with that beast. Much luck.

Commando - Yep, memories for me...that is the reason for the build

Bill - Thanks for the peek

Rounds Complete!!

"The Moral High Ground....A Great Place to Emplace Artillery."

  • Member since
    July 2004
  • From: Texas
Posted by wbill76 on Monday, January 21, 2013 12:38 PM

Making good progress on this one Mike! Beer

  • Member since
    April 2005
  • From: Martinez Ga
Posted by commando on Monday, January 21, 2013 8:39 AM

Takes me back to my GANG days at Ft. Stewart, Ga in the 80's!

'A government big enough to give you everything you want, is strong enough to take everything you have.' -Thomas Jefferson -

  • Member since
    December 2002
  • From: Valrico, FL
Posted by HeavyArty on Monday, January 21, 2013 8:37 AM

I am sure some people in your house must be itching to drive the beast.

Yup, the princessa is very happy since it will be/is her first ride.  The HS senior "boy next door" is already drooling over the car.  He drives a 10 yr old Toyota DeadBig Smile

Gino P. Quintiliani - Field Artillery - The KING of BATTLE!!!

Check out my Gallery: https://app.photobucket.com/u/HeavyArty

"People sleep peaceably in their beds at night only because rough men stand ready to do violence on their behalf." -- George Orwell

  • Member since
    July 2006
  • From: New Jersey
Posted by redleg12 on Sunday, January 20, 2013 10:22 PM

Gino - Thanks for the peek.

WAIT....WAIT....Gino goes sports car....VERY Nice....I had a 79 Camaro.... yes, in 79. That's when cars were cars. Love it...best of luck. I am sure some people in your house  must be itching to drive the beast.  I will get you on secure push.

Karl - Thanks for the look. It is an odd ball and part of my past. I ended up with on as we changed from jeeps to HMMWV and old uncle Sam came up short a few HMMWV. These were used in the interim. Thus I drove HQ34. Not exactly a car (no real gloss on it) but not a howitzer for sure.

Thanks for stopping by and for the comments.

Rounds Complete!!

"The Moral High Ground....A Great Place to Emplace Artillery."

  • Member since
    January 2007
Posted by the doog on Sunday, January 20, 2013 10:07 PM

Gino---WAY COOL On that Camaro! And GREAT MOVE replacing that goofy hood! Ain't nuthin like stock!

My fiancee', Jenn, has a gorgeous blue 1976 Camaro LT. Your car looks a lot like it.  It's a fabulous car--best of luck with it!

  • Member since
    January 2007
Posted by the doog on Sunday, January 20, 2013 9:55 PM

Mike, that looks great! I want to throw in my rifle and pumpkin suit and take 'er out hunting! A pretty neat project that is a nice break from the "normal" around here!

On the other hand, -- WOW! I can't believe you're doing an "auto" model! lol!

  • Member since
    December 2002
  • From: Valrico, FL
Posted by HeavyArty on Sunday, January 20, 2013 9:24 PM

Coming along really nicely Mike.  The decals and stenciling look great.


I too have started a new project.

A 1:1 scale '77 Camaro.  It is very detailed and has lots of moving parts.  The 4" cowl hood is already replaced with a stock hood (I think it looks better) with the matching racing stripes added.  This one will take me a while.

Wish me luck.

Gino P. Quintiliani - Field Artillery - The KING of BATTLE!!!

Check out my Gallery: https://app.photobucket.com/u/HeavyArty

"People sleep peaceably in their beds at night only because rough men stand ready to do violence on their behalf." -- George Orwell

  • Member since
    July 2006
  • From: New Jersey
Posted by redleg12 on Sunday, January 20, 2013 9:20 PM

I had long week on the road for work so not too much progress this week.  I did get the body coated in future. I also made up the custom decal sheet for the bumper numbers.

On the front I applied my custom bumper number and unit number, I used the kit decals for the star on the front license plate and I used Archer Transfers for their Bridge Marker set for the marker numbers.

In the rear are the same set of custom bumper numbers and the star from the kit decals.

On the body side I used the kit decals for the tire pressure markers over each wheels and for the fuel cover I created the Diesel Only decal.

After allowing all the decals to harden, I applied another coat of future to seal the decals. I then painted the window gaskets around the two rear windows and the front windshield.

That’s it for now, weathering up next with more details.

As always feel free to leave a comment either positive or negative

Rounds Complete!!

"The Moral High Ground....A Great Place to Emplace Artillery."

  • Member since
    July 2006
  • From: New Jersey
Posted by redleg12 on Monday, January 14, 2013 11:06 PM

Bill - Thanks..it's always good to get the smell of paint.

Bufflehead - I like the Tamiya colors for the NATO paint...they are dead on. Thanks for the peek

Rounds Complete!!

"The Moral High Ground....A Great Place to Emplace Artillery."

  • Member since
    July 2006
  • From: San Francisco Bay Area
Posted by bufflehead on Monday, January 14, 2013 10:50 PM

and its got paint!!  Hmmm....those Tamiya Nato colors look pretty authentic!

Ernest

Last Armor Build - 1/35 Dragon M-26A1, 1/35 Emhar Mk.IV Female


Last Aircraft Builds - Hobby Boss 1/72 F4F Wildcat & FW-190A8


  • Member since
    July 2004
  • From: Texas
Posted by wbill76 on Monday, January 14, 2013 10:45 AM

Nice work on the camo as usual Mike, this one's making good time in the march to the finish line.

  • Member since
    July 2006
  • From: New Jersey
Posted by redleg12 on Monday, January 14, 2013 1:37 AM

Tread - Thanks my friend

Jezones - Thanks for stopping by and for the comments

Sprue - Thanks for the peek and for the comments

Rounds Complete!!

"The Moral High Ground....A Great Place to Emplace Artillery."

  • Member since
    January 2006
  • From: California
Posted by SprueOne on Sunday, January 13, 2013 8:37 PM

The colors look on-point

Anyone with a good car don't need to be justified - Hazel Motes


Iron Rails 2015 by Wayne Cassell Weekend Madness sprueone

  • Member since
    April 2011
Posted by jezones on Sunday, January 13, 2013 8:08 PM
It looks great, the camo looks spot on.
  • Member since
    September 2005
  • From: beacon falls , Ct.
Posted by treadwell on Sunday, January 13, 2013 7:39 PM

Heya Mike Smile

Looks great man...Camo is dead on ! Yes

talk to ya soon,

tread Cool


JOIN OUR COMMUNITY!

Our community is FREE to join. To participate you must either login or register for an account.

SEARCH FORUMS
FREE NEWSLETTER
By signing up you may also receive reader surveys and occasional special offers. We do not sell, rent or trade our email lists. View our Privacy Policy.