SEARCH FINESCALE.COM

Enter keywords or a search phrase below:

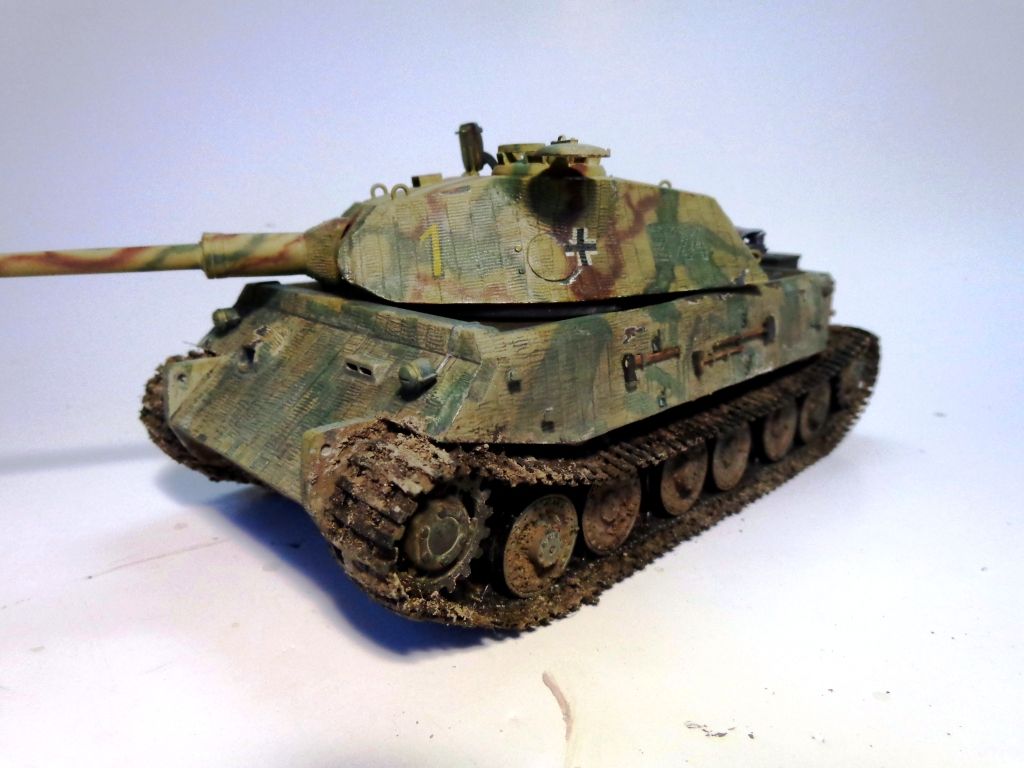
VK-4502 Vorne: "The Berlin Hedgehog" FINISHED PICS!

29100 views
105 replies
1 rating 2 rating 3 rating 4 rating 5 rating
  • Member since
    October 2010
  • From: Hoodsport, WA
Posted by Dogfish_7 on Wednesday, July 3, 2013 7:18 AM

Awesome interior detail work!

Bruce

  • Member since
    July 2003
  • From: On my kitchen counter top somewhere in central North Carolina.
Posted by disastermaster on Thursday, July 4, 2013 8:09 PM

http://forums.celicasupra.com/images/smilies/naughty.gif Hey man.

       How's it going..........http://www.picgifs.com/smileys/smileys-and-emoticons/dead/smileys-dead-763421.gif

           I'm a dying here http://forums.celicasupra.com/images/smilies/faint.gif


 https://i.imgur.com/LjRRaV1.png


  • Member since
    January 2007
Posted by the doog on Wednesday, July 10, 2013 9:13 AM

Thanks so much, Bruce! I appreciate it!

  • Member since
    January 2007
Posted by the doog on Wednesday, July 10, 2013 10:20 AM

OK, here's a big update:

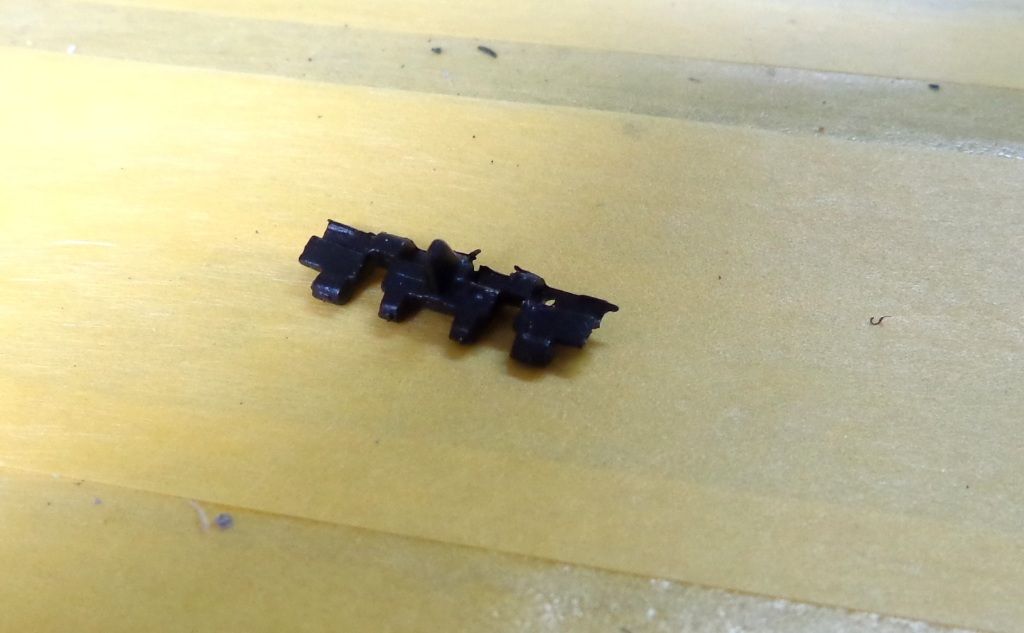
I had a devil of a time with the tracks. I'll tell ya---after struggling to find ANYTHING that would glue together the tracks of the 1/72 Sturmtiger kit that I did from Trumpeter, I have to say that Trumpeter really has to get its act together on their tracks issues. This new plastic that they use in the molded indy-link tracks is AWFUL. Lot of flash, and really a nightmare to put together as a result. Here's an example of one of the links---each of which had no less than SIX attachment points on the sprue! Look at all that flash! It makes it a bugger to try to dry-fit the links on the masking tape strips.
For what it's worth, here's the length you need for a run---it's 57 double links, not 55 as the directions say. They wrap around nicely once finished. I had to glue the links together every 20 or so links instead of waiting until finishing a full run, as they wouldn't stay linked on the tape. It kinda screwed up my timetable for allowing the run to fuse, but in the end I just plain got lucky in the timing.
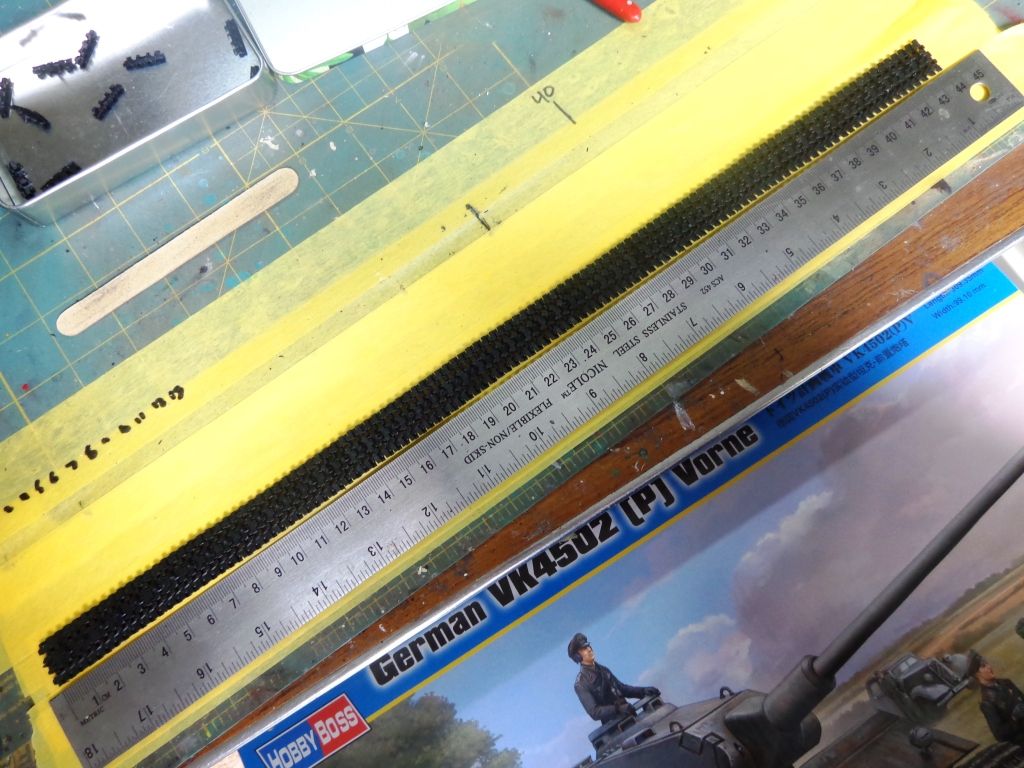
Done! Phew!
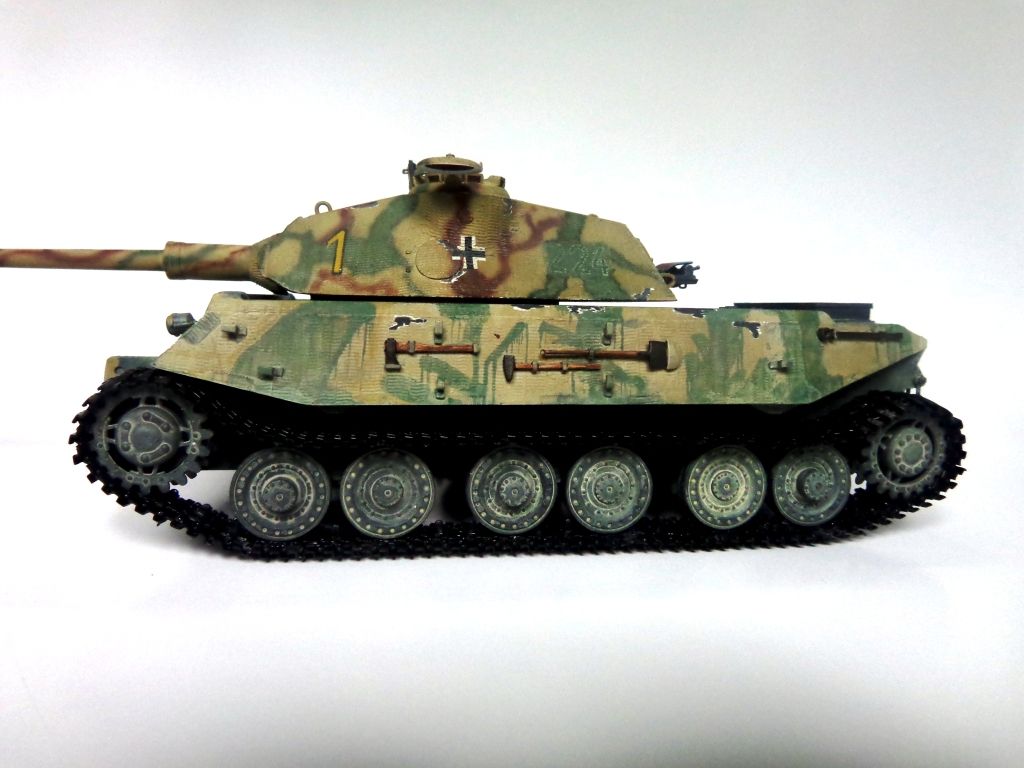
The tracks were first painted in a dirt-brown as a preparation for weathering.
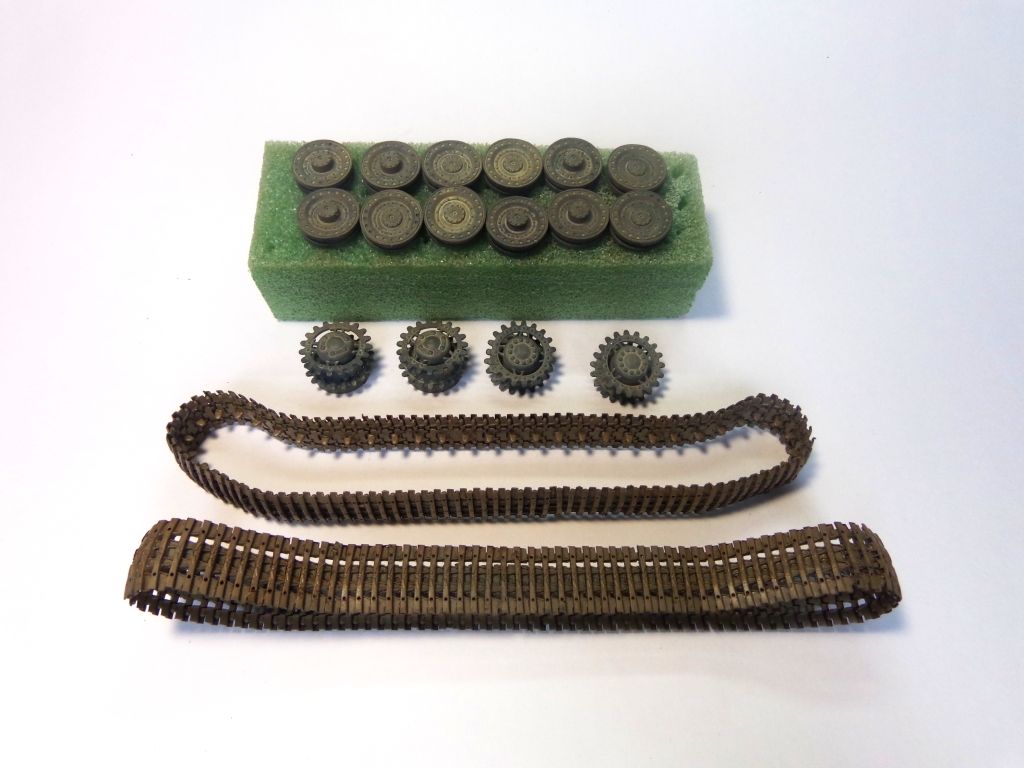
And now the nitty-gritty. I mixed up some paste of dirt, pigments, paint, glue, and acrylic resin. You can see one track already finished on the left. The tracks had also been weathering with metallic shades and silvering prior to this stage.
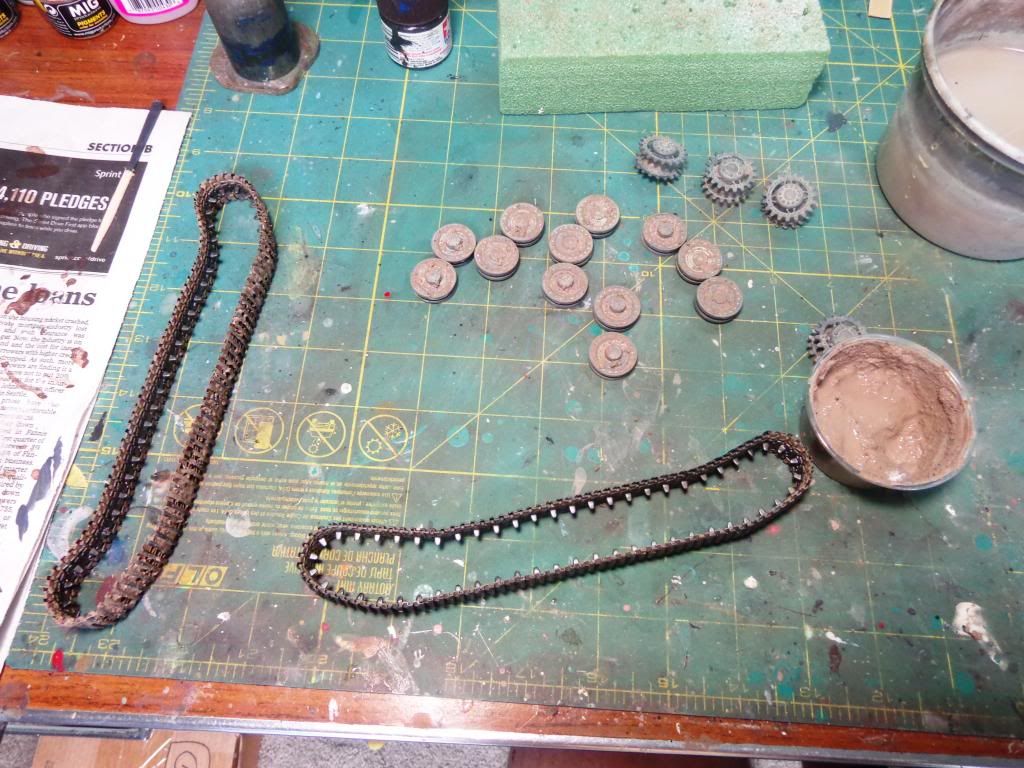
Next, I dip in a medium-width brush, and pick up some slop...
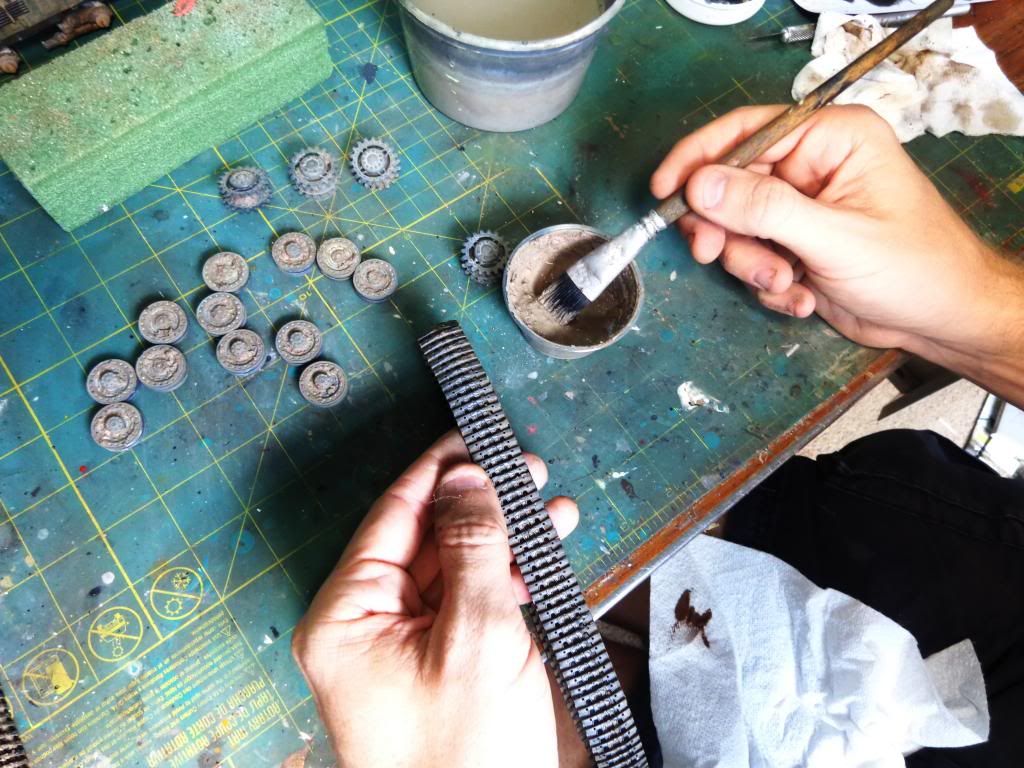
Apply it to the tracks:
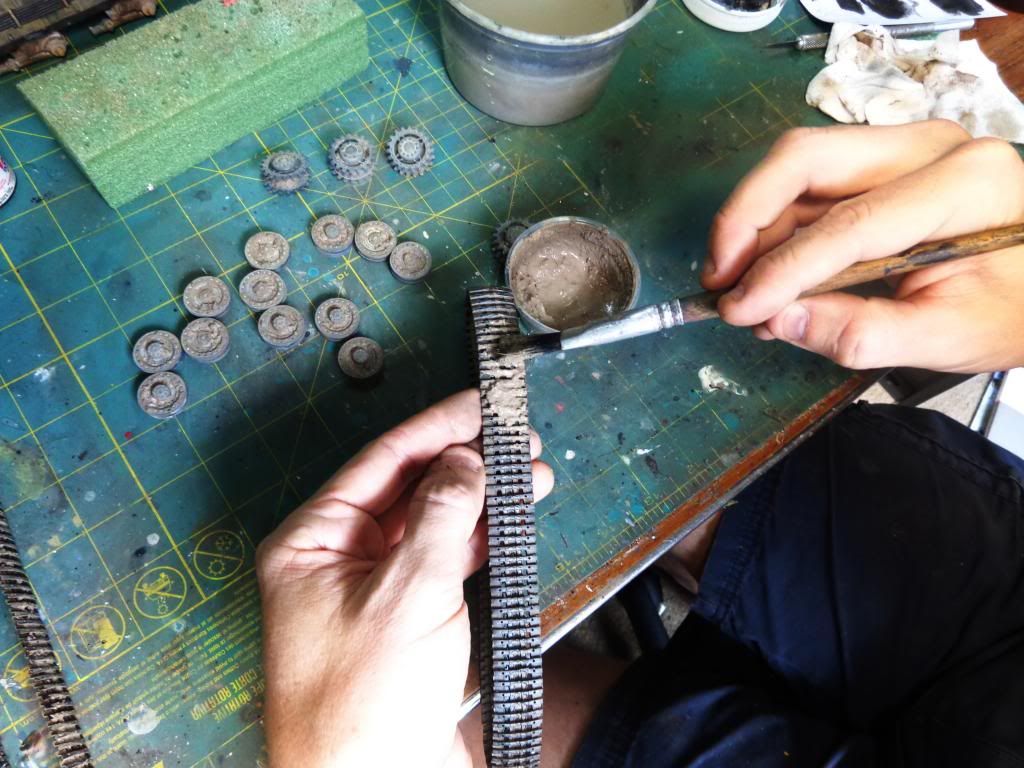
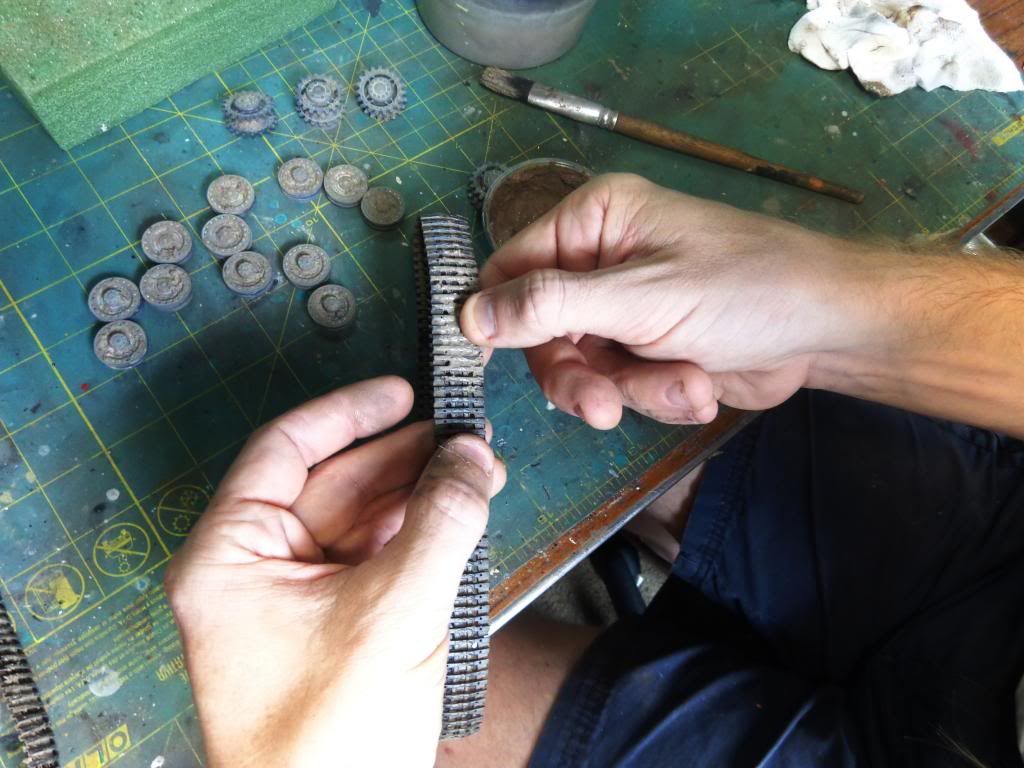
Next, grind it in between the links with your thumb:
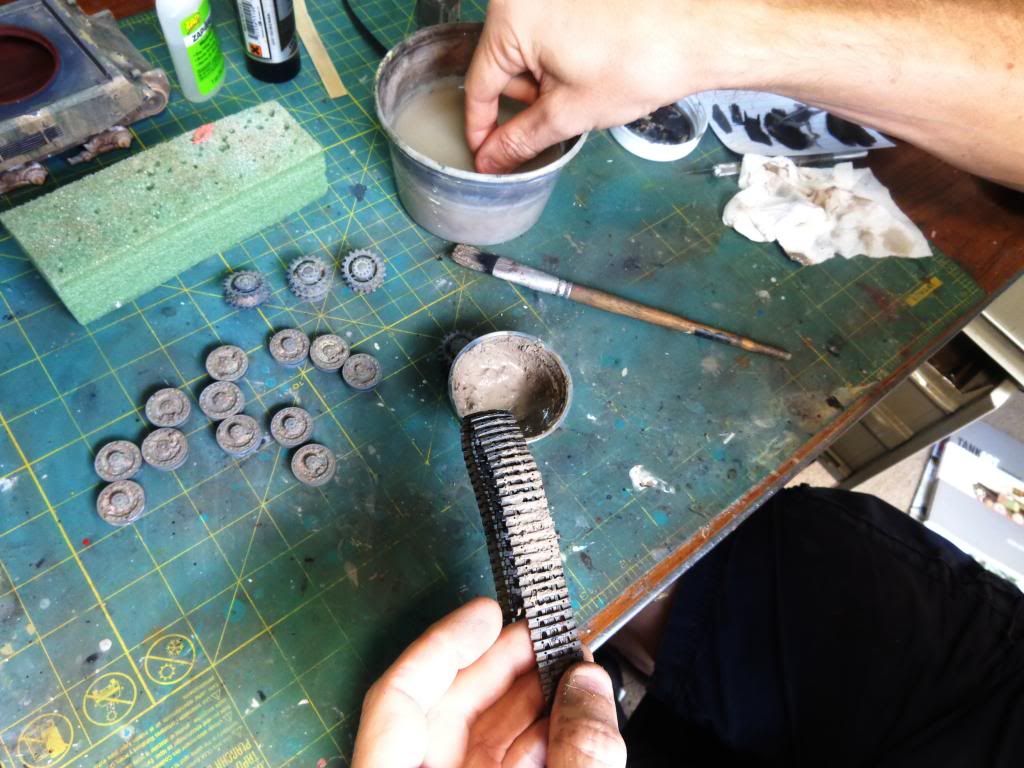
Rinse the slop off your fingers:
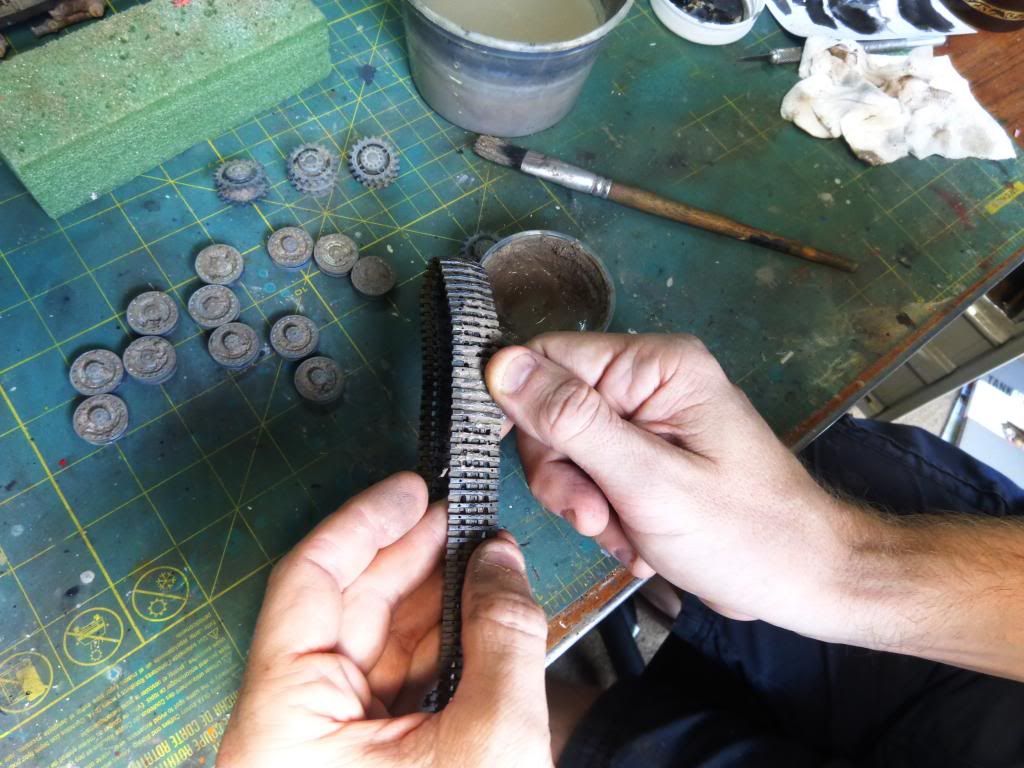
..and with a wet thumb, clean off the track faces;
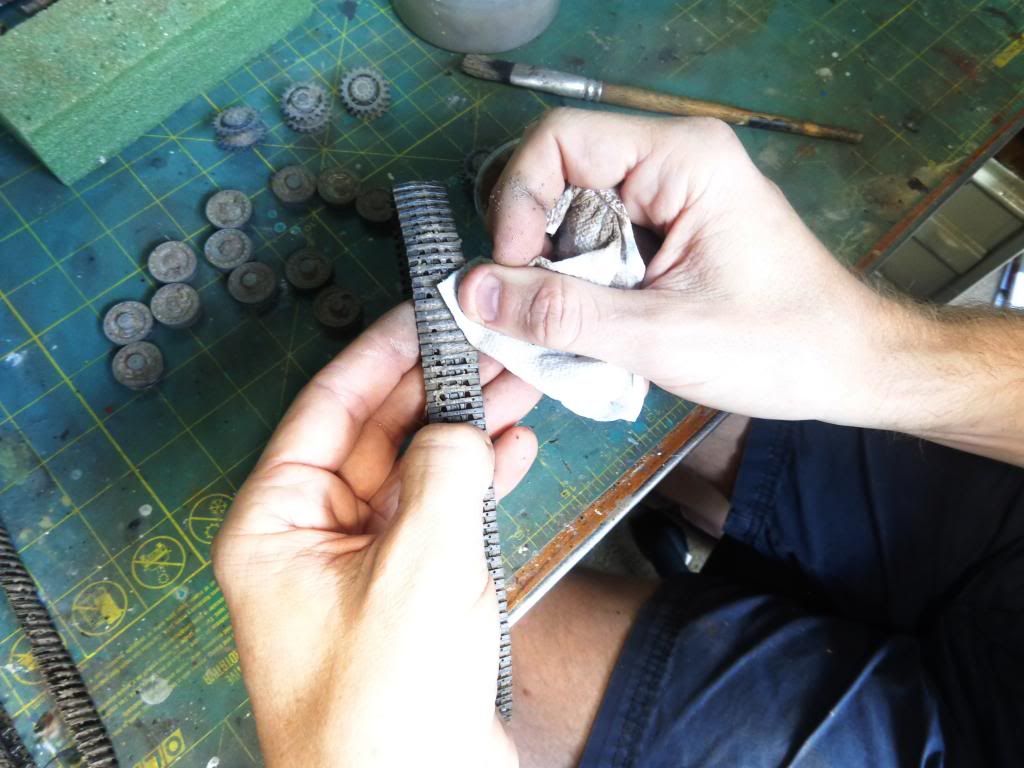
You can then use a paper towel to clean off the paint residue and restore the metallic sheen to the faces.
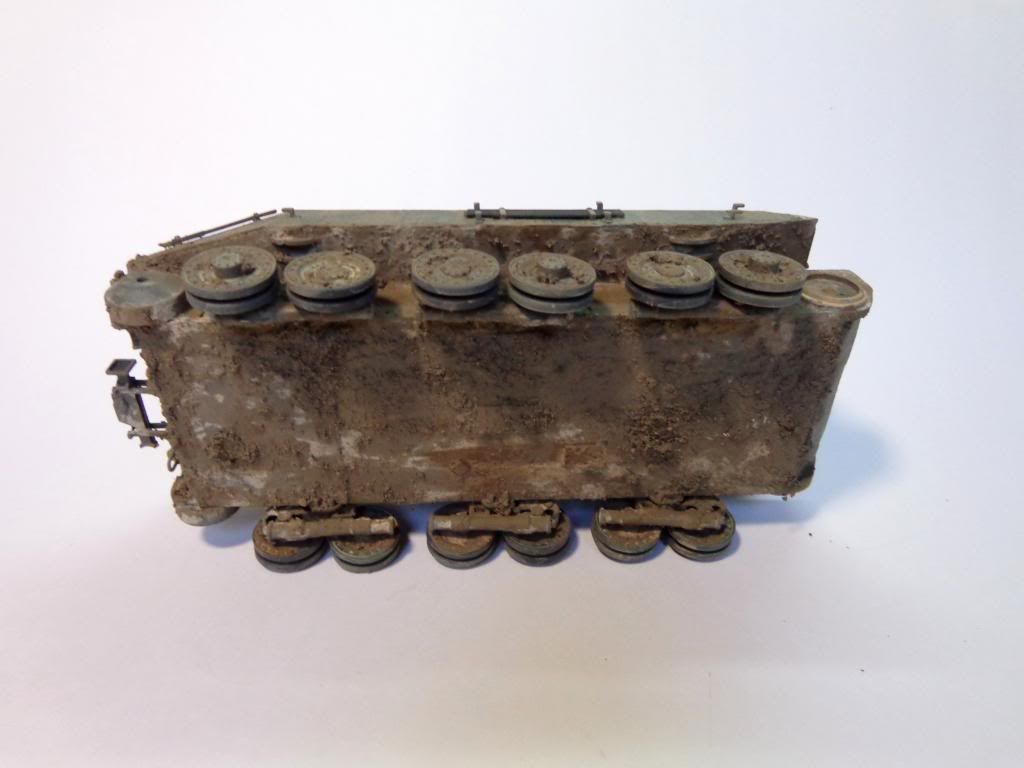
The bottom of the hull and suspension got the same treatment.
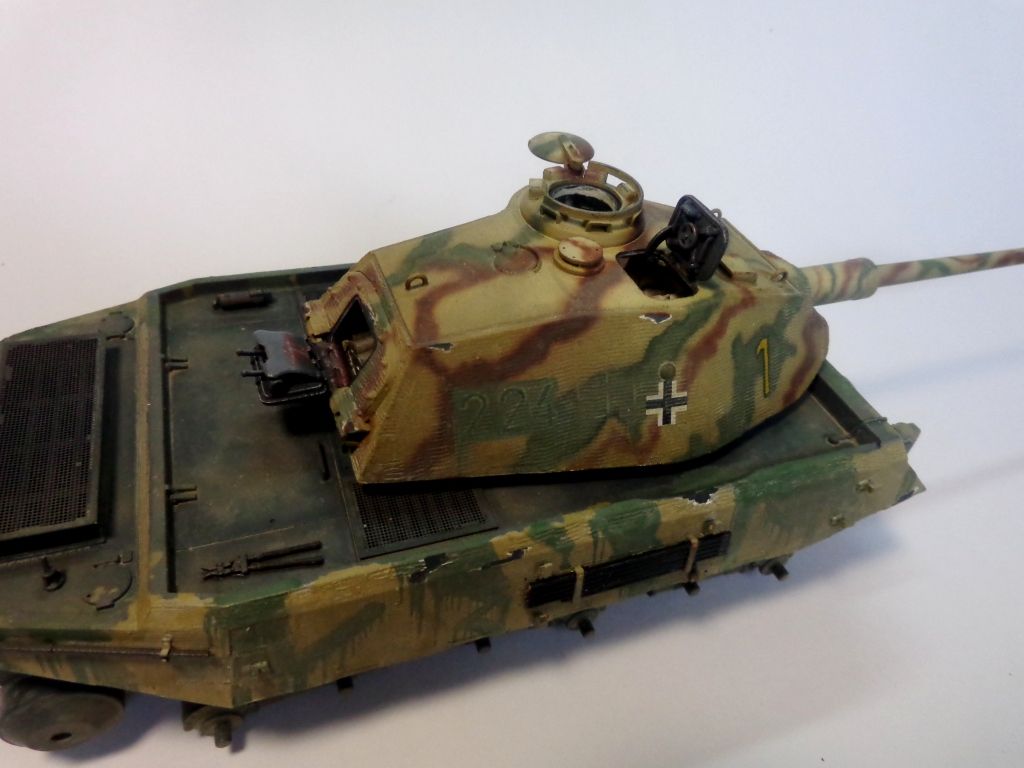
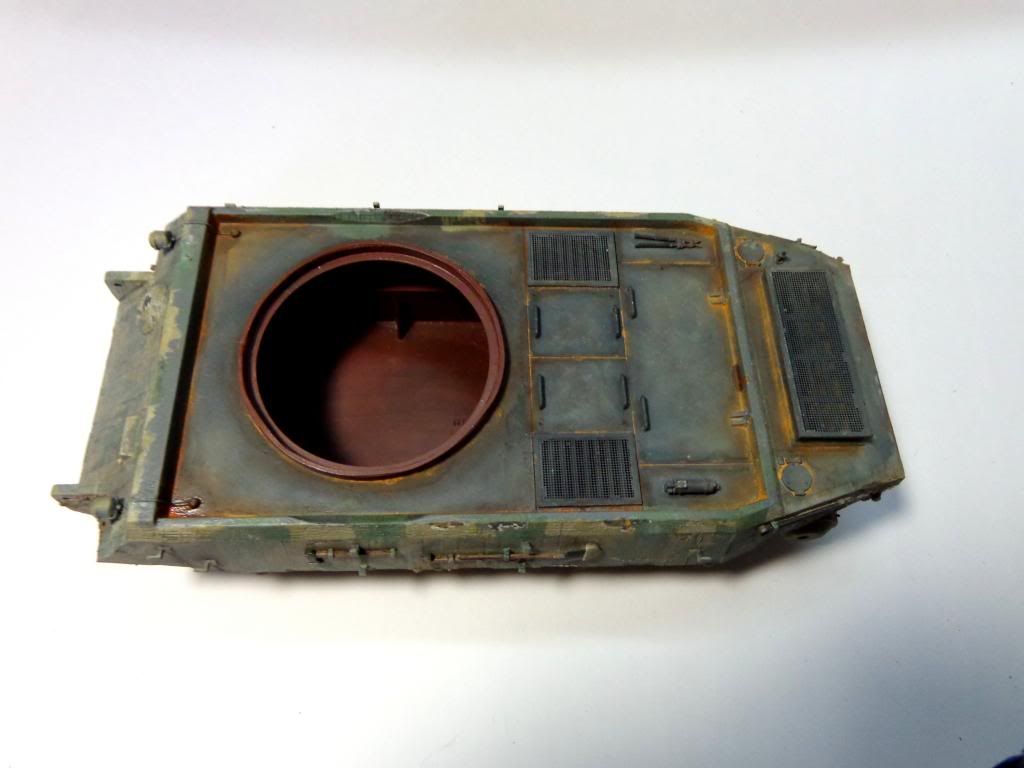
Next, I took Steve's advice and re-painted the hatch interiors grey. Not only did they probably be painted this color from before, but they actually provided more color harmony with the rest of the vehicle.
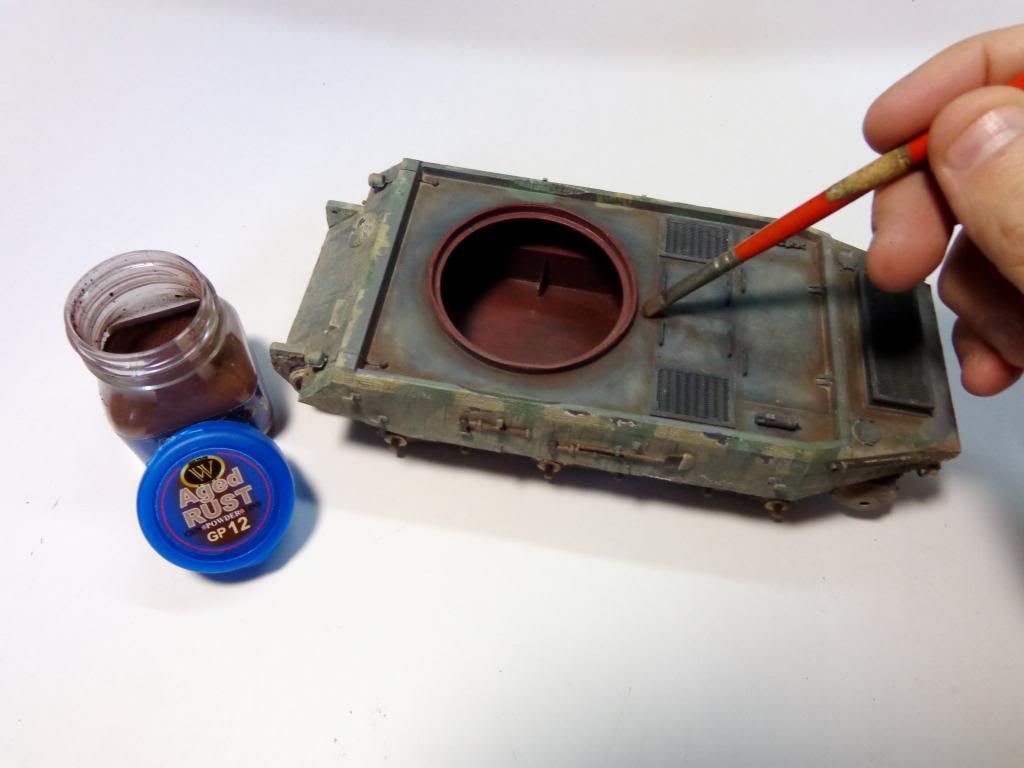
I wanted to start distressing the hull, so using Adam Wilder's new pigment line, I used "Aged Rust"  an starting rubbing it in around the panel lines of the hull.
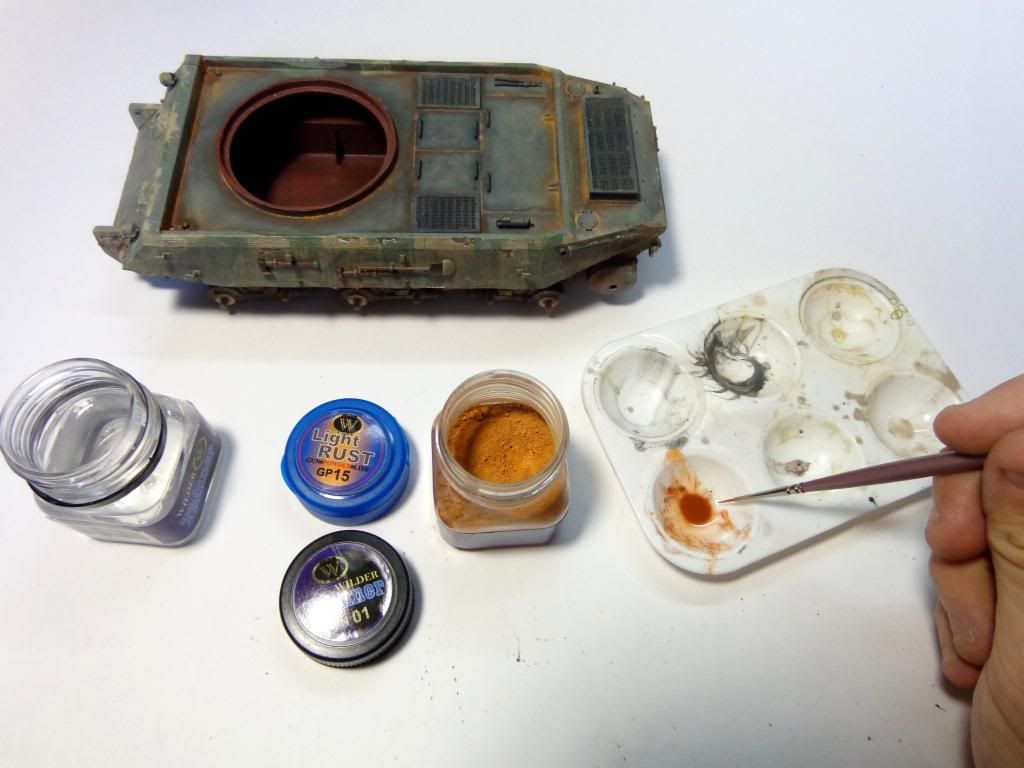
I then followed up with a light wash of "Light Rust" suspended in Wilder thinner, and massaged that into the corners and panel lines.
This is so far what I have....it look, in my mind, like a hull that sat for years, and was rushed out into service.....or so I hope....
The tracks were laboriously attached now--it took about an hour to get them on, as I had plugged up the sprocket holes with hardened "dirt" and had to clear all the holes--I"ll remember that next time. Now, the real character of the model in my vision is coming out just a little...
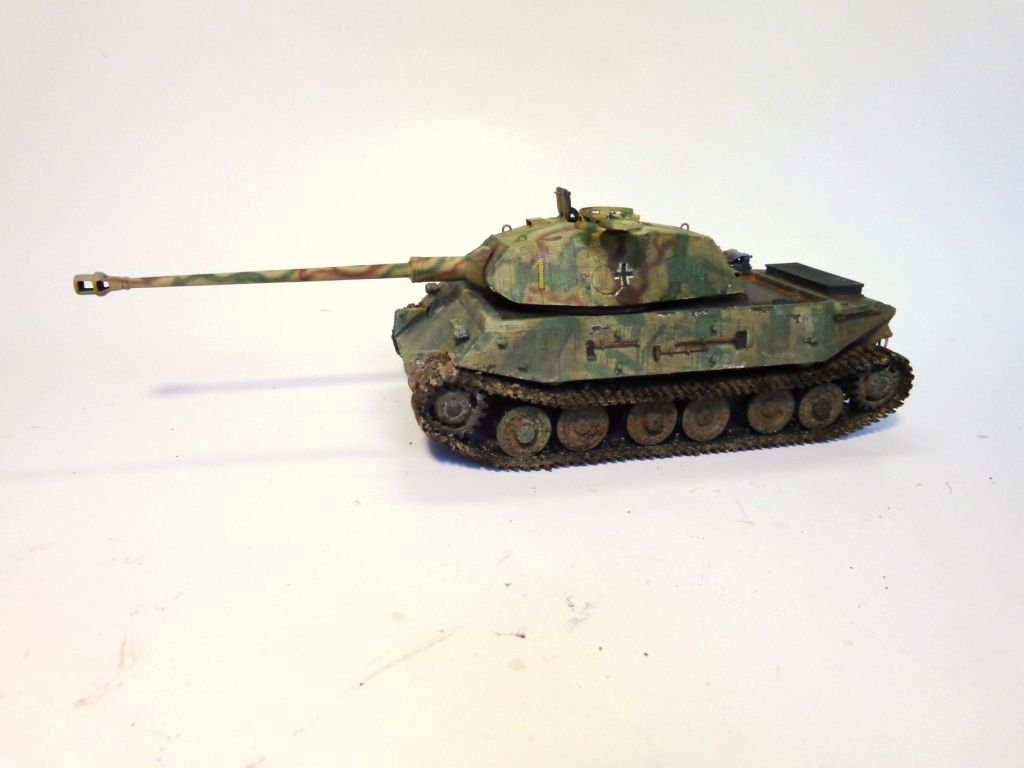
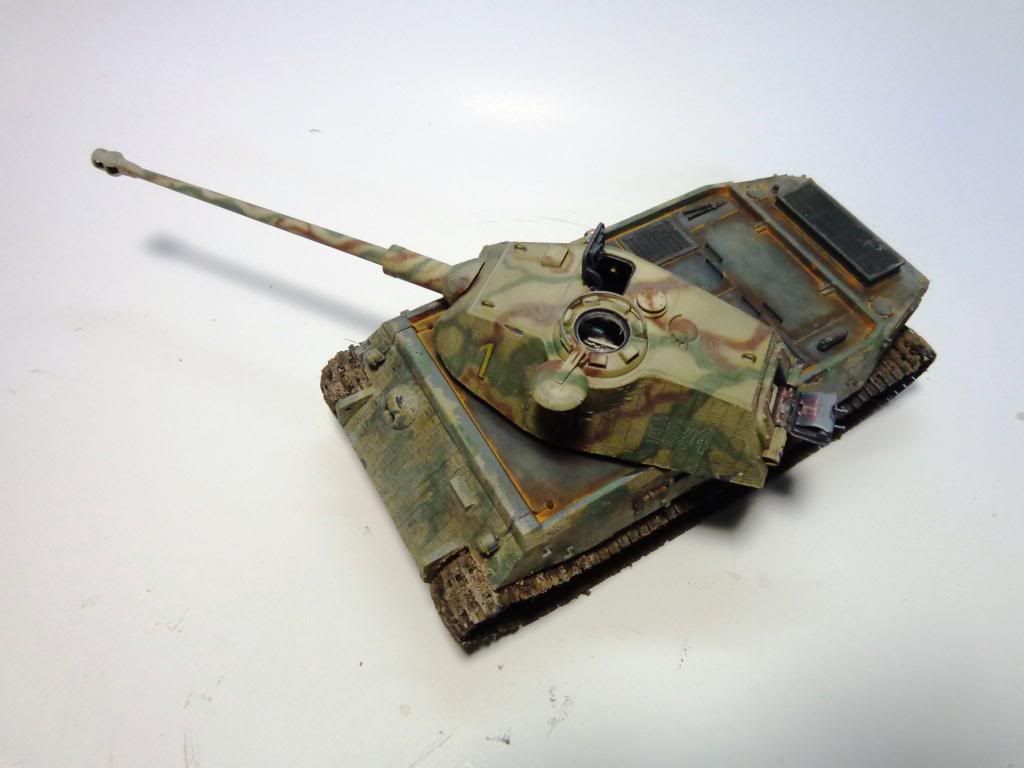
Still much to do yet. I've got to ad the spare tracks, the ropes, and stipple and spatter the hull and wheels/tracks. Gotta weather the DY parts.....hmmmm....much to think on.

Lemme know what you're feeling about it, guys?! Thanks for looking in!

  • Member since
    July 2003
  • From: On my kitchen counter top somewhere in central North Carolina.
Posted by disastermaster on Wednesday, July 10, 2013 11:34 AM

 http://emoticoner.com/files/emoticons/smileys/zombi-smiley.gif?1292867706Been a needin' this.


http://emoticoner.com/files/emoticons/smileys/yes-happy-smiley.gif?1292867704  I KNEW it would all come together and it's looking grand......http://emoticoner.com/files/emoticons/smileys/yay-smiley.gif

http://emoticoner.com/files/emoticons/smileys/flabbergasted-smiley.gif?1292867594 The mud, the rust ..... and the dust.

  http://i137.photobucket.com/albums/q207/ValiORCD/smiley_angry.gif  Looks mean enough to me.

 http://emoticoner.com/files/emoticons/smileys/wink3-smiley.gif?1292867701 Looking forward to all the upcoming additions http://emoticoner.com/files/emoticons/smileys/yum-smiley.gif?1292867706

 https://i.imgur.com/LjRRaV1.png


  • Member since
    April 2013
Posted by SchattenSpartan on Wednesday, July 10, 2013 11:56 AM

Incredible looking weathering! All the rust and dirt/mud together looks very convincing and really awesome!

  • Member since
    July 2004
  • From: Texas
Posted by wbill76 on Wednesday, July 10, 2013 8:53 PM

Looks like you've achieved your goal Karl, very convincing results so far. Yes Yes

  • Member since
    April 2004
  • From: Boston MA
Posted by vespa boy on Wednesday, July 10, 2013 9:21 PM

Karl That looks just great. One thing I really like is the darker edge to the sprayed camoflage areas. When I have looked closely at this, it looks to me like a more saturated and denser application around the outline, and a thinner application in the centre. You really captured that look well. The whole model looks fantastic. You've really outdone yourself.

http://public.fotki.com/nkhandekar

This ain't no Mudd Club, or C.B.G.B.,
I ain't got time for that now

  • Member since
    October 2010
  • From: Hoodsport, WA
Posted by Dogfish_7 on Thursday, July 11, 2013 3:41 AM

Awesome work DOOG!

Bruce

  • Member since
    December 2007
  • From: Bridgeview, Illinois
Posted by mg.mikael on Saturday, July 13, 2013 3:28 PM

Still an artist as always doog! The turret interior work and the zimming look simply stunning. I could keep going on but you know it looks good. ;)

PS: Hey guys haven't seen a lot of you in what seems like forever!

"A good plan executed now is better than a perfect plan next week." - George S. Patton

  Photobucket 

  • Member since
    March 2004
  • From: Spartanburg, SC
Posted by subfixer on Saturday, July 13, 2013 5:52 PM

Lookin' real, doog.

I'm from the government and I'm here to help.

  • Member since
    September 2006
  • From: Dripping Springs, TX, USA
Posted by RBaer on Saturday, July 13, 2013 6:43 PM

I'm doogin' it!

Sorry, couldn't help it.

Apprentice rivet counter.

  • Member since
    December 2006
  • From: N. Georgia
Posted by Jester75 on Saturday, July 13, 2013 10:46 PM

Looking sweet doog!

Eric


  • Member since
    January 2007
Posted by the doog on Wednesday, July 17, 2013 9:43 AM

Guys,

Thanks everyone; I appreciate all the support and nice comments on this build so far!

Sorry to have gotten back to you all so late! I'm stuck up in New York doing some work and recording, and have been unexpectedly delayed here until maybe next weekend. I'm looking forward to getting back to the bench and t finishing up this complicated build!

Thanks again for everyone who's weighed in here and commented!

  • Member since
    October 2004
  • From: Northern Virginia
Posted by ygmodeler4 on Wednesday, July 17, 2013 11:42 AM

As always a great build and great weathering, can't wait to see it finished.

-Josiah

  • Member since
    March 2003
  • From: Western North Carolina
Posted by Tojo72 on Wednesday, July 17, 2013 4:19 PM

Really looking good Karl

  • Member since
    July 2004
  • From: Sonora Desert
Posted by stikpusher on Wednesday, July 17, 2013 4:43 PM

Karl that looks excellent! Redoing the hatch interior face in Panzer Gray definitely looks better to my eye. And the mud... the glorious, beautiful, sticky, dirty mud...  it's a beautiful tank!


F is for FIRE, That burns down the whole town!

U is for URANIUM... BOMBS!

N is for NO SURVIVORS...

       - Plankton

LSM


  • Member since
    January 2007
Posted by the doog on Wednesday, July 17, 2013 4:54 PM

Thanks so much, guys. Like I said, I'm on hiatus a little while right now until I get back. I appreciate you all weighing in and giving me such nice compliments! Toast

I"ll be back to finish up in about 10 days! Thanks again, all!!!

  • Member since
    July 2003
  • From: On my kitchen counter top somewhere in central North Carolina.
Posted by disastermaster on Wednesday, July 17, 2013 11:08 PM

http://emoticoner.com/files/emoticons/smileys/scolding-smiley.gif?1292867668..........

.............http://emoticoner.com/files/emoticons/smileys/tantrum-smiley.gif?1292867686

 https://i.imgur.com/LjRRaV1.png


  • Member since
    January 2007
Posted by the doog on Sunday, August 4, 2013 4:11 PM

OK, here's the "Berlin Hedgehog" Wink The Vorne is finished....I think....? I may look at it next week and decide that it needs something else, but for now I can't think of anything else to do with it but for the inevitable figure that will come. I wanted to get this up today though, while the weekend is here.

I apologize for not having a lot of "here's how I did this" photos this time. I came back from my trip up North, and was a little reluctant to get back to this build---the interruption of "work" does that to me sometimes. I was intimidated by the sheer pressure to present something awesome. Then one day I just kinda had a vision and got into a whirlwind of activity on it. I had gotten in the barbed wire while I was gone, and figured that a last-stand panzer at the end of the war would have thrown in everything it could to keep off the swarming Russians and maybe just to look intimidating? So without further ado....Camera

I figured that the barbed wire would keep off any nasty swarming hordes of Russian sappers!

The leaves are from Hudson and Allen. I thought they gave a nice colorful touch to the model. Weathering was done with Adam Wilder's new "Gunpowder" line of pigments and other washes, filters and spatter effects. I must report on he total satisfaction that I have in working with these new products. They're easy to use and the results are exactly what I wanted.

The "standing water" effect was made with Woodland Scenics' "Real Water", which is something like a clear silicone or something. I wasn't having the same luck with gloss products, although I didn't try Future. That might've worked, in layers, but this stuff from WS goes on thick and dries that way, so you don't need to build up so many tedious layers in 1/35 scale.

A shot without the turret:

The rear deck was done by putting some pigments on a wide, soft brush, and then tapping it from about 4 inches above the model, resulting in a fine dispersion pattern of pigments on the model, which were then sealed by spraying some sealer from about a foot above. I got this idea from Mike Rinaldi at AAMPS. It gives you a really fine variation in tone of the base coat.

Well, I hope you enjoy this model and this build! Lemme know what you think, honestly, about the concept? I tried to be a little imaginative, and hope that it resonates with you all.

Any questions about specific techniques or how I got this or that effect, please don't hesitate to ask--I'll try to answer all questions in a timely manner.

Thanks for looking in, and for taking time to comment!! Big Smile

  • Member since
    April 2013
Posted by SchattenSpartan on Sunday, August 4, 2013 5:06 PM

A true masterpiece!

Those leaves and water are great additions to the overall appearance of the tank! The barbed wire looks awesome as well (especially the wire wrapped around the gun barrel)! I just hope that there is still a way for the crew to get off the vehicle with all that spiky stuff everywhere! Wink

Bow DownBow DownBow DownBow DownBow DownBow DownBow DownBow DownBow DownBow DownBow DownBow DownBow DownBow DownBow DownBow DownBow DownBow DownBow Down

  • Member since
    August 2007
  • From: back country of SO-CAL, at the birth place of Naval Aviation
Posted by DUSTER on Sunday, August 4, 2013 5:08 PM

   Worth the wait, well done

Steve

Building the perfect model---just not quite yet  Confused

  • Member since
    July 2004
  • From: Sonora Desert
Posted by stikpusher on Sunday, August 4, 2013 5:09 PM

So ugly that it is beautiful!!!!


F is for FIRE, That burns down the whole town!

U is for URANIUM... BOMBS!

N is for NO SURVIVORS...

       - Plankton

LSM


  • Member since
    March 2013
  • From: Puebla, Mexico
Posted by garzonh on Sunday, August 4, 2013 8:23 PM

Oh WOW, that is a nice messy tank.

It looks like a Mad Max tank with all that barbwire..cool, finish and the leafs give it a nice real world finish.

Another proud trophy.!

  • Member since
    December 2006
  • From: N. Georgia
Posted by Jester75 on Sunday, August 4, 2013 8:29 PM

Karl, I am not sure how much higher you can keep raising that bar! Amazing work!!

Eric


  • Member since
    July 2003
  • From: On my kitchen counter top somewhere in central North Carolina.
Posted by disastermaster on Sunday, August 4, 2013 8:39 PM

http://www.smileystar.com/emoticons/animated%20emoticons/communicate/funuk/10.gif Built the way I like 'em.

 Gee doog, http://board.whatisfatmagulsfault.com/public/style_emoticons/default/spitting.gif

  I can feel the grit in my mouth......http://www.freesmileys.org/smileys/smiley-fc/toothbrush.gif

 ..... but it's still a pleasant surprise.

      http://www.abandonia.com/vbullet/images/smilies/generic/sneaky You snuck one up on me tonight.

 It's always worth the wait to see your stuff come to completion........... http://www.kiwibiker.co.nz/forums/images/smilies/wait.gif I just can't help but be impatient sometimes.

   http://www.sherv.net/cm/emoticons/cook/blender-accident.gifThe way you've blended it all together is just masterful. That barbed wire is a innovative and complimentary touch for it too.    

  http://www.laserholics.com/images/smilies/daydream-animated-animation-day-dream-smiley-emoticon-000404-medium.gifReminds me of the barbed wire I put on my Russian BT7.

OK http://www.smileystar.com/emoticons/animated%20emoticons/communicate/funuk/36.gif

...........now you've got to TOP THIS ONE........http://www.kiwibiker.co.nz/forums/images/smilies/wink.gif

 https://i.imgur.com/LjRRaV1.png


  • Member since
    January 2007
Posted by the doog on Monday, August 5, 2013 7:18 AM

Thanks, guys, for all the positive waves! I appreciate you taking the time to give the Vorne some love!

SchattenSpartan, yes, I thought about the idea of the crew not being able to get off the tank; that's why I left the sides un-barbed. I figured I, personally, would probably jump off the sides, using the tracks as "steps". But that big butt on it made me feel like it had to be guarded in some other way. Thanks for looking in!

Thanks, Duster! I appreciate the big smiley!

Carlos, thanks, man! That's a memorable compliment!

garzonh---"Mad Max"--yes! That's rather what I was going for! A mean, intimidating look to scare the hell out of the other side! Thanks, bud!

Eric, thank you kindly. That's very kind of you. :)

Steve, thanks, Smiley-King! And thank you, too, for reminding me of where I saw barbed wire on a model before--as I was putting it on, I was thinking "Hmmm, didn't I see this somewhere before?"--but I couldn't remember WHERE. I was hoping that it was on a reference photo---but it was probably your BT! Well, thank you for the idea--it just proves what I've said all the time--that your work is inspiring! Now get off the computer and let's see your version that you're working on! I, personally, can't wait to see what you come up with! Thanks for the nice comps, buddy!

  • Member since
    February 2010
  • From: Maine
Posted by Stage_Left on Monday, August 5, 2013 9:42 AM

Another outstanding effort, Karl....wow. Love the standing water and leaves; I think they add the perfect touch to this vehicle's story. Just excellent start to finish.

Dave

  • Member since
    May 2009
  • From: Poland
Posted by Pawel on Monday, August 5, 2013 12:37 PM

Hello Karl!

I didn't write in this thread before, sorry about that! Now that it's done I wanted to tell you that I like it a lot. Like Dave just wrote, the standing water and especially the leaves look  very good to me. I also like the subdued contrast between all the parts. A very nice model that also constitutes an artwork! So what are your plans for the next one? Good luck with your projects and have a nice day

Paweł

All comments and critique welcomed. Thanks for your honest opinions!

www.vietnam.net.pl

  • Member since
    July 2003
  • From: On my kitchen counter top somewhere in central North Carolina.
Posted by disastermaster on Monday, August 5, 2013 3:11 PM

the doog

....now get off the computer and let's see your version that you're working on! I, personally, can't wait to see what you come up with! Thanks for the nice comps, buddy!

 http://www.sherv.net/cm/emoticons/jobs/waiter-smiley-emoticon.gif Be assured those "comps" are sincerely meant........

 .....and my VK should be entertaining http://www.thisthingwedo.com/forum/images/smilies/ttwd%20smilies%202011/dancing_smiley2.gif http://www.sherv.net/cm/emo/dancing/funny-dancing-stickman-smiley-emoticon.gif(I hope) like the Sherman build, but it seems that I've managed to get myself in a bit  deep on this project.


At this point I'm waiting for some partshttp://www.sherv.net/cm/emoticons/toilet/reading-on-toilet.gif (and my next armor project/kit to show up).

They're on a "Slow Boat from China" so to speakhttp://www.sherv.net/cm/emoticons/confused/reading-a-map-smiley-emoticon.gif


 I also have a base in progress (not sure if I'm going to use it yet) and I'm juggling that between stripping 13 year old paint off a Tiger I for a future project while waiting (just to keep my creativity humming).

 And yes, too much time and smiley chasing on the computer figure into it also.

  Lastly I was wondering if you made that barbed wire or where you got it..... it looks like the photo-etch version because I couldn't see any dimension to it in the pictures.

  As for inspiration, it IS indeed a two way street. Thanks, I wouldn't have it any other way.

http://i20.photobucket.com/albums/b232/gluetank/Animated/th_Disastermastermotion-3.gif?t=1303709089

 https://i.imgur.com/LjRRaV1.png


JOIN OUR COMMUNITY!

Our community is FREE to join. To participate you must either login or register for an account.

SEARCH FORUMS
FREE NEWSLETTER
By signing up you may also receive reader surveys and occasional special offers. We do not sell, rent or trade our email lists. View our Privacy Policy.