SEARCH FINESCALE.COM

Enter keywords or a search phrase below:

VK-4502 Vorne: "The Berlin Hedgehog" FINISHED PICS!

29101 views
105 replies
1 rating 2 rating 3 rating 4 rating 5 rating
  • Member since
    November 2008
  • From: Central Florida
Posted by plasticjunkie on Wednesday, June 26, 2013 9:13 PM

That is one unique looking camo. Looks great!

 GIFMaker.org_jy_Ayj_O


Too many models to build, not enough time in a lifetime!!

  • Member since
    September 2006
  • From: Dripping Springs, TX, USA
Posted by RBaer on Wednesday, June 26, 2013 4:38 PM

Looking at the camo makes me think of a particular Stug that looked like Picasso painted it. Maybe this one was done by an as-yet-undiscovered modernist or impressionist?

Cool, way cool.

Apprentice rivet counter.

  • Member since
    July 2004
  • From: Texas
Posted by wbill76 on Tuesday, June 25, 2013 7:51 PM

Man, really love the look of that camo pattern Karl! Very nice. Yes Yes

  • Member since
    January 2007
Posted by the doog on Tuesday, June 25, 2013 7:40 AM

Eric, thanks man! That makes me feel good that you're feeling that when you look at it! I appreciate it!

  • Member since
    January 2007
Posted by the doog on Tuesday, June 25, 2013 7:39 AM

stikpusher

.. the rear turret hatch inner face should be a color that matches the exterior, either Panzer Gray or Dunkelgelb I imagine.

Thanks for weighing in, Carlos, and Steve!

I thought a LOT about this model and how to most accurately pull it off---did a lot of research, and I came across this photo on google of a Jagdtiger where you can see the rear hatch. I was surprised to see that it was in Elfenbein (Ivory, basically), same as the interior. Even at that late date!

I have also seen a KT hatch interior in an old photo where it appears to be ivory. In the end, I take it as a judgment call--I prefer to keep it in ivory, as I've seen enough back-n-forth discussions about what constitutes "correct" colors on a particular week, or month, of German tank production to have come to a firm belief that, although there are indisputable guidelines and designated colors, there is enough leeway and exceptions to allow for choices to be made, within reason.

My thought is that this turret would have been necessarily removed from this hull at some point, and applied to an operational hull, which was then in refurbishment when the need for an operational turret saw it transferred to this existing prototype hull, which would have been "headless" in some warehouse in Kummersdorf when the war came there. The painting of it is intended to relate that narrative, with the two different paint schemes. In the case of the turret interior, the rear hatch really didn't open "up", so I wouldn't have seen it as being "glaring" if it were standing up, like a loader's hatch--so I don't think that the crew would have painted it over. And then there's ta Jagdtiger picture....Whistling

Big Smile Thanks for your heads-up on it though! Good to know that you're paying attention and watching out for mistakes! Yes

  • Member since
    December 2006
  • From: N. Georgia
Posted by Jester75 on Tuesday, June 25, 2013 7:25 AM

Karl you have definitely achieved a unique look with this paint work and I think it definitely screams 'hurry up and get this machine into action' if you ask me.

Eric


  • Member since
    January 2007
Posted by the doog on Tuesday, June 25, 2013 6:49 AM

Thank you, Clemens! I appreciate you taking the time to leave a comment! Smile

  • Member since
    July 2003
  • From: On my kitchen counter top somewhere in central North Carolina.
Posted by disastermaster on Tuesday, June 25, 2013 5:17 AM

stikpusher

Looking real good there Karl... it definitely has a "scraping the bottom of the barrel for any weapons" look... just a suggestion though, the rear turret hatch inner face should be a color that matches the exterior, either Panzer Gray or Dunkelgelb I imagine.


Good mornin'...

  http://www.smileyvault.com/albums/userpics/10001/book-smiley.gif

 In September 1944, an order went out to stop using the Ivory paint and leave the tanks entirely red inside. This seems like sheer idiocy, but there are surviving Panthers and Hetzers with 100% red interiors. Other simplifications were being made to tank manufacture at the same time - Zimmeritt was discontinued, for example. There were loud complaints, and at the very end of 1944 the Ivory paint was officially reinstated.

 Hmm... you would think that entirely red would include the hatch interiors but common sense dictates the exterior color would be more sensible as you stated.

Crazy Germans.

 This info's word for word http://i475.photobucket.com/albums/rr120/Angelintown/Smiley%20diversen/smiley_book.gif 'bout halfway down the page at http://byrden.com/panzers/Colours/index.html

 https://i.imgur.com/LjRRaV1.png


  • Member since
    July 2004
  • From: Sonora Desert
Posted by stikpusher on Monday, June 24, 2013 6:31 PM

Looking real good there Karl... it definitely has a "scraping the bottom of the barrel for any weapons" look... just a suggestion though, the rear turret hatch inner face should be a color that matches the exterior, either Panzer Gray or Dunkelgelb I imagine.


F is for FIRE, That burns down the whole town!

U is for URANIUM... BOMBS!

N is for NO SURVIVORS...

       - Plankton

LSM


  • Member since
    April 2013
Posted by SchattenSpartan on Monday, June 24, 2013 4:55 PM

That's looking awesome, Doog! I love that hand-painted camo on the hull!

Cheers, Clemens

  • Member since
    January 2007
Posted by the doog on Monday, June 24, 2013 4:39 PM

OK, the painting is done, as far as the camo...

I added a couple dozen more micro "drips" and runs of paint in the hull, but otherwise concentrated on the turret. The Field Grey color had some JA Green mixed in to make it darker, and then lightened with a touch of yellow and Green. The Red Brown was darkened a bit with Brown + Black, and then lightened a bit with Desert Yellow. The highlights were painted in the centers for the most part.

Here she is so far!

The gun is not attached, just posed in the gun hole.

Gonna put some numbers and a cross on it now and then paint them out, and put a new single hand-painted Roman numeral on it somewhere.

Thanks for looking in, all! Toast

  • Member since
    January 2007
Posted by the doog on Monday, June 24, 2013 4:33 PM

Ha ha, GREAT, Steve!!!! Let's see some WIP pics!!!?

Thanks too, BRUCE!!!!

  • Member since
    October 2010
  • From: Hoodsport, WA
Posted by Dogfish_7 on Monday, June 24, 2013 8:28 AM

Looking good DOOG!

Bruce

  • Member since
    July 2003
  • From: On my kitchen counter top somewhere in central North Carolina.
Posted by disastermaster on Monday, June 24, 2013 5:57 AM

 Okay Karl - 3:10 am, now 'ya done it.......http://www.sherv.net/cm/emoticons/sleep/sleepy-smiley-face.gif

       I'm up http://www.smiley-lol.com/smiley/fatigue/tres-fatigue.gif

         http://t2.gstatic.com/images?q=tbn:ANd9GcR_L7cHWhW5Msb3iDqnWNKpf4YXCo8MLEtrATf7KQqDPy5r5ETxRlSA2vQI'm still working on mine at 6:57 am.....

           http://i20.photobucket.com/albums/b202/sneezytwo/camera_smiley.gif and I got a new camera to figure out too.


 https://i.imgur.com/LjRRaV1.png


  • Member since
    March 2003
  • From: Western North Carolina
Posted by Tojo72 on Sunday, June 23, 2013 7:19 PM

Looking real good Karl,not one you see every day

  • Member since
    July 2003
  • From: On my kitchen counter top somewhere in central North Carolina.
Posted by disastermaster on Sunday, June 23, 2013 7:15 PM

   That green paint application looks a

                      bit aggressive......http://www.4smileys.com/smileys/drinking-smileys/shake-smiley.gif

            but that turret is totally awesome.

 Your weathering will bring it all together though....

              http://www.4smileys.com/smileys/drinking-smileys/beer-drinking-smileys.gif  it always does.

                                            (Been a watching utube looking for ideas.........)

 https://i.imgur.com/LjRRaV1.png


  • Member since
    January 2007
Posted by the doog on Sunday, June 23, 2013 6:29 PM

Yet another update in the stage-by-stage painting of this model....

I have added some Panzer Green camo---this is Tamiya's XF65 (erroneously called "Field Grey" but really their version of Panzer Dark Green.) In order to get effect of sloppy brush painting with runny, diluted paint, I thinned it with Tamiya's own thinner, and added some dishwashing liquid to really cut down the surface tension to allow it to run. I slopped it on with a medium brush--first the highly-diluted coat. I then took a smaller brush of UN-diluted paint and added lines of thicker paint--mostly along the top and where it would have pooled on the bottom. I slopped some over the sides of the upper hull, and added runs in the corners of the interior upper hull.

I tried to imagine myself as three inches tall and wielding a brush...

Hard to see here, but the thin strip behind the engine screens has been left in unpainted zimmerit.

The turret, meanwhile, has been basecoated in untinted Tamiya Dark Yellow. Yikes, but is that dark!

Next, using a series of tape masks, and three different shades of successively-lightened DY, I've done some color modulation on the turret.

I've added some straight Flat Yellow to the top highlight coat to give the turret some sleight color variation from the hull;

The hull and turret together, giving somewhat of a hint of what the model will eventually look like....

Thanks for looking in, if you are, and let me know what you're thinking---comments are always fun and appreciated!!

Big Smile Doog

  • Member since
    January 2007
Posted by the doog on Sunday, June 23, 2013 8:51 AM

Carlos, thanks for that affirmation as well. Glad to know that it's got some positive response!

I've got what I hope is a heck of a cool vision for this model. I hope I can carry it of the way I envision it---stay tuned!

  • Member since
    January 2007
Posted by the doog on Sunday, June 23, 2013 8:48 AM

PropellerThanks too, Bill, for the positive waves!

I'm riding them on a styrene surfboard!

  • Member since
    January 2007
Posted by the doog on Sunday, June 23, 2013 8:46 AM

Thanks, Steve! You'd better be working on yours too! Stick out tongue Thanks for the affirmation! Beer

  • Member since
    July 2004
  • From: Sonora Desert
Posted by stikpusher on Saturday, June 22, 2013 9:46 PM

This project is defintely unique. I like this paint job better than the original camo scheme that you had.


F is for FIRE, That burns down the whole town!

U is for URANIUM... BOMBS!

N is for NO SURVIVORS...

       - Plankton

LSM


  • Member since
    July 2004
  • From: Texas
Posted by wbill76 on Saturday, June 22, 2013 4:41 PM

Got to love PB! Wink Making good progress Karl, no pressure sir, just go with the flow and explore! Nice work on the foundation. Beer

  • Member since
    July 2003
  • From: On my kitchen counter top somewhere in central North Carolina.
Posted by disastermaster on Saturday, June 22, 2013 1:50 PM

What a bummer with photobucket and yet a clever go-around with the picture. Love that gray.

http://i170.photobucket.com/albums/u244/heydoog/VK4501%20Vorne/17DYpaint5c_zps0269033b.jpg

Looks like you're finally on the right track, tread, link or whatever.......http://i717.photobucket.com/albums/ww173/prestonjjrtr/Smileys/duh_7b.gif

 https://i.imgur.com/LjRRaV1.png


  • Member since
    January 2007
Posted by the doog on Saturday, June 22, 2013 8:58 AM

A small painting update---please note that if you can't see my photos for whatever reason, I got an alert from Photobucket that "You are close to exceeding your bandwidth limit for the month" (which I find awfully hard to believe, as I've NEVER even come close to that even when this site was a LOT more active?!) Hmm If I exceed it, I'll have to upgrade after b*tching to Customer Service!

Anyway,....a small painting update here;

     I wanted to portray a vehicle which had been base-painted in gray, and then hurriedly brush-painted in the last dwindling reserves of Dark Yellow. I Started with Tamiya Buff, Dark Yellow, and White, with a small pool of Tamiya thinner to aid in keeping the fast-drying Tamiya paint "wet" while brush-painting.

I started painting with the middle-tone Buff...

And then randomly added in lighter / darker tones, going or variation and trying to picture a 30inch man painting in swaths with a tiny brush. I figured he would have tinned the paint a lot at first to make it go farther, and then put some last strokes of whatever untinted reserves were left at the bottom of the can.

Here's where I am so far...a good starting point for weathering after I add some green camo.

Hope you can see my pics and comment! Thanks for looking in, guys!

  • Member since
    January 2007
Posted by the doog on Friday, June 21, 2013 8:35 PM

Thanks, Bill!

After looking at it, I felt that that pattern looked a little too unorthodox when it was done. The lines of the third color also came out too wide--I had problems getting used to painting in the darned humidity and heat down here--I shoulda thinned the paint a little more and gotten finer lines.

Ever since AMPS I've been second-guessing everything I do now. So much pressure to excel! I have to keep reminding myself that that's not the point of the hobby! Propeller

  • Member since
    January 2007
Posted by the doog on Friday, June 21, 2013 8:30 PM

Hey, thanks for that info, Steve--cool stuff to know. And I hope you're working on that baby again. It'll be cool to have two of them on the site at once!

  • Member since
    July 2004
  • From: Texas
Posted by wbill76 on Thursday, June 20, 2013 6:40 PM

Sounds like a good plan to me Karl! Looking forward to seeing this one come to life even more. I do have to say though that I did like that pattern you scrapped...had some real eye appeal. Wink

  • Member since
    July 2003
  • From: On my kitchen counter top somewhere in central North Carolina.
Posted by disastermaster on Thursday, June 20, 2013 12:32 AM

the doog

 I've added a ring of .015 strip to the turret ring because the turret really scraped the hull--

I'm a draggin' with the Dragon kit and haven't run into a problem with that or the commander's hatch..........

 It didn't have the track bumpers on the bottom of the sponsons http://www.smileyvault.com/albums/userpics/12962/bump~0.gif so I just made my own.

the doog

        Historically, the prototypes were not accepted as production Tigers, and the remaining turrets were placed onto Henschel hulls and they became the "Porsche turret" Tigers. The hulls were left in storage at Kummersdorf Testing Grounds until the very last months of the war. At some point, Kummersdorf was "raided" for spare vehicles and armaments--anything that could be thrown at the advancing Russians. There are reports of a "Tiger" being used from Kummersdorf in the final battles---could it have been a prototype with a refurbished turret added?

  And so we have the Kummersdorf division.....  a motley http://ollr.createaforum.com/Smileys/users/ollr/smiley-rocker.gifcrew of various tanks including a sherman and a t-34.

 Well here's a partial from the list of resources I have available ......here goes,

http://i717.photobucket.com/albums/ww173/prestonjjrtr/Funny/SmileyHappyDance.gif

 The Special Henschel turret  was especially designed for the VK4502 by professor Porsche and would mount the 8.8cm Kw.K. L/71.

 68 rounds for this gun were carried in the tank. 42 in horizontal panniers along the superstructure sides, 10 horizontally on the floor and 16 rounds stored horizontally in the turret.


 As for the hull, work continued into the middle of 1944. By that time the vehicle had hydraulic drive, new suspension, a 900 metric horsepower air-cooled diesel, and heavier armament .....

      and so and so.....
                                   http://www.augiedoggy.com/Smilies3/SewingMachine22222222.gif and so...

the doog

Hmmmm.....it looked like Salvador Dali got into the paint shed...

...so I tried to tone it down with Schoklolade Braun....

Cool, but not plausible in my eyes. It was into the Mean Green bath, and stripped......sigh....Crying

Gee doog, Looks pretty cool - I actually like it......

the doog

Here's where I"m at now. Getting ready to add the camo colors!

Let me know what you think of the concept, guys. I'm trying to "think outside the box" on this one and pull off something original! Comments and critiques warmly welcomed! SmileBeer

The gray will look good I'm sure.......http://forums.easypooltutor.com/images/smilies/smiley_wink.gif

Hey, I heard a while back that someone put a copyright to that phrase....... "think outside the box", imagine that!

Looking forward to the finale!

http://forums.collectors.com/i/expressions/clown.gif

 https://i.imgur.com/LjRRaV1.png


  • Member since
    January 2007
Posted by the doog on Wednesday, June 19, 2013 9:22 PM

Well, as you will soon see, 'm off onto a sort-of "maverick-y" adventure here; the Quest for Something Different.!

I've been wanting to give this build something different, and I'll be honest--with so many prototypes and paper panzers out there--and all the subsequent wild paint schemes---it's been hard to think of something original-yet-plausible. I've been working away here, made a few missteps, and am finally correcting course and think that I'm on to something "different".

First, some construction updates:

Here's the nice gun breech to be painted and added to the turret interior:
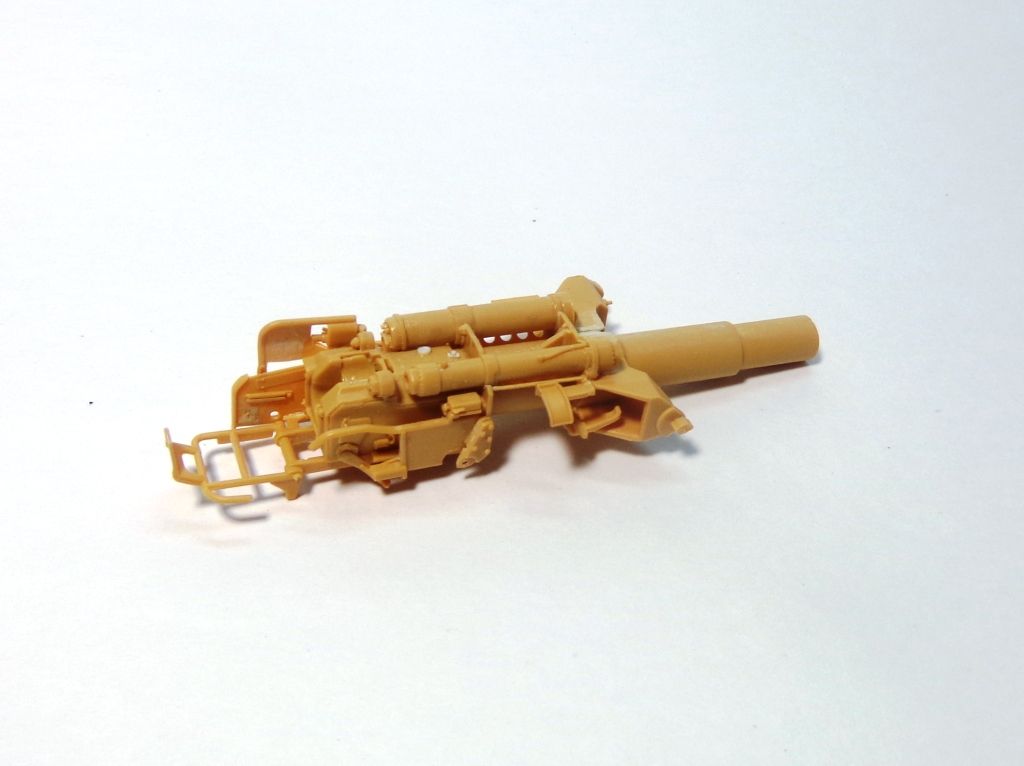
Next, I've added a ring of .015 strip to the turret ring because the turret really scraped the hull--I mean, it REALLY was low! I also added two tools to the rear hull panel on either side, and light wiring with terminal "buttons".
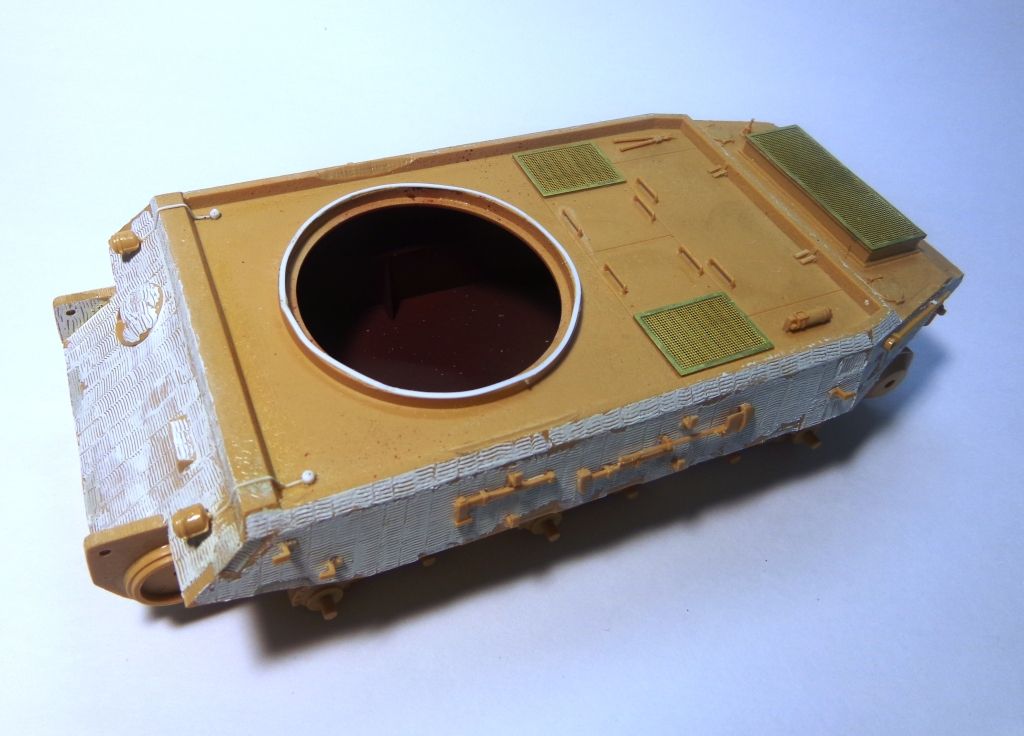
The turret sits at a more realistic height now.
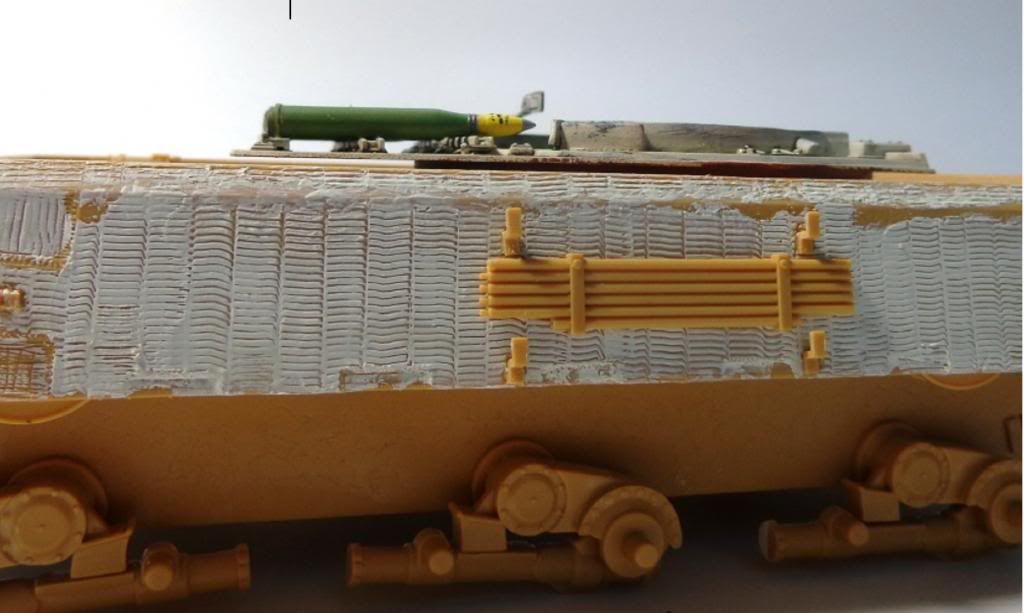
I also used a Dremel to chamfer the hull sides, as the turret just barely cleared the sides.

You can see how close the turret comes to the side.
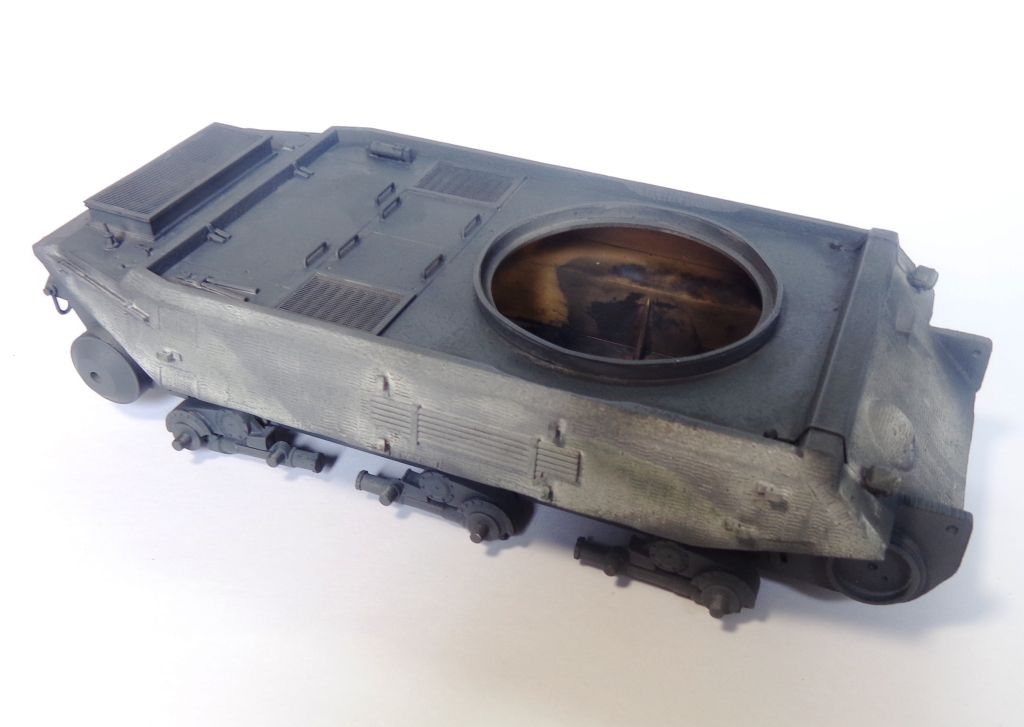
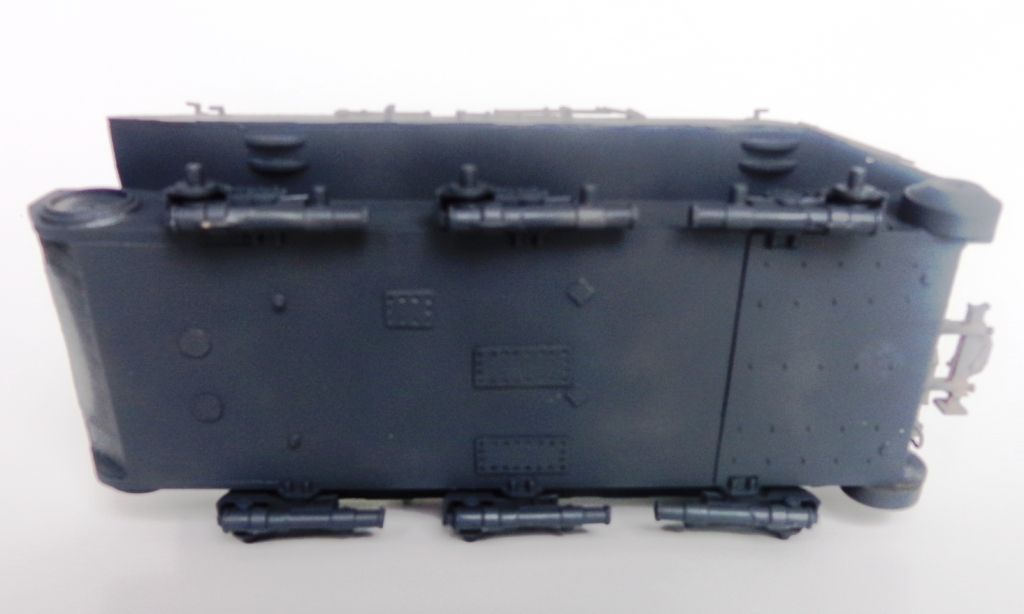
The underside looks good now with the added detailing and the new Dark Grey paint as a base coat.
I cannot tell a lie---in my quest for originality, I had a few missteps. Here's my concept for this tank: 

        Historically, the prototypes were not accepted as production Tigers, and the remaining turrets were placed onto Henschel hulls and they became the "Porsche turret" Tigers. The hulls were left in storage at Kummersdorf Testing Grounds until the very last months of the war. At some point, Kummersdorf was "raided" for spare vehicles and armaments--anything that could be thrown at the advancing Russians. There are reports of a "Tiger" being used from Kummersdorf in the final battles---could it have been a prototype with a refurbished turret added?

In any case, the protoype would have presumably been painted in Panzer Grey, as the first tanks were completed in October 1942, and Dark Yellow was not standardized until Feb 1943. My model postulates that the hull was painted thus; later, zimmerit was applied-whether as a testbed for eventual widespread use, or in maybe as a practice hull for  workers? Maybe it was even added before being sent out to face the Russians in 1945, as the superstition regarding the magnetic mines remained entrenched. The model will be painted with this narrative in mind.

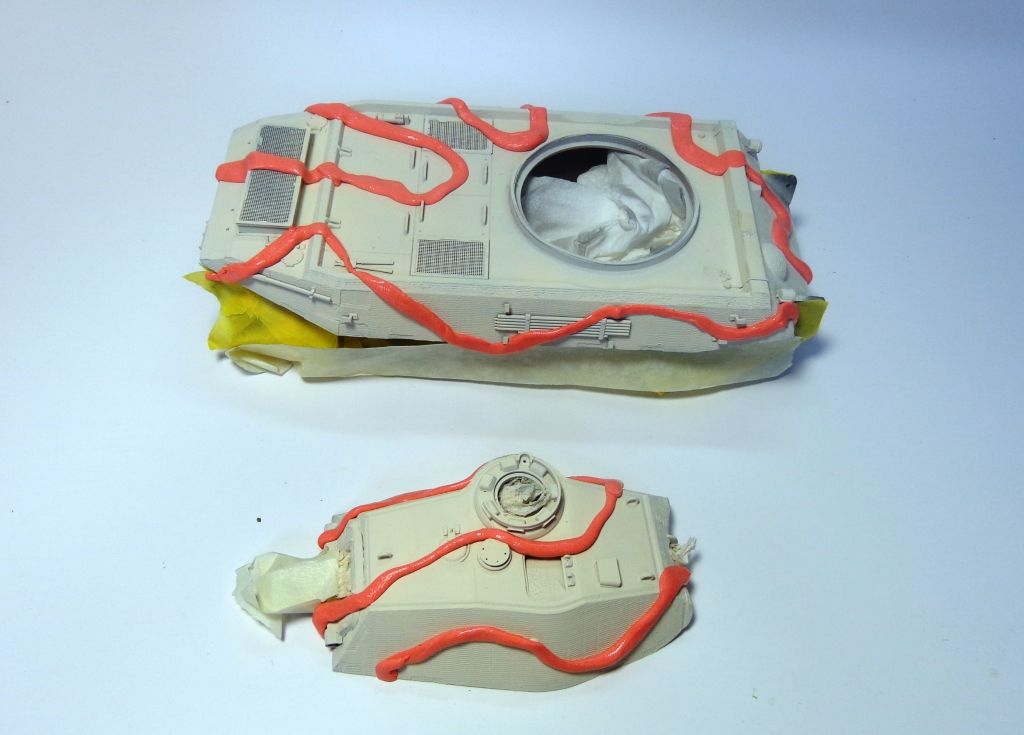
My first experimental scheme was a two-tone green with "Czech cream" hard edge lines painted via the Silly Putty method:
After shading, it looked like this:
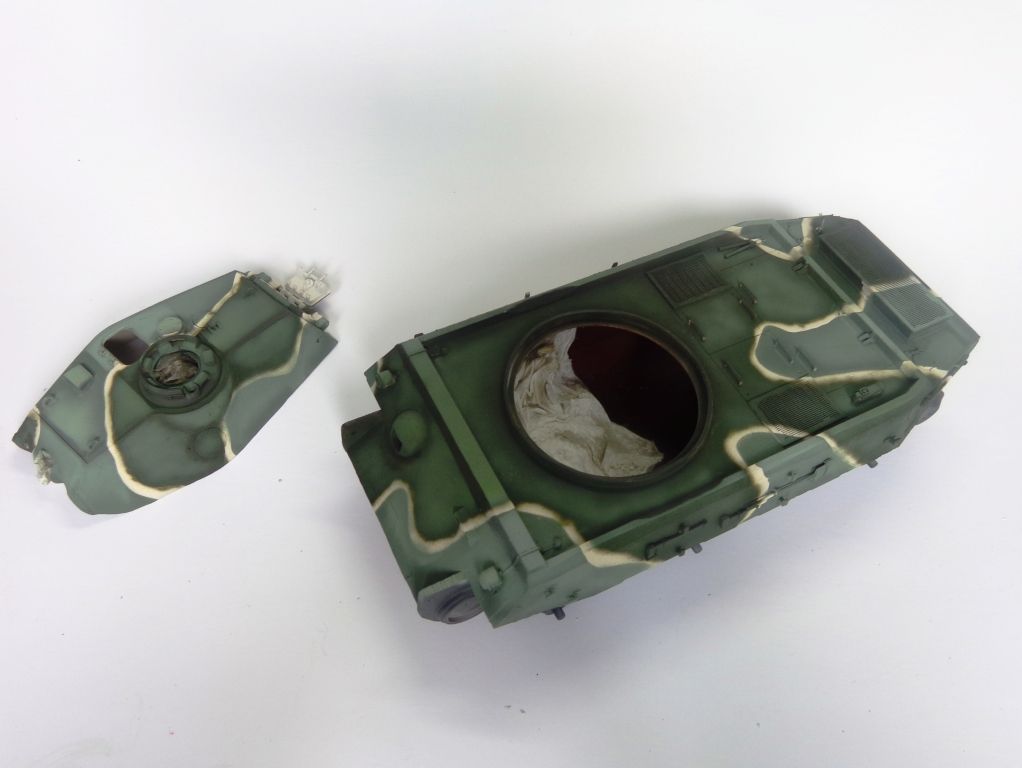
Hmmmm.....it looked like Salvador Dali got into the paint shed...

...so I tried to tone it down with Schoklolade Braun....
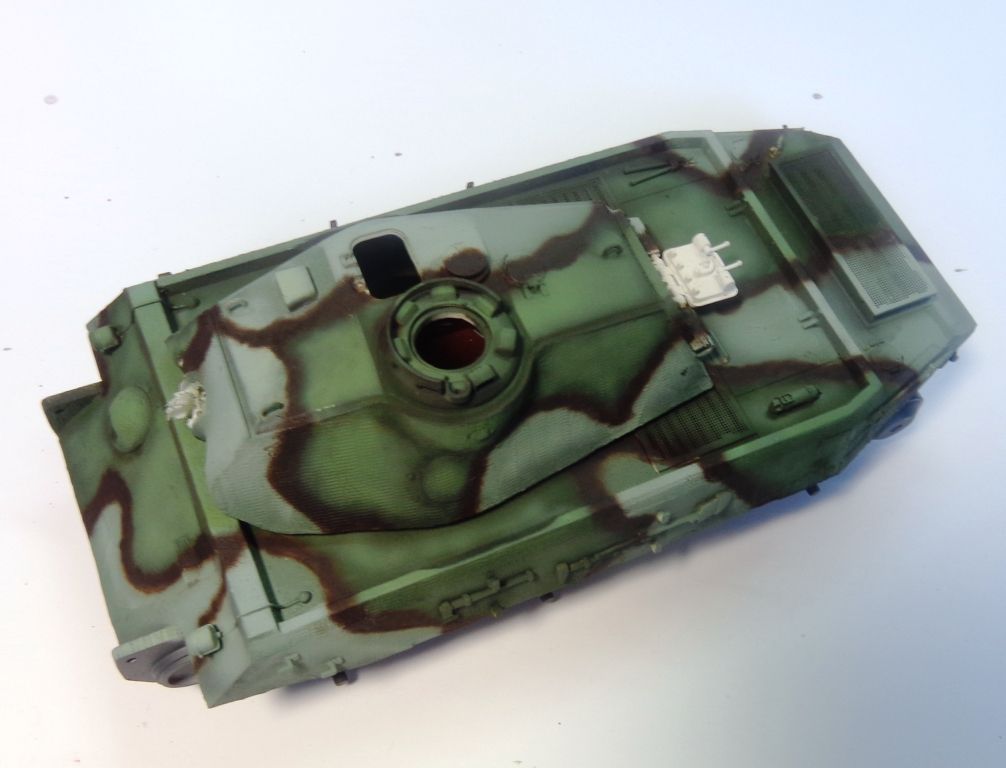
Cool, but not plausible in my eyes. It was into the Mean Green bath, and stripped......sigh....Crying

Back to the drawing board, I envisioned now painting the zimmerit "zimmerit color", under which would be the original base color of Pz Grey. What I intend to do is to show a thin Dark Yellow/Pz Green hard edge pattern over the added zimmerit hull sides, and leaving the hull top and suspension in grey. Kinda like the workers got whatever small stock of paint they could procure and painted what they could before rolling  it out to the front ASAP. The turret will sport a normal 3-tone, as if it were added from a reconditioned wreck that had acted as a donor tank.

So, are you following me? Good! Big Smile I started back with the base coat:

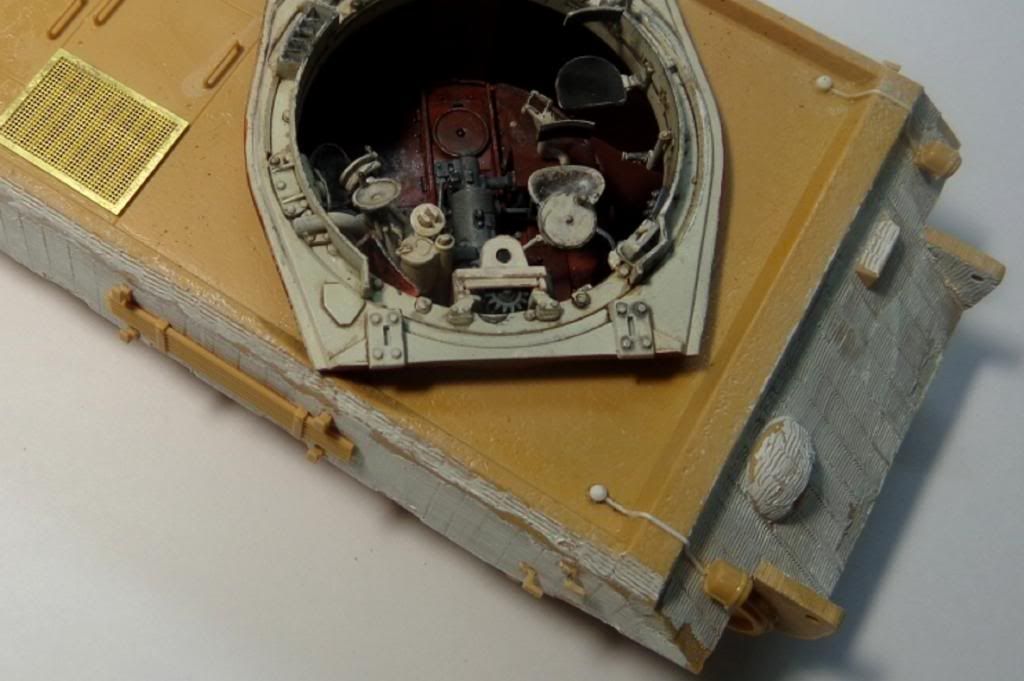
Next, I painted the zimmerit a grey-tan. Use Tamiya thinner to keep the fast-drying Tamita paint "wet" while you brush paint.
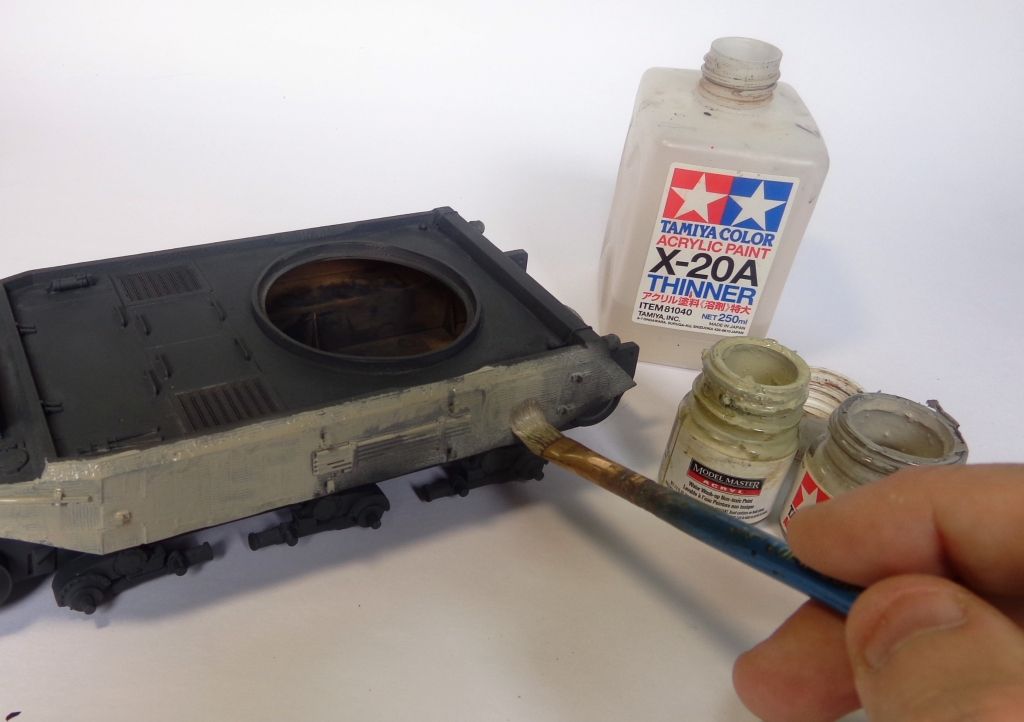
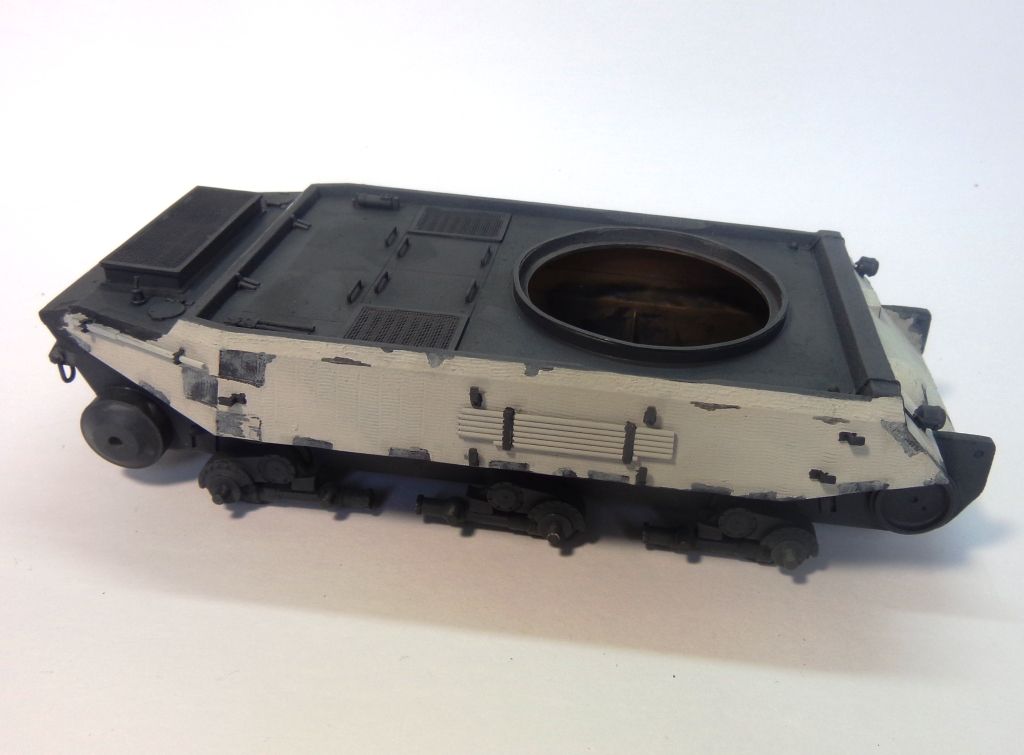
I added chips for variety and interesting visuals....
Here, I'm masking off top surfaces to paint highlights. This is how you "color modulate" using an airbrush...
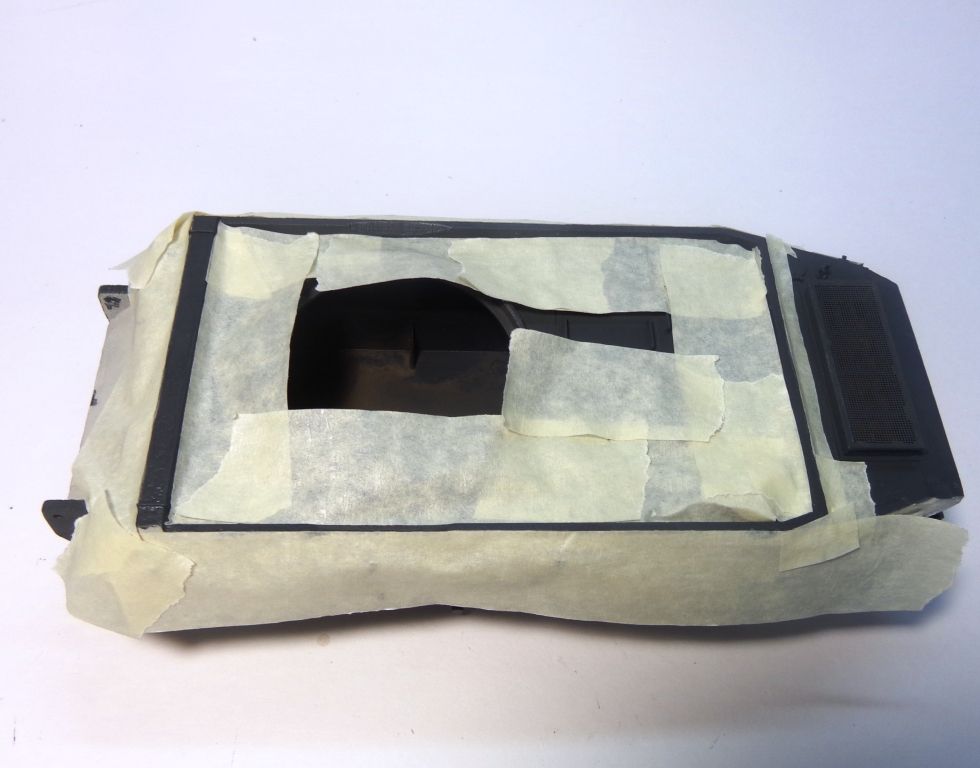
Masks come in all shapes and sizes....
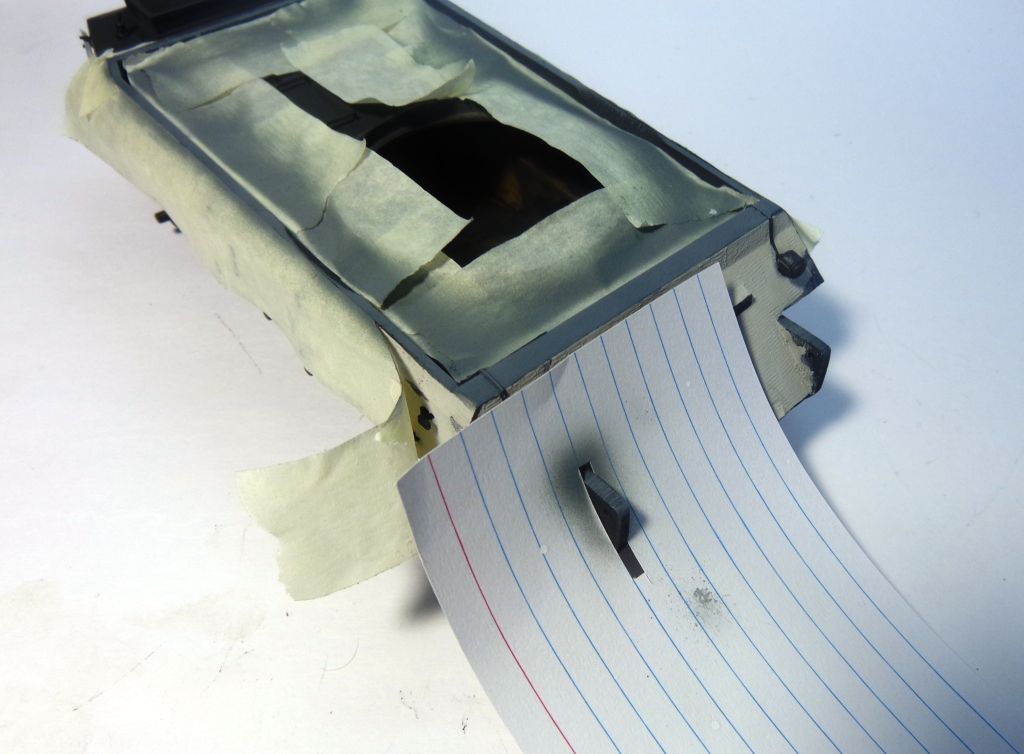
I've shaded the top, and actually even added some weathering filters from Adam Wilder's new line. This is because I want to simulate a coat of camouflage paint that will have gone over an already-existing hull. So the finish has to be somewhat advanced to get the proper effect. The chipped zimmerit parts have been given a light acrylic drybrushing to simulate leftover zimmerit dust or whatever putty-like material it was made of?
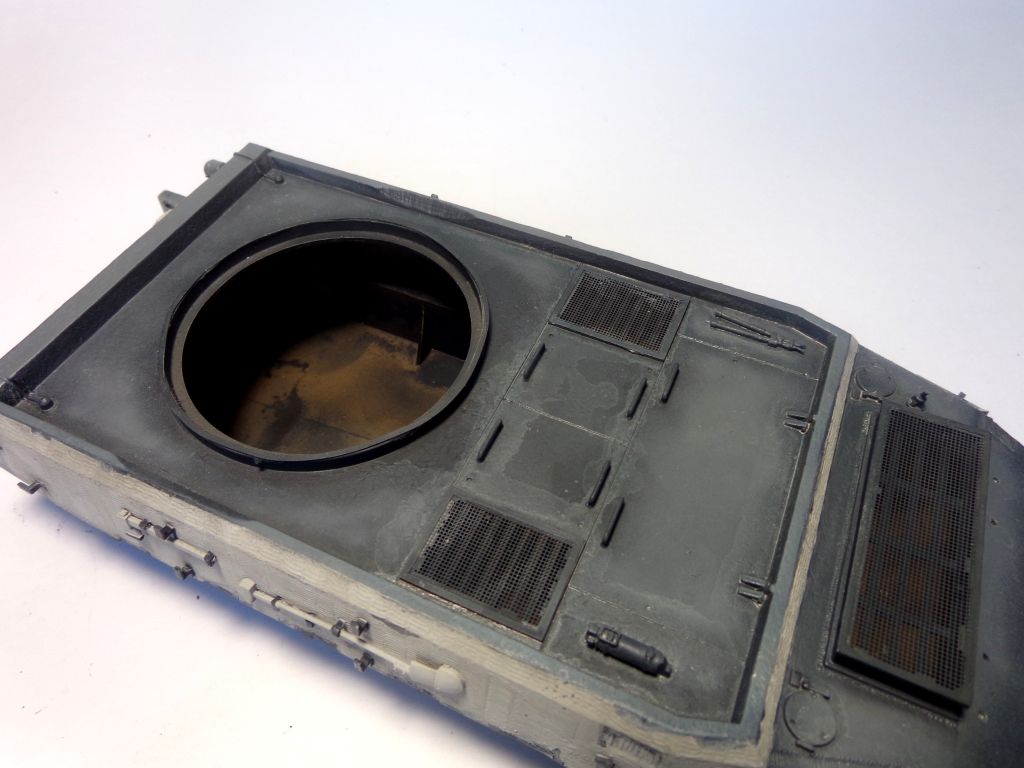
Here's where I"m at now. Getting ready to add the camo colors!
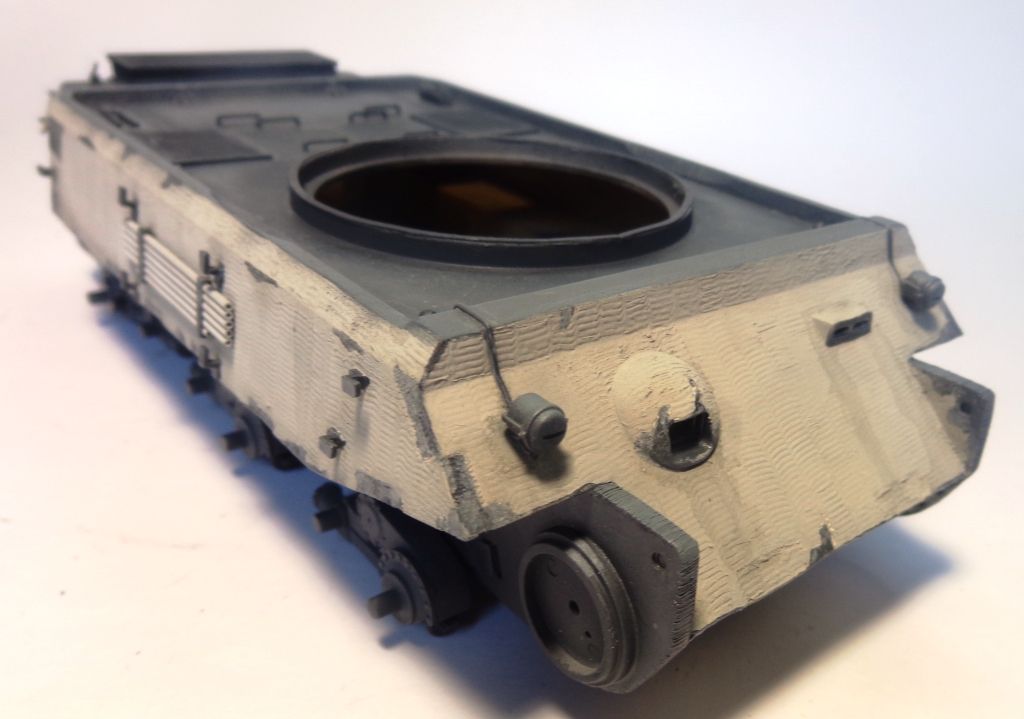
Let me know what you think of the concept, guys. I'm trying to "think outside the box" on this one and pull ff something original! Comments and critiques warmly welcomed! SmileBeer

  • Member since
    January 2007
Posted by the doog on Wednesday, June 19, 2013 8:33 PM

Hey thanks, Russ. I've given it a fair bit of thought, and I"m pretty sure that I"m just going to leave the hatches open and that'll be the extent of it.The rear turret hatch, too!  Wink New update coming right up....!

JOIN OUR COMMUNITY!

Our community is FREE to join. To participate you must either login or register for an account.

SEARCH FORUMS
FREE NEWSLETTER
By signing up you may also receive reader surveys and occasional special offers. We do not sell, rent or trade our email lists. View our Privacy Policy.