SEARCH FINESCALE.COM

Enter keywords or a search phrase below:

Wirbelwind---FINISHED PICS! pg 7

20056 views
136 replies
1 rating 2 rating 3 rating 4 rating 5 rating
  • Member since
    March 2013
  • From: Puebla, Mexico
Posted by garzonh on Thursday, December 26, 2013 5:17 PM

What can I say my friend!!

you are a master at modeling,the colors are amazing, to be sincere in fact I liked it more before the cammo patern, the base color with the darken areas looke perfect for me.

But I should wait and see it finished before giving an opinion, Im sure it will be another museum quality piece

Happy Holidays!!

  • Member since
    January 2007
Posted by the doog on Thursday, December 26, 2013 7:27 AM

"Santa Doog", lol. I like that, ha ha. Thanks, Brian!

Thanks for looking in, SprueOne. Glad you like the weld seams; the turret really needs the detail on the old Tamiya kit.

Ernest, thanks for the confidence in my future weathering, and for the comment on the camo--i DID try to make it look rather "field painted". It's a relief to hear that someone thinks I made a mark in that regard.

Thanks too, Jack! I appreciate the thumbs-up on the turret interior!

  • Member since
    April 2006
  • From: ON, Canada
Posted by jgeratic on Thursday, December 26, 2013 2:57 AM

Karl, looking stellar.  

Really impressed with how the turret interior turned out.

regards,

Jack

  • Member since
    July 2006
  • From: San Francisco Bay Area
Posted by bufflehead on Thursday, December 26, 2013 12:00 AM

"You ARE a bold one!"

Much bolder than I was with my last attempt with color modulation!!  I must admit its looking a little funky right now, but you've always managed to apply some great weathering that tones all of those stark colors right down!

I like your method of applying the two tone camo.  It looks very random, haphazard and rushed, just like a field maintenance crew would do when hard pressed for time (which most were!)  Many of us, myself included, tend to make it much neater....falling into the "hand of God" trap when applying camo.

Looking forward to the end result Karl!

Ernest

Last Armor Build - 1/35 Dragon M-26A1, 1/35 Emhar Mk.IV Female


Last Aircraft Builds - Hobby Boss 1/72 F4F Wildcat & FW-190A8


  • Member since
    January 2006
  • From: California
Posted by SprueOne on Wednesday, December 25, 2013 9:05 PM

Looks good from here. Nice realistic weld seams too

Anyone with a good car don't need to be justified - Hazel Motes


Iron Rails 2015 by Wayne Cassell Weekend Madness sprueone

  • Member since
    December 2008
  • From: Goffstown, NH
Posted by New Hampshire on Wednesday, December 25, 2013 4:20 PM

Ho ho ho, Santa Doog brings us a nice present in the form of photo goodies.  Thank you Santa Doog! YesBig SmileYes

Brian

  • Member since
    January 2007
Posted by the doog on Wednesday, December 25, 2013 2:51 PM

Hello all, and Merry CHristmas to you all!

Well, it's been a weird CHristmas--Jenn had to work (there are no "holidays" in the hospital!) and since we couldn't travel north to visit our families, I'm just modeling through the day and practicing guitar.

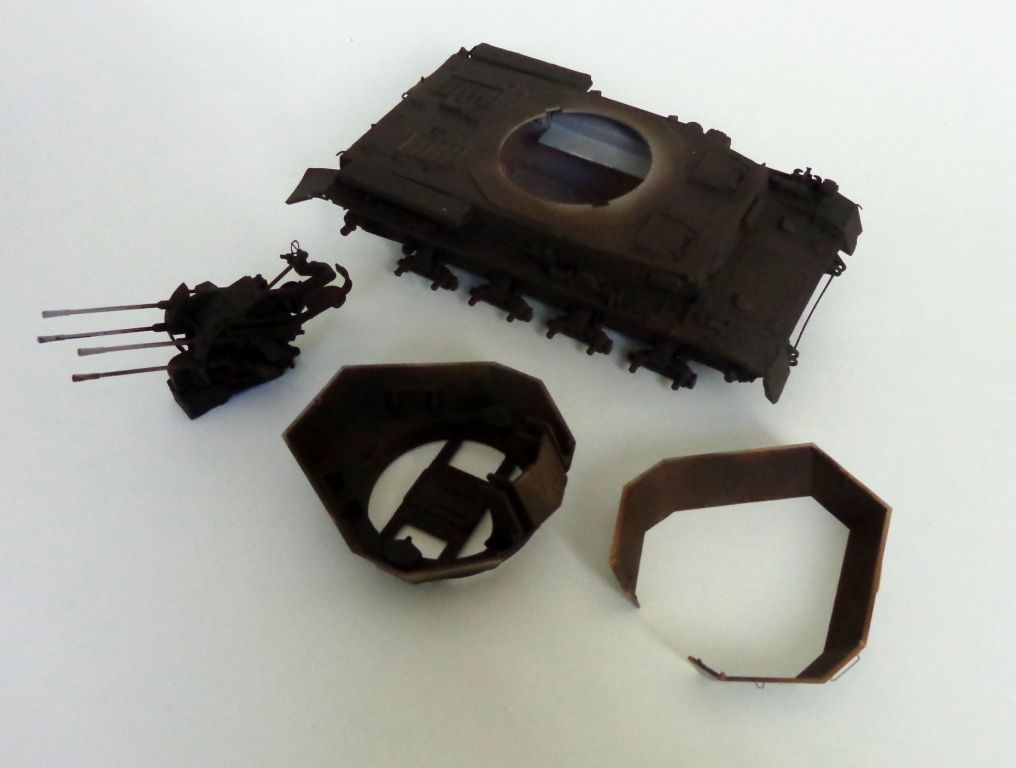
I have another painting update. Lotsa work here: since Wirbelwinds were modifications of existing Pz IV hulls, I wanted to go for a look of a new add-on turret with a fresher paint job than the old hull. First thing I did was give it a all a shot of Tamiya gray primer to cover all that PE.

 '

Then, a coat of Tamiya Brown + Black as an undercoat..
Next, uninted Tamiya Dark Yellow

Wheels got the same treatment, but I"m omitting the inneccesary coverage of that for now.

Then I made a "light"  mix of DY by adding WHite and Buff, and sprayed it in the panels of the hull. In the turret, I only bothred to fo the inside fo it, as the outside will be painted when the interior is weathered a bit.
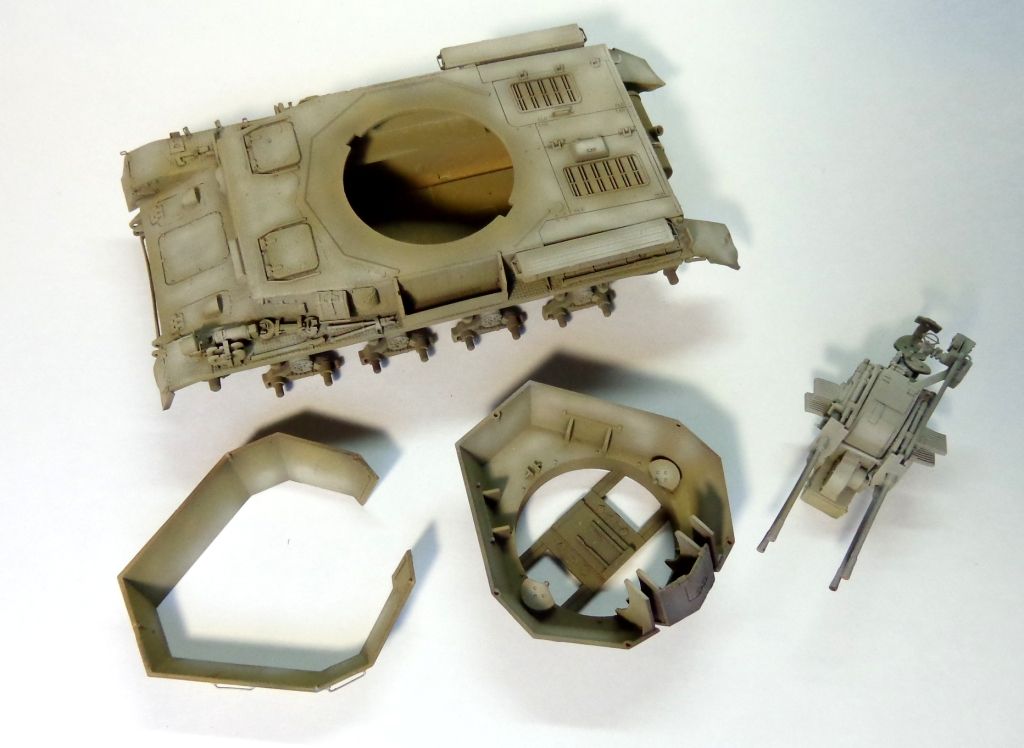
One small detail I did to add some life to the interior ws to build "empty" magazine holders. Just to make it look like the vehicle has seen some use. This was easily accomplished with styrene.

Next,. some light Dark Umber washes was added in the seams and corners, and the guns were painted along with the barrels in MM Semi-Gloss Black, and then lightly drybrushed with steel.

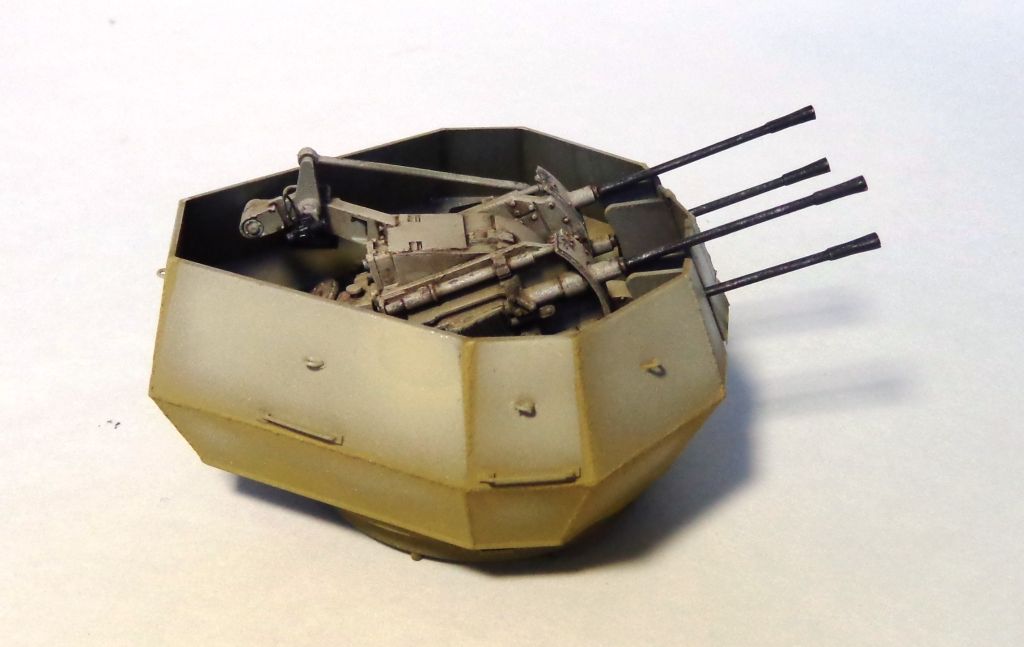
The turrert was sealed, and sprayed with untinted DY over the plastic. Leaving the brown undercoat out of this step will give me a slightly different tint to it-a key step in making the DY coat just ahair different than the hull's.
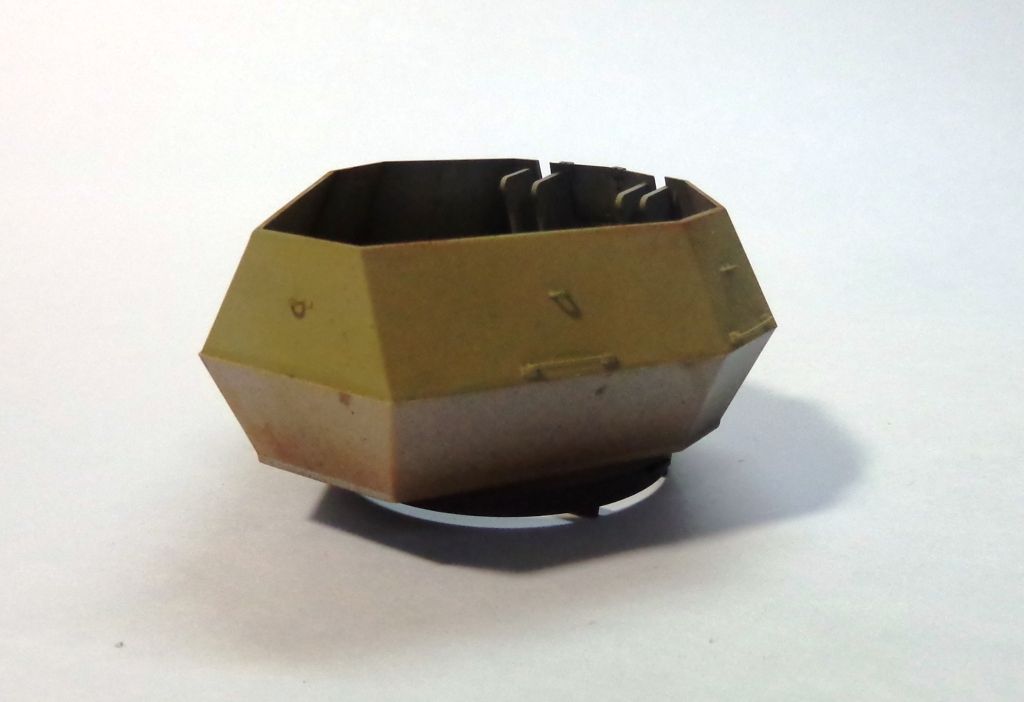
Next, new welds were added to the plate joints using white putty and lacquer thinner.

After a quick repaint of DY (slightly backwards step there...) I masked and taped the panes in oder to do some Color Modulation Technique.
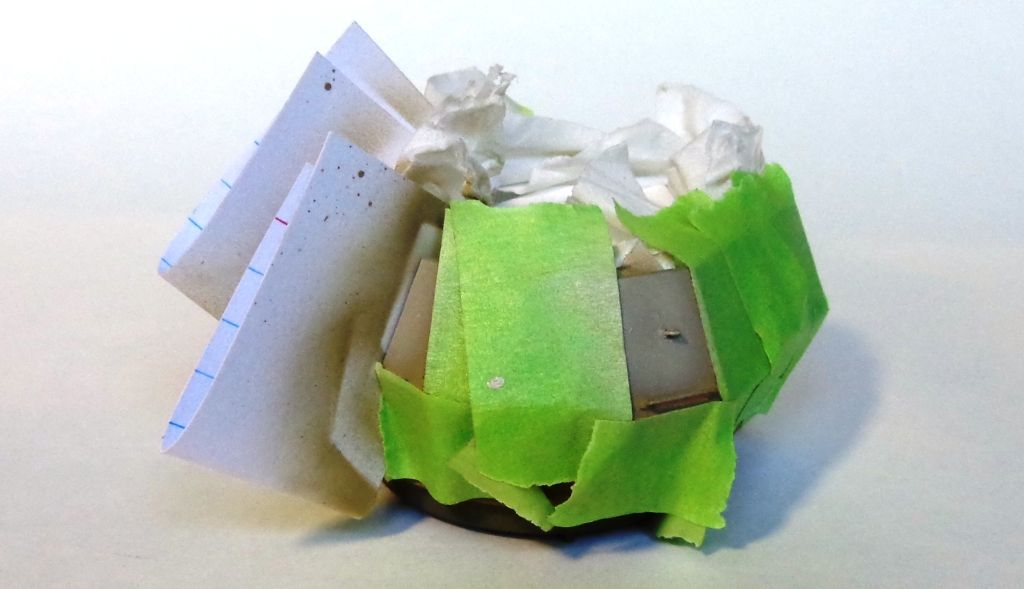
The panels were sprayed with a new light DY mix ONLY on the top, and from the top-left corner, in. The lower right panel would be shaded darker by not painting it. Additionally, I won't paint the lower half of the hull.

ANd here's the result:
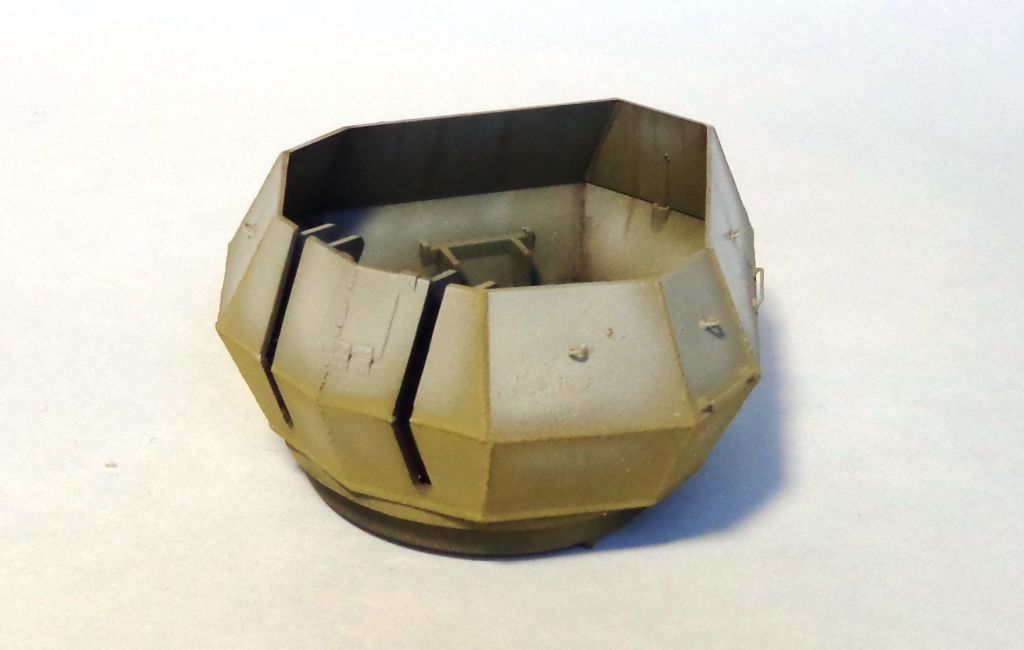
It looks kinda funny, now, but I then mixed a "middle" DY color and highlighted the bottom panels so as not to have such a stark difference.
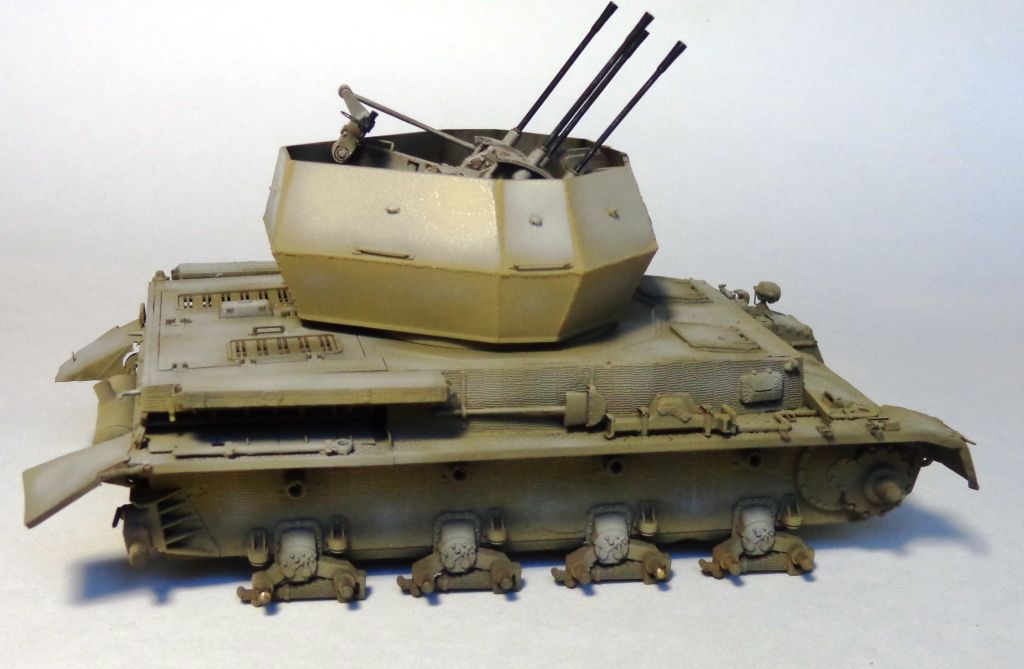
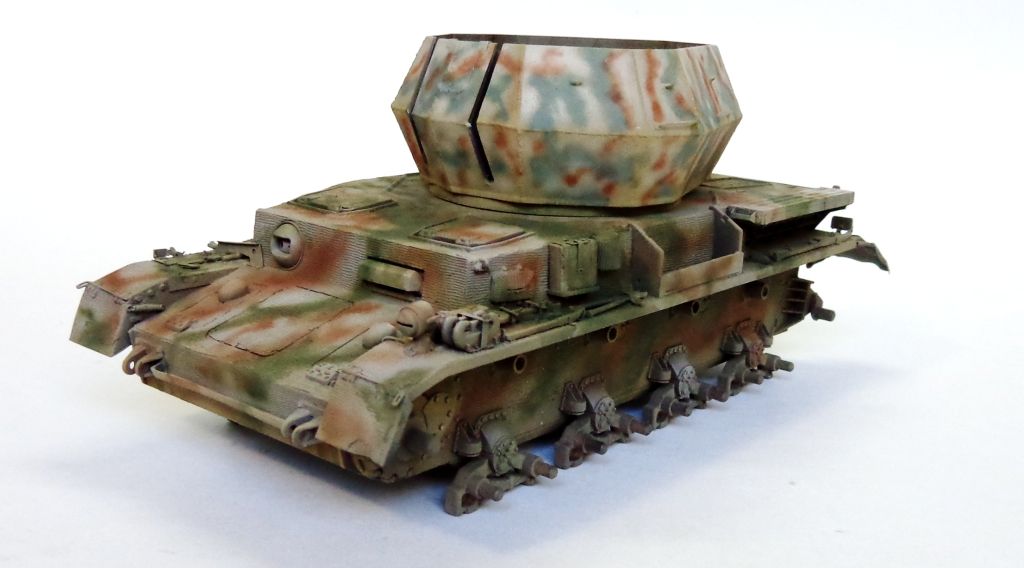
I then mixed a green color from Olive Green + Buff and sprayed a pattern. I used it on the turret as well to provide some color harmony.
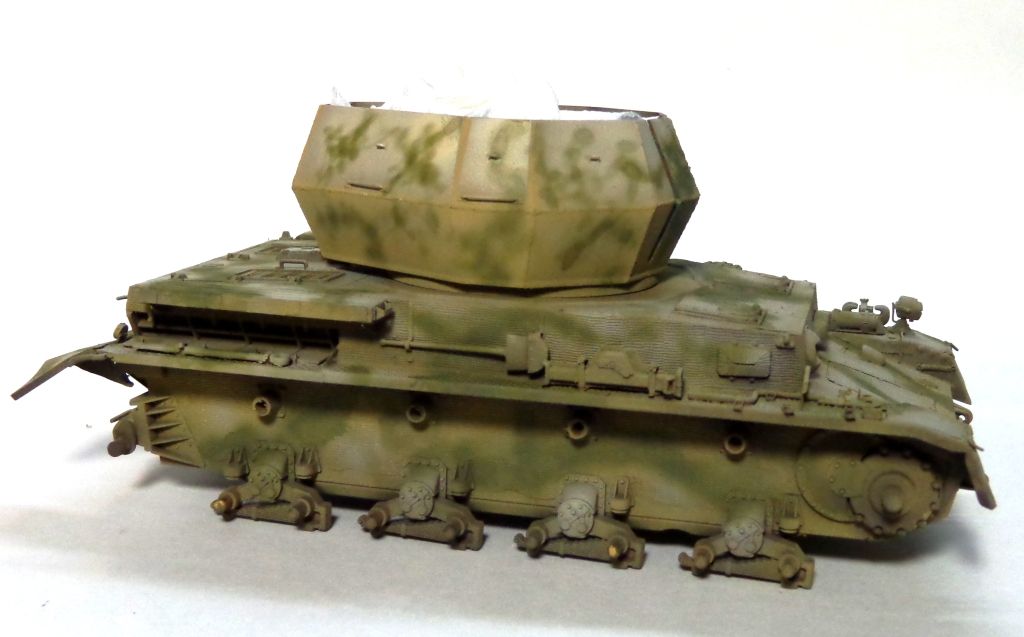
Next, I took Tamiya "Field Gray" and sprayed the turret lines again, so I had two different shades, but predominantly Field Gray.I also added some Red Brown.

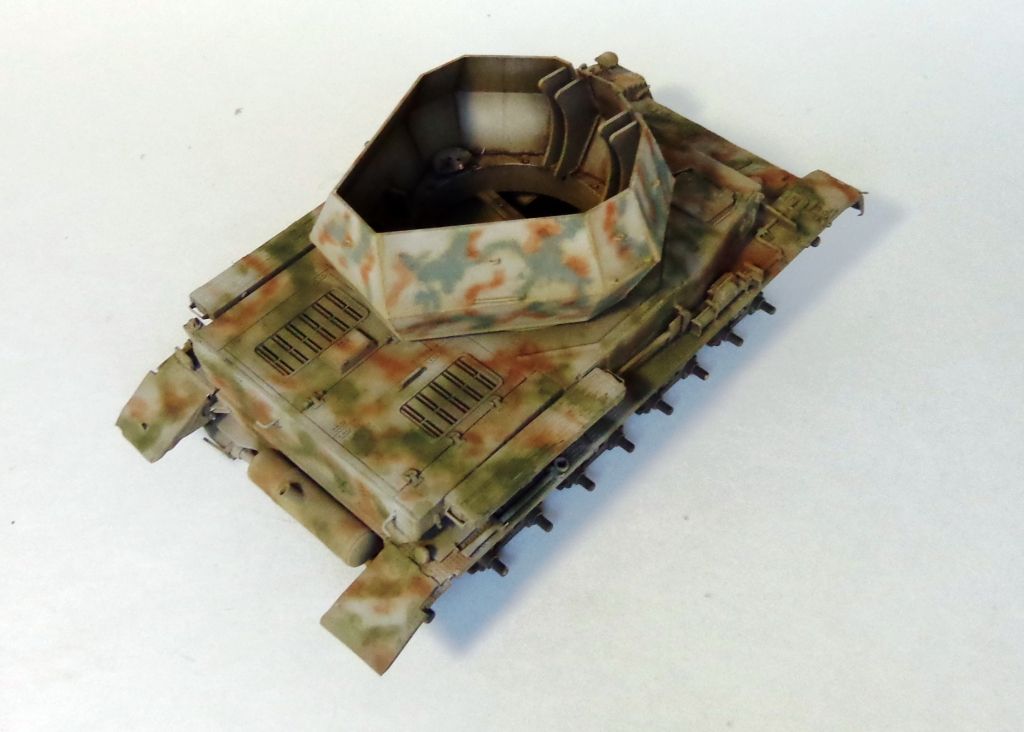
I feel like I"ve succeeded in making a subtle-but-noticeable dstinction between the hull and turret. Hopefully the weatering will serve to tie it together even moire and make a cool presentation.

Thanks for looking in, all, and please let do me know what you think of the concept? Smile

  • Member since
    August 2012
Posted by JimNTENN on Wednesday, December 25, 2013 2:30 PM

It looks really good. I built this one a long time ago. It was my first serious attempt at doing armor and it doesn't look anywhere near as good as yours. Nor does it have any PE details on it.

Current project(s): Hobby Boss: 1/72 F9F-2 Panther

                                  Midwest Products: Skiff(wood model)


  • Member since
    January 2007
Posted by the doog on Wednesday, December 25, 2013 2:18 PM

Thanks for taging along here again, Ernest! And a Merry Christmas to you as well! Glad that track toot worked for you!

  • Member since
    July 2006
  • From: San Francisco Bay Area
Posted by bufflehead on Monday, December 23, 2013 9:15 PM

Shoot!  I've been busy and thought this was done already!  I'm pleasantly surprised that you're still working on it Karl and I must say its looking very nice!  Love the detail work on the gun and interior....some of us just can't leave well enough alone!! Whistling

Oh, and nice track assembly method.......I think I've used that before! Pirate

Ernest

Last Armor Build - 1/35 Dragon M-26A1, 1/35 Emhar Mk.IV Female


Last Aircraft Builds - Hobby Boss 1/72 F4F Wildcat & FW-190A8


  • Member since
    January 2007
Posted by the doog on Sunday, December 22, 2013 4:19 PM

Glad to hear that, Ernest! Merry Christmas to you too!

  • Member since
    March 2003
  • From: El Dorado Hills, CA
Posted by IBuild148 on Thursday, December 19, 2013 11:33 PM

As always looks good! Welcome back home and Merry Christmas.

Thanks for your and Bills Nashorn blog. Progress is slow but I have finished all steps up to 8. Without the blogs I was contemplating seeing a shrink.

IBuildOne48

Teach modeling to youth!

Scalefinishes.com

http://i712.photobucket.com/albums/ww122/randysmodels/NMF%20Group%20build%20II/Group%20Badge/NMFIIGBbadgesmall.jpg


  • Member since
    January 2007
Posted by the doog on Thursday, December 19, 2013 7:46 PM

Thanks, Hugo! Paint update coming up this weekend!

  • Member since
    March 2013
  • From: Puebla, Mexico
Posted by garzonh on Tuesday, December 17, 2013 5:11 PM

Another great buidl, cant wait to see the paint.

good work pal!

  • Member since
    January 2007
Posted by the doog on Tuesday, December 17, 2013 4:41 PM

Thanks for looking in, SchattenSpartan, Bill and Steve!! I Hope to get another update sooner than later!

  • Member since
    January 2007
Posted by the doog on Tuesday, December 17, 2013 4:40 PM

It'll be coming soon, Bish! Hang in there--I just have to find the time!!

  • Member since
    January 2007
Posted by the doog on Tuesday, December 17, 2013 4:39 PM

lol, Kenny, you flatter me too much! Of course you would have been prompted to get back into modeling! I would hate to think that my simplistic details would dissuade anyone from enjoying the enjoyable act of building OOB! I only wish I could build MORE OOB builds--but at this point, modeling for me is another potential source of income, so I have to buck up and notch up the finish factor a bit. But sometimes it's a real albatross!

  • Member since
    December 2002
  • From: Bury St Edmunds, Suffolk, England
Posted by Bish on Tuesday, December 17, 2013 4:05 PM

Looking nice Karl. can't wait for that track tut.

I am a Norfolk man and i glory in being so


On the bench: Airfix 1/72nd Harrier GR.3/Fujimi 1/72nd Ju 87D-3

  • Member since
    July 2004
  • From: Texas
Posted by wbill76 on Tuesday, December 17, 2013 10:14 AM

Nice update Karl! Looking forward to seeing it with paint on. Beer

  • Member since
    April 2013
Posted by SchattenSpartan on Tuesday, December 17, 2013 8:51 AM

She's looking superb, Karl! I can't wait to see pics of her with some paint on.

  • Member since
    November 2004
  • From: Essex England
Posted by spacepacker on Monday, December 16, 2013 7:51 PM

'This was the model that brought me back into this game.

I picked it up from a Charity shop for £1.00 built OOB because I didn't know any better, even followed the box art for the painting; all very simple.

So, I'm very pleased you  did not publish this 'Blog' at the same time, it's for sure I would not have finished it and would not still be modelling.

Great build so far, looking forward to the finish...cheers....Kenny

  • Member since
    July 2003
  • From: On my kitchen counter top somewhere in central North Carolina.
Posted by disastermaster on Monday, December 16, 2013 7:04 PM

I'll be tuning in..... http://smileys.on-my-web.com/repository/Music/radio-006.gif

 https://i.imgur.com/LjRRaV1.png


  • Member since
    January 2007
Posted by the doog on Monday, December 16, 2013 4:30 PM

Hi all,

Well, I'm back home from hunting up north, and after a successful hunt (got a nice 6 pointer) have gotten around to finishing this construction--she's ready for paint! YAY!

I have got the tracks on--I"m going to be doing a special "tracks tutorial" post here soon, so watch for it!

I detailed the interior of the gun trunions--there's no detail here on the old Tamiya kit, only knock-out marks. I found a photo in a book showing how to detail them and went to work. It's just styrene sheet with some razor-blade cut nuts.

The PE set had some small details to use on them.

And I also added some hand rails and foliage loops on the turret. I'm going to paint the guns and interior first, then glue it up and add weld seams to the joints.

I'm going to start painting tomorrow. Trying to think of something cool for the camo...this should be fun. Stay tuned! Comments or suggestions always welcomed!

  • Member since
    March 2003
  • From: El Dorado Hills, CA
Posted by IBuild148 on Sunday, December 1, 2013 11:21 PM

You are really testing your patience. Its even testing mine Bang Head just reading all the efforts in the details.

IBuildOne48

Teach modeling to youth!

Scalefinishes.com

http://i712.photobucket.com/albums/ww122/randysmodels/NMF%20Group%20build%20II/Group%20Badge/NMFIIGBbadgesmall.jpg


  • Member since
    January 2007
Posted by the doog on Sunday, December 1, 2013 2:05 PM

disastermaster

Well, we all know that doog is into heavy metal.

https://encrypted-tbn3.gstatic.com/images?q=tbn:ANd9GcSlu2TYHc3jU9PTMbFxEmkg4G32ie97fd-HynmxAwRUfqEysSY8lBHyvI8

This is just his armored version of it.

Big SmileBeerBeerBeerBeerBeerBeerBeerBeerBeerBeerBeerBeerBeerBeer

  • Member since
    January 2006
  • From: California
Posted by SprueOne on Wednesday, November 27, 2013 11:14 AM

LOL, good one!

Anyone with a good car don't need to be justified - Hazel Motes


Iron Rails 2015 by Wayne Cassell Weekend Madness sprueone

  • Member since
    July 2003
  • From: On my kitchen counter top somewhere in central North Carolina.
Posted by disastermaster on Tuesday, November 26, 2013 5:26 PM

Well, we all know that doog is into heavy metal.

https://encrypted-tbn3.gstatic.com/images?q=tbn:ANd9GcSlu2TYHc3jU9PTMbFxEmkg4G32ie97fd-HynmxAwRUfqEysSY8lBHyvI8

This is just his armored version of it.

 https://i.imgur.com/LjRRaV1.png


  • Member since
    April 2006
  • From: ON, Canada
Posted by jgeratic on Tuesday, November 26, 2013 3:09 AM

Bristling with awesomeness, all that PE sure does looks great.

I like what you did with the spare barrel boxes, simple but very effective.

If you are going to remove PE, I'm sure you are aware nail polish remover does the trick, (the acetone?)

regards,

Jack

  • Member since
    August 2008
  • From: S.W. Missouri
Posted by Pvt Mutt on Monday, November 25, 2013 8:48 PM

Karl I was there and the shovel got knocked off going through some brush. I told the guys not to put it there

but why would they pay any attention to me? Registered Rednecks don't carry much weight you know.

Tony leeDunce

Shoot Low Boys They're Ridin Ponys

  • Member since
    January 2007
Posted by the doog on Monday, November 25, 2013 7:37 PM

ha ha, that's funny, Lee!

JOIN OUR COMMUNITY!

Our community is FREE to join. To participate you must either login or register for an account.

SEARCH FORUMS
FREE NEWSLETTER
By signing up you may also receive reader surveys and occasional special offers. We do not sell, rent or trade our email lists. View our Privacy Policy.