SEARCH FINESCALE.COM

Enter keywords or a search phrase below:

"The Hunters GB" (2/1/08 to 6/1/08)

98572 views
1237 replies
1 rating 2 rating 3 rating 4 rating 5 rating
  • Member since
    April 2005
Posted by Thunderbolt379 on Sunday, February 3, 2008 5:53 AM

This thread's gone a bit quiet... There must be a whole lot of plastic engineers with their heads down over their benches!

For myself, I'm nearly ready to begin, the previous model is nearly done, but I managed to drop my AB earlier -- it slid off the bench, hit the floor and bent its trigger assembly. (No glass jar attached at the time, phew!) I'll have to drop it into the service shop tomorrow. Luckily I'd finished all spraying, including cleaning (thankfully!) and had even turned the gas bottle tap off, I just had to bleed the hose pressure and ... bang! I've never done that in 29 years of airbrushing!

Well, I could ceremonially glue two bits of Trumpeter plastic together tonight -- and announce myself as well and truly aboard!

Cheers,

TB379

http://worldinminiature.blogspot.com/

  • Member since
    May 2006
  • From: Nanaimo, BC, Canada
Posted by Brews on Saturday, February 2, 2008 9:45 PM

A couple more progress pics:


  • Member since
    October 2004
  • From: Northern Virginia
Posted by ygmodeler4 on Saturday, February 2, 2008 8:56 PM
Hey digger, go with the Marder II, just my My 2 cents [2c]

-Josiah

  • Member since
    July 2003
  • From: Ozarks of Arkansas
Posted by diggeraone on Saturday, February 2, 2008 8:24 PM
Well I guess I will get started on my builds since I put my fist throught the Chaffee I was doing.So which one should I start with,the Stug IV or the Marder II.Digger
Put all your trust in the Lord,do not put confidence in man.PSALM 118:8 We are in the buisness to do the impossible..G.S.Patton
  • Member since
    October 2004
  • From: Northern Virginia
Posted by ygmodeler4 on Saturday, February 2, 2008 8:18 PM
Looking real good guys,,,
Update: I emailed my dad with a list of things I thought were appropriate to add to our stash, lol, maybe it'll work, hopefully it will, lol.

-Josiah

  • Member since
    January 2008
  • From: Chicago
Posted by DerOberst on Saturday, February 2, 2008 8:05 PM

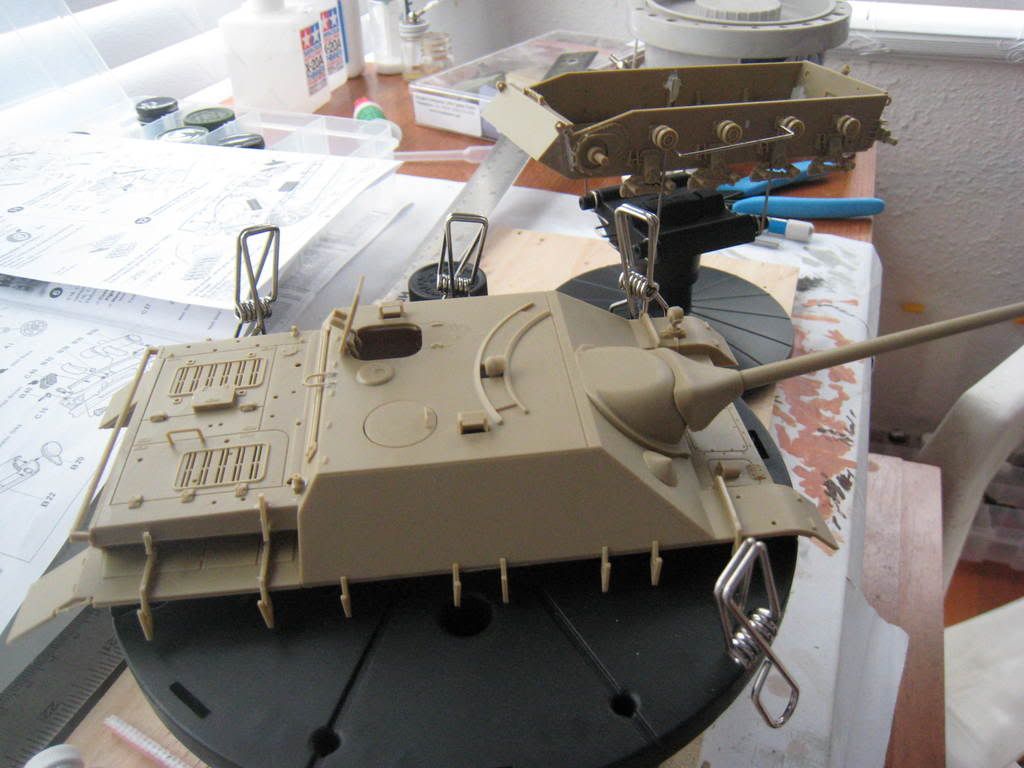
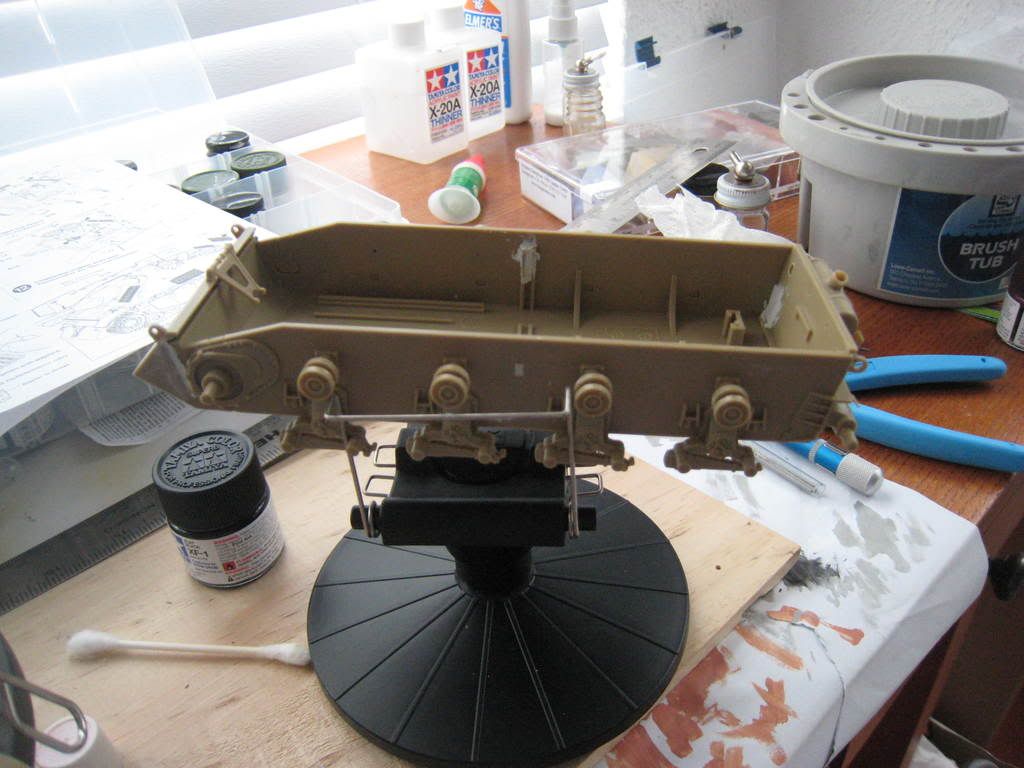
Well I spent a few hours last night working on my Jagdpanzer IV L70. 

I have noticed a few things:

--I started working on it after the kids went to bed at 8PM.   The next thing I knew, it is 1AM.  Talk about addictive.   Crack addicts keep better track of time.

-- I notice that there are many different styles of build.  I keep the hull halves separate and attach everything that will be painted in the base color and camo scheme.  I paint the tools and other stuff later.  

-- I leave the road wheels off for painting.  I paint them rubbber, then use a mask to spray the hubs.  I could never paint them all on the vehicle like some of you.

-- I find myself filling ejector marks and sanding edges that WILL NOT be visible.  Is this normal?  (of course, some of you build detailed interiors that are not visible, so I am probably not asking the right crowd...)

-- The kits seems to leave the sides above the return rollers completely open.  There is a 1.5cm gap between the lower hull and the upper hull along both sides.  This will not be visible on the assembled model, even without the Shurzen.  I filled the gap with some styrene.  I am crazy to spend time filling gaps that cannot be seen?

-- The L70 barrel that came with the kit was a mess.  I sanded and puttied, and it is still a bit lumpy.  Any suggestions for making it more round?  (I am looking at aluminium ones, but I dont see one for the Tamiya kit, only DML and Italieri.  Any thoughts?)


Next steps:

Painting the hull Dunklegrub, painting the road wheels, etc..


  • Member since
    May 2006
  • From: Nanaimo, BC, Canada
Posted by Brews on Saturday, February 2, 2008 3:51 PM

I added an instrument panel, with dials by Mike Grant Decals. I dropped one of the return rollers, and despite working on a concrete floor, I couldn't find it. It must have bounced across the room. So, I made another by sticking a piece of round sprue in my dremel, and using a #11 blade as a tool. I'm pleased to say that it's hardly noticeably different.

The tracks are now joined (by soldering iron). Despite the age of the kit, the detail on these is quite pleasing. There is enough slack in the track that I hope to be able to make it sag realistically between the idler and the rear return roller.

Edited to include pics:

Sample injector-pin remedy 


For the short-sighted Tigerman:


  • Member since
    March 2003
  • From: Rain USA, Vancouver WA
Posted by tigerman on Saturday, February 2, 2008 12:53 PM
 Brews wrote:
 tigerman wrote:

That's how I'd want to do one. 

That's a tad ambiguous :)

You'd make one outside Moscow, with 11 kills, or as DAK? 

I just think it would make a  good DAK scheme. I'm still itching to try one with the chip method. 

   http://i7.photobucket.com/albums/y269/wing_nut_5o/PANZERJAGERGB.jpg

 Eric 

  • Member since
    May 2006
  • From: Nanaimo, BC, Canada
Posted by Brews on Saturday, February 2, 2008 12:15 PM

It's funny how you see things in daylight that you think you can ignore under "good" workbench lighting.

I just dremelled some ejector pin marks - about 6 of them. 

  • Member since
    May 2006
  • From: Nanaimo, BC, Canada
Posted by Brews on Saturday, February 2, 2008 12:13 PM
 tigerman wrote:

That's how I'd want to do one. 

That's a tad ambiguous :)

You'd make one outside Moscow, with 11 kills, or as DAK? 

  • Member since
    March 2003
  • From: Rain USA, Vancouver WA
Posted by tigerman on Saturday, February 2, 2008 11:51 AM
 Brews wrote:

Oooh! Look what I found!

Wartime pics

Museum Specimen

11 kill rings!?

I'm almost sorry I'm making mine as a DAK vehicle :)


That's how I'd want to do one. 

   http://i7.photobucket.com/albums/y269/wing_nut_5o/PANZERJAGERGB.jpg

 Eric 

  • Member since
    May 2006
  • From: Nanaimo, BC, Canada
Posted by Brews on Saturday, February 2, 2008 11:40 AM

Oooh! Look what I found!

Wartime pics

Museum Specimen

11 kill rings!?

I'm almost sorry I'm making mine as a DAK vehicle :)


  • Member since
    March 2003
  • From: Rain USA, Vancouver WA
Posted by tigerman on Saturday, February 2, 2008 10:49 AM

Johan, loving all that PE. Grateful I don't have to assemble it. LOL

Wish I could build today, but Super Bowl roadtrip with my homies.  Back to the bench probably Tuesday. 

   http://i7.photobucket.com/albums/y269/wing_nut_5o/PANZERJAGERGB.jpg

 Eric 

  • Member since
    October 2004
  • From: Northern Virginia
Posted by ygmodeler4 on Saturday, February 2, 2008 10:42 AM

Thanks again Hermes,,,, I am very appreciative

 On another note, great looking builds guys.

-Josiah

  • Member since
    April 2005
  • From: Gothenburg
Posted by JohanT on Saturday, February 2, 2008 10:02 AM

The plan is to build an Egyptian SU-100, turret number 1, captured by the Brittish 3'd Para at Pord Said early November 1956.
Hopefully I can get some very basic detail into the drivers area so that the Drivers and Gunners hatch can be left open.
The wagon has a Commanders cuppola that is not fully supported in Dragons # 6359, it seems as if a disc is missing from the sprues but I can scratch something.
The cuppola and the hatches are there but the cuppola does not fit to the casemate.
I might scratch off the small handles and replace them with wire.

The "goodies"


Any pictures of SU-100 interiors are greatly appreciated Tongue [:P]

Very Best Regards
Johan

  • Member since
    March 2003
  • From: Rain USA, Vancouver WA
Posted by tigerman on Saturday, February 2, 2008 9:37 AM

Man, that is going to be tiny Brews. be sure to take pics under a magnifying-glass. Laugh [(-D]

Fantastic progress so far Dupes. It looks the part for sure. Nice weld seams.

Eric, don't feel alone, I got about as much done as you, on almost the same area. 

   http://i7.photobucket.com/albums/y269/wing_nut_5o/PANZERJAGERGB.jpg

 Eric 

  • Member since
    May 2006
  • From: Nanaimo, BC, Canada
Posted by Brews on Saturday, February 2, 2008 9:30 AM
 dupes wrote:

So yesterday ended up being a pretty productive day, got all prepped for some marathon modeling - had a half gallon of D+D coffee Propeller [8-] and the Ipod packed with a bunch of heavy metal Banged Head [banghead] for building some heavy metal. and ended the night like so:

Oooh, I'd still like to finish before you :)

I assembled the lower hull bits , superglued the idler and drive wheels, painted the tyres, resprayed Afrika Korps Brown (1942) as well as a bit of interior buff. I sprayed the brown over the buff, by the way. Logically, I should have sprayed the buff, then oversprayed with Panzer Grey, then oversprayed with AKB, but I wanted to have a lighter contrasting interior. The interior detail, by the way, isn't too bad. It includes a driver's seat, a transmission and drive shaft, as well as an engine compartment firewall. The floor has no treadplate, and I'm not going to indulge in PE for this, although I MIGHT drop in something ...

Anyway, after I finished up for the night, I realised that I maybe should have painted tyres on the idler wheel. I'd assumed that this would be steel-rimmed.

sigh.

  • Member since
    December 2006
  • From: N. Georgia
Posted by Jester75 on Saturday, February 2, 2008 9:08 AM
Cool, thanks alot Hermes!

Eric


  • Member since
    April 2006
  • From: LaValle, Wisconsin
Posted by Hermesminiatures on Saturday, February 2, 2008 9:06 AM
Top is correct...doesn't make much sense but it's right.

Jonathan

For every modeling technique that works, I have three that don't.

  • Member since
    December 2006
  • From: N. Georgia
Posted by Jester75 on Saturday, February 2, 2008 8:51 AM

Holy smokes Dupes, now thats some marathon modeling!! I spent about 2 1/2 hours last night working on my Jagdpanzer and all I finished was the rear panel, and its not all the way done.

I have a question for all of you Pz IV experts out there. My Eduard PE set come with some straps, handles and a small "tray" with lightening holes in it for the wooden jack block. In my mind, this tray should be on the bottom of the block when it is installed in its final position but looking the the instructions, it appears to be on the top. Which place is correct??

If you need pics, I can post them. Thanks!

Eric


  • Member since
    November 2006
  • From: Coastal Maine
Posted by dupes on Saturday, February 2, 2008 8:33 AM

So yesterday ended up being a pretty productive day, got all prepped for some marathon modeling - had a half gallon of D+D coffee Propeller [8-] and the Ipod packed with a bunch of heavy metal Banged Head [banghead] for building some heavy metal. Started out like so:

and ended the night like so:

overall, construction has gone waaaaay better than I thought it would (for a Zvezda kit, anyway Wink [;)]). All of the roadwheels lined up without too much trouble, and the majority of the parts have fit pretty well...until I got to sprue C. Apparently the two halves of the mold didn't quite match up, EVERY single part has large mold lines, and flash everywhere. So there's going to be a bit of cleanup time there. Hopefully it won't take tooooo long, hope to have construction done (and a primer coat?) tonight! Big Smile [:D]

  • Member since
    January 2005
  • From: Portland, Oregon
Posted by fantacmet on Friday, February 1, 2008 11:48 PM
WEll I started on mine a little bit earlier.  Already have the interior done for the main hull minus 4 parts(the seats) which will be painted a different color then the rest of it.


  • Member since
    April 2006
  • From: LaValle, Wisconsin
Posted by Hermesminiatures on Friday, February 1, 2008 11:15 PM
 ygmodeler4 wrote:
 Hermesminiatures wrote:

The Krupp/Steyr Waffentrager is based on the RSO chassis, not the Panzer 38(t). It uses some late Hetzer suspension components or sometimes the RSO suspension with different wheels.

The steel-rimmed road wheels are unique Waffentrager components and are not 38(t) parts.

There were different types of Waffentrager, and the only one that used 38(t) wheels (they are actually late Hetzer wheels, there is a difference), is the 128mm version with the sharply sloped gun shield and perforated muzzle brake (the gun from the MAUS tank).

The vehicle represented in the Alan kit mounts an 88 and has only tracks and idlers from the 38(t). You'll have to use the kit wheels and sprockets.

Thanks Hermes, so the Alan kit has the 38(t) idler, but different road wheels and sprockets....but you said the tracks were 38(t) also, so does that mean I could buy some AM tracks for the 38(t) and replace those with the kit tracks?

Right, late Hetzer tracks should be right. Earlier 38(t) tracks won't do becuase they are a different pattern (...if you want to be picky.)

I (obviously) didn't kill myself skiing (despite playing around on the expert runs and the super park all day...) so I should be able to spend most of tomorrow on the Jagdpanzer. I hope to do the basic construction, Fruils, and fenders...gotta hustle to be done for that show on March 1!

Jonathan

For every modeling technique that works, I have three that don't.

  • Member since
    February 2007
  • From: Calgary, Alberta, Canada
Posted by T-rex on Friday, February 1, 2008 8:45 PM

Ha ah! I found tamiya's Hezert and two more, one made from a unknow company and another from edward for 89$ there must be lots of PE parts in that one, too hard for me.

I'll make a diffrent camo scheme.

Working on: Trumpeter SU-152 (1/35) Trumpeter E-10 (1/35) Heller Somua (1/35)

"The world is your enemy, prince of a thousand enemy. And when they'll find you, they will kill you... but they will have to catch you first ''

  • Member since
    May 2006
  • From: Nanaimo, BC, Canada
Posted by Brews on Friday, February 1, 2008 8:33 PM

I've sprayed a coat of Testors Afrika Korps Yellow brown on the PzJg I.

The hull is 2.5cm wide and 6cm long.


  • Member since
    March 2003
  • From: Rain USA, Vancouver WA
Posted by tigerman on Friday, February 1, 2008 7:11 PM
Pieces are getting glued, but already I'm getting overwhelmed with cleanup. It seems each piece has 3-4 connectors. Yuck. The hull is already overcomplicated and requires putty. I guess this is the price we pay for detail. Evil [}:)]

   http://i7.photobucket.com/albums/y269/wing_nut_5o/PANZERJAGERGB.jpg

 Eric 

  • Member since
    March 2003
  • From: Rain USA, Vancouver WA
Posted by tigerman on Friday, February 1, 2008 11:36 AM
 bufflehead wrote:

To schurzen or not to schurzen, that is the question......

After looking at those tiny, tiny bolts and finding nothing other than Hermes photo, I'm going sans schurzen. 

   http://i7.photobucket.com/albums/y269/wing_nut_5o/PANZERJAGERGB.jpg

 Eric 

  • Member since
    December 2002
  • From: Reno, NV
Posted by espins1 on Friday, February 1, 2008 11:28 AM
 dupes wrote:

Alright...I've had enough of this "work" crap. I'm outta here...gotta run into town for a minute (might be a pile of kits at the post office!) then I'm home to eat some lunch and start in on the ISU-152! Ha ahaaaa! Dinner [dinner]

Some days it pays to be the Vice President. Wink [;)]

Awesome!  Lucky Censored [censored] Laugh [(-D] 

I've got my research materials with me at work to pour over during lunch.  Although I pretty much know the StuG III Ausf. G inside and out.  Propeller [8-]

The StuG III Ausf. G hits the bench this weekend.  I'll be building it along with my PzKpfw II Ausf. F and PzKpfw 38(t) for the Desert and Winter Warriors builds.  Cool [8D]

Scott Espin - IPMS Reno High Rollers  Geeked My Reviews 

  • Member since
    November 2006
  • From: Coastal Maine
Posted by dupes on Friday, February 1, 2008 10:52 AM

Alright...I've had enough of this "work" crap. I'm outta here...gotta run into town for a minute (might be a pile of kits at the post office!) then I'm home to eat some lunch and start in on the ISU-152! Ha ahaaaa! Dinner [dinner]

Some days it pays to be the Vice President. Wink [;)]

  • Member since
    July 2006
  • From: San Francisco Bay Area
Posted by bufflehead on Friday, February 1, 2008 10:45 AM

DARN!!  I tried, I tried to stay up to midnight and start my kit....but sleep and this Censored [censored] lingering cold got the better of me!!Dead [xx(]  I won't be able to start until I get home tonight.  At least the Pz IV G for the Winter Warriors GB is finally assembled.  I won't start painting that until tomorrow, so I can start the Jagd this evening....yippeee!!

To schurzen or not to schurzen, that is the question......

Ernest

Last Armor Build - 1/35 Dragon M-26A1, 1/35 Emhar Mk.IV Female


Last Aircraft Builds - Hobby Boss 1/72 F4F Wildcat & FW-190A8


JOIN OUR COMMUNITY!

Our community is FREE to join. To participate you must either login or register for an account.

SEARCH FORUMS
FREE NEWSLETTER
By signing up you may also receive reader surveys and occasional special offers. We do not sell, rent or trade our email lists. View our Privacy Policy.