SEARCH FINESCALE.COM

Enter keywords or a search phrase below:

DML E100, corrected hull

31808 views
114 replies
1 rating 2 rating 3 rating 4 rating 5 rating
  • Member since
    January 2007
DML E100, corrected hull
Posted by the doog on Tuesday, March 4, 2008 2:54 PM

Hey guys--just wanted to show ya what I'm working on lately before I probably ruin it ([:-^])--the "new" DML E-100 "Nachtjaeger". I've decided to put figures in the turret so to better show the immense size of this beast, so I've decided to lose the IR scopes off the turret.

I corrected a glaring error in the old DML kit--which is the same original model here that they've just repackaged with 3 new, small sprues of the IR equipment molded in clear plastic (I built one of them on the front driver's position).

THe front hull is molded incorrectly if you decide to leave off the skirts--you can see how I thickened the front hull sides, and repositioned the interlocking welds, which are incorrectly canted. You have to do this if you plan to pose the tank minus side skirts-which I like the look of better...

SO, before I ruin the cool shaded-red primer base coat with some putty-camo, I thought I'd post it! 

Here's the WIP on the front--the welds have been filled in with putty. They will be scraped out later with a micro-chisel that I got from MicroMark, and some judicious work with the Exacto blade. See the original seam running the length of the hull front plate? That has tro be considerably thicker, so I'll address that too...
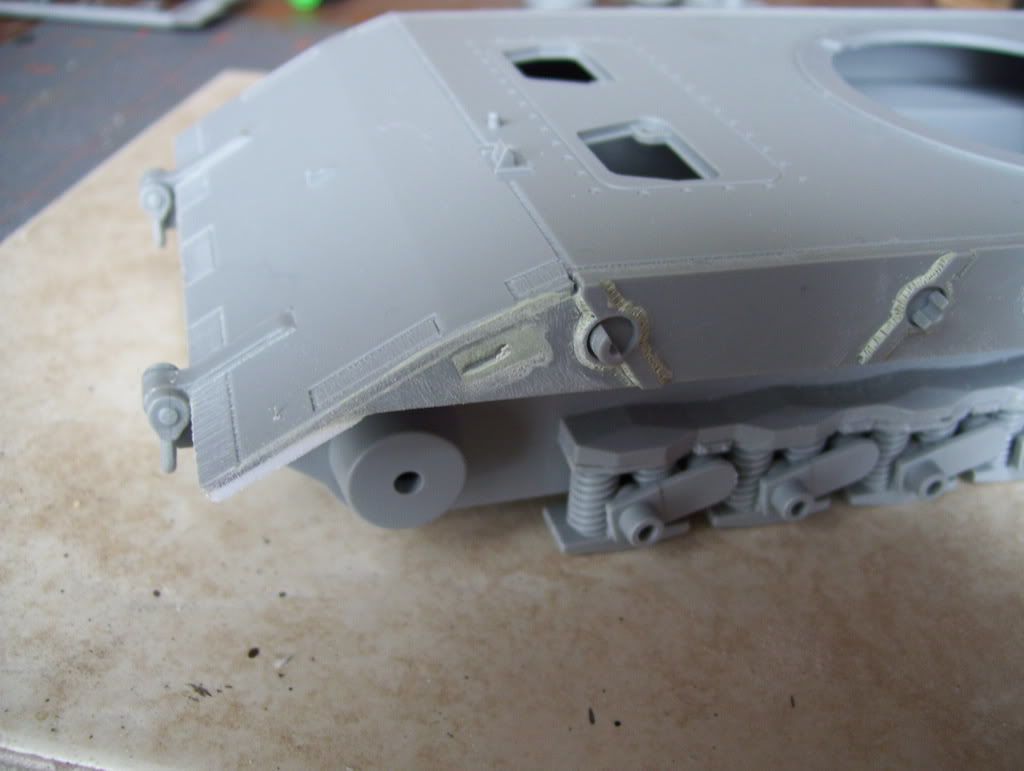
 

I also added some welds to the skirt attachments:
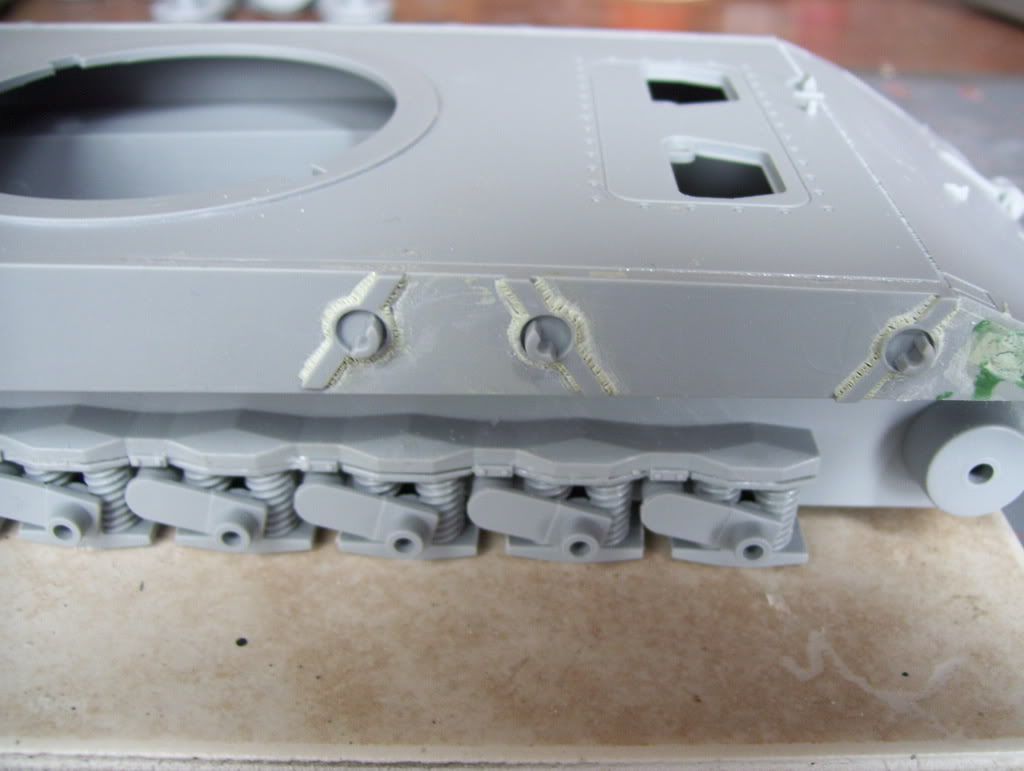
Here you can see the corrected front. You have to drill out these little holes in the side...I don't know quite what they were..? Notice the interlocking weld seam...
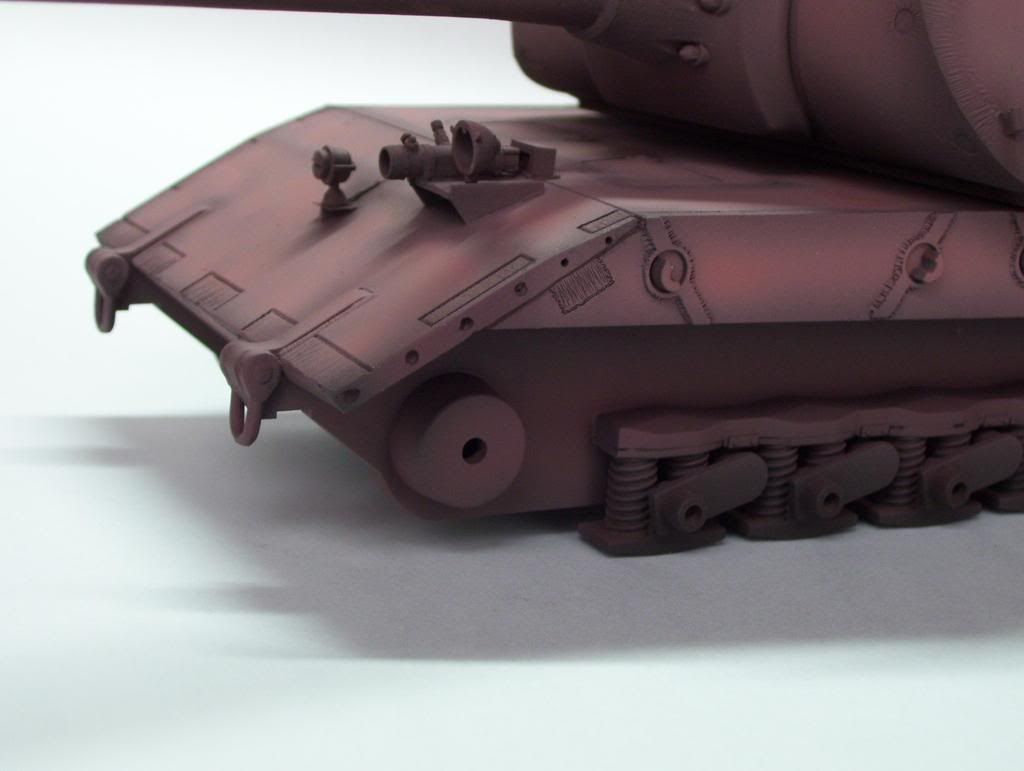
And here's the painted base coat...
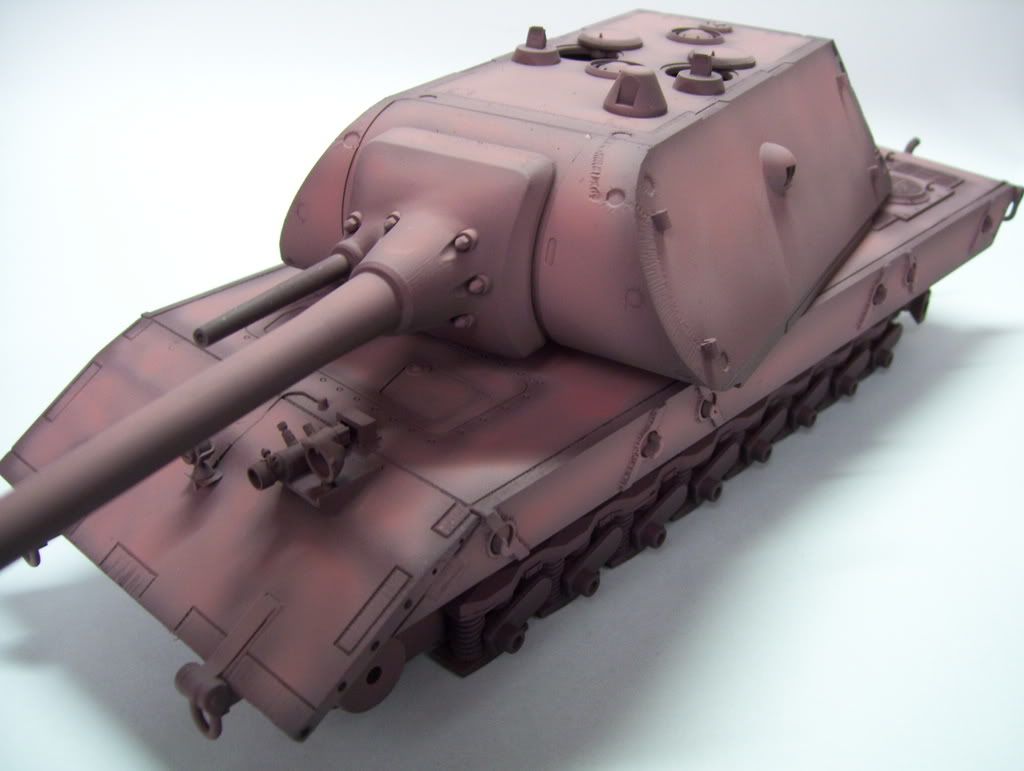
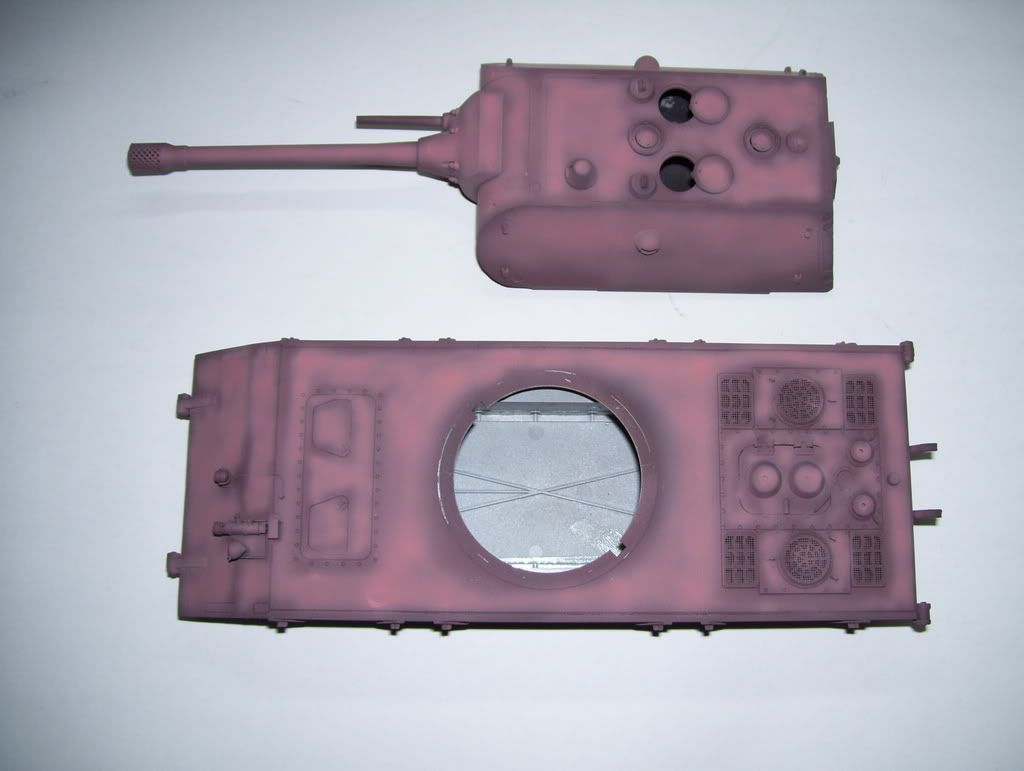
Questions or comments welcomed!  Big Smile

Dre
  • Member since
    June 2007
  • From: here, not over there
Posted by Dre on Tuesday, March 4, 2008 3:04 PM

That primer coat is sweet as is...are you going to ruin it with paint?Smile [:)]

Those spring assemblies for the roadwheels look so primitive as compared to other panzers. 

  • Member since
    September 2007
Posted by rios on Tuesday, March 4, 2008 4:17 PM

hi doog.

At the forward end of the front plate, there's a thickened part which from the side looked like a L shape. I thought dragon included that, but apparently not on this kit?

I was wondering what those holes are for too, since the place where you corrected weld lines are fixtures for that entire section of side skirt.

  • Member since
    March 2003
  • From: Rain USA, Vancouver WA
Posted by tigerman on Tuesday, March 4, 2008 4:25 PM
Looking good so far. I second the adding paint comment. I really like the look of the primer color.

   http://i7.photobucket.com/albums/y269/wing_nut_5o/PANZERJAGERGB.jpg

 Eric 

  • Member since
    January 2007
Posted by the doog on Tuesday, March 4, 2008 6:25 PM
 rios wrote:

hi doog.

At the forward end of the front plate, there's a thickened part which from the side looked like a L shape. I thought dragon included that, but apparently not on this kit?

I was wondering what those holes are for too, since the place where you corrected weld lines are fixtures for that entire section of side skirt.

Actually rios, you are correct about the "L" shape--I neglected to mention that I did fashion that little "lip" thing there--there also one at the rear hull just above the idler wheel--but I haven't glued it on yet, as I wasn't sure if it would make it a PITA when I'm installing the tracks. I'm going to add both pieces after I install the wheels and tracks.

I have to laugh; I actually don't want to cover the base paint here with a camo job, but I just can't see the pure primer coat as being plausible alone--even though there is a color photo of a Mobelwagen in overall red primer out there. I just think it needs a camo coat, but I agree that the red base coat is pretty striking. 


  • Member since
    May 2006
  • From: Queensbury,NY
Posted by panzer88 on Tuesday, March 4, 2008 6:54 PM
Looking real good doog !!!! Can't wait to see this bad boy with the complete "doog treatment"!! I'll be watching this one closely. Great work as usual.


  • Member since
    July 2003
  • From: On my kitchen counter top somewhere in central North Carolina.
Posted by disastermaster on Tuesday, March 4, 2008 8:07 PM

  The image “http://www.mothering.com/discussions/images/smilies/knit.gif” cannot be displayed, because it contains errors.I be wachin' you......

                                   Steve
 

 https://i.imgur.com/LjRRaV1.png


  • Member since
    July 2006
  • From: New Jersey
Posted by redleg12 on Tuesday, March 4, 2008 9:24 PM

Love the red lead lookEvil [}:)]

Looks like you are having fun.

Rounds Complete!!

"The Moral High Ground....A Great Place to Emplace Artillery."

  • Member since
    January 2007
Posted by the doog on Tuesday, March 4, 2008 11:01 PM
 redleg12 wrote:

Love the red lead lookEvil [}:)]

Looks like you are having fun.

Rounds Complete!!

"Having fun" don't come close! LOL! Laugh [(-D] I'm LOVIN' it! These big panzers are too cool in my book! The only problem is all the space they take up in the bookcase!

Thanks for the comments guys! Big Smile [:D]

  • Member since
    September 2007
Posted by rios on Tuesday, March 4, 2008 11:39 PM
Bigger they are better they get. Multiple turrets are even better.
  • Member since
    January 2007
  • From: Iowa
Posted by IA Novice on Wednesday, March 5, 2008 4:11 PM

Doog,

The E-100 is a paper panzer that made it part way through the development process right?  so it's concievable that if there was one that was finished (or nearly finished) at the end of the war, it might still be stuck in primer - especially if you consider the state of affaris at the end of the war - shortages, disruptions critical in supplies, ruined logisitcs, etc. 

If it is using artistic license to build it, I don't think it is that much more of a stretch to leave it in primer.

Just my My 2 cents [2c]


The definition of insanity: doing the same thing over and over and expecting different results.
  • Member since
    July 2004
  • From: Texas
Posted by wbill76 on Wednesday, March 5, 2008 5:07 PM
Nice work so far doog, I'm on the sidelines about the primer-yes-or-no question...either way I'm sure it'll be a show stopper. Thumbs Up [tup]
  • Member since
    January 2007
Posted by the doog on Wednesday, March 5, 2008 6:44 PM

Thanks again, guys.

I agree, it wouldn't be a stretch to leave it in red primer, but I want another color on it, as I just think the basic red is cool, but not as compelling as a hard-edge Dark Yellow and possible Panzer Gray in there as a hypothetical "Urban Camo Scheme" that might have been feasible in defending German cities at the end of the war. That's kinda what I'm going for...Wink [;)]

Gotta add some tools and grab handles too...the tracks are a nightmare--huge and clunky, and a Censored [censored] to get the right length! Man, what a stressful afternoon! Banged Head [banghead]

  • Member since
    April 2007
  • From: Schroon Lake, NY
Posted by SMJmodeler on Thursday, March 6, 2008 12:27 AM

doog:  There's gotta be a way to model that bad boy so that red primer is seen!  How about a factory scene...partially dark yellow with a lot of red primer exposed?  I'm sure there are a bunch of figures available that would be posed properly for something like that.  If the tracks are such a nightmare have them rolled out on the "factory" floor or something like that (not installed yet).  Food for thought...Dinner [dinner]

Is that a red overall spray first and then a lightened shade over it?  Looks darn goodThumbs Up [tup]

doog...just c h i i i l l l Wink [;)]...you'll get it worked out, this is supposed to be fun, right?!Big Smile [:D]

  • Member since
    July 2003
  • From: On my kitchen counter top somewhere in central North Carolina.
Posted by disastermaster on Thursday, March 6, 2008 3:52 AM

Here's something for 'ya Doog .....

 http://www.hlj.com/hljlist2/?Maker1=AIF&MacroType=DetAcc&GenreCode=Mil&Dis=2

                                                        Steve
 

 https://i.imgur.com/LjRRaV1.png


  • Member since
    July 2003
  • From: Alabama
Posted by Circuitrider on Thursday, March 6, 2008 7:41 AM

Looking good, Doog. 

I've a question about the finish.  It looks like you preshaded with a dark color (black I'm assuming).  Was the preshading a primer coat over all of the tank, or did you just hit the low spots and corners, and then fill in the blanks with the red-oxide primer?


  • Member since
    September 2007
  • From: Fredrikstad, Norway
Posted by Stampede on Thursday, March 6, 2008 8:33 AM

Ah, looking good so far doog! Thumbs Up [tup]

Gotta follow this tread to completion.  Please explain how you did the shaded red oxide coat if you've got the time. 

If electricity comes from electrons, does morality come from morons?
  • Member since
    January 2007
Posted by the doog on Thursday, March 6, 2008 4:26 PM
 Stampede wrote:

Ah, looking good so far doog! Thumbs Up [tup]

Gotta follow this tread to completion.  Please explain how you did the shaded red oxide coat if you've got the time. 

Well, the primer red color I used is my own mix, which started as Tamiya XF-9 Hull Red; I lightened it a bit I think with White? I pre-shaded the entire tanks by adding about 20% Black to the straight Hull Red, and then for the highlights, added maybe 40% White and another 5-10% straight Red to them my own Hull Red-based shade and hit all the "insides" of the major panels and parts--that's al there really was to it. It's far from done though; I'm going to hit it with some camo, and then hit it with some oils and filters.

I HAVE managed to get the tracks done; yikes, what a PAIN! They are two part, and when you build them, they come together on the "wrong" link--I had to do some creative fudging and squeezing and bending to get them to sit right--they look pretty cool though, they're so HUGE!

I know that a lot of people want to see this left in Primer Red color, but I just can't seem to get my head around that. Maybe I'll do a different tank like that--there IS a Mobelwagen photo of a Mobelwagen in overall primer red, so it CAN work...

Hey Tigerman--thanks for that cool link! That Maus II turret looks killer! I just wish they had more stuff "in stock"! 

Thanks for the comments and sugestions, guys! More photos soon! Big Smile [:D]

  • Member since
    February 2007
  • From: Bournemouth UK
Posted by Luftwoller on Thursday, March 6, 2008 4:53 PM

Looking sweet so far Doog, keep the pics a comin.

...Guy

..'Your an embarrassment to the human genus, makes me ashamed to call myself Homo'.
Dre
  • Member since
    June 2007
  • From: here, not over there
Posted by Dre on Friday, March 7, 2008 11:23 AM

Keep it primer red and paint a Plimsoll line around the lower hull?  Then you could paint everything above the line however you liked....<ducks and runs>


  • Member since
    July 2003
  • From: On my kitchen counter top somewhere in central North Carolina.
Posted by disastermaster on Friday, March 7, 2008 2:49 PM
 the doog wrote:
 Stampede wrote:


Hey Tigerman--thanks for that cool link! That Maus II turret looks killer! I just wish they had more stuff "in stock"! 

Yeah, thanks tigerman......... 

 https://i.imgur.com/LjRRaV1.png


  • Member since
    January 2007
Posted by the doog on Friday, March 7, 2008 3:17 PM
 disastermaster wrote:
 the doog wrote:
 Stampede wrote:


Hey Tigerman--thanks for that cool link! That Maus II turret looks killer! I just wish they had more stuff "in stock"! 

Yeah, thanks tigerman......... 

DAMN! I DID IT AGAIN!!! Sigh [sigh]Sigh [sigh]Banged Head [banghead]Banged Head [banghead]Black Eye [B)]Dead [xx(]

OK, I have to start making sure from now on that I'm actually AWAKE when posting replies!

SO SORRY, Steve! Maybe its the paint fumes?......Whistling [:-^]

  • Member since
    January 2007
Posted by the doog on Friday, March 7, 2008 4:43 PM

OK< so here's the update...

I added some stuff to the rear plate--tools, a fire extinguisher, and some steps to the turret. I woulda used PE tool holders, but would have had to do them all, and didn't have quite enough left, so.....

I added some gray camo, in three shades of Panzer Gray, lightened with dark yellow and white. I also managed to get the figures done pretty quickly; nothing fancy, but I like their aggressive stances. They're DML.

The tools on the rear:


Hans ans Franz survived the Russian Winter aboard the Field Kitchen carts and got a promotion to Panzer Crewmen... 

I'm going to add a couple splotches or lines of Dark Yellow to lighten up the finish a little, as it will darken a bit in weathering....I also may paint the gun barrel in Primer Gray, as recent info has indicated was the normal practice. Does anybody have an idea of what color would be approximately close? Lighter or darker?

Comments appreciated and welcomed! Big Smile [:D]

Dre
  • Member since
    June 2007
  • From: here, not over there
Posted by Dre on Friday, March 7, 2008 4:56 PM

It's looking good thus far, and it's freakin' HUGE!

  • Member since
    August 2007
  • From: Peterborough, Ontario
Posted by Townsy11 on Friday, March 7, 2008 5:59 PM
Looks great so far Doog! Can't wait to see it with tracks.
"The object of war is not to die for your country, but to make the other bastard die for his."-- General George S. Patton
  • Member since
    April 2007
  • From: Schroon Lake, NY
Posted by SMJmodeler on Friday, March 7, 2008 7:50 PM

doog:  That turrets looks like it's 1:35 scale added to a 1:48 kit!  Could the Germans have made that any larger!?!? Maybe they held pre-battle conferences with all the top brass in there!!!

Are you keeping the red like that?...I hope so, it looks really coolThumbs Up [tup]!!!

Top notch airbrushing work there Chuck, oops...I mean doogLaugh [(-D]  Seriously though, well done and the color variations are superb, great weathering starts with a great airbrushing!!!

  • Member since
    July 2003
  • From: On my kitchen counter top somewhere in central North Carolina.
Posted by disastermaster on Friday, March 7, 2008 9:18 PM
 the doog wrote:
 disastermaster wrote:
 the doog wrote:
 Stampede wrote:


Hey Tigerman--thanks for that cool link! That Maus II turret looks killer! I just wish they had more stuff "in stock"! 

Yeah, thanks tigerman......... 

Maybe its the paint fumes?......Whistling [:-^]

That's what I was thinkin'....... told ya I'd be watchin' you Laugh [(-D]

 https://i.imgur.com/LjRRaV1.png


  • Member since
    January 2007
Posted by the doog on Friday, March 7, 2008 11:01 PM
 SMJmodeler wrote:

Top notch airbrushing work there Chuck, oops...I mean doogLaugh [(-D]

Ha HA! I deserve that! Whistling [:-^] Smile,Wink, & Grin [swg]

Yeah, I'm gonna leave the red like that---the weathering is going to be a challenge though; to not cover it up too much. I'm gonna have to sleep on it....

Thanks for the compliments guys!  

  • Member since
    February 2007
Posted by Boomerang on Friday, March 7, 2008 11:18 PM

   Hey Doog, just catching up on lots of posts. Haven't been around for a while. Well, you truly are the master at writing these tutorials. Nice and easy to understand and so much good stuff to learn. You have a gift mate....Make a Toast [#toast]

   This E-100 is going to be huge! Am looking foward to seeing another work of art. Bow [bow]

    Boomer...  

  • Member since
    July 2004
  • From: Texas
Posted by wbill76 on Saturday, March 8, 2008 11:04 AM

Doog,

Nice work so far! On the barrel primer color for a dark-gray primer vs. a red oxide primer, the shade is most likely close to what you've got going with the camo shade of gray. It should be a darker gray, but not as dark as Panzer Gray if that makes any sense...


JOIN OUR COMMUNITY!

Our community is FREE to join. To participate you must either login or register for an account.

SEARCH FORUMS
FREE NEWSLETTER
By signing up you may also receive reader surveys and occasional special offers. We do not sell, rent or trade our email lists. View our Privacy Policy.