SEARCH FINESCALE.COM

Enter keywords or a search phrase below:

M8 Armored Car in the Ardennes Winter WIP 7/27/08 *Complete* Figs IP

32180 views
127 replies
1 rating 2 rating 3 rating 4 rating 5 rating
  • Member since
    July 2006
  • From: New Jersey
M8 Armored Car in the Ardennes Winter WIP 7/27/08 *Complete* Figs IP
Posted by redleg12 on Friday, June 27, 2008 9:55 PM

Hey Gang 

After my last build, I wanted to work on something smaller, easier and simple. This rest was with an M8 Greyhound. Over the past few months there have been a few of you who have built this kit, notable Biffa and Disastermaster.

I will build the Tamiya version but as a twist from my esteemed colleagues, I decided to use a little of Doog (snow) and a touch of Manny (figures to come). After doing research here is what I am shooting for.

We started out going through the first 3 assembly steps to get the under carriage built.  

Next we assembled the upper hull main parts and began some internal assembly.

Now....did you think I would not scratch and AM an easy kit....well I could not resist so we will add the Verlinden M8 interior, some PH sprinkeled throughout and tires with chains later.

Stated to get most of the interior in place for a wash

Interior completed and washed.

Thanks for looking in. On to mating the upper hull and beginning the turret. All comments welcome

Rounds Complete!!

"The Moral High Ground....A Great Place to Emplace Artillery."

  • Member since
    November 2005
Posted by Anonymous on Friday, June 27, 2008 10:11 PM

Wow, I'm impressed...good interior...that Tamiya kit is a dream to build...gonna really keep my eyes on this one...your ref shows a VERY complete and neat application of whitewash...I built the Tamiya one as well a while back and set it in an Ardennes dio:

Gonna add the snowchains???

  • Member since
    January 2006
  • From: Pineapple Country, Queensland, Australia
Posted by Wirraway on Friday, June 27, 2008 10:33 PM

Manny, I love that dio, and I certainly dont want to hijack or sidetrack this thread, but I couldnt work out the storyline.  Abandoned US vehicles with no battle damage, no signs of their crew (alive or dead)  Obviously the German troops have moved into the sector ?  or are they lost ? 

PS:  Redleg, that M8 is looking great- luv that interior !

"Growing old is inevitable; growing up is optional"

" A hobby should pass the time - not fill it"  -Norman Bates


GIF animations generator gifup.com

  • Member since
    December 2007
  • From: Bridgeview, Illinois
Posted by mg.mikael on Friday, June 27, 2008 10:39 PM

Redleg12, so far your Greyhound looks fantastic, keep us posted!!Smile [:)]

Manstein, that dio looks phenomenial!!Thumbs Up [tup] Especially love the look of the snow, where it's thawing on the edges.

"A good plan executed now is better than a perfect plan next week." - George S. Patton

  Photobucket 

  • Member since
    January 2005
  • From: in the tank factory in my basement
Posted by biffa on Friday, June 27, 2008 10:45 PM
Nice start Mike very tidy work on the interior i love this vehicle i did the italeri one and the tamiya m20 it is also a beauty, i have another in the stash heh you have my attention Smile [:)]
Ron g.
  • Member since
    September 2007
  • From: Relocating
Posted by Mobious on Friday, June 27, 2008 11:26 PM

 Hi Redleg,

 Some how I don't think smaller means simpler and easierBig Smile [:D] The interior looks great. The tire chains sound neat. Keep postin.

 Best regards,


"It's a problem of applied physics" Roy Brown

  • Member since
    July 2004
  • From: Texas
Posted by wbill76 on Saturday, June 28, 2008 12:01 AM
Off to a great start, looking forward to more! Thumbs Up [tup]
  • Member since
    July 2003
  • From: On my kitchen counter top somewhere in North Carolina.
Posted by disastermaster on Saturday, June 28, 2008 12:38 AM

Yo Michael,

  The image “http://img410.imageshack.us/img410/4237/omgblinky3sm.gif” cannot be displayed, because it contains errors. If you need some insight as to how I did my chains, look on the last page of Panzerbait. I added a mini-toot on how I did it.

 I'm interested in how this is gonna go as The image “http://ganjataz.com/smileys/01-grayball/images/grayball-intent.gif” cannot be displayed, because it contains errors. I'm notorious for loving 'em ragged.

Great start........

Helpful suggestion on my part............ The image “http://img301.imageshack.us/img301/2403/idea3el.gif” cannot be displayed, because it contains errors. (you know... my two cents worth)  With all that snow there'll be mud and with all that mud and dampness from the GI's boots, it'd be pretty nasty inside. 

                                                                                         Disastermaster
 

Sherman-Jumbo-1945

"I was so much older then, I'm younger than that now"


  • Member since
    June 2008
  • From: Iowa
Posted by Hans von Hammer on Saturday, June 28, 2008 12:51 AM

Wirraway

...but I couldnt work out the storyline.  Abandoned US vehicles with no battle damage, no signs of their crew (alive or dead)  Obviously the German troops have moved into the sector ?  or are they lost ? 

Not that much of a stretch if you think about it.  Some U.S. units were caught completely unaware by the German push, like the 106th Infantry Division.  Over the summer of 1944 the 106th Division, then at Camp Atterbury, Indiana, was filled with replacements from other training units, the Army Air Corps, Army Specialized Training Program (ASTP), Coast Artillery, Anti-Aircraft Artillery units and others, with no combat experience.

In October 1944 the Division shipped overseas to England for a brief period of training, then shipped across the channel to the LeHavre, France area. On 11 December 1944 the men of the 106th replaced the U.S. 2nd Division on line. The 2nd Division, in the Schnee Eifel area of the German/Belgium border east of St.Vith, Belgium, was replaced man for man and gun for gun and the entire division was greener than Kermit the Frog, especially the Officers and NCOs. Add to THAT Charlie Foxtrot, at the time the 106th Infantry Division caught the brunt of the German Offensive on 16 December 1944 they:

  • Had been on the Continent only 15 days.
  • Had been in place in a "quiet" sector for orientation.
  • Had the youngest troops (average age - 22) of any American Division on line.
  • Had been in their new positions only five days.
  • Had no prior warning that the Germans were going to attack.
  • Occupied a front line that covered over three times the normal distance.   The normal coverage for a division on the front line was approximately five miles. The 106th's positions extended for 21 miles and jutted out, like a thumb, into Germany in a salient extending approximately 7 miles.

Not a good way for a division to start the war... 

  • Member since
    September 2007
  • From: Relocating
Posted by Mobious on Saturday, June 28, 2008 1:14 AM
 disastermaster wrote:

Yo Michael,

  The image “http://img410.imageshack.us/img410/4237/omgblinky3sm.gif” cannot be displayed, because it contains errors. If you need some insight as to how I did my chains, look on the last page of Panzerbait. I added a mini-toot on how I did it.

                                                                                         Disastermaster
 

 Hey Disastermaster,

That tutorial you did was with those cool tire chains that were removable. That toot was a hoot.Big Smile [:D]

Best Regards

"It's a problem of applied physics" Roy Brown

  • Member since
    July 2006
  • From: New Jersey
Posted by redleg12 on Saturday, June 28, 2008 5:56 AM

Manny = Thanks for the comments. I remember that dio and loved it. Yes the M8 is rather clean, no real chipping which is why I like this one. Plus nice deep snow...fun with tires and making snow fenderburgs!!

Wirraway - Thanks for looking in

MG Mike - Thanks for your comments

Biffa - It's always a pleasue to have you comment. Went through your thread prior to this build. Still peaking back as I go.

Mobious - True, but at least the Tamiya kit is a good fit and not a lot of putty work...

As an engineer the old saying of cup half empty or full is answered with you cup was twice as big as you needed...now thats smaller!!

Bill - Thanks for your comments and for looking

Disastermaster = OK....I'm gonna level with you....I was a BAD BOY and cheated....I took the easy way out....the dark side force of buying something was too strong...I have Tank Workshop tires with chains.....

I know, I should be beaten....BUT....I love your toot and will use the chain in the future.

Hopefully you still respect me in the morning!!

As far as the wet inside and boots, I agree...stuck with dirty....when finished the interior view is limited....I did not want to go too nuts on the interior with puddles and snow....but I agree with your comment

And Thanks for you comment and looking.

Hans-von-Hammer - Thanks for looking and you comments

Rounds Complete!!


"The Moral High Ground....A Great Place to Emplace Artillery."

  • Member since
    April 2005
  • From: Piscataway, NJ!
Posted by wing_nut on Saturday, June 28, 2008 6:51 AM
Mike great looking interior and a great start.  Did I miss it or did you say if you're going with the white?  And that pic is really WHITEShock [:O]

Marc  

  • Member since
    July 2006
  • From: New Jersey
Posted by redleg12 on Saturday, June 28, 2008 7:03 AM

Marc - Yep....white....with all the snow on the ground in the photo...there was no chance for dirt. I will need to paint lightly so the OD shows through and not PURE WHITE. You know....there is always a point when a vehicle is white washed, when it is clean and not full of scratches. I have the photo!!!!!!!! Oh yes...we will have the rusty blacked exhaust and dirty air intake in the rear. We will allso have some outside stowage in the rear. But, I thought to do something different.....all white snow.....all white vehicle. How much purer can you get?????

Thanks for your comments.

Rounds Complete!!


"The Moral High Ground....A Great Place to Emplace Artillery."

  • Member since
    June 2005
  • From: Indiana U.S.A.
Posted by Panther F on Saturday, June 28, 2008 8:19 AM

Very neat!  And with winter just around the corner too.  Wink [;)]  The interior sure looks great and it would be a shame to cover it up.

I like white washed vehicles, can't wait to see more!  The pictures are so clear too!

  • Member since
    November 2005
Posted by Anonymous on Saturday, June 28, 2008 9:32 AM
 redleg12 wrote:

Marc - Yep....white....with all the snow on the ground in the photo...there was no chance for dirt. I will need to paint lightly so the OD shows through and not PURE WHITE. You know....there is always a point when a vehicle is white washed, when it is clean and not full of scratches. I have the photo!!!!!!!! Oh yes...we will have the rusty blacked exhaust and dirty air intake in the rear. We will allso have some outside stowage in the rear. But, I thought to do something different.....all white snow.....all white vehicle. How much purer can you get?????

Thanks for your comments.

Rounds Complete!!


Although it is a very thorough and neat application of whitewash there is a lot of room to give her some color and variation...the stars and serials appear to be neatly masked off prior to the white being applied and the borders are very crisp, which almost suggests that this vehicle was spray painted instead of brush painted...this promises to be a very unique finish!
  • Member since
    July 2006
  • From: New Jersey
Posted by redleg12 on Saturday, June 28, 2008 10:29 AM

Manny - Exactly... the star could be weathered. yes...a nice circle around the star. The vehicle #s look like the were quickly masked. The area in the wheel wells also appears to be masked with OD in the upper area. Also the variation in coverage of the white wash.

Thanks for the cocurrance and observation. As I said...I wanted different, I think I found it.

Rounds Complete!!

"The Moral High Ground....A Great Place to Emplace Artillery."

  • Member since
    July 2006
  • From: New Jersey
Posted by redleg12 on Wednesday, July 2, 2008 6:12 PM

Moving along on my M8, here is my current progress.

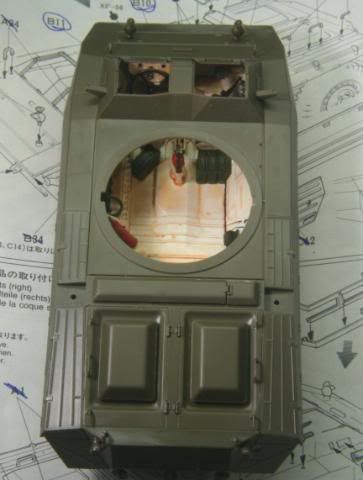
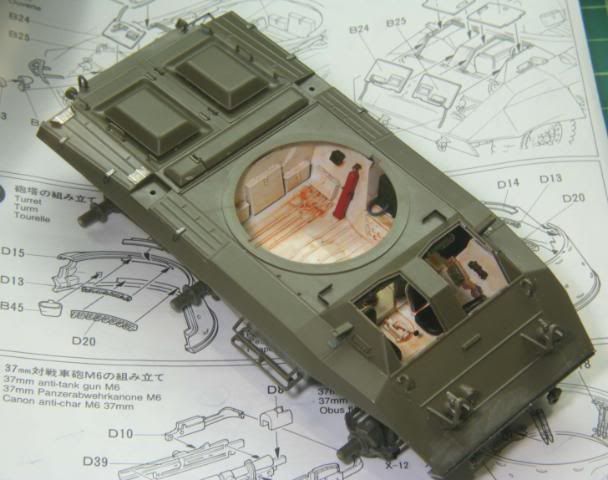
Mounted the upper hull and added kit details

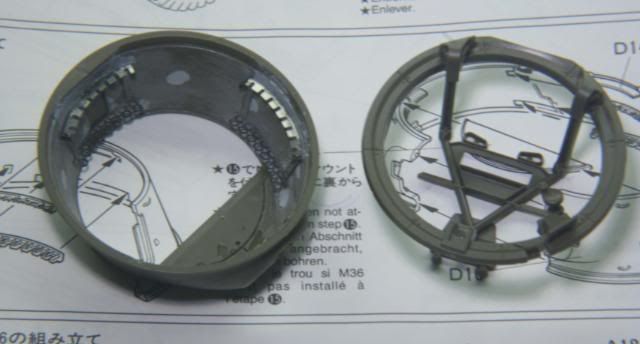
Now it was time for some PE

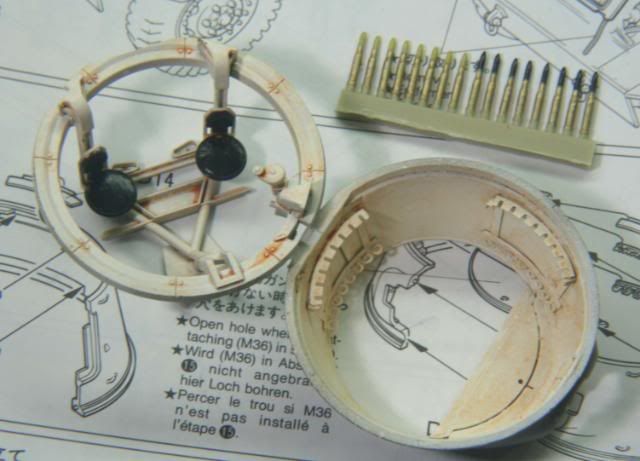
Assembled the turret, cleaned up some pin marks and added PE ammo racks

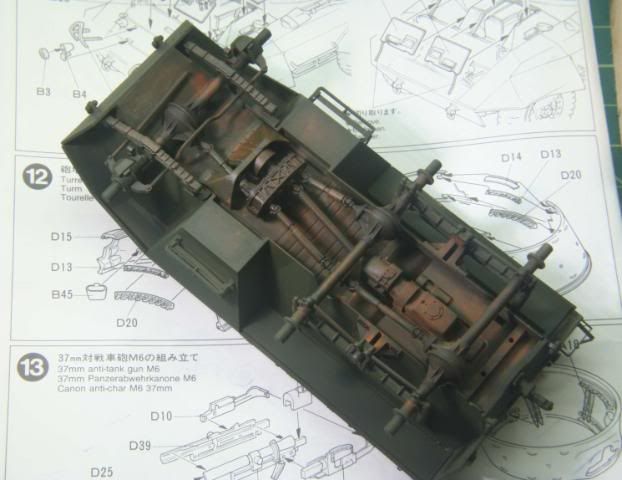
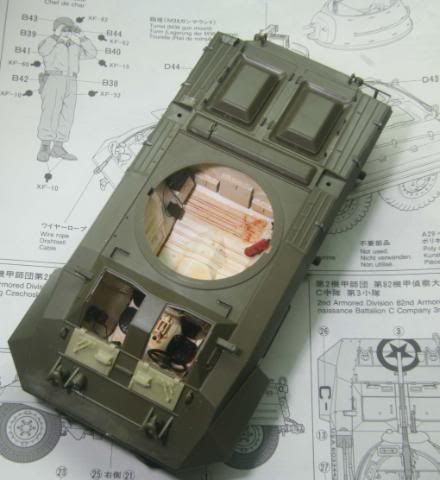
With the main body finished, it was time to paint the underside. Since this this will stay green a prime coat and a coat of Tamiya OD. Then weathered with an oil wash and then some MIG pigments.

Painted the inside of the turret with Tamiya Flat White, detailed the turret gears with Alclad Steel, and seats with Tamiya Black. Then gave an oil wash for weathering.

I finished assembly of the main body by adding the front fenders and lower hatches. We are now ready to prime and base coat with OD

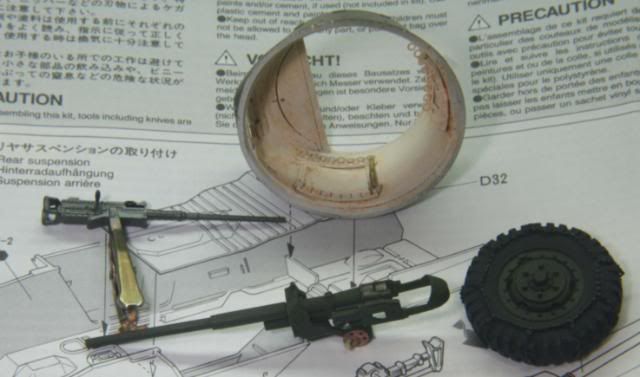
Other details coming together such as the 37mm gun, the M2 50 cal, ammo into the racks on the turret and tires cleaned, primed, painted black, rims in OD, and chains in Alclad Steel.

As a note on the reference photo, the rear fender covers are removed. Also the 50 cal mount is not standard but appears to be welded brackets to hold the 50 on the turret front (ahhh...some scratch building to come).

This version also does not have the middle fenders but has the mine cages.

Well that where we are today. Thanks for looking in. All comments welcome

Rounds Complete!!

"The Moral High Ground....A Great Place to Emplace Artillery."

  • Member since
    April 2005
  • From: Piscataway, NJ!
Posted by wing_nut on Wednesday, July 2, 2008 7:47 PM
Mike you are doing some outstanding work on that.  I just checked with our club president and I was right... we are not allowing any M8 amored cars at MCon next yearWhistling [:-^]

Marc  

  • Member since
    July 2003
  • From: On my kitchen counter top somewhere in North Carolina.
Posted by disastermaster on Wednesday, July 2, 2008 7:54 PM

I think the interior beneath and inside the turret was OD.......only the frontal area in white, but with the whitewash theme, The image “http://www.wizdforums.co.uk/images/smilies/shrug.gif” cannot be displayed, because it contains errors. I can't be sure.

                                                                                    DISASTERMASTER 

Sherman-Jumbo-1945

"I was so much older then, I'm younger than that now"


  • Member since
    July 2006
  • From: New Jersey
Posted by redleg12 on Wednesday, July 2, 2008 8:23 PM

Marc - I'll be there...if you don't want my M8 I'll shoot my Pershing missile at them Shock [:O]  Thanks

Disaster - Well you are right and you are wrong. I checked Osprey M8/M20. Some photos, like page 8, show white turret interior and white ring. Others show, like page 9, show green turret and white ring. And yet some others look all green.

I think the only incorrect combo is white turret and green ring!

Besides....it's a winter scene

Thanks for looking and commenting

Rounds Complete!!

"The Moral High Ground....A Great Place to Emplace Artillery."

  • Member since
    September 2007
  • From: Relocating
Posted by Mobious on Wednesday, July 2, 2008 9:06 PM

 A fine looking project that's coming along nicely. Is the PE, part of the Verlinden upgrade or an additional set? Just curious.

 Thanks Hans, for the brief informative history on the 106th. I think those are some of the same reasons the German High Command had decided to launch operation sickle cut thru the exact same terrain 4 years earlier, with completely different results. 

 Best Regards,

"It's a problem of applied physics" Roy Brown

  • Member since
    November 2005
Posted by Anonymous on Wednesday, July 2, 2008 10:05 PM
This is looking great...some awesome PE work going on...
  • Member since
    July 2006
  • From: New Jersey
Posted by redleg12 on Wednesday, July 2, 2008 11:02 PM

Mobious - Yes...Some of the PE is from the Verlinden set. I also have the Eduard PE set. Eduard is better for the straps and tiedowns (yes they are coming) and the ammo racks. The Verlinden set has some other items which go with the resin parts. You can most likely get away with just the Verlinden set and make some of your own small detail. I had both....It makes things eaiser. And just think of all the leftover PE to use on another kit!

Manny - Thanks. I'm in bending heaven

I'm getting worried. I had picked up some Jaguar figures to go with the kit but their fit in the model is bad. The driver is cut off at the waist so he sits too low...need to add a butt. Even with that, he is too wide to fit through the hatch. He is also an armless figure but you can see in to the steering wheel...not good

The chief looks fine but the gunner is also cut at the waist. If I have him stand in the turret I need to add his lower half.

Lastly, it will be much more difficult to veiw the interior with the turret and driver side filled with a figure(s).

Any suggestions from the "figure master" would be appreciated

And again...Thanks

Rounds Complete!! 

"The Moral High Ground....A Great Place to Emplace Artillery."

  • Member since
    November 2005
Posted by Anonymous on Thursday, July 3, 2008 7:26 AM
That's odd about the figure set being half or quarter figures, since this model has a pretty comprehensive interior even when it is built OOB...Personally, considering what I have seen of your super-detailing of the interior, I would consider not inserting figs that would obstruct the interior...maybe consider having a vignette with figs outside the vehicle or standing on the rear deck observing the action thru binocs, etc...I believe the kit comes with a mini-man in that pose...
  • Member since
    March 2008
  • From: The Bluegrass State
Posted by EasyMike on Thursday, July 3, 2008 7:38 AM

 Hans von Hammer wrote:
...Some U.S. units were caught completely unaware by the German push...

It would be safe to say all the allied units were unaware of the push. 

Smile [:)]


  • Member since
    May 2007
Posted by Specter on Thursday, July 3, 2008 8:20 AM
Cool stuff Redleg, I like the interior
Seth
  • Member since
    July 2006
  • From: New Jersey
Posted by redleg12 on Thursday, July 3, 2008 9:20 AM

Manny - I agree, I will try to work somthing outside the model. As for the figures, I will photo them to show you for my next update. The figure that comes with the kit is fine. The problem figures were the Jaguar US tankers in winter....I guess all the extra clothes made them too bulky. Smile,Wink, & Grin [swg]

Thanks again for your help

Easy Mike & Specter - Thanks for looking and for your comments

Rounds Complete!!

"The Moral High Ground....A Great Place to Emplace Artillery."

  • Member since
    April 2007
  • From: Schroon Lake, NY
Posted by SMJmodeler on Thursday, July 3, 2008 11:56 AM
redleg12:  When you get to that whitewash, DON'T WIMP OUT!!!  Spray it HEAVY, especially based on your photo.  You'll almost have a white vehicle, please DO NOT brush on the white!!!  It's not hard to bring back the olive drab, kinda' like adding chips and scratches, except they'll be green.  I have a winter camo' tutorial that will help...I'm lame on the links, but let me know if you need help getting thereThumbs Up [tup].

  • Member since
    July 2004
  • From: Texas
Posted by wbill76 on Thursday, July 3, 2008 12:58 PM
Making good progress on this one, have to cast my vote along with MR about not using figures in the vehicle. Thumbs Up [tup]
  • Member since
    July 2006
  • From: New Jersey
Posted by redleg12 on Thursday, July 3, 2008 1:09 PM

SMJ - Thanks...No brush for this except white oil wash. Saw your toot a while back. I'll look it up again. This M8 is fresh and white also all snow on the ground so there wont be too much ware. Dirt and grime by the air intakes and exhaust. Planning on doing light coats of really thinned white until I get the effect of the photo.

Thanks for the help and the comments.

Bill - It's like an old friend dropping by the house. Yes...I agree with Manny and you. The figures will be outside. Digging through the stash and looking for "the right bodies". By my next post I hope I have some inseration.

Thanks for looking and and for your comments.

Rounds Complete!! 

"The Moral High Ground....A Great Place to Emplace Artillery."

JOIN OUR COMMUNITY!

Our community is FREE to join. To participate you must either login or register for an account.

SEARCH FORUMS
FREE NEWSLETTER
By signing up you may also receive reader surveys and occasional special offers. We do not sell, rent or trade our email lists. View our Privacy Policy.