SEARCH FINESCALE.COM

Enter keywords or a search phrase below:

M8 Armored Car in the Ardennes Winter WIP 7/27/08 *Complete* Figs IP

32186 views
127 replies
1 rating 2 rating 3 rating 4 rating 5 rating
  • Member since
    April 2007
  • From: Schroon Lake, NY
Posted by SMJmodeler on Thursday, July 3, 2008 1:21 PM
 redleg12 wrote:

SMJ - Thanks...No brush for this except white oil wash. Planning on doing light coats of really thinned white until I get the effect of the photo.

redleg12: respectively...NO!!!  You CANNOT get the look of that photo with an oil wash.  PLEASE, fire-up the air brush, thin the paint, and then apply it like a white/heavy dose of post shading!!!  Do SEVERAL coats if needed...again, don't WIMP OUT, trust me on this one...put the paint on and THEN add the "whitewash" touches...(see my toot'), I PROMISE it works!!!

Here's a small portion of the toot' that applies, no dis-respect...just hope to help a fellow modeler:

Adding white "clouds":

Using flat white thinned 30% paint, 70% thinner I airbrushed white to all the exterior of the tank:


The airbrush is set as if you were painting fine lines, you want to have maximum control to where the paint is being applied.  Refer to your reference photos if you have them, if not, add more paint to where the crew would NOT wear the white off and focus on the center of each "panel" of the tank:


Don't worry if the paint runs a bit because that would be what the whitewash would do in real life.  Also don't be afraid to hit those un-worn areas several times because the impact of the white will be toned down in the next step.  Don't forget to spray the road wheels too!  Note:  vary the amount of white as you move around the vehicle, you might even need to do a "dusting" of white to ensure ALL surfaces at least have a misting of white paint.

  • Member since
    July 2006
  • From: New Jersey
Posted by redleg12 on Thursday, July 3, 2008 1:56 PM

SMJ - Thanks for the help but you totally misunderstood what I was saying or maybe I was not clear.

ABSOLUTLY I will be airbushing. In my case, Tamiya Flat White in thin coats building up the white color with cloud areas. And yes, I intended to thin the paint in the area you mentioned in your toot (30/70)

AFTER the base white color is on I will then touch the model with a BRUSH using Winston white oils for highlights as part of weathering, similar to your toot.

I have no intention of brusching on the white paint. If you look at the picture, it would appear the whitewash was sprayed on. It is almost even and does not appear to be a "mop" job

And trust me, I not afrad of paint...anything can be fixed. I hope I'm clear and thanks for the concern and help!!

Rounds Complete!!

"The Moral High Ground....A Great Place to Emplace Artillery."

  • Member since
    April 2007
  • From: Schroon Lake, NY
Posted by SMJmodeler on Thursday, July 3, 2008 2:04 PM
redleg12:  WHEWShock [:O], sounds like you're on it and I mis-understood...good luck, post some pics'!!!

  • Member since
    January 2007
Posted by the doog on Thursday, July 3, 2008 2:51 PM

Mike, it´s looking great, as I would have suspected!

Hey, you might want to try a "Hairspray whitewash" on this baby, like I did for my Nomad junker? Might be a real opportunity to embrace a new technique--and in truth, it´s simple really!

I should be able to catch the finished build when I get home in 9 days or so? I´ll check in b4 that if I can....looking fine, though!

  • Member since
    July 2006
  • From: New Jersey
Posted by redleg12 on Thursday, July 3, 2008 9:15 PM

SMJ - I know....I may have caused some heart problems. Thanks for the help and consideration

Doog - What in the wide world of sports are you doing on the forum. Thanks for the comments. Say hello to Alice for me....Last time I saw him, I lost some brain cells at his concert in MSG. That was a long time ago in a place far far away! Propeller [8-]

Thanks again

Agentg - OK...I'm no biffia. Last project lasted 4+ months. As I said in the beginning, wanted something simple this time. Plus, my secret is I am on vacation this week so I'm getting further than normal.

I know how you feel. I could not keep up with the likes of biffia or wing nut. Just got lucky this time.

Thanks for the comments

Rounds Complete!!

"The Moral High Ground....A Great Place to Emplace Artillery."

  • Member since
    July 2006
  • From: New Jersey
Posted by redleg12 on Sunday, July 6, 2008 8:43 PM

At the end of this holiday weekend, here is what I have completed

I moved from the main body to the turret. First I painted the two types of ammunition for the main gun. The colors for the shells are High Explosive, which is a yellow/green shell and armor piercing which is black. Then the rack clips on the PE strip were painted white and weathered. The strips put around the shell and then the shells into the rack.

I will admit a month or so ago I invested in an assortment of Alclad metal finish paints. They are a bit expensive but in every case I have found they are worth it over any other metal finish I have tried, including Tamiya, Humbrol and MM. Their pale gold does a nice brass shell

After I took care of the ammunition, it was on to scratch building the M2 mount. Thinking somewhat as they would, I took a ring top section which hold the yoke and put that in place the used some Evergreen angle stock for the reinforcing strips.

The turret was now ready for the main gun and mantlet. Then I stuffed the hatch openings with tissue and gave everything their final coat of Tamiya OD.

After allowing things to dry, I went back into the spray booth and with a 70% thinner 30% Tamiya Flat White, and began the white wash. After spraying was complete, I removed the tissues and the tape used for masking the star areas and the vehicle bumper numbers.

SMJ....Yes I air brushed it..LOL...Thanks again

Well everything is drying. Lots of details to add when I get back to the bench, including the 30 cal the M2 (both painted with Alclad Steel...perfect color) plus lots of little details to be mounted.

Well that where I am today. Thanks for looking in. All comments welcome

Rounds Complete!!


"The Moral High Ground....A Great Place to Emplace Artillery."

  • Member since
    November 2005
Posted by Anonymous on Sunday, July 6, 2008 8:52 PM
Sweet...ready rack ammo looks great and the scratched 50 cal mount matches the pic perfectly...
  • Member since
    September 2007
  • From: Relocating
Posted by Mobious on Sunday, July 6, 2008 9:23 PM

 Hey Redleg12,

 That's lookin good, The white wash looks neat. The ammo looks the part. Very nice metal finish. Gonna look into the Alclad metal finishes, for myself. Thanks for the post.

 Best Regards,

"It's a problem of applied physics" Roy Brown

  • Member since
    July 2004
  • From: Texas
Posted by wbill76 on Sunday, July 6, 2008 9:54 PM

Love the little details that you've added, looking sharp. The sprayed on white coat looks the part! I was going to suggest adding the gradient ring numbers to the inside base of the turret but I think you've already glued the base and turret together? I have the gradient ring as a PDF that I used to print my own decal and add when I did this one way back when. It's available to you or anyone else that wants to take advantage of it, here's the link:

http://www.bpmodels.net/Model/Decal.pdf


  • Member since
    July 2006
  • From: New Jersey
Posted by redleg12 on Monday, July 7, 2008 8:29 AM

Manny - Thanks for the comments

Mobious - Thanks, glad to have been of some help. Like I said, love the Alclad paint. Biggest plus is it works well in an Air Brush and cleans up well after use.

Bill - Great minds think alike. No, I did not final glue the turret. With the white wash work, I wanted to wash the model whole but small thing like the 30 cal could not be installed until after the wash so the turret and ring were only dry fit.

I was going to add a few more details and was going to try to create the ring markings using Autocad. You just saved me a bunch of hours at the computer. I will download from you site tonight. Thanks for the help and your comments.

Rounds Complete!!

"The Moral High Ground....A Great Place to Emplace Artillery."

  • Member since
    April 2007
  • From: Schroon Lake, NY
Posted by SMJmodeler on Monday, July 7, 2008 8:43 AM
 redleg12 wrote:

NICELY DONE!!!

  • Member since
    May 2007
Posted by Specter on Monday, July 7, 2008 9:50 AM

I forgot if you said if you were going to keep the white wash like this or not. Either way you are going to have it it looks great so far.

Seth
  • Member since
    February 2008
  • From: ladner BC Canada
Posted by stick man on Monday, July 7, 2008 10:27 AM

Looks GREAT with the whiite wash on!

Can't wait to see it fnished.

Smile [:)]

I'm 15 and I model I sk8board and I drum what could be better.
  • Member since
    July 2006
  • From: New Jersey
Posted by redleg12 on Monday, July 7, 2008 10:52 AM

SMJ - Considering the help you gave, your comment is is GREATLY APPRECIATED!!

Specter - I was not going to show a lot of ware based on the photo at the beginning of the WIP which shows a fairly well intack wash. May put in some scratches etc., but thats about it. Will do some washes to tone town the blue/white color of the wash and highlight some details.

Stick Man - Thanks for the comments

Rounds Complete!!


"The Moral High Ground....A Great Place to Emplace Artillery."

  • Member since
    July 2006
  • From: San Francisco Bay Area
Posted by bufflehead on Monday, July 7, 2008 3:10 PM

Hey redleg, been busy getting caught up on missed posts and I just finished with this one.  Fantastick work on that M8 dude!  I love the white camo you're doing with this one...its not often seen!  The interior looks fabulous.  Too bad we're not doing the "Winter Warriors II" GB, this would fit right in!!  Funny to see a winter whitewashed vehicle in the middle of summer....its 90+ outside right now!!  Anyway, I'll be keeping my eyes on this thread....I'm dying to see how this armored car turns out!!

Ernest

Last Armor Build - 1/35 Dragon M-26A1, 1/35 Emhar Mk.IV Female


Last Aircraft Builds - Hobby Boss 1/72 F4F Wildcat & FW-190A8


  • Member since
    July 2006
  • From: New Jersey
Posted by redleg12 on Monday, July 7, 2008 6:47 PM

Bufflehead - Thanks for the comments. I thought I would do something different with the M8. It also seemed nice to do a winter build in July!!

thanks again

Rounds Complete!!

"The Moral High Ground....A Great Place to Emplace Artillery."

  • Member since
    April 2007
  • From: Schroon Lake, NY
Posted by SMJmodeler on Tuesday, July 8, 2008 8:31 AM
 redleg12 wrote:

SMJ - Considering the help you gave, your comment is is GREATLY APPRECIATED!

No prob' redleg, and thanks...by the way, did you spray that white OVER the green?...I expect you did...that's tough spraying over a perfectly good paint job isn't it?  I have a half track I'm starting that I plan on painting german gray...post-shading, the works, then I'll hit it with the white camo'.  You loose the work below, but you gain experience with the airbrush/technique too!!!

  • Member since
    November 2005
Posted by T26E4 on Tuesday, July 8, 2008 8:31 AM

Redleg: Great work on the 37mm PE ammo racks.  I got started with mine and the Eduard set but got stuck there.  Seeing your work motivates me to try to restart mine.  One thing I've noticed on others' builds of the M8 is low-hanging stowage off the turret.  Note that the crews had to deftly stow stuff as to not interfere with the traverse of the turret against the drivers' hood.


WBill: great PDF file! 


Roy Chow 

Join AMPS!

http://www.amps-armor.org


  • Member since
    July 2006
  • From: New Jersey
Posted by redleg12 on Tuesday, July 8, 2008 10:37 AM

SMJ - Yep, Sprayed the white over a nice OD paint job but to get the bleed of color its the best way. Also if you want scratches, the tip of the #11 blade lightly will scratch the white down to the OD. If you want wash ware, 600 grit sanding gives the ware down to the OD. Experimented with this on my paint cow. Don't know how much I will use considering my subject photo, but though that would help.

Thanks again.

Roy - The rack and ammo is a Censored [censored]. What I found is bend the rack as required. Roll using a dental pick. Glue one side and let it set, the roll in the turret, add glue to the other side and use the pick to hold in place until set. That should get it flat to the wall of the turret

The retainer clips I cut, used the pick to roll and glued to the round. Once set, using forceps to help insert the round and then used a drop of glue on the bottom to hold.

Everything was pre painted. Being anal and slow plus some...how the hell am I going to do this time, all in, paint to complete install was ~4 hours. It's a pain but looks great when finished.

Thanks for the comments

And yes thanks Bill for the decal. It does look great. It's a definite for me

Rounds Complete!!

"The Moral High Ground....A Great Place to Emplace Artillery."

  • Member since
    May 2007
Posted by Specter on Tuesday, July 8, 2008 12:53 PM
sorry for the late response. I see what you are talking about (looked at the picture)
Seth
  • Member since
    January 2005
  • From: in the tank factory in my basement
Posted by biffa on Tuesday, July 8, 2008 3:32 PM
Super progress on this little jewel Mike the interior looks great cant wait to see her done up in snowchains i really love these little scout cars and youve really been moving along with this one.   
Ron g.
  • Member since
    July 2006
  • From: New Jersey
Posted by redleg12 on Tuesday, July 8, 2008 9:08 PM

Specter -  Not a problem, I know what it is like. I feel like I can never catch up on everthing here!!

Ron -Thanks for the comments and words of encouragement. Doing the little M8 and having last week off let me go at almost Ron speed Smile,Wink, & Grin [swg]. Its nice to do a simpler kit though you start adding everything and well...

I'm getting anxious to see it done myself. Thanks for looking in.

Rounds Complete!!

"The Moral High Ground....A Great Place to Emplace Artillery."

  • Member since
    November 2007
  • From: Wisconsin Rapids, WI
Posted by moose421 on Tuesday, July 8, 2008 9:45 PM

Another great looking build from you.  Sorry I just caught it now.  Love the white wash and the look of the ammo.  Will have to remmember the paint that you used.  Sorry your vacation is over by now.  But getting a lot done during that is the why I was able to get my rammtiger build so quickly as well.

Keep it UP and always enjoying your builds.

  • Member since
    April 2005
  • From: Piscataway, NJ!
Posted by wing_nut on Wednesday, July 9, 2008 6:16 AM
Mike, Great work.  The paint looks sweet. Oh and good news... the planning committee has decided to reopen the armored car category to you.Wink [;)]  I wanna see this guy in person.

Marc  

  • Member since
    July 2004
  • From: Texas
Posted by wbill76 on Wednesday, July 9, 2008 1:56 PM
Roy, redleg, my pleasure glad it's of use to you. Wink [;)]
  • Member since
    July 2006
  • From: New Jersey
Posted by redleg12 on Sunday, July 13, 2008 8:05 PM

It was back to work this week so progress slowed but at least I am far enough along to see the light!!

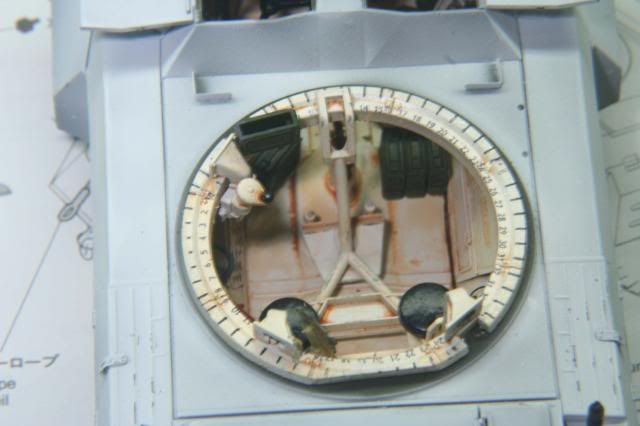
Bill was so gracious to give his decal pattern to Roy and I so Bill, this is for you, after applying your decal to the turret interior.

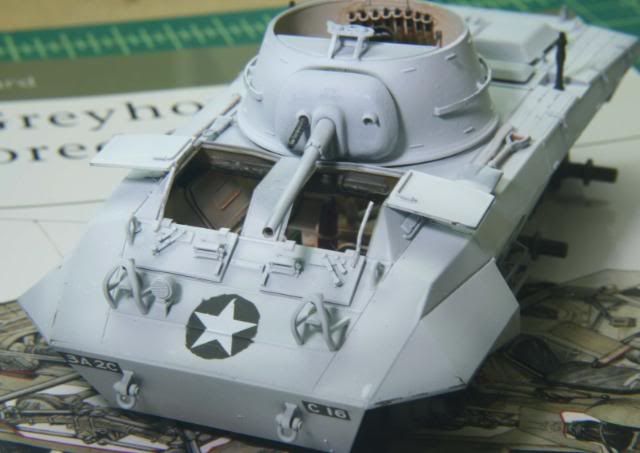
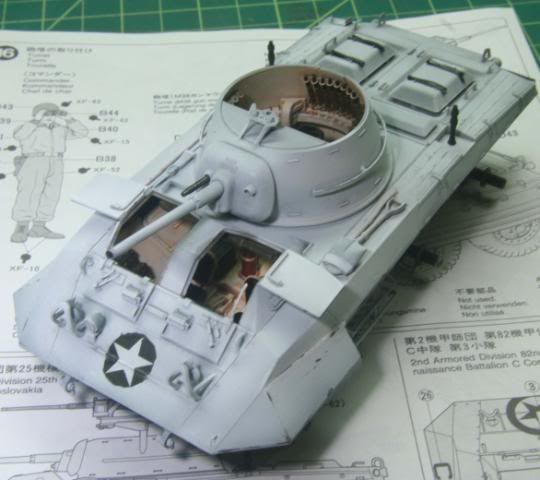
Here is a view of the whole model with the decal. Also added the lower front hatch handle to each hatch. The hatch is from the Verlinden set and the handle is 14 gauge wire.

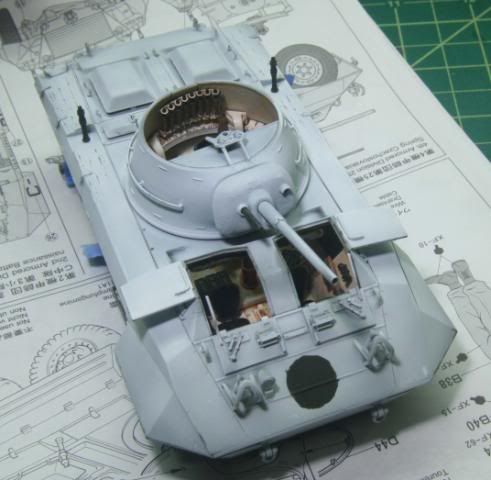
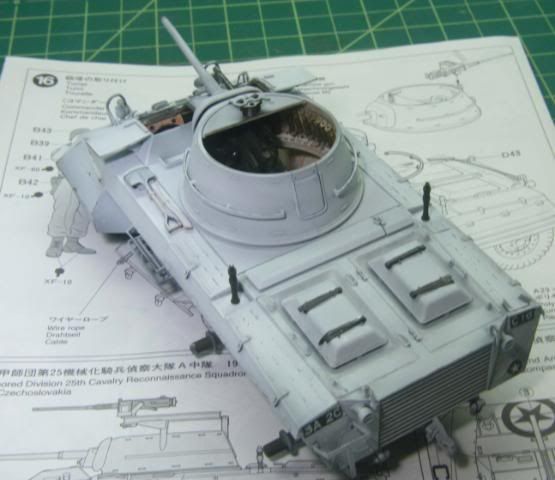
The turret installed. Drilled the antenna mounts for .020 brass wire antenna and installed the mounts. The antenna and tie downs will wait until after we install the tires to keep from breaking them. Also began doing some scratch work on the white wash

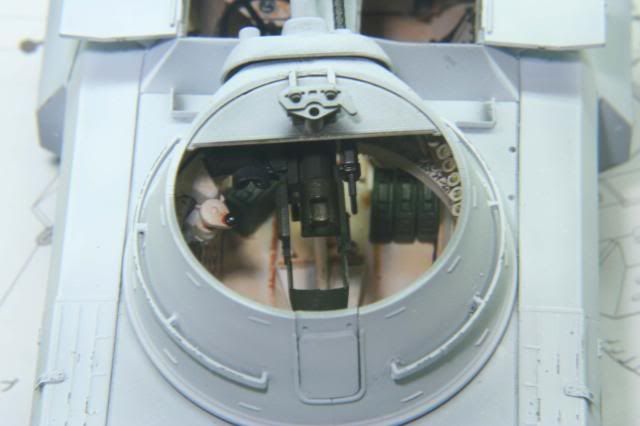
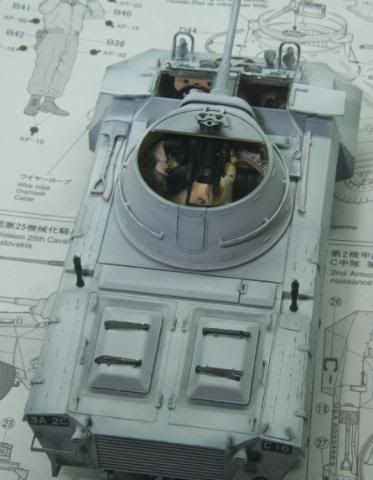
Here is a closer view through the turret with the 30 cal and sight installed. Also installed (can't see in the photo) 30 cal ammo belt to the ammo can. This shot gives a better view of the "scratching" in the turret area.

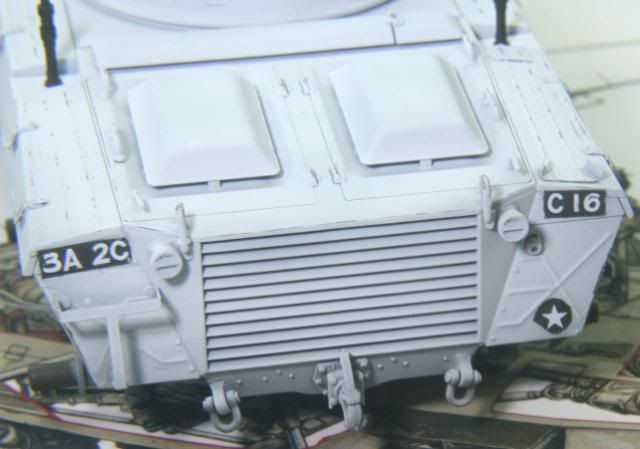
Time for markings! I used Archer transfers and the wet transfer paper. The unit and vehicle number are the same as my opening photo. Front view:

Rear view

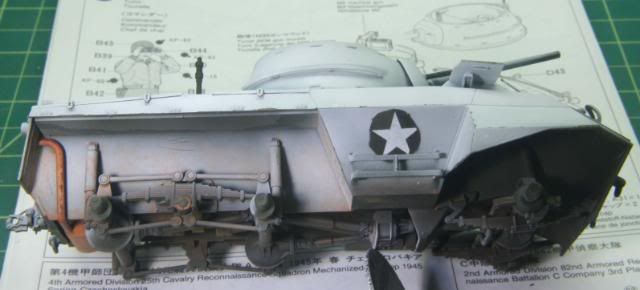
Now I mounted the tools. Their holders were the same "white" density as the vehicle but the tool was give a quick once coat. Looking at the photo of the real vehicle, it would appear this is what they did. Also added rear tie-down straps tied closed. Again looking at the photo of the real vehicle, they did not have any outside stowage but there is a dark spot which could be the straps.

I began to wash in the engine area with a grey wash to create shadows in the sunken areas of the engine covers

Using the same grey wash to highlight area like a black pin wash. Black would be too strong for the white finish.

After the grey wash, I created a rust/dirt wash with raw sienna and some MIG rust. I used this in the wheel wells for the dirt and rust "look"

With all the washes dry but needing set up, here is the finished look so far.

Well next its snow time! I'll be working on the wheels and the hopefully wrapping up the vehicle over the next week or so.

Thanks for looking in. All comments welcome

Rounds Complete!!


"The Moral High Ground....A Great Place to Emplace Artillery."

  • Member since
    April 2005
  • From: Piscataway, NJ!
Posted by wing_nut on Monday, July 14, 2008 5:57 AM
Looks really sweet Mike. I guess I'll be seeing this in Danbury and looking forward to it.

Marc  

  • Member since
    February 2008
  • From: ladner BC Canada
Posted by stick man on Monday, July 14, 2008 11:05 AM

I realy like the shadowing afect around the engin covers.

GREAT work can't  wait to see more!

Smile [:)]

I'm 15 and I model I sk8board and I drum what could be better.
  • Member since
    April 2007
  • From: Schroon Lake, NY
Posted by SMJmodeler on Monday, July 14, 2008 12:41 PM
redleg12:  That under carriage is perfect, fantastic work combining the winter wash and road/engine grime!!!  I don't recall the exact look of the photo, but the topside of your model looks a bit "pristine", IMO.  Maybe a couple more strategically placed chips on the front would help.  Some local, maybe a bit heavier, washes might help too.  Looking really good overall though!!!  I'll be watching to see how you do on the snow...are you using Woodland Scenics?  If so, experiment with future and arstist's gloss varnish for some variations in dry/wet/slushy snow.  Oh yeah, a TOUCH of your dirt/ mud color in the snow adds a nice touch too...literally sprinkle it over your mix RIGHT before application...you've got a really sweet build goingThumbs Up [tup]Thumbs Up [tup]!!! Good luck with the "snow"!

  • Member since
    January 2008
  • From: Bournemouth UK
Posted by Bodge on Monday, July 14, 2008 12:51 PM
This is looking really nice,i will keep watching . Thumbs Up [tup]
JOIN OUR COMMUNITY!

Our community is FREE to join. To participate you must either login or register for an account.

SEARCH FORUMS
FREE NEWSLETTER
By signing up you may also receive reader surveys and occasional special offers. We do not sell, rent or trade our email lists. View our Privacy Policy.