SEARCH FINESCALE.COM

Enter keywords or a search phrase below:

Tamiya 1/35 Char B1 bis *WIP*

27555 views
137 replies
1 rating 2 rating 3 rating 4 rating 5 rating
  • Member since
    April 2005
  • From: Piscataway, NJ!
Posted by wing_nut on Wednesday, November 12, 2008 6:33 AM
The overall look is great Scott. Youmay have siad so but I missied it but did you do the pigment treatment over a flat or gloss surface? And once the turpenoid is dry, is the pigment fixed in place or does it need to be sealed?

Marc  

  • Member since
    April 2008
  • From: Commonwealth of Virginia
Posted by USArmyFAO on Wednesday, November 12, 2008 1:57 AM
Awsome work...  I can't wait to start mine (after of course I finish a Japanese D4Y1, Korean T-37, and some other partial builds languishing on my shelf)...  Your work is a true inspiration.  Keep it up!

Cheers, Matt

"If we increase the size of the penguin until it is the same height as the man and then compare the relative brain size, we now find that the penguin's brain is still smaller. But, and this is the point, it is larger than it *was*."

  • Member since
    January 2007
  • From: Australia
Posted by Fast Heinz on Tuesday, November 11, 2008 10:48 PM

Dare i say it, i think you've gone one step too far with the pigments. I thought the previous pics in your post of 9 November showed it off at its best. The weathering was good and the base camo was still visible. Personally i would have been happy at that point and stopped. The base paint in these latest shots is almost indistinguishable and i think its lost some of its character as a result.

Regardless of that though, the workmanship is excellent and i'm picking up a ton of useful tips for the one i'm building at the moment so thanks for that.

Cheers 


  • Member since
    September 2003
  • From: USA
Posted by mstazz62 on Tuesday, November 11, 2008 6:45 PM

OOOO, she's purdy! Love the scheme and the weathering is top notch - just enough.

I'm in the midst of building one now - a conversion to the German 10.5 cm howtzer - but after seeing yours I wanna do the original french version!

Thanks for the inspiration,

Mark

mstazz62
  • Member since
    July 2006
  • From: New Jersey
Posted by redleg12 on Tuesday, November 11, 2008 6:37 PM

Scott - Ahhhhhh.....chains look GOOD. I love pigments myself. Love the look. worth the wait to see.

Rounds Complete!!

"The Moral High Ground....A Great Place to Emplace Artillery."

  • Member since
    September 2007
  • From: Relocating
Posted by Mobious on Tuesday, November 11, 2008 5:35 PM

 Hello, espins1, with the results you've achieved with the "Warpigs", Think I'll be looking into a set. I like the fact that the names are a little more familiar to me than "City Double Rubble Dust" or "Early Fall, Central European, Windblown, Moments Before a Low Pressure Cell Moves Thru The Area, Dark Dust". The application tips are great, in particular, the way the pigments were applied to achieve the effect of accumulated dirt. Great work!Bow [bow]

 Mobious

"It's a problem of applied physics" Roy Brown

  • Member since
    October 2007
  • From: N.H.
Posted by panzerguy on Tuesday, November 11, 2008 2:55 PM


   Scott just got caught up on this. Man have you made some progress. Excellent jobBow [bow] Think I'll be printing out your weathering list if you dont mind. 

    A little tip on the chains, I've soaked them in coffee or cola soda and it take's the shine off .  


"Happiness is a belt fed weapon"

  • Member since
    December 2002
  • From: Reno, NV
Posted by espins1 on Tuesday, November 11, 2008 10:43 AM

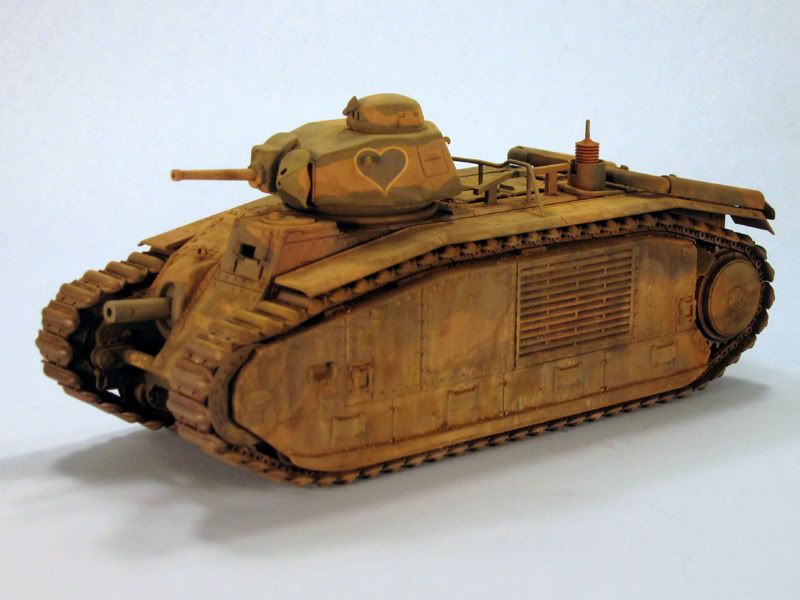
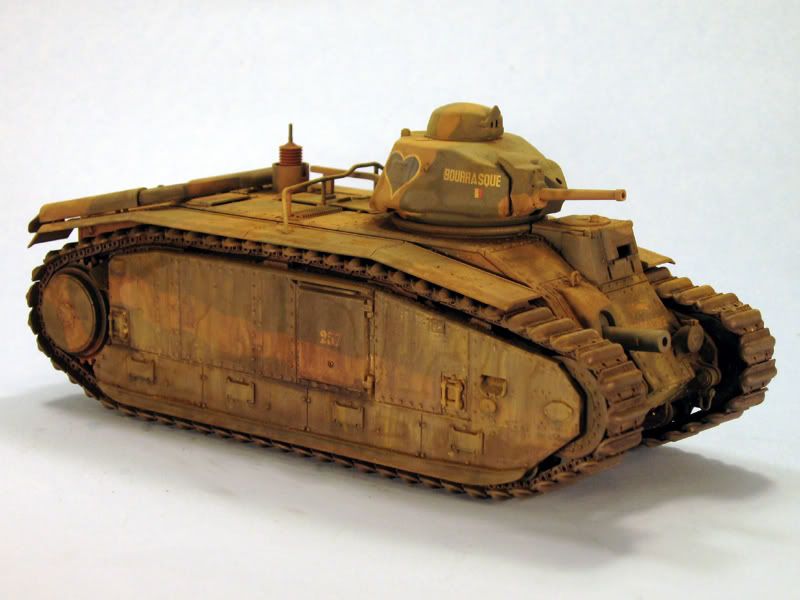
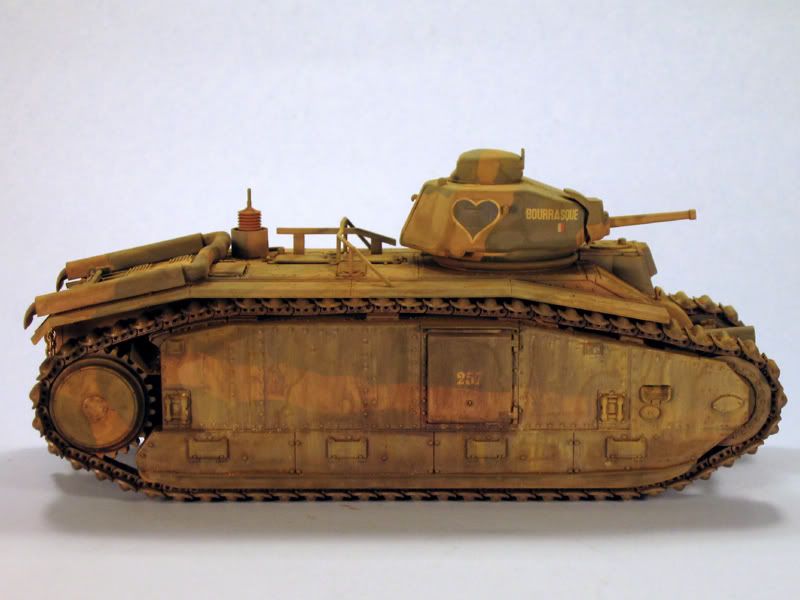
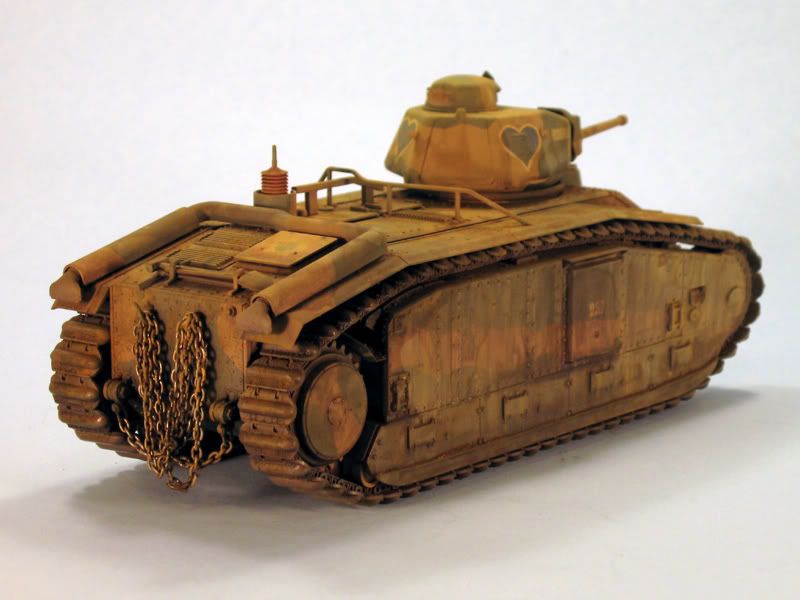
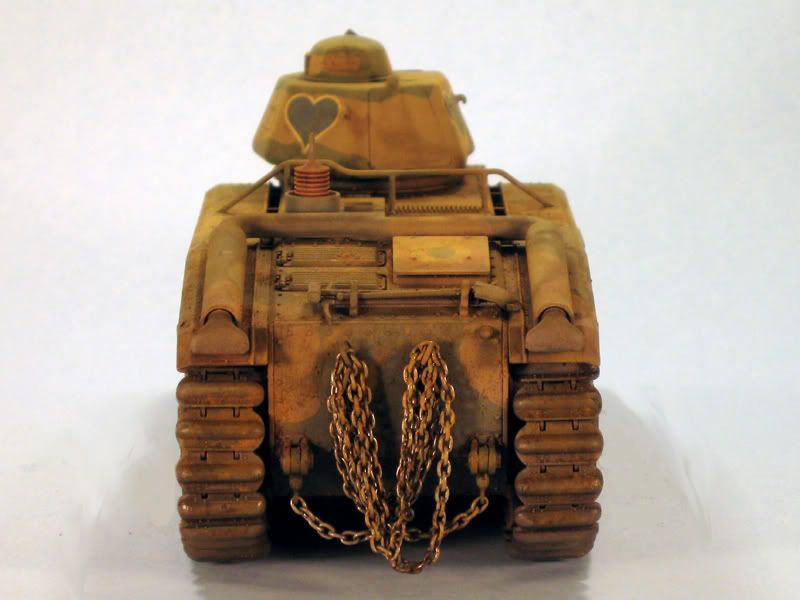
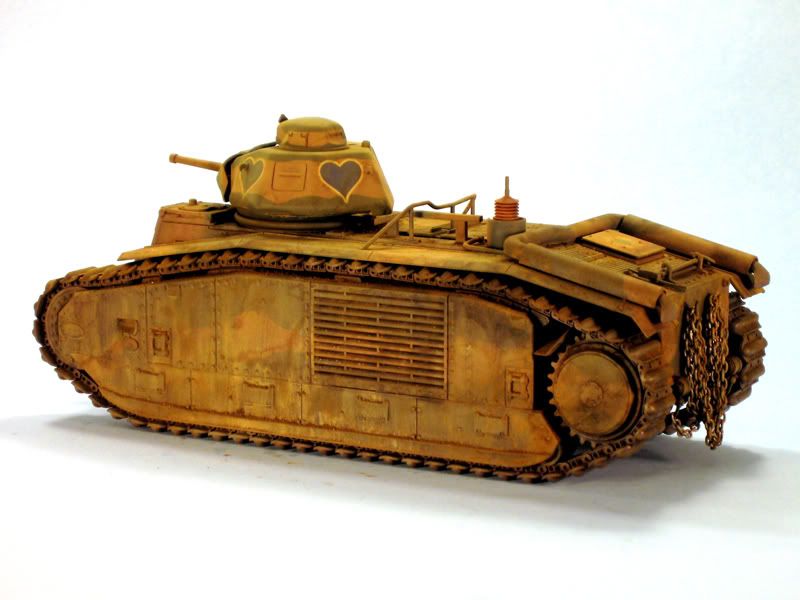
Thanks for the comments and the interest guys.  Smile [:)]

This was my first time using pigments for weathering and I had a ball with them!  I did a little basic experimenting so I could get the hang of applying them dry, wet and dry onto a wet surface.  Once I got the feel for how they worked I really went to town developing streaks down those slab sided flanks.  I used a combination of techniques and three different shades of pigments from the Warpigs "earth" set - Natural Umber, Natural Sienna and either Light Sienna or Natural Yellow, can't remember which right now (I'm at the office Wink [;)])

  • Using a wide brush I lightly wetted one section at a time with turpenoid, tipped the tank about halfway on it's side supported by a big bottle cap and a plate edge, then dipped a dry, wide brush into some pigment then gently stroked the brush in downward strokes along the sides gently brushing the pigments in straight lines down the flanks.  I continued with that process all they way accross, then repeated for the other side.  This gave it the overall basic downward streaking I was looking for as a base, with heavier emphasis on the upper parts.
  • Using a smaller round brush with a fairly precise point at the end I dipped it into a mix of some darker pigments in a beer bottle cap with just a little turpenoid and more or less painted the darker streaks individually down the sides.
  • Used more dry pigments and dabbed them all over the tank in random batches using three different colors of pigments.  Using a dry short, stiff brush I dabbed it all over the tank to create a good general effect of dryed dirt and mud all over.
  • With dry pigments and a big brush, I flicked pigments down the sides starting at the trackes on top.  Pigment then slid down the sides and stopped along the tops of all the raised surfaces.  Using a small, round brush I wicked just a little turpenoid in the areas where the pigments had piled up so the "dirt" would stay and give the 3 dimensional effect of having loose dirt piling up. 
  • Using a mix of turpenoid and pigments I grubbied up the lower part of the tank, especially on the rubber boots at the bottom.
  • Wetted spots like the drive sprockets with a little turpenoid, dipped a big soft brush in the pigments then flicked the brush at the sprockets without actually touching them.  The pigments flecked off just right and look like mud spatters after they hit the wetted sprockets.
  • I also wicked turpenoid along all the seams and raised detail, again to simulate streaking of water, oil etc.  I also just flicked some clean turpenoid in various areas to simulate various stains etc.
  • I wetted up the chain pretty good and slathered it up with a dry brush dipped in the pigments.

For a first attempt using pigments I am pleased with the results and have a much better understanding of the different ways to apply them and the effect they create.  What do you guys think?
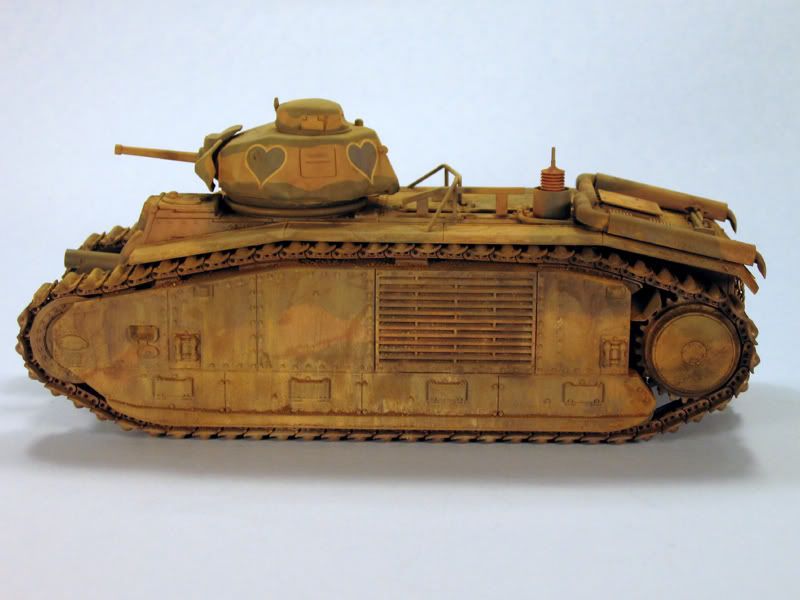
 

Scott Espin - IPMS Reno High Rollers  Geeked My Reviews 

  • Member since
    July 2006
  • From: New Jersey
Posted by redleg12 on Sunday, November 9, 2008 9:14 PM

Scott - Coming along nicely. Love the weathering. Turning it into a real mudder.

Just a quick thought. Does the chain in the back look to clean as compared with the rest of the weathering...just a thought.

Rounds Complete!!

"The Moral High Ground....A Great Place to Emplace Artillery."

  • Member since
    January 2007
Posted by the doog on Sunday, November 9, 2008 8:51 PM

Scott, it's looking really excellent!

To get that look of the mud, try this--get some real dirt (you can use pigments if you want, but it may get a bit pricey?) and turn the tank on its side. Then, "paint" long streaks of flat lacquer (Acrylic, preferably) down the sides, and drop the dirt (or pigments) onto the wet streaks, letting them absorb it and seal it in. This way you can build it up. You'll never do it by conventional methods. You have to get it on there "in bulk".

Let the stuff dry, and then blow/brush off the excess dirt/pigments. You should be able to build up long streals of thick mud in this way in a very short time.

  • Member since
    July 2004
  • From: Texas
Posted by wbill76 on Sunday, November 9, 2008 8:22 PM
Coming along nicely Scott, going to be a very dirty Char by the time you're all said and done! Thumbs Up [tup]
  • Member since
    September 2007
  • From: Relocating
Posted by Mobious on Sunday, November 9, 2008 6:37 PM

Espins1, The additional "dusting" really blended things together very well. Noticed the chain on the rear, Is that a brass chain? Noticed it on an earlier post and was wondering what you were planning. The subtle weathering on it looks great. Looking forward to more updates and application of the "Warpigs".

 Mobious

"It's a problem of applied physics" Roy Brown

  • Member since
    April 2005
  • From: Piscataway, NJ!
Posted by wing_nut on Sunday, November 9, 2008 5:52 PM
Scott my man that is just outstanding. Ive said before that Char seems to do well at MosquitoCon.  You should definately come East next year with that bad boy.

Marc  

  • Member since
    December 2002
  • From: Reno, NV
Posted by espins1 on Sunday, November 9, 2008 5:20 PM

I ordered some pigments from a new brand of pigments called "Warpigs".  There is an excellent review of them here if you're interested.  I'm going to use them to try to replicate the vertical mud and dirt streaks cascading down the huge flanks of the Char B1 bis. 

I just applied another dustcoat and am going in for the kill shortly with the pigments.  Here are some shots of the dustcoat prior to the final mud applications.

Scott Espin - IPMS Reno High Rollers  Geeked My Reviews 

  • Member since
    December 2002
  • From: Reno, NV
Posted by espins1 on Saturday, November 1, 2008 2:17 PM

Here's another great pic of Bourrasque as it appeared at the time of it's capture.  I'd love to be able to replicate the streaks of mud and goo coming down the sides like this.  I'm just going to have to keep building up the layers.

Scott Espin - IPMS Reno High Rollers  Geeked My Reviews 

  • Member since
    December 2006
  • From: N. Georgia
Posted by Jester75 on Saturday, November 1, 2008 1:46 PM
Awesome Scott!! This is one fantastic looking Char, I love it!

Eric


  • Member since
    September 2007
  • From: Relocating
Posted by Mobious on Saturday, November 1, 2008 1:41 PM

 Be looking forward to more "Mudslinging!" Interesting, looking at the earlier post and seeing where the weathering is going. Nice job, espins1

 Mobious

"It's a problem of applied physics" Roy Brown

  • Member since
    October 2008
  • From: Portland, Oregon
Posted by RickLawler on Saturday, November 1, 2008 1:17 PM

Then you are on the right track...you still have quite a ways to go! 

Rick

  • Member since
    December 2002
  • From: Reno, NV
Posted by espins1 on Saturday, November 1, 2008 1:06 PM

I may add a bit more mud actually, I was using images like this as my guide.  Smile [:)]


Scott Espin - IPMS Reno High Rollers  Geeked My Reviews 

  • Member since
    October 2008
  • From: Portland, Oregon
Posted by RickLawler on Saturday, November 1, 2008 12:23 PM

Pretty Cool!  You achieved some nice effects using your oils and washes. I might suggest feathering out some of the harder wash edges just a little - just my opinion.

Rick

  • Member since
    December 2002
  • From: Reno, NV
Posted by espins1 on Saturday, November 1, 2008 11:18 AM

Thanks guys.

Fast Heinz - you are correct.  I must have made my runs short by only having 57 links.  That's what I get for assembling the tracks under the influence of a good bottle of Cabernet  Blush [:I]

Mobius - The light dusting technique is pretty good for any build as it helps to blend everything together very nicely in addition to replicating the layers of dust that build up so quickly.

Thanks for the Birthday wishes for the Mrs. The kids took us out for dinner and we had a really nice time.  It was nice having them pick up the tab for a change.  Smile,Wink, & Grin [swg] Dinner [dinner] Make a Toast [#toast]

Here are a few shots after some "mud washes".  I wish I had some MIG pigments in the stash as I think they would be perfect for the effect I'm looking for.  Unfortunately I was building the Char for the Blitzkrieg GB over at Armorama and didn't think of using them until it was too late to order them in time.  Basically what I did for the mud streaks is put little blobs of Burnt Umber and Raw Sienna oils on the top of the slab sides just under the tracks.  Then using just straight turpenoid and a wide brush I dabbed the turpenoid loaded brush along the edge of blogs so the pigments would run down the sides.  I also put a blob of burnt umber in each of the mud shoots and ran turpenoid through the shoots from the top (since I had opened them up earlier in the build Smile [:)] )

Scott Espin - IPMS Reno High Rollers  Geeked My Reviews 

  • Member since
    October 2008
  • From: Portland, Oregon
Posted by RickLawler on Saturday, November 1, 2008 6:54 AM

Looks great, Scott!


 espins1 wrote:
  I still need to do some oil washes on the turret and next up will be an attempt to get the streaks of mud and goo going down the huge flanks  

 This is the fun part! 

 Rick

  • Member since
    July 2006
  • From: New Jersey
Posted by redleg12 on Saturday, November 1, 2008 6:02 AM

Scott - Sorry I have not spoken up on this thread.....(I'm a bad boy!!!)....but went back through and as usual another great build.

First HAPPY BIRTHDAY to your lovely wife. Before any of this stuff....the household 6 is most important. I hope she had a great time at dinner!

(And now we will return to our normal programming) Like the the idea of the "spary wash" for dust. Nice decals...(were the hearts for the wife????).

I'll keep my eye on things...hopefully not get side tracked so long again.

Rounds Complete!!

"The Moral High Ground....A Great Place to Emplace Artillery."

  • Member since
    September 2007
  • From: Relocating
Posted by Mobious on Friday, October 31, 2008 9:55 PM

 Hello,

 espins1, really like the way "Dust" lightens the overall subject, very subtle. Be giving that a try also.

 Thanks again,

 Mobious

"It's a problem of applied physics" Roy Brown

  • Member since
    January 2007
  • From: Australia
Posted by Fast Heinz on Friday, October 31, 2008 9:55 PM

Hey Espins

Once again, great thread and fantastic job on the build. I'm a bit confused about one point though. In a previous post you mentioned that you had to add some links in addition to those required by the instructions. I'm about to start one of these and my instructions tell me that 61 links per side are required. When i count the links in yours, i come up with 61 also. Perhaps Tamiya have corrected an error in the instruction sheet and i can go with it (??).

Cheers 


I went to put on the tracks and found that I'm 4 links short on each side!  Black Eye <img src=" border="0" width="15" height="15" />  That's what I get for trusting the directions...

  • Member since
    December 2002
  • From: Reno, NV
Posted by espins1 on Friday, October 31, 2008 7:59 PM

Thanks Mobius!  Smile [:)]

Usually for dust coats I'll put about 2ml of Tamiay Thinner X-20A in the paint cup and add about .1 to .2 ml of XF-60 Dark Yellow, or better yet XF-57 Buff depending on the tint I want for the dust. Basically 10 to 20% paint pigment to thinner.  I then just mist it back and forth and all over the tank.  For this beast I'm concentrating most of the dust along the flanks with heavier emphasis along the bottom half.

Scott Espin - IPMS Reno High Rollers  Geeked My Reviews 

  • Member since
    September 2007
  • From: Relocating
Posted by Mobious on Friday, October 31, 2008 7:34 PM

Hello,

 The decals look great. How are you applying the "dust"? The blue hearts really look good on these pics. Very nice work.

 You and the Mrs. enjoy the evening!Make a Toast [#toast]

 Best Regards,

 Mobious

"It's a problem of applied physics" Roy Brown

  • Member since
    December 2002
  • From: Reno, NV
Posted by espins1 on Friday, October 31, 2008 5:55 PM

The dust skirts will be so dusty even a psychic wouldn't be able to tell what the original color was.... heh heh heh  Wink [;)]

Cruising right along.  The tracks have been installed and I put down another dust coat making it heavier as you go down the sides of the tank.  I still need to do some oil washes on the turret and next up will be an attempt to get the streaks of mud and goo going down the huge flanks before we go early vote and take my wife out to dinner for her birthday. Dinner [dinner] Make a Toast [#toast]


Scott Espin - IPMS Reno High Rollers  Geeked My Reviews 

  • Member since
    July 2004
  • From: Texas
Posted by wbill76 on Friday, October 31, 2008 4:04 PM

Scott,

Thanks for the explanation and the effects of the wash are spot on, very nice. Are you going to paint the rubber dust skirts a different color for the road wheels or leave them as is with the hull color? Very nice effects all around, looking forward to seeing it with the tracks on. I had the same problem with the instruction count on the track links per side, not sure how Tamiya got that one wrong but they did! Laugh [(-D]

  • Member since
    October 2007
  • From: N.H.
Posted by panzerguy on Friday, October 31, 2008 3:49 PM


   A beautiful job you've have done there mon amie.  Looking foward to seeing the tracks and the weathering scott.

     I bet those german gunners must have loved that big blue heart lol.

"Happiness is a belt fed weapon"

JOIN OUR COMMUNITY!

Our community is FREE to join. To participate you must either login or register for an account.

SEARCH FORUMS
FREE NEWSLETTER
By signing up you may also receive reader surveys and occasional special offers. We do not sell, rent or trade our email lists. View our Privacy Policy.