SEARCH FINESCALE.COM

Enter keywords or a search phrase below:

Tamiya 1/35 Char B1 bis *WIP*

27549 views
137 replies
1 rating 2 rating 3 rating 4 rating 5 rating
  • Member since
    October 2008
  • From: Portland, Oregon
Posted by RickLawler on Monday, October 27, 2008 9:17 PM

I've finally had the opportunity to read through your build...very nice, you've done some good building.

The painting steps are looking good as well.  I generally shy away from brushing Tamiya paints, but you seem to have tamed them just fine.  Very attractive camo scheme.

Rick

  • Member since
    January 2007
Posted by the doog on Tuesday, October 28, 2008 12:20 AM
Scott, your brush painting of this tank is impeccable! It's really stunning! And with Tamiya paints yet--WOW!
  • Member since
    April 2007
  • From: Schroon Lake, NY
Posted by SMJmodeler on Tuesday, October 28, 2008 10:32 AM
Scott: I was wondering where this build went...TOP NOTCH camo' there sir!  I saw a couple really nice Char B1 bis at  Nationals and AMPS East...looks like you've got a beauty there yourself!

  • Member since
    December 2002
  • From: Reno, NV
Posted by espins1 on Tuesday, October 28, 2008 11:26 AM

Thanks guys, I appreciate the compliments and the interest.  That was a very challenging paint scheme.  Shock [:O]

The decals are finished on the lower hull.  I ran into a problem with the turret though.  There are three big blue heart decals that need to go on the sides and back of the turret.  Unfortunately, there is a lifting hook on the left side that is right where one of the hearts is supposed to go.  I had to pry the hook off so I could get the decal on, and was planning on just reattaching the hook after and painting it blue.  I managed to damage the side of the turret in the process as the lifting hook was very securely attached to the turret.  I applied Mr. Surfacer last night (two applications), sanded it down this morning and repainted that side.  Hopefully the paint will be dried and stable enough to get the decals on as soon as I get home tonight.  I'm going to go ahead and start weathering the hull, which is fine because it's going to be a lot filthier than the turret. 


Scott Espin - IPMS Reno High Rollers  Geeked My Reviews 

  • Member since
    December 2002
  • From: Reno, NV
Posted by espins1 on Thursday, October 30, 2008 10:18 AM
I've done several oil washes and am working on building up the streaking on the flanks of the Char B1 bis. I've just about got the blue heart shaped decal that goes on the right side of the turret hunkered down over the hatch and visor. Repeated applications of micro-sol are slowly doing the trick. I'll post some update photos later today or tomorrow. It all depends on how I feel after my outpatient surgery (very minor) at 2pm this afternoon.

Anyway, it will be finished by tomorrow.

Scott Espin - IPMS Reno High Rollers  Geeked My Reviews 

  • Member since
    January 2007
Posted by the doog on Thursday, October 30, 2008 10:28 AM

Looking cool, Scott!

Hey! Shock [:O] Isn't that like, a Spitfire airplane decal on the back there?!? Smile,Wink, & Grin [swg]

  • Member since
    December 2002
  • From: Reno, NV
Posted by espins1 on Thursday, October 30, 2008 12:59 PM
 the doog wrote:

Looking cool, Scott!

Hey! Shock [:O] Isn't that like, a Spitfire airplane decal on the back there?!? Smile,Wink, & Grin [swg]

I like to think of it as a "bulls eye" for the Stukas!   Whistling [:-^]

Scott Espin - IPMS Reno High Rollers  Geeked My Reviews 

  • Member since
    July 2004
  • From: Texas
Posted by wbill76 on Thursday, October 30, 2008 1:54 PM
Almost done with this one Scott, looking good so far! The roundel on the rear deck ironically was to prevent "friendly fire" incidents...but turned out to be something different I think in the end. Laugh [(-D]
  • Member since
    September 2007
  • From: Relocating
Posted by Mobious on Thursday, October 30, 2008 6:47 PM
 espins1 wrote:
 the doog wrote:

Looking cool, Scott!

Hey! Shock [:O] Isn't that like, a Spitfire airplane decal on the back there?!? Smile,Wink, & Grin [swg]

I like to think of it as a "bulls eye" for the Stukas!   Whistling [:-^]

 LOLLaugh [(-D]Laugh [(-D]Laugh [(-D]

 BTW, Thanks for the tip with the Mr Surfacer/Alcohol espins1. I know I'll be using that one for sure.

"It's a problem of applied physics" Roy Brown

  • Member since
    April 2005
  • From: Piscataway, NJ!
Posted by wing_nut on Thursday, October 30, 2008 6:53 PM
That camo is looking real nice. The markings sure are brightWink [;)]

Marc  

  • Member since
    February 2008
  • From: ladner BC Canada
Posted by stick man on Thursday, October 30, 2008 6:55 PM
 espins1 wrote:
 the doog wrote:

Looking cool, Scott!

Hey! Shock [:O] Isn't that like, a Spitfire airplane decal on the back there?!? Smile,Wink, & Grin [swg]

I like to think of it as a "bulls eye" for the Stukas!   Whistling [:-^]

I wonder how meny German gunners had fun aming at that tagetWhistling [:-^]

Nice job so far the camo is realy cool.

Smile [:)]

I'm 15 and I model I sk8board and I drum what could be better.
  • Member since
    January 2007
  • From: Australia
Posted by Fast Heinz on Thursday, October 30, 2008 7:21 PM

Great Thread. I'm about to start one of these myself, having just finished a Centurion, so the build tips and references will be very helpful and much appreciated.

Love the one about the Mr Surfacer and Alcohol. There have been a few times i could have used that in the past and saved myself some frustration.

Cheers

  • Member since
    December 2002
  • From: Reno, NV
Posted by espins1 on Friday, October 31, 2008 12:41 PM
Thanks guys.  I had minor surgery yesterday to remove a cyst which was the result of a spider bit about 18 years ago. Shock [:O]  The surgery went fine and the pain isn't too bad... yet... the Vicodin have been seeing to that.    Cool [8D] 

Here are a few photos after the dust coat from the other day.  I was way too busy yesterday to get these posted.  I'm actually much farther along than these photos show.  Several oil washes have been done and I'm just about to apply another dust coat (which will be the first on the turret).  I was finally able to get the blue heart decal to settle down over the hatch/visor on the turret.  The lifting hook has been reattached over the decal and painted blue as well.  I'll post the new pics in a little bit.  We're going to go early vote (McCain!) this morning and its my wife's birthday today! Happy B-Day [bday]


Scott Espin - IPMS Reno High Rollers  Geeked My Reviews 

  • Member since
    July 2004
  • From: Texas
Posted by wbill76 on Friday, October 31, 2008 1:48 PM

Scott,

Glad the surgery went ok and happy birthday to your wife! Kudos as well for voting early, it's something everyone should do regardless of political affiliation or candidate preference to have their voice heard.

I noticed in your latest batch of photos after you say you applied a dust coat and some oil washes that many of the decals have silvered. Did this happen because of one or more of the steps between this set of photos and the last set?  

  • Member since
    September 2007
  • From: Relocating
Posted by Mobious on Friday, October 31, 2008 1:55 PM

Hello,

 espins1, tell the betterhalf Happy B-Day [bday]. Glad the surgery went well.

 The blue heart decals look to be settled down very well.

 Mobious

"It's a problem of applied physics" Roy Brown

  • Member since
    December 2002
  • From: Reno, NV
Posted by espins1 on Friday, October 31, 2008 2:01 PM
 wbill76 wrote:

Scott,

Glad the surgery went ok and happy birthday to your wife! Kudos as well for voting early, it's something everyone should do regardless of political affiliation or candidate preference to have their voice heard.

I noticed in your latest batch of photos after you say you applied a dust coat and some oil washes that many of the decals have silvered. Did this happen because of one or more of the steps between this set of photos and the last set?  

Thanks Bill.  What you're seeing is just an anomoly that occurs whenever I do a dust coat before the oil washes.  They're really not silvering, it's just the effect the paint has against the clear background of the decal borders.  As soon as I got the first oil wash down that visual effect went away.  I'll get some updated photos shortly.  I went to put on the tracks and found that I'm 4 links short on each side!  Black Eye [B)]  That's what I get for trusting the directions.......  So I'm quickly painting the two short sections so I can then grubby them up and get them to the same stage the rest of the tracks are at.

Scott Espin - IPMS Reno High Rollers  Geeked My Reviews 

  • Member since
    December 2002
  • From: Reno, NV
Posted by espins1 on Friday, October 31, 2008 2:02 PM
 Mobious wrote:

Hello,

 espins1, tell the betterhalf Happy B-Day [bday]. Glad the surgery went well.

 The blue heart decals look to be settled down very well.

 Mobious

And thanks Mobius, I appreciate it.  The updated photos will show them off a little better.  Smile [:)]

Scott Espin - IPMS Reno High Rollers  Geeked My Reviews 

  • Member since
    December 2002
  • From: Reno, NV
Posted by espins1 on Friday, October 31, 2008 3:04 PM
Here are some updated photos as my Char appeared yesterday evening.  Keep in mind no weathering had been done on the turret at this point as I was still in the process of repairing the damage from removing the lifting hook and getting the heart decals to hunker down.  The hull has received a couple of oil washes using turpenoid and burnt umber oils.

I went to put on the tracks, only to find the runs 4 links short!  That's what I get for following the instructions and not dry fitting......  I've quickly assemble the sections, painted them, dry brushed and applied a wash.  I'll be putting the track sections on shortly.  Then comes another dust coat and some dot/streak washes.


Scott Espin - IPMS Reno High Rollers  Geeked My Reviews 

  • Member since
    October 2007
  • From: N.H.
Posted by panzerguy on Friday, October 31, 2008 3:49 PM


   A beautiful job you've have done there mon amie.  Looking foward to seeing the tracks and the weathering scott.

     I bet those german gunners must have loved that big blue heart lol.

"Happiness is a belt fed weapon"

  • Member since
    July 2004
  • From: Texas
Posted by wbill76 on Friday, October 31, 2008 4:04 PM

Scott,

Thanks for the explanation and the effects of the wash are spot on, very nice. Are you going to paint the rubber dust skirts a different color for the road wheels or leave them as is with the hull color? Very nice effects all around, looking forward to seeing it with the tracks on. I had the same problem with the instruction count on the track links per side, not sure how Tamiya got that one wrong but they did! Laugh [(-D]

  • Member since
    December 2002
  • From: Reno, NV
Posted by espins1 on Friday, October 31, 2008 5:55 PM

The dust skirts will be so dusty even a psychic wouldn't be able to tell what the original color was.... heh heh heh  Wink [;)]

Cruising right along.  The tracks have been installed and I put down another dust coat making it heavier as you go down the sides of the tank.  I still need to do some oil washes on the turret and next up will be an attempt to get the streaks of mud and goo going down the huge flanks before we go early vote and take my wife out to dinner for her birthday. Dinner [dinner] Make a Toast [#toast]


Scott Espin - IPMS Reno High Rollers  Geeked My Reviews 

  • Member since
    September 2007
  • From: Relocating
Posted by Mobious on Friday, October 31, 2008 7:34 PM

Hello,

 The decals look great. How are you applying the "dust"? The blue hearts really look good on these pics. Very nice work.

 You and the Mrs. enjoy the evening!Make a Toast [#toast]

 Best Regards,

 Mobious

"It's a problem of applied physics" Roy Brown

  • Member since
    December 2002
  • From: Reno, NV
Posted by espins1 on Friday, October 31, 2008 7:59 PM

Thanks Mobius!  Smile [:)]

Usually for dust coats I'll put about 2ml of Tamiay Thinner X-20A in the paint cup and add about .1 to .2 ml of XF-60 Dark Yellow, or better yet XF-57 Buff depending on the tint I want for the dust. Basically 10 to 20% paint pigment to thinner.  I then just mist it back and forth and all over the tank.  For this beast I'm concentrating most of the dust along the flanks with heavier emphasis along the bottom half.

Scott Espin - IPMS Reno High Rollers  Geeked My Reviews 

  • Member since
    January 2007
  • From: Australia
Posted by Fast Heinz on Friday, October 31, 2008 9:55 PM

Hey Espins

Once again, great thread and fantastic job on the build. I'm a bit confused about one point though. In a previous post you mentioned that you had to add some links in addition to those required by the instructions. I'm about to start one of these and my instructions tell me that 61 links per side are required. When i count the links in yours, i come up with 61 also. Perhaps Tamiya have corrected an error in the instruction sheet and i can go with it (??).

Cheers 


I went to put on the tracks and found that I'm 4 links short on each side!  Black Eye <img src=" border="0" width="15" height="15" />  That's what I get for trusting the directions...

  • Member since
    September 2007
  • From: Relocating
Posted by Mobious on Friday, October 31, 2008 9:55 PM

 Hello,

 espins1, really like the way "Dust" lightens the overall subject, very subtle. Be giving that a try also.

 Thanks again,

 Mobious

"It's a problem of applied physics" Roy Brown

  • Member since
    July 2006
  • From: New Jersey
Posted by redleg12 on Saturday, November 1, 2008 6:02 AM

Scott - Sorry I have not spoken up on this thread.....(I'm a bad boy!!!)....but went back through and as usual another great build.

First HAPPY BIRTHDAY to your lovely wife. Before any of this stuff....the household 6 is most important. I hope she had a great time at dinner!

(And now we will return to our normal programming) Like the the idea of the "spary wash" for dust. Nice decals...(were the hearts for the wife????).

I'll keep my eye on things...hopefully not get side tracked so long again.

Rounds Complete!!

"The Moral High Ground....A Great Place to Emplace Artillery."

  • Member since
    October 2008
  • From: Portland, Oregon
Posted by RickLawler on Saturday, November 1, 2008 6:54 AM

Looks great, Scott!


 espins1 wrote:
  I still need to do some oil washes on the turret and next up will be an attempt to get the streaks of mud and goo going down the huge flanks  

 This is the fun part! 

 Rick

  • Member since
    December 2002
  • From: Reno, NV
Posted by espins1 on Saturday, November 1, 2008 11:18 AM

Thanks guys.

Fast Heinz - you are correct.  I must have made my runs short by only having 57 links.  That's what I get for assembling the tracks under the influence of a good bottle of Cabernet  Blush [:I]

Mobius - The light dusting technique is pretty good for any build as it helps to blend everything together very nicely in addition to replicating the layers of dust that build up so quickly.

Thanks for the Birthday wishes for the Mrs. The kids took us out for dinner and we had a really nice time.  It was nice having them pick up the tab for a change.  Smile,Wink, & Grin [swg] Dinner [dinner] Make a Toast [#toast]

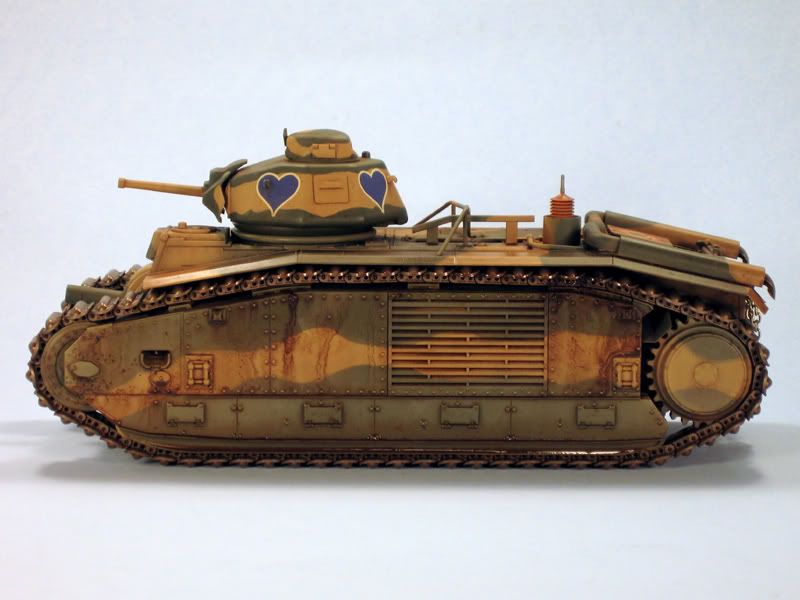
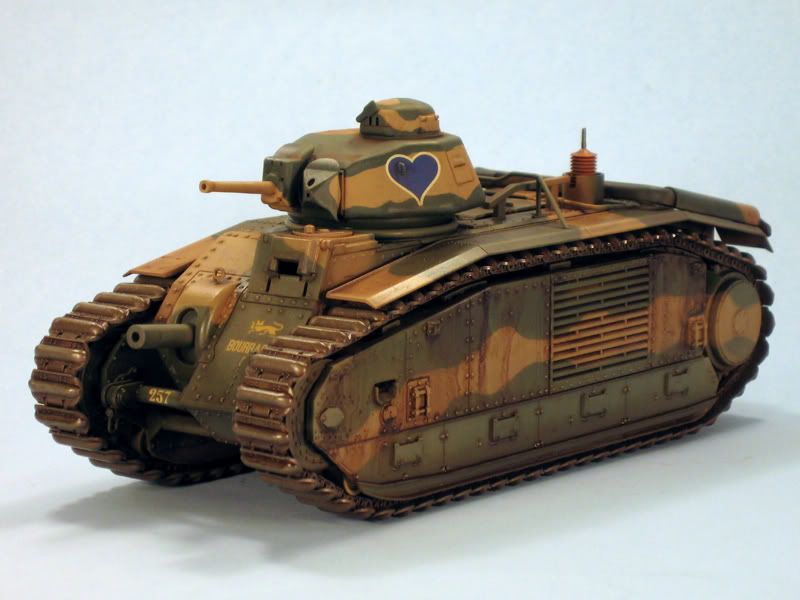
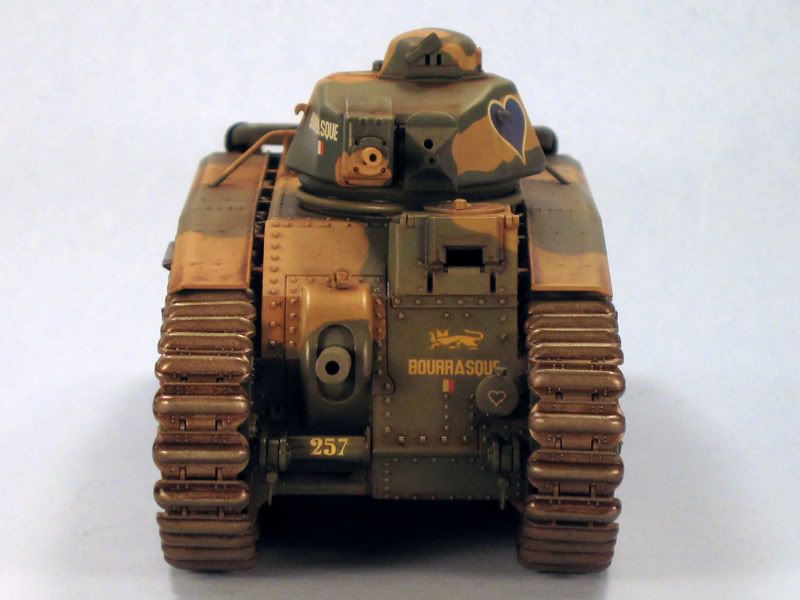
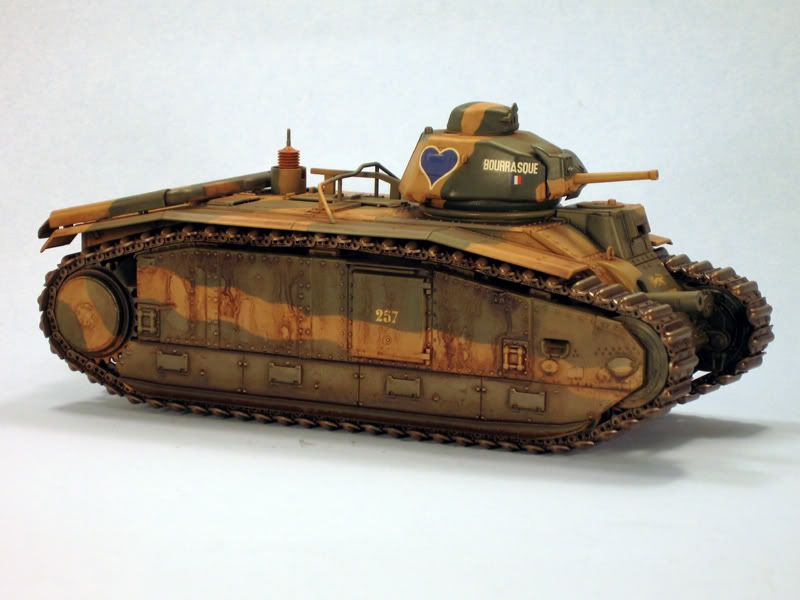
Here are a few shots after some "mud washes".  I wish I had some MIG pigments in the stash as I think they would be perfect for the effect I'm looking for.  Unfortunately I was building the Char for the Blitzkrieg GB over at Armorama and didn't think of using them until it was too late to order them in time.  Basically what I did for the mud streaks is put little blobs of Burnt Umber and Raw Sienna oils on the top of the slab sides just under the tracks.  Then using just straight turpenoid and a wide brush I dabbed the turpenoid loaded brush along the edge of blogs so the pigments would run down the sides.  I also put a blob of burnt umber in each of the mud shoots and ran turpenoid through the shoots from the top (since I had opened them up earlier in the build Smile [:)] )

Scott Espin - IPMS Reno High Rollers  Geeked My Reviews 

  • Member since
    October 2008
  • From: Portland, Oregon
Posted by RickLawler on Saturday, November 1, 2008 12:23 PM

Pretty Cool!  You achieved some nice effects using your oils and washes. I might suggest feathering out some of the harder wash edges just a little - just my opinion.

Rick

  • Member since
    December 2002
  • From: Reno, NV
Posted by espins1 on Saturday, November 1, 2008 1:06 PM

I may add a bit more mud actually, I was using images like this as my guide.  Smile [:)]


Scott Espin - IPMS Reno High Rollers  Geeked My Reviews 

JOIN OUR COMMUNITY!

Our community is FREE to join. To participate you must either login or register for an account.

SEARCH FORUMS
FREE NEWSLETTER
By signing up you may also receive reader surveys and occasional special offers. We do not sell, rent or trade our email lists. View our Privacy Policy.