SEARCH FINESCALE.COM

Enter keywords or a search phrase below:

Tamiya 1/35 Char B1 bis *WIP*

27552 views
137 replies
1 rating 2 rating 3 rating 4 rating 5 rating
  • Member since
    October 2008
  • From: Portland, Oregon
Posted by RickLawler on Saturday, November 1, 2008 1:17 PM

Then you are on the right track...you still have quite a ways to go! 

Rick

  • Member since
    September 2007
  • From: Relocating
Posted by Mobious on Saturday, November 1, 2008 1:41 PM

 Be looking forward to more "Mudslinging!" Interesting, looking at the earlier post and seeing where the weathering is going. Nice job, espins1

 Mobious

"It's a problem of applied physics" Roy Brown

  • Member since
    December 2006
  • From: N. Georgia
Posted by Jester75 on Saturday, November 1, 2008 1:46 PM
Awesome Scott!! This is one fantastic looking Char, I love it!

Eric


  • Member since
    December 2002
  • From: Reno, NV
Posted by espins1 on Saturday, November 1, 2008 2:17 PM

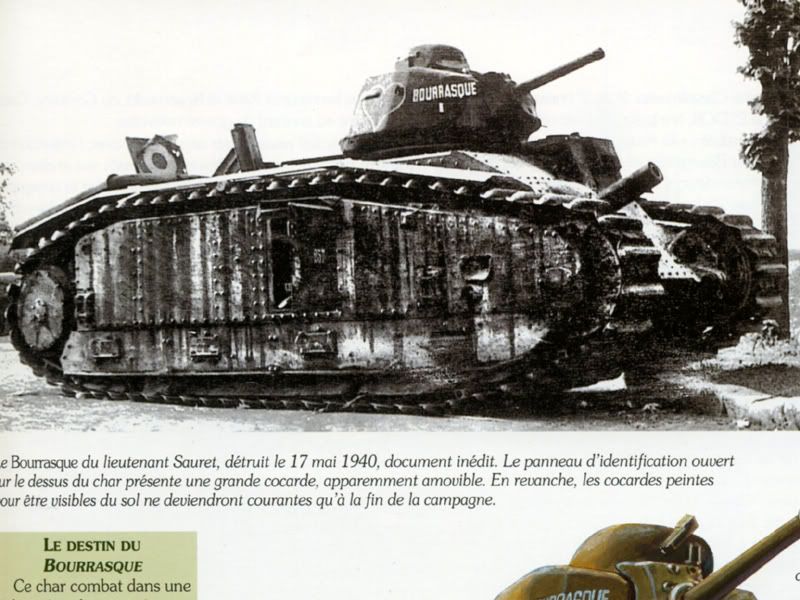
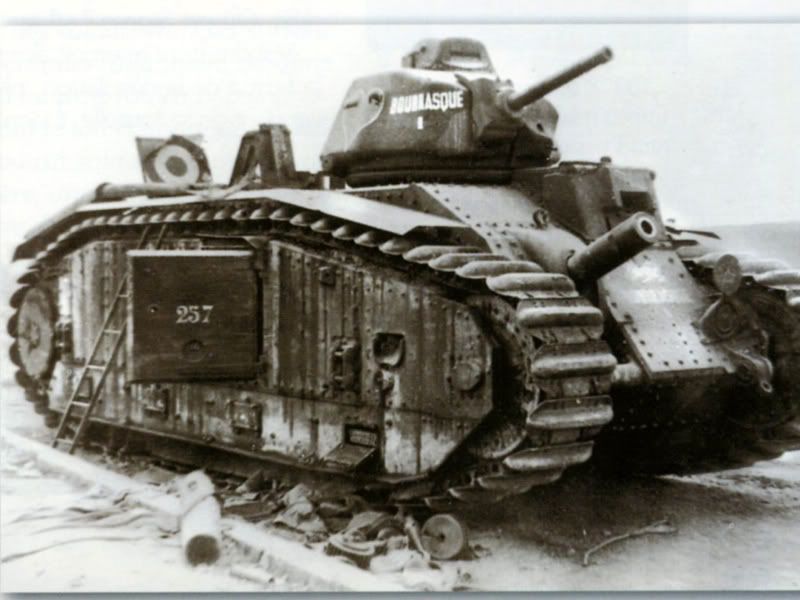
Here's another great pic of Bourrasque as it appeared at the time of it's capture.  I'd love to be able to replicate the streaks of mud and goo coming down the sides like this.  I'm just going to have to keep building up the layers.

Scott Espin - IPMS Reno High Rollers  Geeked My Reviews 

  • Member since
    December 2002
  • From: Reno, NV
Posted by espins1 on Sunday, November 9, 2008 5:20 PM

I ordered some pigments from a new brand of pigments called "Warpigs".  There is an excellent review of them here if you're interested.  I'm going to use them to try to replicate the vertical mud and dirt streaks cascading down the huge flanks of the Char B1 bis. 

I just applied another dustcoat and am going in for the kill shortly with the pigments.  Here are some shots of the dustcoat prior to the final mud applications.

Scott Espin - IPMS Reno High Rollers  Geeked My Reviews 

  • Member since
    April 2005
  • From: Piscataway, NJ!
Posted by wing_nut on Sunday, November 9, 2008 5:52 PM
Scott my man that is just outstanding. Ive said before that Char seems to do well at MosquitoCon.  You should definately come East next year with that bad boy.

Marc  

  • Member since
    September 2007
  • From: Relocating
Posted by Mobious on Sunday, November 9, 2008 6:37 PM

Espins1, The additional "dusting" really blended things together very well. Noticed the chain on the rear, Is that a brass chain? Noticed it on an earlier post and was wondering what you were planning. The subtle weathering on it looks great. Looking forward to more updates and application of the "Warpigs".

 Mobious

"It's a problem of applied physics" Roy Brown

  • Member since
    July 2004
  • From: Texas
Posted by wbill76 on Sunday, November 9, 2008 8:22 PM
Coming along nicely Scott, going to be a very dirty Char by the time you're all said and done! Thumbs Up [tup]
  • Member since
    January 2007
Posted by the doog on Sunday, November 9, 2008 8:51 PM

Scott, it's looking really excellent!

To get that look of the mud, try this--get some real dirt (you can use pigments if you want, but it may get a bit pricey?) and turn the tank on its side. Then, "paint" long streaks of flat lacquer (Acrylic, preferably) down the sides, and drop the dirt (or pigments) onto the wet streaks, letting them absorb it and seal it in. This way you can build it up. You'll never do it by conventional methods. You have to get it on there "in bulk".

Let the stuff dry, and then blow/brush off the excess dirt/pigments. You should be able to build up long streals of thick mud in this way in a very short time.

  • Member since
    July 2006
  • From: New Jersey
Posted by redleg12 on Sunday, November 9, 2008 9:14 PM

Scott - Coming along nicely. Love the weathering. Turning it into a real mudder.

Just a quick thought. Does the chain in the back look to clean as compared with the rest of the weathering...just a thought.

Rounds Complete!!

"The Moral High Ground....A Great Place to Emplace Artillery."

  • Member since
    December 2002
  • From: Reno, NV
Posted by espins1 on Tuesday, November 11, 2008 10:43 AM

Thanks for the comments and the interest guys.  Smile [:)]

This was my first time using pigments for weathering and I had a ball with them!  I did a little basic experimenting so I could get the hang of applying them dry, wet and dry onto a wet surface.  Once I got the feel for how they worked I really went to town developing streaks down those slab sided flanks.  I used a combination of techniques and three different shades of pigments from the Warpigs "earth" set - Natural Umber, Natural Sienna and either Light Sienna or Natural Yellow, can't remember which right now (I'm at the office Wink [;)])

  • Using a wide brush I lightly wetted one section at a time with turpenoid, tipped the tank about halfway on it's side supported by a big bottle cap and a plate edge, then dipped a dry, wide brush into some pigment then gently stroked the brush in downward strokes along the sides gently brushing the pigments in straight lines down the flanks.  I continued with that process all they way accross, then repeated for the other side.  This gave it the overall basic downward streaking I was looking for as a base, with heavier emphasis on the upper parts.
  • Using a smaller round brush with a fairly precise point at the end I dipped it into a mix of some darker pigments in a beer bottle cap with just a little turpenoid and more or less painted the darker streaks individually down the sides.
  • Used more dry pigments and dabbed them all over the tank in random batches using three different colors of pigments.  Using a dry short, stiff brush I dabbed it all over the tank to create a good general effect of dryed dirt and mud all over.
  • With dry pigments and a big brush, I flicked pigments down the sides starting at the trackes on top.  Pigment then slid down the sides and stopped along the tops of all the raised surfaces.  Using a small, round brush I wicked just a little turpenoid in the areas where the pigments had piled up so the "dirt" would stay and give the 3 dimensional effect of having loose dirt piling up. 
  • Using a mix of turpenoid and pigments I grubbied up the lower part of the tank, especially on the rubber boots at the bottom.
  • Wetted spots like the drive sprockets with a little turpenoid, dipped a big soft brush in the pigments then flicked the brush at the sprockets without actually touching them.  The pigments flecked off just right and look like mud spatters after they hit the wetted sprockets.
  • I also wicked turpenoid along all the seams and raised detail, again to simulate streaking of water, oil etc.  I also just flicked some clean turpenoid in various areas to simulate various stains etc.
  • I wetted up the chain pretty good and slathered it up with a dry brush dipped in the pigments.

For a first attempt using pigments I am pleased with the results and have a much better understanding of the different ways to apply them and the effect they create.  What do you guys think?


Scott Espin - IPMS Reno High Rollers  Geeked My Reviews 

  • Member since
    October 2007
  • From: N.H.
Posted by panzerguy on Tuesday, November 11, 2008 2:55 PM


   Scott just got caught up on this. Man have you made some progress. Excellent jobBow [bow] Think I'll be printing out your weathering list if you dont mind. 

    A little tip on the chains, I've soaked them in coffee or cola soda and it take's the shine off .  


"Happiness is a belt fed weapon"

  • Member since
    September 2007
  • From: Relocating
Posted by Mobious on Tuesday, November 11, 2008 5:35 PM

 Hello, espins1, with the results you've achieved with the "Warpigs", Think I'll be looking into a set. I like the fact that the names are a little more familiar to me than "City Double Rubble Dust" or "Early Fall, Central European, Windblown, Moments Before a Low Pressure Cell Moves Thru The Area, Dark Dust". The application tips are great, in particular, the way the pigments were applied to achieve the effect of accumulated dirt. Great work!Bow [bow]

 Mobious

"It's a problem of applied physics" Roy Brown

  • Member since
    July 2006
  • From: New Jersey
Posted by redleg12 on Tuesday, November 11, 2008 6:37 PM

Scott - Ahhhhhh.....chains look GOOD. I love pigments myself. Love the look. worth the wait to see.

Rounds Complete!!

"The Moral High Ground....A Great Place to Emplace Artillery."

  • Member since
    September 2003
  • From: USA
Posted by mstazz62 on Tuesday, November 11, 2008 6:45 PM

OOOO, she's purdy! Love the scheme and the weathering is top notch - just enough.

I'm in the midst of building one now - a conversion to the German 10.5 cm howtzer - but after seeing yours I wanna do the original french version!

Thanks for the inspiration,

Mark

mstazz62
  • Member since
    January 2007
  • From: Australia
Posted by Fast Heinz on Tuesday, November 11, 2008 10:48 PM

Dare i say it, i think you've gone one step too far with the pigments. I thought the previous pics in your post of 9 November showed it off at its best. The weathering was good and the base camo was still visible. Personally i would have been happy at that point and stopped. The base paint in these latest shots is almost indistinguishable and i think its lost some of its character as a result.

Regardless of that though, the workmanship is excellent and i'm picking up a ton of useful tips for the one i'm building at the moment so thanks for that.

Cheers 


  • Member since
    April 2008
  • From: Commonwealth of Virginia
Posted by USArmyFAO on Wednesday, November 12, 2008 1:57 AM
Awsome work...  I can't wait to start mine (after of course I finish a Japanese D4Y1, Korean T-37, and some other partial builds languishing on my shelf)...  Your work is a true inspiration.  Keep it up!

Cheers, Matt

"If we increase the size of the penguin until it is the same height as the man and then compare the relative brain size, we now find that the penguin's brain is still smaller. But, and this is the point, it is larger than it *was*."

  • Member since
    April 2005
  • From: Piscataway, NJ!
Posted by wing_nut on Wednesday, November 12, 2008 6:33 AM
The overall look is great Scott. Youmay have siad so but I missied it but did you do the pigment treatment over a flat or gloss surface? And once the turpenoid is dry, is the pigment fixed in place or does it need to be sealed?

Marc  

  • Member since
    December 2002
  • From: Reno, NV
Posted by espins1 on Wednesday, November 12, 2008 1:09 PM

Thanks guys.  I must admit I was a bit nervous venturing outside of my comfort zone.  I usually build more idealized versions of my tanks, intact, with no damage and minimal weathering.  I almost stopped before the pigments and was ready to finish it up right then and there, but I really wanted to learn how to use pigments to take my modeling to the next level.

I've always been fascinated with the filthy look of the Char B1 bis in wartime photos.  I guess it boiled down to either the artistic (again, idealized view of the tank) or the realistic (what it looked like at the time of its final engagement).  Tough decision to make, but very enjoyable!  I may someday build another one with a more perfect appearance for aesthetic reasons to park next to my idealized Das Reich Tiger, Grossdeutschland Panther etc. 

I really wanted to try to replicate that weathered look somehow, both as a skill building exercise and just to see if I could do it.  Granted, I'm still a novice with pigments but man, talk about a fun learning exercise!  Tongue [:P]  The downside to wanting to replicate this look, as Fast Heinz mentioned, is that the camo is almost completely undiscernable on the flanks.  (Thanks for making that point Fast Heinz, I was wondering when someone would bring that topic up.  I had an internal debate about that very same thing my friend.) If you look at the photos I used for inspiration you'll see that the camo is even less discernable than it is on my build so the argument could be made that it needs even more!  Shock [:O]  I'm still debating on whether or not to add a few darker streaks of simulated mud as you can see in the photos.  The gears are turning.....  Burger [BG]


I have stayed away from using Future over my camo jobs for the last few builds after seeing some of Karl's (the Doog!) work and now prefer not to gloss coat my builds, even for decaling.  It's mostly a matter of personal preference.  I don't necessarily care for the over exaggerated look of pin washes over a gloss coat.  Without the gloss coat I like how the washes still emphasize detail but also leave a bit of grubbiness behind on the flat surfaces, which in my opinion is a bit more realistic if that is the look you're trying to achieve.

I'm home sick again with this stupid cold, so I'm taking a break from the workbench for a day or two.  Thanks again for the comments and interest gentlemen, I appreciate it!   :)

Scott Espin - IPMS Reno High Rollers  Geeked My Reviews 

  • Member since
    April 2007
  • From: Schroon Lake, NY
Posted by SMJmodeler on Thursday, November 13, 2008 10:47 AM

Scott:  Venturing out of the "comfort zone" can be tough; but for me it keeps the hobby interesting and challenging.  The weathering may cover up some exhaustive time and effort, but it can be worth it too...you have progess pic's if ever needed.  You learn more each time you try another skill and you add it to your arsenalWink [;)]

She's a real beauty Scott, the massiveness REALLY comes through!  All the detail and weathering is superb!...and I LOVE those chains...I'll have to scroll back to see any info on how you did those. (I have a M26 in the stash)  I'd add those dark streaks, and don't be stingy with them, add a bunch...the contrast will be STRIKING...GO FOR IT!!!

  • Member since
    September 2007
  • From: Relocating
Posted by Mobious on Thursday, November 13, 2008 3:59 PM

 Hello espins1,Congratulations on taking a step outside the comfort zone and expanding on your skills, and sharing the results. IMO the weathering on the Char is not overstated and quite accurate in regards to the reference pics you've posted. The pics show the camo on the large slab sides of the Char to be obscurred and barely visible, while the camo on the upper structures are easily discernable, just as the model portrays. Nice job interpreting the photos and aritistically rendering the weathering to achieve realistic results. The only thing missing are the dark streaks. IMHO the chain is a bit bright and tends to distract from the overall picture, but that's just my opinion.

 Thanks again for posting,

 Best Regards,

 Mobious

"It's a problem of applied physics" Roy Brown

  • Member since
    January 2007
  • From: Australia
Posted by Fast Heinz on Thursday, November 13, 2008 7:56 PM

Yes, i have to concede that if the intention is to emulate the photo, then the degree of weathering is not overstated at all and you've done a fine job all round. My comment was around the "look" of the model. I thought (and still do) that it looked more visually pleasing at the earlier stage when the camo was visible through the dirt/dust buildup.

Its just a personal taste thing i guess.

Cheers

  • Member since
    December 2002
  • From: Reno, NV
Posted by espins1 on Thursday, November 13, 2008 8:11 PM
 Fast Heinz wrote:

Yes, i have to concede that if the intention is to emulate the photo, then the degree of weathering is not overstated at all and you've done a fine job all round. My comment was around the "look" of the model. I thought (and still do) that it looked more visually pleasing at the earlier stage when the camo was visible through the dirt/dust buildup.

Its just a personal taste thing i guess.

Cheers

I agree with you 100%, it did look more asthetically pleasing before all the dirt.  Smile [:)]

I kinda wish I could have two of these built, one filthy and one just for the beauty of the tank.  The Char B1 bis has a beauty all it's own and each one of them was fairly unique in its own right.  This Tamiya kit is really nice and I would love to build another.  Tongue [:P] 

Scott Espin - IPMS Reno High Rollers  Geeked My Reviews 

  • Member since
    December 2002
  • From: Reno, NV
Posted by espins1 on Thursday, November 13, 2008 8:22 PM

Thanks everyone for the comments and the interest, I really appreciate it.  It's so much more fun when this hobby isn't a solo project.  Smile [:)]

I'm still debating what to do about the chains.  My original intention was to get more of the pigments etc on them, but due to the nature of the metal I'm not getting good coverage.  I'm considering some of the ideas mentioned earlier such as dipping them in coke or something. 

Do any of you have experience with "Blacken-It"?  I have some that I was going to use on some Friulmodel tracks on another build.  Would that work on these chains?

Scott Espin - IPMS Reno High Rollers  Geeked My Reviews 

  • Member since
    June 2005
  • From: San Tan Valley,AZ
Posted by smokinguns3 on Friday, November 14, 2008 3:26 PM
she looks great scott you did a bang up job on it.
Rob I think i can I think i can
  • Member since
    January 2007
Posted by the doog on Friday, November 14, 2008 3:33 PM

Scott, I have to say that I agree about the aesthetics of the kit before the deluge of pastels. I think that you went a little overboard with the pastels.

Did you miss my post on page one? I really think that the problem with your pastel application was because you went for an overall coating of powders, rather than the "3-dimensional" application which I had suggested. I think that you could have kept much of the base paint visible and unobscured if you had used white glue drips coated in powders to simulate the "dripping" mud.

It still might be posssible to clean up some of that powder on the sides, and then add white glue "lines" down the side which you could then coat with powders while still tacky--that would give you 3-D drips of mud like it looks in the photos there.

It might be worth a shot? Can you scrub off some of that all-over powder coat on the sides?

  • Member since
    December 2002
  • From: Reno, NV
Posted by espins1 on Friday, November 14, 2008 5:20 PM

Thanks for all the input and suggestions gentlemen, much appreciated. Smile [:)]

Again  Sigh [sigh]  I am trying to model Bourrasque as it appears in the two photos below taken shortly after it was abandoned by it's crew due to lack of fuel.  

Can anyone makeout the camo on the flanks?  I can't... it's completely covered with dirt and mud.  Look at period photos of the Char B1 bis in combat, almost without exception photos of the Char B1 bis in Combat show one thing in common.... dirt, oil and mud covered flanks in vertical streaks formed by it running down the sides. Shock [:O]  Look at how the tracks wrap around the entire outside of those big, slab sided flanks.  Mud, oil, water, goo, whatever, drips, plops and runs constantly down the sides from those filthy dinosaur tracks that go over the top of the flanks.  Shy [8)]  With the exception of the open hatches, I am trying to make mine look similar to the way Bourrasque appears in these photos...... not an "idealized" verson or an artistic "most pleasing to the eye" look of Bourrasque.  I am not trying to model it as it would have appeared on the parade ground.  I am trying to replicate what I see in the actual photos.  Notice, you can't make out any of the camo patterns or colors on the flanks, only on the upper hull and turret.  Whistling [:-^]

(I hope the above doesn't come across as testy in any way, it's been a rough 2 days at the office..... 300 people in the Reno facility alone were let go yesterday and today.  It's been very stressful and thankfully I am still here and I didn't have to let any of my staff go.  Angel [angel] )


Scott Espin - IPMS Reno High Rollers  Geeked My Reviews 

  • Member since
    October 2004
  • From: League City, Texas
Posted by sfcmac on Friday, November 14, 2008 5:42 PM

Oh man that stinks. (not the tank but the stressful stuff) I think that once the change uncertainty and such pass things will probably get worse before they get better though. But I'll lie to ya if it makes you feel any better. Lots of us in that same boat right now I am afraid. Galveston Countys biggest employer the UTMB Hospital is cutting like 3500 jobs because of mismanagement and the hurricane damage. Businesses here are sucking wind trying to rebuild and repair during this slump. Really bad because Houston industry is usually pretty resilant. Oh well all we can do is what we can.

As far as your French tank 2 points of view clash. What looks right and what it actually looked like. You chose to be as genuine as you can make it. Nothing wrong with that as far as I can see. As long as it just isn't coffee stains on the photo.  Seriously I hate trying to interpret black and white photos as they can mislead ya. But it's all we got in a lot of cases! That is another greatness of this hobby! To see how each other see things.

Good luck with the work stuff! Goes for all of us!

  • Member since
    October 2008
  • From: Portland, Oregon
Posted by RickLawler on Friday, November 14, 2008 5:58 PM

Ok, I'll get into some of this dirty talk.

Scott, I commend you on taking bold steps with the weathering, it takes nerve and vision to do what you are doing. 

I''m going to go out on a limb (boy, this is a first for me, aye?) and suggest that if you were to stop now you would be stopping before the miracles happen.  I see many very good models that seem to have only half of the idea expressed.  I believe that you are at that point...almost there!

I'm not suggesting slathering on another 20 layers of pigments, but I do believe that you are on the brink of some very exciting results if only you finish, or refine your thoughts.  I see your next step as re-defining the details that you have lost from the pigments.  At the moment the surfaces have lost their details and features.  I would suggest breaking out the artist oils and do some very selective pin washes around some of the bolt details and panel lines.  Use a dark(ish) earth color for this - I'm partial to Raw Umber. 

 Those darker streaks that you are contiplating could be achieved by these same washes.  Start at the top, slowly.  Let the paints/thinners do their thing and darken the base pigments - allow them to dry as this is the only way to really detemine the effect. (wet pigments will alway look dark and, well....wet!)  Repeat until you have what you are looking for.  The final weather with pigments and oils cannot be rushed...you really need to let things settle and dry to get a realistic assesment of where you are at and what needs to be done.

Fast Heinz has a point about loosing some of the base colors...some of that can be regained by brushing off certain areas allowing more glimpes to what is underneath.  I realize that you are working off the photo, but keep in mind that even a light dusting of earth taken on a black & white photo will obscure the colors...it's the nature of the photographs and it makes it very tough to interpret.

Great projects provoke great discussions....

Take care,

Rick 


  • Member since
    July 2007
Posted by Moon Puppy on Friday, November 14, 2008 7:15 PM

Hey Scott, I like it. I enjoyed your take on the the Migs stuff. I'm looking to drop a dime on the stuff for a build I'm doing, I've never used them either.

One thing I'd like to note, your reference photos and the open hatch. The Unit number on the side is quite visible, more visible that what you have on your model. Perhaps the buildup is overstated in the black and white photo? I'm not sayin' I'm just sayin'. I think you did a great job on it and really enjoyed reading this thread.

Remember, we are told Post Counts don't matter! (unless it's really high)

Modelers' Alliance

JOIN OUR COMMUNITY!

Our community is FREE to join. To participate you must either login or register for an account.

SEARCH FORUMS
FREE NEWSLETTER
By signing up you may also receive reader surveys and occasional special offers. We do not sell, rent or trade our email lists. View our Privacy Policy.