SEARCH FINESCALE.COM

Enter keywords or a search phrase below:

PAGE 3 ALL FINISHED! "Checkered Past" Rusty Impala vignette

27629 views
76 replies
1 rating 2 rating 3 rating 4 rating 5 rating
  • Member since
    October 2008
  • From: New Jersey
Posted by oddmanrush on Friday, April 30, 2010 1:28 PM

Karl, in the words of Ed Olczyk, this is "tremendously tremendous"! Love your work!

Jon

My Blog: The Combat Workshop 

  • Member since
    April 2008
  • From: Philadelphia PA
Posted by smeagol the vile on Friday, April 30, 2010 1:18 PM

Hey Karl, I love those leaves you use, they always look great, I remember oohing and aahing at your lair of the rust bunnies, they really make the dios. 


Can I put in my 2 cents about the base, every time I have made a base using celluclay (haven't done much, but I like the outcome) to get a better ground texture what I do is mix some pebbles/gravel into the celluclay so when I put it down they either come through as small stones or give the ground a bit of more realistic texture.


dunno if that helps or a good idea, but I thought id throw it out there


  • Member since
    September 2007
  • From: Truro Nova Scotia, Canada
Posted by SuppressionFire on Friday, April 30, 2010 5:18 AM

Can't hang that vignette on the wall....

ITS OFF THE HOOK!

Bow DownBow DownBow DownBow DownBow Down

I see many IPMS Gold awards in your future... Clear some room on the trophy shelf for a few 'Best of show' awards as well!

Your immaculate eye for detail, techniques and execution of said skills are second to none. Thanks Doog for the excellent WIP's and tutorials.YesToast

http://i6.photobucket.com/albums/y211/razordws/GB%20Badges/WMIIIGBsmall.jpg


  • Member since
    May 2005
  • From: Left forever
Posted by Bgrigg on Thursday, April 29, 2010 10:23 PM

Karl, the base looks terrific and this is easily one of your best builds I've seen.

I present you with this Hammer, for you have NAILED that build!

So long folks!

  • Member since
    January 2007
Posted by the doog on Thursday, April 29, 2010 10:10 PM

Hey all! Here's the last update!

Well, here's the base tutorial. The diorama is complete! 

First of all, MAKE SURE that you varnish and WATER-SEAL your base plaque! I use MINWAX "Indoor/Outdoor HELMSMAN Spar Urethane Clear Satin" spray-on sealer. Two heavy coats does thetrick perfectly. If you don't seal your wood, you will get warpage from the wet celluclay! I started by mixing up some celluclay with some white craft glue and some brown craft store paint for both added adhesion and color..I masked the edges of my plaque with masking tape and applied an even layer of celluclay over the plaque. When I pull up he tape, I get a nice, neat edge that can be smoothed with some water on your finger.

Here's the stuff I used for the base foliage---WOODLAND SCENICS' "Harvest Gold" static grass powder, real leaves, Joefix Studios "fall leaves", and real, sifted dirt taken from a construction site, where it's been pounded fine, and there is no "Live" organic material in it that might start sprouting! I mix them all up into a nice, fine mixture...

I put this down over a good slathering of white glue....I threw in some "logs" and sticks..

I used a piece of paper to press down the mixture into the glue...

I sealed the mixture in with a light coat of Dullcoat. After this has dried, I put the car down, and take some thread and delineate the borders of where the snow will fall, as per the photograph. I trapped the thread under the masking tape protecting the base edges.

I used my airbrush to lay down some flat white where the snow would be. The car is NOT attached yet at this point! It is shown here only for reference. I do this with the paint because when I put down the snow powder, the powder is not realistically dense enough once it falls into the lacquer spray that I will use to stick it to the base. It will look anemic and thin without the paint's help!

Now, I mask the base where I don't want any snow to be ...and after I hit it with a good coating of Dullcoat  I layer on a good coating of Woodland Scenics' Snow powder.

Using a pick to poke holes into the base, I secured various twigs and a leafy product from Joefix Studios called "Zeeschuim" as weeds, as well as some stuff from AC Moore's floral section. I've also placed some Joefix leaves and various real twigs.

And it's done! WAHOOO!!!

Again, the real car...

and the model.....

That's it for now--thanks for everyone who followed this thread, and who rated it 5 stars! I SINCERELY APPRECIATE THE SUPPORT!! On to the next project--no, I don't know yet what that will be! Confused....Big Smile


  • Member since
    January 2007
Posted by the doog on Wednesday, April 28, 2010 7:49 PM

Thanks, Roger and Jim!

"A memorial to the fallen"--that's a cool alternate title! Big Smile Thanks, bud!

Jim, you can see that I like these old wrecks! All I have to do now is to get some more "Rust bunnies" for this dio, lol! I appreciate your comments, and compliments!

THANKS, GUYS!!

  • Member since
    February 2003
Posted by Jim Barton on Tuesday, April 27, 2010 3:49 PM

Fantastic job!YesYes

By the way, I was reading the January, 2008 Fine Scale Modeler today and saw your article "Deconstruction Construction." Another great build!

"Whaddya mean 'Who's flying the plane?!' Nobody's flying the plane!"

  • Member since
    November 2008
  • From: Biding my time, watching your lines.
Posted by PaintsWithBrush on Monday, April 26, 2010 10:40 AM

Another fine bit of work of an all too common subject. Just breaks my heart to seen on old warrior cast aside like that.

Your build could be described as a memorial to the fallen.

Regards, PWB.

A 100% rider on a 70% bike will always defeat a 70% rider on a 100% bike. (Kenny Roberts)

  • Member since
    January 2007
Posted by the doog on Sunday, April 25, 2010 6:54 PM

Thanks, both--Zokissima and Jon! I appreciate you both looking in and taking the minute it takes to comment!

Jon, good luck on your build--please post some pics of it if you get it started! Big Smile

  • Member since
    October 2008
  • From: New Jersey
Posted by oddmanrush on Sunday, April 25, 2010 3:42 PM

Karl, Incredible work, so life like, extraordinary. I appreciate the tutorial for this project. I just picked up Revell's '41 Chevy pickup and I was hoping to use your build as inspiration. Won't be for a while though as I've got some other kits in line first. But seeing this, I'm very excited to get going on it. Again, great work.

Jon

Jon

My Blog: The Combat Workshop 

  • Member since
    July 2003
  • From: Toronto, Ontario, Canada
Posted by zokissima on Thursday, April 22, 2010 7:28 PM

Absolutely beautiful result!!!

  • Member since
    January 2007
Posted by the doog on Thursday, April 22, 2010 9:14 AM

Thanks, smeagol! That makes me happy to hear--that you get ideas from my builds. That's the whole point and reward for me! I appreciate your comments!

Rob--I was hoping you'd look in on the car! I thought that the cracked paint was probably something you'd have come across--it could be very useful in future projects! Thanks for the nice words!

Mike, thanks for coming over to the neighborhood and for your funny comments!! Wink I should be back to Armor before the summer some time....you keep things organized over there til I get back! I appreciate your comments!

Thanks too, John, for your very generous compliment!

Stay tuned, guys, to see the completed project with the dio base! Smile

  • Member since
    June 2008
  • From: Piscataway,NJ
Posted by jtrace214 on Wednesday, April 21, 2010 9:53 PM

Karl,don't know how you do it....(Yes I do you showed us lol) but each build tops the last. Very impressive build,and thanks for the tut.


John

the pic to the left is my weekend condo lol

  • Member since
    July 2006
  • From: New Jersey
Posted by redleg12 on Wednesday, April 21, 2010 8:26 PM

OK.....I'm itchy being over here Smile Dots....but had to see what you are up to....Very nice work...the usaual king of weathering look.....I see the references to BMF and I keep thinking you are talking about me Whistling

I think you have found one of your true callings in rust. It looks fantastic....some of the armor weathering translated well.

Now when you are through with being Mr Sanford,

 we will keep a spot warm for you back over in armor.....its time to build something that clanks and can go BOOM in the night!! Wink

Great job as always

Rounds Complete!!

"The Moral High Ground....A Great Place to Emplace Artillery."

  • Member since
    February 2009
  • From: mass,USA
Posted by scratchmod on Wednesday, April 21, 2010 8:15 PM

Hey Karl


Nice to see you back to rusting up some cars. Would be better if it were armor, but as long as it's rusty I'll be looking. The crackle medium is pretty good stuff, glad it worked with great effect. Can be tricky to always get the same result. You seemed to have nailed buddy.

Cool work with the snow, looks too real. Yes

Gotta love the oils and pigments. awesome work on that car.


Rob

www.scratchmod.com

  • Member since
    April 2008
  • From: Philadelphia PA
Posted by smeagol the vile on Wednesday, April 21, 2010 7:46 PM

Your builds never cease to amaze me.  Some to the things you do would never had occurred to me otherwise, like the carpet, or the snow.

Yes


  • Member since
    January 2007
Posted by the doog on Wednesday, April 21, 2010 7:29 PM

......aaaaaaaaaaand here's another update! Big Smile

I have completed the car itself; now all that's left to do si to construct the simple dio base.

From here, I will show how to complete the weathering and snow cover on the model. First, here are the 
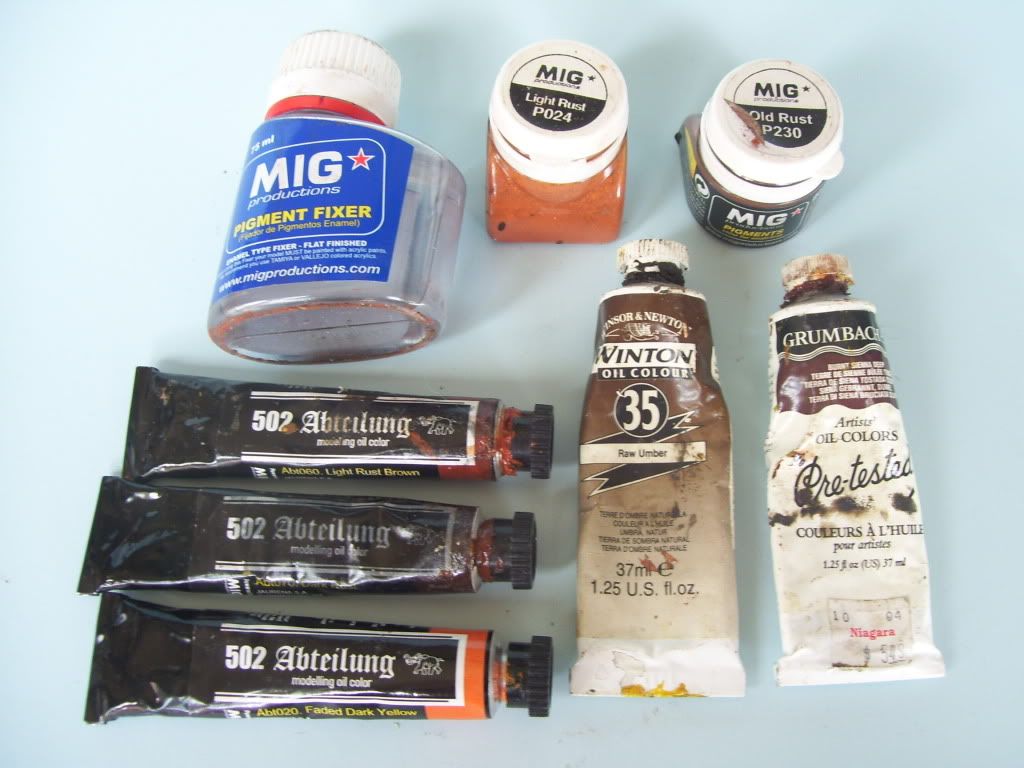
products I have used for completion of the weathering. From top left--MIG Pigment Fixer; MIG pigments P024 Light Rust and P230 Old Rust; 502 Abteilung (MIG's oil weathering line) #060 Light Rust Brown; #070 Dark Rust, 020 Faded Dark Yellow (which is really a light orange); and standard Raw Umber and Burnt Sienna Deep oil paint.

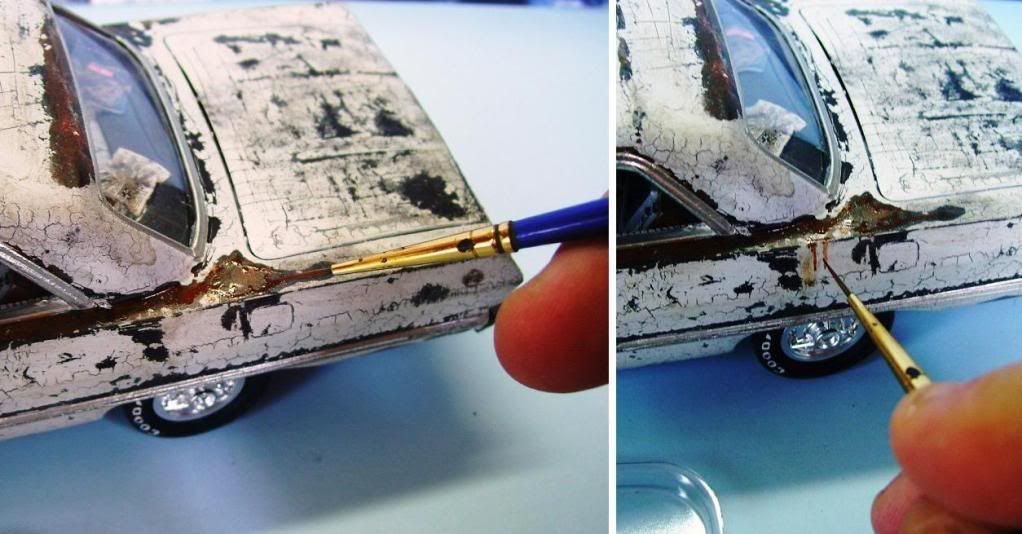
I start by applying a varied combination of oil colors in the exposed dark rusted area, and then I pull them down to make streaks. Use a variety of the colors, and put dark colors first, and lighter colors on top, because new rust is lighter.

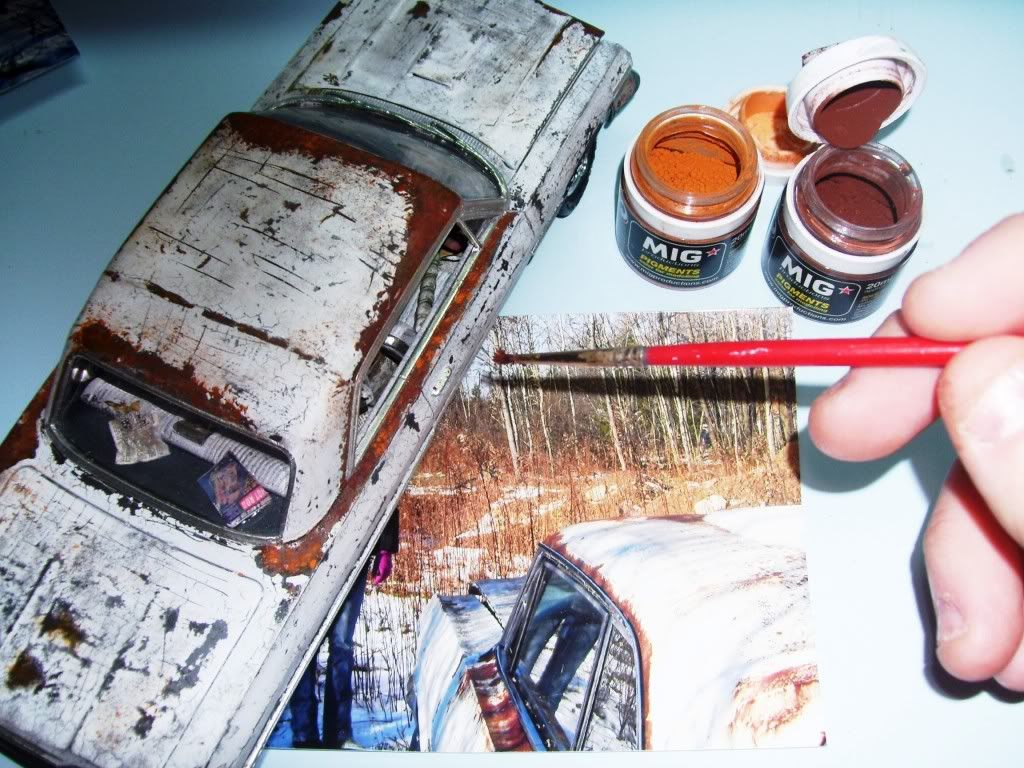
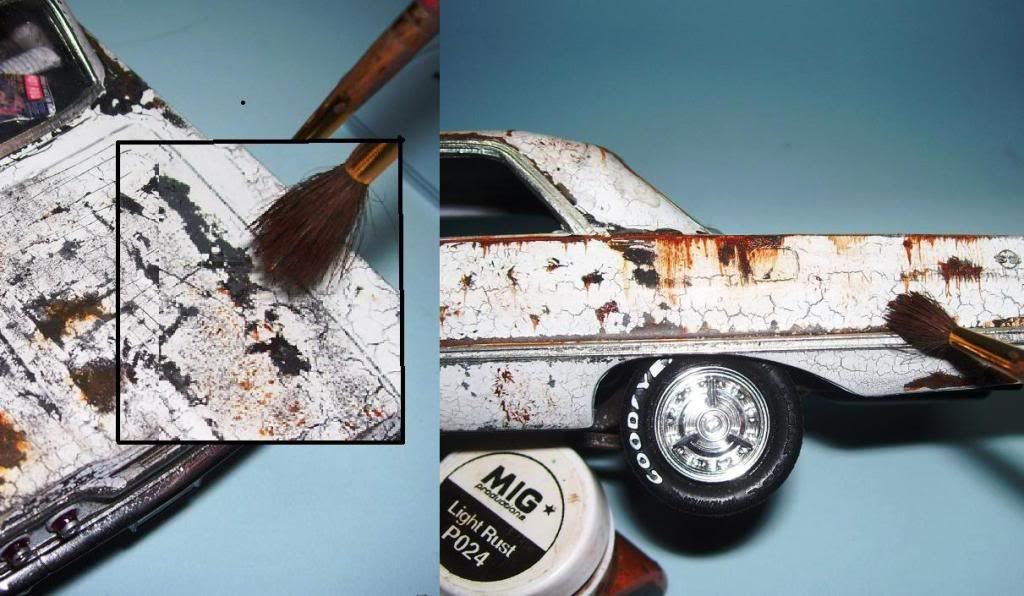
When I had good coverage and was satisfied with the results of the streaks and drips, I used a brush to apply MIG's weathering pigments right onto the still-wet pigments, which actually help them to adhere to the model.

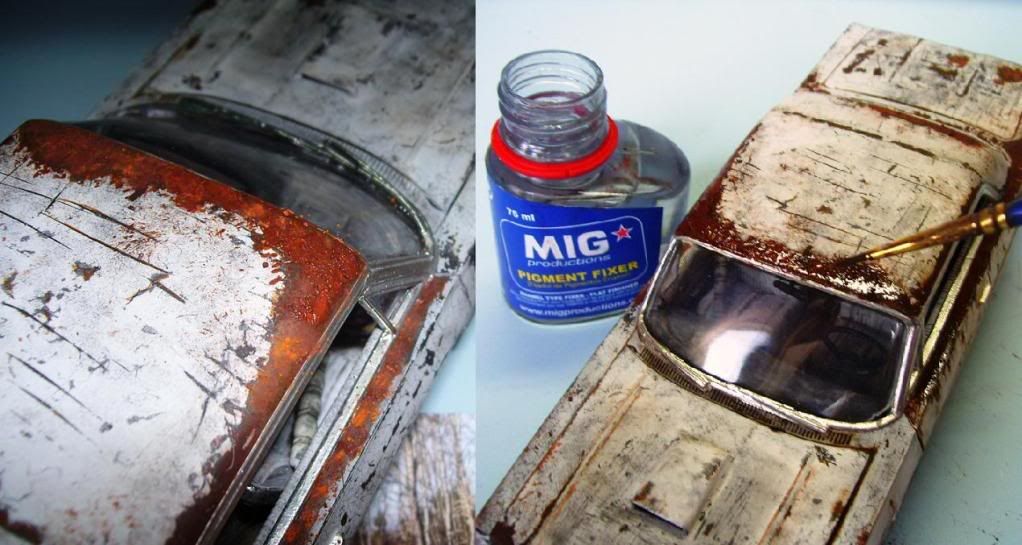
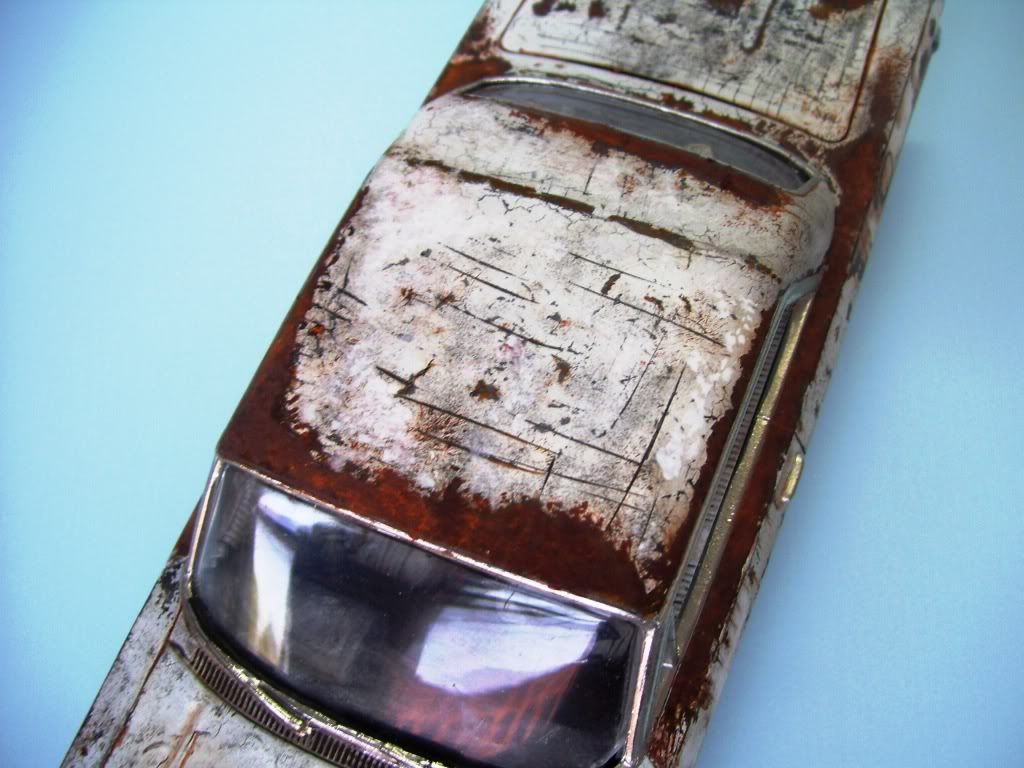
Notice the texture that the pigments lend to the rust. To seal them in permanently, I use MIG Pigment Fixer. Just use a brush to drop the stuff rightonto the pigmented areas. Capillary action will spread the liquid into the pigments, fixing them fast.

I also used a larger brush to "bounce" on rust spot from oil. A larger brush also helps make different dimensions of streaks as well.

Next, in order to get more layers of variety in the finish, I took some craft store white acylic paint and dabbed on some pure white in areas.
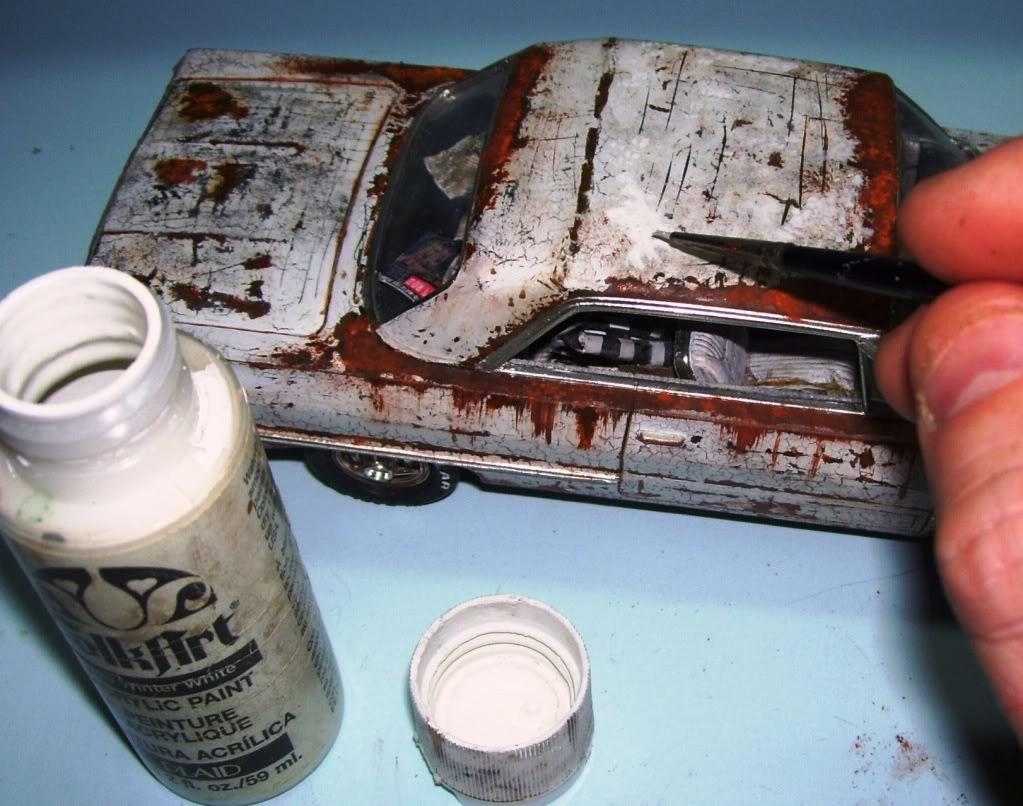
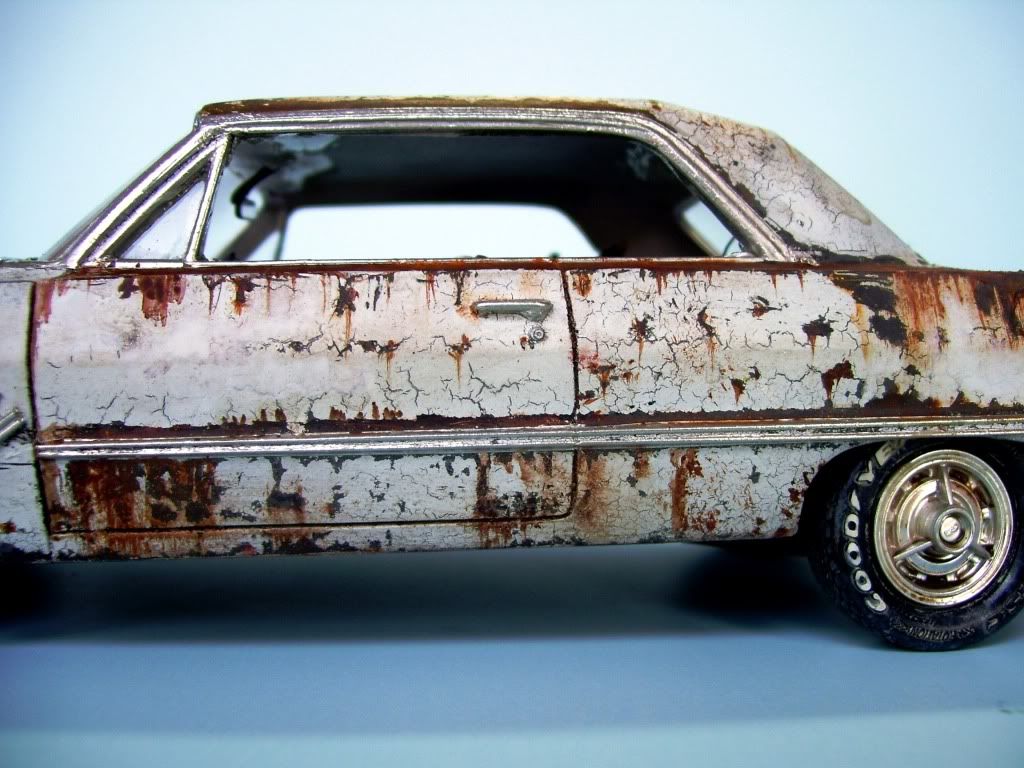
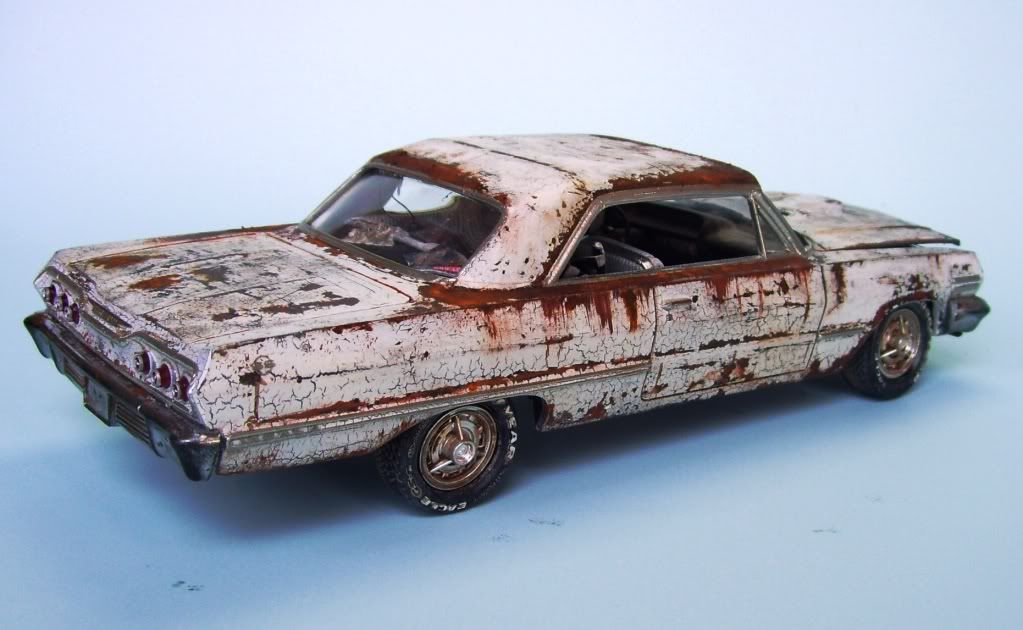
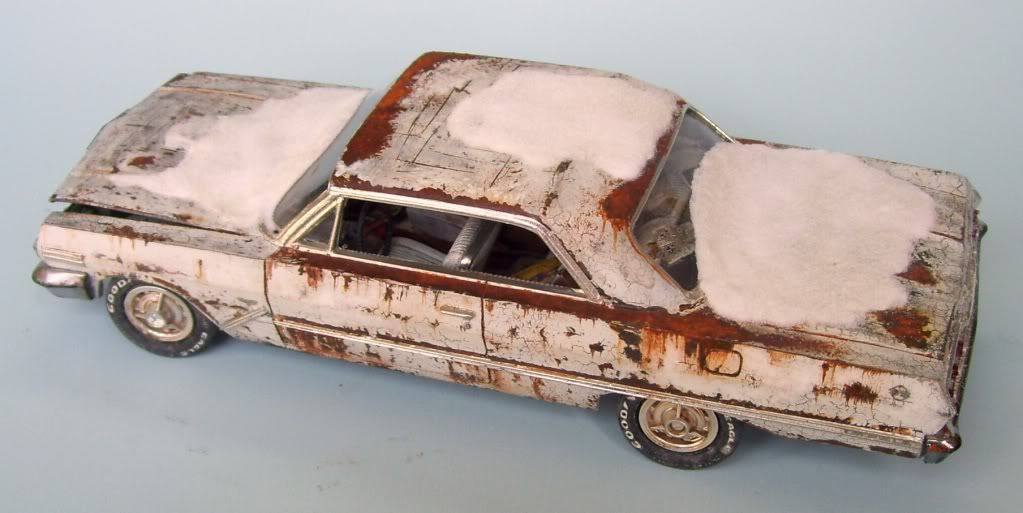
Results so far:

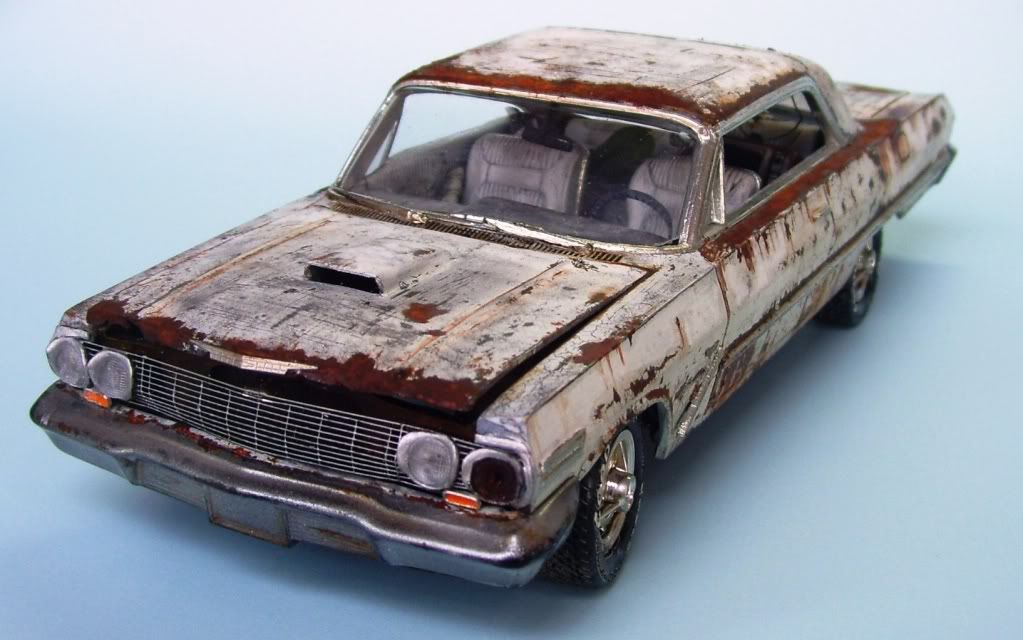
 I cleaned up the front fender a little with that white paint. The wheels were given a wash of tan oil paint, and a light wash of rust colored oil in the hubs...

ADDING THE "SNOW CAPS"

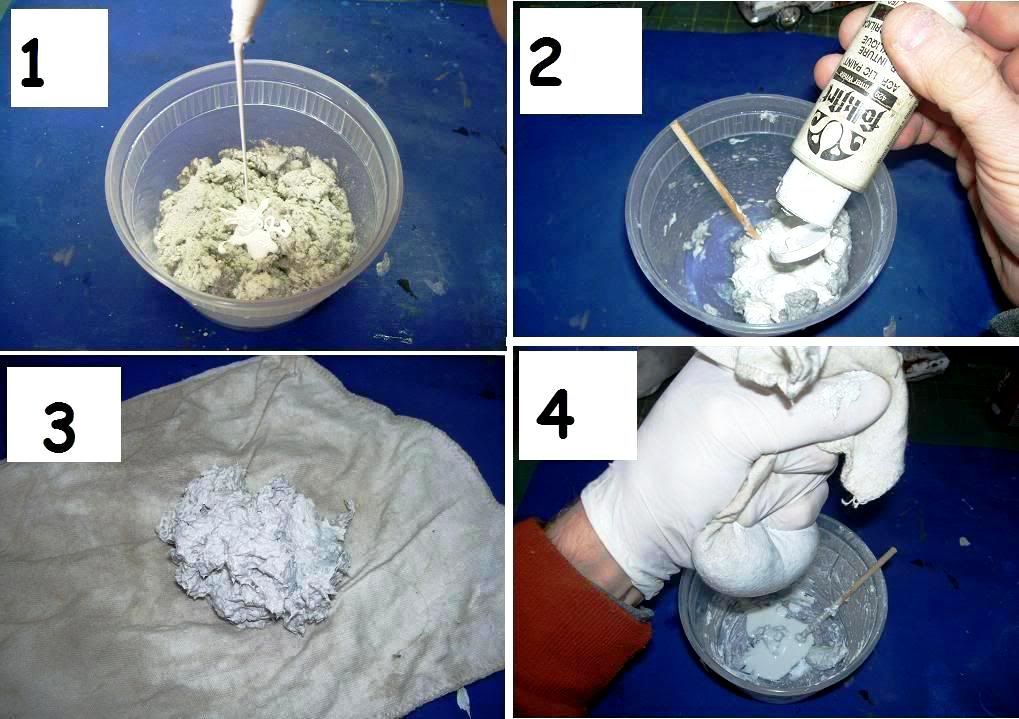
Now it's time to add the "snow". For this I use a paper-mache type of product called Celluclay. First, I add both WHite Craft glue (1), and acrylic paint (2) to the powdery product. I add a little bit of water to it, stirring always, just enough to wet the whole mess. Many people who claim to have problems with this product do so because they don't add glue and add too much water. Celluclay will shrink as it dries; the ore water, the more it will shrink. To counter this, I scoop out the bulk of it onto the sleeve of an old T-shirt, (3) and squeeze the excess water, glue, and paint out. (4).

I then scoop out the clay with a cocktail stick and start to apply it to the appropriate areas.(1). I wet my fingers with water (2) to help shape it, and also use a wetted paintbrush to carefully shape the edge. The water on the brush will both shape the perimeter as well as cleaning the window from any glue-haze.

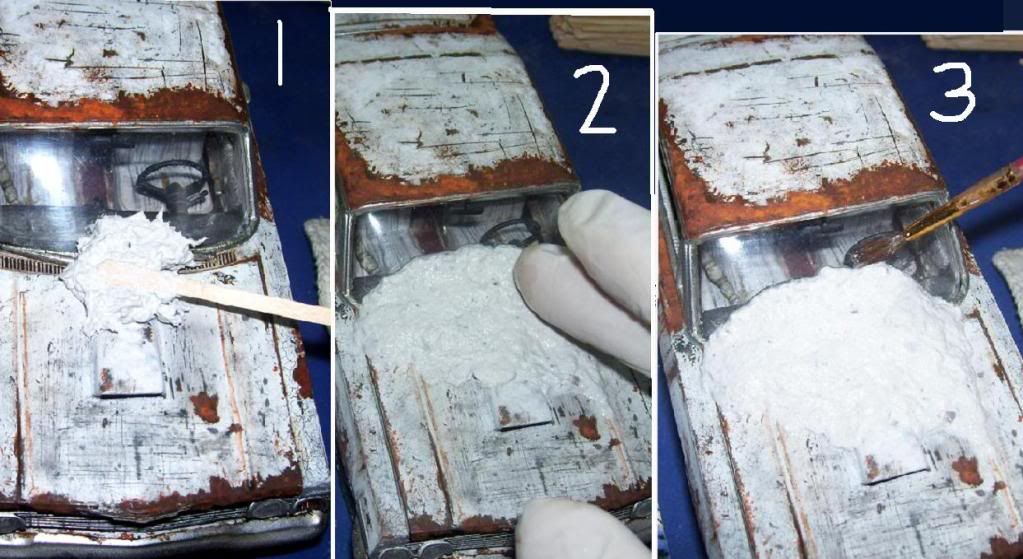
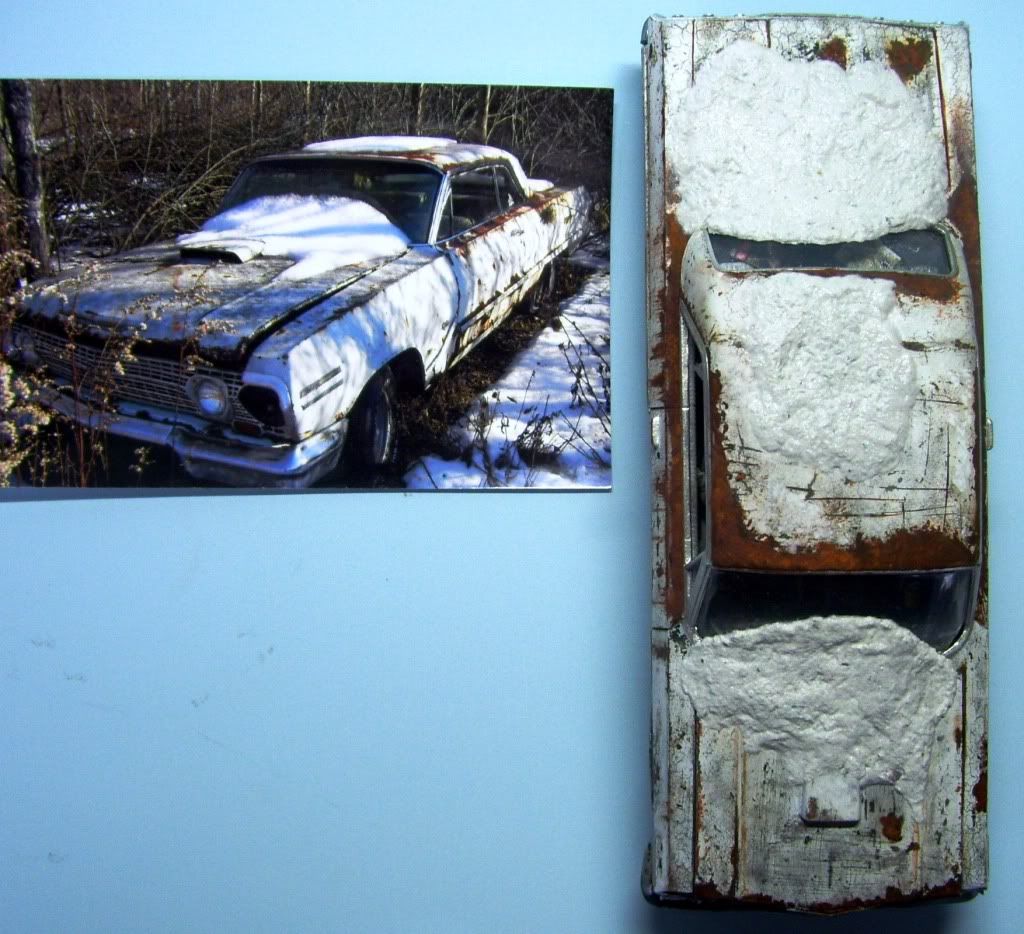
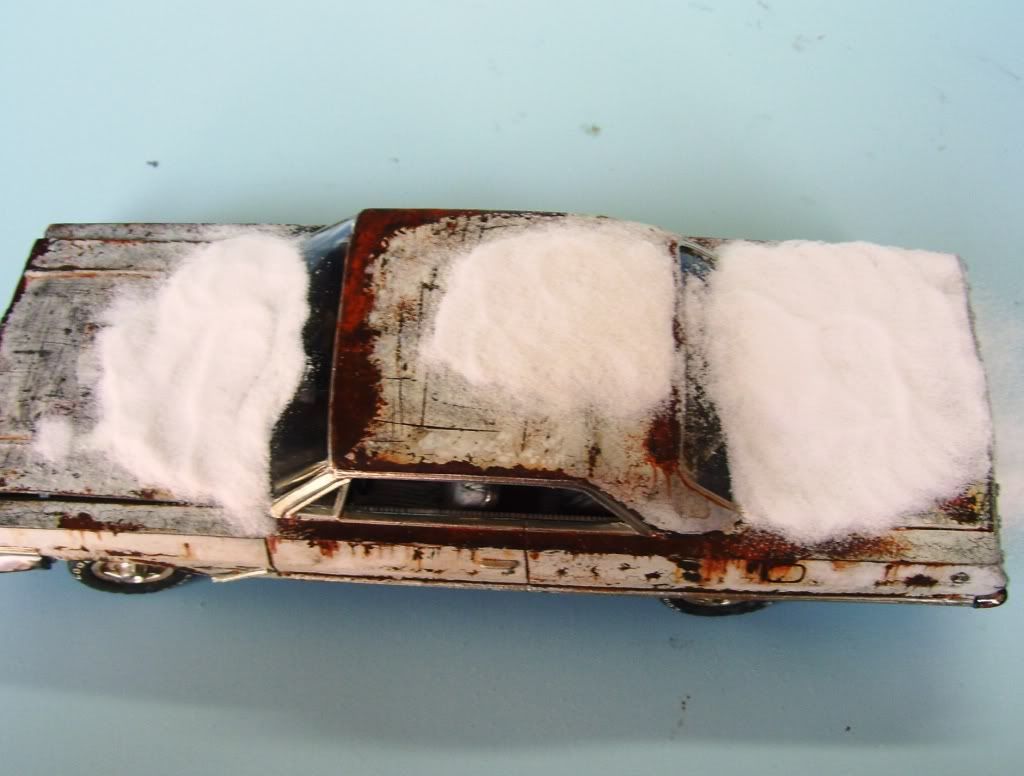
\The three areas have been completed. After this step, I let the model sit overnight to let the celluclay cure and dry. In the morning, I put it inside of my real vehicle, on the dashboard n the sun with the windows up, in order to speed the drying/curing process.

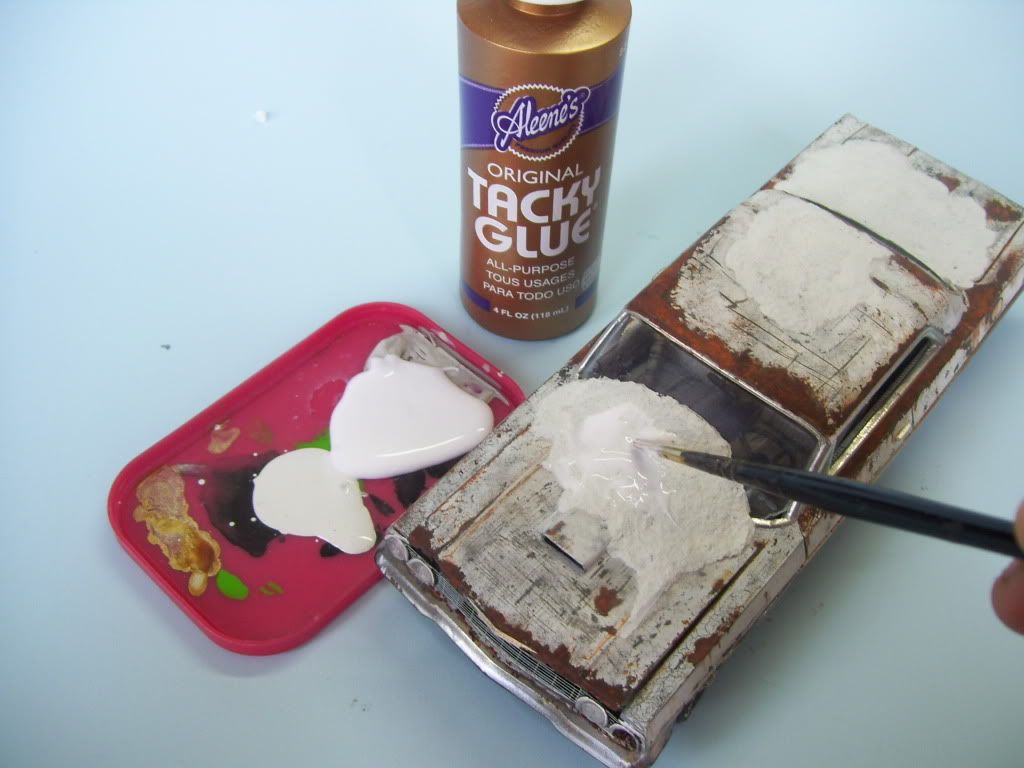
 Next, after making sure that the celluclay was hard, I painted it with white acrylic paint, and then use white Aleene's Craft Glue, which is a really think craft glue similar to Elmer's to carefully cover the celluclay parts.

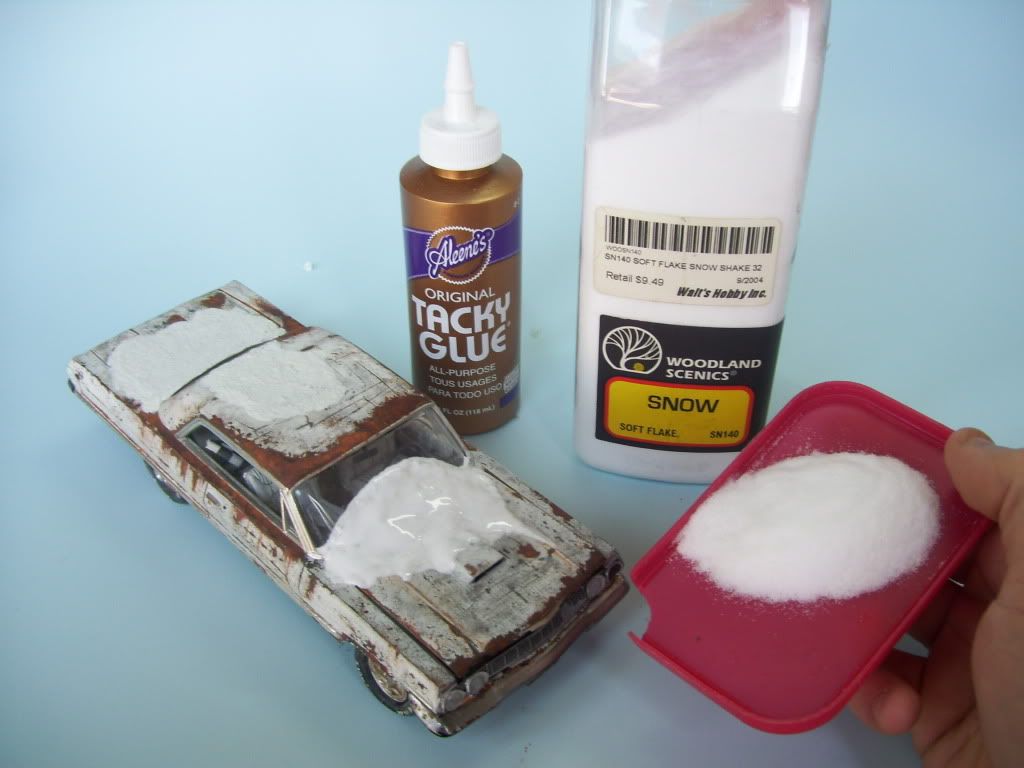
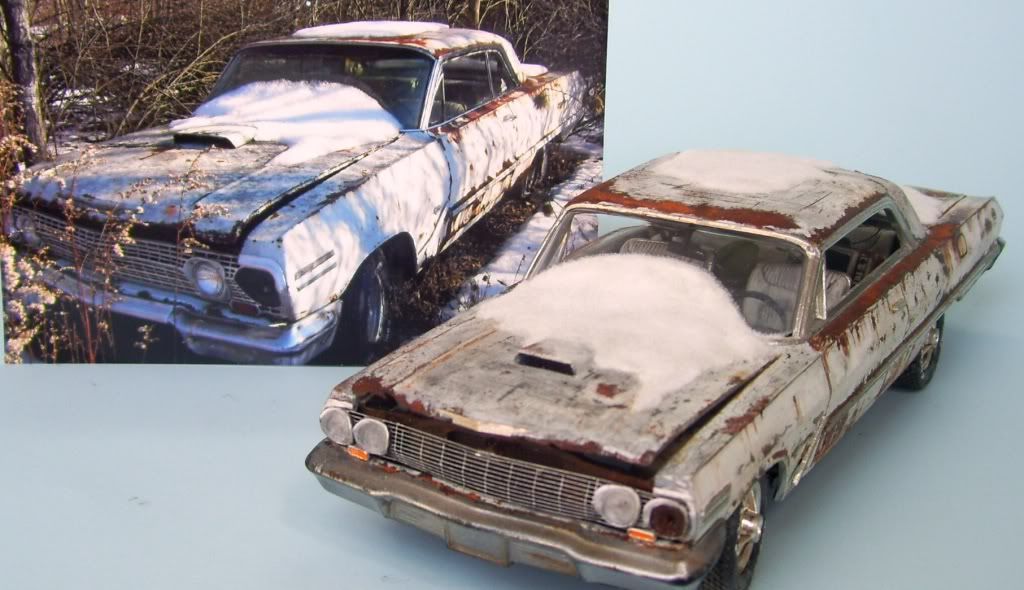
Next, using Woodland Scenics' snow powder, I carefully shake out a covering of "snow" onto the wet glue. I do ONE SECTION at a time! This glue dries too fast to let it sit around.

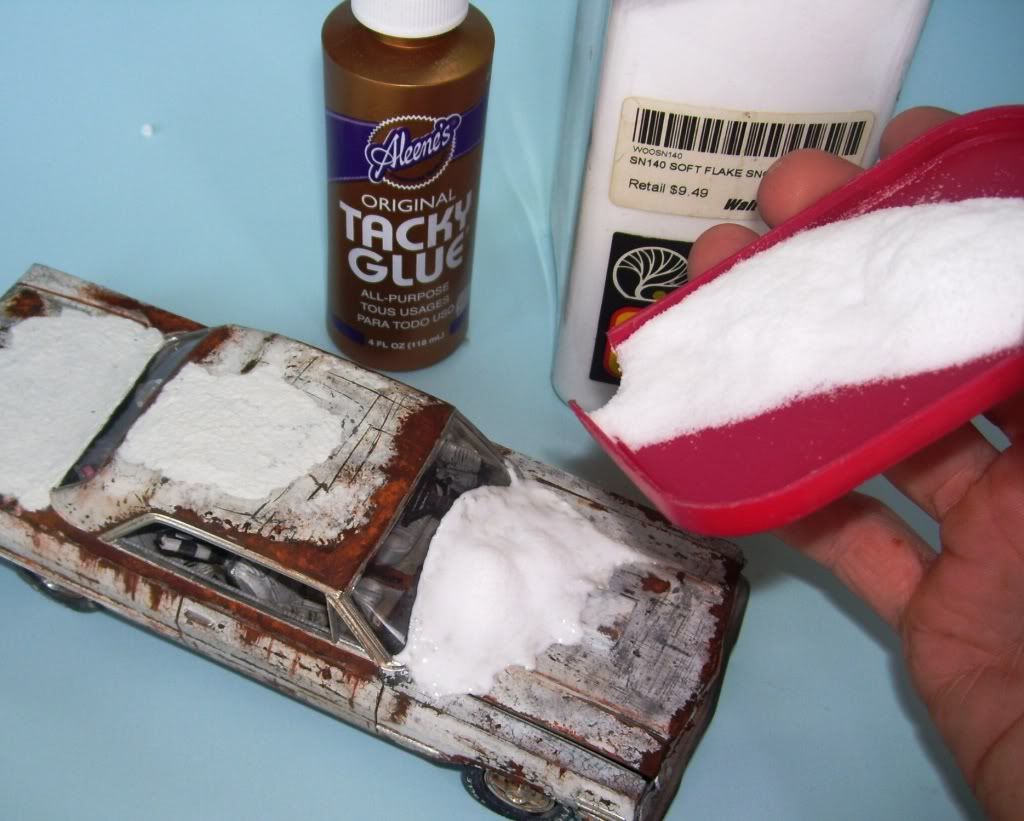
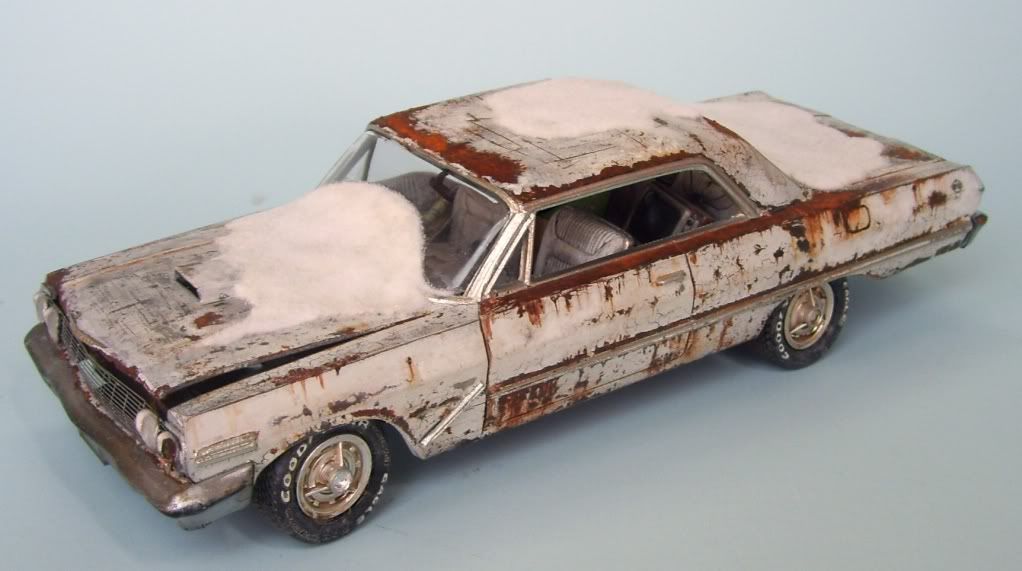
 I applied a copious amount, and tamped it down with my fingers

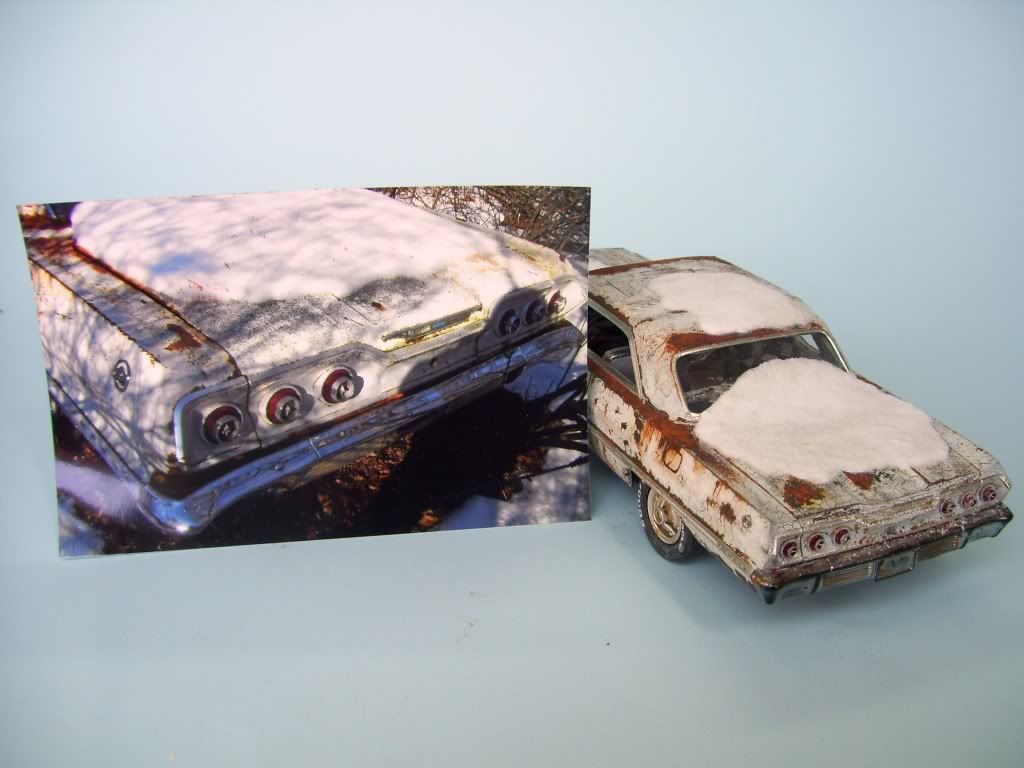
I let it sit for about 10 minutes, and then turned the car over to get rid of the excess, and here's the result!

Now comes making the base, which is being varnished and sealed at the moment. Stay tuned, and thanks for any comments or critiques! Comments are appreciated and welcomed!


  • Member since
    January 2007
Posted by the doog on Wednesday, April 21, 2010 7:11 PM

Thanks, Mike and Jason! I honestly do appreciate your comments and nice words! It's good to know that there are people out there who appreciate the work involved in posting these detailed WIPs, and will take the few minutes to post some support!

THANK YOU!!!! Big Smile

  • Member since
    September 2007
  • From: Truro Nova Scotia, Canada
Posted by SuppressionFire on Wednesday, April 21, 2010 6:47 PM

Yes

Excellent job on the Impala! I will read the entire article at a later time, thanks for posting all the detailed pictures. There is a lot of kung-foo to be learned from weathering & rust master Karl!

Bow DownBow DownBow DownBow DownBow Down

http://i6.photobucket.com/albums/y211/razordws/GB%20Badges/WMIIIGBsmall.jpg


  • Member since
    September 2004
  • From: Tulsa, Oklahoma
Posted by mm23t on Wednesday, April 21, 2010 6:16 PM

Karl, it just keeps getting better. Amazing how junk can turn into a piece of art.

Medals are not "Won", they are "Earned".

Mike..


  • Member since
    January 2007
Posted by the doog on Monday, April 19, 2010 9:34 PM

Thanks, Bill, John, and Jim!

Jim--"Lair of teh SNOW Bunnies"--LMFAO! That one had me rolling! But it's not finished yet! Stay tuned--I still have to complete the weathering and the base with snow on the car, too!

The real car has probably been sitting there less than 15 years. This was next to an old quarter-mile dirt rack that closed in the mid-nineties, I think.

Make sure you look in in about a week or so-- the model itself should be finished by then; not sure how long the base will take?

Thanks for the conversation, Jim! Good hearing from ya! Smile Karl

  • Member since
    February 2003
Posted by Jim Barton on Monday, April 19, 2010 4:03 PM

The real car actually looks in pretty decent shape (I think) for something that's been sitting out in the woods for thirty-five or forty years.

Your model turned out terrific, too!YesYes All you need are some rabbits and you could have "The Lair of the Snow Bunnies!"Big Smile

"Whaddya mean 'Who's flying the plane?!' Nobody's flying the plane!"

  • Member since
    August 2006
  • From: Cygnus X-1
Posted by ogrejohn on Monday, April 19, 2010 4:06 AM

Oh yeah! Nice and junky!

  • Member since
    May 2005
  • From: Left forever
Posted by Bgrigg on Sunday, April 18, 2010 1:54 PM

Seems odd to say this, but...

That poor car looks terrible! Excellent work! Yes

So long folks!

  • Member since
    January 2007
Posted by the doog on Sunday, April 18, 2010 1:23 PM

John, thanks for the info..I will see if I can find your buddy's name in my program!

Mike, thanks---but I think that the discovery was not the hair dryer, but the fact that I was shooting flat acrylic paint over such a shiny gloss finish. THAT--along with the quick-drying of the hair dryer--seems to have made the effect happen? Thanks for your comment!

And here's an update for y'all!

Here's a new update for your pleasure!

I had originally gotten the old AMT Impala kit to do this build with before realizing that the Revell was a much better choice; in any case, that kit comes with these "accessories", so I decided to use them in this build.

In the real car, there's a lot of junk in the rear seat. Unfortunately, I didn't get a good photo of it. However, I figured that these would give that look of a car that head been used as a "junk storage", as old cars sometimes are--ever watch "American Pickers"?! I LOVE that show!

There's  a '70's style speaker, a pair of bed posts or something, an old TV, and a box of flags. I made the flags with some lead foil from wine bottles. Really nothing complicated here; I just cut out some rectangular pieces, and super-glued one end to a styrene rod. Laid a coat of Tamiya White Primer on them, airbrushed 'em green and white, and then used a Sharpie to draw in the checkered squares on the finish flag and draped/posed them in the box. This will give a nice reference to the "racing history" of this car, and give a visual clue to the observer as to the eventual title of the vignette, "Checkered Past" The cardboard box is a Verlinden item--actual German military boxes made from real, "scale" cardboard that can be cut out and folded up and glued. I glued it inside-out, hiding the Nazi eagles and whatnot.

In the interior, I made some more detailing to the rear. I made some "carpets" by taking a piece of rough sandpaper and using some White craft glue to glue some tan flocking to it, and then simply cut it up into squares. I then glued these "carpet squares" onto the read floor area behind the seats, and tinted them with oil paints again.I also added some more Verlinden newspapers and envelopes--all of these are military items from my Armor modeling. They're 1/35 scale, but they look great in this scale as well. There are also some 1/24 magazines that I picked up off eBay.

..and here's the "junk" put inside...kinda hides my carpets...

On the outside, I added all the PE badges--the "SS" logo, and the "Impala" in the trim. You can also see all the BMF that I put down.

 The whole car has been BMF'ed and the tires' lettering painted as per the real car; On the real car, the trim almost seems to have been painted over in white? However, in the interest of "Artistic License", I foiled them, as I think it makes a more visually-exciting model. I can just hear some IPMS judge saying "He forgot to BMF on the trim" ! also added some reflectors to the front grille, as these were absent from the PE set. I made these out of strip styrene. The lights have been added, and some wire stuck out of the empty light hole.
 It was a real bear to get the top to sit on the tub after the windows had been put in. All I can say is "Thank god for the Dremel!"

One thing I have also decided AGAINST doing--putting in the side windows, which have been left UP in the real car. These would be easy enough to add, but they would undoubtedly make it a lot harder to see into the car and see the detail.

Stay tuned for more--I have to do the actual outside rust weathering using MIG oil paints and pigments, and add the "snow" caps on the car, and build the dio base.

More to come! All comments of course are welcomed and appreciated! Karl the doog

  • Member since
    September 2004
  • From: Tulsa, Oklahoma
Posted by mm23t on Friday, April 16, 2010 6:10 PM

Karl, as always excellent work...and the hair dryer, quite the discovery. 

Medals are not "Won", they are "Earned".

Mike..


  • Member since
    June 2008
  • From: Piscataway,NJ
Posted by jtrace214 on Friday, April 16, 2010 5:43 PM

Artie ran Modifieds there and here in Jersey for the life of me I can't remember the number( I have worked on dozens of cars over the years) It would have Art Taylor heating oil on the side and it was a black Olsen car. I want to try and make Wall thos sat. I will be half way there on sat. morning Englishtown swap meets ( great place for model cars I gotten kits there $5.00 each picked up a few Revell choppers there last year for $8.00 each.) Great work so far..


John

the pic to the left is my weekend condo lol

  • Member since
    January 2007
Posted by the doog on Thursday, April 15, 2010 11:18 PM

Darren and Terry,

Thanks, guys! You make me blush! Embarrassed

You should know me by now, Terry-always trying to push myself to new frontiers and new standards of excellence in different genres. I think it helps to prevent me from getting bored with the hobby? I'm gald that you like what I'm doing!

And Darren, I'm pleased to know that I inspire you! I shall try to not let you down! Smile

  • Member since
    May 2005
  • From: Dublin Rep Of Ireland
Posted by terry35 on Wednesday, April 14, 2010 6:25 PM

Hi, Karl sorry I don't call over here too much, I will be calling in on this one more often and thats for sure. THat is just amazing work. I kinda missed you in armour but you are obviously happy wit your current project. Its a stunner and really this one is a true showcase for your skills as a modeller.

Terry.

  • Member since
    October 2003
  • From: Albuturkey New Mexico
Posted by modelmaniac1967 on Wednesday, April 14, 2010 5:25 PM

Doog,

 Your work never ceases to amaze me, you are a genius and when it comes to weathering you are a master, i hope someday i can be as good as you. In fact your work inspires me to keep trying!

Darren

Life is an illusion, if you can master the art of illusion you have it made.[View:http://sdfusioninc.blogspot.com/]

JOIN OUR COMMUNITY!

Our community is FREE to join. To participate you must either login or register for an account.

SEARCH FORUMS
FREE NEWSLETTER
By signing up you may also receive reader surveys and occasional special offers. We do not sell, rent or trade our email lists. View our Privacy Policy.