SEARCH FINESCALE.COM

Enter keywords or a search phrase below:

PAGE 3 ALL FINISHED! "Checkered Past" Rusty Impala vignette

27629 views
76 replies
1 rating 2 rating 3 rating 4 rating 5 rating
  • Member since
    January 2007
Posted by the doog on Wednesday, April 14, 2010 10:18 AM

Thank for the compliment, James!

vespa boy

You nailed it Karl. The decayed paint is super impressive. I think it is the sealing coat that allowed the white to crack like that. As paint dries it shrinks and if it doesn't key into the lower layer it can crack like that...its sometimes called ductile cracking. People who "antique" furniture do the same thing...they apply acrylic paint over a layer of dried white glue (I've heard it called school glue) and it cracks beautifully.

The seats are phenomenal. The yellow foam is so evocative of old cars and a great detail. I didn't know about the BMF technique and it gives great results. Its so cool how you can take your careful observations and incorporate them into your models. I'm really loving these cars you are building lately. Keep them coming.

Narayan, thanks for the nice compliments! And I think you hit it right on the head about the paint cracking--I never knew that, but yes, it makes perfect sense, That seems to be the perfect explanation. I hurried up the drying of the paint and being that it was over gloss, it had no "bite" to speak of, and so it shrunk and contracted. "Ductile cracking"--yup; gotta file that term away for the future! Hey, you don't mind if I quote you if this build ever makes it into article form, do you? Big Smile lol!

I'm glad you like this style of building. Something about old, rotting cars just speaks to me, and I'm always on the lookout for them. This one was just a lucky find! Smile

  • Member since
    January 2007
Posted by the doog on Wednesday, April 14, 2010 10:08 AM

John, that's cool that you were at Moc-A-Tek! I wish now more than ever that it was still open so I could go there and actually root for someone who I knew!

Do you remember anything specifically about the track? What did you run--the stockers or a modified?

I still have an old program from there. I'll have to look and see if your buddy was running in any of the races listed in there!

  • Member since
    April 2004
  • From: Boston MA
Posted by vespa boy on Wednesday, April 14, 2010 9:01 AM

You nailed it Karl. The decayed paint is super impressive. I think it is the sealing coat that allowed the white to crack like that. As paint dries it shrinks and if it doesn't key into the lower layer it can crack like that...its sometimes called ductile cracking. People who "antique" furniture do the same thing...they apply acrylic paint over a layer of dried white glue (I've heard it called school glue) and it cracks beautifully.

The seats are phenomenal. The yellow foam is so evocative of old cars and a great detail. I didn't know about the BMF technique and it gives great results. Its so cool how you can take your careful observations and incorporate them into your models. I'm really loving these cars you are building lately. Keep them coming.

http://public.fotki.com/nkhandekar

This ain't no Mudd Club, or C.B.G.B.,
I ain't got time for that now

  • Member since
    April 2007
  • From: Canada
Posted by JTRACING on Tuesday, April 13, 2010 9:27 PM

Awesome work! Bow Down

  • Member since
    June 2008
  • From: Piscataway,NJ
Posted by jtrace214 on Tuesday, April 13, 2010 9:24 PM

Karl, went there in the early 90's my buddy Art Taylor ran there once in a while and I helped him out. Also in Pa been to Williamsgrove alot,Evergreen,Selingsgrove,Pocono Mt. Nazereth (both dirt and paved tracks) gotta be more I don't recall.In NY I love Syracuse,Rolling Wheels, Middletown etc.. one asphalt track on Long Island, Riverhead I love short  track racing going Sat. night to Wall Stadium in Belmar NJ. 1st asphalt track I ever went to in like 76-77 or so(still own a Street Stock for there)


John


the pic to the left is my weekend condo lol

  • Member since
    May 2003
  • From: fort mill SC
Posted by Robert92562 on Tuesday, April 13, 2010 8:59 PM

outstanding work ...please check out my 69 nova ...needs work post....better photos

  • Member since
    January 2007
Posted by the doog on Tuesday, April 13, 2010 8:06 PM

Thanks, PWB! Smile Yup. I have to say that I dind't see that paint crackle coming--but it sure looks COOL!

I have been aching for some real dirt bikes for YEARS! I wish nearly ANYBODY would release some current, up-to-date models!

Ed, thanks for looking in and commenting!

Thanks, John--I appreciate ya looking in and leaving a Yes!

Gotta say, Huxy--you made me laugh with that one! lol! Yeah, I feel guilty about not coming back sooner to Armor. I'm just onto a "new frontier" here, and learning a lot that will actually help me in Armor building. It's like "Cross training"! I just am having fun with some cool cars that I've always wanted to have in my display case; problem was, I could never gloss paints to work, but now that I've kinda figured it out, I'm just catchin' up on some cool vehicles that I always have admired.

DOn't worry; I'll get back to the treads soon enough. I just have to build a few more "shinys". Smile

  • Member since
    August 2006
  • From: Cygnus X-1
Posted by ogrejohn on Tuesday, April 13, 2010 7:39 PM

An absolute wreck that looks so cool! Mighty fine work Karl!

  • Member since
    April 2008
  • From: Kristiansund, Norway
Posted by Huxy on Tuesday, April 13, 2010 7:34 PM

Karl, the solution to all of your problems here are easy....

Remember the armour?

That's the vehicles that got glorified for the looks you present on this beast in this thread...

Please come home! Black Eye

Forgot the adress?

It's right here: /forums/3.aspx

I for one miss your armour builds a lot..


But that beside, absolutely fantastic, Karl! Just eyecandy all the way!

Cheers!

-Lasse Toast

"Every War Starts And Ends With An Invasion".

  • Member since
    March 2006
Posted by TD4438 on Tuesday, April 13, 2010 3:44 PM

Unbelievable workmanship.

  • Member since
    November 2008
  • From: Biding my time, watching your lines.
Posted by PaintsWithBrush on Tuesday, April 13, 2010 11:35 AM

"...the paint crackled and split in a most unexpectedly wonderful way".

Man, even your goof ups turn into gold! Oh, how I hate you Wink .

Seriously, this is some major nice looking work, as per usual.

I just wish Tamiya would do some current M/X bikes to compliment their crop of roadracers so we could see what you'd do with that.

Regards, PWB.

A 100% rider on a 70% bike will always defeat a 70% rider on a 100% bike. (Kenny Roberts)

  • Member since
    January 2007
Posted by the doog on Tuesday, April 13, 2010 12:16 AM

Thanks, guys! Fox, Spruce-ce, and Bill--I do really appreciate your kind compliments! Glad you're enjoying and learning from the build!

jtrace214

Great work Karl, I fondly remember Aquanet....... Not for this application though lol..... That was when stock cars were stock cars. What track did you go to back then? In the 70's with my first step dad (mom's working on number 7 now lol) we hit alot in Pa./NJ/NY


John

John; thanks, man!

Moc-a-Tek Speedway was up in Lakeville, Pa, on route 590, not far from Lake Wallenpaupack. It was an old dirt quarter-mile. run on Saturday nights. Here's what the concourse and track looked like...

The first turn...

Coming off the back stretch...bleachers in front...

Have you ever been there? It was a good time--rough, dirt racing, with always a good spill or two, and real nitty-gritty dueling on a small track!


  • Member since
    May 2005
  • From: Left forever
Posted by Bgrigg on Monday, April 12, 2010 11:27 PM

Karl, you constantly amaze me how you can take plain old styrene and make it look like a 45 year old wreck.

So long folks!

  • Member since
    June 2008
  • From: Piscataway,NJ
Posted by jtrace214 on Monday, April 12, 2010 11:14 PM

Great work Karl, I fondly remember Aquanet....... Not for this application though lol..... That was when stock cars were stock cars. What track did you go to back then? In the 70's with my first step dad (mom's working on number 7 now lol) we hit alot in Pa./NJ/NY


John

the pic to the left is my weekend condo lol

  • Member since
    September 2005
  • From: Illinois: Hive of Scum and Villany
Posted by Sprue-ce Goose on Monday, April 12, 2010 10:28 PM

Oh,Man !

It pains me to see a car in that condition.

Great job on rusting plastic !

Makes me want to look under the model for rust flakes falling to the table.

fox
  • Member since
    January 2007
  • From: Narvon, Pa.
Posted by fox on Monday, April 12, 2010 10:18 PM

Looking great Karl. I'm learning a lot from your builds. Utterly fantastic. Toast

Jim Captain

 Main WIP: 

   On the Bench: Artesania Latina  (aka) Artists in the Latrine 1/75 Bluenose II

I keep hitting "escape", but I'm still here.

  • Member since
    January 2007
PAGE 3 ALL FINISHED! "Checkered Past" Rusty Impala vignette
Posted by the doog on Monday, April 12, 2010 2:34 PM

Hi guys,

Well, it's time for another junker. This particular project comes from a real-life experience and car. Lemme explain.

If you saw my thread about the '34 modified race car that took me 9 time and one body ruined to finish, you'll remember that it was a fond "tribute" so to speak, to an old quarter-mile dirt track that I used to go to as a kid, but that has long since closed. Well, this past winter, Jenn and I took a trip up to Moc-A-Tek Speedway in Pennsylvania to see what was left of it--it is remarkably still there, and fairly intact.

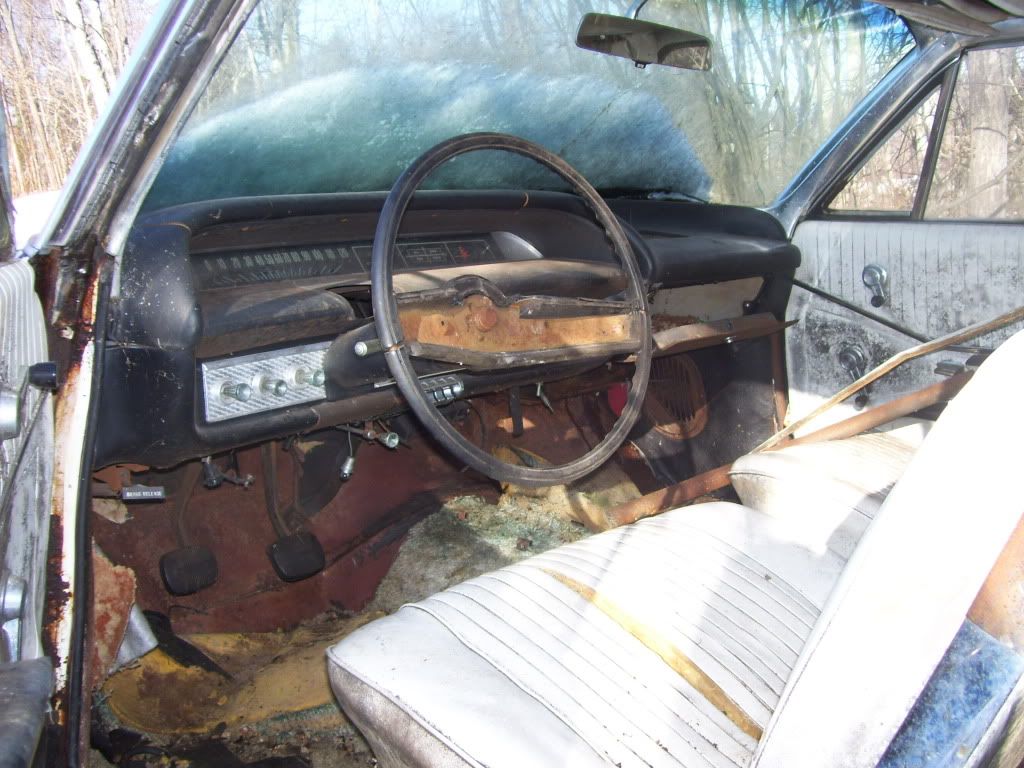
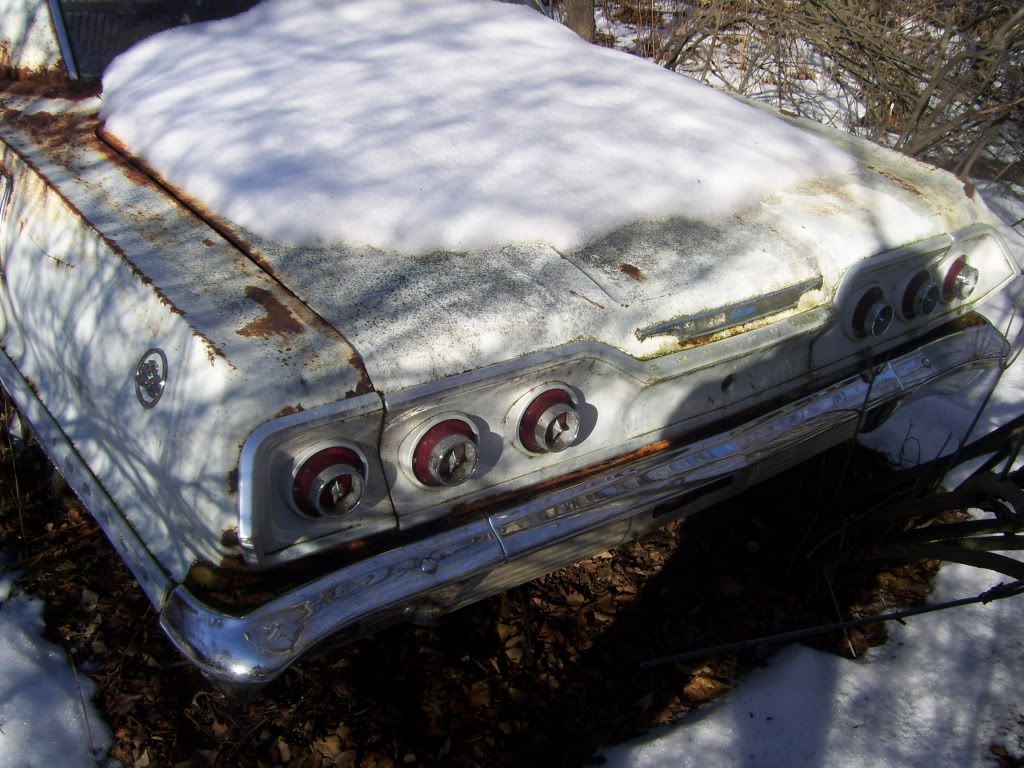
Anyway, as the main gate was closed,, we had to go in "the back way" (through the woods) and we came upon this old modified stocker--an old Impala that had been raced at one time. The hood scoop wasn't stock; it had racing tires, and unbelievably someone had put the '63 shell over a '64 interior! The engine was gone, of course, but it remained there, a mute testimony to good times gone past.

First, here's some looks at the car;

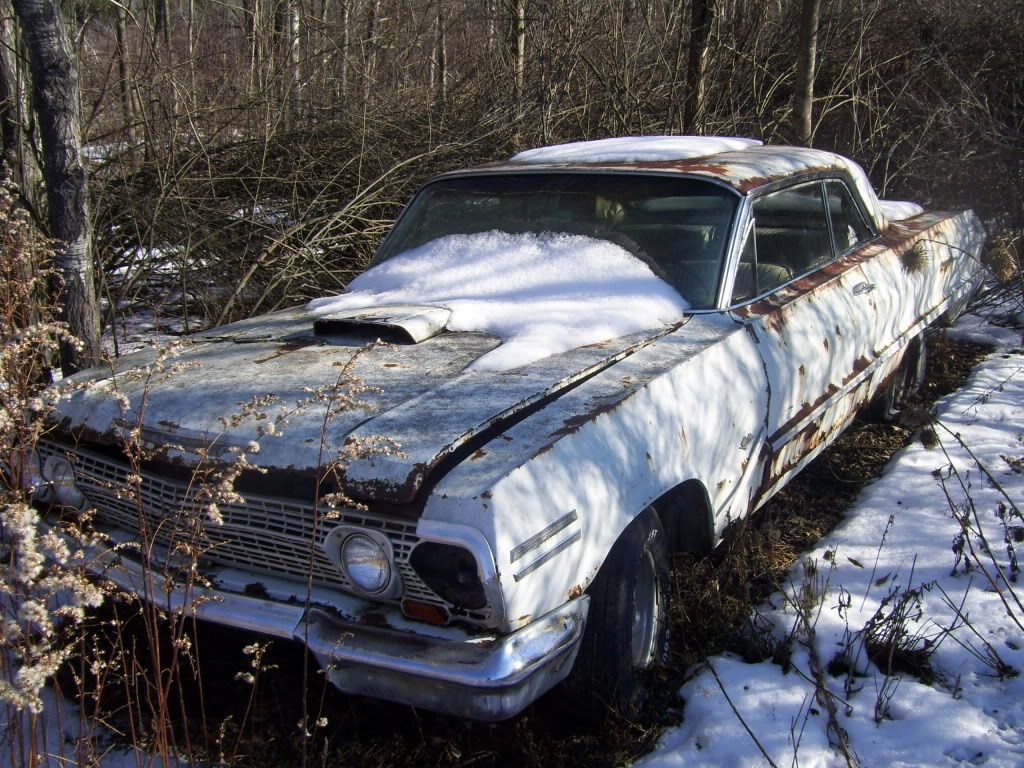
Pretty roached, huh? So the first thing I had to do was to procure two kits to put together. Luckily, Revell makes both! I hoped that this would make the "squeeze" a little easier. Hmmmm...lesson #1--NEVER ASSUME!

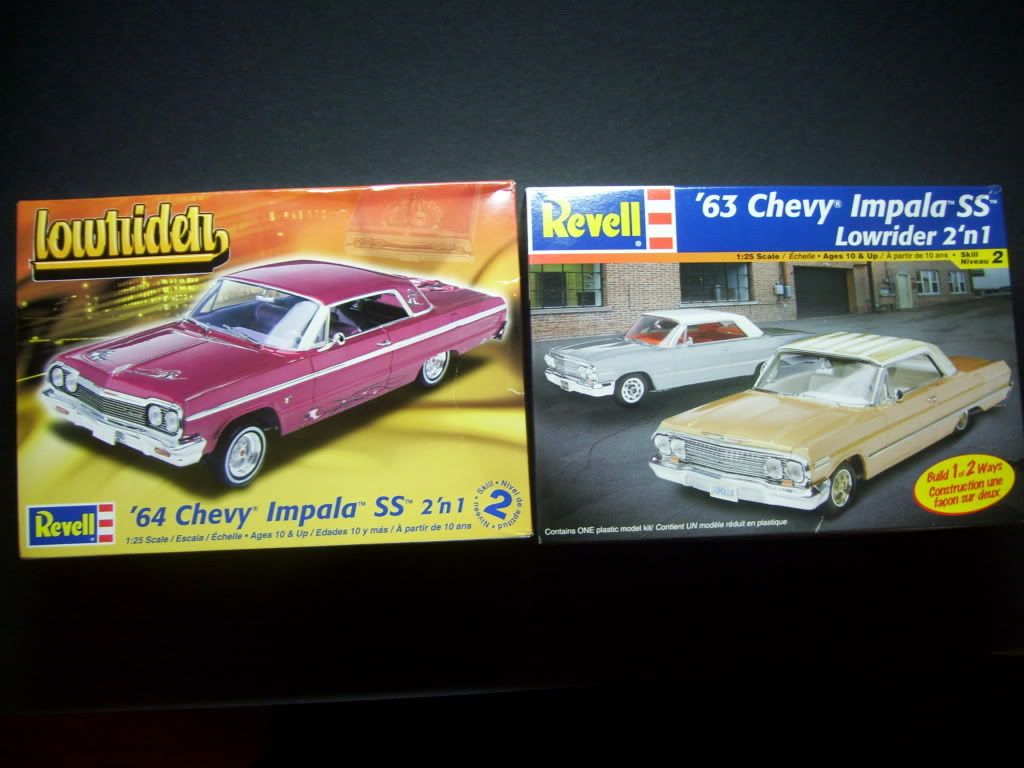
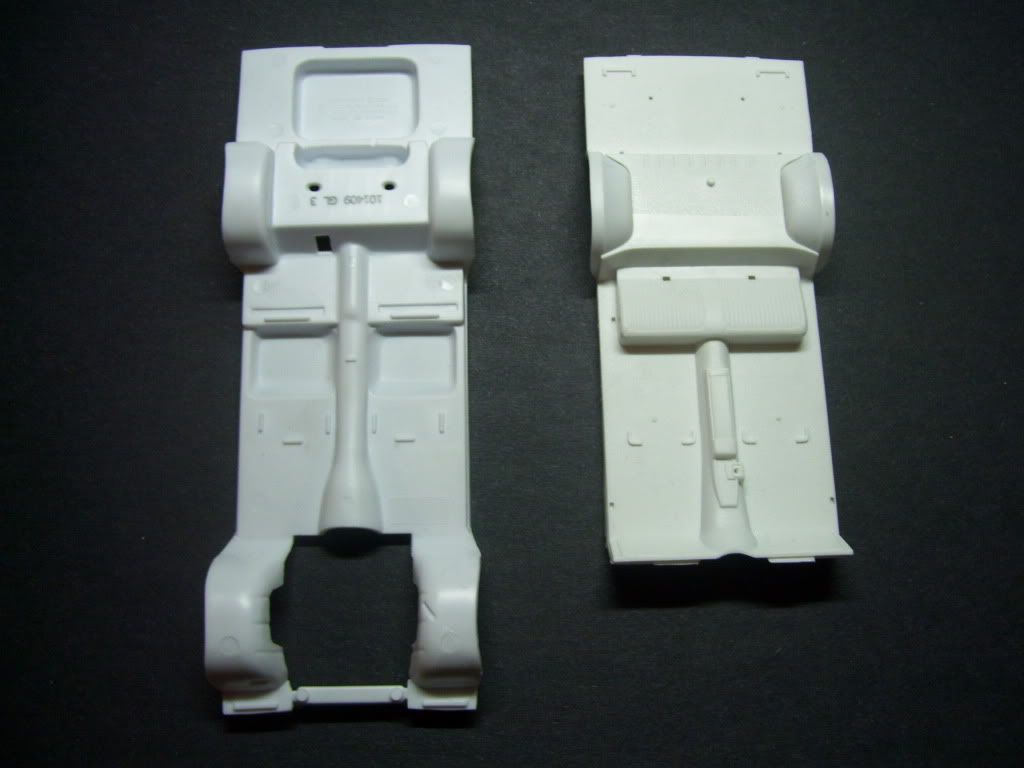
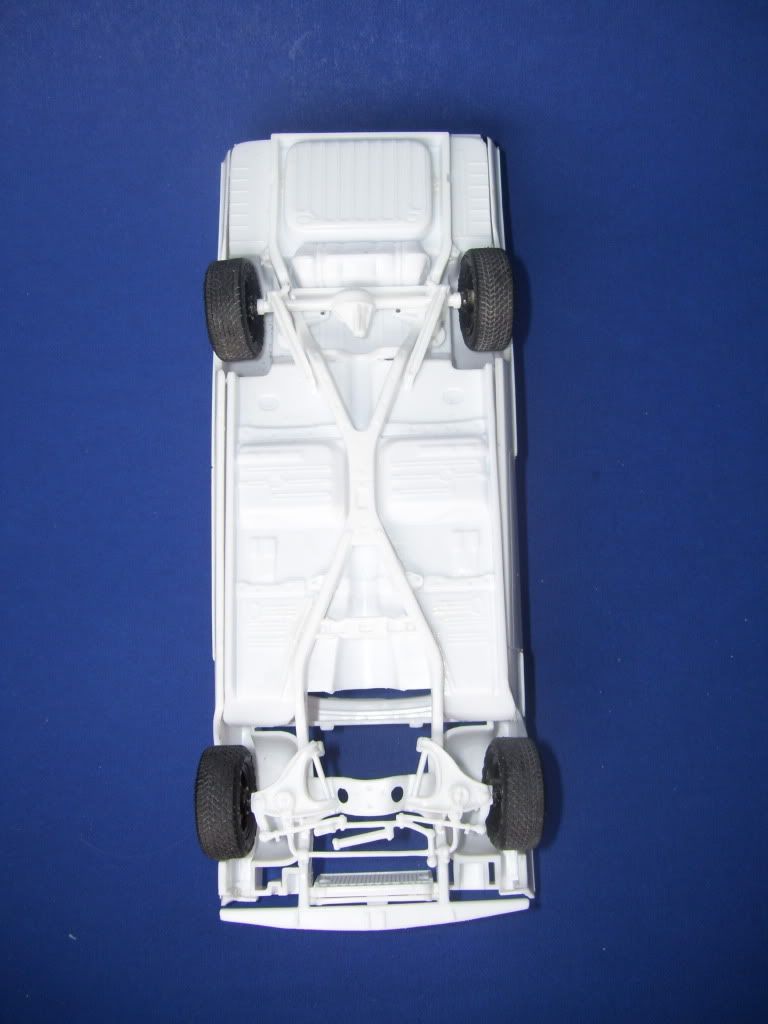
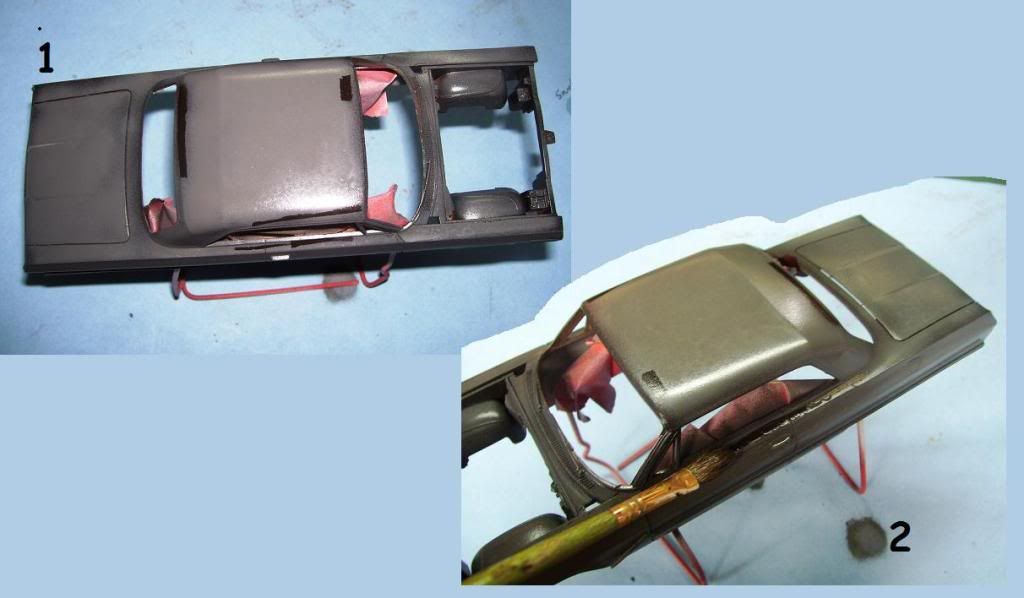
First, the two kits are completely different in the way the tub and floorpan fit;

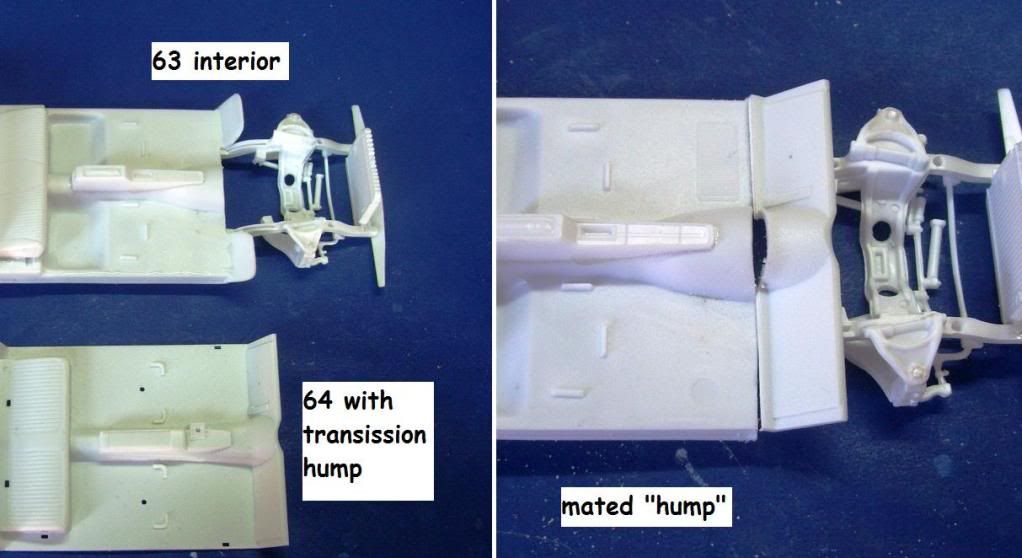
I wound ip having to cut the front off both, and join the 63 transmission hump to the 64 floorpan.

When I tried to mate some spare "Goodyear" tires instead of the stock whitewall-type tires, I got this mismatch--the tires wouldn't fit.

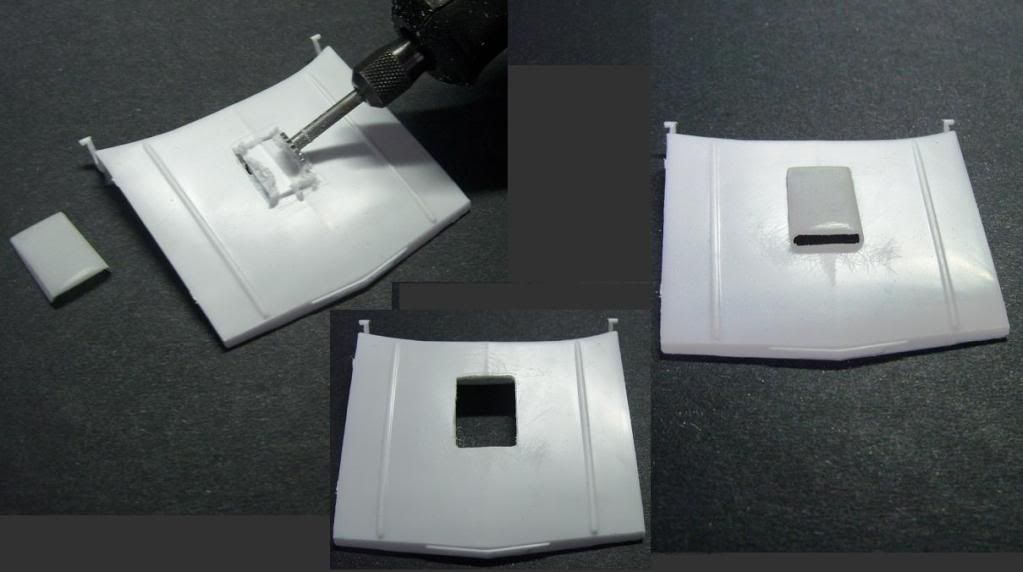
I had to fix that, and got a good sit by using a Dremel to ground down the hubs. I also cut out the hood for the scoop, and used a scoop sent by a friend from a '49 Ford kit.

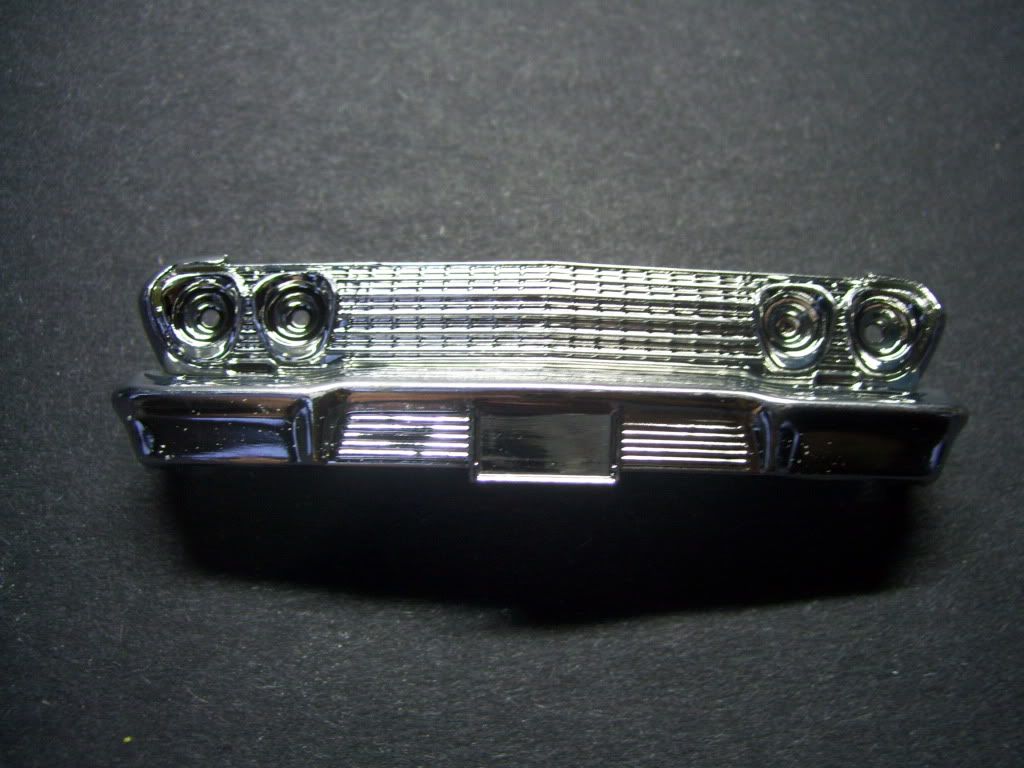
The grille was just too heavy-looking, and too much work to make usable. I used a Detail Master 64 Impala PE set to fashion a new grille.

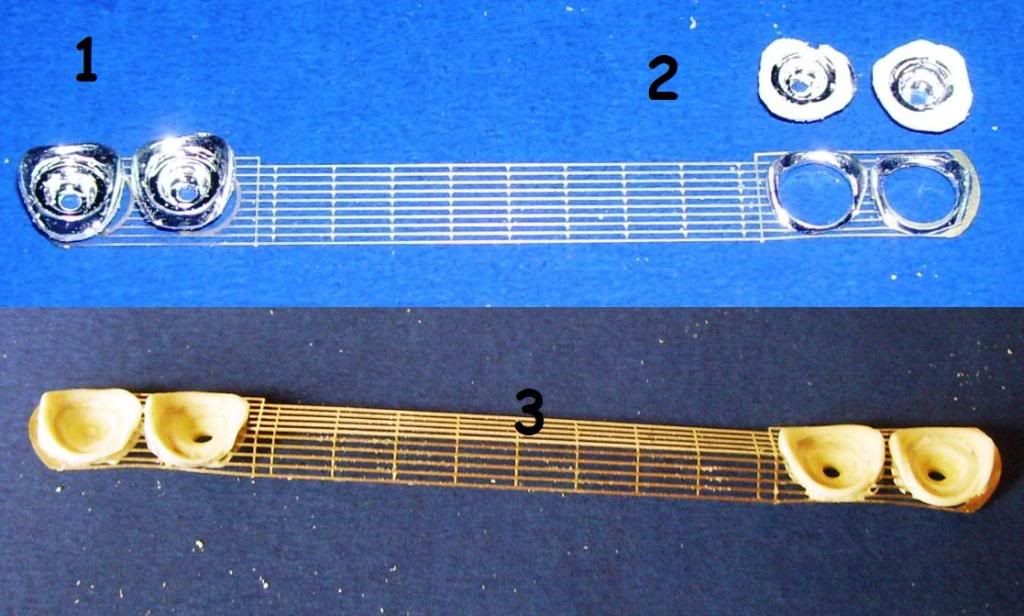
I had to detach the grille from the bumper; I also then removed the individual light sockets from the plastic frame.

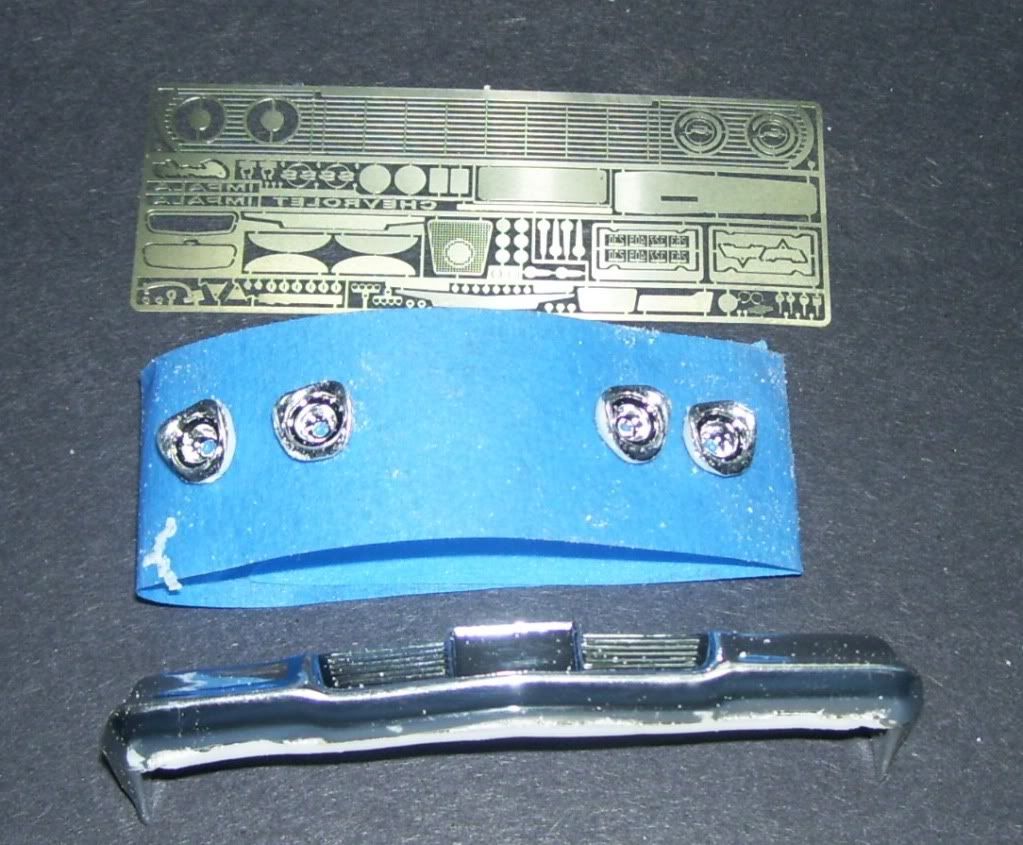
...and then carefully cut those in half, joining the two halves around the PE frame. In #1 you can see that they wouldn't have fit without this mod--they would sit too high in the PE frame.

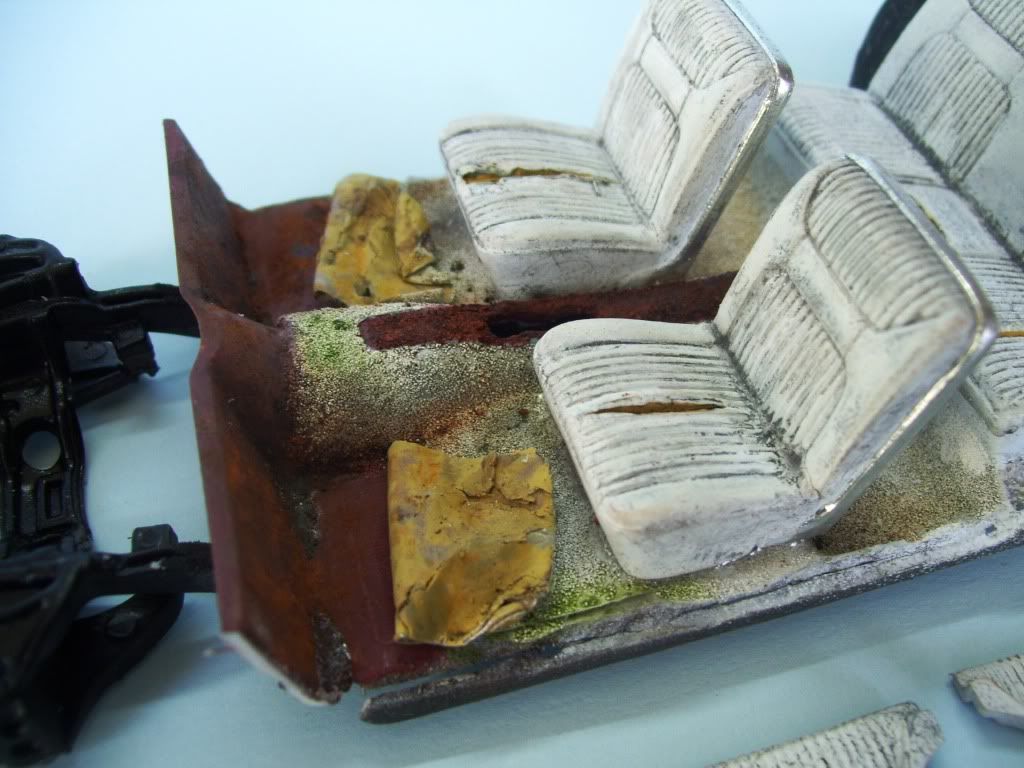
The seats needed some aging. I cut into the seat with a razor saw, opened up the cut with a #11, and used BMF to simulate the ripped fabric.

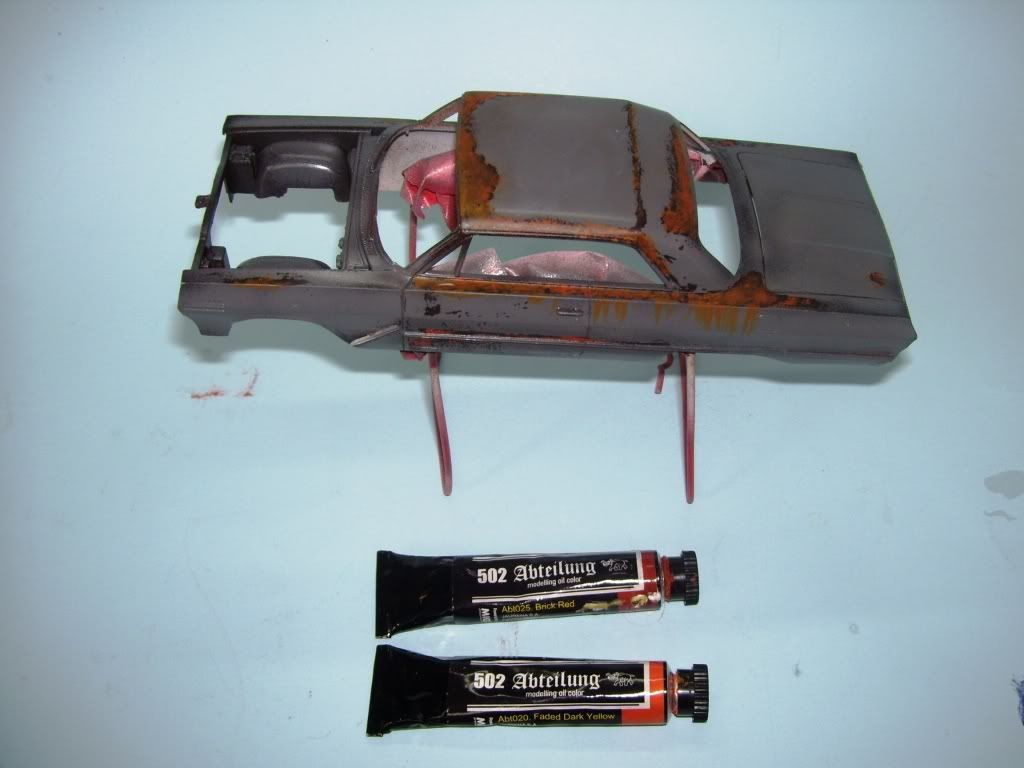
The car's carpets have been pulled up near the tranny hump, exposing red primer. I painted this with a Tamiya mixture, and used lead foil to simulate the ripped-up carpet. Then, the floor was "flocked" with embossing powder (THANKS JTRACING!) and then MIG "502 Abteilung" oils were used to tint and paint the piece.

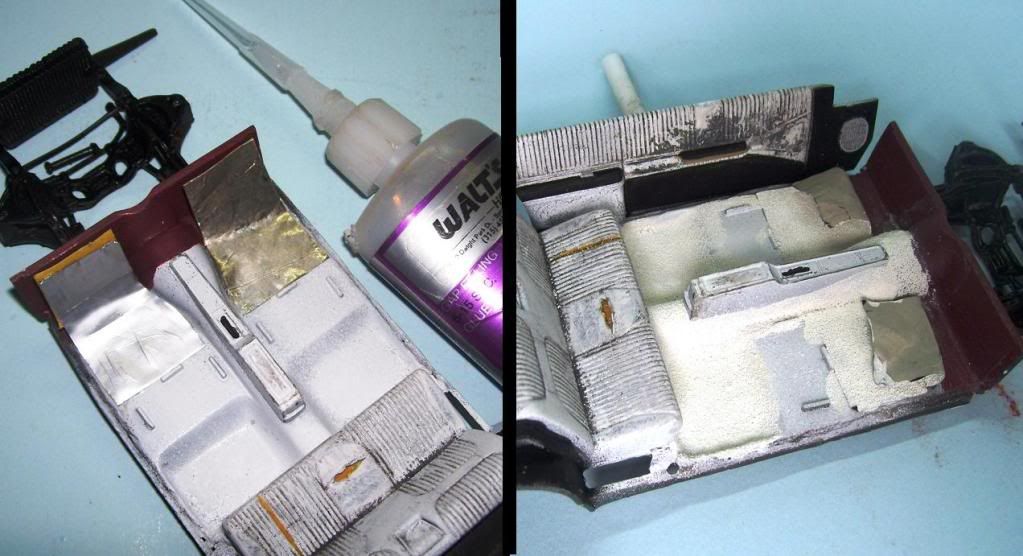
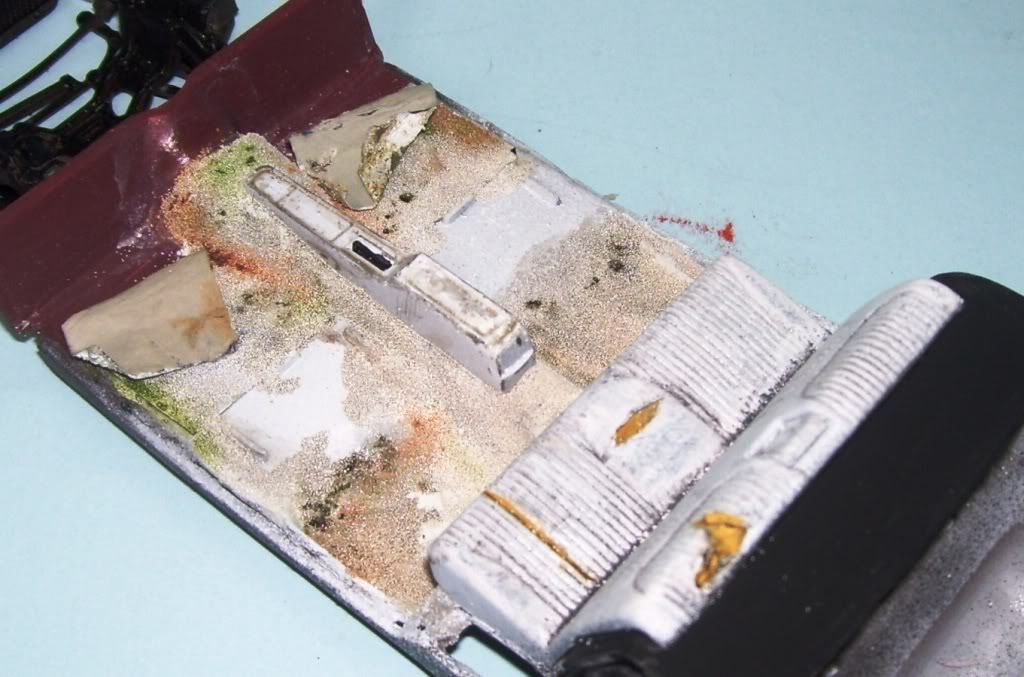
The "bottom" of the "carpet" was coated with Squadron White putty--this would be "cracked" later to simulate the degraded insulation underneath the carpet. Note too, the ripped seats.

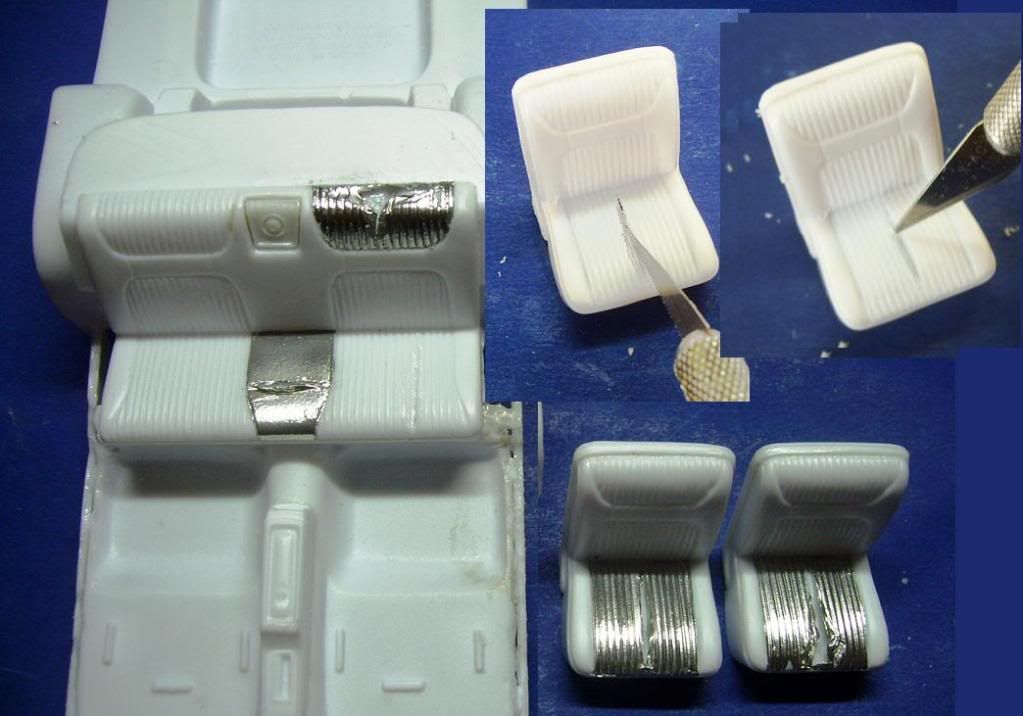
The interior pieces. I cut out the glove compartment, and fashioned an inside. The door panels have BF trim, and Detail Master door handles set upon styrene posts.The interior of the steering wheel was also hollowed out.

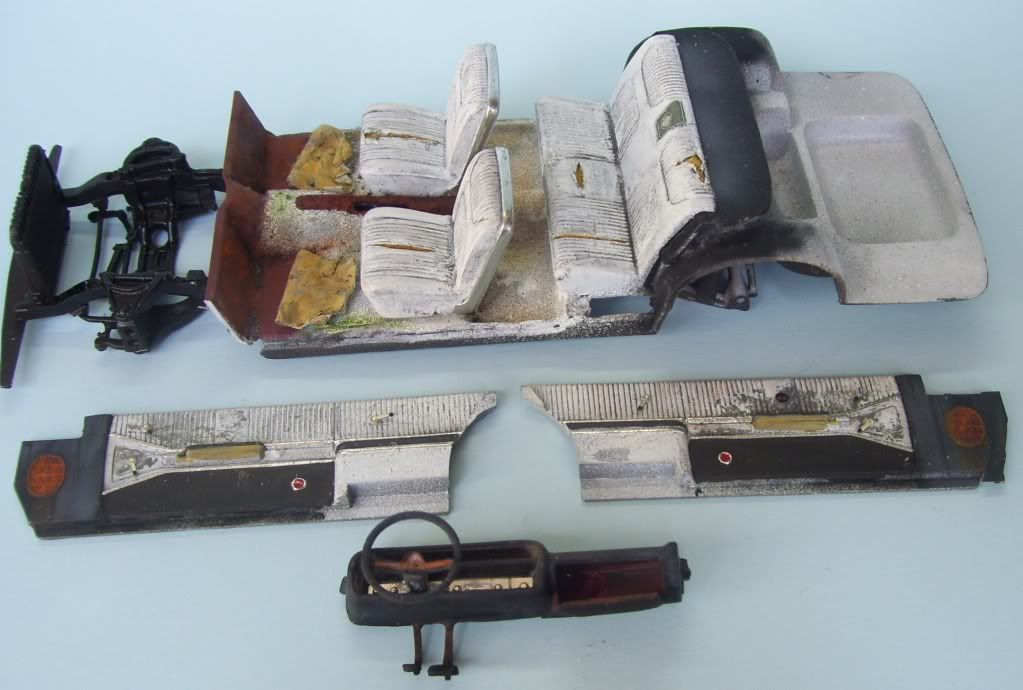
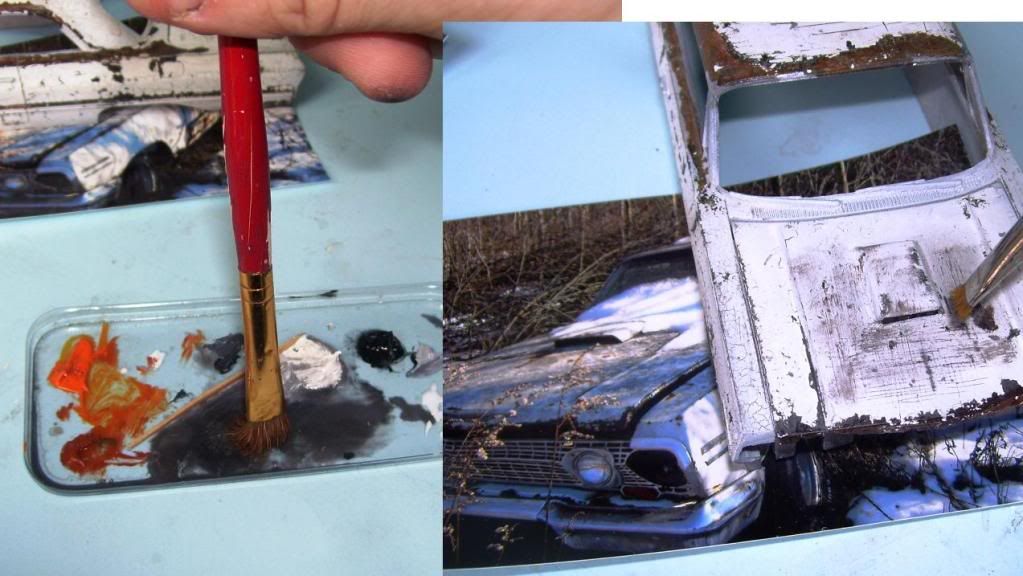
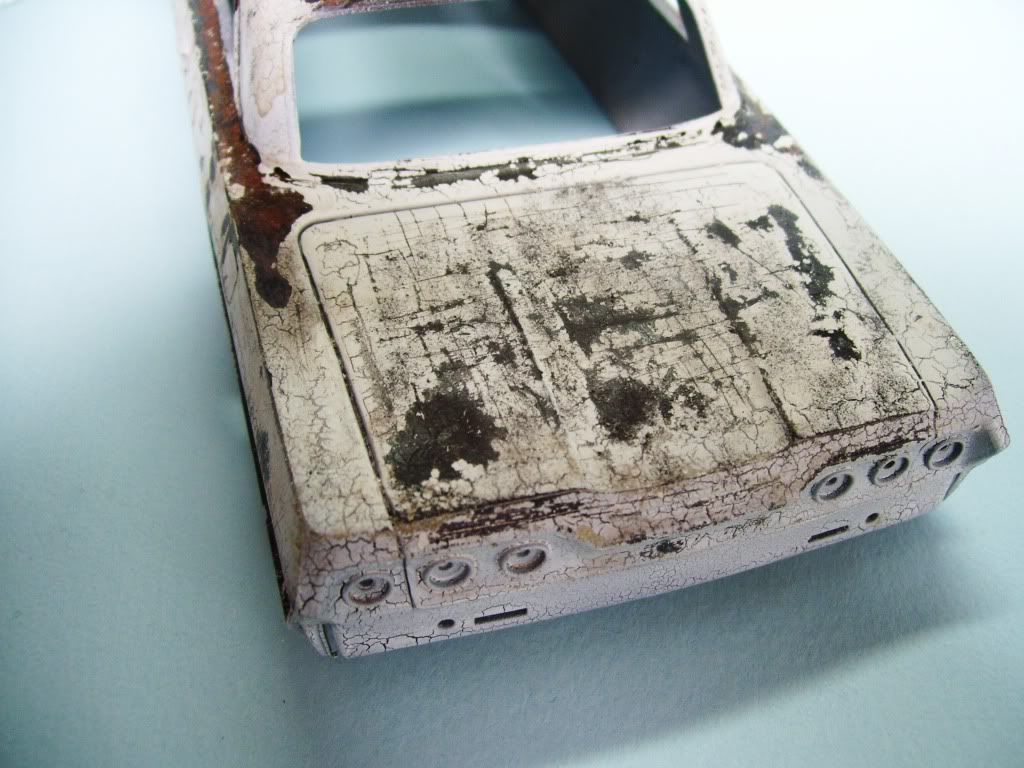
Compare the finished interior with the above photo. The insulation has been painted, and I noticed that the console had been ripped out as well in the real car, so with a pair of channel-lock pliers, I did the same. MIG weathering pigments were used to rust that area, and a Dremel used to open a hole for the shift linkage.

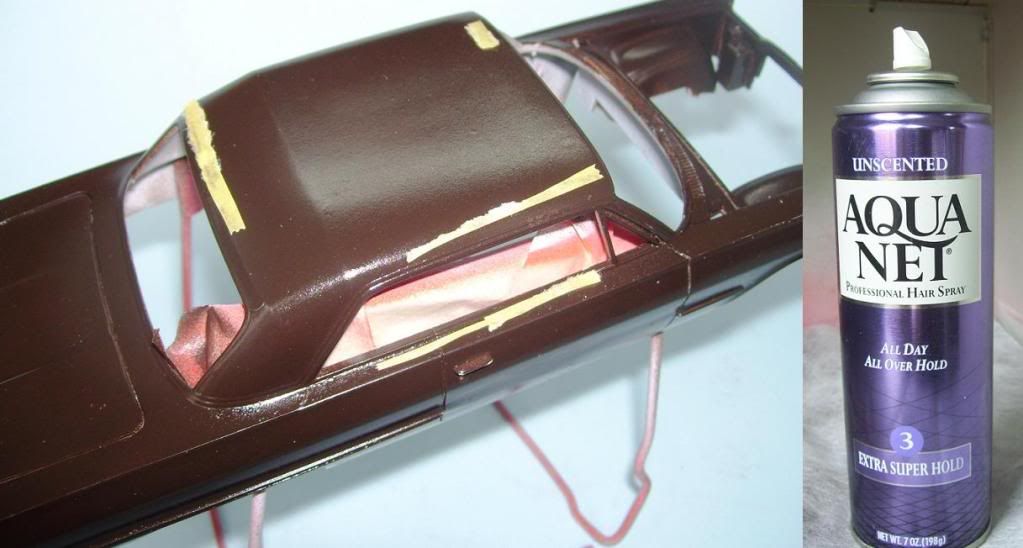
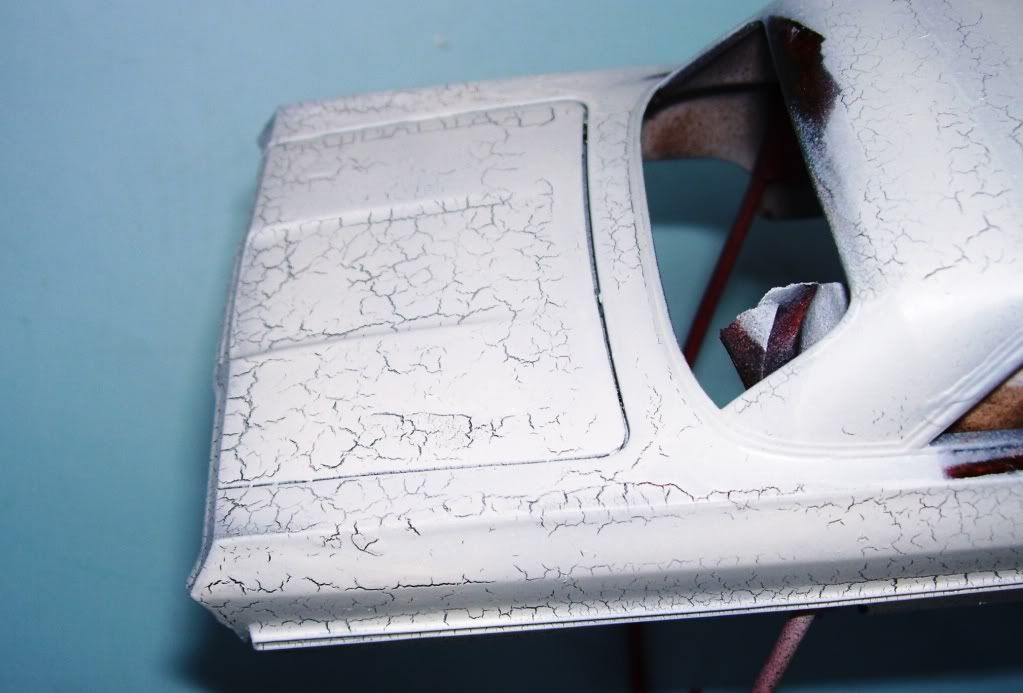
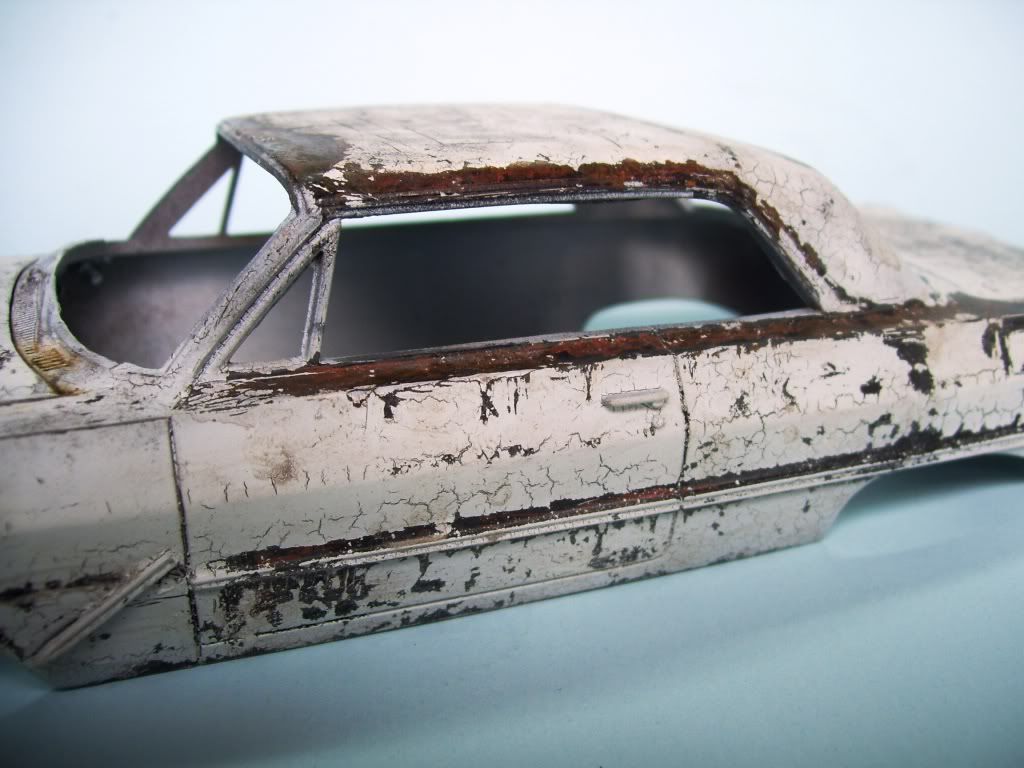
Now, getting to the exterior--I had to plan how to portray that degraded finish. There was a lot of cracking and fracturing of the paint, with gray primer showing through beneath, and of course, the rust. I decided to use the hair spray method.

Once again, I called upon my old lover, Aqua Net Extra Super Hold, to assist me. I mixed up an appropriate dark rust color from Tamiya Red-Brown, Orange, and Black, with some added Tamiya Clear to give a glossy shine to the paint. Tamiya "Clear" is NOT a "clear gloss" that you can spray over a finish! If you do that, it will fog and ruin your finish! In this photo, the car has been sprayed with the color, then sprayed with some hair spray, and pieces of tape used to block off areas that I know I will want exposed  This also helps to facilitate the passage of water into the hair spray underneath the next color coat, As the hair spray is easily water-soluble, the hair sray dissolves and carries away the top layer of paint.

Next, the model was painted with a mix of Tamiya White + Black, both gloss colors. The tape was removed, and then a swath of water put on the exposed rust/hair spray and left to sit for a few minutes.

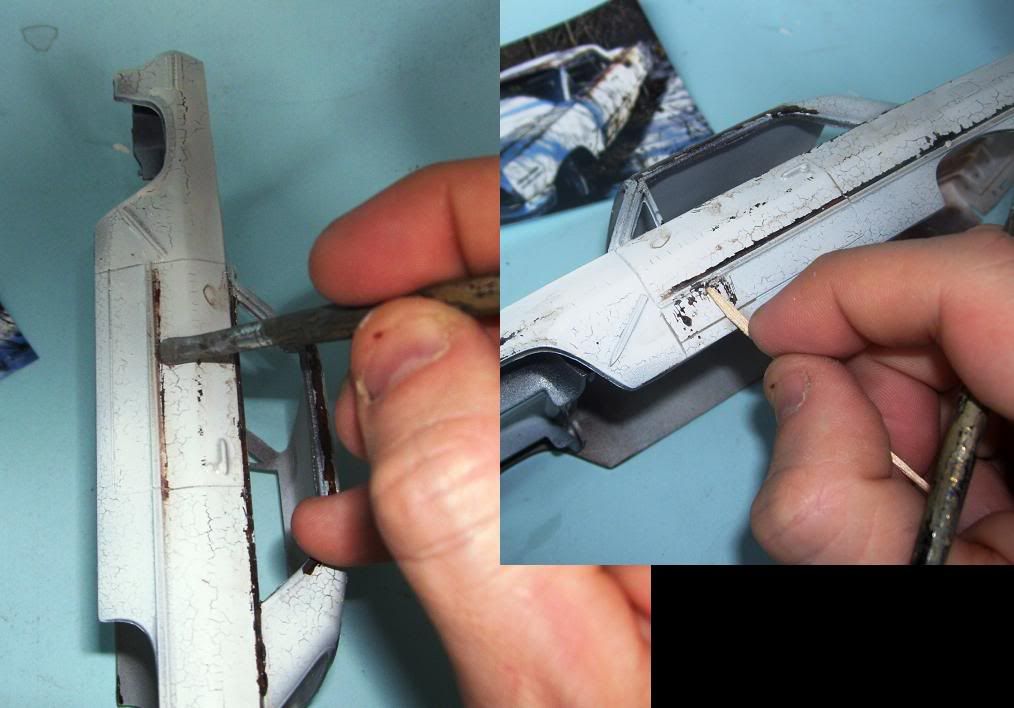
Using short and stiff-bristled brushes as well as toothpicks, I started removing paint where I wanted the rust to be prominent.

I then used some MIG "602 Abteilung" oils to play up the rust color to a lighter shade.

OK, fast forward a bit....the model was then sealed--yes, sealed!--(I RARELY EVER use sealing coats!) using some Testor's Gloss. Why gloss? Because again, the gloss helps the next layer of paint slide off the dissolving hair spray easier. I then used some MicroMask to cover the rusted parts, instead of the tape, which is rather imprecise. Then, another generous coat of hair spray. The model then got a few coats of Model Master acrylic Flat White. I used MM acrylic, because it's not as "toothy" as Tamiya, which is actually a form of acrylic/lacquer.

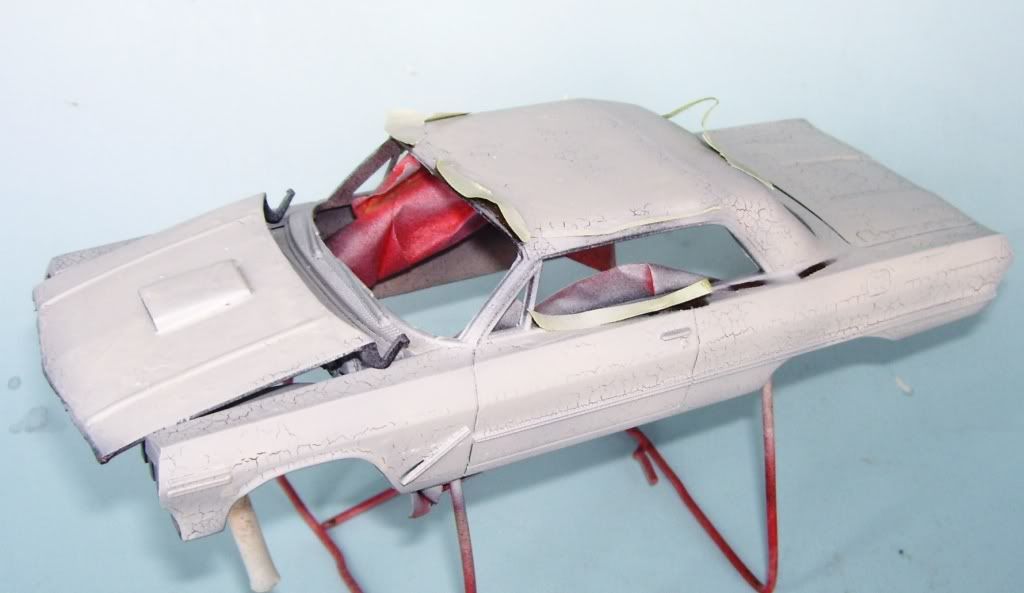
And then, this wonderful "accident" happened--I used a hair dryer to speed up the drying time (it was a somewhat humid day) and the paint crackled and split in a most unexpectedly wonderful way!

I'll take it! The next step was to then weather and beat-up the finish as per the photo of the real car.

I used th Exacto, toothpicks, and even rough sandpaper to remove selected areas of paint, I used water to loosen the hair spray.

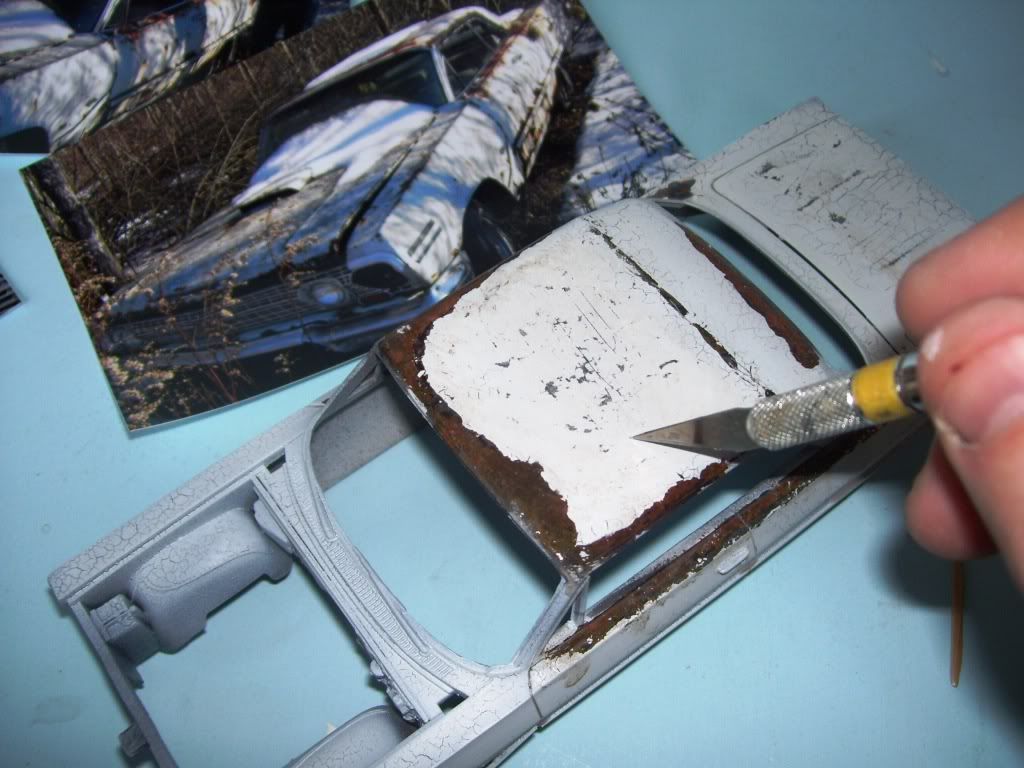
I then used some gray mixed oil paint to accentuate the degradation of white-into-gray.

And the result so far..

Well, that's where I'm at for now. I'm currently working on BMF'ing the car, and still need to do the rust streaking and pigments. Plus a lot of small detailing. Hope you like it so far!

All critiques, observations, and comments are always welcomed and appreciated!

Karl the doog


JOIN OUR COMMUNITY!

Our community is FREE to join. To participate you must either login or register for an account.

SEARCH FORUMS
FREE NEWSLETTER
By signing up you may also receive reader surveys and occasional special offers. We do not sell, rent or trade our email lists. View our Privacy Policy.