SEARCH FINESCALE.COM

Enter keywords or a search phrase below:

Reworking a Vintage T-47

3768 views
47 replies
1 rating 2 rating 3 rating 4 rating 5 rating
  • Member since
    January 2009
  • From: Central CA
Posted by Division 6 on Thursday, March 26, 2009 5:01 PM

Got a bit more work done.

Made the inner panels with all the holes.

Also started reworking the guns.

Eric... 

  • Member since
    January 2009
  • From: Central CA
Posted by Division 6 on Tuesday, March 24, 2009 11:17 AM

I just picked up some 3/16" brass rod for replacing the cannon tubes.

I was looking to some perforated plastic or metal to place in the panel openings like the stuff used on the studio models but couldn't find anything so I guess I'll have to try and hand drill enough to fit my needs. 


Eric... 

  • Member since
    January 2009
  • From: Central CA
Posted by Division 6 on Monday, March 23, 2009 5:33 AM

You should find some useful pix in this thread for the gun.


Yeah I was thinking some small ribbing and some wiring.

I wanted the round one to be a refueling port. 


Eric... 

  • Member since
    October 2003
  • From: Albuturkey New Mexico
Posted by modelmaniac1967 on Sunday, March 22, 2009 11:02 PM
You should be able to do some shallow access panels with some shallow ribbing and wires in the panels that you opened. Can be workable. Or just wires. I was thinking of doing that in areas on mine that have no space either. But then again if i get to carried away ill have just a ton of panels that make no sense. I think Ill leave mine alone and just concentrate on the scribing and harpoon gun....

Life is an illusion, if you can master the art of illusion you have it made.[View:http://sdfusioninc.blogspot.com/]

  • Member since
    October 2003
  • From: Albuturkey New Mexico
Posted by modelmaniac1967 on Sunday, March 22, 2009 10:50 PM
Oh sweet, I like the panel in the front. The scribing is awesome and I really like the scribing , coming out really cool.

Life is an illusion, if you can master the art of illusion you have it made.[View:http://sdfusioninc.blogspot.com/]

  • Member since
    January 2009
  • From: Central CA
Posted by Division 6 on Sunday, March 22, 2009 10:44 PM

Made a little progress today.

Cut out a few panels but sadly there isn't much space in there.

Eric... 

  • Member since
    October 2003
  • From: Albuturkey New Mexico
Posted by modelmaniac1967 on Saturday, March 21, 2009 10:03 PM
Looking really good, I like it, great work. Recessed panels are so much better than raised lines...

Life is an illusion, if you can master the art of illusion you have it made.[View:http://sdfusioninc.blogspot.com/]

  • Member since
    January 2009
  • From: Central CA
Posted by Division 6 on Saturday, March 21, 2009 5:42 PM

Alrighty,

Just got all the scribing done on the main upper body.

It was easier than I thoughy it would be.

Only down side is I discovered after I started that I drew the lines between the 2 support pylons off by about 1/4 inch.  oops.


Go slow and use the back edge of the blade.

I used a standard metal ruler as a straight edge.

I also used a couple phone books to rest the piece on so it was flat and easy to work with. 


After many messed up attempts in the past I am finally over my fears of scribing.Party [party]


Eric... 

  • Member since
    January 2009
  • From: Central CA
Posted by Division 6 on Saturday, March 21, 2009 2:11 PM

Did you see the post in the techniques section on scribing lines? 

Here 


Eric... 

  • Member since
    October 2003
  • From: Albuturkey New Mexico
Posted by modelmaniac1967 on Saturday, March 21, 2009 12:25 PM
Im anxious to see how the scribing goes. I know I have to do it to make it more realistic, just very nervous getting a straight line. Can't wait to see how yours comes out.

Life is an illusion, if you can master the art of illusion you have it made.[View:http://sdfusioninc.blogspot.com/]

  • Member since
    January 2009
  • From: Central CA
Posted by Division 6 on Saturday, March 21, 2009 12:14 PM

A few turns should do it but after a couple mishaps I went all the through on all of them accept the 2 on the back flap area.

A little spot putty on the back will fix it.


Eric... 

  • Member since
    October 2003
  • From: Albuturkey New Mexico
Posted by modelmaniac1967 on Saturday, March 21, 2009 12:05 PM

I went back and check out those models and it does look good, ill have to add that to my list of things to do. In order to not drill to far in did you use a guide or anything to keep the drill bit from going to deep?


Life is an illusion, if you can master the art of illusion you have it made.[View:http://sdfusioninc.blogspot.com/]

  • Member since
    January 2009
  • From: Central CA
Posted by Division 6 on Saturday, March 21, 2009 9:30 AM

They are used on the panels to simulate screw placement or something.

Check out the filming models I linked to in your thread and you'll see what I mean.


I used a pinvise to do them but it didn't really take that long.

I counted them AFTER I did them so it wasn't so daunting. LOL 


Eric... 

  • Member since
    October 2003
  • From: Albuturkey New Mexico
Posted by modelmaniac1967 on Saturday, March 21, 2009 5:08 AM
 Division 6 wrote:

Than we can help each other since I'm the same way.Big Smile [:D]

Just got done drilling 130 holes.

Probably start on the scribing tomorrow, got a few things gluing at the moment and have to do some touch up on the outer edge and replace the edging around the cockpit since I had some trouble removing the tub. 

Eric... 

130 HOLES, wow thats a ton of holes. what were they used for?

Life is an illusion, if you can master the art of illusion you have it made.[View:http://sdfusioninc.blogspot.com/]

  • Member since
    January 2009
  • From: Central CA
Posted by Division 6 on Friday, March 20, 2009 8:39 PM

Than we can help each other since I'm the same way.Big Smile [:D]

Just got done drilling 130 holes.

Probably start on the scribing tomorrow, got a few things gluing at the moment and have to do some touch up on the outer edge and replace the edging around the cockpit since I had some trouble removing the tub. 

Eric... 

  • Member since
    October 2003
  • From: Albuturkey New Mexico
Posted by modelmaniac1967 on Friday, March 20, 2009 8:19 PM
Really? Thats cool im glad I got some one fired up, now to keep me fired up, I usually start out strong then it takes a lot to keep my attention on the build at hand. I start 50 other projects and finish non. But seeing your progress may keep me focused on mine.

Life is an illusion, if you can master the art of illusion you have it made.[View:http://sdfusioninc.blogspot.com/]

  • Member since
    January 2009
  • From: Central CA
Posted by Division 6 on Friday, March 20, 2009 6:39 PM

Thanks.

Your build is what really got me kick started on this.


Eric... 

  • Member since
    October 2003
  • From: Albuturkey New Mexico
Posted by modelmaniac1967 on Friday, March 20, 2009 6:35 PM
Very nice, this is gonna be a very nice build indeed. Keep up the awesome work...

Life is an illusion, if you can master the art of illusion you have it made.[View:http://sdfusioninc.blogspot.com/]

  • Member since
    January 2009
  • From: Central CA
Reworking a Vintage T-47
Posted by Division 6 on Friday, March 20, 2009 5:41 PM

After putting it off for almost 2 years I finally decided to take apart my old (1980) AMT Snow Speeder and redo it.


After looking at some incredible studio scale scratch builds and some excellent ILM reference I decided to sand off all the inaccurate raised detail and try my hand at scribing in accurate panel lines.

Keep in mind that I just got back into modeling after 10+ years so it will be an learning project.

Also while looking through my old reference books I decided I like the earlier concept drawings with a 2 part canopy and wider cockpit tub so these will be scratch built.


This little project will take some time as most of my time is currently going towards a couple planes in the group build.


Well let's get started shall we.

First off I took apart my old model.

It got a long bath in Super Clean and a good scrub down to remove most of the paint.
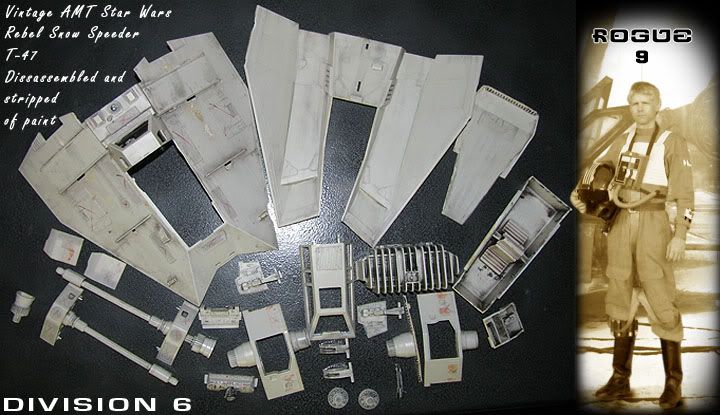
After that I sanded off all the surface detail on all the top pieces, I didn't bother with the bottom since the ship will be grounded on a base.

Today I started mapping out all the panel lines on the main body, at this point I still need to do the other parts.

I also cut out the front vent.


Well that's where I am at the moment.

Progress will continue as I have time.


Cheers

Eric... 

JOIN OUR COMMUNITY!

Our community is FREE to join. To participate you must either login or register for an account.

SEARCH FORUMS
FREE NEWSLETTER
By signing up you may also receive reader surveys and occasional special offers. We do not sell, rent or trade our email lists. View our Privacy Policy.