SEARCH FINESCALE.COM

Enter keywords or a search phrase below:

LIS Chariot 1:35

40221 views
676 replies
1 rating 2 rating 3 rating 4 rating 5 rating
  • Member since
    October 2021
Posted by PhoenixG on Thursday, October 19, 2023 3:23 PM

That did feather nicely.  Hopefully this did the job for you and the next round of priming will be the last one.

I use Vallejo primer.  Got around it's issues by drying it in a hot box at about 112F.   Now it doesn't tear, but I don't think it feathers as well as the MRP.

On the Bench:

Bandai Starblazers 2202 Garmillas Zoellugut

  • Member since
    July 2014
  • From: Franklin Wi
Posted by Bakster on Thursday, October 19, 2023 8:58 PM

I use Vallejo primer.  Got around it's issues by drying it in a hot box at about 112F.   Now it doesn't tear, 

It sounds like you have a system worked out that works for you. Nice! I like your idea about the drying box. It is a novel way to deal with a sticky situation. I do like how you think out of the box to solve problems.

As for me, I am still working on a go to process. I think that I am much closer.

So, the answer is, it was NOT up to snuff. Using CA can be hit or miss. My last application was not good enough because I found high spots. So, I sanded best I could, trying not to make things worse. Once I did that, I mulled over what to do next. Another layer of CA? That idea did not thrill me. Though, I have done that in the past, it is the hit or miss factor that haunts me. CA works well to fill but getting it flawlessly smooth on flat surfaces, I find that challenging.

I decided to err on the side of caution. I purchased a bottle of Tamiya Surface Primer. The stuff is thick. I brushed the paint over the suspect areas, let it dry for a day, and then sanded. The stuff sanded and feathered beautifully. As best that I could tell, it looked good. I hit the area with more MRP primer and sure enough, pretty much flawless. There is some dust I kicked up but I will sand that out.

This may become my go to process: Filler, sand, brushed on Tamiya primer, sand, then prime again. One of these days I'd still like to try CA mixed with talc. I know some modelers do this with good result. Apparently, it is easier to sand. That is for another day.

Below: This is how it looks after another coat of MRP primer. This will be followed by a light sanding.

Anyhow, sorry for the excruciating detail of my paint/filler journey. 

My work on the graphics must wait until the weekend. Too much going on. I did at least confirm that I have decal film. Glad that I don't need to order some. Tick-tock.

  • Member since
    November 2005
  • From: Formerly Bryan, now Arlington, Texas
Posted by CapnMac82 on Friday, October 20, 2023 11:24 AM

"We" are in a topsy-turvey world in re primers (and paints, truth be told).

The formulations of the old, tried and true, primers have changed, part by regulation, part due to using less-expensive solvent stocks to control retail pricing.

Our pages here have any number of laments about "I used to use [product] and" [product] is OOP or changed or Too Expensive, "so, what do I do?"

Like as not, there are, in our minority, a huge range of possible options, and everyone is always searching for their own Goldilocks. 

And, rather a lot of "us" tend to buy in bulk, to better offset the high prices with volume buying.  But, that also commits a person to the whole volume, too.

This thought came to me yesterday in a round about way.  My new ride has a sensor to check the level in the windhield washer reservoir.  So, I grabbed a jug on the way home from work. 

That familiar blue color then reminded me of the Beforetimes when Tamyia acrylics were then brand new.  There were arguements about paying $$$ for the Tamiya acrylic thinner (and another $$$ for the airbrush thinner, too).  And there were those who were arguing that water was good enough.  Others that isopropyl was better.  And still yet another camp for mixed water & iso.  Well, guess what most windshield washer fluid is?  Water and IPA.  The tinting is an issue, of course.  But it was cheap for cleaning airbrushes.

  • Member since
    July 2014
  • From: Franklin Wi
Posted by Bakster on Saturday, October 21, 2023 9:42 PM

CapnMac82

"We" are in a topsy-turvey world in re primers (and paints, truth be told).

The formulations of the old, tried and true, primers have changed, part by regulation, part due to using less-expensive solvent stocks to control retail pricing.

Our pages here have any number of laments about "I used to use [product] and" [product] is OOP or changed or Too Expensive, "so, what do I do?"

Like as not, there are, in our minority, a huge range of possible options, and everyone is always searching for their own Goldilocks. 

And, rather a lot of "us" tend to buy in bulk, to better offset the high prices with volume buying.  But, that also commits a person to the whole volume, too.

This thought came to me yesterday in a round about way.  My new ride has a sensor to check the level in the windhield washer reservoir.  So, I grabbed a jug on the way home from work. 

That familiar blue color then reminded me of the Beforetimes when Tamyia acrylics were then brand new.  There were arguements about paying $$$ for the Tamiya acrylic thinner (and another $$$ for the airbrush thinner, too).  And there were those who were arguing that water was good enough.  Others that isopropyl was better.  And still yet another camp for mixed water & iso.  Well, guess what most windshield washer fluid is?  Water and IPA.  The tinting is an issue, of course.  But it was cheap for cleaning airbrushes.


Capn, you have a talent turning chaos into reason. For the one in the midst of the battle, it sure brings some solace. I so appreciate that. Thanks for that.

And to your points, I agree with all of it. 

  • Member since
    November 2009
  • From: SW Virginia
Posted by Gamera on Saturday, October 21, 2023 9:50 PM

Yeah that finish looks perfect Bakster!!! 

As usual the Captain speaks truth! I wonder if some of the formulas have changed with mail regulations though. I keep seeing warnings 'This product cannot be delivered by mail'. 


I'm starting to want to build my own Chariot now. I'm thinking of what would happen if Don got bored during the unfilmed fourth season and repainted the Chariot candy apple red and added flames down the side with big chrome tailpipes??? 

"I dream in fire but work in clay." -Arthur Machen


  • Member since
    July 2014
  • From: Franklin Wi
Posted by Bakster on Saturday, October 21, 2023 10:19 PM

Well, I made a huge dent with the graphics. 

Below: You might remember this image from a previous post. I scanned a decal sheet but more importantly, I scanned the individual pads designed for my custom graphics. This allows me to scale the graphics within my computer, fairly precisely, for those pads. 

The original plan was to possibly use the graphics on the decal sheet but as I got into it, it became problematic scaling them down. The images fell apart. They became soft and blurry. That left me creating my own within the computer. If I create the graphic at the correct scale, they appear fairly sharp. 

Below: In this image you can see the control panels on the 1:1. The decal sheet is not very close and neither are the graphics that I made. Since the design of the dash is far from the 1:1, this opens the door to a lot of interpretation. And that is fine with me. I am not trying to make an exact replica, just a decent and loose representation.

Below: This is what I came up with. I added colored indicators to give them some life. The 1:1 looks oftly plain, in my opinion. From here, I need to print them on standard paper, cut them out, and test for fit. Any adjustments can be made in the computer before I print the final copy onto decal film.

I tell ya... I am glad of two things. The first is that I scanned the pads before mounting them. I cannot imagine how difficult it would be to scale and create grapics based on measurements alone. Secondly, I am glad I made a cartoon of their placements. It would have been a headache figuring orientatiion because my scan was not in any sort of order. And fortunately, I found that scrap of paper that had what I needed. It took me awhile to find. It is one of the dangers of builds that run long. You lose things.

And that is all for now.


  • Member since
    July 2014
  • From: Franklin Wi
Posted by Bakster on Saturday, October 21, 2023 10:23 PM

I'm starting to want to build my own Chariot now. I'm thinking of what would happen if Don got bored during the unfilmed fourth season and repainted the Chariot candy apple red and added flames down the side with big chrome tailpipes??? 


Gam, that would be cool! Lol.

  • Member since
    November 2009
  • From: SW Virginia
Posted by Gamera on Sunday, October 22, 2023 4:25 PM

Lol, I wish I could! As the slogan I picked says if I could get 10% of my ideas built I'd be the new Shep Paine! 

"I dream in fire but work in clay." -Arthur Machen


  • Member since
    October 2021
Posted by PhoenixG on Sunday, October 22, 2023 6:16 PM

I like the new decal set!  They are visually more interesting than the originals.

Bakster
The original plan was to possibly use the graphics on the decal sheet but as I got into it, it became problematic scaling them down. The images fell apart. They became soft and blurry.

In my experience that's related to the Dots Per Inch (DPI) being maintained while the scale is reduced.

I wrote the great American Novel of a response to detail this, but decided it would be better to ask if interested before posting.  :)

Is there is anything on the original decal sheet you'd like to reuse?  I'd be happy to take a swing at scaling them down while maintaining the look.  All of my recent decal projects have required me to become familiar with this process.

On the Bench:

Bandai Starblazers 2202 Garmillas Zoellugut

  • Member since
    November 2009
  • From: SW Virginia
Posted by Gamera on Sunday, October 22, 2023 9:02 PM

Yeah the new decals look cool to me! Looking forward to seeing them in place. 

"I dream in fire but work in clay." -Arthur Machen


  • Member since
    July 2014
  • From: Franklin Wi
Posted by Bakster on Monday, October 23, 2023 10:42 AM

Gamera

Yeah the new decals look cool to me! Looking forward to seeing them in place. 


Hey thanks, Gam. Yeah me too. Getting closer to that, installing them that is.

  • Member since
    July 2014
  • From: Franklin Wi
Posted by Bakster on Monday, October 23, 2023 10:51 AM

PhoenixG

I like the new decal set!  They are visually more interesting than the originals.


Bakster
The original plan was to possibly use the graphics on the decal sheet but as I got into it, it became problematic scaling them down. The images fell apart. They became soft and blurry.


In my experience that's related to the Dots Per Inch (DPI) being maintained while the scale is reduced.

I wrote the great American Novel of a response to detail this, but decided it would be better to ask if interested before posting.  :)

Is there is anything on the original decal sheet you'd like to reuse?  I'd be happy to take a swing at scaling them down while maintaining the look.  All of my recent decal projects have required me to become familiar with this process.


Hey PG, as follows:


1. Thanks for the kind words.

2. I would LOVE to read the American Novel. This could be a big help to me. So, if not too much trouble, please post it. Yes

3. I still have the circular gauges to do and I have the same issue as with the others...they go blurry when scaled. I was about to create my own version but if your novel will help me get around the issues, that would be great! Or yes, I could send the scan too but it might be easier if your novel gets me through.


Thanks!

  • Member since
    October 2021
Posted by PhoenixG on Tuesday, October 24, 2023 4:29 PM

Bakster
2. I would LOVE to read the American Novel. This could be a big help to me. So, if not too much trouble, please post it. Yes

No trouble at all, but I did try to warn you. Big Smile

In the following I'll do my best to define and explain the various elements that influence image quality when resizing.

The idea of DPI is the number of dots squeezed into an inch.  At 1200 DPI a line 1 inch long would be made up of 1200 dots. At 600 DPI that same 1” line would have 600 dots.   Pretty straight forward so far.  

What happens when we are looking at a line that is less than 1 inch long?

Starting at 1200 DPI a line that is .5” long would have 600 Dots.  Why?  Because it takes a full inch to get 1200 Dots.  At half an inch we cut the number of Dots available in half.  This means that at 600 DPI a .5” line would have 300 dots.   

Ok, that was line.  How about a square.

Starting at 1200 DPI and a 1” square.  The image would be a 1" square made up of 1200 Dots across and 1200 Dots down.

 If you reduce the image to .5" @ 1200 DPI, the image would be a .5" square at 600x600.  Remember, it takes a full inch to achieve the 1200DPI.   If it goes down to a .25” we’re now reduced to 300x300.   

This means that if the DPI remains constant and we continue shrinking the size we continue to lose dots. AKA resolution.   When your image is several inches long, making small changes in scale rarely results in a visible difference.  However, decal images are often less than an inch long.  Any change in scale (without a corresponding change in DPI) will greatly affect how it looks.

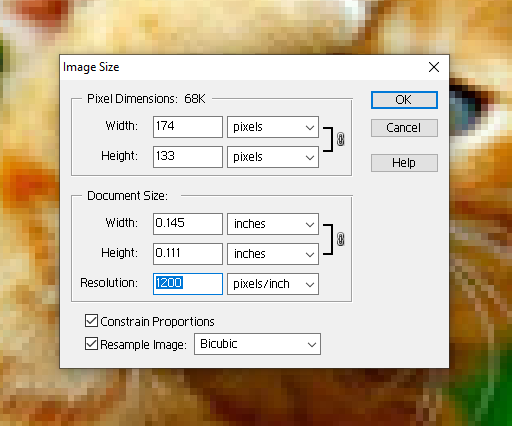
The two images below would both print to the exact same physical size.  The difference is the DPI.  The one on the left is 1200DPI and the one on the right is 600DPI.
 
hirescatlowrescat

 
Now, you might be thinking “Hold on a second Johann.  They can’t be the same size.  The one on the left looks so much bigger on my screen than the one the right.”  You’re right, it does look bigger.  Monitors have no concept of DPI.  They only know resolution.  Resolution is the exact number of dots (pixels) used to make up any image.
 
The first image is 1200 DPI and has a resolution of 174x133 pixels.  As shown in the screen capture below.  

hiressettings


The second image is 600 DPI with a resolution of 87x67 pixels.  

lowrescatsettings

 
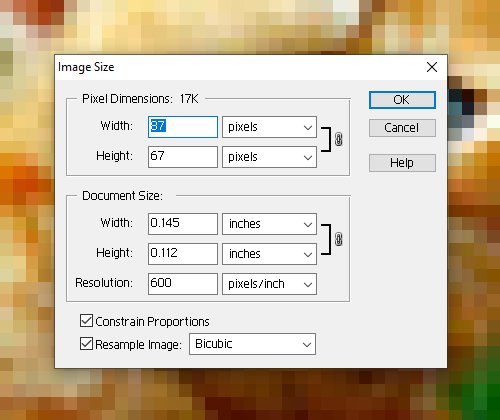
If you look at the physical dimensions, they are the exact same size.  However, the lower DPI means there are fewer dots available to put into each inch.

Weird isn’t it.   

What it comes down to is printers need a combination of physical size and resolution to make an image.  They need to know how big to make the image (inches) and how good to make it look (resolution).  Resolution on a printer is defined by how high the DPI of the image is.  The higher the DPI the better it will look when printed.  Assuming the source material was good to start with.

When scaling an image to sizes smaller than an inch it is important to first set the DPI of the image to match the maximum capabilities of the printer.  This does two things.  First, it will help maintain the quality of the image as it scales (scale meaning how we increase or decrease the inches of the print).  Second it will ensure we are leveraging the full capabilities of the printer.

What’s the best way to do this?  That depends upon the software being used.  However, most have options similar to what I showed earlier.

settigngs


When I am scaling the size of an image the first thing I change is the DPI.  This will help ensure I don’t lose too many dots when scaling the image down.  Once I have the DPI set to match my printer, I can then change the physical size of the image.  

EXAMPLE:

First thing to do is scan the image at the highest DPI supported by the scanner.  My scanner maxes out at rather low 600 DPI.

This is my baseline image right after scanning. 

(Recommend clicking on the following images, to make differences more readily apparent.)

hiscan

If I immediately shrink the image down to 1" you can see the loss of fidelity.  This is validated by the total number of pixels reported being cut in half in each dimension.

oneinch

If I reduce the size down further (again no change to DPI)to half an inch, you can see the quality loss is even greater. And the pixels shrank to 300 in a given dimension. 300 pixels is very little data to make up an image.

quarter inch

The way to manage the impact of shrinking the image is to do the following. 

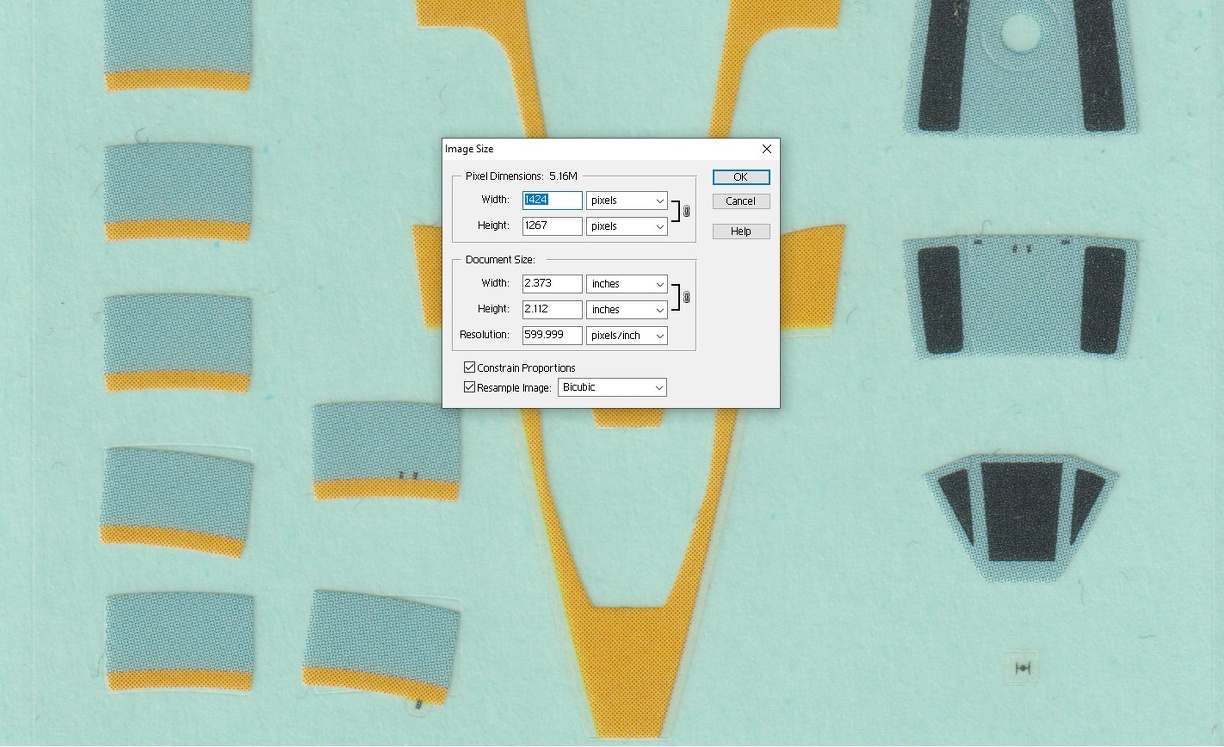
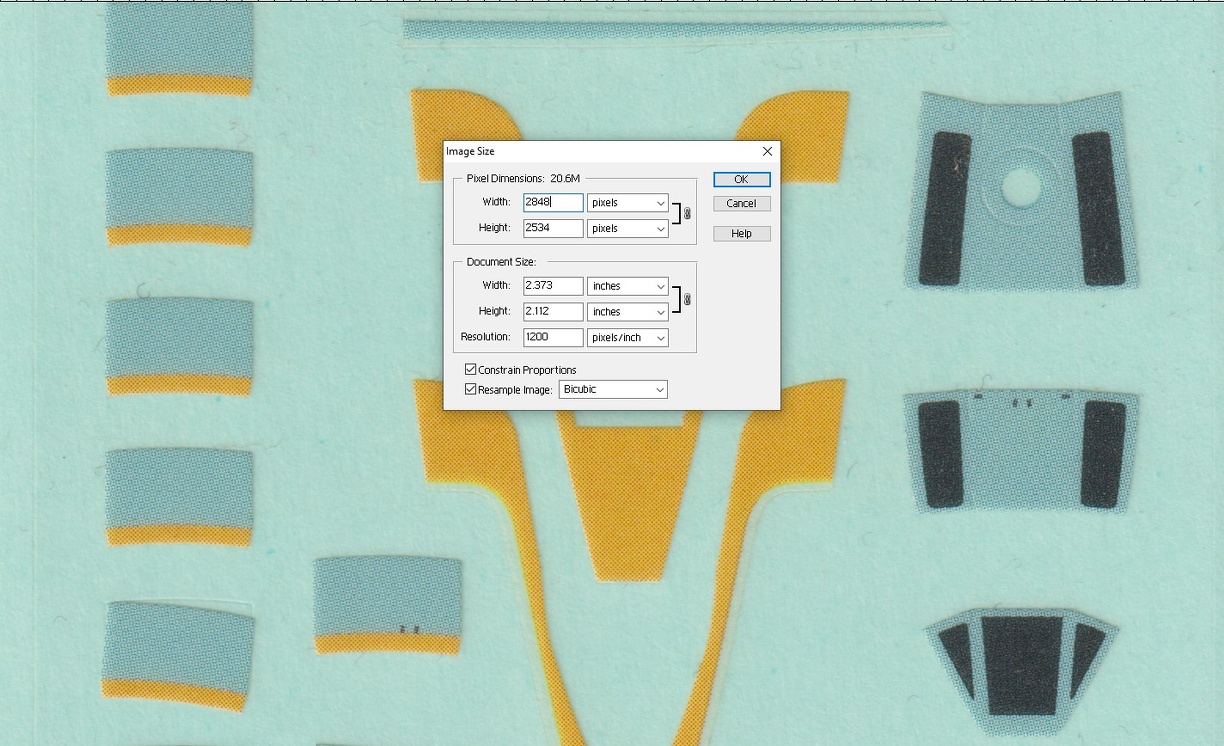
First set the DPI to match that of your printer.  My printer maxes out at 1200 DPI so that is what I will use.  The image below has the exact same inches but higher DPI.

doubleddpie

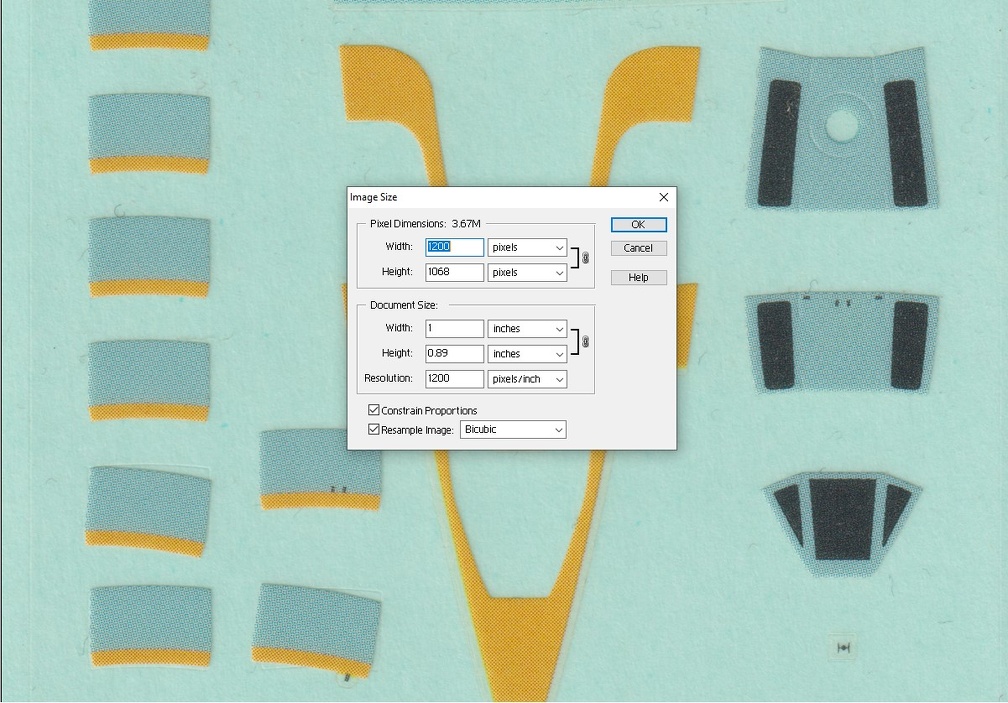
Now when I shrink it down to 1" the quality is nearly the same.

1in1200pi

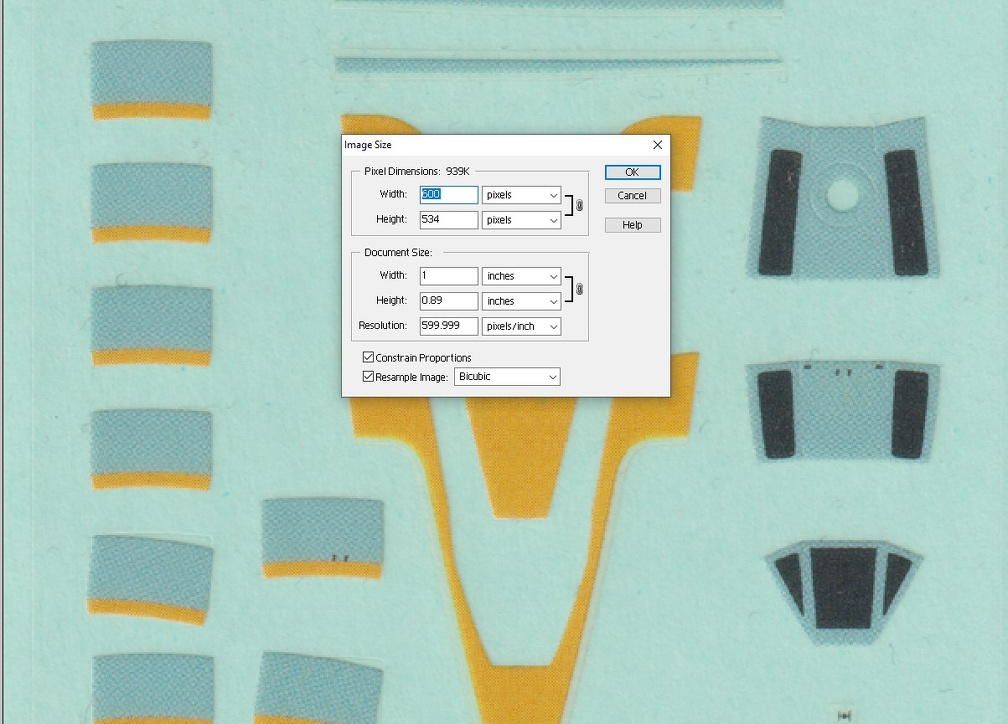
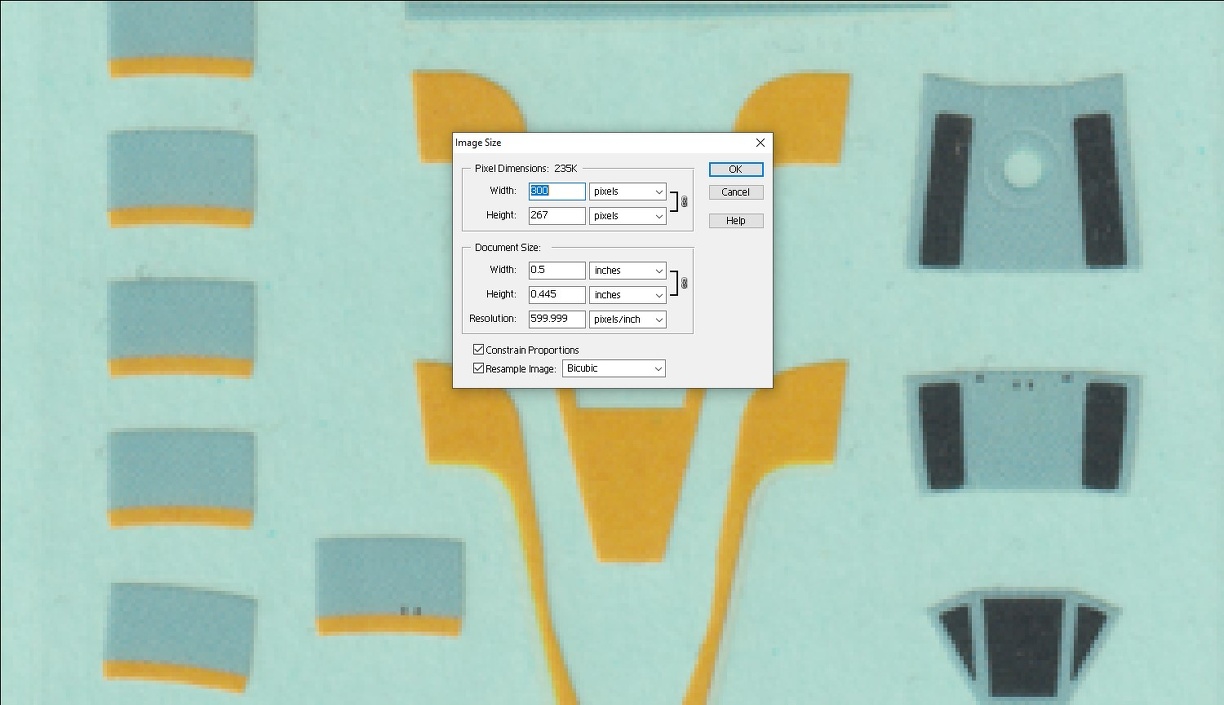
Going down to .5" we start seing loss but nothing like before.

halfin1200dpi

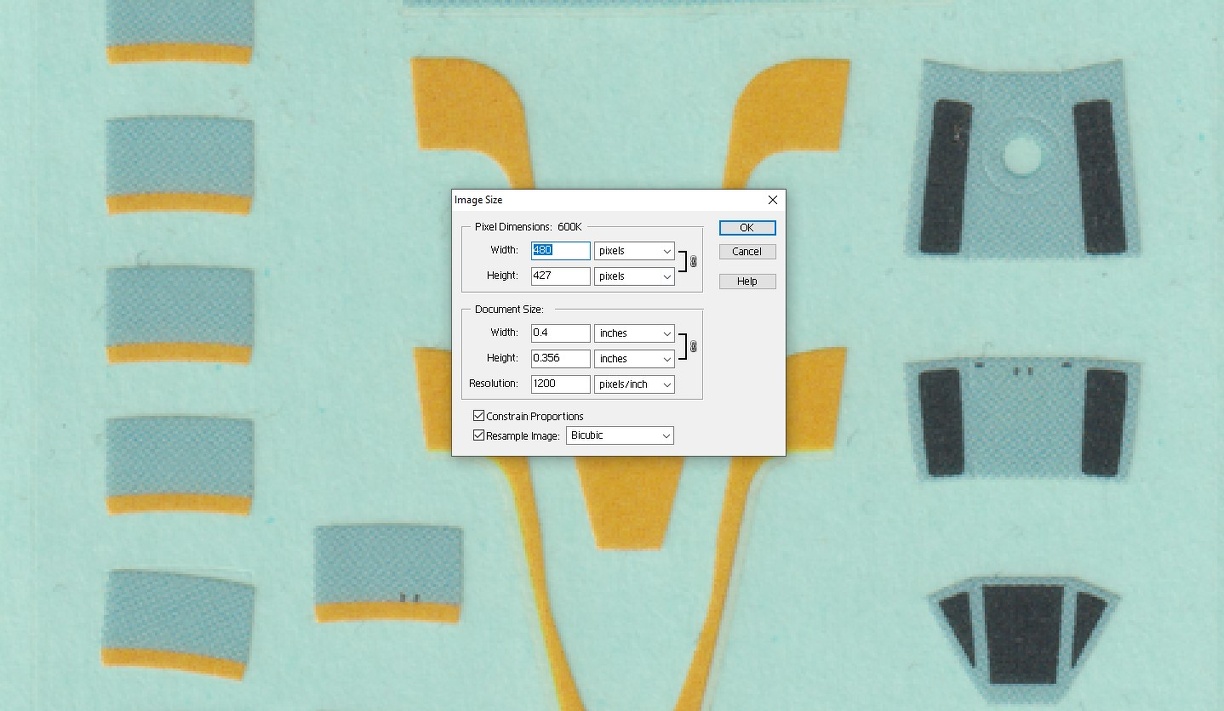
Unlike before at half an inch we still have 600 pixels in a dimension. 

The examples above are an exaggeration in order to emphasize the impact.  I shrunk an entire decal sheet from 2.3" down to .5" in size.   Not a likely scenario, but helps illustrate the changes that occur.

There is also the point of diminishing returns.  Even when we follow all the product capabilities, the final print will not necessarily match the image exactly.
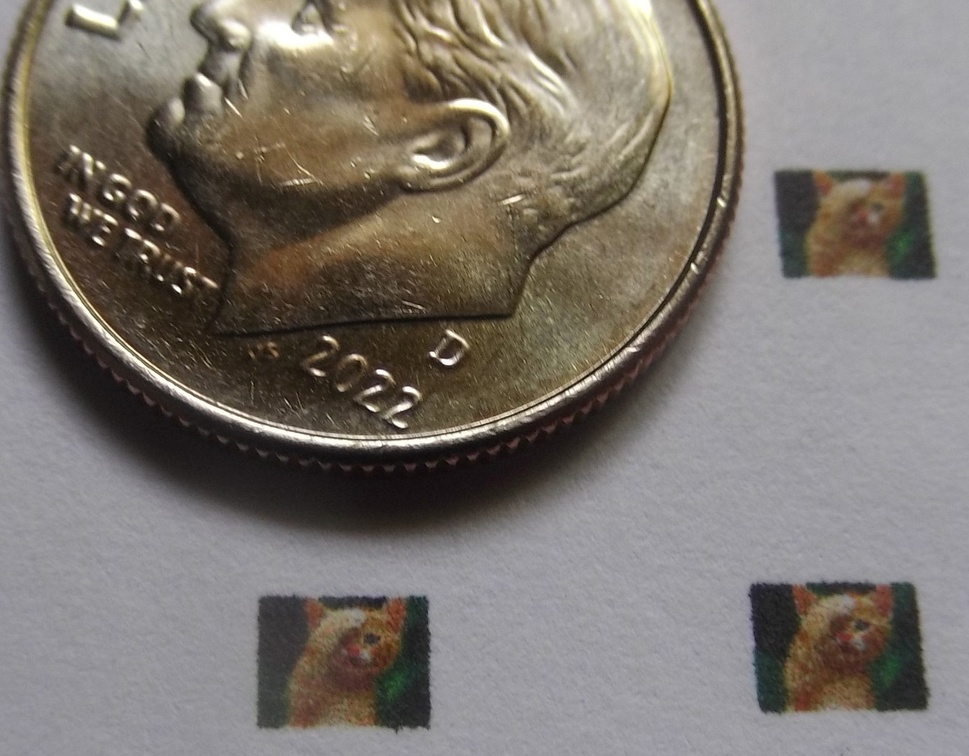
This image,

hirescat

Printed like this (1200 DPI printer),

actual print


SUMMARY:

  1. Scan at highest DPI possible
  2. Before resizing, set the image's DPI to be no lower than the printer's maximum capability
  3. After completing the first two, resize the image to match necessary scale.

Hopefully this write-up will make it easier to resize images and maintain a higher degree  quality.

On the Bench:

Bandai Starblazers 2202 Garmillas Zoellugut

  • Member since
    July 2014
  • From: Franklin Wi
Posted by Bakster on Wednesday, October 25, 2023 9:14 AM

Hey PG, no regrets here. That is all great info and in the end it helped me. For the gauges, I was able to eek out a better image than before. Also, I am sure your post will be helpful to others as well!

What I was not doing before is scan at a higher resolution. That did seem to make a difference. Second to that, I changed how I scale the image. Rather than grabbing at the handles and scale, I went into the image size tool and scaled from there. Even now with higher resolution I see greater distortion if I use the grab handles.

I printed a test page and I think it will do. It has to. I think I am reaching the point of diminishing return. To get the size I need, I had to reduce the image down to 15%. That is a whole lot of shrinking. In testing, 20% looked decent. Lower than 20 is where it seems to degrade. It is what it is and it is better than what I had. And, to be honest, the original that I scanned from was not all that good either.

The funny thing... this is a whole lot of fuss over something you can barely see once printed. If you strain your eyes you can see the detail.  But, at least, there is detail there making the alternative a blurry mess.

Scanning and scaling to the pads seems to have worked very well. I cut the decals from a paper printout and they fit perfectly.

Below: This is what I came up with. For the gauges, I toyed with using a black background or an orange. On the computer the black looks decent but once printed, the graphic gets lost. I am using a background so as to make the graphic one piece, one decal. I am not interested in trying to trim out those tiny gauges. Homemade decals are not terribly strong and neither are my eyes.

I hope to print a final copy today and seal it. Our weather is turning colder after today and that might be all she wrote until Spring.

Thanks again, PG.

Updated: If anyone is wondering. I am making multiple copies of the graphics for if I mess some up in trimming. Thus the reason for the duplications.


  • Member since
    November 2005
  • From: Formerly Bryan, now Arlington, Texas
Posted by CapnMac82 on Wednesday, October 25, 2023 2:19 PM

Bakster
The funny thing... this is a whole lot of fuss over something you can barely see once printed. If you strain your eyes you can see the detail. But, at least, there is detail there making the alternative a blurry mess.

Yeah, sometimes "going with the flow" is the proper answer.

Our esteemed Johann provided an excellent essay on the riddle of screen resolution and image DPI.

Printer 'resolution' in DPI is very important for printing decals.

In our perfect world, a 1200 DPI preinter would "resolve" its ink or toner dots down to 1/1200 units (preseumptively inches).  Where this gets complicated is that printers, as they 'want' to be optimized for printing text often do this "thing" where they print as 800x600 DPI in reality.  [Insert rude language here]

So, in reality, you can render an image down to around 1/600 inch--0.00166" (around 0.042mm)  Which is pretty teeny-tiny.  As long as what you want is orthagonal--exactly x or y.  If you need an angle, or, worse yet, a an arc or circle, you actually need 4 dots.  Dag-nabbit.

And, teey-tiny is very relative.  At 1/32 scale, an inch is 1/32"--0.0125 or 0.79mm.

So, an 1/8" (0.125", around 4mm) at 1/32 is 0.00390625" or 0.099mm.  Which is getting close to that putative 800x600 printer's resolution.  And, remember, angles and circles want for 4 dots to render.  And the resolution rendering block is skewed--it's 800x600.

Which we can conceptually picture like this:
000000
000000
000000
000000
000000
000000
000000

A diagonal line would try to be like this:
00000â–ˆ
0000██
000██0
00██00
00â–ˆ000
0██000
â–ˆ00000

Note how it goes all "jaggy" trying to "climb" the biased matrix.  Just how it 'tracks' is tied up in how the graphics package renders the image to the printer.  It can be more or less jagged, based on the way it is translated.

Ain't tech fun?

Well, I finished up Andromeda, and have started in on Majel Roddenberry's previous series, Earth Final Conflict.  The plotting of the various story arcs is better, a bit deeper than Andromeda. 
Given that the aliens and most of their tech are amorphous and "grwon" it's middlign easy to see why no models really spawned out of it.

The story lines are interesting, although the tech has not aged well--there's a WorldCom everyone has, which has a slide-out video screen, and there's one provider, MCI. 


  • Member since
    July 2014
  • From: Franklin Wi
Posted by Bakster on Wednesday, October 25, 2023 5:09 PM

Hey Capn, your diagonal image is exactly what I was facing. Imagine that on a circle like  with the gauges. They looked horrid. I mananged to use the built in software where I could cookiecutter a circle and make a mask. I inserted the gauges under the mask.  Somehow, the software did a better job with circles than if I tried to erase or cut them out. Blah. 

I should probably re-state the reason for my having to scale the decals. The decal sheet I have is from another kit at another scale. The kit I am building does not come with decals. Too bad for the latter or all this headache would be for not.

Anyhow, the decals are printed and sprayed with an acrylic sealer. Lest some disaster strikes, that lobotomy is done. Wink I think next up is to start painting the tub with color.

Thanks for the additional info about DPIs and Pixels. Between PG and you, I should print all this for a few years down the road and when I forget! Or, maybe, I should just stop building these wonky kits, or just be happy with out of the box. But where is the challenge in that! 


  • Member since
    November 2009
  • From: SW Virginia
Posted by Gamera on Wednesday, October 25, 2023 6:34 PM

Looks good Bakster! Making a couple extras is a good idea! 


Really like the 'Smith's Stupid BS' meter there, I assume when it fills up Don blows his top??? Wink

"I dream in fire but work in clay." -Arthur Machen


  • Member since
    July 2014
  • From: Franklin Wi
Posted by Bakster on Thursday, October 26, 2023 8:20 AM

Gamera
Really like the 'Smith's Stupid BS' meter there, I assume when it fills up Don blows his top??? 

Gam, that's a good one. You have no idea how close you are with that to the theme of this build. Yes 

  • Member since
    October 2021
Posted by PhoenixG on Thursday, October 26, 2023 1:58 PM

Bakster, glad the write up proved to be of some use.  Can't wait to see the final product.

As you and the Cap'n both observed, when you get down to decals that are sized in miniscule fractions of an inch it's difficult create crisp images.

Topci change:

Tip for easy screenshots in Windows use,

windows key+shift+s

It turns on a screen shot tool for snipping a section of whatever is on your screen via a drag selection and then save the image.  I use it all the time.

On the Bench:

Bandai Starblazers 2202 Garmillas Zoellugut

  • Member since
    July 2014
  • From: Franklin Wi
Posted by Bakster on Friday, October 27, 2023 12:24 PM


Hey thanks PG, and I will try that Windows shortcut sometime too!

  • Member since
    July 2014
  • From: Franklin Wi
Posted by Bakster on Friday, October 27, 2023 12:38 PM

Funny how this comes up. I was recently talking about paint grain being cumulative and how I deal with that. Aaron Skinner just released a video on the subject. Aaron does an excellent job walking a person through the process and it is extremely close to how I deal with the problem. The only place my process diverges is how I apply the color coat. I don't have the patience for thin layers of paint. However, with using MRP lacquer, I learned I need to do that to avoid crazing, and the coverage is just as effective. But when I use acrylics, I tend to flood the piece drawing out a smooth finish. Aaron's way is probably better but I just don't have that patience.

Anyhow, it's an excellent tutorial and worth a watch.

https://youtu.be/P2DXPH6Wmk4?si=QdWs6LCk_LKBx9O_


  • Member since
    November 2005
  • From: Formerly Bryan, now Arlington, Texas
Posted by CapnMac82 on Friday, October 27, 2023 12:42 PM

PhoenixG
Notifications

What, those ever worked?

  • Member since
    July 2014
  • From: Franklin Wi
Posted by Bakster on Friday, October 27, 2023 12:45 PM

CapnMac82


PhoenixG
Notifications


What, those ever worked?


Laughing. 

  • Member since
    October 2021
Posted by PhoenixG on Friday, October 27, 2023 2:18 PM

Bakster


CapnMac82


PhoenixG
Notifications


What, those ever worked?


Laughing. 


LOL,

Yeah yeah.  I see how it is.  Make fun of the newbie (yes, after nearly two years I still consider myself "new").  Stick out tongue

I wasn't aware of just how long standing this problem is, or how many continue to be affected by it.  Having learned a bit more about this, I can understand why there's some sniggering when seeing my signature.  I predict a change to it in the near future. :)


On the Bench:

Bandai Starblazers 2202 Garmillas Zoellugut

  • Member since
    July 2014
  • From: Franklin Wi
Posted by Bakster on Friday, October 27, 2023 2:48 PM

PhoenixG


Bakster


CapnMac82


PhoenixG
Notifications


What, those ever worked?


Laughing. 


LOL,

Yeah yeah.  I see how it is.  Make fun of the newbie (yes, after nearly two years I still consider myself "new").  Stick out tongue

I wasn't aware of just how long standing this problem is, or how many continue to be affected by it.  Having learned a bit more about this, I can understand why there's some sniggering when seeing my signature.  I predict a change to it in the near future. :)


Yes, no offense to you. Lol. Yes, sniggering is to the long standing problem. For me, it has not worked for 5 plus years. Add a couple more years to it where it would work a month or two then not again. 

It seems to work for some, and I am envious of these people.

  • Member since
    November 2005
  • From: Formerly Bryan, now Arlington, Texas
Posted by CapnMac82 on Sunday, October 29, 2023 12:47 PM

PhoenixG
Make fun of the newbie

Was not my intent at all.  We here in the "old crowd" will often jape about such things.

And the tribulations of the Notification feature pale in comparision to the debacle which is the Search function.

(If one is keen to search, going to one's preferred browser, and includind either "FSM" or "Fine Scale" will actually get better results than the "built in" search function.)


  • Member since
    July 2014
  • From: Franklin Wi
Posted by Bakster on Monday, October 30, 2023 10:29 AM

Back to the model.

Below: Printed and ready for application. The detail came through fairly well.

Also, I painted the tub and what should have been a slam dunk ended with a problem. Some areas came up with bullseye marks. I washed the piece beforehand. It should have been clean and I left it to dry over night. I am questioning my wisdom to include dish soap at this stage. I have seen this issue occur before and I suspect it is residual soap. I do recall some water droplets on the piece to air dry and that I couldn't shake off. I am out of canned air too.  I suppose I could have wiped it dry but then you introduce lint or whatnot. Ugh. I will sand the piece until smooth and then apply a new top layer. 

The tub is fighting me and Bakster no likey.

  • Member since
    November 2005
  • From: Formerly Bryan, now Arlington, Texas
Posted by CapnMac82 on Monday, October 30, 2023 1:05 PM

Those look good. 

After this last "polar bomb cyclone" (it's all of 47° here in Texas, after having scared 35° last night) there are likely all manner of potential weather related hiccups lurking around.

  • Member since
    November 2009
  • From: SW Virginia
Posted by Gamera on Monday, October 30, 2023 8:15 PM

Those decals look great Bakster! 

Weird about the rings in the tub. I've had a similar type of thing happen to me. It could be the the soap. 

Or Dr. Smith leaving coffee cup rings. 

Darned if I know...


I'm going to blame those dang dirty apes... 

"I dream in fire but work in clay." -Arthur Machen


  • Member since
    November 2009
  • From: SW Virginia
Posted by Gamera on Monday, October 30, 2023 8:17 PM

Capt: Interesting about 'Andromeda' and 'Earth the Final Conflict'. I've never seen either of those. 

"I dream in fire but work in clay." -Arthur Machen


JOIN OUR COMMUNITY!

Our community is FREE to join. To participate you must either login or register for an account.

SEARCH FORUMS
FREE NEWSLETTER
By signing up you may also receive reader surveys and occasional special offers. We do not sell, rent or trade our email lists. View our Privacy Policy.