SEARCH FINESCALE.COM

Enter keywords or a search phrase below:

Zvezda 1/72 English Medieval Ship Thomas - Fin 28 April 2014

38555 views
138 replies
1 rating 2 rating 3 rating 4 rating 5 rating
  • Member since
    July 2010
  • From: Tempe AZ
Posted by docidle on Saturday, August 3, 2013 2:13 AM

The obligatory sprue shots of the kit.

Steve


  • Member since
    July 2010
  • From: Tempe AZ
Posted by docidle on Saturday, August 3, 2013 2:15 AM

Continuing


  • Member since
    July 2010
  • From: Tempe AZ
Posted by docidle on Saturday, August 3, 2013 2:16 AM


  • Member since
    July 2010
  • From: Tempe AZ
Posted by docidle on Saturday, August 3, 2013 2:18 AM

And more...


  • Member since
    July 2010
  • From: Tempe AZ
Posted by docidle on Saturday, August 3, 2013 2:23 AM

And more...


  • Member since
    July 2010
  • From: Tempe AZ
Posted by docidle on Saturday, August 3, 2013 2:23 AM

And the construction begins.


  • Member since
    July 2010
  • From: Tempe AZ
Posted by docidle on Saturday, August 3, 2013 2:24 AM

And continues.


  • Member since
    July 2010
  • From: Tempe AZ
Posted by docidle on Saturday, August 3, 2013 2:28 AM

No image


  • Member since
    July 2010
  • From: Tempe AZ
Posted by docidle on Saturday, August 3, 2013 2:29 AM

Last one.  Hope you all enjoyed it.

Steve


  • Member since
    March 2012
  • From: Marysville, WA
Posted by David_K on Saturday, August 3, 2013 6:03 PM

Good looking stuff, Steve!

Glad to hear you're feeling better, by the way!

It's funny, because I'm working on the Thomas right now, too!  And I'm approximately at the same stage...just got the castles *oiled up* this morning, and they'll be ready for install in a couple of days...I'm not using the Kingly colors you mentioned, mostly just woody kind of stuff, and I mixed a custom color for the tarred lower hull.

I found it interesting that the kit came with nameplates for the Hansa Kogge, and the Thomas, as well as two different tops for the mast, one square and one trapezoidal? Did Zvezda literally use two different boxes and sell the same kit under different names?

I'm also using a few aftermarket parts...I have a bag of brass eyebolts (from MS) so I decided to ditch the plastic eyes and replace the ones on the aftercastle and the base of the mast with brass ones...looks much better.  And I bought some hearts from Bluejacket to rig my own deadeyes, though the kit's molded ones look great, which is typical for Zvezda (not sure why no one else can seem to make good-looking molded lanyards and blocks, but they can!)

What are your plans for the sail?

Anyway, hope things continue to look up for ya!  It'll be nice to have you around again!  

        _~
     _~ )_)_~
     )_))_))_)
     _!__!__!_         
     (_D_P_K_)
   ~~~~~~~~~~~~~
    ~~~~~~~~~~~

Current Project:  Imai/ERTL Spanish Galleon #2

Recently Finished: Revell 1/96 Cutty Sark

Next Up:  ???


  • Member since
    July 2010
  • From: Tempe AZ
Posted by docidle on Sunday, August 4, 2013 1:52 AM

Thanks Dave, I am definitely on the mend.

It just goes to show that you produce two to three ships to my one...... I must getting old!  When did you start your Thomas build?  I have been "working" on this for eight to nine months.

I agree, iT was a bit weird when I found not only the name plates but also the peaks of the mast.  One was the Hanse peak with the cross finial and the other a ball finial.  The tops I not sure about; there was the square one which is included in the pictures above and the trapezoidal were the two forecastles.  There was the smaller forecastle from the Hanse Kogge included but the Thomas should have the larger  forecastle since that would have accommodated more soldiers.  There are three incarnations of the Kogge but maybe four by Zvezda so we should not be surprised about the extra parts which will go into the spare parts box!  I would love to see pictures of your build.

I also made my own eyebolts on the Hanse Kogge since the plastic one broke in no time flat and I am with you, the metal now only look better but also work better with the rigging.  I rigged the deadeyes and stays using wooden deadeyes and hearts and I am glad I did since they look so much better; although Zvezda makes some really good plastic deadeyes and blocks.  I believe that they are able to since there ships all are in the 1/72 scale.  I also believe that Imai only included their blocks in the larger scale since my USS Susquehanna 1/150 does not have blocks and my 1/120 Constitution doesn't either but I'll have to check.

Since this a "How To" I am actually going to build the OOB as much as possible.  I could also include the deadeye rigging I did on the Hanse Kogge for more advanced modelers.

I'm including a shot of the large forecastle.

Steve


  • Member since
    July 2010
  • From: Tempe AZ
Posted by docidle on Sunday, August 4, 2013 1:54 AM

Whoops wrong one, that's the aft castle.  Here's the forecastle.

Steve


  • Member since
    March 2012
  • From: Marysville, WA
Posted by David_K on Sunday, August 4, 2013 10:35 AM

Ah...the smaller trapezoid is a forecastle!  It's so tiny, I figured it must be a different style of mast top...but now that I think about it, there would be no way to fasten it to the mast...interesting.

I started on the Thomas a few weeks ago...it's fun to see the same kit being worked on by someone else...in some ways they look similar, but the little differences in our style make it fun to compare!

I'll be sure and post a few pics pretty soon.  I'm taking pics along the way, but not posting a WIP here this time.

Once I finish her, I'll be switching gears from ships to build a new Tamiya Formula 1 Race car that just came out...then I'm trying to get the courage to build that Katy of Norfolk Model Shipways kit...if I do, then I expect I'll create a WIP, because I'll be counting on a lot of advice!!  Wood scares me!  But it's a solid-hull model, so hopefully I'll have a better chance with carving than with planking!

        _~
     _~ )_)_~
     )_))_))_)
     _!__!__!_         
     (_D_P_K_)
   ~~~~~~~~~~~~~
    ~~~~~~~~~~~

Current Project:  Imai/ERTL Spanish Galleon #2

Recently Finished: Revell 1/96 Cutty Sark

Next Up:  ???


  • Member since
    December 2002
  • From: Greenville,Michigan
Posted by millard on Monday, August 5, 2013 11:23 PM

Steve

 Very nice.I'm really liking your weathering.keep the photo's coming.

Rod

  • Member since
    March 2009
  • From: brisbane australia
Posted by surfsup on Tuesday, August 6, 2013 4:41 AM

I missed this one Steve. She is looking beautiful with the weathering so far. Watching with interest.....cheers mark

If i was your wife, i'd poison your tea! If Iwas your husband, I would drink it! WINSTON CHURCHILL

  • Member since
    July 2010
  • From: Tempe AZ
Posted by docidle on Friday, August 9, 2013 2:19 AM

Thanks Rod.  I appreciate you keeping an eye on my posts.  Please feel free to suggest anything that would make her look better.

Steve


  • Member since
    July 2010
  • From: Tempe AZ
Posted by docidle on Friday, August 9, 2013 2:21 AM

Thanks Mark again for the support.  The Yamato is looking awesome.  I would appreciate some pointers on photo-etching when I start on the Revell 1/350 Tirpitz.

Steve


  • Member since
    July 2010
  • From: Tempe AZ
Posted by docidle on Friday, August 9, 2013 2:23 AM

Here a some more shots for your entertainment.

Steve


  • Member since
    July 2010
  • From: Tempe AZ
Posted by docidle on Friday, August 9, 2013 2:25 AM


  • Member since
    July 2010
  • From: Tempe AZ
Posted by docidle on Friday, August 9, 2013 2:26 AM


  • Member since
    March 2012
  • From: Marysville, WA
Posted by David_K on Saturday, August 10, 2013 5:27 PM

 Lookin' good, Steve!

I have my rudder for the Thomas sitting here, couldn't resist hijacking your thread with a similar pic!

It's so funny to be working on the same (almost) kit...

        _~
     _~ )_)_~
     )_))_))_)
     _!__!__!_         
     (_D_P_K_)
   ~~~~~~~~~~~~~
    ~~~~~~~~~~~

Current Project:  Imai/ERTL Spanish Galleon #2

Recently Finished: Revell 1/96 Cutty Sark

Next Up:  ???


  • Member since
    July 2010
  • From: Tempe AZ
Posted by docidle on Sunday, August 11, 2013 12:41 AM

Dave,

Looking good!  I like the wood color and the darker bottom color who came up with.  The brass fittings (pintles) on the rudder and (grunions) on the ship which I assume are also painted brass, look striking and the whole thing has come together very nicely. I can't wait to see the finished product.

I agree, it's interesting to see how the same ship can be interpreted in different ways and both look great.  Reminds me of playing guitar with a couple of other people using the same make and model and all playing differently and making sounds you had never considered before but adding so much beauty to the song.

I'm going to make a rope ladder for the fighting top because theoretically it would be pretty difficult for long bowman with bow and arrows and whatever other accruements they would need, shinnining up a stay.  I also plan on not using the tent provided.  It just doesn't look right in size or shape. I am not sure if I'll scratch build one or not since I do not plan on adding any figures.

Steve


  • Member since
    March 2009
  • From: brisbane australia
Posted by surfsup on Sunday, August 11, 2013 1:22 AM

Lovely work Steve. If I can help when you start the Tirpitz I would be glad too.....Cheers mark

If i was your wife, i'd poison your tea! If Iwas your husband, I would drink it! WINSTON CHURCHILL

  • Member since
    March 2012
  • From: Marysville, WA
Posted by David_K on Sunday, August 11, 2013 10:43 AM

Thanks, Steve!

I'm going to try to get the castles and rudder installed today, if I can find some time to sit down...

I like the brass for the pintles, too....and though I would guess that brass wasn't used for such items, I think it looks cool...sometimes I use bronze or even black for that stuff.

I like your idea for the rope ladder, makes sense.  And the tent?  I'm not in love with the way it looks, either...it didn't occur to me to replace it or just leave it off...something to consider.  We'll see if can get it to look okay, otherwise it might go bye-bye to live in the spare parts box!

Hey, I play guitar, too!

Dave

        _~
     _~ )_)_~
     )_))_))_)
     _!__!__!_         
     (_D_P_K_)
   ~~~~~~~~~~~~~
    ~~~~~~~~~~~

Current Project:  Imai/ERTL Spanish Galleon #2

Recently Finished: Revell 1/96 Cutty Sark

Next Up:  ???


  • Member since
    March 2012
  • From: Marysville, WA
Posted by David_K on Sunday, August 11, 2013 3:35 PM

One chore of modeling that I've failed to attend to is the filling of gaps.  What do you use for the little spaces between mating parts?  I have some milliput that I use for resin figure repair, but I wonder if there's a better/faster-drying/smoother choice?

Got my castles on today (sent you an email with a pic), and soon it'll be time for the sail...but now I am starting to wonder whether I like the molded sail, or if I should try something else?  I'd hate for it to cheapen the overall effect of the kit....

What are your thoughts, Steve?

        _~
     _~ )_)_~
     )_))_))_)
     _!__!__!_         
     (_D_P_K_)
   ~~~~~~~~~~~~~
    ~~~~~~~~~~~

Current Project:  Imai/ERTL Spanish Galleon #2

Recently Finished: Revell 1/96 Cutty Sark

Next Up:  ???


  • Member since
    July 2010
  • From: Tempe AZ
Posted by docidle on Monday, August 12, 2013 1:34 AM

Interesting that you bring up filling gaps.  While I was trying to dry fit the aft castle, the hull got away from me and did a bit of crash and burn.  There are sprung gaps all over the upper and lower hull joint.  I am not sure how I am going to fix it at the moment.  I had an almost perfect join but not anymore......

Anyway, what I usually use for this type of gap filling is Mr Surfacer 500 applied with Tamiya fine pointed Q-Tips.  I let that dry about 10 minutes or so and then take a regular Q-Tip soaked in 91% Isopropyl Alcahol.  Tis can get rid of the paint in the area but if you do it right it won't affect the grain and painting is a lot easier that trying to scribe new grain.  After you get to where the gap is filled and there is no excess let it dry overnight and then apply more if there was shrinkage.

In regards to the sail, since this is a How To article/CD, I am building the Thomas Out of the Box, except for the stuff they call rigging line.  I will scan the coat of arms decal before using it so that I can go back after the article is done and rerig with wooden deadeyes, etc... Pretty much like the Hanse Kogge from last year.  If I can find a way to make realistic looking sails then I use the coat of arms I scanned.  However, if I have the sail set, then I will need to populate the ship, otherwise it will look like a ghost ship in my opinion.

Hope this helps.  I wrote an awesome reply earlier but it disappeared into the ether........

Steve


  • Member since
    July 2010
  • From: Tempe AZ
Posted by docidle on Monday, August 12, 2013 1:38 AM

Dave,

By the way, what type of guitar do you play?  I play a 1970 Fender Telecaster, an Ibenez Les Paul Custom and an Ovation acoustic.  Although I really don't get much time to play anymore and the band years are long ago....... Kinda like my hair!

Steve


  • Member since
    March 2012
  • From: Marysville, WA
Posted by David_K on Monday, August 12, 2013 6:03 PM

I have a Takamine G-Series....I play acoustic.  Been playing with a guy from work, having fun!  We play classic rock tunes, Beatles, Eagles, Pink Floyd...We actually put on a little concert for our co-workers last Friday!

Sorry you dropped your model...what a pain!

        _~
     _~ )_)_~
     )_))_))_)
     _!__!__!_         
     (_D_P_K_)
   ~~~~~~~~~~~~~
    ~~~~~~~~~~~

Current Project:  Imai/ERTL Spanish Galleon #2

Recently Finished: Revell 1/96 Cutty Sark

Next Up:  ???


  • Member since
    March 2012
  • From: Marysville, WA
Posted by David_K on Wednesday, August 28, 2013 4:36 PM

Got my sail on the Thomas last night...one of the neatest things about this kit is that the yard doesn't have any locator pins to attach it to the mast...this kit actually comes with a molded parral with trucks, and once it is clipped to the yard (around the mast), the lift and the sling rigging is what actually holds it up!  So, now I have it suspended by some binder clips and line, have to decide at what height to tie the yard...

        _~
     _~ )_)_~
     )_))_))_)
     _!__!__!_         
     (_D_P_K_)
   ~~~~~~~~~~~~~
    ~~~~~~~~~~~

Current Project:  Imai/ERTL Spanish Galleon #2

Recently Finished: Revell 1/96 Cutty Sark

Next Up:  ???


  • Member since
    March 2012
  • From: Marysville, WA
Posted by David_K on Wednesday, August 28, 2013 7:19 PM

Steve!  Man, I just realized the bowlines (or whatever they are that go from the sides of the sail to the blocks on the bowsprit and then belay on cleats on the deck) don't reach the cleats without rubbing on the forecastle...ugh.  Any suggestions for where to run them?

        _~
     _~ )_)_~
     )_))_))_)
     _!__!__!_         
     (_D_P_K_)
   ~~~~~~~~~~~~~
    ~~~~~~~~~~~

Current Project:  Imai/ERTL Spanish Galleon #2

Recently Finished: Revell 1/96 Cutty Sark

Next Up:  ???


  • Member since
    July 2010
  • From: Tempe AZ
Posted by docidle on Wednesday, August 28, 2013 10:49 PM

Dave,

On the Kogge the foc'sle is much smaller and had cleats on the aft bulwark ribbing both port and starboard which is where the bowlines were tied off.  If you still have some of those metal cleats, I would drill a hole either on the aft bulwark ribbing or along the side ribbings starting about half way back.

In the instructions they have you tying off after running your line through the chess trees, which is incorrect as well as not working very well.  I was planning on adding some cleats myself.

Here is a picture of the foc'sle which hopefully demonstrates what I am babbling on about.  You want to think about where is the logical place to tie off so that it does not interfere with soldiers fighting the ship.

Steve


  • Member since
    July 2010
  • From: Tempe AZ
Posted by docidle on Wednesday, August 28, 2013 10:53 PM


  • Member since
    July 2010
  • From: Tempe AZ
Posted by docidle on Wednesday, August 28, 2013 10:56 PM


  • Member since
    July 2010
  • From: Tempe AZ
Posted by docidle on Wednesday, August 28, 2013 11:55 PM

Here's a bow shot of the Thomas.  The last three shots were from the Hanse Kogge I did last year.  I wanted to illustrate the grain effect on this model.  I need to touch up the chesstree  and the supports.

Steve

Unpainted


And painted


  • Member since
    March 2012
  • From: Marysville, WA
Posted by David_K on Thursday, August 29, 2013 10:42 PM

Awesome!  I love the Kogge!  What did you use for the yard?

I got my Thomas more-or-less finished tonight.  Waiting for the oil paint on the base/nameplate to dry, and I have a little touch-up painting to do (gotta hide those little glue spots that show up!)...then I can set it on the stand.

The rigging got a little funny, I wish I had noticed the problems sooner...for the bowlines, I ended up drilling two holes in the aft of the forecastle and installing brass eyebolts, and belayed the lines there.  And the sheets were another problem...there's no good way to get to the inner bulwark cleat without fouling on the deadeyes or the caprail...so I made some modifications to those lines, too...speaking of cleats, those tiny little parts don't have enough contact surface to hold much tension...I popped a couple off and had to re-attach them.  Seems like everything's holding now. :)

Heading to Eastern Washington in the morning, but on Sunday I should be able to get it all finished up, and I'd like to post a few pics...Steve, do you mind if I put them here?

Dave

        _~
     _~ )_)_~
     )_))_))_)
     _!__!__!_         
     (_D_P_K_)
   ~~~~~~~~~~~~~
    ~~~~~~~~~~~

Current Project:  Imai/ERTL Spanish Galleon #2

Recently Finished: Revell 1/96 Cutty Sark

Next Up:  ???


  • Member since
    July 2010
  • From: Tempe AZ
Posted by docidle on Thursday, August 29, 2013 11:13 PM

Thanks Dave, I took the Kogge down of the self last night to get an idea of how I had set up the rigging plan again, and dang if I do not love that build.  Of course I see the problem areas better now which I'll get around to fixing one of these days.

Thanks for the heads up on the tack and sheet, I look forward to seeing how you overcame the problem.  For your question on the yard, I cut the full sail off the yard with a razor saw "very carefully" and then cleaned it up, painted and oiled.  It actually came out nice as seen in these pictures.  In regards to the cleats, I used brass cleats with superglue and then tied off the line on the cleat and ran the rigging backwards.  Kind of weird I know but I read about it somewhere and it worked.  You cannot do this all the time but it really helped on the Kogge.

I have no problem with you posting on this thread bud, maybe we should change the heading so people will know that both of the Thomas' are in here.  Kind of like a "group build"!

Have fun in Eastern Washington, part of my wife's family live in Spokane and I went through Eastern Washington on my way to the 1973 Scout Jamboree in Farragut, Idaho.  Beautiful country although I prefer the Puget Sound area myself.

Steve


  • Member since
    March 2009
  • From: brisbane australia
Posted by surfsup on Saturday, August 31, 2013 11:12 PM

I love your weathering work Steve. Looks fantastic on her.....Cheers mark

If i was your wife, i'd poison your tea! If Iwas your husband, I would drink it! WINSTON CHURCHILL

  • Member since
    August 2013
Posted by Jsmyth on Monday, September 2, 2013 1:51 PM

What a great job Steve!! I have to agree with Surfsup on the weathering.

  • Member since
    July 2010
  • From: Tempe AZ
Posted by docidle on Wednesday, September 4, 2013 8:28 PM

Thank you Mark and J.  I am going to post the work I have done on the sail.

Steve


  • Member since
    July 2010
  • From: Tempe AZ
Posted by docidle on Wednesday, September 4, 2013 8:42 PM

Here is the hunk of plastic which consists of the sail and yard.  As you can see, you can choose whether you want to show full sail or furled.  Although I chose door three on the Hanse Kogge by sawing off the yard off the sail this time I will use the sail as is.

Anyway, for such a hunk of plastic, the detail is rather nice.  The sail material is quite petite and it looks to scale.  The bonnet lines on both front and back, as well as the line bordering the sails is also shown.

Painting this was fun.  After I filled in the ejection marks on the rear of the sail with Squadron White Putty, I had to be very careful not to sand the detail away.  Since the sail is billowing the horizontal line bisecting the sail had to follow the curve or it would have been really funky looking.  Much patience and even the use of a toothpick was needed to finish the painting off.

You can see the decals that go on the sail which is one of the reasons I used it.  Also, I am building this pretty much OOB.  I am actually using the sails as well as the deadeyes and blocks from the kit.  I am using my own rigging line since the kit's line was garbage.

Enjoy,

Steve


  • Member since
    August 2005
  • From: Glenolden, PA
Posted by highlanderburial on Friday, September 6, 2013 9:48 PM

Hey Gents,

What "oil" are you using to bring out the wood grain finish. I am super jealous of how well your "wood" looks on that kit!

Todd

Imagine a witty signature right .....here....

  • Member since
    July 2010
  • From: Tempe AZ
Posted by docidle on Saturday, September 7, 2013 2:23 AM

Todd,

I use high grade artist oils over acrylics.  You can use student grade oils but  they do not have the longevity of  the pro grade.  The initial outlay is on the high side but you really don't use that much on each model so they last a long time.

Steve


  • Member since
    August 2011
  • From: Earth, for now
Posted by BashMonkey on Monday, September 9, 2013 3:08 PM
I have been interested in this kit. How big is it?

 ALL OF YOUR BASE ARE BELONG TO US!

  • Member since
    July 2010
  • From: Tempe AZ
Posted by docidle on Monday, September 9, 2013 11:23 PM

The Thomas is 16.6 inches long and about the same height with the stand.

Steve


  • Member since
    August 2011
  • From: Earth, for now
Posted by BashMonkey on Wednesday, September 11, 2013 4:13 PM

Thanks! thats a good sized kit.

 ALL OF YOUR BASE ARE BELONG TO US!

  • Member since
    July 2010
  • From: Tempe AZ
Posted by docidle on Thursday, September 12, 2013 8:33 PM

Bash,

It's an interesting build and makes into an interesting boat.  I firmly believe in what Prof Tilley says about getting back into ship modeling; build a.small ship in a large scale.  This also has a nice bit of rigging, not too much but enough to teach someone the basics. Nice grain for weathering and painting.  

If you decide to build one, please share pictures I would love to see how you built it.  In fact DavidK built the same model at the same time.  He did a beautiful job but different approach as well as building it much faster than I take.  He usually does at least two to three models to my one.  Hopefully he'll post some pictures of the build soon.  If you have any questions, please ask.

Steve


  • Member since
    January 2007
  • From: Chester Basin Nova Scotia
Posted by John Lyle on Monday, September 30, 2013 3:07 PM
I love the finish you got on the hull, it looks like real wood. How did you achieve this? I admit to prefering wood for sailing ships but this kit looks very interesting.

Winters may be cold in Canada but at least there are no mosquitoes or blackflies

  • Member since
    July 2010
  • From: Tempe AZ
Posted by docidle on Monday, September 30, 2013 8:14 PM

John,

It is just artist's oil paint over acrylic paint.

Steve


  • Member since
    July 2010
  • From: Tempe AZ
Posted by docidle on Friday, October 4, 2013 5:49 PM

Here is the sail with decals on finally.  It was a bear getting these babies on!  I thought the Lions were going to be the hardest, they only broke apart in about 4 or 5 places; however, the fleur- de- lis added at least a parcel of gray hair to appear.  They broke apart in so many places I lost count.  Add that to eye balling them to conform to the sail, let's just say I'm glad that part is done.

Now on to weathering them.  I was wondering if I should seal them with Future and then a dull coat before I weather or just a Future coat and then a dull coat after I weather them?

Steve


  • Member since
    June 2012
Posted by arnie60 on Friday, October 4, 2013 9:02 PM

Wow. If there are any breaks, I just can't see them. Nice save.

  • Member since
    July 2010
  • From: Tempe AZ
Posted by docidle on Friday, October 4, 2013 11:43 PM

Thanks Arnie, like I said, I am REALLY glad that part is over.  You rarely encounter decals building sailing ships but it is always good to stretch your limits.

Steve


  • Member since
    July 2010
  • From: Tempe AZ
Posted by docidle on Tuesday, November 12, 2013 6:13 PM

I finally got to weathering the sail.  It is a bit shiny due to the fact I just painted the oils on it.  I'm still toying with the idea of using a bit of yellow ochre but I'll sleep on it for now.


  • Member since
    March 2004
  • From: Spartanburg, SC
Posted by subfixer on Wednesday, November 13, 2013 10:15 AM

Looking quite proper.

I'm from the government and I'm here to help.

  • Member since
    September 2013
  • From: San Antonio, Texas
Posted by Marcus McBean on Wednesday, November 13, 2013 2:47 PM

Very nice work.

  • Member since
    July 2010
  • From: Tempe AZ
Posted by docidle on Wednesday, November 13, 2013 8:51 PM

Sub,

Oh yes, quite so old boy.

Thanks McBean.

Steve


  • Member since
    July 2010
  • From: Tempe AZ
Posted by docidle on Thursday, November 28, 2013 8:32 PM

Happy Thanksgiving everyone in the U.S.

These pictures show the evolution of the painting technique and shows the start of rigging.  I put the kit block in to show the difference between the handmade rigging vs. the kit version.  Since I am using the sail, the sequence of the build is getting weird.  I need to do the anchor ropes before securing the fo'c's'le so that I can secure the rope around the bits, the capstan and then down below.  

The sail/yard needs to be rigged next so that I can run the halyards around the wench ( oops, I meant windlass! ), as well as the lift, brace, tack and sheet blocks.  I'll probably rig the back stays next since it will be immensely easier without the sail than with it.

Anyway, enjoy the pictures.

Steve


  • Member since
    May 2003
  • From: Greenville, NC
Posted by jtilley on Thursday, November 28, 2013 9:05 PM
Hmmm....run the halyards around the wench....Souns like something really interesting is going on aboard that ship.

Beautiful model. Have you considered adding some people? Zvezda makes some nice 1/72 medieval figures for war gaming, and your superb oil painting technique could make them look spectacular.

Youth, talent, hard work, and enthusiasm are no match for old age and treachery.

  • Member since
    July 2010
  • From: Tempe AZ
Posted by docidle on Thursday, November 28, 2013 10:09 PM

Thanks for catching that Professor T!  Although, it being the King's ship and all ....... You just never know.

I actually placed the 1/72 figure for size comparison and the thought has crossed my mind during this build.  I have seen some rather nice figures by Zvezda and Ceasar.  What I haven't found are bombards, although again, I am not sure if the English carried them on board during the battle of Sluy.  If I do go with the figures I am definitely going to put Longbowmen in the fighting top.

Although I was going to do this built out of the box, when it came time to start rigging I couldn't bring myself to rig her that way. I put the kit block in the picture so that a modeler you is thinking of building the Thomas or another Kogge can see the difference between the two methods.

Finally, thank you for the compliment, I always appreciate your input.

Steve


  • Member since
    March 2012
  • From: Marysville, WA
Posted by David_K on Friday, November 29, 2013 12:28 PM

Looks great, Steve!  When I did my Thomas, I replaced the kit blocks with walnut hearts (from Cornwall Model Boats, in the UK....SUPERB fittings, BTW!)...though Zvezda does a great job with their blocks, I felt that rigging my own was a good idea, and they look way better...as do yours!  I don't remember if I posted any progress pics of the Thomas on here...been awhile since I contributed at Finescale...

Makes me consider starting a thread for the Chebec build...

Dave

        _~
     _~ )_)_~
     )_))_))_)
     _!__!__!_         
     (_D_P_K_)
   ~~~~~~~~~~~~~
    ~~~~~~~~~~~

Current Project:  Imai/ERTL Spanish Galleon #2

Recently Finished: Revell 1/96 Cutty Sark

Next Up:  ???


  • Member since
    July 2010
  • From: Tempe AZ
Posted by docidle on Friday, November 29, 2013 11:11 PM

Dave,

Thanks!  I agree, Zvezda makes good looking blocks and I will use those on this build like I did on the Hanse Kogge.  But I just could not bring myself to use the ready made deadeyes or the kit provided rigging line.  I also used the decals for the shields and they did not come out too bad especially after I weathered them.  I think it shows on one of the pictures of the fore and aft castles and if not, I'll post one.

Steve


  • Member since
    July 2010
  • From: Tempe AZ
Posted by docidle on Friday, November 29, 2013 11:24 PM

Here is a really bad photo of the shields.  They had a gloss coat on and are not weathered or placed on the ship (DUH).  I'll need to try and take another picture but in the meantime try not to be TOO blinded by the reflection.

Steve


  • Member since
    July 2010
  • From: Tempe AZ
Posted by docidle on Wednesday, December 11, 2013 1:04 PM

Working on the anchor lines.

Steve


  • Member since
    July 2010
  • From: Tempe AZ
Posted by docidle on Thursday, December 12, 2013 1:22 PM

Secured the anchors and glued the knee on.

Steve


  • Member since
    July 2010
  • From: Tempe AZ
Posted by docidle on Tuesday, December 17, 2013 2:23 PM

I found that with the anchors secured as per instructions, the forecastle would not sit right.  There was a gap between the deck and the aft vertical supports.  So I painted some stock styrene and after priming, painting and cutting I glued them in.  Not perfect but better than the gap.  Here is the sequence if interested.

Steve


  • Member since
    November 2005
  • From: Formerly Bryan, now Arlington, Texas
Posted by CapnMac82 on Saturday, December 21, 2013 12:45 AM

Most elegant progress--congratulations!

One thing that caught my eye was the elegant way the anchor line went round the capstan..  It keeps things neat and orderly.  So, I'd keep it that way even though turning the capstan would heave one line in while paying the other out.  Pushme-Pullyou!

  • Member since
    July 2010
  • From: Tempe AZ
Posted by docidle on Saturday, December 21, 2013 3:30 PM

Thanks Capn'  My navy training wants things squared away and even though I know it is a push me pull you rig, I think it works quite well.  That is, until we actually have to take in an anchor!

Steve


  • Member since
    October 2013
Posted by infofrog on Saturday, December 21, 2013 5:33 PM

ToastWhat a awesome build .Super great photos

  • Member since
    July 2010
  • From: Tempe AZ
Posted by docidle on Wednesday, December 25, 2013 12:05 AM

Thanks IF, I appreciate the kudos.  Regarding the pictures, I am finally getting the hang of my digital camera so that I can actually see the progression following my other posts.

Steve


  • Member since
    February 2003
  • From: Lacombe, LA.
Posted by Big Jake on Wednesday, December 25, 2013 9:07 AM

Steve,

Can you please post a quick list of the oils and colors you used.  I sent you a PM but you may not have had a chance to read it yet.  I've used mainly enamels and have no experience with oils, so a tutorial is needed.  

I'm cleaning out my stash and am focusing on just historic and time line ship in my collection.  I got the Thomas and would like to do mine as close to your as possible.

Thanks

Jake Groby

Lacombe, LA.


  • Member since
    July 2010
  • From: Tempe AZ
Posted by docidle on Tuesday, December 31, 2013 12:28 AM

Jake,

I sent you a PM.

Steve


  • Member since
    July 2010
  • From: Tempe AZ
Posted by docidle on Tuesday, January 14, 2014 6:11 PM

Here are some pictures of the rope ladder I constructed for the Thomas.  Octavius is there as usual for scale perspective.  I'll take some better pics later and post them since I still have not oiled the rungs and they look a bit flat.

Steve


  • Member since
    September 2012
Posted by GMorrison on Tuesday, January 14, 2014 6:16 PM

Steve, not to be a pill but maybe the rungs are a bit over sized? Just a gut thing...

 Modeling is an excuse to buy books.


  • Member since
    July 2010
  • From: Tempe AZ
Posted by docidle on Tuesday, January 14, 2014 6:23 PM

GM,

Now that you mention it, they are a bit.  Although they are close to the ladders on the fore and aft castle which look a bit over scale too.  Back to the drawing board…….

Thanks,

Steve


  • Member since
    July 2010
  • From: Tempe AZ
Posted by docidle on Friday, January 17, 2014 9:52 PM

After trying different approaches I tore out the ladder and then tried to remember how to tie tiny clove hitches to make a "real" rope ladder.  The first knot took me about 20 minutes total and the second….. about 15.  When I go to the fourth line, I was humming along tying a clove hitch in about  a minute tops.

These shots are just a practice rope ladder to see if I could still do it and what would be the most efficient process.  It is a bit hard seeing the rungs but they're there.  I am now soaking the line to get the kinks out before I wax it.  Then we'll be in business to make a rope ladder.

Steve


  • Member since
    March 2012
  • From: Marysville, WA
Posted by David_K on Saturday, January 18, 2014 9:52 AM

I like it!  I remember a piece of advice I've heard here on the forum....and I'm paraphrasing:

"If in doubt about the scale, err on the small side."

Your first ladder didn't look too bad to me, but the smaller one definitely seems to fit into the scene better!

Well done, my friend!  Can't wait to see the finished product!

        _~
     _~ )_)_~
     )_))_))_)
     _!__!__!_         
     (_D_P_K_)
   ~~~~~~~~~~~~~
    ~~~~~~~~~~~

Current Project:  Imai/ERTL Spanish Galleon #2

Recently Finished: Revell 1/96 Cutty Sark

Next Up:  ???


  • Member since
    July 2010
  • From: Tempe AZ
Posted by docidle on Saturday, January 18, 2014 10:09 PM

Thanks Dave and I agree, it is better to err on the side of smaller than larger.  After trying so hard not to rig the line I end up having to, I guess I should never have said that I wasn't going to tie this ladder..... Karma in a weird sort of way.

Steve


  • Member since
    July 2010
  • From: Tempe AZ
Posted by docidle on Sunday, March 9, 2014 6:20 PM

After a long period away from the work desk, I was able to actually start the rigging on this "ship that will never be finished".  After four attempts at rigging a rope ladder I decided to put that on the back burner for a bit.  I now know four ways not to rig the ladder!  So, beginning with the starboard shrouds I rigged wooden deadeyes instead of the plastic ones included in the kit.  I will use the blocks from the kit as they are actually rather nice.  Here is the sequence I took for the first two starboard shrouds.

Enjoy,

Steve


Yes, I did sneak in a port side shroud, since I did not take a photo of that step on the starboard side.


  • Member since
    September 2013
  • From: San Antonio, Texas
Posted by Marcus McBean on Sunday, March 9, 2014 7:00 PM

Good to see you back.  Our pictures will come in real handy when I get to that step.  I can't wait to see the final product, nice work.

  • Member since
    October 2013
Posted by infofrog on Sunday, March 9, 2014 8:32 PM

looks great  from here

  • Member since
    July 2010
  • From: Tempe AZ
Posted by docidle on Monday, March 10, 2014 8:58 PM

The Thanks guys.  I am adding these pictures today so that you can actually see what the heck I was doing.

Steve


  • Member since
    July 2010
  • From: Tempe AZ
Posted by docidle on Friday, March 14, 2014 10:14 PM

The standing rigging is done at long last!  I'll start on the running rigging this weekend..... hopefully.  There are a few tweaks I need to make but all in all I am somewhat pleased.

Enjoy

Steve


  • Member since
    January 2007
  • From: Chester Basin Nova Scotia
Posted by John Lyle on Saturday, March 29, 2014 11:29 AM

This is plastic????!!!! Sure looks great, more like aged wood to me. Good job.

Winters may be cold in Canada but at least there are no mosquitoes or blackflies

  • Member since
    July 2010
  • From: Tempe AZ
Posted by docidle on Tuesday, April 1, 2014 12:35 AM

Thanks John, I appreciate the kudos and thank you checking out my build.

Steve


  • Member since
    July 2010
  • From: Tempe AZ
Posted by docidle on Tuesday, April 1, 2014 12:40 AM

I have a great number of photos regarding the running rigging.  I will try and post them in sequential order so bear with me if I make a mistake.  I am ALMOST finished and all in all it came out pretty decent.

We’ll start with a single block. This is a kit block so it needed to be cleaned up, painted and then oiled. I just painted the stropping Black to match the standing rigging. 

Enjoy,

Steve


  • Member since
    July 2010
  • From: Tempe AZ
Posted by docidle on Tuesday, April 1, 2014 12:41 AM

Then using the Magic Hands, Extra Hands device from Micro Mark (well worth the investment of less than $20 USD). Note that the line being used is lighter than the standing rigging. Standing rigging is tarred to protect the lines and so is either a Black or Dark Brown to simulate the tar.

The running rigging on the other hand isn’t tarred and therefore lighter, usually a Light Tan or even a Light Gray.

So the first photo shows the line running through the end of the strop.

Steve


  • Member since
    July 2010
  • From: Tempe AZ
Posted by docidle on Tuesday, April 1, 2014 12:43 AM

I prefer using CA(SuperGlue), but white glue is just as effective but takes longer to dry. A little dab will do ya’! I either use a toothpick or a thin copper  wire to apply CA.


  • Member since
    July 2010
  • From: Tempe AZ
Posted by docidle on Tuesday, April 1, 2014 12:44 AM

To secure the line, tie the smaller sewing thread around the two lines and pull tight. You can use a bit of CA now If you wish to secure the thread before wrapping it. Note in the last photo that I use Waxed Paper for my CA glue; CA doesn’t stick to Waxed Paper so it’s a handy and cheap glue holder.

Steve


  • Member since
    July 2010
  • From: Tempe AZ
Posted by docidle on Tuesday, April 1, 2014 12:46 AM

I usually use about four to five turns before trying of the line.


  • Member since
    July 2010
  • From: Tempe AZ
Posted by docidle on Tuesday, April 1, 2014 12:51 AM

And finally a dab of CA and then clip off the ends and you are set to do all the blocks now! I can’t express enough about how much using the Extra Hands tool is. It makes working with blocks SO much easier.

Steve


  • Member since
    July 2010
  • From: Tempe AZ
Posted by docidle on Tuesday, April 1, 2014 12:54 AM

Note in this picture that the line securing the Heart is Black because this is considered Standing Rigging. However the line between the two Hearts is light, hence running rigging. This is also true for the Deadeyes.

I think that is enough for tonight.

Steve


  • Member since
    March 2012
  • From: Marysville, WA
Posted by David_K on Tuesday, April 1, 2014 5:01 PM

Well done, Sir!  She looks super sweet!

        _~
     _~ )_)_~
     )_))_))_)
     _!__!__!_         
     (_D_P_K_)
   ~~~~~~~~~~~~~
    ~~~~~~~~~~~

Current Project:  Imai/ERTL Spanish Galleon #2

Recently Finished: Revell 1/96 Cutty Sark

Next Up:  ???


  • Member since
    July 2010
  • From: Tempe AZ
Posted by docidle on Tuesday, April 1, 2014 11:04 PM

Thanks Dave!  I almost got 'er done.

Steve


  • Member since
    July 2010
  • From: Tempe AZ
Posted by docidle on Tuesday, April 1, 2014 11:15 PM

Here is a continuation of the running rigging. I opened the holes out on the beak to make rigging easier.

Enjoy

Steve


  • Member since
    July 2010
  • From: Tempe AZ
Posted by docidle on Tuesday, April 1, 2014 11:17 PM

The halyards to raise and lower the yard.


  • Member since
    July 2010
  • From: Tempe AZ
Posted by docidle on Tuesday, April 1, 2014 11:19 PM


  • Member since
    July 2010
  • From: Tempe AZ
Posted by docidle on Tuesday, April 1, 2014 11:21 PM

The halyards will wrap around the winch later.


  • Member since
    July 2010
  • From: Tempe AZ
Posted by docidle on Tuesday, April 1, 2014 11:22 PM


  • Member since
    July 2010
  • From: Tempe AZ
Posted by docidle on Tuesday, April 1, 2014 11:23 PM

Note the kit provided parrells. They actually help keep the yard close to the mast and helps the yard move up and down the mast.

Steve


  • Member since
    July 2010
  • From: Tempe AZ
Posted by docidle on Tuesday, April 1, 2014 11:27 PM

I know you were wondering where Octavius was.


  • Member since
    July 2010
  • From: Tempe AZ
Posted by docidle on Tuesday, April 1, 2014 11:29 PM

Here is the beginning of the lifts rigging.


  • Member since
    July 2010
  • From: Tempe AZ
Posted by docidle on Tuesday, April 1, 2014 11:31 PM


  • Member since
    July 2010
  • From: Tempe AZ
Posted by docidle on Tuesday, April 1, 2014 11:35 PM

The hanging block at the end of the yard is for the brace.

Steve


  • Member since
    July 2010
  • From: Tempe AZ
Posted by docidle on Tuesday, April 1, 2014 11:36 PM


  • Member since
    July 2010
  • From: Tempe AZ
Posted by docidle on Tuesday, April 1, 2014 11:39 PM


  • Member since
    July 2010
  • From: Tempe AZ
Posted by docidle on Tuesday, April 1, 2014 11:41 PM


  • Member since
    July 2010
  • From: Tempe AZ
Posted by docidle on Tuesday, April 1, 2014 11:44 PM


  • Member since
    July 2010
  • From: Tempe AZ
Posted by docidle on Tuesday, April 1, 2014 11:46 PM

I'll post more tomorrow.

Steve


  • Member since
    November 2009
Posted by santa on Thursday, April 3, 2014 7:22 AM

Beautiful build Steve--well beyond what I can due.

  • Member since
    July 2010
  • From: Tempe AZ
Posted by docidle on Thursday, April 3, 2014 3:24 PM

Thanks Niels, but I seriously doubt that this anywhere near your beautiful builds!

Steve


  • Member since
    July 2010
  • From: Tempe AZ
Posted by docidle on Thursday, April 3, 2014 3:45 PM

Sorry about having to post one picture per post, I have been posting from my iPad.  It is a bear and then some to try posting more than one at a time; however, I am on the big boy computer so here are a couple more photos of the build.

Enjoy,

Steve


  • Member since
    July 2010
  • From: Tempe AZ
Posted by docidle on Thursday, April 3, 2014 3:59 PM

I'm using a bulleye on the bowline instead of the a single block used per the instructions.  The instructions have single blocks off the "bowsprit(?)" which makes much more sense.  I also added the cleats on the inside aft portion of the forecastle for the tie off.

Steve

Checking the length for the lines.


Tied off at the sail


  • Member since
    July 2010
  • From: Tempe AZ
Posted by docidle on Thursday, April 3, 2014 4:13 PM

Here is the tie off at the blocks.  Note the angle of the yard. I hope I am not boring too many people with the "process" photos.

Steve


Adjusting the lines again

And finally the tie off.  I use painter's tape and wrap my lines on them.  Then a 50/50 mixture of water and Elmer's glue is painted on them them and are then left to dry.


  • Member since
    March 2012
  • From: Marysville, WA
Posted by David_K on Thursday, April 3, 2014 6:03 PM

I like your technique for laying the rope coils...I always struggle with rope coils...hey Steve, do you have a preferred method for making coils to hang on pinrails?  I can never get them to work the way Mastini or Wilkins say in their books...

        _~
     _~ )_)_~
     )_))_))_)
     _!__!__!_         
     (_D_P_K_)
   ~~~~~~~~~~~~~
    ~~~~~~~~~~~

Current Project:  Imai/ERTL Spanish Galleon #2

Recently Finished: Revell 1/96 Cutty Sark

Next Up:  ???


  • Member since
    July 2010
  • From: Tempe AZ
Posted by docidle on Friday, April 4, 2014 12:41 AM

Thanks Dave,

On this build and the Nina, I have been experimenting with the Elmer's glue and water mix to fairly good results.  I am still using CA on the contact points for lines, but for coiling line I built a jig made of wood and small nails (finishing nails).  The nails are of various distances from each other and these are what I use to coil line.  

I wax the line as usual, by running it through a block of bees wax and then pass it  over a small flames couple of times and then soak the line line until it is limp.  I then take a length of this line and wrap it around a couple of nails that corespond with the height of the belaying pin rail and also how much rope I want to display.  At this point you paint the line with the 50/50 mixture of white glue and water, let dry and then lay it over the the pin.  I then paint the line again with a bit of the glue/water so that it will sag, mostly with a little help from your rigging tool.

Otherwise, if you are using the Wilkins' method, are you using the old tube plastic cement to coat the line when it is on the rod? And using liquid cement while holding the line on the pin and forming it with some form of rigging tool?

I started using the white glue/water mix because I really did not like the look of the Wilkins' method.  It was probably me using FAR too much glue than was needed!

I do not know what method Mastini  recommends but if you want to give me a run down on how it works, I would appreciate it.

Hope this help bud,

Steve


  • Member since
    March 2012
  • From: Marysville, WA
Posted by David_K on Friday, April 4, 2014 5:42 PM

The problem I have is that the coils don't want to stay coiled, especially when removing them from the jig..soon as they are flexed, the whole thing comes undone like a jack in the box!

Mastini, in Ship Modeling Simplified, uses a similar technique, but he suggests tying loops like a woolding (with the ends of the seize being tied under, and then together outside the loop) around a rod (or exacto handle), and then sliding them off...same problem, though...I can't get them to stay in a loop...maybe more glue??

I never use the tube type cement...I hate that stuff  :)

I guess I'll keep experimenting, but I've failed with about 30 attempts!

lol

        _~
     _~ )_)_~
     )_))_))_)
     _!__!__!_         
     (_D_P_K_)
   ~~~~~~~~~~~~~
    ~~~~~~~~~~~

Current Project:  Imai/ERTL Spanish Galleon #2

Recently Finished: Revell 1/96 Cutty Sark

Next Up:  ???


  • Member since
    March 2012
  • From: Marysville, WA
Posted by David_K on Friday, April 4, 2014 5:48 PM

Here's a pic from the book...

        _~
     _~ )_)_~
     )_))_))_)
     _!__!__!_         
     (_D_P_K_)
   ~~~~~~~~~~~~~
    ~~~~~~~~~~~

Current Project:  Imai/ERTL Spanish Galleon #2

Recently Finished: Revell 1/96 Cutty Sark

Next Up:  ???


  • Member since
    June 2012
Posted by arnie60 on Friday, April 4, 2014 6:41 PM

You are going to laugh at this, I use the rod technique you show above, but I soak it w/ plain water before I pull it off the rod. Surprisingly they tend to hold their shape even after I hang them w/ out using any glue. Sometimes I have to re soak them to reshape them a bit, but then they seem fine. The only glue I use is to attach it to the belaying pin. Might depend on what kind of cordage you are using. All mine comes from Syrene. A bit spendy, but well worth it.

  • Member since
    July 2010
  • From: Tempe AZ
Posted by docidle on Saturday, April 5, 2014 12:54 AM

Dave,

I think the jack in the box outcome has to do with not using the tube glue.  I'll do a test and see if that is it or not.  For liquid cement, do you use the Model Master brand and if so is that what you're you using on the line while wrapped around the rod?  You might want to try the painters tape and white glue mix to see if it comes out more to your satisfaction.  Please let me know how it comes out.

Arnie,

That is amazing that you can get the line to lay the way you want to.  I have a little bit left so I think I'll give it a test.  I'm glad that you find Chuck's line suitable.  Personally,  love his products which is why I recommended it to you.  I agree, it is a bit pricey but well worth it!

I will post some more pictures this weekend on the build, so stay tuned, same ship channel same ship station.....

Steve


  • Member since
    March 2012
  • From: Marysville, WA
Posted by David_K on Saturday, April 5, 2014 9:29 AM

Hmmmm...let me apologize for hijacking your thread a little bit Steve!

But...how many people use kit line, and how common is it to source line from companies like Syren?  Is there a seriously noticeable difference?  I'm a bit of a cheapskate, so I usually make do with the stuff from the kit (unless it's terrible [the stuff in the new Revell Vasa was BAD!])....but if it really makes for better performance, I guess I should give it a whirl...By the way, I bought a bunch from Model Shipways for cheap last year, but I found it plastic-y and lame....The line in all my Imai kits seems good...I never have any trouble, except if I'm trying to make coils!

I use dilute elmer's when I'm trying to stiffen line for coils...the anchor rope for the Chebec worked out great, but that's easy, since it lies on the deck in a coil (all I did was shape it, brush it with glue+water, and put some clothespins on it to hold it in shape until it was dry)...the stuff that hangs from pinrails seems trickier.  This is a technique that I really want to learn, coiled rope feels like an important detail.

Dave

        _~
     _~ )_)_~
     )_))_))_)
     _!__!__!_         
     (_D_P_K_)
   ~~~~~~~~~~~~~
    ~~~~~~~~~~~

Current Project:  Imai/ERTL Spanish Galleon #2

Recently Finished: Revell 1/96 Cutty Sark

Next Up:  ???


  • Member since
    July 2010
  • From: Tempe AZ
Posted by docidle on Thursday, April 10, 2014 4:23 PM

Dave,

I agree with you, having coiled line on pin rails and on the deck does make a difference between a well made model and a model that stands out.  Don't get me wrong, a poorly built model ship does not magically become a masterpiece just because you coiled some lines for it. However, that being said, it is up to the modeler to make whatever decisions they want for their build and hopefully have fun building the dang thing.  

I have a hunch that it's the line you are having issues with and not your coiling technique. Especially after the rigging you did for your amazing Chebec.  I did an experiment with some line that was not Model Expo nor kit line.

Here is a series of photos to show you how I did this with a belaying pin rack, although it is really the same process I use with line coiled on the deck.  I just set it up with the length being greater than the width.  You might say that it is not a small coil but if you look at pictures of working ships, the length of the coil varies even on the same rail.  If you want, I'll set up a smaller length on the pin rail.  I hope this helps.

Steve

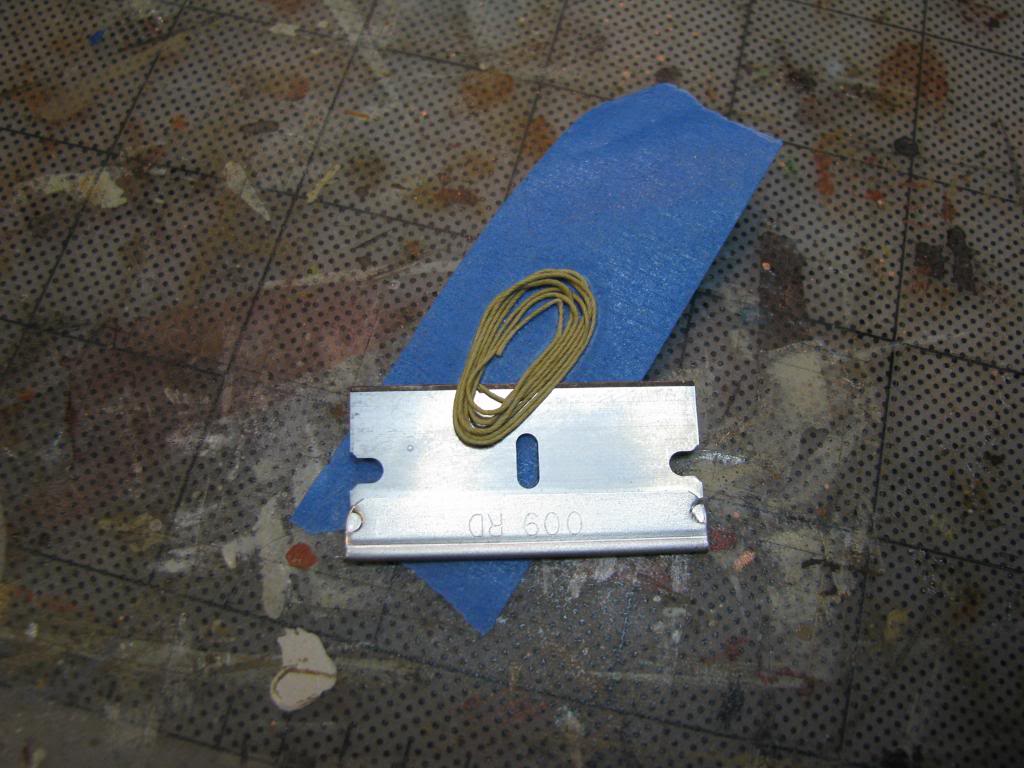
Here is the coil on the painter's tape already brushed with glue.

I use a straight safety razor blade to slip the coil off the tape.
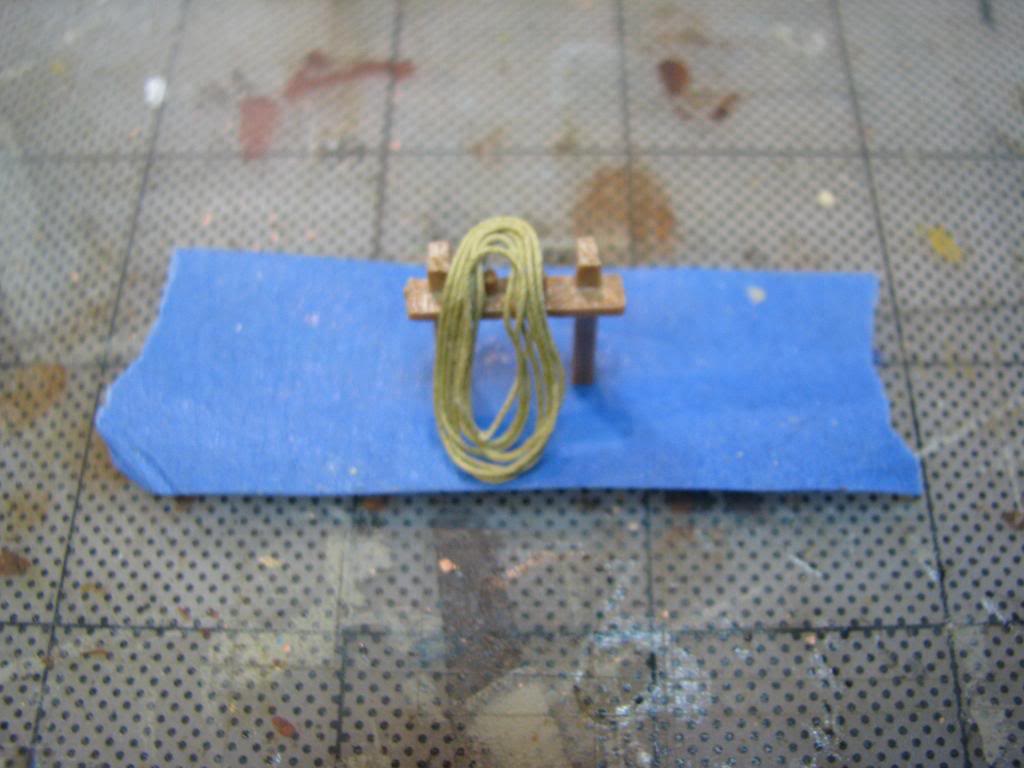
Sorry this one is a bit blurry but this is the coil laid over the pin
And here is the coil brushed with water and just a bit of glue.  I played with it a bit more so that it lay better.
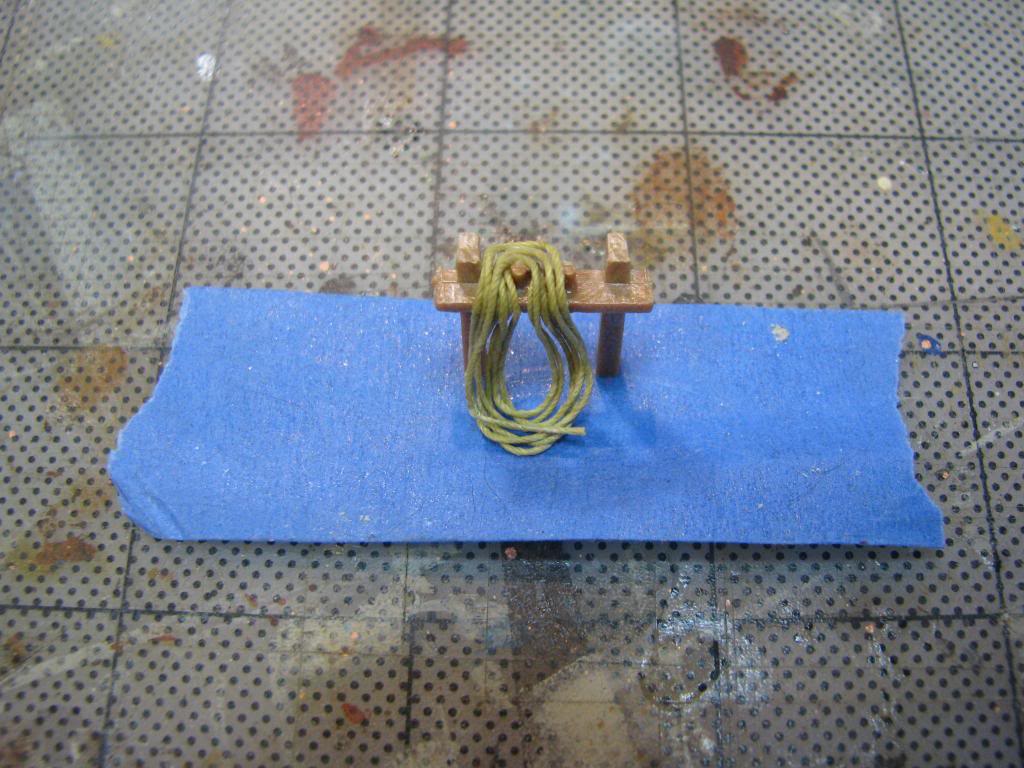
Once that dries, you have a coil laid over the pin rail.  As I said, to really make it look great, it needs to be moved around a bit.


  • Member since
    March 2012
  • From: Marysville, WA
Posted by David_K on Friday, April 11, 2014 6:11 PM

I see....I really like the idea of using tape to help hold it down!  I guess it's not really necessary to make a jig to simulate the angle of a pinrail...

What kind of line is that?  Is it from the Syren company you mentioned before?

Also, how dilute do you make your elmer's when you use it to stiffen the coils....pretty much straight glue, or is it quite dilute?

I'm definitely going to do some more experimenting!  

Thanks!

        _~
     _~ )_)_~
     )_))_))_)
     _!__!__!_         
     (_D_P_K_)
   ~~~~~~~~~~~~~
    ~~~~~~~~~~~

Current Project:  Imai/ERTL Spanish Galleon #2

Recently Finished: Revell 1/96 Cutty Sark

Next Up:  ???


  • Member since
    July 2010
  • From: Tempe AZ
Posted by docidle on Friday, April 11, 2014 8:51 PM

Dave,

The line is from Syren and as Arnie says, it can get expensive; however, it looks great and it does not unravel like MoRope although I really like their served line. Check out www.modelbau-takelgarn.de, this is were I will be getting my served line from, although I would love to learn how to make my own line.

I dilute my glue with a 50/50 mix.   I will go with more water when I am draping the line over the rail and you could use a small drop of CA to hold the top of the line over the pin, although it works well without it.

I did a double line on the same rail so check it out.

Steve


  • Member since
    July 2010
  • From: Tempe AZ
Posted by docidle on Sunday, April 13, 2014 6:58 PM

And now back to our regularly scheduled download.

Here is the process I used for the sheet and tack lines.  On both I started with the cleat tie off and the coiling of the line since it starts to get crowded with the different lines getting rigged.  I usually start the running rigging with the bow then work back towards the stern along the middle of the deck, then continue at the bow again and rig up from the inside and work out.  If you have been following this thread you'll notice that I started at the stern and worked forward.  I did it this way because the yard/sail had to be set up before I could start with the running rigging.

Before I raised the yard/sail, I set up all the blocks to make it easier to connect.  I always do this because it is easier to rig and serve the blocks while on the work desk then while hanging from the masts in midair

Here are the blocks first, tack forward, sheet aft.

At this point I am measuring lines both on the sheet and tack to make sure I'll have enough.

Now that I have an idea how much line I'll need I start to tie off at the forward cleat.

After I tied off the tack line at the cleat I coiled the line just like in previous photos.  You'll notice that I haven't finished the tie off at the chesstree.  This is to make sure I have the ability to adjust the tack lines later.


  • Member since
    July 2010
  • From: Tempe AZ
Posted by docidle on Sunday, April 13, 2014 9:12 PM

Here is the rigging of the sheet lines.  The first photo is measuring the sheet lines to make sure I have enough.

Please note the port sheet line goes through the shrouds.

Again, I tied off at the aft cleat and coiled the line

The line is now fed through the sheet block.

This shot shows again that I left the tack and sheet lines unsecured at one end so that I can adjust them if needed.  They will be tied towards the end of the build.

The last shot also shows that I finally  attached the aft castle.  In the instructions the aft castle is glued down fairly early but that would make rigging some of the lines really difficult.


  • Member since
    March 2012
  • From: Marysville, WA
Posted by David_K on Tuesday, April 15, 2014 6:15 PM

Almost there, Steve...Looks great!

I notice that some of the coiled line on deck is *weathery* looking, while some of the coils are still shiny and new....what do you use to weather your line?  Or do you just keep some of it looking new on purpose?

        _~
     _~ )_)_~
     )_))_))_)
     _!__!__!_         
     (_D_P_K_)
   ~~~~~~~~~~~~~
    ~~~~~~~~~~~

Current Project:  Imai/ERTL Spanish Galleon #2

Recently Finished: Revell 1/96 Cutty Sark

Next Up:  ???


  • Member since
    July 2010
  • From: Tempe AZ
Posted by docidle on Wednesday, April 16, 2014 12:21 AM

Thanks Dave, I have the wooden base sanded and hope to start staining it tomorrow, or at lease this weekend.  I also filed the brass pedestal notches so that the keel will fit into them.  The aft castle is on and the rigging attached, so I'll post some pics tomorrow or this weekend, so stay tuned!

In regards to the lines being weathered or not, I do make a distinction according to where the line is and what is its purpose.  Such as, the anchor rope, I used a thick Coral line and weathered it with a Burnt Umber oil wash first, then when that's dry, I used a bit of Pthalo Green to represent sea weed and muck from the harbor bottom, etc...  Other weathered lines were done with combinations of artist oils.  On other running rigging lines which would get an abundance of use, I left some of them pristine because the older ones were worn out and were replaced by the crew.

I actually used seven different sized lines on the Thomas, although I did not measure for the exact size, I just eyeballed them and used what looked right to me.

Steve


  • Member since
    July 2010
  • From: Tempe AZ
Posted by docidle on Wednesday, April 16, 2014 9:26 PM

In the last set of photos, you can see a bit of the aft castle.  I have glued it down and added a bunch of rubber bands to hold it together.  The rudder is on now too.

Enjoy,

Steve


  • Member since
    July 2010
  • From: Tempe AZ
Posted by docidle on Wednesday, April 23, 2014 12:47 PM

The beginning of the rigging for the braces.

Steve


  • Member since
    July 2010
  • From: Tempe AZ
Posted by docidle on Friday, April 25, 2014 8:35 PM

Here are photos of the completed braces at the block and the tie off.

Steve


  • Member since
    July 2010
  • From: Tempe AZ
Posted by docidle on Friday, April 25, 2014 8:38 PM

These are finished photos of the Tack and Sheet lines from block to tie off.

Steve


  • Member since
    July 2010
  • From: Tempe AZ
Posted by docidle on Friday, April 25, 2014 8:44 PM

Getting ready to mount the Thomas.  I stained the board in Dark Walnut and used Deft Clear Gloss lacquer finish.  I think on the next build I'll go back to the Satin finish. The brass pedestals are from ModelExpo.

Steve


  • Member since
    July 2010
  • From: Tempe AZ
Posted by docidle on Sunday, April 27, 2014 8:57 PM

I actually secured the Thomas to it's base this evening.  I put two coats of dull coat on her and called her done.  I will post final pictures tomorrow or Tuesday...... I still have to take them.

Steve


  • Member since
    July 2010
  • From: Tempe AZ
Posted by docidle on Monday, April 28, 2014 6:14 PM

As promised, here are some final pictures of the Thomas.

Enjoy,

Steve


  • Member since
    July 2010
  • From: Tempe AZ
Posted by docidle on Monday, April 28, 2014 6:21 PM

Here are some closeups.


  • Member since
    July 2010
  • From: Tempe AZ
Posted by docidle on Monday, April 28, 2014 6:42 PM

                                                                            Fin


  • Member since
    March 2012
  • From: Marysville, WA
Posted by David_K on Monday, April 28, 2014 7:50 PM

Magnifique!  Hard to believe she's actually done!

You are a master of your craft, Steve!

        _~
     _~ )_)_~
     )_))_))_)
     _!__!__!_         
     (_D_P_K_)
   ~~~~~~~~~~~~~
    ~~~~~~~~~~~

Current Project:  Imai/ERTL Spanish Galleon #2

Recently Finished: Revell 1/96 Cutty Sark

Next Up:  ???


  • Member since
    June 2012
Posted by arnie60 on Monday, April 28, 2014 8:39 PM

Excellent finish!

I love how simple a ship she is, but still reeks of character which you have done a fine job of emphasizing. Thanks for sharing your work here.

  • Member since
    July 2010
  • From: Tempe AZ
Posted by docidle on Monday, April 28, 2014 11:18 PM

Dave and Arnie,

Thank you gentlemen I really appreciate the remarks.  Now, back to the Nina and Pinta!

Steve


JOIN OUR COMMUNITY!

Our community is FREE to join. To participate you must either login or register for an account.

SEARCH FORUMS
FREE NEWSLETTER
By signing up you may also receive reader surveys and occasional special offers. We do not sell, rent or trade our email lists. View our Privacy Policy.