SEARCH FINESCALE.COM

Enter keywords or a search phrase below:

Heller Soleil Royal (WIP)

69941 views
575 replies
1 rating 2 rating 3 rating 4 rating 5 rating
  • Member since
    May 2003
  • From: Greenville, NC
Posted by jtilley on Wednesday, February 18, 2015 11:14 AM

It looks great to me. I think the photos are a little dark; that may make the weathering look a little more severe than it is.

Having the keel parallel to the base is right if the new waterline is parallel to the keel. It looks like it is.

Youth, talent, hard work, and enthusiasm are no match for old age and treachery.

  • Member since
    December 2003
  • From: 37deg 40.13' N 95deg 29.10'W
Posted by scottrc on Wednesday, February 18, 2015 12:18 PM

Excellent work!

  • Member since
    March 2012
  • From: Marysville, WA
Posted by David_K on Wednesday, February 18, 2015 3:29 PM

Hi Guys-

Thanks for the comments. :)

Arnie, that break in the planking is because the Hawse Hole area of the hull is actually a separate piece...the hull had a rectangular void in there until the piece went in, and it evidently doesn't fit flush with the planking behind it...not sure why it was designed that way?  Some future builders might like to fill that gap in, or find a way to even out the fit of the parts there. It is kind of glaring, now that you mention it...just took a look at the instructions, it also seems that Heller meant for that front section of the bow (starting AT that line) to be painted black, from that line and up to the top of the wales?  

Bill, my painting/weathering technique is something I figured out by studying the effects of other ship models that I liked...I use acrylic model paint basecoats in various colors, and then I apply artists oil paints (the kind in a tube, for making paintings)....sometimes I use it full strength, and sometimes I thin it a bit with turpenoid to get a more wash-y consistency.  I used to apply more traditional washes made from thinned model paint, but I found it kinda difficult to get the exact level of color transition where I wanted it, and I find that tube paints offer me more control.  I recommend getting a tube from your local art/hobby store, and trying some experiments!

John, you're right, the photos are a bit dark (and grainy...I thought my phone had a decent camera?)...but the *worn wood* effect is meant to be somewhat severe...though not as much as it may seem.  I'm going to try to take better pics in the future, maybe the lighting in here is too dim for a good pic (which would also explain the digital graining, maybe)...

I was careful to make sure the waterline is parallel to the keel, thank you for mentioning that the marked waterline is uneven...that's also something that future builders might like to keep in mind...

When I got to the point of mounting the hull on the base, I had to be careful that the *prongs* of the pedestals were keeping the hull correctly leveled...the fore pedestal prong only fits beyond the edge of the keel by about ~1/8" before they bottom-out on the hull...the aft pedestal prong could fit all the way on until the keel bottoms out in the pedestal slot....because of the hull shape toward the rear and how the strakes (?) are closer to vertical....SO, I lined up the hull at the correct level, and used a bunch of epoxy to fix the hull at its level on the mounting hardware before tightening the nuts onto the bolts.  Just re-read that explanation, and it's obvious that it probably doesn't make a lick of sense!  haha

Anyway, there yo go....

Thanks again!

Dave

        _~
     _~ )_)_~
     )_))_))_)
     _!__!__!_         
     (_D_P_K_)
   ~~~~~~~~~~~~~
    ~~~~~~~~~~~

Current Project:  Imai/ERTL Spanish Galleon #2

Recently Finished: Revell 1/96 Cutty Sark

Next Up:  ???


  • Member since
    March 2012
  • From: Marysville, WA
Posted by David_K on Sunday, February 22, 2015 7:36 PM
Does anybody have some advice with regard to the placement of eyebolts for gun breeching lines? As far as height on the bulwark. And spacing?
thanks!
        _~
     _~ )_)_~
     )_))_))_)
     _!__!__!_         
     (_D_P_K_)
   ~~~~~~~~~~~~~
    ~~~~~~~~~~~

Current Project:  Imai/ERTL Spanish Galleon #2

Recently Finished: Revell 1/96 Cutty Sark

Next Up:  ???


  • Member since
    June 2012
Posted by arnie60 on Sunday, February 22, 2015 7:41 PM

Dave;

Check out Force9's latest post. what a coincidence!

  • Member since
    July 2013
Posted by steve5 on Sunday, February 22, 2015 8:51 PM

dave , when describing your weathering techniques , you said you use artist's oil's, I assume you apply it with a brush not an air brush.,I'm only asking because I'm a lousey weatherer., and I've decided to have a go at the black pearl., and I know there is a lot of weathering on this model.,do you just build layer's up sanding in between and dry brush at the end., am I some where near the mark. your about the best weatherer I've seen , and believe me I need help.


  • Member since
    March 2012
  • From: Marysville, WA
Posted by David_K on Monday, February 23, 2015 7:28 AM

Hey Steve-

Thanks for the kudos...

Yes, use a brush to apply the artist's oils....and I recommend using a brush that's meant for oil paint...they have more coarse, stiff bristles....if you use a regular modeling paintbrush you're likely to ruin it, or at least get poor results.

If you like the really, really weathered look, you should check out some of Steve's (docidle) threads n the forum...he really goes for it with weathering!

My best suggestion for you would be to pick up a couple colors of tube oil paint (some light and some dark tones) and some thinner (turpenoid, odorless mineral spirits) and a brush.  Take some old model parts that you might have lying around, or heck, buy a cheapo kit and use it for practice...I bought one of the small Disney Pirate Ship models from Revell for like 10 bucks and used the parts for weathering experiments.  Just lay down some basecoats (remember, use acrylic base coats if you're going to weather with oil) and then start messing with different techniques...

Good Luck!

Dave

        _~
     _~ )_)_~
     )_))_))_)
     _!__!__!_         
     (_D_P_K_)
   ~~~~~~~~~~~~~
    ~~~~~~~~~~~

Current Project:  Imai/ERTL Spanish Galleon #2

Recently Finished: Revell 1/96 Cutty Sark

Next Up:  ???


  • Member since
    March 2012
  • From: Marysville, WA
Posted by David_K on Monday, February 23, 2015 7:32 AM

That IS a coincidence!  Looks like I can probably go with a similar placement for my breeching lines...

THX!

        _~
     _~ )_)_~
     )_))_))_)
     _!__!__!_         
     (_D_P_K_)
   ~~~~~~~~~~~~~
    ~~~~~~~~~~~

Current Project:  Imai/ERTL Spanish Galleon #2

Recently Finished: Revell 1/96 Cutty Sark

Next Up:  ???


  • Member since
    March 2012
  • From: Marysville, WA
Posted by David_K on Monday, February 23, 2015 7:37 AM

And as long as I'm on here, asking questions....

Can anyone recommend a kit/technique for making molds of small parts?  I'd like to copy the decorative carvings from the quarter gallery windows, cast duplicates and attach the duplicates to a false wall within the galleries.  But I don't know a thing about molding, and casting.  ?  They're very thick while still attached to the panels, so I thought if I could just make copies of the raised portion of each decoration I could use them...

Anybody have some experience with this?

Thanks!

D

        _~
     _~ )_)_~
     )_))_))_)
     _!__!__!_         
     (_D_P_K_)
   ~~~~~~~~~~~~~
    ~~~~~~~~~~~

Current Project:  Imai/ERTL Spanish Galleon #2

Recently Finished: Revell 1/96 Cutty Sark

Next Up:  ???


  • Member since
    June 2012
Posted by arnie60 on Monday, February 23, 2015 9:43 AM

Dave;

I have no experience w/ resin casting, so I can't help w/ that, but I have taken  "Premol" clay that you bake to harden. What i have done is press the original into the clay, then bake it to get a hard mold, then use the same clay to fill the mold and pull a casting from it that you then bake as well. I used some vegetable oil to keep the clay from sticking to the mold and then cleaned up the edges etc. before baking. Worked just fine and a lot less complicated than resin casting.

  • Member since
    September 2012
Posted by GMorrison on Monday, February 23, 2015 11:16 AM

Ditto and there's a similar product I use called Sculpy.

 Modeling is an excuse to buy books.


  • Member since
    March 2012
  • From: Marysville, WA
Posted by David_K on Monday, February 23, 2015 11:30 AM

Well, if you guys have gotten good results with oven-bake clay....guess I have to give it a try.  I've used sculpy and Fimo before...

Thanks for the advice!

        _~
     _~ )_)_~
     )_))_))_)
     _!__!__!_         
     (_D_P_K_)
   ~~~~~~~~~~~~~
    ~~~~~~~~~~~

Current Project:  Imai/ERTL Spanish Galleon #2

Recently Finished: Revell 1/96 Cutty Sark

Next Up:  ???


  • Member since
    May 2003
  • From: Greenville, NC
Posted by jtilley on Monday, February 23, 2015 12:37 PM

There's an important advantage to that clay approach over resin. If I remember the kit correctly (beware my notorious memory), you're going to have to put your new "carvings" on a flat surface, whereas the ones you'll be copying are curved. If you shape them right after you take them out of the molds, that should be fairly easy. If you use cast resin, it won't be.

I've bought a package or two of Sculpy over the years, but I've never gotten around to trying it seriously. I have no idea how it would work for a job like this. I do know that Chuck Passaro has made some good figureheads with it.

If that doesn't work, MicroMark sells a whole range of products for making resin castings. I've never used them, but I've heard that they work well. They aren't cheap, though.

If you can figure out how to correct that problem with the quarter galleries, you'll be taking a major step toward fixing one of the kit's most glaring mistakes. Good luck.

Youth, talent, hard work, and enthusiasm are no match for old age and treachery.

  • Member since
    July 2013
Posted by steve5 on Monday, February 23, 2015 1:39 PM

thanks dave for the advice., only one thing left to do., have a go


  • Member since
    March 2012
  • From: Marysville, WA
Posted by David_K on Monday, February 23, 2015 2:25 PM

Flexibility of the unbaked clay is a good point, John....a couple of the panels do have some curvature, so it'll be nice to make adjustments before baking!  Thanks!

I'll pick up some Sculpy or FImo this week (way cheaper than a casting kit!)...and see if I can get some test pieces made up.  

Steve, you're right...just gotta try it out, see what happens!  I think you'll get a feel for it pretty quick, and then you can develop it into a personal style...Good luck , amigo!

Dave

        _~
     _~ )_)_~
     )_))_))_)
     _!__!__!_         
     (_D_P_K_)
   ~~~~~~~~~~~~~
    ~~~~~~~~~~~

Current Project:  Imai/ERTL Spanish Galleon #2

Recently Finished: Revell 1/96 Cutty Sark

Next Up:  ???


  • Member since
    September 2005
  • From: Groton, CT
Posted by warshipguy on Tuesday, February 24, 2015 11:00 AM

I am definitely interested in seeing how this technique works!

Bill

  • Member since
    March 2012
  • From: Marysville, WA
Posted by David_K on Tuesday, February 24, 2015 12:27 PM

Me too, Bill!  haha

Hopefully the clay will be able to capture the fine details of these decorative panels...the relief is not very pronounced.  Since it's a new technique for me, I'll be sure and document my trials, and post my findings here.  I still have plenty to do before the galleries go together, though...

THX

Dave

        _~
     _~ )_)_~
     )_))_))_)
     _!__!__!_         
     (_D_P_K_)
   ~~~~~~~~~~~~~
    ~~~~~~~~~~~

Current Project:  Imai/ERTL Spanish Galleon #2

Recently Finished: Revell 1/96 Cutty Sark

Next Up:  ???


  • Member since
    March 2012
  • From: Marysville, WA
Posted by David_K on Thursday, February 26, 2015 6:32 PM

I built a couple of *test cannons*, to see how they look, and if I like them.

I spread the wheels out further than the instructions indicate, they made the guns look wobbly and top-heavy, and just plain funny otherwise...I think they look better now.  I also drilled holes in the carriage for breeching ropes, and there's a rope though one of the carriages.

I really, really don't like the half-molded gun barrels...so hard to eliminate the seam.

The oil paint is still fresh, so it looks shiny.

I also got my Sculpy today...which brings me to a quick rant:

I went to my local JoAnn Fabrics to get some oven-bake clay, since I like to support brick & mortar shops when I can...I get to the *Clay Aisle*, and the price tag for a box of Sculpy was 16 dollars.  I was kinda surprised, so I took out my trusty "smartphone", and looked up the same product on Amazon...

$8.01, with free 2-day shipping (Prime)...well, like I said, I prefer to support local businesses, but for a price difference of 100%, I really felt like I wanted to keep the other 8 dollars...sorry, JoAnn!

Anyway, I made 12 molds of the gallery panels, and baked them....not sure if they will produce good detail when I cast replacement parts from them, but we'll see.

Thanks for looking!

Dave

        _~
     _~ )_)_~
     )_))_))_)
     _!__!__!_         
     (_D_P_K_)
   ~~~~~~~~~~~~~
    ~~~~~~~~~~~

Current Project:  Imai/ERTL Spanish Galleon #2

Recently Finished: Revell 1/96 Cutty Sark

Next Up:  ???


  • Member since
    September 2012
Posted by GMorrison on Friday, February 27, 2015 1:39 AM

Yeah I get Sculpey at the local art store for about $ 9,00 out the door.

 Modeling is an excuse to buy books.


  • Member since
    September 2012
Posted by GMorrison on Friday, February 27, 2015 1:45 AM

Half and half cannons are  a gremlin for all of the big (1/96- 1/100).  No easy answer when you need 50-74 and they cost $ 4.00 AM.

I just sit down for a week and sand sand sand.

Can't imagine plastic ship modeling before flexi sanding sticks from CVS,

Oh wait, I did that.

 Modeling is an excuse to buy books.


  • Member since
    January 2015
Posted by rdiaz on Friday, February 27, 2015 3:09 AM

If the molds do not produce sufficient detail you can always resort to your painting skills to enhance the resulting parts...

And half cannons are a pain indeed. I'm just about to start assembling those of the 1/100 Victory during lunch time at work, and just looking at the sprues is so intimidating already!

  • Member since
    July 2013
Posted by steve5 on Wednesday, March 4, 2015 2:36 AM

dave I know you have done a few tutorials., on u tube , how to do ratlines , make chainplates., have you thought of doing one for your weathering techniques. I for one would love to see it.,


  • Member since
    March 2012
  • From: Marysville, WA
Posted by David_K on Sunday, March 15, 2015 7:43 PM

I know it's early to be concerning myself with rigging line, but I figured I would need some pretty soon for fitting and testing.  I've heard a lot of great things about Syren, so I went over to their website and ordered one each of several diameters/colors.  Since I'm not exactly sure what sizes I'll need, I just got an assortment that I thought seemed *close* to what I might need....once it arrives I figure I can judge them by diameter and at least then as I order more for later, I'll have a gauge to make my decision by.

Here's what I ordered, and for what purpose I hope each type will serve....

.008 tan, for ratlines

.018 tan, for lanyards, light running rigging, etc.

.018 dark brown (?)

.025 tan, for most running rigging lines

.025 dark brown, for upper stays, upper shrouds (?)

.035 dark brown, for stays, shrouds

.045 dark brown, for stays, shrouds

Progress update:  All the cannons are done, with the upper deck guns fitted with breeching ropes as the only rigging added.  Got the gunports painted and weathered..  I really wanted to get a bunch of the most tedious work out of the way early (guns and gunports), so now I don't have to think much about them until installation.

my next step is to start prepping the decks for installation, and associated deck furniture, boats, etc., then to begin installing brass eyebolts in the hull for chainplate prep, and it won't be long before I'm working on some gold decorative painting....things are about to start happening, after all this preliminary work!  Very exciting!

Dave

        _~
     _~ )_)_~
     )_))_))_)
     _!__!__!_         
     (_D_P_K_)
   ~~~~~~~~~~~~~
    ~~~~~~~~~~~

Current Project:  Imai/ERTL Spanish Galleon #2

Recently Finished: Revell 1/96 Cutty Sark

Next Up:  ???


  • Member since
    June 2012
Posted by arnie60 on Sunday, March 15, 2015 11:02 PM

This might help you on those line sizes.

I believe you can find standard line sizes for 18th century rigging in Longridge, But I do not know what level you want to take this to. In any case excited about the prospect of some soon to come pics.

  • Member since
    May 2003
  • From: Greenville, NC
Posted by jtilley on Monday, March 16, 2015 3:51 AM

Dr. Anderson's book contains plenty of info about rigging line diameters. That's the most important source I used for the rigging of my SR, lo those many years ago.

Youth, talent, hard work, and enthusiasm are no match for old age and treachery.

  • Member since
    November 2009
  • From: Twin Cities of Minnesota
Posted by Don Stauffer on Monday, March 16, 2015 9:56 AM

Since ratlines get tarred after finishing, I ordinarily use black.  I often but not always paint results black or very dark brown anyway to simulate tarring.

Don Stauffer in Minnesota

  • Member since
    March 2012
  • From: Marysville, WA
Posted by David_K on Tuesday, March 17, 2015 9:10 AM

Thanks, guys!

It won't be super-critical to me (of course) to adhere strictly to scale for the rigging, but I do want it to be sorta close, and visually proportionate.  I'll definitely compare that table (thanks Arnie!) to the material I'm using and see how similar the sizes are....also, Anderson will undoubtedly prove to be helpful.  I really do like all the info in that book, though I do wish some of the drawings were bigger, or that they showed more complete sections of the rigging....in many cases, all that is shown are the standing ends of each line, and in quite small depictions...truth is, some of the most helpful info is purely text descriptions, which is okay, too.  There are some good diagrams, but I wish every book on rigging were as *clear* as Lennarth Petersson's stuff!

Regarding ratlines...I've done them with black thread, and also with tan.  Of course, it's no secret that standing rigging should be tarred, and therefore black (or dark brown, which I'm using for all the tarred standing rigging on this ship...I think the Syren dark brown looks pretty *tarr-ey*, so I'm hoping it translates well on the model)....but somehow I kinda like the dimensional effect of lighter colored line for the ratlines....my Swan had tan ratlines, as well as the Golden Hind.  While not correct, I do like it.  What I don't like seeing is tan shrouds with tan ratlines...even I can't abide that!  haha

Anyway, I wanted some very fine line from Syren, so I got the thinnest stuff in tan....I've always used sewing thread for my ratlines in the past, and it's very possible I'll use sewing thread for the SR ratlines, as well (it's MUCH cheaper than anything from Syren!)...and just for the sake of thoroughness (?) I'll compare black and tan for the ratlines, and see which I like best before I commit.

I should have some actual construction progress soon.  I'm about to detail up the main deck parts and get them prepped.  

Thanks again!

Dave

        _~
     _~ )_)_~
     )_))_))_)
     _!__!__!_         
     (_D_P_K_)
   ~~~~~~~~~~~~~
    ~~~~~~~~~~~

Current Project:  Imai/ERTL Spanish Galleon #2

Recently Finished: Revell 1/96 Cutty Sark

Next Up:  ???


  • Member since
    March 2012
  • From: Marysville, WA
Posted by David_K on Saturday, March 21, 2015 6:00 PM

Just a couple of quick notes...

Firstly, and this is a heads-up for future builders of the SR, while I was test-fitting the upper deck and bulwarks on the hull, I noticed that there is a small area of the inner hull that is visible between the deck and where the upper bulwarks attach (maybe 1/8")...When I painted the hull, I didn't bother painting much in the way of the interior, assuming that the deck and bulwarks would meet up and there'd be no need for any coloring.  I realized during dry-fitting that the plain black plastic band would be visible above the deck and below where the bulwark is fitted (maybe I should attach a pic?)...anyway, I noticed it before I got any closer to assembly, and went ahead and painted that section of the inner hull red, so that it will match the bulwarks when they go on.

Hope that makes sense?

Secondly, I received my Syren rigging line, and my first impression is.....dang.  Pretty nice stuff!

It seems a little stiff, but I haven't done anything to it, like soaking or even handling it too much.  The smaller diameter stuff doesn't seem necessarily special, but as the size increases (the .025 is awesome-looking!) it really does seem just like small rope!

Did someone say that they don't even use wax on it?  It would seem a shame to coat it with wax and possibly fill in some of that wonderful spiral effect...

Anyway, of course there will be more of my experience with it as I reach some actual rigging steps, but it definitely LOOKS good!  Not sure if it's worth 4.50 a packet, but I'll find out soon enough!  

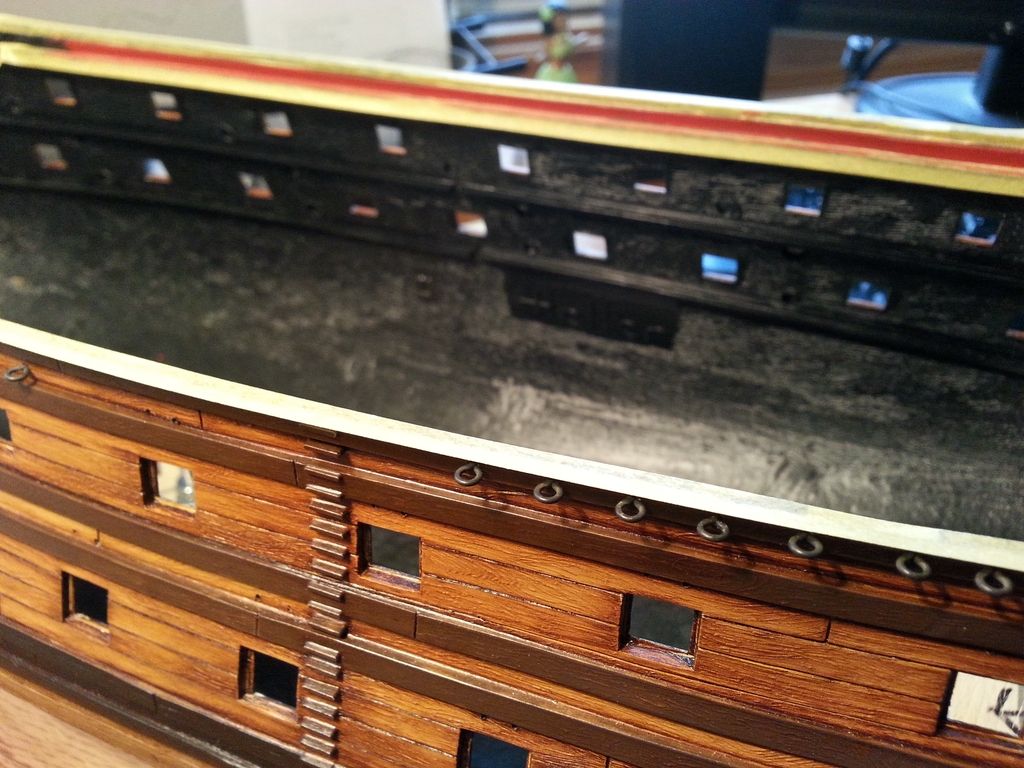
Progress update for SR:  I installed brass eyebolts in the hull for chainplate attachment points...Blackened them with Blacken-it, pushed them through pre-drilled holes, and snipped off the ends (inside the hull) before gluing them in place with CA.  Upper deck is weathered, and will be ready in a couple days.  Meanwhile, I'll be continuing to pre-assemble various upper decks, deck furniture, boats, etc., but it won't be long before the lower decks go in and the lower guns along with them.

**EDIT**

Added a pic showing the newly-attached eyebolts, and in the background, you can see the masked-off line where I painted the inner hull Insignia Red to match where the upper bulwarks will attach above the deck.

        _~
     _~ )_)_~
     )_))_))_)
     _!__!__!_         
     (_D_P_K_)
   ~~~~~~~~~~~~~
    ~~~~~~~~~~~

Current Project:  Imai/ERTL Spanish Galleon #2

Recently Finished: Revell 1/96 Cutty Sark

Next Up:  ???


  • Member since
    July 2010
  • From: Tempe AZ
Posted by docidle on Saturday, March 21, 2015 7:55 PM

Dave,

The Syren line already comes waxed so you won't have to apply your own.

Steve


  • Member since
    June 2012
Posted by arnie60 on Saturday, March 21, 2015 9:08 PM

First off, what little you've shown here, is superbly up to your usual artistic mastery with paints.

Second, Is that all we get to see? C'mon Dave, don't tease us like that. (LOL)

Third, I think waxing your lines is overrated. I guess it is a good insurance against dust [if you don't put it in a case]  and ultimately, deterioration, like 20 years from now. It can make it easier to work w/ "stiffened" waxed lines in some cases, and more difficult in others [tying knots]. I have a mixed bag of it on my Connie mainly because I bought a considerable amount of cordage from BlueJacket, which comes pre waxed. I like working w/ the un-waxed, un-shiny cordage from Syren much, much better and doubt that I will use waxed line in the future. [No doubt someone is going to flame me for preaching such blasphemy Huh?

Anywho... looking forward to more posts from ya.

JOIN OUR COMMUNITY!

Our community is FREE to join. To participate you must either login or register for an account.

SEARCH FORUMS
FREE NEWSLETTER
By signing up you may also receive reader surveys and occasional special offers. We do not sell, rent or trade our email lists. View our Privacy Policy.