SEARCH FINESCALE.COM

Enter keywords or a search phrase below:

1/96 Cutty Sark WIP (Revell H-399)

29923 views
293 replies
1 rating 2 rating 3 rating 4 rating 5 rating
  • Member since
    March 2012
  • From: Marysville, WA
Posted by David_K on Monday, March 19, 2018 5:22 PM

Quick progress update...

Got the wire installed in the hull for the lower deadeye strops/chainplates, and glued the hull halves together.

 20180315_161621 by Dave Kump, on Flickr

I'm a little bummed about the molding of the hull parts....the wales don't line up at the stern, even though the upper edge and keel are aligned....I don't have a picture of that yet, but they look uneven, and I'll have to do something to try and fix it.  Good ol' Revell!

lol

Here's another pic of the hull, during test-fit of the base.  I used 3/4" Red Oak, and pedestals from Model Expo.

 20180316_144457 by Dave Kump, on Flickr

You'll notice the inner bulwarks are *weathery*....I can't help but apply some texture, I feel like bare paint just looks fake, so I went ahead with some thinned oils to help fill in the shadows and add some character....The oil actually darkened the lower hull so much that it now looks more like copper than the original paint I laid down...no biggie to me, but it's worth mentioning.

And finally, here's another pic after I stained the wood for the base....it's installed and levelled out (I go through great pains to make sure everything is level at this point...even if there's a minute *list*, by the time the upper masts and yards are on, it will be exxagerated!)....the bolts are tightened, tomorrow I'll apply a bunch of epoxy down in the hull to keep the hardware from ever coming loose later (which happened on my Soleil Royal, and it was a *royal* pain to re-stabilize the pedestals after the deck was in!)

 20180319_145515 by Dave Kump, on Flickr

The instructions say that mast assembly is next, so I guess that's what I'll be doing for awhile.

Thanks for looking!

Dave


        _~
     _~ )_)_~
     )_))_))_)
     _!__!__!_         
     (_D_P_K_)
   ~~~~~~~~~~~~~
    ~~~~~~~~~~~

Current Project:  Imai/ERTL Spanish Galleon #2

Recently Finished: Revell 1/96 Cutty Sark

Next Up:  ???


  • Member since
    December 2010
  • From: Salem, Oregon
Posted by 1943Mike on Monday, March 19, 2018 5:54 PM

Looking great Dave. Your weathering technique looks right on as usual.

What gauge wire and of what material did you use for attaching the strops/chainplates?


Mike

"Le temps est un grand maître, mais malheureusement, il tue tous ses élèves."

Hector Berlioz

  • Member since
    February 2016
  • From: Western No. Carolina
Posted by gene1 on Tuesday, March 20, 2018 10:39 PM

David, your work is just flawless looking. Everything you do looks perfect. Your posts are a joy to watch.      Gene

  • Member since
    March 2012
  • From: Marysville, WA
Posted by David_K on Wednesday, March 21, 2018 4:35 PM

Thanks for the compliments, guys!

Mike, the wire I used is 28 gauge annealed dark wire, the brand is Hillman.  I've used it before for deadeye strops, and other various uses in shipmodeling....I like it because it's dark in color, and it's flexible, so it can be bent and twisted several times before it will break.  Pretty cheap, too...you can find it on eBay or Amazon for a couple bucks per 50 feet.


Dave

        _~
     _~ )_)_~
     )_))_))_)
     _!__!__!_         
     (_D_P_K_)
   ~~~~~~~~~~~~~
    ~~~~~~~~~~~

Current Project:  Imai/ERTL Spanish Galleon #2

Recently Finished: Revell 1/96 Cutty Sark

Next Up:  ???


  • Member since
    July 2006
Posted by Michael D. on Wednesday, March 21, 2018 10:02 PM

Nice start on the Cutty Sark DaveYes. No doubt I'll be appling some of your tecniques when the time comes for me to do mine when I eventually get my Victory back dating project done..


Michael D.

  • Member since
    May 2017
  • From: Asheville, NC
Posted by LIVIT on Wednesday, March 21, 2018 10:37 PM

Hi Dave, looking great bud. So the deadeyes for the CS go on the inside of the hull ? I have never built a CS, so will be following your build closely.  Thanks for info on that wire, I am ordering some now, should be a help on my Connie or a future build.    Dale

  • Member since
    December 2010
  • From: Salem, Oregon
Posted by 1943Mike on Wednesday, March 21, 2018 11:09 PM

Dave,

I had a feeling it looked like the stuff I have. It is. I have a box of 10 of those 50ft. reels. Lord knows if or when I'll ever use them all but that stuff has come in handy more than once on ships and aircraft. 

If I ever rig another Cutty Sark I'll use your method.

Mike

"Le temps est un grand maître, mais malheureusement, il tue tous ses élèves."

Hector Berlioz

  • Member since
    July 2013
Posted by steve5 on Friday, March 23, 2018 5:19 AM

beautiful as always dave , could you tell me where you got those pedestals , from please .


  • Member since
    December 2010
  • From: Salem, Oregon
Posted by 1943Mike on Friday, March 23, 2018 10:22 AM

Steve,

Dave, in his post at the top of this page, said:

"Here's another pic of the hull, during test-fit of the base.  I used 3/4" Red Oak, and pedestals from Model Expo."

Mike

"Le temps est un grand maître, mais malheureusement, il tue tous ses élèves."

Hector Berlioz

  • Member since
    July 2013
Posted by steve5 on Friday, March 23, 2018 3:08 PM

thank's mike , sorry dave . it pay's to read everything , instead of being mesmerised by the build


  • Member since
    March 2012
  • From: Marysville, WA
Posted by David_K on Saturday, March 24, 2018 8:49 AM
Really cool video, Rob! THX
        _~
     _~ )_)_~
     )_))_))_)
     _!__!__!_         
     (_D_P_K_)
   ~~~~~~~~~~~~~
    ~~~~~~~~~~~

Current Project:  Imai/ERTL Spanish Galleon #2

Recently Finished: Revell 1/96 Cutty Sark

Next Up:  ???


  • Member since
    December 2012
Posted by rwiederrich on Saturday, March 24, 2018 9:29 AM

Thought it was quite informative.

  • Member since
    December 2010
  • From: Salem, Oregon
Posted by 1943Mike on Saturday, March 24, 2018 1:29 PM

Rob,

Thank you for posting that video.

I wasn't sure if I'd heard the narrator correctly when he referred to "the iron hull" in one section of dialogue but a few seconds on the internet got me the information I needed. Even though the script in that video may not have been 100% accurate as far as "the iron hull" is concerned, I found out (thanks to my ignorance and the video) that sections of the hull were indeed made of iron.

From: Royal Museums Greenwich:

"Cutty Sark’s hull was innovative for its composite design, which combined wooden planks with an iron 'skeleton' of frames, beams and cross bracing. The result was a very strong, rigid ship, with more room for cargo, because the iron framework took up substantially less space than a wholly wooden hull.

Originally the hull was covered in Muntz metal, a composite that was developed in Birmingham. The current sheathing has the same appearance, but is more readily available today."


Live and learn.

Mike

"Le temps est un grand maître, mais malheureusement, il tue tous ses élèves."

Hector Berlioz

  • Member since
    September 2012
Posted by GMorrison on Saturday, March 24, 2018 1:43 PM

Here's the iron part, Mike. (Different ship).

Then the entire hull was planked with oak. Over that is the Muntz metal, replacing what would have been copper on a warship or anti-fouling paint on commercial ships.

 Modeling is an excuse to buy books.


  • Member since
    March 2012
  • From: Marysville, WA
Posted by David_K on Sunday, April 8, 2018 10:46 AM

Hey Everyone-

Thought I would stop in for a quick post.

Not a lot of especially exciting developments...I've been detail painting mast parts and applying some texture via oil washes.  I also started putting together lower deadeyes for the crosstrees so they're in place before mast assembly...using 3.5mm walnut deadeyes from Model Expo and some annealed black wire, I drilled holes in the cross trees (using the plastic deadeye parts as spacing gauges)....then I wrapped a short piece of wire around the deadeyes, twisted it around itself once, snipped off one end and pushed the remaining end down through the crosstree hole. Bent it over like a hook, and CA'd it in place...Boom!

 20180408_080459 by Dave Kump, on Flickr


Regarding my wood deck from Scaledecks...

I cut out all the pieces and decided to try a test fit of the main deck...to my surprise, it didn't quite fit.  The wooden part seemed to be too long (by about an 1/8")...if I fit it on one end it would line up, but it gradually grew more misaligned along the length, to the point that the holes for the foremost hatch were off by 1/8".

I was concerned, and considered that maybe I'd trimmed too much material from kit plastic parts (it's 3 large plastic deck parts cemented together to make the main weather deck)...but 1/8" is a lot of material to have taken off with a sanding stick.  I decided to reach out to Scaledecks to see if they'd heard of any other similar issues.

John at Scaledecks is a great guy, very communicative and helpful.  He told me this issue had occured rarely with their previous cutting instrument (they've since gotten a new cutter).  He graciously offered to send me a replacement, which I received quickly, and the fit is MUCH BETTER!

Additionally, there is a new design of the Cutty Sark deck kit that they offer, with a darker, richer teak coloration, and with some mismatched planks and other little nuances to give it a more realistic aspect.  It's a beautiful set.  In fact, I'd hate to say I'm glad the first set was faulty...but if it wasn't then I would not be using the new design, so there's that!

Anyway, here's a pic of the original deck, and the new style deck from Scaledecks...some may prefer the clean lines of the lighter colored deck, but for me, I really dig the new one.

 20180408_080400 by Dave Kump, on Flickr

*Oops, I posted the same pic twice...it's edited to display the correct pic now :)

Once I finish the masts, I guess I'll be installing the deck and putting eyebolts into it...I'll bring some notes and pics to the next update.

Thanks!

Dave


        _~
     _~ )_)_~
     )_))_))_)
     _!__!__!_         
     (_D_P_K_)
   ~~~~~~~~~~~~~
    ~~~~~~~~~~~

Current Project:  Imai/ERTL Spanish Galleon #2

Recently Finished: Revell 1/96 Cutty Sark

Next Up:  ???


  • Member since
    March 2012
  • From: Marysville, WA
Posted by David_K on Sunday, April 8, 2018 11:33 AM

Might as well add a few more pics...

Here's how I'm stropping my deadeyes (as described in the previous post)....these pics are of the t'gall deadeyes, which are super-tiny (2.5mm)...

 20180408_090555 by Dave Kump, on Flickr

I'm using the same gauge wire, so it's a bit burly compared to these tiny deadeyes

I wrapped the wire to loop around the deadeye and make it a snug fit

 20180408_090638 by Dave Kump, on Flickr

Then I bring one end of the wire over the other to loop it

 20180408_090724 by Dave Kump, on Flickr

Trim off the end, and tuck it up snugly behind the deadeye, and Ta-Da!

 20180408_090851 by Dave Kump, on Flickr


        _~
     _~ )_)_~
     )_))_))_)
     _!__!__!_         
     (_D_P_K_)
   ~~~~~~~~~~~~~
    ~~~~~~~~~~~

Current Project:  Imai/ERTL Spanish Galleon #2

Recently Finished: Revell 1/96 Cutty Sark

Next Up:  ???


  • Member since
    December 2003
  • From: 37deg 40.13' N 95deg 29.10'W
Posted by scottrc on Monday, April 9, 2018 11:47 AM

Great update David, that new deck does have more appeal than the older one.  

  • Member since
    March 2012
  • From: Marysville, WA
Posted by David_K on Sunday, April 15, 2018 11:57 AM

I agree, Scott.

I actually made some more progress this week...got most of the deck parts glued down, and even started on some shading/weathering of the scaledecks.

One point I want to make is the means of adhesive for the scaledecks.

I started out with contact cement....big mistake!  It makes a strong bond, but it grabs instantly once the parts touch each other, leaving zero time for adjustment/alignment...it was stressful, and I wasn't able to get the large deck section lined up perfectly.  I switched to regular testors liquid styrene cement for the last few pieces, and it worked great!  nice bond, plenty of time to get it all lined up before it set.  Anyway, I needed to share that point :)

Once I got the parts on, I did a little trimming on the edges, installed the brass (blackened) eyebolts and then set about some texturing.  John at Scaledecks recommended against using anything *wet* for weathering (oil paint, regular paint, washes, etc.) so I used some artist pastels I had from years ago (basically earthy-colored chalk sticks)....I used them with a gentle application and shaded the areas using a stump, or tortillon (another tool artists use for shading)...it worked pretty well, though I could use some more practice.

Here's a few pics....some of the deck parts after they were cemented, and some with shading for comparison...I may go a couple more passes with the pastels to even out the shading, but I think it looks *okay*...

Thanks for watching!
Dave

 20180409_171128 by Dave Kump, on Flickr

 20180410_150603 by Dave Kump, on Flickr

 20180411_154830 by Dave Kump, on Flickr

 20180411_154841 by Dave Kump, on Flickr

 20180415_092144 by Dave Kump, on Flickr

 20180415_092204 by Dave Kump, on Flickr


        _~
     _~ )_)_~
     )_))_))_)
     _!__!__!_         
     (_D_P_K_)
   ~~~~~~~~~~~~~
    ~~~~~~~~~~~

Current Project:  Imai/ERTL Spanish Galleon #2

Recently Finished: Revell 1/96 Cutty Sark

Next Up:  ???


  • Member since
    December 2012
Posted by rwiederrich on Sunday, April 15, 2018 7:02 PM

Dave..looking very good.

I'm quite sure your model will be exceptional.

Personally I'm not a fan of the multi-color plank deck..but that is irrelevant.

Here are some images of the CS deck for reference...during her long life.

  • Member since
    December 2012
Posted by rwiederrich on Sunday, April 15, 2018 7:05 PM

Dave..if you are going to add some of your weathering details...will these be applied to the deck as well?

Your hull is spectacular. 

Rob

  • Member since
    March 2012
  • From: Marysville, WA
Posted by David_K on Monday, April 16, 2018 5:01 PM

Thanks for the compliment, Rob, and thanks for the pics!  I always love getting some good views of ships!

I've actually already applied a good amount of my weathering...though, it's more of a shading technique, meant to add a little more texture than actual weathering.  If you look at the first two pics of my previous post, those are images of the wood decks glued down as-is...the next two pics show the main deck without any shading, but with a forecastle(?) deck having had some shading applied...the two last pics show the main decks (and pretty much all of them) having all been treated with shading, via the artist pastel chalks.

I'm going for a subdued, but still shaded and slightly weathered look, both for the decks, and for the rest of the model...even the mast and deck furniture are really only getting a mild treatment, to add just a touch of *weather* and mostly for shading and texture....

I wonder if I went too subtle with the decks, if it's not really noticeable?  Maybe I'll go over them with a little more vigor one more time.

I got the main deck glued in, and when I removed the clamps this afternoon, nothing popped open, so that's a good sign!  lol  The hull was slightly warped and need to be held tight to the deck while the glue dried...I'm glad it held.

Dave

        _~
     _~ )_)_~
     )_))_))_)
     _!__!__!_         
     (_D_P_K_)
   ~~~~~~~~~~~~~
    ~~~~~~~~~~~

Current Project:  Imai/ERTL Spanish Galleon #2

Recently Finished: Revell 1/96 Cutty Sark

Next Up:  ???


  • Member since
    December 2012
Posted by rwiederrich on Monday, April 16, 2018 6:52 PM

Looking forward to your progress.

Rob

  • Member since
    July 2013
Posted by steve5 on Monday, April 16, 2018 9:38 PM

dave your build is looking wonderful , looking forward to seeing more

steve5


  • Member since
    March 2012
  • From: Marysville, WA
Posted by David_K on Sunday, May 6, 2018 1:59 PM

So I've been on hold with this build, because of an impasse.

Early on, I decided on a means to install the lower deadeyes...any who've built this kit know the kit-supplied deadeye assemblies are meant to be glued to the inboard pinrails, and used with the coated thread shroud/ratline assemblies included.  Those threaded shroud/ratline mesh parts don't apply much in the way of tension (if at all) to the pinrails, so for those who use them, there's no issue.

For me, I prefer to use wooden deadeyes, and rig my shrouds and ratlines.  This means I needed to find another way to fasten the deadeyes, because the tension of the shrouds would quickly pop the pinrails off, no matter how well they were glued to the bulwarks.

So....I pre-installed some annealed wire through drilled holes below the waterways, drilled adiditional holes in the pinrails, and led the wire through when I installed the pinrails.  When I made this plan months ago, I foolishly assumed it would work without a hitch, and even if any trouble came up, I'd find a way to make it work.

Boom.

Once I started trying to install the lower deadeyes using the wire, I quickly realized I had little control over the finished height of the deadeyes.  With so little room to work between the pinrails and the bulwark, and the stiffness of the wire, I couldn't after many tries, get the deadeyes to sit at a consistent level.  It was terribly frustrating.

I finally figure out a way that I think will work.  And it means more or less abandoning the wire for stropping.  I've done a few with the *new* method, and I think it will hold up and allow me finer control of deadeye height.  PHEW!

Anyway, the point of this long-winded post is that I've been absent for awhile, trying to get around an obstacle, and I wonder how many others have dealt with the frustration of the lower deadeyes on this kit?

...but I may have gotten past it!

I'll take some pics of the process and include them with my next post, to help it all become more clear.

It's unusual for me, because all my previous builds involving replacing kit deadeyes with wooden parts and tied shroud/ratlines have been pretty easy, using channels, chainplates and brass pins/eyes in the hull....with no channels, it makes the Cutty Sark a real departure.

Thanks!

        _~
     _~ )_)_~
     )_))_))_)
     _!__!__!_         
     (_D_P_K_)
   ~~~~~~~~~~~~~
    ~~~~~~~~~~~

Current Project:  Imai/ERTL Spanish Galleon #2

Recently Finished: Revell 1/96 Cutty Sark

Next Up:  ???


  • Member since
    December 2012
Posted by rwiederrich on Sunday, May 6, 2018 9:16 PM

The pin rail IS the channel in this application.  That is why I fixed all the lower deadeyes to a thin wood strip then glued that to the rail..painting it the same color...so it would blend in.  What else are you gonn do that works well?  They never are even noticed.  Good shrouds and ratlines make up for the necessity of the mod.

You could always add the deadeyes to the rail prior to its install..by drilling small holes that the wire pass through...the same wire used to strop the deadeye....or you can band the deadeye with fine copper strips (Paint white)then drill small holes through the mating ends and thread wire through, secure and then run that through the holes in the pin rail.Huh?

I still prefered my easiest/earlier method as you might find out for yourself.

Move on to what is really noticed....yards and thier rigging.

Good luck in what ever you do.

Rob

  • Member since
    March 2012
  • From: Marysville, WA
Posted by David_K on Tuesday, May 8, 2018 8:17 PM

Interesting you would suggest that, Rob, because that was one of my ideas for them...to install the deadeyes to a piece of flat material, and then attach that to the rail...but I was afraid of the tension of the shrouds pulling the pinrail off.

I also considered making a flat piece (same as above) and trying to put some kind of angled brace on it and attaching via the inner bulwarks, thus avoiding the perilous pinrail pulling.

Once I've gotten a few more installed, I'll take some pics of my hybrid technique, and post it here...not that I would recommend this way to anyone, since I'm really just using what's necessarily left from my original idea, and salvaging it with an easier, more consistent method.

Thanks!
Dave

        _~
     _~ )_)_~
     )_))_))_)
     _!__!__!_         
     (_D_P_K_)
   ~~~~~~~~~~~~~
    ~~~~~~~~~~~

Current Project:  Imai/ERTL Spanish Galleon #2

Recently Finished: Revell 1/96 Cutty Sark

Next Up:  ???


  • Member since
    September 2012
Posted by GMorrison on Tuesday, May 8, 2018 8:55 PM

You've got to cut yourself some slack too. These kinds of projects seem feasible "all else being equal", but it never is.

The bulwarks may be too low, the pinrail is too thick, the pins are baseball bats.

Whatever you come up with Maestro, the results will be so much superior to the original.

 Modeling is an excuse to buy books.


  • Member since
    March 2012
  • From: Marysville, WA
Posted by David_K on Tuesday, May 8, 2018 9:31 PM

"Baseball Bats."

lol. Yes, it seems that way sometimes, Bill!

I am going to have to cut myself some slack on this one...at this point, I'm desperate to move on....

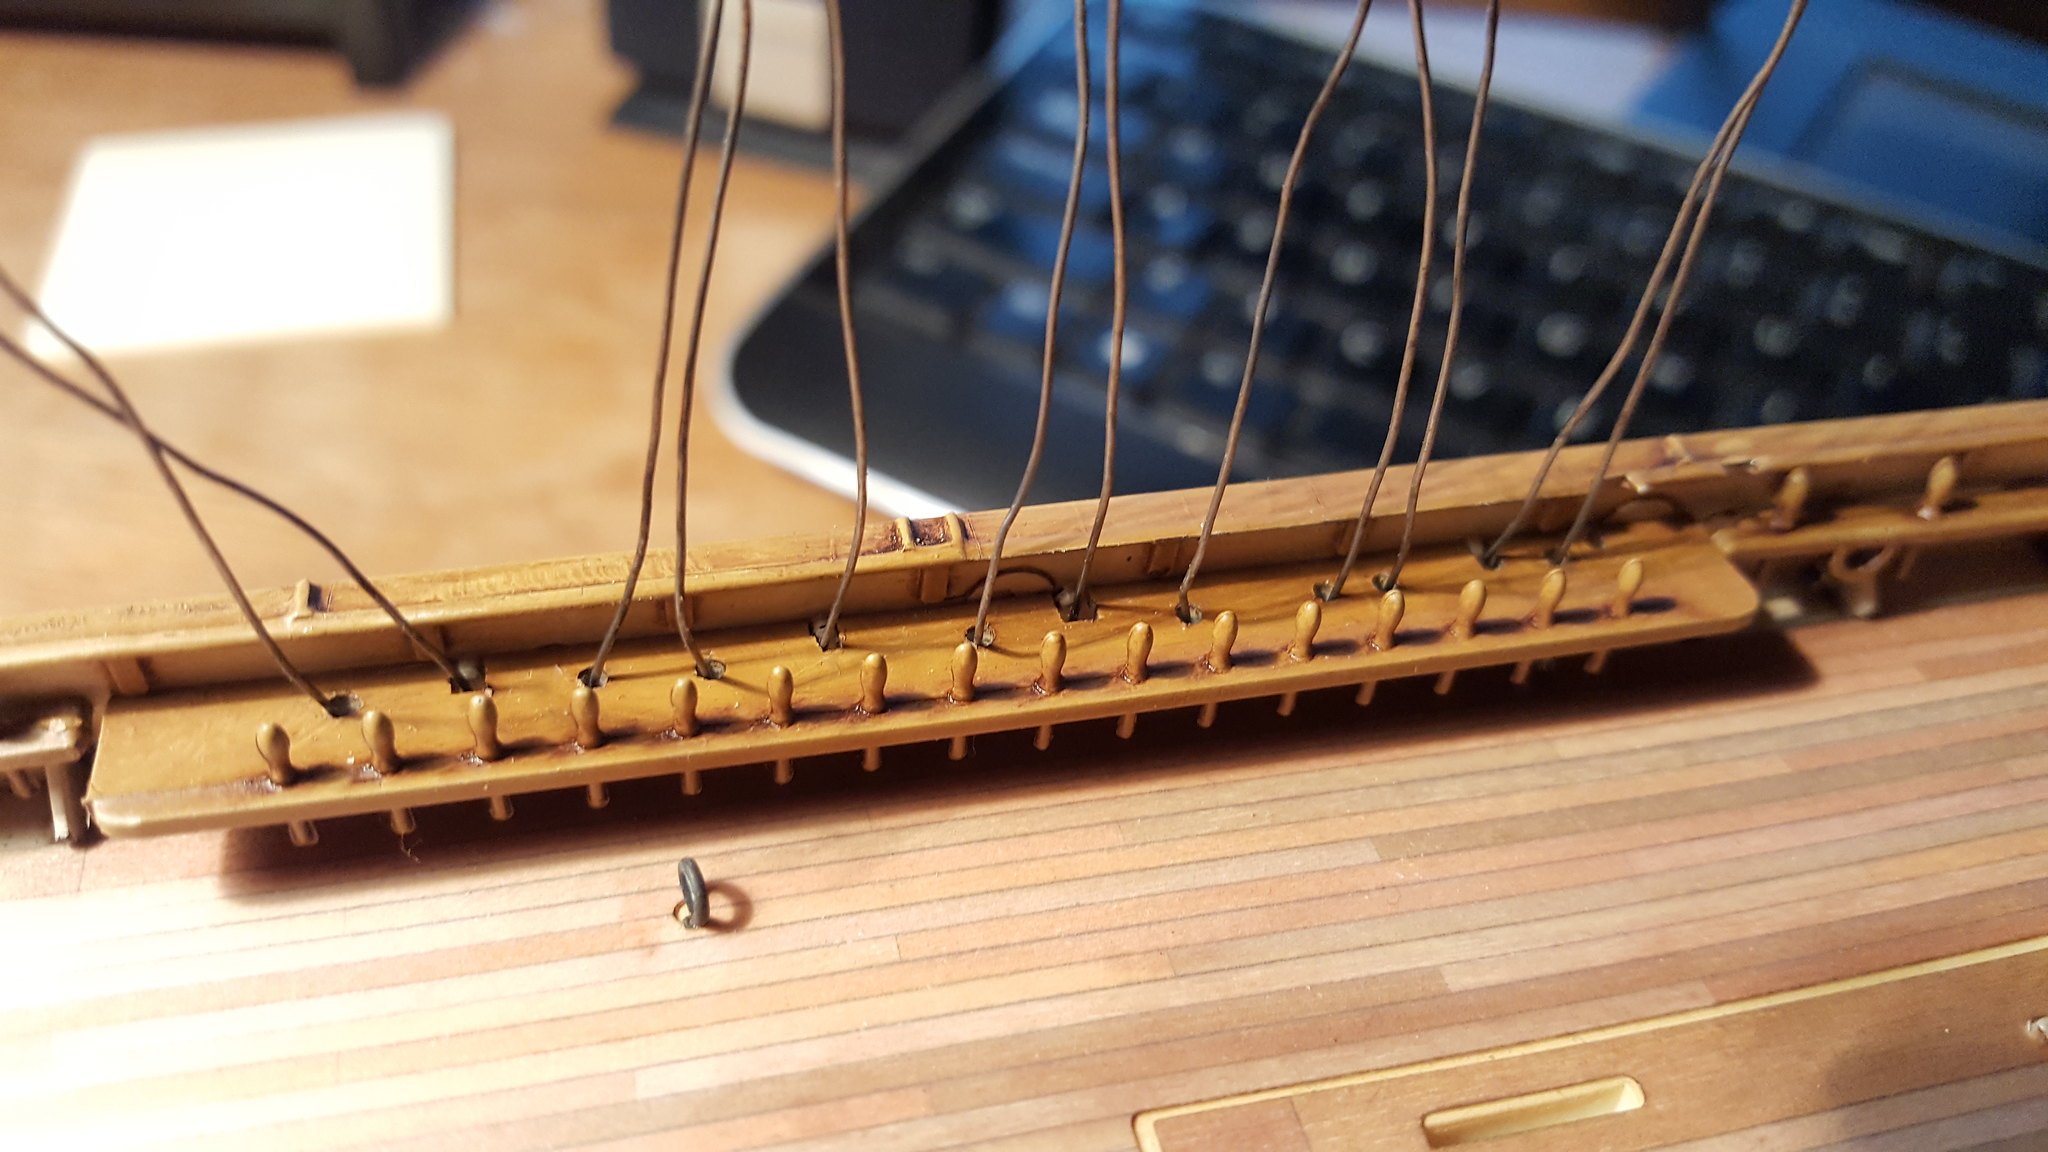
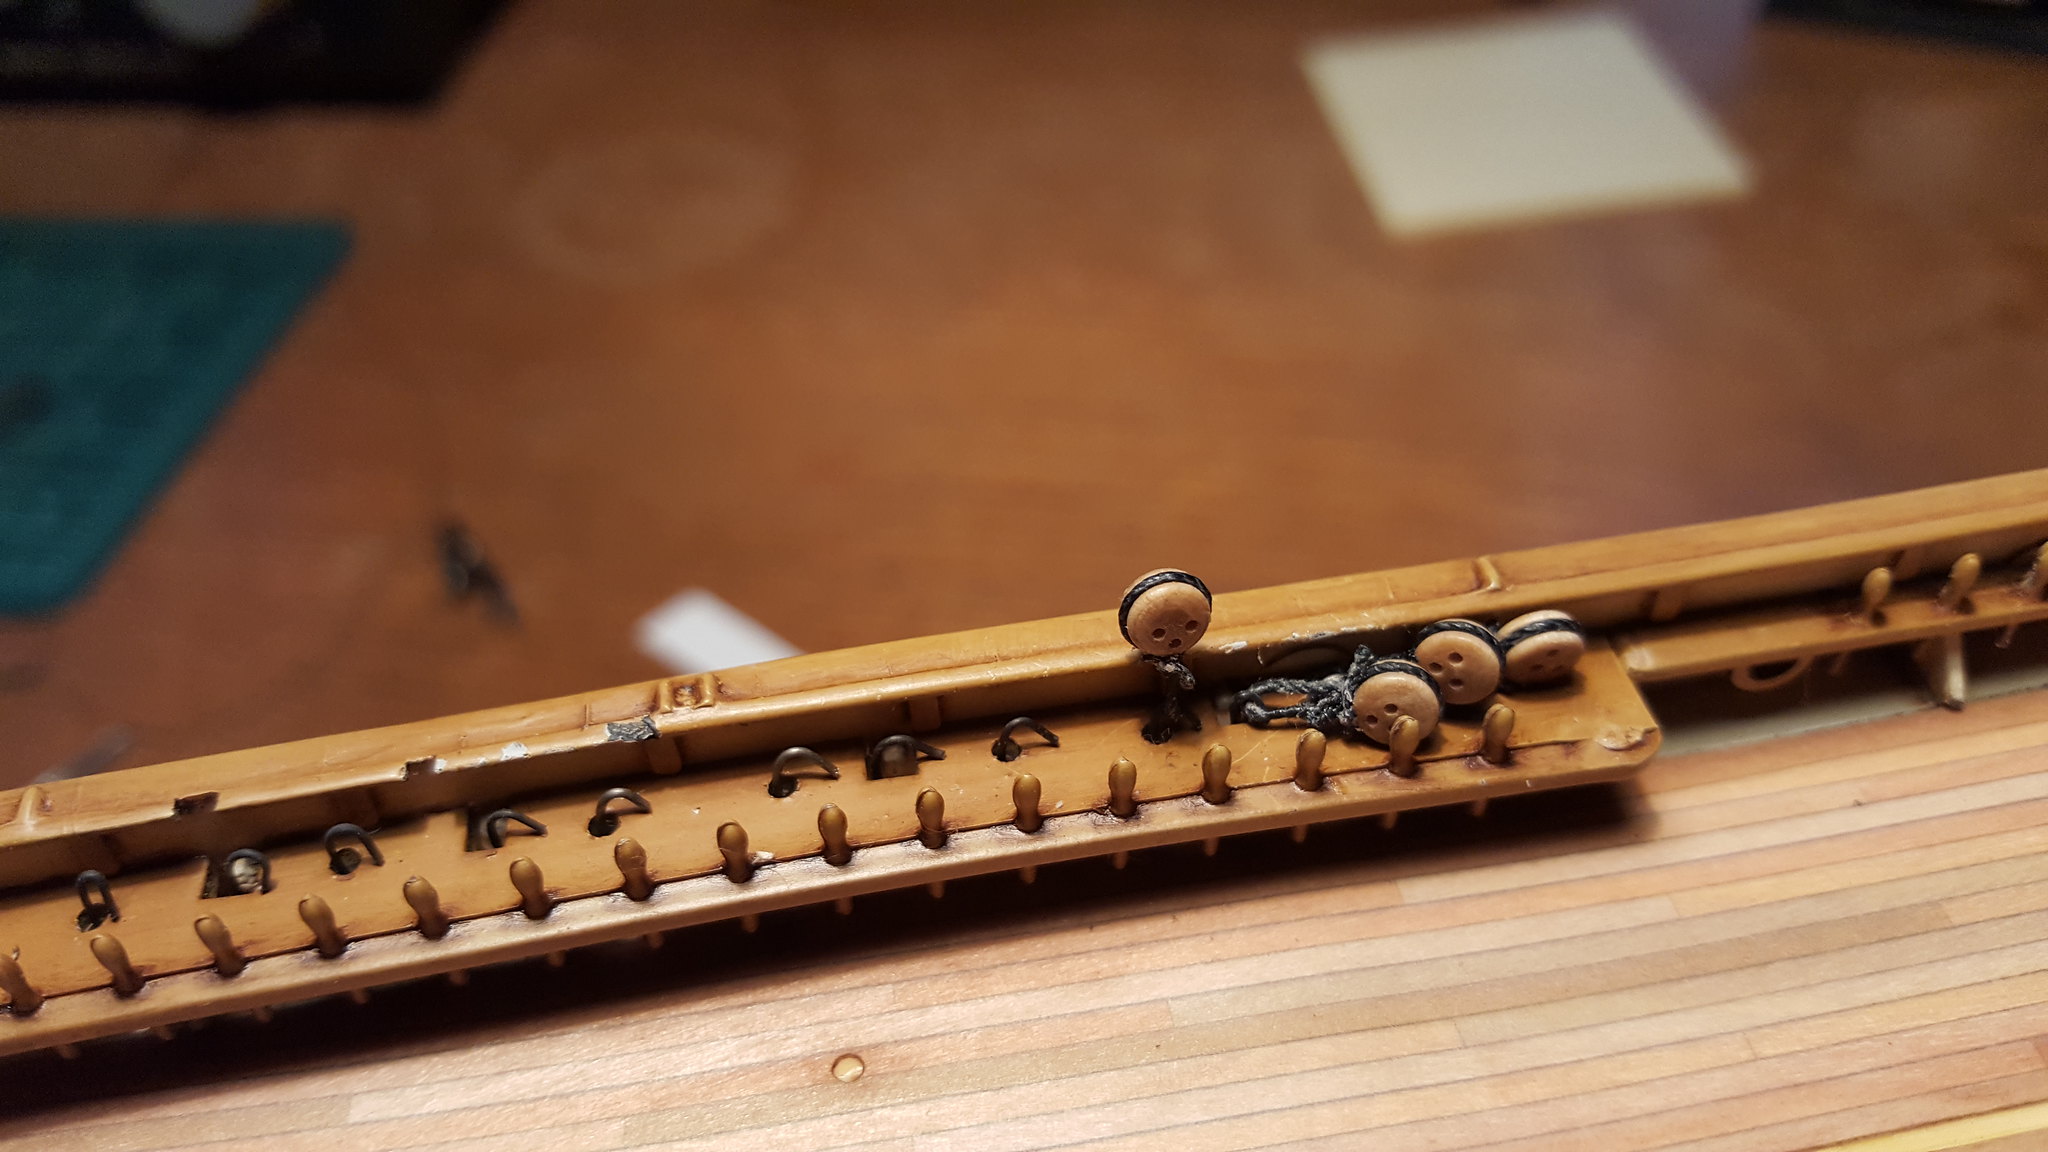
So I got one pinrail section of deadeyes installed, not my prettiest work, but it'll do and hopefully they won't stand out too much later.  Here's the deal:

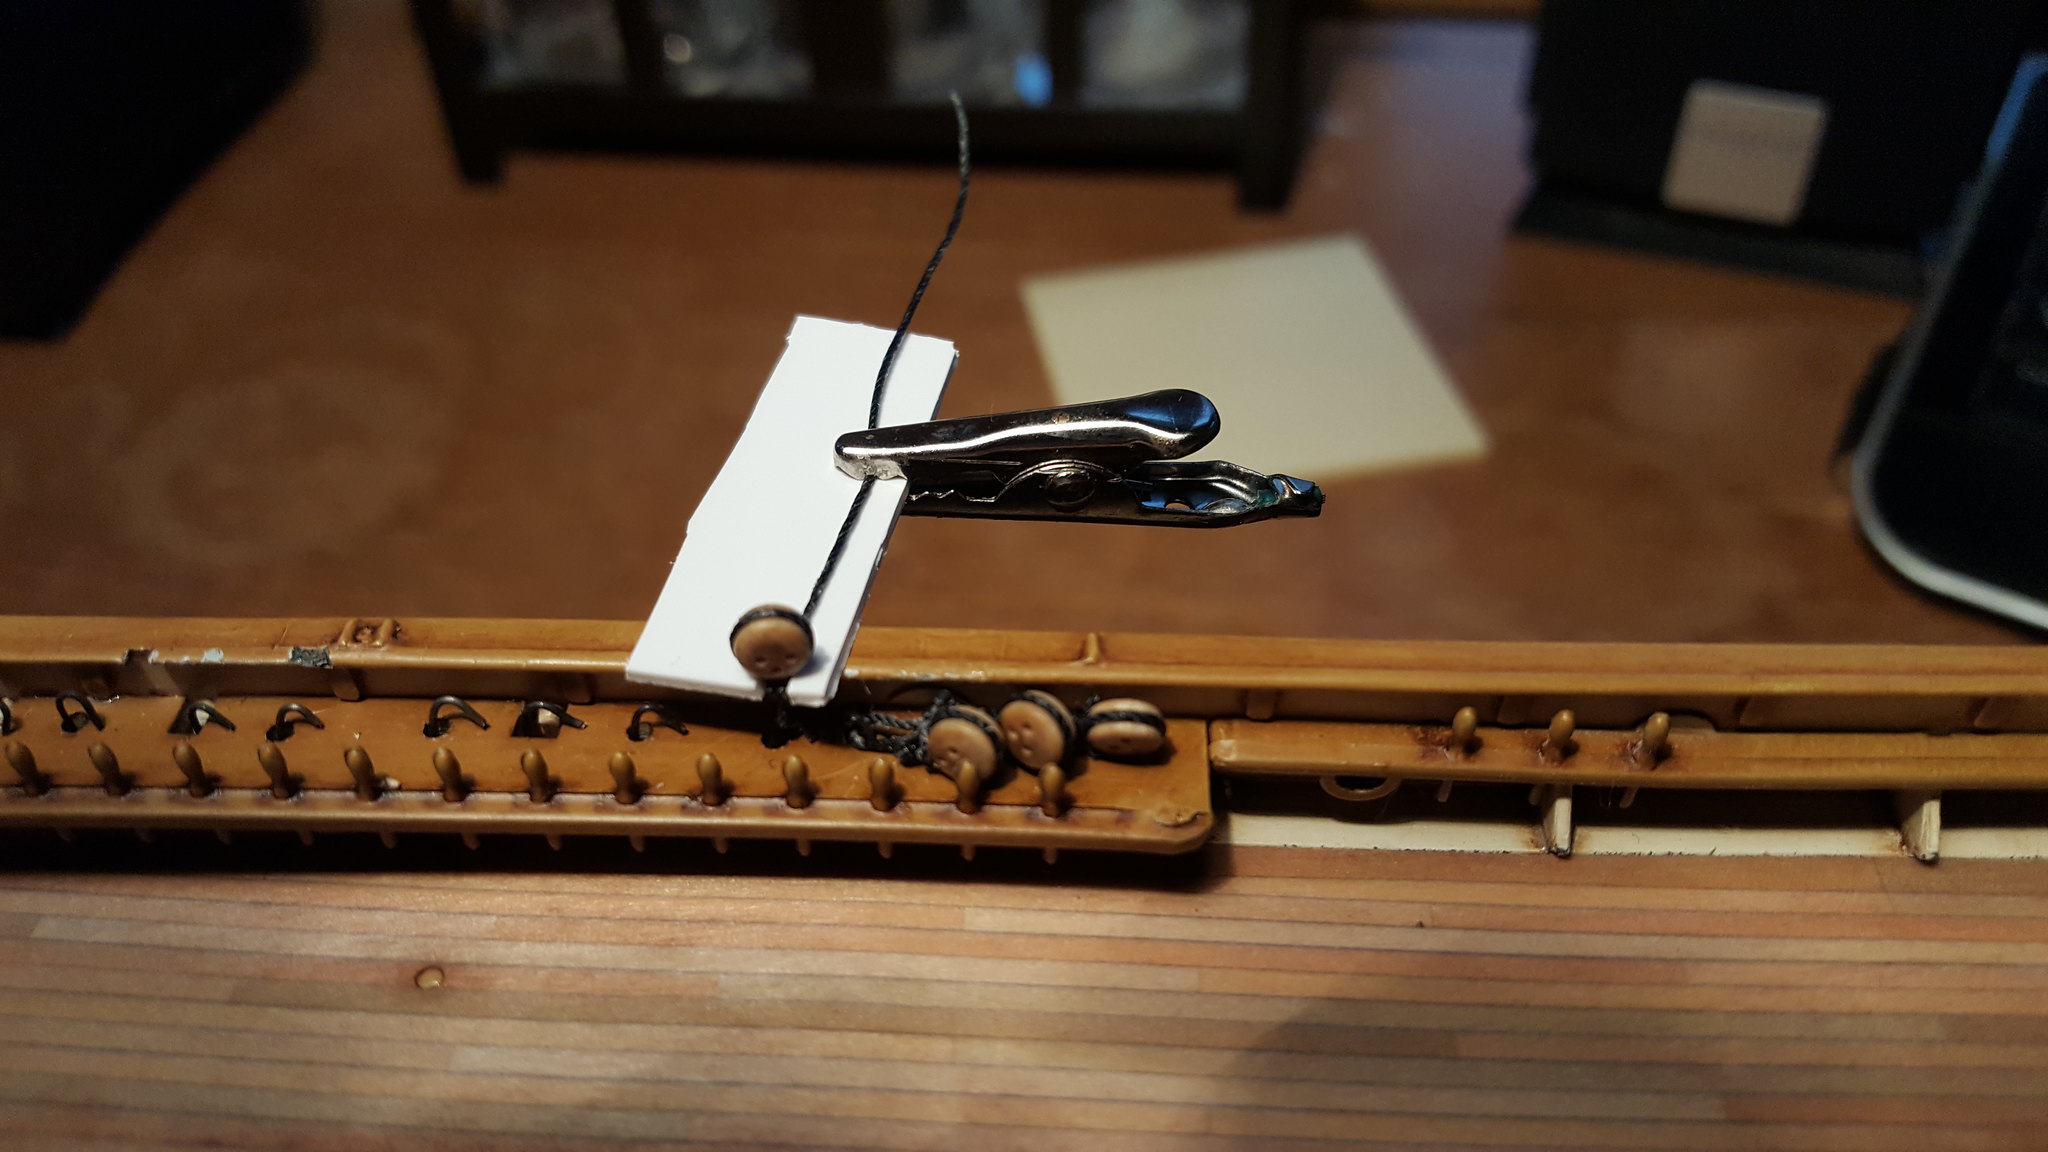
My original plan was to run these wires up through the waterways in drilled-out holes, then through holes in the pinrail, install the deadyes by wrapping the wire around and twist, snip, done.

 20180508_182501 by Dave Kump, on Flickr

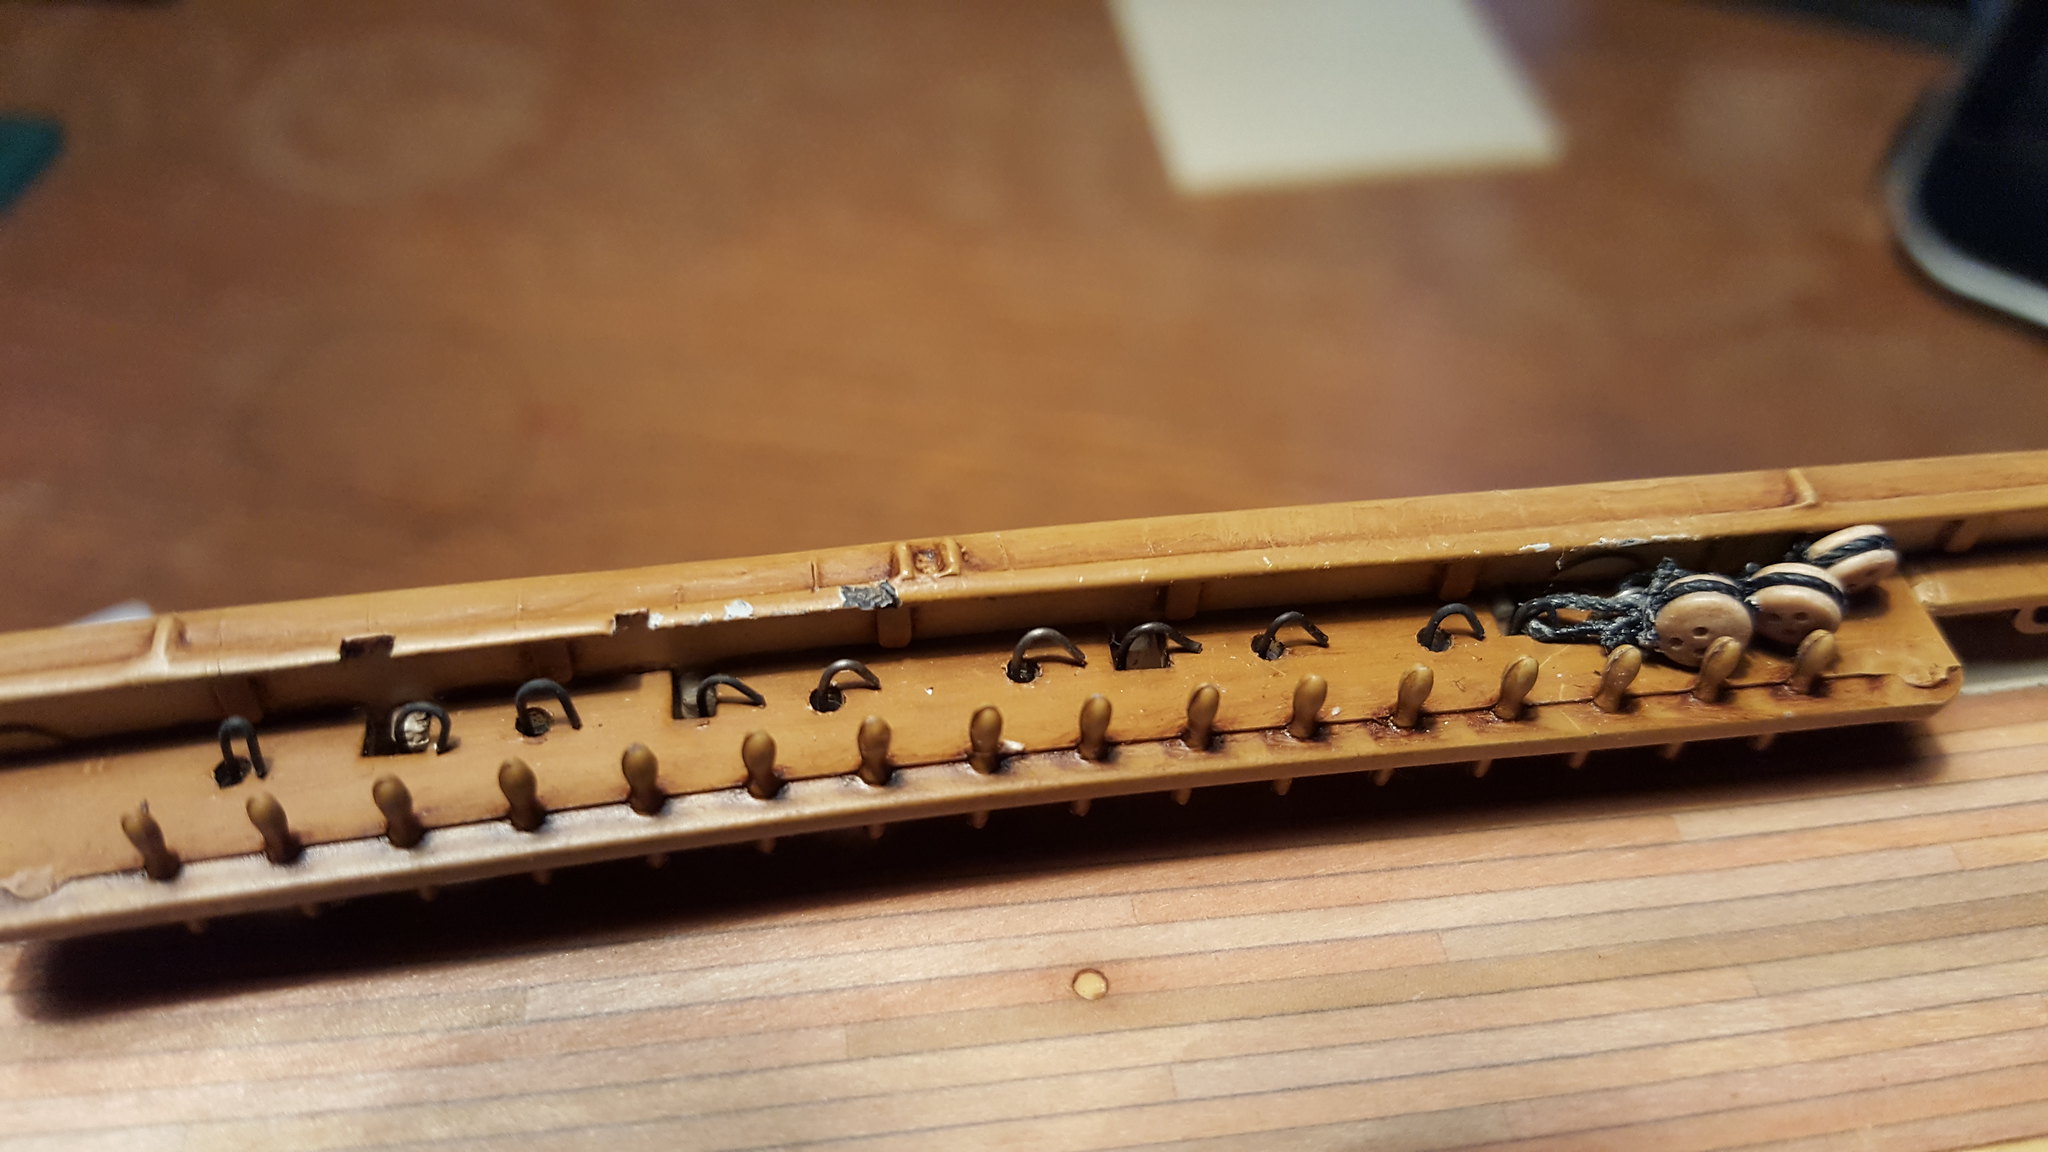
I soon realized the wire wasn't going to be forgiving enough, and I couldn't keep them uniform in height (the deadeyes, that is)....so I decided to trim the wire, curl it into a little hook, and use black line as my strop/chainplate

 20180508_182512 by Dave Kump, on Flickr

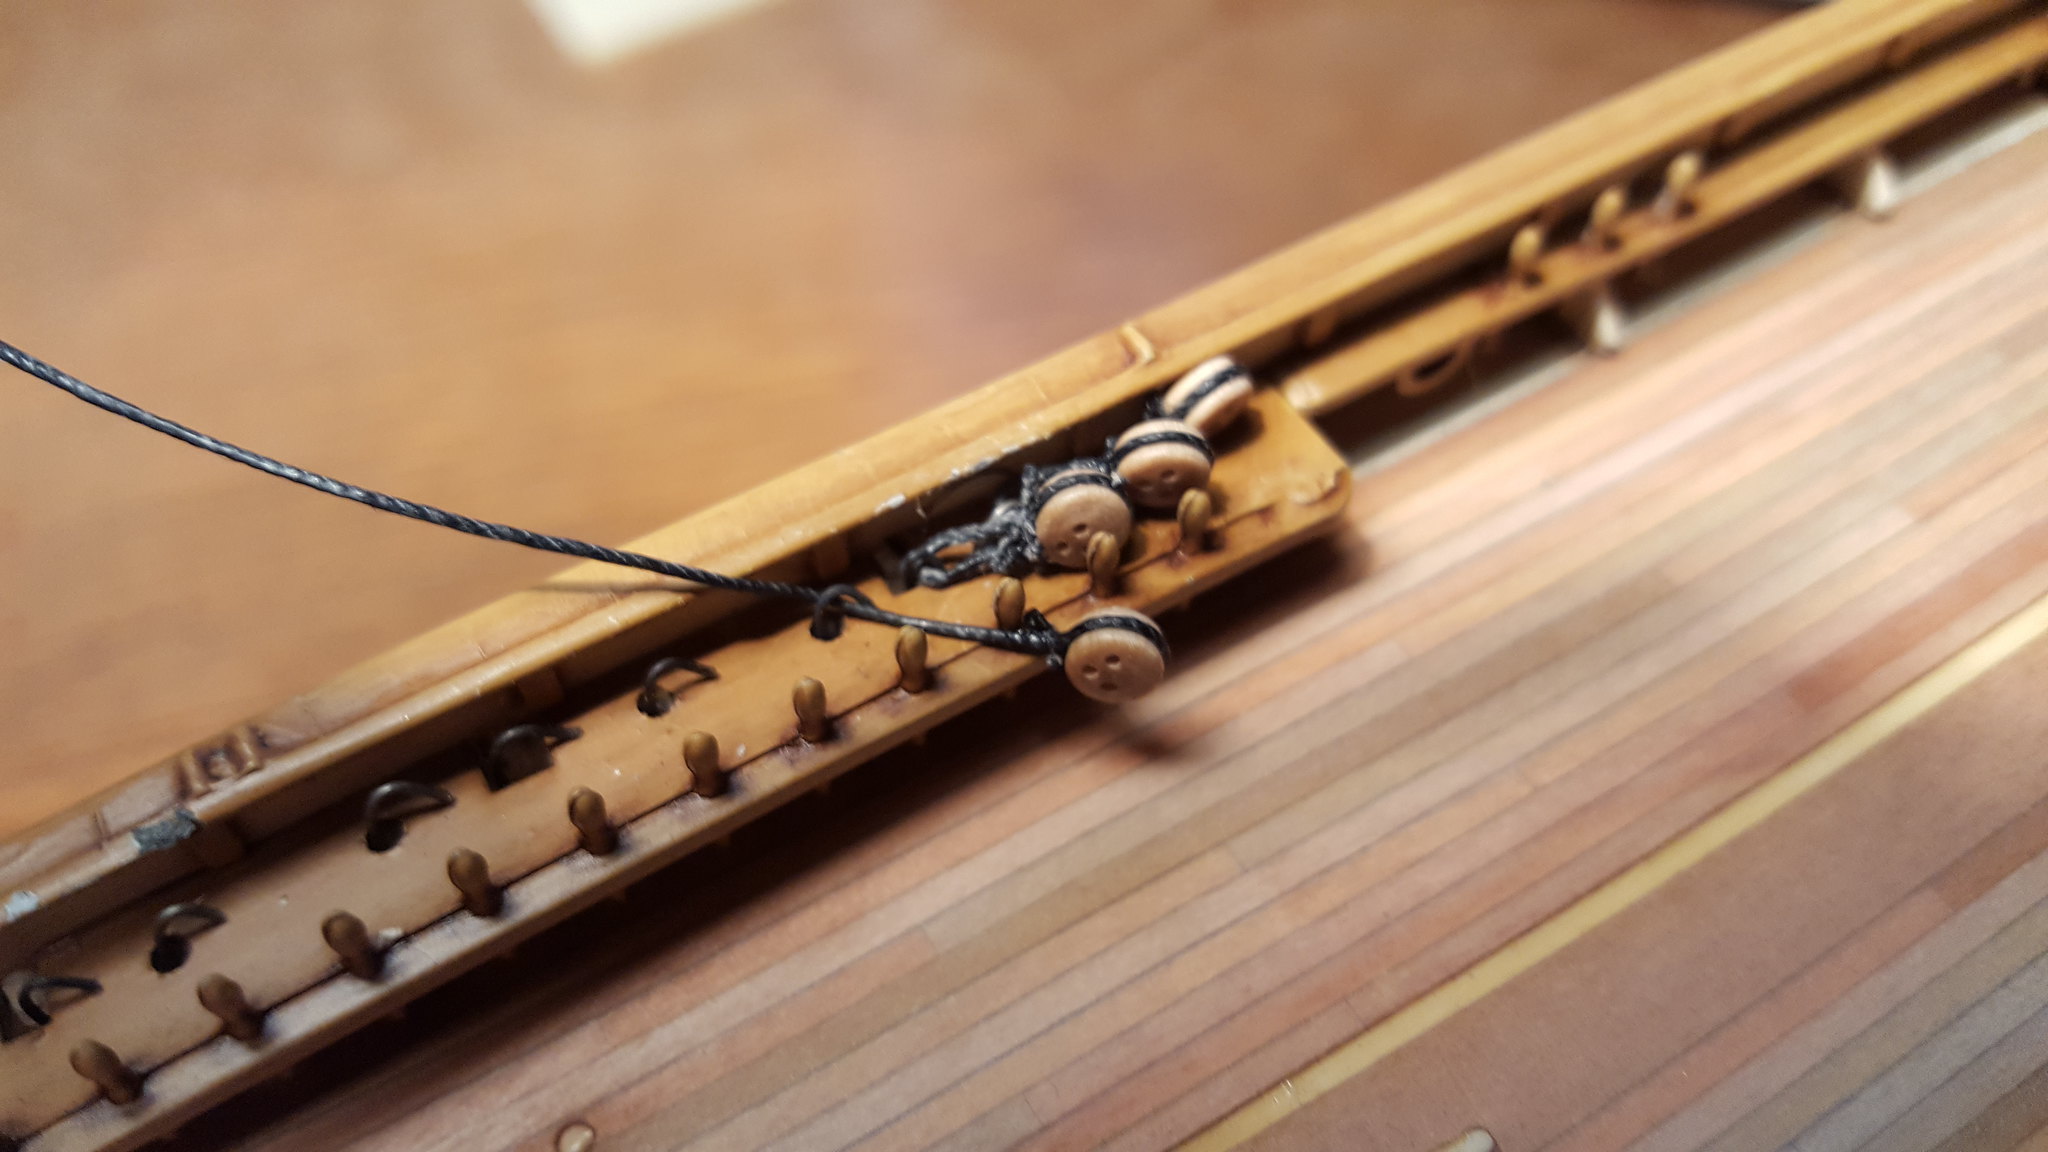
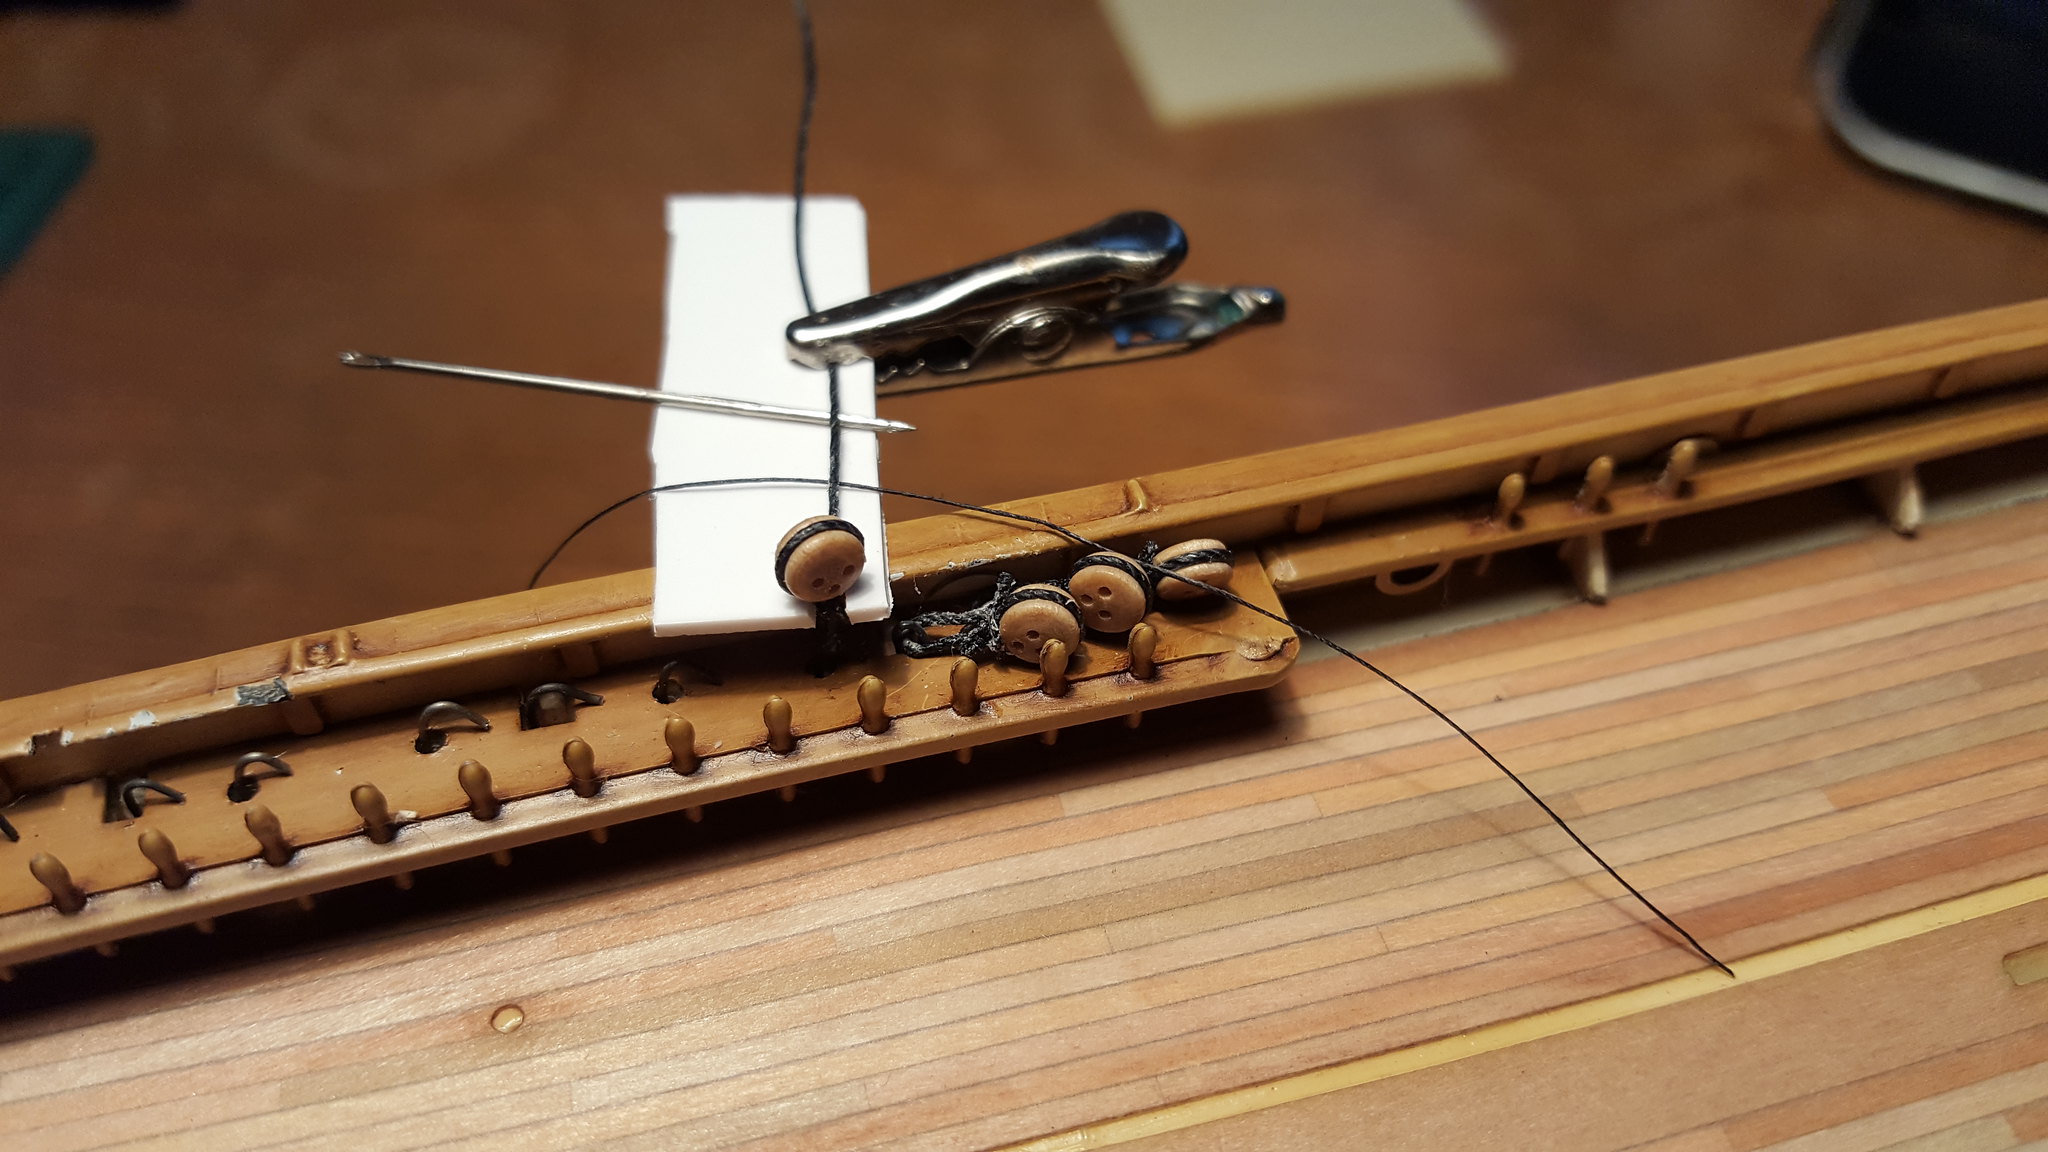
Using the line as my new strop, I feed one end under the wire *hook*

 20180508_182613 by Dave Kump, on Flickr

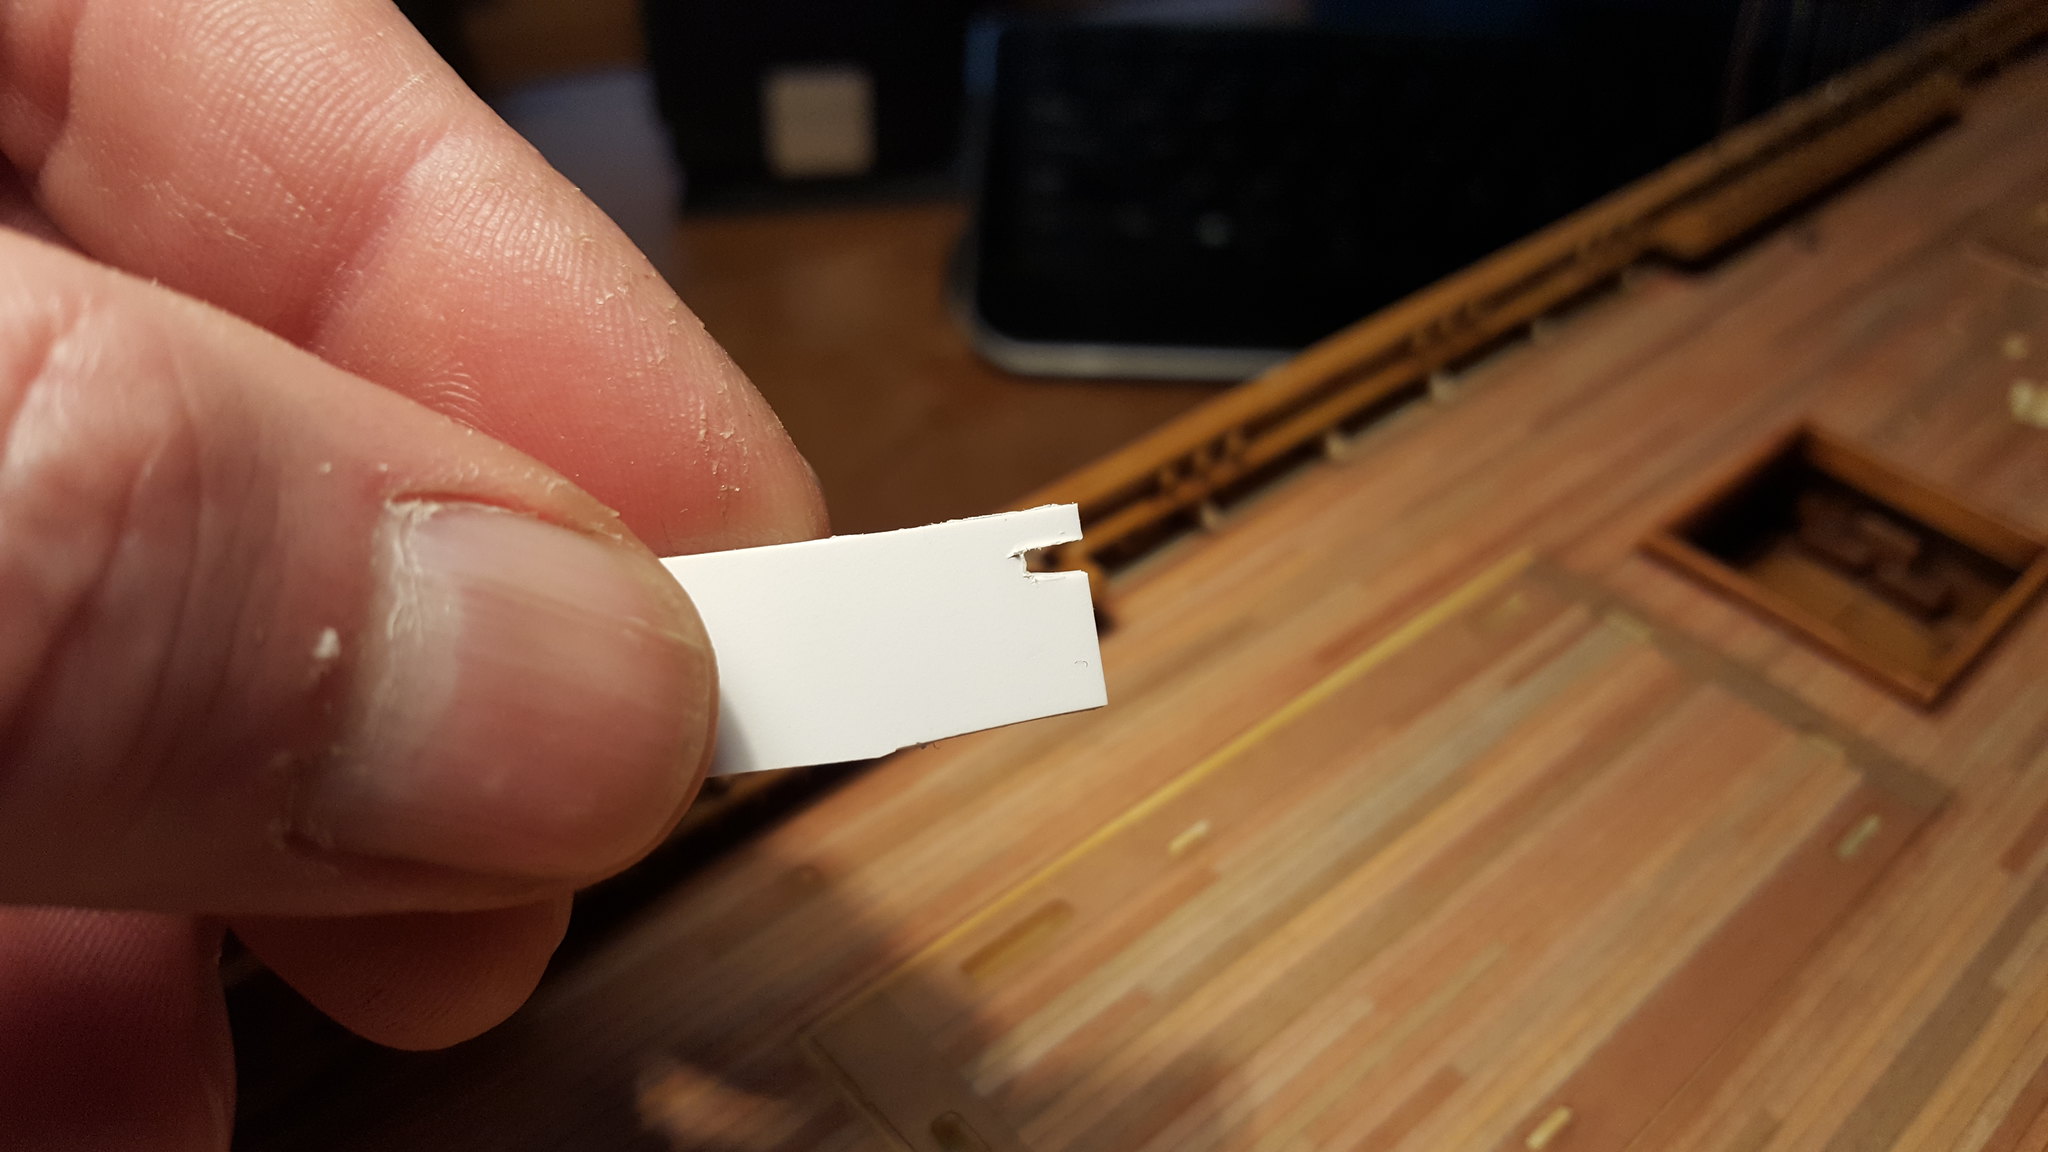
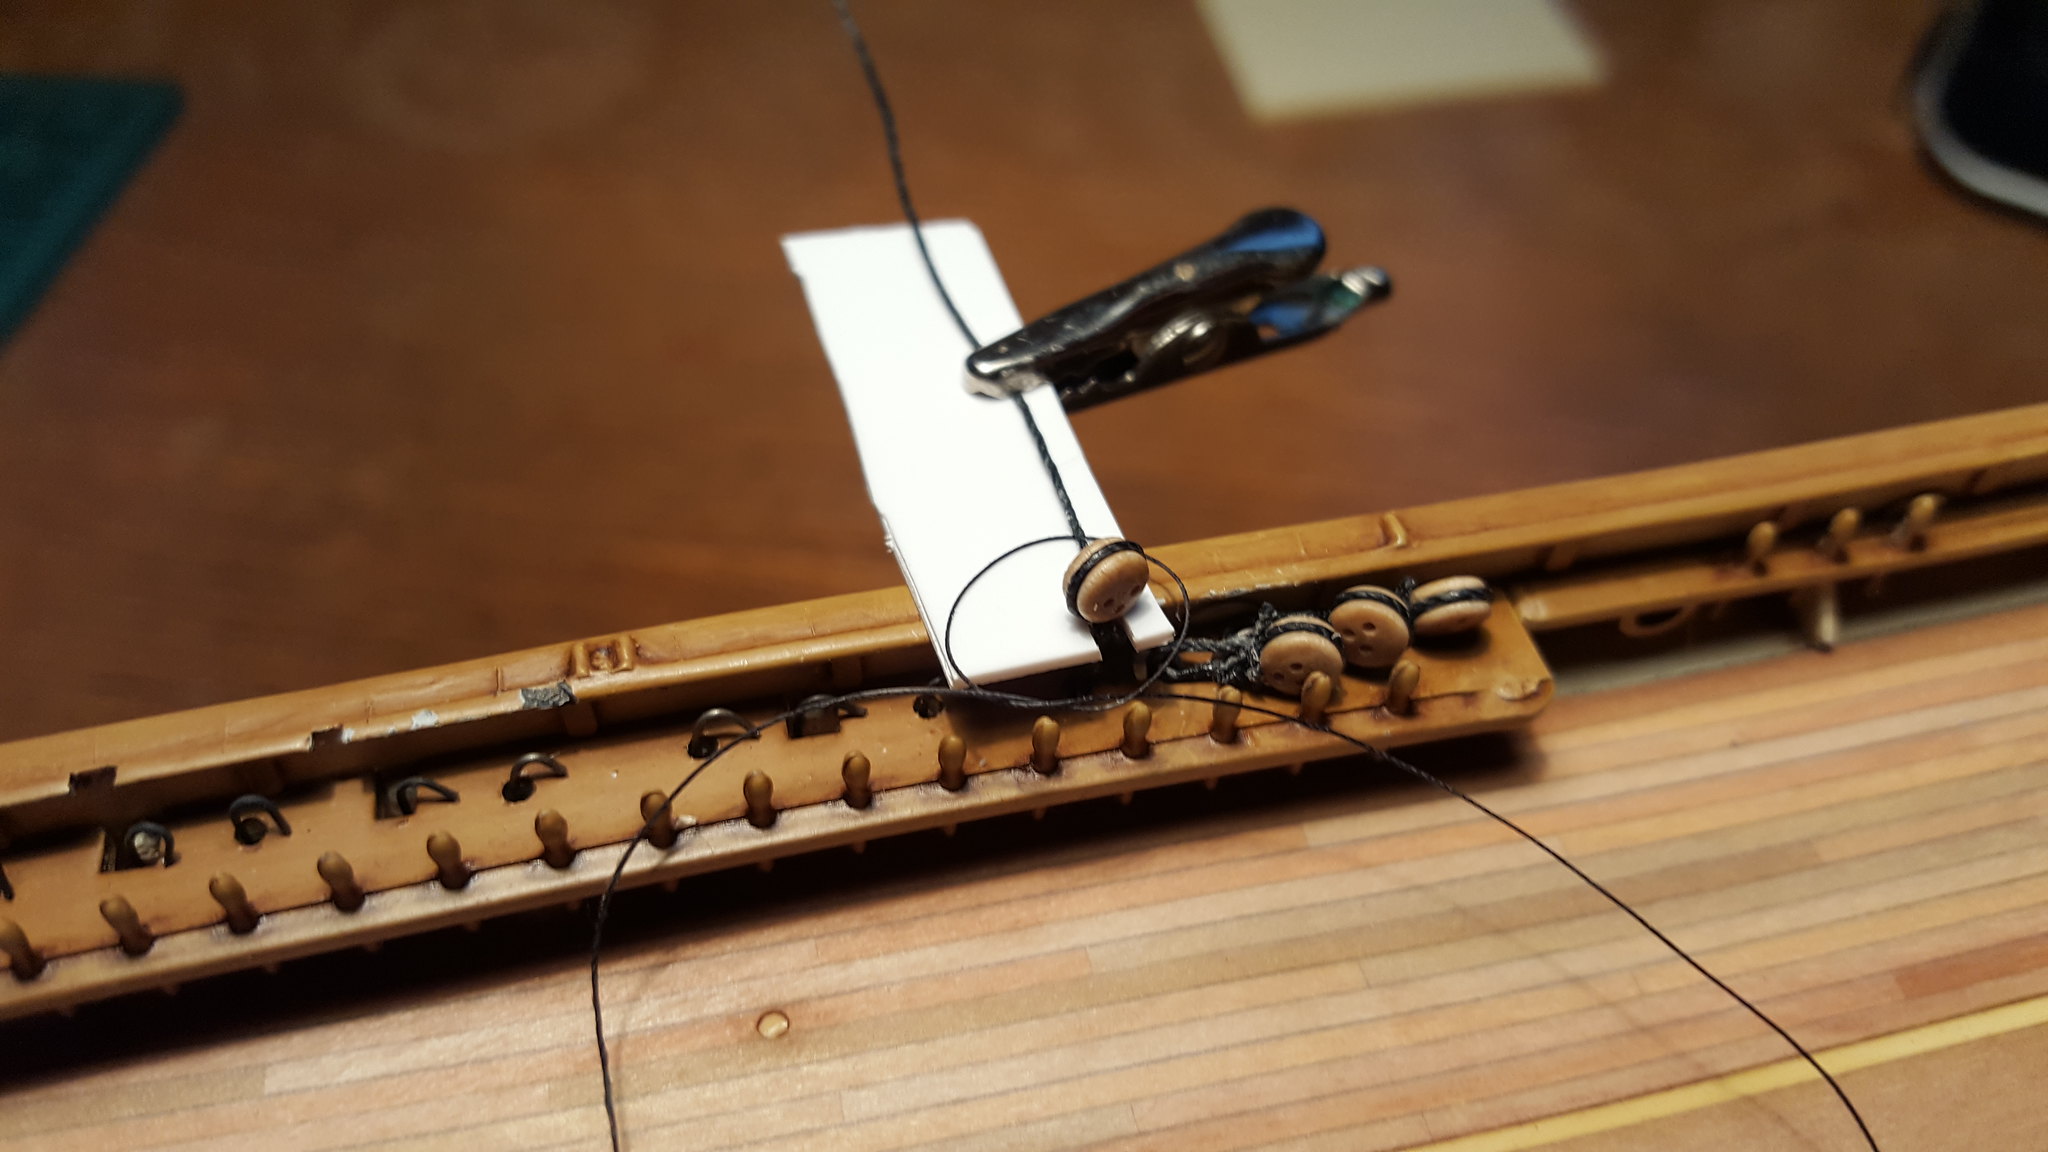
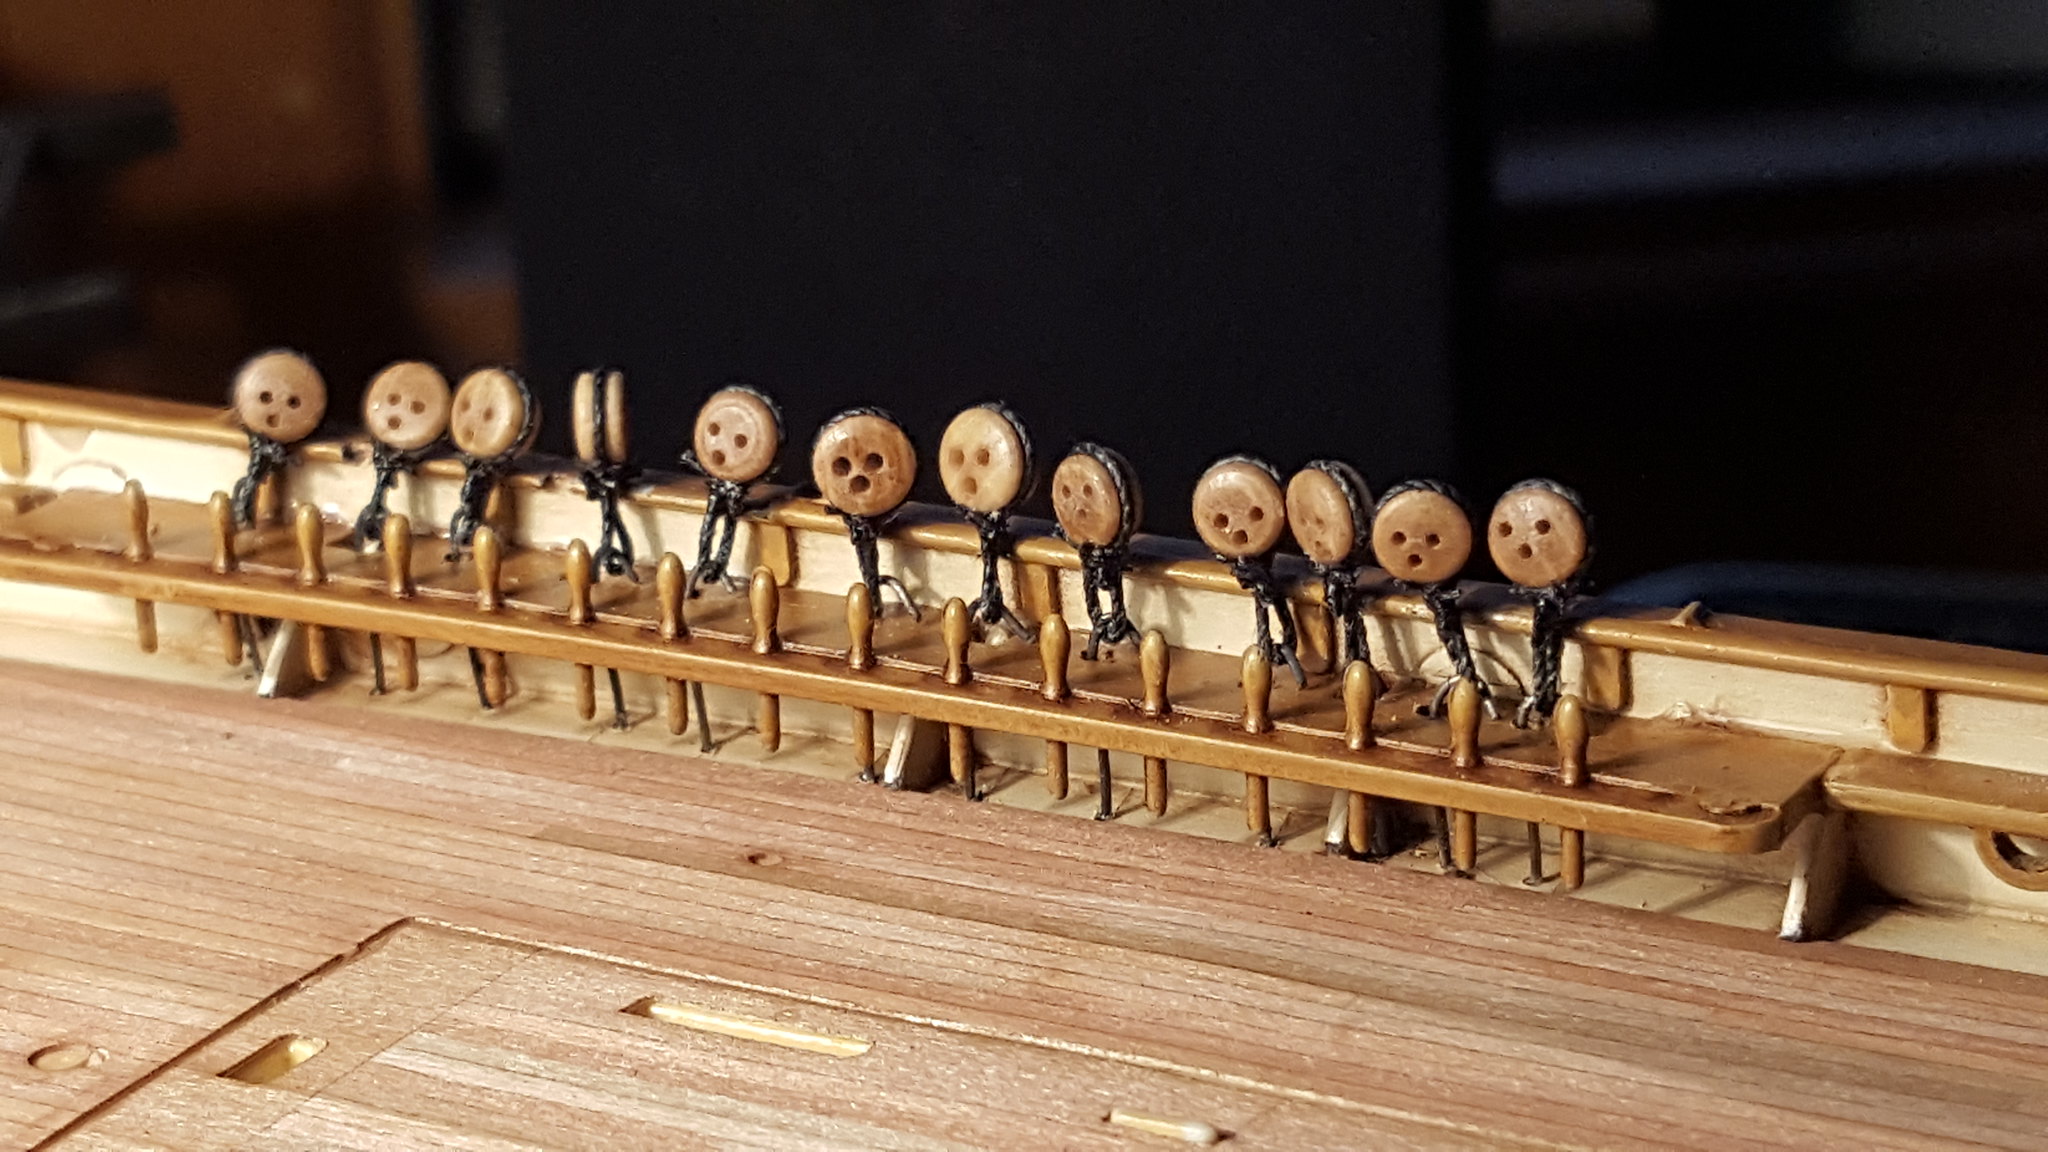
And using a sweet little styrene jig with a notch cut out of it, I pulled the line up to bring the deadeye to a prescribed height, clipped the line to the jig, and tied it snug...

 20180508_182622 by Dave Kump, on Flickr

 20180508_182717 by Dave Kump, on Flickr

 20180508_182750 by Dave Kump, on Flickr

 20180508_182826 by Dave Kump, on Flickr

 20180508_182903 by Dave Kump, on Flickr

 20180508_182946 by Dave Kump, on Flickr

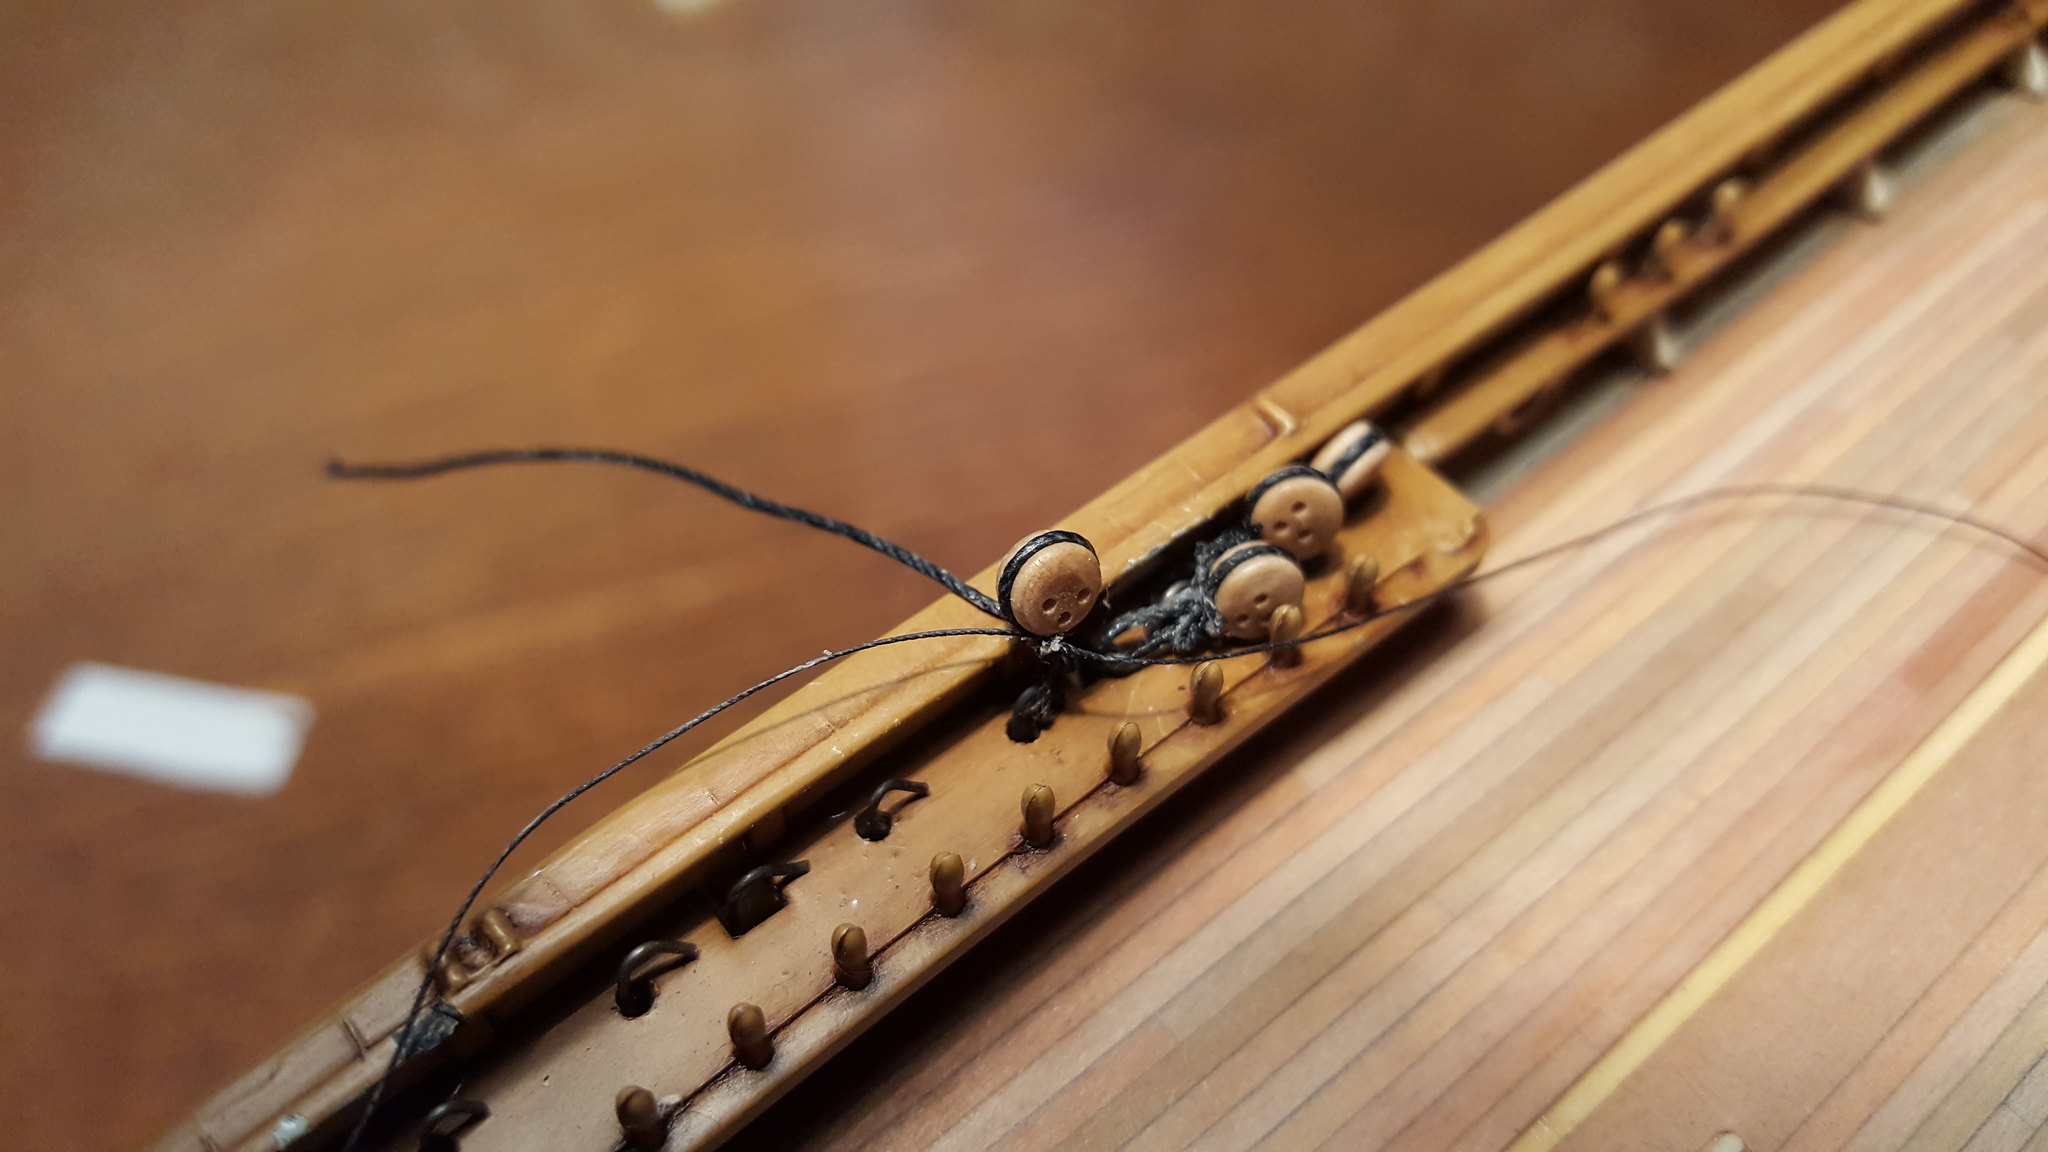
This last pic is of the entire pinrail (12 deadeyes, all 3.5mm except the middle two, which are 4mm)...they look pretty messy and uneven, but that's mostly (!) becasue they are now free to settle onto the wire hooks. Once the shrouds are on, the deadeyes will be pulled back up the original height that they were tied at (all things being equal)...

 20180508_190549 by Dave Kump, on Flickr

Anyway, I've got 54 more to install to the hull...with luck I'll be a pro by the end of the starboard side, and the port will be my default display side! 

Again, I don't think this is the best way...it's just what I ended up with...I'm sure if I tangle with the Cutty Sark again, I'll devise some other plan....I like Rob's idea of pre-installing them and then affixing the whole assembly as one piece.


Thanks for watching!
Dave


        _~
     _~ )_)_~
     )_))_))_)
     _!__!__!_         
     (_D_P_K_)
   ~~~~~~~~~~~~~
    ~~~~~~~~~~~

Current Project:  Imai/ERTL Spanish Galleon #2

Recently Finished: Revell 1/96 Cutty Sark

Next Up:  ???


  • Member since
    December 2012
Posted by rwiederrich on Wednesday, May 9, 2018 8:21 AM

Interesting approach Dave.  I never had any issues of the rail popping off due to stress from the shrouds...because, along with good glue...I also reinforced under the rail with blocking..joining the bottom of the rail with the side of the bullwark, forming a much larger glueing surface.  There is ample room beneath the rail to hide this additional blocking..because of the depth and shallowness of the rail and the close proximity of the deck house...you will never see beneath the rail as you can in your photograph.  Plus if you set/glue your deadeyes to a thin piece of stryrene you have all that surface to bond to  the rail that you already reinforced. Paint the styrene.

Or you can simply attach the deadeyes directly to the rail(skipping the styrene) prior to glueing the entire rework to the bullwark

Plus your deadeyes will be below the monkey rail as they should be.

I did this technique on both my CS and the Ferriera..and I had no issues of seporation or pulling off of the rail from the bullwark.

Your painting and deck look wonderful...I can't wait to see more.


Rob

  • Member since
    March 2012
  • From: Marysville, WA
Posted by David_K on Saturday, June 2, 2018 8:29 AM

Finally got the lower deadeyes all installed, and I've been able to move onto assembly/install of deck furniture.  Very happy to be able to proceed, at last!  Those deadeyes gave me a serious case of *builder's block*....lol

I do have to say, even after installing the *forecastle* deck with the windlass, there are more fit issues.  I had to perform dramatic reshaping of the focsl deck to get it even close to snugging up between the fore waterways of the hull parts, and then the windlass didn't want to line up.  Seems like it's been one thing after another with this kit...maybe it's a Revell thing, maybe it's just "one of those builds", you know?  Maybe I got spoiled with all the Imai kits I built before :)

Anyway, I've got some deckhouses, pumps, and ladders to detail, then hopefully the install goes smoothly.  No pics this time, but once I get the next 4 steps (21-24) completed, I'll share some thoughts and images.

Thanks, wish me luck!

Dave

        _~
     _~ )_)_~
     )_))_))_)
     _!__!__!_         
     (_D_P_K_)
   ~~~~~~~~~~~~~
    ~~~~~~~~~~~

Current Project:  Imai/ERTL Spanish Galleon #2

Recently Finished: Revell 1/96 Cutty Sark

Next Up:  ???


JOIN OUR COMMUNITY!

Our community is FREE to join. To participate you must either login or register for an account.

SEARCH FORUMS
FREE NEWSLETTER
By signing up you may also receive reader surveys and occasional special offers. We do not sell, rent or trade our email lists. View our Privacy Policy.