SEARCH FINESCALE.COM

Enter keywords or a search phrase below:

Revell 1/72nd S-100 Schnellboot Completed Page 4

8455 views
132 replies
1 rating 2 rating 3 rating 4 rating 5 rating
  • Member since
    November 2008
  • From: Central Florida
Posted by plasticjunkie on Monday, March 9, 2020 11:21 AM

That certainly looks like a PE overdose attack lol but looking very nice Bish. The level of details are greatly enhanced with the upgrades.

Like I mentioned before, the old Airfix E Boat does in fact have the high bridge being an early S7 Class and the Revell being a later S100 Class boat so you get quite a different contrast between the two pieces when shown side by side.

I would love for someone to come out with a pe detail set for the older Airfix boat or have Revell put out the S-7 or S-38 Class as new moldings.

 GIFMaker.org_jy_Ayj_O


Too many models to build, not enough time in a lifetime!!

  • Member since
    December 2002
  • From: Bury St Edmunds, Suffolk, England
Posted by Bish on Monday, March 9, 2020 4:04 AM

Thanks guys. Yes, it is a bit daunting, without doubt this is the most PE i have used on a build, and being a ship not somthing i have experiance with. But its leading me to bigger things. I have the 72nd U-Boat this year and then hopefully in a few years a 350 Bismarck.

Chad, while the kit is very nice, the PE does greatly improve the detail as well as correct a few things. Though i think Eduard does a set which would be less daunting. I have not even touched the sets for the guns and torpedos and i am not yet a 1/3rd of the way through the main set.

TB, am i correct in think the old Airfix kit has the older style bridge. I would not mind doing an earlier boat at some point.

I am a Norfolk man and i glory in being so


On the bench: Airfix 1/72nd Harrier GR.3/Fujimi 1/72nd Ju 87D-3

  • Member since
    April 2015
Posted by Mopar Madness on Sunday, March 8, 2020 10:50 PM

Bish, this looks like quite an ambitious project but I know you'll make it look smashing! I've been on the fence when it comes to PE for mine. 

Chad

God, Family, Models...

At the plate: 1/48 Airfix Bf109 & 1/35 Tamiya Famo

On deck: Who knows!

  • Member since
    October 2019
  • From: New Braunfels, Texas
Posted by Tanker-Builder on Sunday, March 8, 2020 5:31 PM

Hi Bish!

 Although you chose the Armored Cupola Model, this is awesome. I am partial to the older version. Now that said, keep it up, beautiful work so far!

  • Member since
    April 2003
  • From: USA
Posted by keavdog on Sunday, March 8, 2020 4:22 PM

Quite the project you've got going there Bish.  Looking good.

Thanks,

John

  • Member since
    December 2002
  • From: Bury St Edmunds, Suffolk, England
Posted by Bish on Sunday, March 8, 2020 2:53 PM

Its been a couple of weeks, so time for an update. A few people have said they have the same Griffon set, so i am going to start with a few issues i have found with it, mainly down to the instructions.

First one is on the main deck. You have to remove the raised area, greyed out in the instructions. And it clearly shows that the vertical sides are to be left.
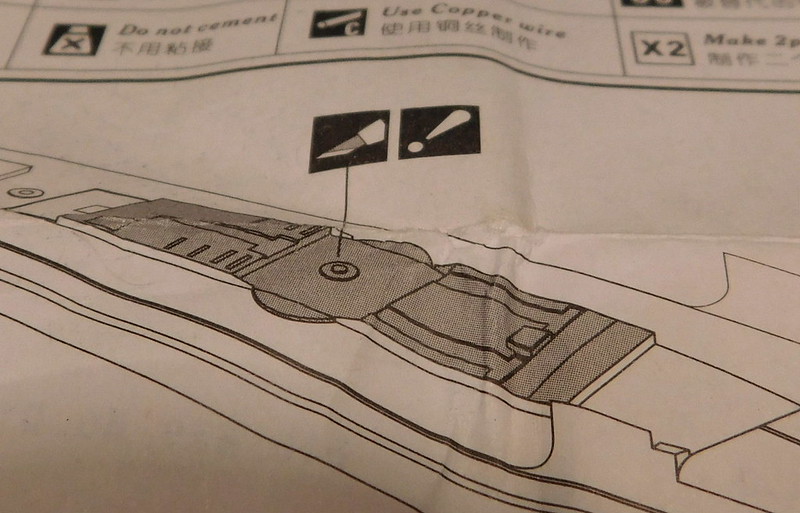
Which leaves you with this.
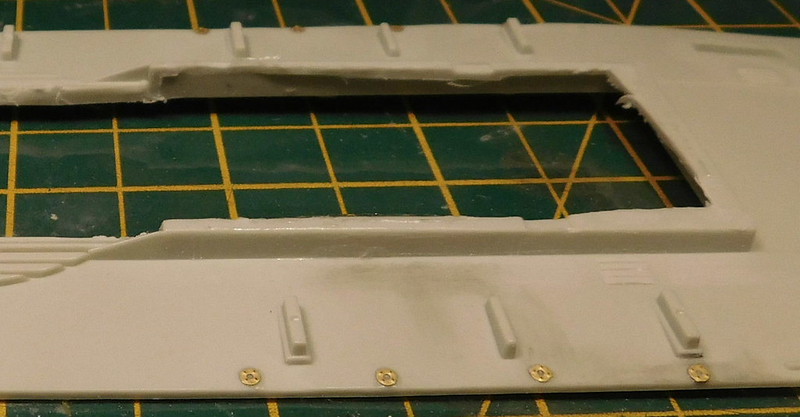
But the 2 peices that go over the hole look like this underneath.

Clearly the cross piece with not allow it to fit with the sides of the kit in place. So, the sides had to be removed, here the rear has been done but not the front.

Next issue is the rear section of the torpedo tubes. Before adding AM, they should fit like this.

There is a PE piece for each side which going off the instructions fit like this.

Clearly thats not right, in the instructions, the top of the PE run along the plastic piece. Whjat they miss out is the the sides of the vertical plastic bulkhead have to be taken back.
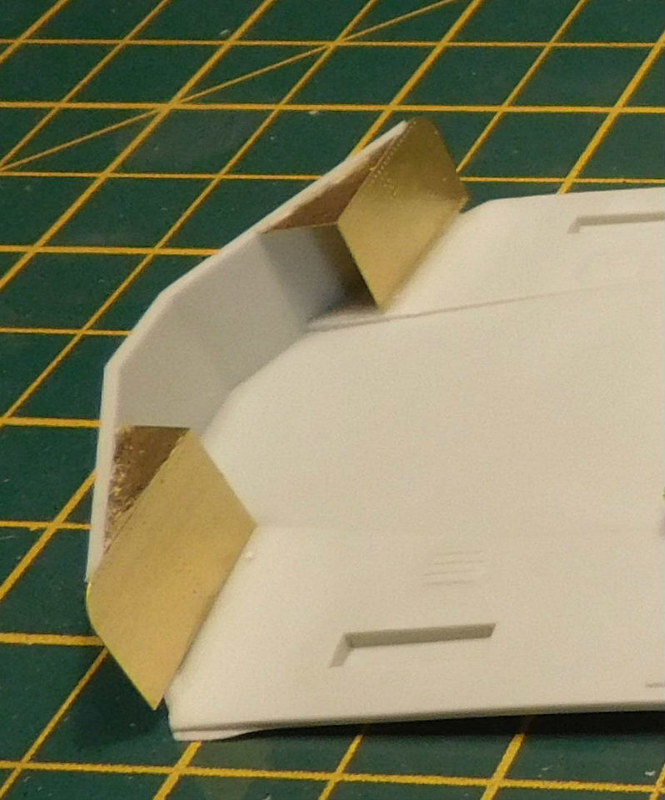
This also means that the torpedo tubes won't fit and have to be cut back, again this is not mentioned.

Those isues caused me some head scratching, though really it should have been clear what to do. I only realised when i look at the Griffon models website and the page on this AM set had a lot of images which included this area without the bridge fitted.

Unfortunatly, the link to different products does not seem to be working at the moment, at least on my computer. The product is a little way down on the right side, BPN 72001.

http://www.griffonmodel.com/

So once those issues where dealt with, this is how the rear deck looked.

I waisted a couple of evenings trying to sort that out, but it got there. So i was able to fit the deck and put the hull together.

I then did some work on the raised front deck including around the forward gun mount and the hatch, this was then fitted. Towards the rear, there are 2 raised circles just behind the small raised deck section. There were 4 of these, the other 2 being on the outside edge. These are the bases for the smoke generators. The instructions tell you to remove the inner ones. But the pics of my boat clearly show the generators on these inner positions, so i removed the other ones.

The prop shafts were also fitted, i left out the rudders.

And i got one of the rear sections of the torpedo tubes donw. Lots of tricky PE on there. You can see the front has been cut back. I did a bit to much so had to add some styrene strip.

And finally, those props we were speaking about. In the ship craft book there are a couple of pics of an S-38 prop which show them well. They also show that the centre prop attaches to the main rudder. The kit has this right, but i thought it must have been wrong when i saw the instructions, but what do i know about ships.

When i checked the Shapways site, it did not show one of the propeller like this, so will have to see when they get here. And thats going to be sooner than i expected. They are due to arrive tomorrow, i was not expecing them until the end of the month.

More soon.


I am a Norfolk man and i glory in being so


On the bench: Airfix 1/72nd Harrier GR.3/Fujimi 1/72nd Ju 87D-3

  • Member since
    December 2002
  • From: Bury St Edmunds, Suffolk, England
Posted by Bish on Friday, March 6, 2020 2:01 AM

Thanks Steve, and no problem. I will look into it, but if i think its to tricky i will just do as you suggest. I noticed those smaller wholes as well

I had seen the term Boot Top in a couple of books and was not sure if thats what it applied to, i just thought it was the waterline. Thanks for clearing that up.

I am a Norfolk man and i glory in being so


On the bench: Airfix 1/72nd Harrier GR.3/Fujimi 1/72nd Ju 87D-3

  • Member since
    December 2002
  • From: Bury St Edmunds, Suffolk, England
Posted by Bish on Friday, March 6, 2020 1:55 AM

Thanks PJ.

And last night i found a couple of pics in one of those books i have of the props on an S-38 class boat. I'll get a pic taken and post it with my next update.

I am a Norfolk man and i glory in being so


On the bench: Airfix 1/72nd Harrier GR.3/Fujimi 1/72nd Ju 87D-3

  • Member since
    November 2008
  • From: Central Florida
Posted by plasticjunkie on Thursday, March 5, 2020 11:14 AM

Bish

Thanks PJ, i will try that. Its not so much the props, its more the shield i am worried about. Is the 3D plastic more brittle than normal resin?


Very delicate so be careful cutting anything. I used a very thin razor saw to separate parts.


 GIFMaker.org_jy_Ayj_O


Too many models to build, not enough time in a lifetime!!

  • Member since
    November 2008
  • From: Central Florida
Posted by plasticjunkie on Thursday, March 5, 2020 11:12 AM

docidle


plasticjunkie

I think if you use an acrylic primer like Future then the enamel top coat will not attack the brittle 3D plastic.


I think you're right PJ. I remember our conversation regarding a Future coat on my PT Boat I'm getting ready to weather since I used ColourCoat paints and I love to weather with Artist Oils. It should protect them fairly well.

Thanks again,

Steve


Yes


 GIFMaker.org_jy_Ayj_O


Too many models to build, not enough time in a lifetime!!

  • Member since
    July 2010
  • From: Tempe AZ
Posted by docidle on Thursday, March 5, 2020 11:00 AM

plasticjunkie

I think if you use an acrylic primer like Future then the enamel top coat will not attack the brittle 3D plastic.


I think you're right PJ. I remember our conversation regarding a Future coat on my PT Boat I'm getting ready to weather since I used ColourCoat paints and I love to weather with Artist Oils. It should protect them fairly well.

Thanks again,

Steve


  • Member since
    July 2010
  • From: Tempe AZ
Posted by docidle on Thursday, March 5, 2020 10:57 AM

Bish

Thanks Steve. I have the colourcoats paint including the white and red. I had noticed that about the hull colour as well, and from what i can tell there is no black water line.

Damn, i wasn't sure what to do with those underwater parts so i left them and now i have the deck on. I wounder if i can insert them from the outside. What size tube did you use?

I really should have thought of that.


Bish,

Sorry for adding the drillling out the holes a bit too late. I'm not sure if you could insert tubing now but I will never say never, you could always muscle them in I guess! If not then paint the retracted parts Black and call it a day. When you weather the hull, it will look cool.

I used Evergreen Tube #225 - 5/32 (4.0 mm) for the smaller holes and #227 - 7/32 (5.5mm) for the larger. The tiny holes were drilled but no tubing behind them. In the Kagero book on page 7 and on the drawings, there are two smaller holes just under the waterline forward on both sides. They look like they would use the #225 tubing.

You are correct about the lack of a Black Boot Top. If there is any discolourization at the waterline, it will be from the gas, oil and the normal scum floating in the harbor water.

Steve


  • Member since
    December 2002
  • From: Bury St Edmunds, Suffolk, England
Posted by Bish on Thursday, March 5, 2020 8:39 AM

Thanks PJ, i will try that. Its not so much the props, its more the shield i am worried about. Is the 3D plastic more brittle than normal resin?

I am a Norfolk man and i glory in being so


On the bench: Airfix 1/72nd Harrier GR.3/Fujimi 1/72nd Ju 87D-3

  • Member since
    November 2008
  • From: Central Florida
Posted by plasticjunkie on Thursday, March 5, 2020 7:39 AM

I think if you use an acrylic primer like Future then the enamel top coat will not attack the brittle 3D plastic.

 GIFMaker.org_jy_Ayj_O


Too many models to build, not enough time in a lifetime!!

  • Member since
    December 2002
  • From: Bury St Edmunds, Suffolk, England
Posted by Bish on Thursday, March 5, 2020 4:17 AM

Thanks Steve. I have the colourcoats paint including the white and red. I had noticed that about the hull colour as well, and from what i can tell there is no black water line.

Damn, i wasn't sure what to do with those underwater parts so i left them and now i have the deck on. I wounder if i can insert them from the outside. What size tube did you use?

I really should have thought of that.

I am a Norfolk man and i glory in being so


On the bench: Airfix 1/72nd Harrier GR.3/Fujimi 1/72nd Ju 87D-3

  • Member since
    July 2010
  • From: Tempe AZ
Posted by docidle on Wednesday, March 4, 2020 10:51 PM

Bish

Thanks PJ, thats good to know. I use Alclad primer and enamel paint. Not sure if there is an acrylic version of S-Boot white so maybe seal with Tamiya first. Is there any excess to be removed that could be used to test it on?


Bish,

I have been using ColourCoat paint a great deal lately so I understand the trepidation on using them on 3D parts... especially with the price! I’m going to try and use an acrylic clear flat coat after the primer (Tamiya) on some of the spare sprue and see what happens. Since I’m not really going to start this kit yet.... that said, I had started it a couple of years ago before my hands started going wonky on me. 

The acrylic ”equivalent“ to Scnellboot Wheis (sorry my iPad doesn’t have the correct German B sort of thing for the S), is Vallejo Model Color 70.993 White Grey.

Something else I did when I started this kit was to drill out the different underwater holes for induction and ejection. I then added Evergreen tubing on the interior to give them depth and painted them and the interior Black. Here are a couple of picks to show what I mean. Just some of my AMS (Advanced Modeler Disease) showing through!

Another area of discussion from another thread was the question of the German Anti Fouling paint colors. From what I could find in regards to S-Boots, the earlier boats such s PJ’s Airfix High Bridge E Boot S-1 through S-7 as well as the early S-38 series vs. the later S-38 to S-100 series discussed in another thread, was that the earlier boats used Schiffsbodenfarbe III Grau (Anti Fouling Grey) and the later boats sported Scheffbodenfarbe Rot III (Anti Fouling Red) which is actually on the Brownish side of Red.

Anyway, I hope this helps a bit,

Steve


  • Member since
    November 2008
  • From: Central Florida
Posted by plasticjunkie on Tuesday, March 3, 2020 10:16 AM

Bish

Thanks PJ, thats good to know. I use Alclad primer and enamel paint. Not sure if there is an acrylic version of S-Boot white so maybe seal with Tamiya first. Is there any excess to be removed that could be used to test it on?


No, don't use those. Use like MM acryl or Vallejo paint. Remember that tamiya is an acrylic lacquer and not a true acrylic. It may look ok at first but you may get a reaction days or weeks later. My buddy used MM enamel on it and it looked fine for about a month then he noticed what looked to be like grit on the surface. You will more than likely get the same reaction from a solvent type acrylic lacquer. He carefully brushed it off and used Vallejo paint and had no reaction from that. I used Vallejo black  on my 3" deck gun and it's been fine.

 GIFMaker.org_jy_Ayj_O


Too many models to build, not enough time in a lifetime!!

  • Member since
    December 2002
  • From: Bury St Edmunds, Suffolk, England
Posted by Bish on Tuesday, March 3, 2020 9:59 AM

Thanks Bob. I will be sure to read anything they send me. And i know where to come if i have any questions.

I am a Norfolk man and i glory in being so


On the bench: Airfix 1/72nd Harrier GR.3/Fujimi 1/72nd Ju 87D-3

  • Member since
    March 2018
  • From: Chicago suburbs
Posted by Luvspinball on Tuesday, March 3, 2020 9:46 AM

Bish

 Is there any excess to be removed that could be used to test it on?


Depends on the particular process used.  Some do, some don't.  Be sure to follow any directions they send with on washing/cleaning the parts prior to painting.  Purchased quite a few things over the years, and always been quite pleased with the level of detail.

Bob


Bob Frysztak

Luvspinball

Current builds:  Revell 1/96 USS Constitution with extensive scratch building

  • Member since
    December 2002
  • From: Bury St Edmunds, Suffolk, England
Posted by Bish on Tuesday, March 3, 2020 9:24 AM

Thanks PJ, thats good to know. I use Alclad primer and enamel paint. Not sure if there is an acrylic version of S-Boot white so maybe seal with Tamiya first. Is there any excess to be removed that could be used to test it on?

I am a Norfolk man and i glory in being so


On the bench: Airfix 1/72nd Harrier GR.3/Fujimi 1/72nd Ju 87D-3

  • Member since
    November 2008
  • From: Central Florida
Posted by plasticjunkie on Tuesday, March 3, 2020 9:17 AM

Bish the detail is excellent. I bought a 3d printed 1/144 3" deck gun and the level of detail is incredible. Use water based acrylic paint on that plastic as per the instructions. It mentioned something about solvents possibly damaging the plastic.

This is my 1/144 Gato's 3d printed 3" deck gun. The picture doesn't do it justice. One can see each traversing wheel, gears, levers, bolts etc. Even the barrel is drilled out.


 GIFMaker.org_jy_Ayj_O


Too many models to build, not enough time in a lifetime!!

  • Member since
    December 2002
  • From: Bury St Edmunds, Suffolk, England
Posted by Bish on Tuesday, March 3, 2020 9:13 AM

Well, i took the plunge and ordered the props and gun shield. never used 3D printed stuff before, so keen to see what iots like. Won't be here until the end of the month, but thats no problem.

I am a Norfolk man and i glory in being so


On the bench: Airfix 1/72nd Harrier GR.3/Fujimi 1/72nd Ju 87D-3

  • Member since
    November 2008
  • From: Central Florida
Posted by plasticjunkie on Tuesday, March 3, 2020 6:59 AM

Thanks Steve for the links. I will try to reverse the pitch on the kit blades using Tenax to melt the corrected plastic blades in place. If that fails then I may go with replacement props. I have the 05051 Revell kit with the single 40mm and have the Griffon N72001 PE set for it. 

I also have the old Airfix high bridge E Boat in the stash and have been waiting for someone to come out with a pe set for it. It's a lovely kit but it will benefit a lot more with some PE upgrades.

 GIFMaker.org_jy_Ayj_O


Too many models to build, not enough time in a lifetime!!

  • Member since
    December 2002
  • From: Bury St Edmunds, Suffolk, England
Posted by Bish on Tuesday, March 3, 2020 2:29 AM

Mopar Madness

Well I can't believe I missed this one! I've got this one in the stash and look forward to seeing what you make of it. Beer


Well, glad to have you on board.

I skipped an update this weekend as there was not that much done. But for those who have this PE set, there are a few issues i have picked up, mainly with the instructions. I will highlight those at the next update and hopefully save people a bit of head scratching.

I am a Norfolk man and i glory in being so


On the bench: Airfix 1/72nd Harrier GR.3/Fujimi 1/72nd Ju 87D-3

  • Member since
    December 2002
  • From: Bury St Edmunds, Suffolk, England
Posted by Bish on Tuesday, March 3, 2020 2:24 AM

plasticjunkie

I looked at the kit props and compared them to the Shapeways ones. They look the same to me except for the blade pitch being reversed. Is this the issue? I can’t justify spending about what the kit cost me initially for 3 props.


Ye, from what i could tell looking at them last night, i think this is the main issue. Also the centre prop which connects directly to the rudder. I am sure thats not right either.

Like Steve, i have already spent a bicket load on AM on this kit, so i might as well get those and after looking through it, they also have the 37mm gun shield i need for my boat that the kit and PE set don't supply. Thats going to save some scratch building.

I am a Norfolk man and i glory in being so


On the bench: Airfix 1/72nd Harrier GR.3/Fujimi 1/72nd Ju 87D-3

  • Member since
    July 2010
  • From: Tempe AZ
Posted by docidle on Monday, March 2, 2020 10:20 PM


plasticjunkie

I looked at the kit props and compared them to the Shapeways ones. They look the same to me except for the blade pitch being reversed. Is this the issue? I can’t justify spending about what the kit cost me initially for 3 props.


I agree with you PJ. Here are links that show the correct props. Looking at these, the Shapeways props are correct. Notice the different pitch on the port prop. The second link has a write up of the correct style of props. The metal props are no longer avaible but I will be picking up the Shapeways ones, heck I’ve already spent way more on the kit with the PE and the 3D extras I have now! Hope this will help.

Steve

http://www.modelwarships.com/reviews/misc/cw/s-100-props/props.html


http://www.modelwarships.com/reviews/misc/cw/s-100-props/s100-02.jpg


  • Member since
    April 2015
Posted by Mopar Madness on Monday, March 2, 2020 9:40 PM

Well I can't believe I missed this one! I've got this one in the stash and look forward to seeing what you make of it. Beer

Chad

God, Family, Models...

At the plate: 1/48 Airfix Bf109 & 1/35 Tamiya Famo

On deck: Who knows!

  • Member since
    November 2008
  • From: Central Florida
Posted by plasticjunkie on Monday, March 2, 2020 7:44 PM

I looked at the kit props and compared them to the Shapeways ones. They look the same to me except for the blade pitch being reversed. Is this the issue? I can’t justify spending about what the kit cost me initially for 3 props.

 GIFMaker.org_jy_Ayj_O


Too many models to build, not enough time in a lifetime!!

  • Member since
    December 2002
  • From: Bury St Edmunds, Suffolk, England
Posted by Bish on Monday, March 2, 2020 4:08 AM

Thanks Steve, i will look intio that. I am at work at the moment, but looking at them i think the curve in the blades is completly different. Only issue i can see is that i an sure on the kit one of the props attaches to the rudder. Will have to check that.

Thanks.

I am a Norfolk man and i glory in being so


On the bench: Airfix 1/72nd Harrier GR.3/Fujimi 1/72nd Ju 87D-3

  • Member since
    July 2010
  • From: Tempe AZ
Posted by docidle on Sunday, March 1, 2020 10:42 PM

Bish


plasticjunkie


Bish

Thanks timmey. Ye, i have read that about the props, but i can't find out what the issue is. Going to have to find some pics and try and see if it can be fixed.


I've read a couple of reviews and all they say is that the props are wrong but doesn't explain what or how to correct. I have looked for pictures too but nothing, even in my In Action book. Please let us know what you find out. 


Will do. I know i have seen a pic some where. The kagero book is not to helpful on that area.


Bish,

I forgot to post this link to Shapeways that have the correct props. This is one of the upgrades I plan on making on mine. Hope this helps.

Steve

https://www.shapeways.com/product/FGYP79TKM/1-72-german-schnellboot-propellers-kit?optionId=62908397&li=marketplace


JOIN OUR COMMUNITY!

Our community is FREE to join. To participate you must either login or register for an account.

SEARCH FORUMS
FREE NEWSLETTER
By signing up you may also receive reader surveys and occasional special offers. We do not sell, rent or trade our email lists. View our Privacy Policy.