SEARCH FINESCALE.COM

Enter keywords or a search phrase below:

Liquid dispensers

5766 views
105 replies
1 rating 2 rating 3 rating 4 rating 5 rating
  • Member since
    November 2018
Posted by oldermodelguy on Tuesday, February 15, 2022 5:11 AM

The H is my go to primer and auto finishing high gloss gun.Also clear coats. And yes the side cup needs to be mounted to fill it lol. I like the H for craft paints too. I find 25 psi to be great.

You will find the H to be more forgiving than most internal mix brushes regarding thinner ratio. At least in terms of ability to spray at all. And if you want a kick sometime, try the #5 combo for varnishes. I use that #5 for preparing a canvas with a coat of white before switching to internal mix with art work using mostly High Flow and Soft Body artist acrylics. I use Ceramcoat with just retarder and flow aid in it for the base coat on art work. No thinner with the #5, if any just a few drops. But my compressor will keep up at 40 psi, not all will. The #3 tip is more forgiving on air flow and consumption. Also to use the #5 plan on a jar not the side cup. I used to clear coat with Liquitex varnish my wifes ceramics work and fill three jars before starting ( she has passed on now). She did beautiful brush painting but wouldn't ever learn to airbrush. And that was fine with me, I very much enjoyed clear coating her work for her.

  • Member since
    April 2020
Posted by Eaglecash867 on Tuesday, February 15, 2022 6:28 AM

Bakster
Some things I need to learn: 1. I took the sidecup to my bench, added some thinner, added paint, and paint started spilling out the neck. I come to realize that because they have the spout so low and at an angle, I can only fill it half way. The alternative is to add the paint while the cup is attached to the brush. Then, it's a non-issue. So, I need create a new way of doing things. I don't typically mix the thinner/paint concoction with the cup on the brush. 

Yup, always put paint in the color cup with it attached to the airbrush.  What I do is put my needle and aircap on, then plug the color cup in.  After I do that, I set the whole airbrush on my benchtop and use the color cup as kind of a kick-stand to hold it somewhat up-right...then put my pre-mixed/thinned paint in it.  I always use Dixie paper bathroom cups for mixing paint/thinners when needed.  That way I can assure a complete mix of all of the paint, so the flow is consistent.  The paper/wax combo on the Dixie cup does well with all solvent-based paints...doesn't do so well with ammonia-based acrylics...but alcohol, lacquer thinner, mineral spirits, and even MEK don't do a thing to the wax coating on the cup.  The good thing about the paper is that you can crimp the lip of the cup before you pour to make a good, precise spout for pouring the paint into the cup.

Bakster
2. I need to come up with a new holder because the gun does not sit in the one I have. The kit comes with a wall mount thing but that is not the way I want to go.

I use something similar to this.  It clamps to the side of my workbench and holds two airbrushes nicely.

https://www.amazon.com/Uouteo-Universal-Clamp-Airbrush-Holder/dp/B08MYLDF83/ref=sr_1_6?crid=3QZFCBFQFCUJ9&keywords=airbrush+holder+clamp&qid=1644927556&sprefix=airbrush+holder%2Caps%2C127&sr=8-6

Bakster
3. When I first tried to spray, air was coming out, but not the paint. Eventually, I disconnected the hose and reconnected it. Suddenly, it worked. Not sure what happed but  it works now.

Being a siphon-feed airbrush, depending on how far you open your needle, there is a delay in the beginning when you first start spraying with it.  The smaller your needle opening, the longer it takes for paint to begin spraying.  This is why I recommend using a pad of Post-It notes, so you can get the paint flowing and check your mix and pattern before moving to the model.

Bakster
4. I need to learn a cleaning regiment. It seems clear to me that spraying thinner alone, won't do the job. I did that and there was still plenty of paint on the exterior of the needle. Not a big deal, easy enough to take it out. Just need to come up with a process.

Cleaning is really easy.  Take a look at the part of my first post in this thread where I mention the relish jar with MEK and ultrasonic cleaner.  When the parts come out of the jar after being cleaned, I just run them under hot water and give them a quick blast of air to blow the excess water out of them. 

"No...try not.  Do...or do not.  There is no try." Alien 

"You can have my illegal fireworks when you pry them from my cold, dead fingers...which are...over there somewhere."

  • Member since
    July 2014
  • From: Franklin Wi
Posted by Bakster on Tuesday, February 15, 2022 6:42 PM

oldermodelguy
The H is my go to primer and auto finishing high gloss gun.Also clear coats.

 It will be mine too--including the color coat.

oldermodelguy
And yes the side cup needs to be mounted to fill it lol.

  Lol. Yes quite the mess. A brand new brush covered with paint as I try to install it after the fact. Didn't even get to spray it yet and it was a mess.Embarrassed Quite the sight. 

oldermodelguy
I like the H for craft paints too.

Now you are singing another tune I like. I had seen videos where people use them, and use them well. I tried it with meadiocre success. I look forward to trying it with this brush!!

Also-- I will retry all the other paints that flopped for me. That will include Future (Yes I am a glutton for punishment. I just want to see it work for once.) But I really want to retry Gauzy clear that Eaglecash recommended. It didn't go well with my Badger. I could not get it to lay well. Hoping this gun will make the difference.  

oldermodelguy
I find 25 psi to be great

Noted!

oldermodelguy
You will find the H to be more forgiving than most internal mix brushes regarding thinner ratio

Already noticed this. I expect more surprises. 
oldermodelguy
And if you want a kick sometime, try the #5 combo for varnishes. I use that #5 for preparing a canvas with a coat of white before switching to internal mix with art work using mostly High Flow and Soft Body artist acrylics. I use Ceramcoat with just retarder and flow aid in it for the base coat on art work. No thinner with the #5, if any just a few drops. But my compressor will keep up at 40 psi, not all will. The #3 tip is more forgiving on air flow and consumption. Also to use the #5 plan on a jar not the side cup. I used to clear coat with Liquitex varnish my wifes ceramics work and fill three jars before starting ( she has passed on now). She did beautiful brush painting but wouldn't ever learn to airbrush. And that was fine with me, I very much enjoyed clear coating her work for her.

Very cool! Made a note.


  • Member since
    July 2014
  • From: Franklin Wi
Posted by Bakster on Tuesday, February 15, 2022 7:00 PM

Eaglecash867
Yup, always put paint in the color cup with it attached to the airbrush.  What I do is put my needle and aircap on, then plug the color cup in.  After I do that, I set the whole airbrush on my benchtop and use the color cup as kind of a kick-stand to hold it somewhat up-right...then put my pre-mixed/thinned paint in it.  I always use Dixie paper bathroom cups for mixing paint/thinners when needed.  That way I can assure a complete mix of all of the paint, so the flow is consistent.  The paper/wax combo on the Dixie cup does well with all solvent-based paints...doesn't do so well with ammonia-based acrylics...but alcohol, lacquer thinner, mineral spirits, and even MEK don't do a thing to the wax coating on the cup.  The good thing about the paper is that you can crimp the lip of the cup before you pour to make a good, precise spout for pouring the paint into the cup.

Kind of what I was thinking. I have some dedicated mixing containers for solvent based paints, and some disposable for acrylic. Mix them, then pour it in.

Eaglecash867

 The one I have is similar but for mutiple guns, and with a base. Maybe if I remove some of the other rakes it will work. I will look into it. 

Eaglecash867
Being a siphon-feed airbrush, depending on how far you open your needle, there is a delay in the beginning when you first start spraying with it.  The smaller your needle opening, the longer it takes for paint to begin spraying.  This is why I recommend using a pad of Post-It notes, so you can get the paint flowing and check your mix and pattern before moving to the model.

This was more than a delay.  I monkeyed with it for a few minutes trying to make it spray. It released air but no paint. Not sure what the issue was but I got it to work, eventually.

Eaglecash867
Cleaning is really easy.  Take a look at the part of my first post in this thread where I mention the relish jar with MEK and ultrasonic cleaner.  When the parts come out of the jar after being cleaned, I just run them under hot water and give them a quick blast of air to blow the excess water out of them. 

I will review...Yes


Eaglecash867
"No...try not.  Do...or do not.  There is no try."  

I cannot teach him. The boy has no patience. He is not ready. He is too old. Yes. Too old to begin the training. 

Airbrush Jedi he cannot be.

  • Member since
    July 2014
  • From: Franklin Wi
Posted by Bakster on Tuesday, February 15, 2022 10:34 PM

So, just for grins.

Below: Future over the gloss that I shot yesterday. Actually, one of the spoons was a flat craft paint that I shot weeks back.

This is the closest to what I would consider as my acceptable good that I can get. It has high reflectivity, and high shine. Closer inspection though, micro orange peel. You can't see it in the photo, but when the light is right, it's there. If it not for that, I tell ya, I'd be impressed as all heck. Using what I think was Keavdogs formula I cut the Future with about 50% IPA. 

So there it is. The AB, once again, made all the difference in the world for me. I never would have got that shine using my Badger brushes. I tried everything with those.

BTW, Oldermodelguy. I was dialing in the air pressure to what felt right in terms of spray pattern and pressure, going entirely by feel. I got it to a nice soft mist. And what pressure did it end up at when I looked at the dial? It was 25 lbs. That seemed to be the sweetspot for me too. And that is what I shot the Future at.

I tried spraying the Gauzy, sorry to say, still a no joy. The stuff beads up bad and if I try to light coat it on, I don't get a gloss. This one is still eluding me. I am thinking I need to try cutting it with something.

  • Member since
    November 2018
Posted by oldermodelguy on Wednesday, February 16, 2022 4:46 AM

Interesting Bakster, 25psi is kind of my go to. I do shoot less for thin fluids and more for enamels and on the overall canvas. I find 35lb to be good with enamels. They will shoot at 25 but I just feel all the better at 35-36ish. I believe the H is rated to flow freely to 50 psi as I recall. Many airbrushes today, including some Iwatas are restricted internally to around 25. You can bump you regulator to 40 if you want but the brush will never deliver that. For me,the H having no restriction is a plus especially with the larger needles. I believe Paasche themselves don't advocate for the H to be a low pressure tool, suggesting possibly 35lb as sweet. Anyway to me it does best over 20 and 25 is good for most applications using that side cup. Even 30 sometimes it just settles in to a nice pattern there, flows nice etc. Any siphon feed need to overcome gravity before they shoot any fluid. Figure on 2lb more for that, even 5 for heavier material when compared to gravity feed guns..

Try shooting the Future with no thinner. I don't see where IPA can help anything using the H, not needed imo. The mini orange peel you see may actually be something called solvent popping. The ipa may be evaporating out to fast and leaves tiny little craters in the surface, thousands of them. Not seen at 4 ft away but look close and it's there.

Edit:  FWIW there are tankless compressors that won't keep up with an H @35 psi using the #5 needle and air cap setup. The pressure will fall off rapidly and the brush ends up spitting paint. Some folks have said the #5 is not a good tip to find out their compressor wasn't keeping up. In my case I use an 8gal portable rated to shoot LVLP guns at 4 or so cfm, so I'm fine. That's more compressor than needed but it's what I have. More is better than not enough. Probably most 1 or 2 gal tank style compressors will do the job. I'm sure Paasche has a spec on what is required. That #5 tip is a 1.05, it's entering into spray gun territory and flows like it. It's actually on my H now. but I'm going into the Mr Primer Surfacer test today and will put the #3 back on for that ( I think).

  • Member since
    July 2014
  • From: Franklin Wi
Posted by Bakster on Wednesday, February 16, 2022 10:45 AM

oldermodelguy
I find 35lb to be good with enamels. They will shoot at 25 but I just feel all the better at 35-36ish.

That is right in line with the video I posted a few days back where the guy blasts enamel on car models at 35 lbs pressure. Pretty interesting how the pressures for this gun are fairly consistent. Having said that though-- this truly is a unlearn what I have learned deal. The internal mix brushes were for me, mostly run at between 18 to 20 lbs, and everything after that was thinning, flow improvers, retarders, spray technique, and prayer. With this gun-- it is a whole new ballgame. I like it though. Yoda has not kicked me off Dagobah, just yet. Wink


oldermodelguy
Try shooting the Future with no thinner. I don't see where IPA can help anything using the H, not needed imo. The mini orange peel you see may actually be something called solvent popping. The ipa may be evaporating out to fast and leaves tiny little craters in the surface, thousands of them. Not seen at 4 ft away but look close and it's there.

OK I will try it but I have PTSD from shooting straight Future. Lol. It is another leap of faith for me. Do you think the #3 will work, and do you have any throughts about pressure? I should probably defer the Future experiment and move to the below, but it will be good to know for reference and "FUTURE" experimentation. Nice play on words hey? Indifferent

I am working on a car model right now and I have the model at the point where I want to spray a clear gloss. I am going with Testers Glosscote Lacquer. Any advice on this? I will want to test this before hitting the model with it. Btw. I am running out of painted spoons! Tongue Tied

Thanks for all the other advice and commentary as well. It is not lost here.


  • Member since
    November 2018
Posted by oldermodelguy on Wednesday, February 16, 2022 11:31 AM

The #3 should work fine. I use that or a .5 in my Badger 200. Play with the pressure I haven't used Future/Pledge on a car body in basically forever. Pretty sure I ran 25-30 though.

Except for primer I tend to run lacquers through my Badger 200 or Ganzton Iwata knock off. So not much help there. And I've never shot that particular clear. Sorry on that one.

The reason I say try the Future straight up is I've done the tests with various thinners and found better results with non once dry. But that's me, others find something different apparently.

  • Member since
    July 2014
  • From: Franklin Wi
Posted by Bakster on Wednesday, February 16, 2022 12:19 PM

oldermodelguy
he #3 should work fine. I use that or a .5 in my Badger 200. Play with the pressure I haven't used Future/Pledge on a car body in basically forever. Pretty sure I ran 25-30 though.

I will table this for another time of experimenting. Even if I get it to my liking, I have seen enough reports of spider webbing and or decal issues where I probably wouldn't use it.  So many people use it-- trying to see why. Non issue for me and tabled. 

oldermodelguy
Except for primer I tend to run lacquers through my Badger 200 or Ganzton Iwata knock off. So not much help there. And I've never shot that particular clear. Sorry on that one.

Ok I will figure it out on my own. 

Thanks anyway.

  • Member since
    April 2020
Posted by Eaglecash867 on Wednesday, February 16, 2022 6:03 PM

Wish I had some advice for you on the Gauzy you tried and didn't have good luck with.  My airbrushing technique is low pressure, low volume, and close-in, so the stuff has been working great for me.  I know that PlasticJunkie also loves the stuff, and he might have some pointers on shooting it in a more conventional way.  All I can say about Future is that its for floors.  I have had all kinds of issues with it...cracking, getting hazy when decal setting solution was applied, turning into a mess on canopies that had been dipped in it after reacting badly to a liquid masker, etc.  I use it as an adhesive for small, flat photoetch parts, or small clear parts, and that's about it.

You should have good luck with the Testors Glosscote lacquer with the H though.  Its what I used to put over the top of Future to keep the Future from cracking.  Then I finally decided it was silly to use one clearcoat to compensate for the shortcomings of the other.  When I used Glosscote, I would usually mix it in my paper cups with lacquer thinner.  But still, I was using low pressure, low volume, and I was close-in, so you may have to experiment and adapt it for more conventional airbrushing.

"You can have my illegal fireworks when you pry them from my cold, dead fingers...which are...over there somewhere."

  • Member since
    July 2014
  • From: Franklin Wi
Posted by Bakster on Wednesday, February 16, 2022 8:09 PM

Eaglecash867

Wish I had some advice for you on the Gauzy you tried and didn't have good luck with.  My airbrushing technique is low pressure, low volume, and close-in, so the stuff has been working great for me.  I know that PlasticJunkie also loves the stuff, and he might have some pointers on shooting it in a more conventional way.  All I can say about Future is that its for floors.  I have had all kinds of issues with it...cracking, getting hazy when decal setting solution was applied, turning into a mess on canopies that had been dipped in it after reacting badly to a liquid masker, etc.  I use it as an adhesive for small, flat photoetch parts, or small clear parts, and that's about it.

You should have good luck with the Testors Glosscote lacquer with the H though.  Its what I used to put over the top of Future to keep the Future from cracking.  Then I finally decided it was silly to use one clearcoat to compensate for the shortcomings of the other.  When I used Glosscote, I would usually mix it in my paper cups with lacquer thinner.  But still, I was using low pressure, low volume, and I was close-in, so you may have to experiment and adapt it for more conventional airbrushing.


That is probably my problem with things. I like to go heavier. Light coats and building up layers drives me crazy, especially if all I want is coverage.

What tip are you using for the Glosscote? #3? 

Tonight, I did not have a good night with the brush. Using the #3, trying various pressures, I sprayed some spoons with Glosscote and I am getting occasional junk in the finish. Not dust, though I had that too, but more like chunk. It only got worse when I sprayed some Tamiya acrylic. I had some serious splattering at times. Now, I should add, the Tamiya was old, half used, a preopened paint jar. So there is a good chance paint was the issue. The Glosscote is older too. I guess I should filter the stuff before putting it into the brush or I won't be able to gauge my progress. Nothing irritates more than when I see chunks or splatter coming out of an airbrush brush. 


  • Member since
    July 2014
  • From: Franklin Wi
Posted by Bakster on Wednesday, February 16, 2022 9:57 PM

Everyone is probably sick of my updates on this so I will try to make this my last.

I pulled a new jar of Tamiya and went back at it. Based on the instructions, they recommend 30 lbs pressure for Acrylic and that is what I set it for. I opened the nozzle and let it rip. I started to see more junk in the finish. So, I backed off on the flow to just above where I can get a wet application, and the problem went away. I turned out some nice glossy spoons. So, maybe, that is how this has to go. What I am surprised at though is I had to get in close, like 4 inches, and the area that was being laid down was maybe a little over quarter inch. That was the sweet zone of making gloss. It seems if I opened things beyond that point, that is when I  started to see artifacts, like paint flicking off the tip. That is not like the spray pattern the dude in the video was putting down. That was enamel, but it is hard to imagine it would make as big a difference. So, I got it to work, but I am not sure that I am there yet. I think I will try the #5 nozzle/needle next and see where that takes me.

Btw. I think I figured out why I was not getting paint flow when I first tried the brush; it happened again. The brush has a set screw that holds the needle assembly in place and you release it for cleaning via that screw. The way it is designed, there is a gap, and there is the potential to have the assembly misaligned. The bottom of that needle must butt up against the ball of the brush. I think that I didn't do that, not knowing I needed to. Kind of weird that potential is there. 

Later.


  • Member since
    November 2018
Posted by oldermodelguy on Thursday, February 17, 2022 6:33 AM

Just fwiw,not sick of your posts at all.

What did you thin the Tamiya with and how much ?

  • Member since
    April 2020
Posted by Eaglecash867 on Thursday, February 17, 2022 6:43 AM

The problem with those airbrushing videos is that they're limited in how much detail you can actually see as a viewer.  It may look great in the video, but if a close-in, hi-res pic was taken and shared at full resolution, it might look like it was painted in a sand storm.  You're holding your work to a really high standard like I do, so don't be surprised if you find some of those videos to be a little "deceptive".  When I airbrush, most of the time I'm within 1-2 inches of the piece, and using bright light and a minimum of 3X magnification, so any little defect is going to stick out like a sore thumb.  That's why those airbrushing videos with clouds of paint in fuzz-covered paint booths always make me cringe.  LOL.  Cool

You do have to be careful about too high a volume of paint, especially if its not sufficiently thinned.  It tends to build up around the nozzle opening and then you'll start getting the splattering.  Angle is also really important.  Its always best to try to hit the piece being painted as close to level as possible.

Can't remember what I used for glosscote, but I think it was the #3.  I use a #1 for pretty much everything now, and skim milk-thin paint.  Really like the results doing that.

"You can have my illegal fireworks when you pry them from my cold, dead fingers...which are...over there somewhere."

  • Member since
    July 2014
  • From: Franklin Wi
Posted by Bakster on Thursday, February 17, 2022 9:10 AM

oldermodelguy
What did you thin the Tamiya with and how much ?

In this case it was 50/50 using Tamiya X20A.

  • Member since
    July 2014
  • From: Franklin Wi
Posted by Bakster on Thursday, February 17, 2022 9:53 AM

Eaglecash867
The problem with those airbrushing videos is that they're limited in how much detail you can actually see as a viewer.  It may look great in the video, but if a close-in, hi-res pic was taken and shared at full resolution, it might look like it was painted in a sand storm. 

True. He gives good angles to see under some good lighting but you are right-- defects might still be there that can't be seen.


Eaglecash867
Its always best to try to hit the piece being painted as close to level as possible.

Well--that is in line with my experience then.

I thought about this further and the type of paint seems to play a bigger role than I would first think. Again-- I must unlearn what I have learned.

1. First test was with Mr Color, which is a Lacquer. It was thinned using Mr Color Leveling thinner, 50/50. Using the #3 I was able to get a bigger spray pattern, lower pressure at 25lbs, farther from the test piece, with good result.

2. Tried the Testers Glosscote and that behaved entirely different. Thinned 50/50, same Mr color Leveling thinner, #3 tip. 25 lbs didn't seem so good, bumped to 30 lbs, and the same paint flow as above produced spitting.

3. Tamiya Acrylic behaved like the Glosscote. Thinned with their X20A 50/50, bumped to 30lbs, and with spitting. I closed the paint flow reducing the spray pattern, and drawing in much closer produced good result. I suspect that if I follow the same procedure with the Glosscote, I will get an acceptable result.

4. Enamel. Not tried yet and I don't know, it might behave like the Mr Color. And maybe, that is why the guy in the video could blast it. Just spitballing. 

A closer look at Paasches user instructions--they recommend the #5 needle/tip for Acrylics, thinned lacquer, and clear coats. I didn't try that yet because most everywhere I turn people reference the #3. I will try the #5, just to see how that acts.

One thing is for sure. My compressor will get a workout, and it might not be up for the challenge using the #5. It has a small tank and it is questionable it will keep up with the #5. I have a better sort of shop compressor that I might need to bring into the picture. Larger tank, can hold much larger pressure.


  • Member since
    July 2014
  • From: Franklin Wi
Posted by Bakster on Thursday, February 17, 2022 9:59 AM

PS: I wish I could take all this about the H and make it a stand alone thread. It has taken on a life of it's own. From wash bottles, to spray booth, to paint caddy, to airbrush.

Surprise

  • Member since
    November 2018
Posted by oldermodelguy on Thursday, February 17, 2022 3:17 PM

That #5 may work with your compressor with the tank, all you can do is try it. You may like it, Donn Yost does, that's what he uses for his contest winning finishes shooting enamels.


  • Member since
    July 2014
  • From: Franklin Wi
Posted by Bakster on Thursday, February 17, 2022 4:38 PM

oldermodelguy

That #5 may work with your compressor with the tank, all you can do is try it. You may like it, Donn Yost does, that's what he uses for his contest winning finishes shooting enamels.


Ah... yes, Don. I am familiar. I will certainly try it.

  • Member since
    November 2018
Posted by oldermodelguy on Saturday, February 19, 2022 5:24 AM

Bakster


oldermodelguy

That #5 may work with your compressor with the tank, all you can do is try it. You may like it, Donn Yost does, that's what he uses for his contest winning finishes shooting enamels.


Ah... yes, Don. I am familiar. I will certainly try it.


Donn has even been known to use the Paasche starter brush from the blister pack. It's just a dumbed down H made mostly of plastic. Think it costs about $25 or $30. Hey I started out with the badger starter which is a coveluted thing. But it shot enamel fine. Used that about a year and my wonderful wife ( now passed on) gifted me the Badger 200 back around 1977 that I still use today. My H is a late comer.

  • Member since
    July 2014
  • From: Franklin Wi
Posted by Bakster on Saturday, February 19, 2022 9:40 AM

oldermodelguy


Bakster


oldermodelguy

That #5 may work with your compressor with the tank, all you can do is try it. You may like it, Donn Yost does, that's what he uses for his contest winning finishes shooting enamels.


Ah... yes, Don. I am familiar. I will certainly try it.


Donn has even been known to use the Paasche starter brush from the blister pack. It's just a dumbed down H made mostly of plastic. Think it costs about $25 or $30. Hey I started out with the badger starter which is a coveluted thing. But it shot enamel fine. Used that about a year and my wonderful wife ( now passed on) gifted me the Badger 200 back around 1977 that I still use today. My H is a late comer.


I am curious what size needle assembly Don uses. Have you heard him state that? Non-issue, just curious.

I found another YouTube builder that appears to build show quality cars, and he swears by the H. He uses the brush for primer, clears, color, even shading. In his case, he uses the #5 assembly, primarily. However, he showed one of his early works and though the paint design was beautiful, orange peel was plain to see. Like I said though, it was his earlier works and maybe he worked that out later. I have not got that far on his channel to see.

It is a journey, a quest for simplicity. If at the least I gain that, and I can build an acceptable process around that, I would be happy.

There is another Youtube channel I watch and man, he is extremely talented. I love watching his builds. They are mostly sci-fi builds, a genre I love too, but he has a paint process that is amazing. He sure seems to have it nailed down! And guess what he uses? He uses a $30 harbor freight spray gun like an auto shop might use. The real kicker is he uses craft paint, and the finishes that he gets is absolutely amazing. He does a ton of Star-trek commission builds; his work is top notch.

Sorry to hear about your wife. I just lost my Mom a week ago. It was time. She had a long life, and her last days on Earth were tough for her. I don't think it has set in for me yet that she is gone. 

I will try the #5 assembly today. Will report back.

  • Member since
    November 2018
Posted by oldermodelguy on Saturday, February 19, 2022 11:27 AM

I saw in a video a few years ago where Donn said he uses the #5. He could have changed since but that doesn't seem like hi MO.

Sorry to hear of the loss of your mom as well.

  • Member since
    July 2014
  • From: Franklin Wi
Posted by Bakster on Saturday, February 19, 2022 4:32 PM

oldermodelguy

I saw in a video a few years ago where Donn said he uses the #5. He could have changed since but that doesn't seem like hi MO.

Sorry to hear of the loss of your mom as well.


Good to know and thank you for both.

I just tested the #5 and oh yeah, Bakster likey:

1. I was able to get a larger footprint of wet, much more to my liking. Like before, there is a sweet-zone of spray output that once I go past it, splatter occurs. So from my testing, I can't use the full range of paint flow that the brush provides. That is no matter though. Using the #5 gets me where I want to be as long as I stay below where the issues occur.  Yes

2. My compressor seemed to keep up. I was running todays test at about 30 lbs. The compressor was not running continuously as I feared it might. 

3. I sprayed Testors Glosscote and it sprayed well. I was able to flood the piece getting the gloss I wanted.

4. Again, I tried Future, just to see how it behaved through this tip. I have to say, it worked well with no thinning. What I found works best, and what I have seen others report, is to lay a dusting first. Then give it a bit to set followed by a heavier dose to bring out the gloss. At least that is what I think works but there may be other ways. Others have reported to just keep spraying mist layers and eventually the gloss pops out. 

Below: The top spoon is sprayed with Future, the bottom is with Testers Glosscote Lacquer. Between the two of them, Future came out with the deeper shine. I will set the Future coated spoons aside and watch them over the next several weeks for any evidence of cracking. Why? Just to see because on a previous test that is what happened. I flooded the piece though, probably not unlike what I did today. I will report back.
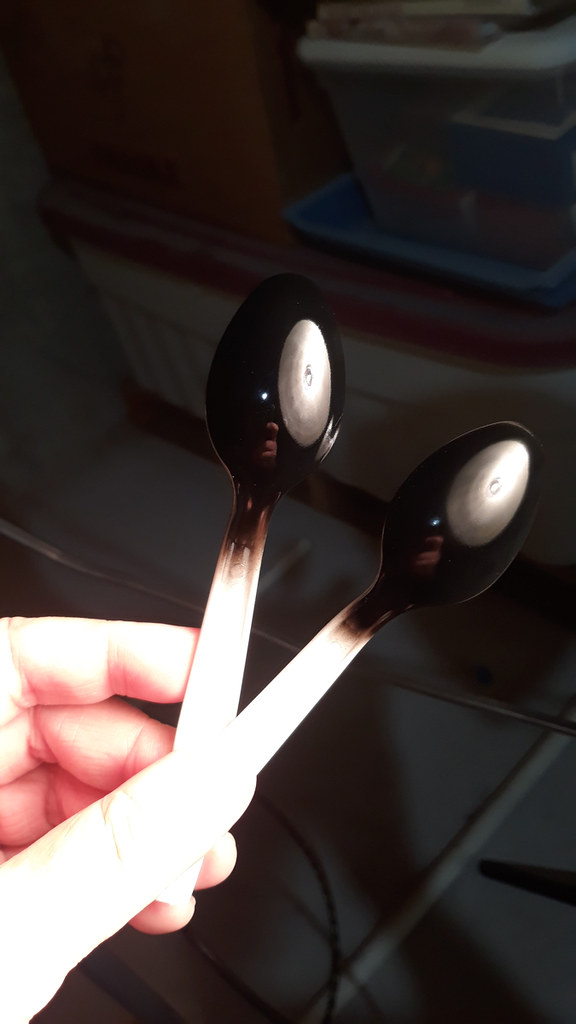
Anyhow, I am pleased with today's results. I think #5 is much closer to how I like to spray, and it will be my mainstay, building my processes around that. Tomorrow, I will respray some Acrylic to see how it behaves with #5. Oh, I should add, the spoons in todays test had been sprayed with Tamiya gloss black.

The goal of simplicity is looking much closer today. I really love the simple design of the brush and how easy it is to clean. 

  • Member since
    November 2018
Posted by oldermodelguy on Sunday, February 20, 2022 6:16 AM

Bakster


oldermodelguy

I saw in a video a few years ago where Donn said he uses the #5. He could have changed since but that doesn't seem like hi MO.

Sorry to hear of the loss of your mom as well.


Good to know and thank you for both.

I just tested the #5 and oh yeah, Bakster likey:

1. I was able to get a larger footprint of wet, much more to my liking. Like before, there is a sweet-zone of spray output that once I go past it, splatter occurs. So from my testing, I can't use the full range of paint flow that the brush provides. That is no matter though. Using the #5 gets me where I want to be as long as I stay below where the issues occur.  Yes

2. My compressor seemed to keep up. I was running todays test at about 30 lbs. The compressor was not running continuously as I feared it might. 

3. I sprayed Testors Glosscote and it sprayed well. I was able to flood the piece getting the gloss I wanted.

4. Again, I tried Future, just to see how it behaved through this tip. I have to say, it worked well with no thinning. What I found works best, and what I have seen others report, is to lay a dusting first. Then give it a bit to set followed by a heavier dose to bring out the gloss. At least that is what I think works but there may be other ways. Others have reported to just keep spraying mist layers and eventually the gloss pops out. 

Below: The top spoon is sprayed with Future, the bottom is with Testers Glosscote Lacquer. Between the two of them, Future came out with the deeper shine. I will set the Future coated spoons aside and watch them over the next several weeks for any evidence of cracking. Why? Just to see because on a previous test that is what happened. I flooded the piece though, probably not unlike what I did today. I will report back.

Anyhow, I am pleased with today's results. I think #5 is much closer to how I like to spray, and it will be my mainstay, building my processes around that. Tomorrow, I will respray some Acrylic to see how it behaves with #5. Oh, I should add, the spoons in todays test had been sprayed with Tamiya gloss black.

The goal of simplicity is looking much closer today. I really love the simple design of the brush and how easy it is to clean. 


It sounded to me that the #5 is where you were headed. That or a bit more thinner in the #3.

For lacquers if you don't have it already invest in a bottle of Mr Leveling Thinner, you owe it to yourself.


  • Member since
    July 2014
  • From: Franklin Wi
Posted by Bakster on Sunday, February 20, 2022 9:23 AM

"For lacquers if you don't have it already invest in a bottle of Mr Leveling Thinner, you owe it to yourself."

Yup. I already have it and I am using. It is good stuff. The leveler DOES help.

I cleaned my booth last night. The thing was quite the mess. I vacuumed it first, then I sprayed the interior with Formula 409 cleaner. Formula 409 is strong enough to cut through light coats of paint. The paper towels I used to wipe were loaded with paint. Good stuff. I also pulled the filter and replaced. Then I used the sticky roller to capture anything left behind.

I mentioned this in another thread but it might be worth rementioning. I reuse those foam/fiber filters. I take the dirty filter to my uitiliy sink, lay it against the wall of the sink, turn the water on and using the hose attached to the faucet, I create a high pressure spray by partially covering the hose outlet. Working from the middle I force the spray down the foam piece. You should see all paint that comes out and how the water turns to uglines. I repeat the process by flipping and rotating the foam. It's a must to flip because each time I do that more paint comes out. Once I am happy the water is coming out relatively clean, I wring out the foam and let dry.  Long story short, I will probably never have to buy new filters again. Or at least, not until they disintegrate. 

I think rather than test acrylics today with the #5, I am gonna take the plunge and spray my model with Glosscote. My confidence level with this brush is now at a point I should be good to go. But, I will be doing more testing in the days and weeks to come. I want to see how acrylic flats go down, and I also want to see how craft paints do.

  • Member since
    November 2018
Posted by oldermodelguy on Sunday, February 20, 2022 11:20 AM

Ha, we probably don't have to say it but report back with your experience !

  • Member since
    July 2014
  • From: Franklin Wi
Posted by Bakster on Sunday, February 20, 2022 1:11 PM

oldermodelguy

Ha, we probably don't have to say it but report back with your experience !


Indeed!

Using Mr Color Leveling thinner I cut Testers Glosscote Lacquer about 50/50. I dumped it into the color cup and press the trigger. Nada. A few brain cells later I realize I didn't have the needle assembly butted up to the body of the brush again. Fumbling, I manage to loosen the set screw without spilling and I made the adjustments. Wallah! I have spray! I test it on a spoon to make sure we are to good. 

One by one I spray each piece building up a gloss coat. One by one, I put them into the container for curing.

So how did it go? It went swimmingly. No runs, drips, or errors. it is exactly what I hoped for. There is a good gloss but not a show-car gloss, and that is exactly what I wanted for this vintage car, and why I chose lacquer for it. If I want a deeper shine I can give it a polish later.

Yes--I like this brush. Thanks Eaglecash for recommending it, and OlderMG for encouraging me through it too. I wish I had found and used it years back. It seems reliable, rugged, and easy to clean. One other thing that I like and that I think is a good touch. I like how how they marked the needles, cones, and nozzle so they are easily matched correctly. No more scratching the head of what is what. Excellent idea. 

I already ordered some accessories for this Brush. I am all in.

  • Member since
    November 2018
Posted by oldermodelguy on Sunday, February 20, 2022 5:01 PM

You should be pleased with that finish.Maybe I missed in all our back and forth it but what paint is the base coat ?

  • Member since
    April 2020
Posted by Eaglecash867 on Sunday, February 20, 2022 5:14 PM

Very cool to see that you're happy with your new H, Bakster!  The markings on the needles, air caps, and nozzles have changed over the years...they used to have actual numbers engraved in them, and there used to be two different needles for the #1 and #3 air cap, but everything still works really well in spite of the changes.  You'll actually be able to enjoy airbrushing now, instead of fighting things all the time.  Did a little bit of windscreen tinting on my F-4B project today with the H, and all went exactly as planned with no guesswork.

"You can have my illegal fireworks when you pry them from my cold, dead fingers...which are...over there somewhere."

  • Member since
    July 2014
  • From: Franklin Wi
Posted by Bakster on Sunday, February 20, 2022 8:16 PM

oldermodelguy

You should be pleased with that finish.Maybe I missed in all our back and forth it but what paint is the base coat ?


Thank you.

The paint I used is linked below. It sprayed nice, and I thinned it with Mr Color Leveling thinner.

https://spraygunner.com/gsi-creos-mr-color-model-paint-gloss-green/


JOIN OUR COMMUNITY!

Our community is FREE to join. To participate you must either login or register for an account.

SEARCH FORUMS
FREE NEWSLETTER
By signing up you may also receive reader surveys and occasional special offers. We do not sell, rent or trade our email lists. View our Privacy Policy.