SEARCH FINESCALE.COM

Enter keywords or a search phrase below:

Packing/shipping built models TOOT

3557 views
24 replies
1 rating 2 rating 3 rating 4 rating 5 rating
  • Member since
    January 2009
  • From: hamburg michigan
Packing/shipping built models TOOT
Posted by fermis on Monday, October 17, 2016 7:40 PM

I know I've posted some methods I have used in some threads in the past. With this one, starting out, I'll show 2 ways...then I'll update whenever another method is required. Every model is a bit different and can require a different method to the madness!

I'll start with a 1/72 Hawkeye, with folded wings.

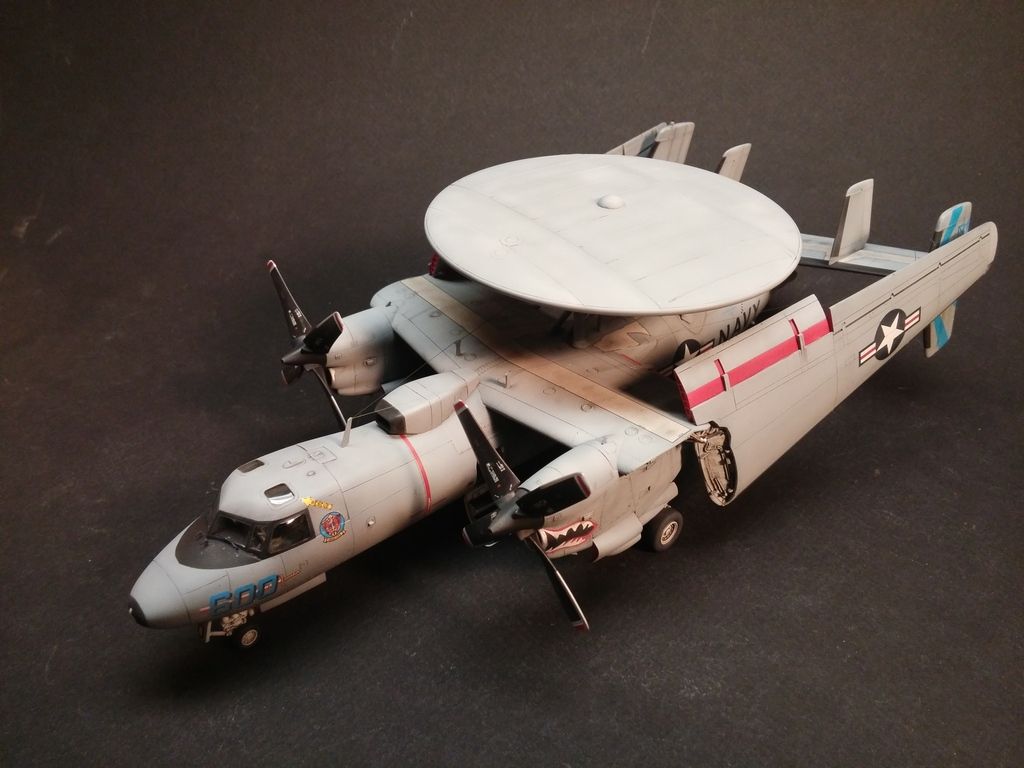
This one is quite unique in the way it must be packed. The disk is removable, which helps. There are so many antennas and things in the way, that my standard "craddle and tie down" method won't work....out to the garage!

Appologies...I didn't think to do a toot, until I already had some done...anyway...

I cut a base piece, just a tad shorter than the plane...

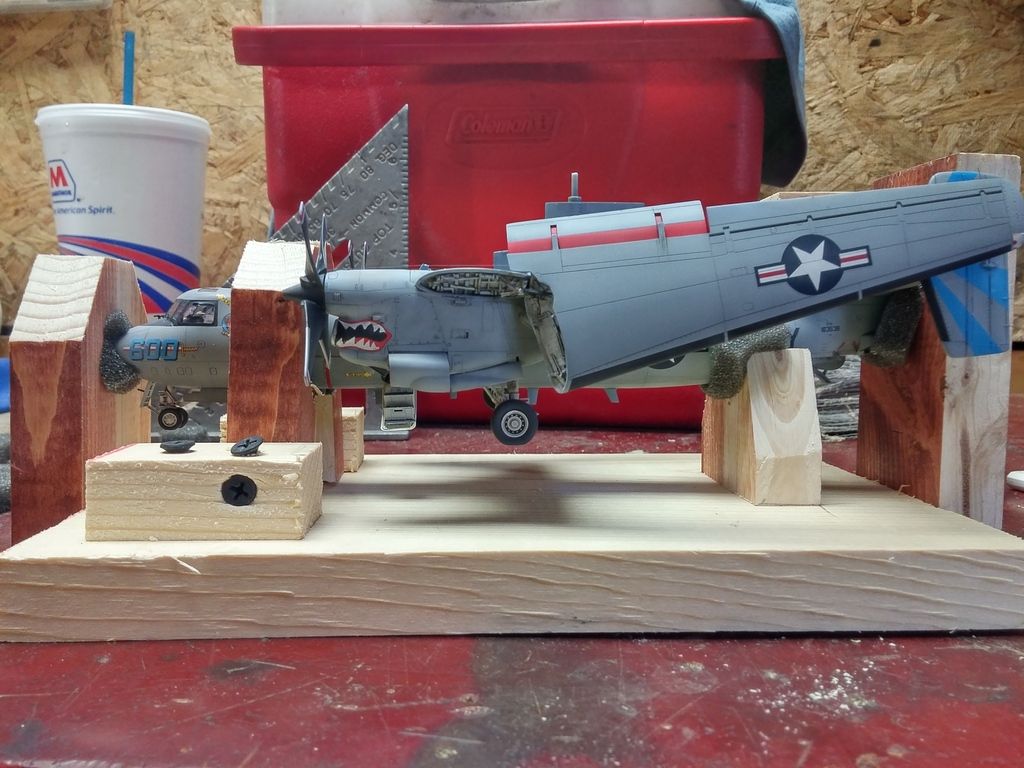
...as well as just a tad wider.

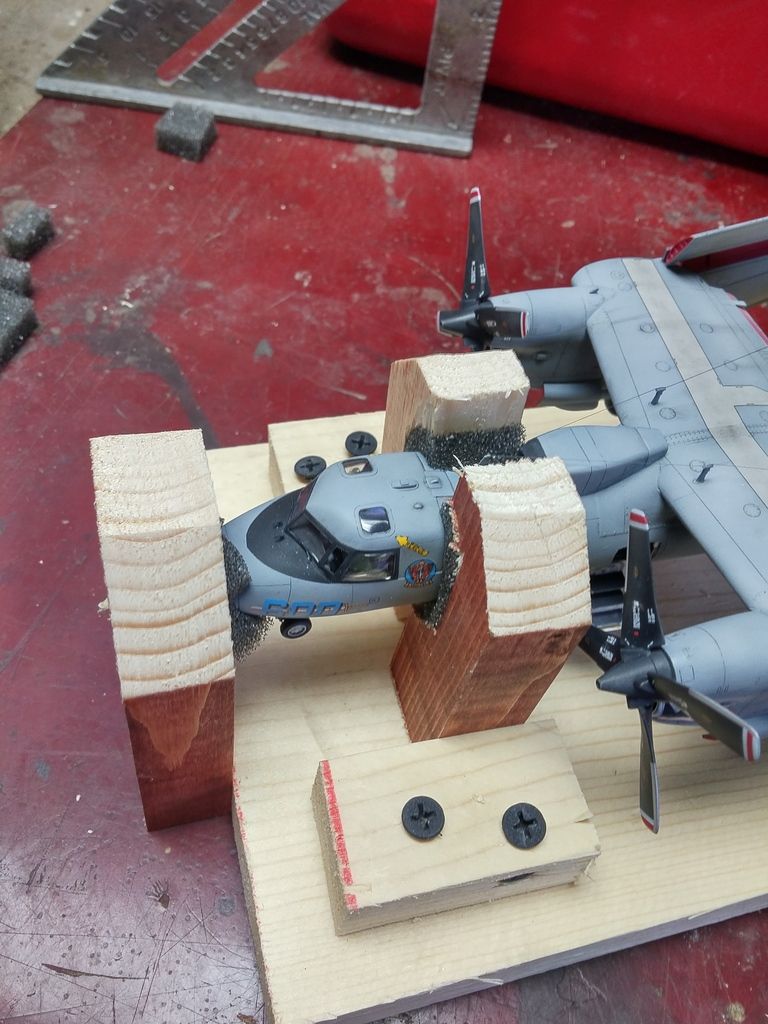
The first piece I added was for the nose. I used a 5/8th" paddle bit to drill a hole to hold the nose(foam padding is a MUST!). The blocks on the sides were added after the tail supports.

Next, I made the "craddle" for the tail to rest on...there was actually an area without any antennas! Then, the tail block...to "sammich" the model front to back...with another little block on top, to hold the tail down in the craddle...sammiching the tail up/down.

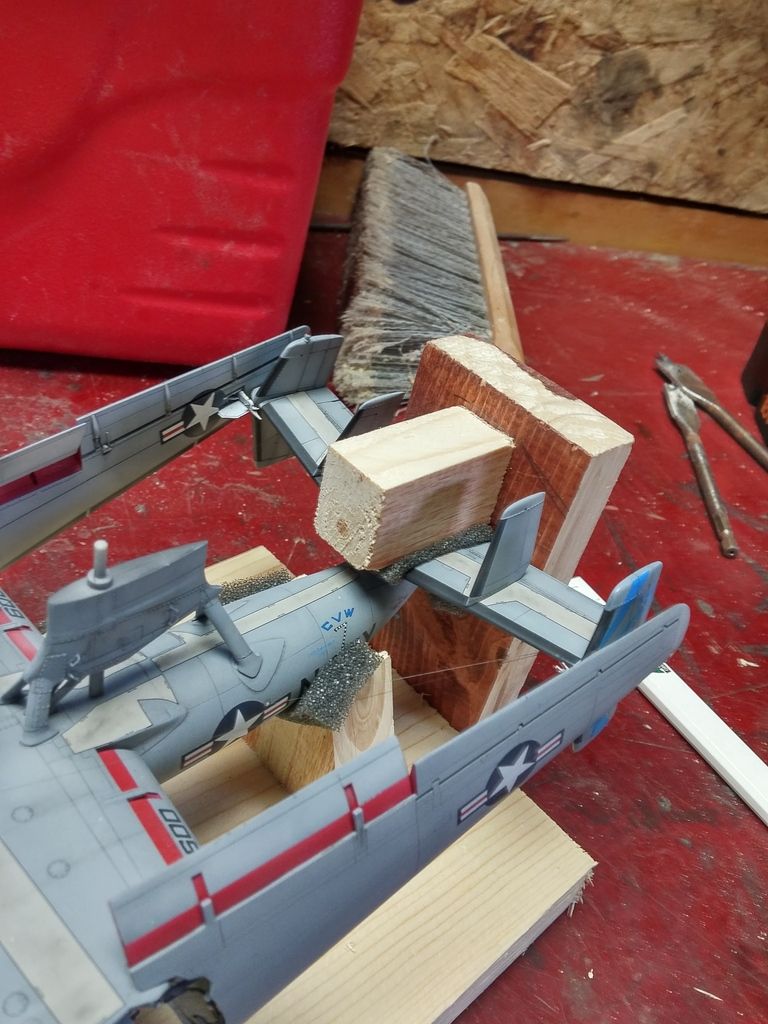
Keep in mind, when cutting the pieces, there needs to be a little room for the foam padding!

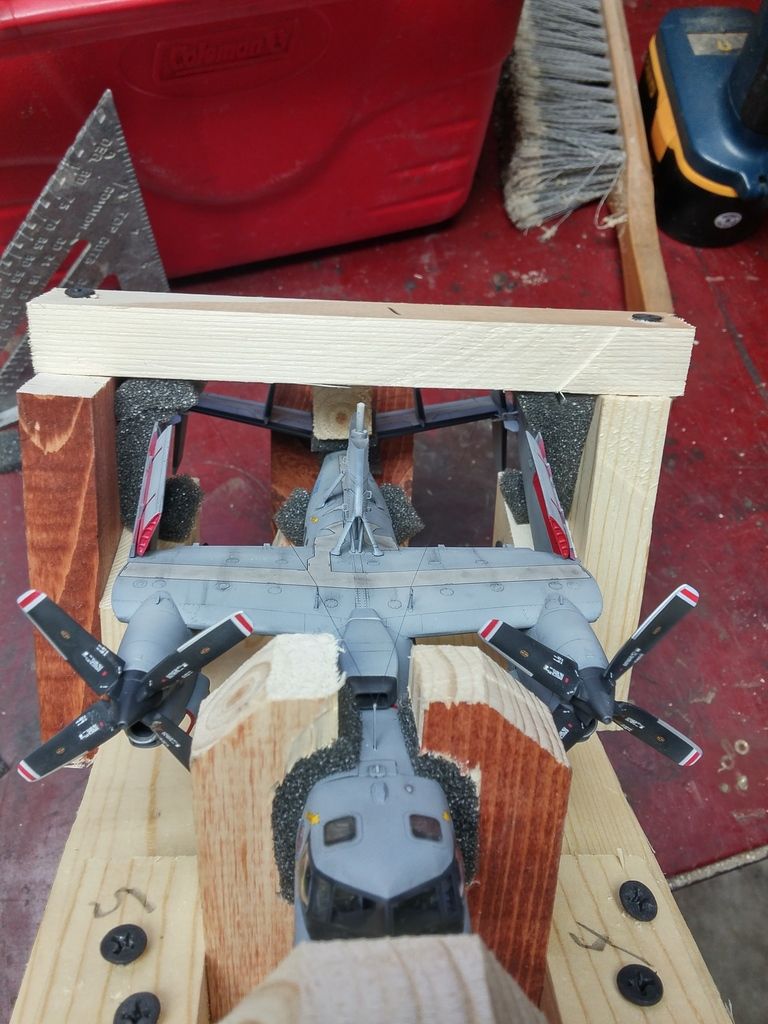
After that, I made the blocks for the "cheeks"...securing the nose up/down and side/side.

Again...

At this point, things are pretty secure...

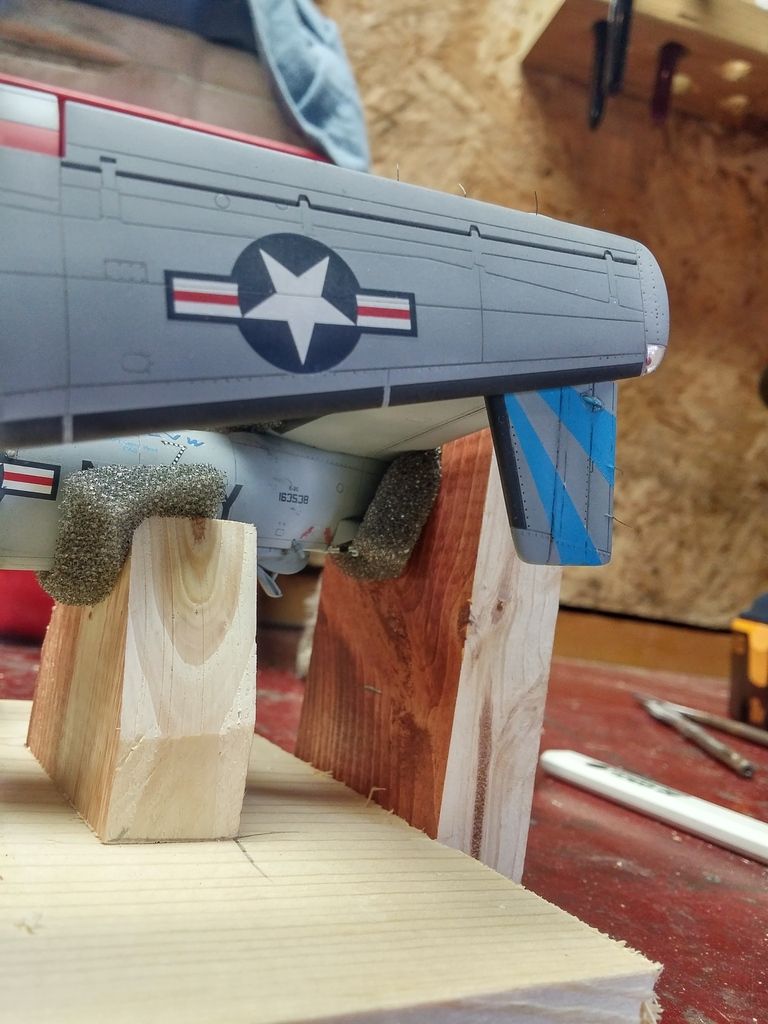
However...this beast is going away via USPS...those wings are solid resin and quite heavy. Even with having pins at the tail and wing, there needs to be a little more support.

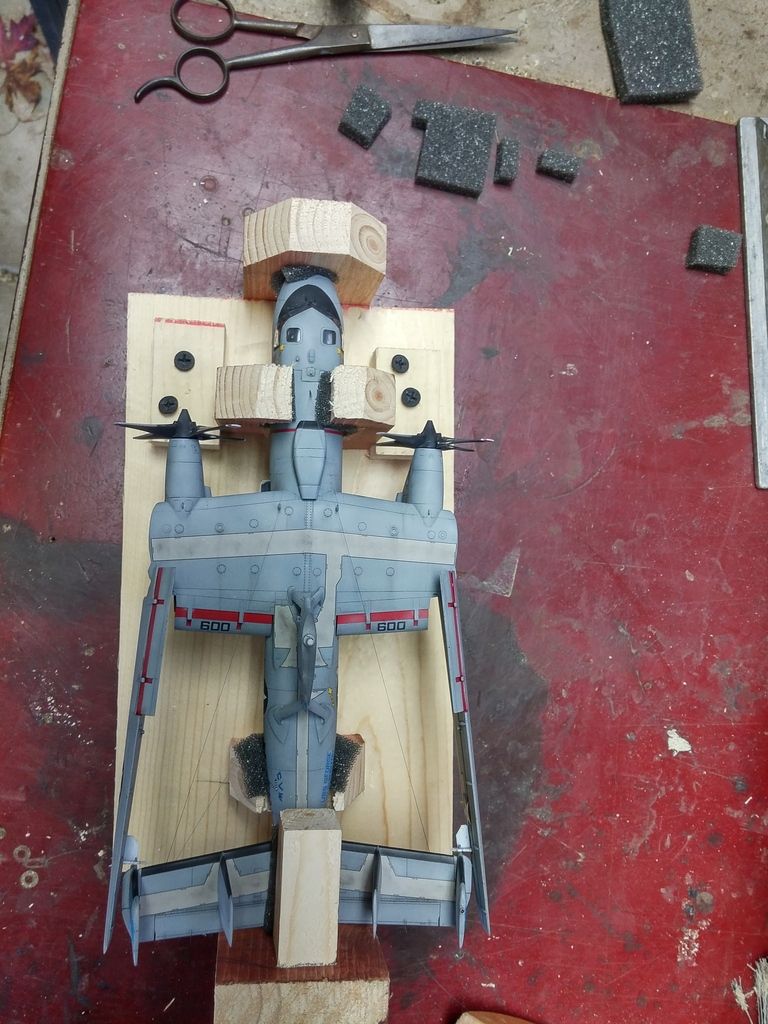
I cut blocks for the sides, and added another block to each, that goes in under the wing. With the foam padding added, I gently slid each block in place and screwed em to the base. Leaving some extra padding up top, I added a block across the top...this secures the wings side/side and up/down.

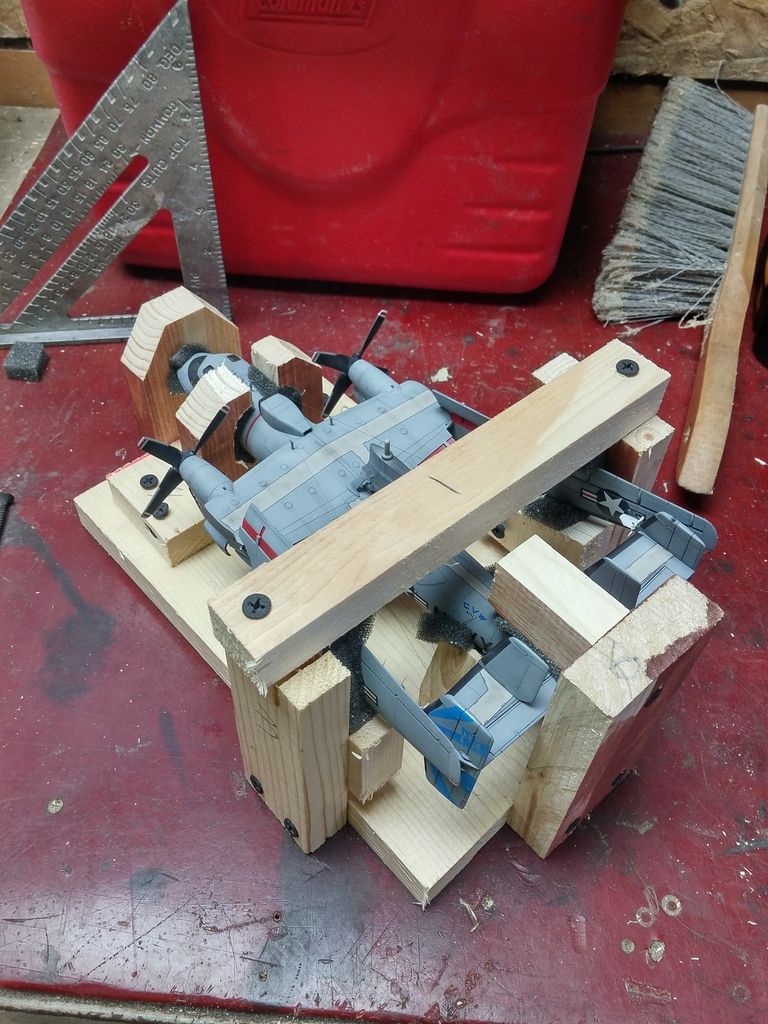
I pre-drilled 4 holes (each corner) so that I could secure it in the shipping crate.

More on that in a few minutes.

  • Member since
    January 2009
  • From: hamburg michigan
Posted by fermis on Monday, October 17, 2016 8:01 PM

I will get to securing this in the shipping crate shortly. I have another that will be sharing the crate, and there's another method here...

This one is much easier!

I'm re-using a block that has a hole drilled through and padding already in place. Also re-using a "craddle"...I just had to make a quick cut down the center of it for the fin on the bottom of the tail section. This will also prevent the model from being able to rotate during shipping.

These are placed in the crate, using the model to space them properly...then the model is removed and the blocks get screwed down to the floor of the crate.

Don't forget the padding!

The screws on the sides are for tying down the model. I take a length of string and make a loop at one end...I add a bit of CA to the knot, just for peace of mind.

Hook the loop on a screw...in this case, I wrapped the string over, in front of the tail, around the screw on the other side...securing up/down...then, back over, behind the tail, securing the model from being able to slide back. Padding under the string as well.

Once tied off to the screw, again, I add a bit of CA to secure the knot.

With that one ready to go...time to add the Hawkeye...Simple, just screw the base down.

You can see in the corner, there is a small, built in box. I have layer of padding in there...this is for misc. loose bits...props, boarding ladders, etc.

You can see the 105s ladders in there. Another layer of padding will go in on top of them to keep em from floppin around.

Secure!!!

Side wall of crate screwed back on, as well as the lid for the small interior misc. bits box. This crate goes back and forth a LOT..so it is nice to have a good, solid, workable piece.

With the lid screwed back in place, the crate goes into a shipping box, lined with a couple layers of carpet padding. The disc from the Hawkeye gets sammiched between the padding.

Ready for another adventure!

  • Member since
    December 2006
  • From: N. Georgia
Posted by Jester75 on Monday, October 17, 2016 8:08 PM

Wow, thanks for taking the time to post all of that! Love your attention to detail which comes as no surprise. They look snug as a bug. Ready for delivery!

packages delivers

Eric


  • Member since
    January 2009
  • From: hamburg michigan
Posted by fermis on Monday, October 17, 2016 8:09 PM

I should add...knowing that these get shipped...I take extra step during the build process. Items that could easily pop loose (Ordnance, etc) get pinned in place...you could hold that 105 up side down, by the missile!

  • Member since
    May 2016
Posted by Revenant on Monday, October 17, 2016 8:11 PM

Stick out tongue. Wow, great thread.  Two things:


1) Where are you shipping these things?

2) Does it work with ships or what? 

  • Member since
    January 2009
  • From: hamburg michigan
Posted by fermis on Monday, October 17, 2016 8:18 PM

Revenant

Stick out tongue. Wow, great thread.  Two things:


1) Where are you shipping these things?

2) Does it work with ships or what? 


1....To my customers address!

2...Ships are a bit different...I'll have an update for that, this winter!

  • Member since
    April 2009
  • From: Longmont, Colorado
Posted by Cadet Chuck on Monday, October 17, 2016 9:15 PM

Beautiful!  But that looks like more work than building the model!

By the way, how many tads in a smidgen?  Wink

Gimme a pigfoot, and a bottle of beer...

  • Member since
    January 2009
  • From: hamburg michigan
Posted by fermis on Monday, October 17, 2016 9:31 PM

Cadet Chuck

By the way, how many tads in a smidgen?  Wink


Like....4.376 tads = 1 smidgen.
 
Propeller

  • Member since
    January 2013
Posted by BlackSheepTwoOneFour on Tuesday, October 18, 2016 9:05 AM

I love how you go great lengths to make damn sure they stay secured during shipping. I gotta ask though, how much did it cost to actually ship it in crates?

  • Member since
    January 2009
  • From: hamburg michigan
Posted by fermis on Tuesday, October 18, 2016 9:16 AM

BlackSheepTwoOneFour

I love how you go great lengths to make damn sure they stay secured during shipping. I gotta ask though, how much did it cost to actually ship it in crates?


Shipping this crate averages about $25 for "priority" mail.

  • Member since
    January 2009
  • From: hamburg michigan
Posted by fermis on Tuesday, October 18, 2016 6:44 PM

Revenant

Hmm   So let me get this straight...you build models and ship 'em to people...what's in it for you???


I don't have to throw my old ones away to make room for new ones!

.....and....

I get a variety of subjects, that I probably would not have done for myself

....and....

Some dollars!

  • Member since
    May 2016
Posted by Revenant on Monday, October 24, 2016 4:22 PM

Yes. Do you have any more pics of other models you've packed using this technique???

  • Member since
    January 2009
  • From: hamburg michigan
Posted by fermis on Monday, October 24, 2016 5:46 PM

Revenant

Yes. Do you have any more pics of other models you've packed using this technique???


I do...I was a bit too lazy to go digging for em....but I finally did. Here's a couple from a while back...both of these show the standard "craddle" method.

This Tony, is craddled by the wings...

This P-40 is craddled at the fuselage...

The model itself dictates the best way to secure it....antennas, ordnance, landing gear, canopy position, opened panels, etc. Just gotta get creative sometimes!


  • Member since
    January 2009
  • From: hamburg michigan
Posted by fermis on Monday, October 24, 2016 5:53 PM

Here's some more...not much difference from the methods above, other than sometimes...upside down is the better way to go....the string and padding can fit in places (between ordnance and/or landing gears for example) that the wood craddle won't fit.

Sorry for the quality of these two...

  • Member since
    May 2016
Posted by jsmith on Monday, October 24, 2016 7:24 PM

i just finished a 1/48 scale kinetic c-2 greyhound for my sister and have to ship it to sandiego from oregon and was wondering how i was going to manage this feat. your thead was most helpfull. thank you.


jim

  • Member since
    May 2013
  • From: Indiana, USA
Posted by Greg on Monday, October 24, 2016 9:19 PM

That was a fun read!

Good engineering on the shipping jigs. Yes

  • Member since
    May 2016
Posted by Revenant on Monday, October 24, 2016 9:25 PM

Huh?...so did the Hawkeye and Thud make it okay or what? 

  • Member since
    June 2014
  • From: New Braunfels , Texas
Posted by Tanker - Builder on Tuesday, October 25, 2016 7:40 AM

Ah ;

  Just you wait Fermis ! You'll be taxed to the limit when you pack a ship . You'll see !  T.B.

  • Member since
    February 2012
  • From: Olmsted Township, Ohio
Posted by lawdog114 on Friday, October 28, 2016 1:52 AM

fermis


Revenant

Hmm   So let me get this straight...you build models and ship 'em to people...what's in it for you???


I don't have to throw my old ones away to make room for new ones!

.....and....

I get a variety of subjects, that I probably would not have done for myself

....and....

Some dollars!


Exactly!.....I haven't built anything for myself in years.  It's turned into quite the lucrative business for me.  I'm hoping it helps put my daughter through college. The foam sandwich technique works for me.  I just shipped a P-51 to Italy and it got there in perfect condition.  Thanks for sharing your technique Fermis. 

 "Can you fly this plane and land it?...Surely you can't be serious....I am serious, and don't call me Shirley"


  • Member since
    January 2009
  • From: hamburg michigan
Posted by fermis on Friday, October 28, 2016 9:14 AM

Tanker - Builder

Ah ;

  Just you wait Fermis ! You'll be taxed to the limit when you pack a ship . You'll see !  T.B.


Shipped a Chen Yuen, Jap sub, Gato sub, U-boat type VIIC, and a 1/72 Schnellboat...

The way I mount them for display, makes them pretty easy to pack. I've got another boat or two in line for this Winter.

  • Member since
    January 2006
  • From: NW Washington
Posted by dirkpitt77 on Friday, October 28, 2016 4:13 PM

I just completed a move from Colorado to Washington. My method was almost exactly like yours, Fermis, except I had to make around 40 wood crates for all my builds in one stretch. Spent a solid two weeks building custom rigs for each model, and boxing them up with plywood and low grade boards from Home Depot. I was lucky in that we'd recently completed a home renovation, too, so we had a lot of scrap wood laying around.

I don't have any pics on my Flickr. Maybe later I'll upload one or two. I'm just now unboxing them, and so far, no damage noted. Boxing them up in wood is the way to go, in my opinion.

--Chris

edit: forgot, I, too, reinforce many fragile model parts as I progress through the kit. My reason is a little different-my kiddos tend not to take care in my hobby room, so most of my builds are made with crashes in mind.  But same end result: bomb-proof builds. ;)

    "Some say the alien didn't die in the crash.  It survived and drank whiskey and played poker with the locals 'til the Texas Rangers caught wind of it and shot it dead."

  • Member since
    July 2014
Posted by modelcrazy on Friday, October 28, 2016 4:42 PM

Ok, I was going to try to start selling some models, but mine are all on bases.

I came up with attaching some egg create foam to the bottom of the base, using Styrofoam under the wings, nose and tail to keep the LG from collapsing and twisted strips of plastic bag tied over the top to prevent the build from detaching itself from the LG. I also secured the base to a custom made cardboard box using Styrofoam attached to the sides and placed that box into a larger box wrapped in bubble wrap. I don't know if this is satisfactory or not but will buy some insurance for the trip once it sells.

I’d like to ask a question though. How does one get to the point where they are building for customers?


Steve

Building a kit from your stash is like cutting a head off a Hydra, two more take it's place.


http://www.spamodeler.com/forum/

  • Member since
    January 2009
  • From: hamburg michigan
Posted by fermis on Friday, October 28, 2016 9:57 PM

dirkpitt77

I just completed a move from Colorado to Washington. My method was almost exactly like yours, Fermis, except I had to make around 40 wood crates for all my builds in one stretch. Spent a solid two weeks building custom rigs for each model, and boxing them up with plywood and low grade boards from Home Depot. I was lucky in that we'd recently completed a home renovation, too, so we had a lot of scrap wood laying around.

When we moved from Michigan to Kansas, I just wrapped all my builds in paper and layed em in a box...stacked right up. That's how the packers had done it with all our moves when I was a kid (Army brat)....that's a terrible way of doing it!Dunce There was a lot of repairs to do as I unpacked! Most of those builds were not any kind of good though...so, whatever!

When we made the move back to Michigan, I had many more builds and the quality was stepped up a notch, so I packed a little more carefully. I had somewhat the same idea, however, knowing that these would only be getting handled by me, and they wouldn't be turned on their sides, flipped upside down, kicked down a hallway, they didn't have to be as secure as the way I ship em. I just used blocks of foam, cut into craddles and glued to the bottom of the box....like so...

IN these examples...these were going to a contest, but the way I packed em for the move was just the same.

In this next pic, you can see that that these two builds are up on a second "shelf". When we moved, I had 5 huge packing boxes, each with 4-5 layers. I'd lay out the models to be on the bottom, then glue in their craddles. I'd then glue blocks of styrofoam to the bottom and sides, to hold up the next sheet of cardboard....lather, rinse, repeat!

Some can be a bit more complicated...

After the move back to Michigan, with the build packed this way, the only repair needed was just one single drop tank had broke loose...that was it, out of 70+ builds.

  • Member since
    January 2009
  • From: hamburg michigan
Posted by fermis on Friday, October 28, 2016 10:21 PM

modelcrazy


I’d like to ask a question though. How does one get to the point where they are building for customers? 

Well...the first "commission" build, was back in 2000. I was working on my private pilot license...there was a T-6 that would show up from time to time(from a smaller, neighboring airport) to get fuel. I asked him if I could get a bunch of pictures, so I could build myself a model of it, and I'd build him one too. He said OK. Later, I went to his hanger and took a bunch of pics. He was in the process of installing a new engine, many of the panels were off (I decided to do a "cut away" build for me...I need to get back to that someday!). Anyway, I built his and delivered it to him. He asked if I had some time to kill..."sure"...he said, "let's go". I got paid with a ride in that plane and even got some stick time (my avatar pic is from that flight).

My second, was also back in 2000. One of the airport residents had a Bonanza(V-tail). I had the kit in my tiny little stash and offered to build it and give it to him. I finished it after the move to Kansas, shipped it back to him. A couple weeks later, I got an unexpected check for a whole $35...WOOHOO...I made money building a model!

Anyway, it didn't become a regular thing until about 4-5 years ago. I was approached right here, through PM. I also picked up another "one off" commission build through the forum here. I believe(IIRC) it was through Wabashwheels?(remember him?). He put me in contact with a gentleman, that lived near(ish)by, that wanted a model of "Mild and Bitter"(B-26). His father flew that plane, as well as the famous "Flak Bait". Was happy to help with that, I even saw my build on the local news, when they aired a story along with footage of a belly landing that his father had made. I ended up doing a second build of the same plane, for the other pilot that his father flew with...I offered it at no charge, but I still got a healthy "tip".

  • Member since
    July 2014
Posted by modelcrazy on Saturday, October 29, 2016 12:42 AM

Man, I would love to do some commissions, or at least sell some of my builds. I have seen some completed ship builds on eBay with an offer to build whatever ship the customer wanted, assuming it was manufactured. The price was outrageous, but I guess some people will buy them.


I suppose I could do that, market on eBay, to drum up some builds.

Steve

Building a kit from your stash is like cutting a head off a Hydra, two more take it's place.


http://www.spamodeler.com/forum/

JOIN OUR COMMUNITY!

Our community is FREE to join. To participate you must either login or register for an account.

SEARCH FORUMS
FREE NEWSLETTER
By signing up you may also receive reader surveys and occasional special offers. We do not sell, rent or trade our email lists. View our Privacy Policy.