SEARCH FINESCALE.COM

Enter keywords or a search phrase below:

B29 Build Progress

53045 views
306 replies
1 rating 2 rating 3 rating 4 rating 5 rating
  • Member since
    March 2009
  • From: Yorkville, IL
Posted by wolfhammer1 on Sunday, February 1, 2015 5:23 PM

May their installation go smoothly, with no more mishaps.  good luck and looking forward to seeing the wonderful completed bird!

John

  • Member since
    August 2013
Posted by RCH73 on Sunday, February 1, 2015 4:51 PM

Today's project was getting the wheels installed.  Port side went on just fine:

 by robertholcomb73, on Flickr

Starboard side, not so much:

 Untitled by robertholcomb73, on Flickr

I used the Eduard wheel set and the mating holes were slightly out of size with the peg on the kit landing gear, so I had to clamp it in place while it dried. 

I liked the Eduard wheel set because they were molded with a slight bulge in the tires to reflect the weight of the aircraft, which appealed to me.

Next is to finish the bottom details (gun turrets and radar dome) and get the gear doors installed.  So far so good!  Then I go on to the top details and finally to decals and installing the engines last.  Recall I completed all the engines, nacelles and propellors in the ill-fated first version, and they have been patiently waiting in a plastic container for their hour to shine. 

cheers, Bob

  • Member since
    February 2003
  • From: Between LA and OC, SoCal
Posted by oortiz10 on Wednesday, January 28, 2015 9:28 PM

Sweet!

Yes

Good luck with the rest of the build!

Cheers,

-O

-It's Omar, but they call me "O".

  • Member since
    August 2013
Posted by RCH73 on Wednesday, January 28, 2015 7:18 PM

Thanks for the good advice.  It worked perfectly!

cheers, Bob

  • Member since
    August 2013
Posted by RCH73 on Wednesday, January 28, 2015 6:08 AM

OK, thanks to both of you.  I had not thought of Windex.  I will try Ortiz's method  tonight and see how it goes.

thank you, Bob

  • Member since
    March 2010
  • From: MN
Posted by Nathan T on Tuesday, January 27, 2015 7:19 PM

Do what Oritz says. Don't use lacquer thinner. Even a bit will strip e everything away, and you'll have to start all over again in that spot.


  • Member since
    February 2003
  • From: Between LA and OC, SoCal
Posted by oortiz10 on Tuesday, January 27, 2015 6:21 PM

Hey Bob,

I've had similar problems when I've used Alclad.  What I've done is take a very fine sanding pad, say, 6000 grit or higher, and lightly sand the spot.  Just sand it enough to knock down the majority of the unwanted color and smooth out any ridges from the drip, but not enough to sand through the underlying Alclad layer(s) to the basecoat/primer.  Once you've done that, wipe away any dust with a lint-free cloth and some Windex.  After that, re-spray the Polished Aluminum.  This method's worked for me with Alclad boo-boos and even enamel overspray.

I don't know if anyone will chime in with anything "better," but I've used this "easy" method with success.

Good luck!

-O

-It's Omar, but they call me "O".

  • Member since
    August 2013
Posted by RCH73 on Tuesday, January 27, 2015 5:41 PM

So, it is Stupid Question Time once again.  I noticed when I had the bird upside down that there is a drip of the Stainless Steel Alclad II paint on the surface of the wing, on top of the Polished Aluminum base coat.  Looks awful, I have to fix it.  What is the best way to correct it without ruining the underlying Polished Aluminum finish?

One thought:  lightly brush a Q-tip with lacquer thinner over the spot to remove the offending Stainless Stell droplet, then respray the Polished Aluminum over it

Another thought:  simply re-spray the Polished Aluminum coat back over the spot and hope it covers it

picture below:

 Untitled by robertholcomb73, on Flickr

Does anyone have any suggestions before I launch off on a solution?

cheers, Bob

  • Member since
    May 2006
  • From: Chapin, South Carolina
Posted by Shipwreck on Tuesday, January 27, 2015 11:14 AM

Bob once you are closed up, the best you can do is to ensure that you have the best bond possible between the edges of the wheel well and the fuseage. You would have to be very careful running thin CA down the seam and not on that pretty black paint!

On the Bench:

Revell 1/96 USS Constitution - rigging

Kinetic 1/48 YF-104A 5-2957

Trumpeter 1/350 USS Hornet CV-8

Revell 1/48 B-1B Lancer Prep & Reasearch


  • Member since
    August 2013
Posted by RCH73 on Tuesday, January 27, 2015 9:14 AM

Thanks, Shipwreck.  I agree about tying it down.  You are right about the relatively weak attachment point for the nose gear.  I might have to consider some supporting braces although it will be hard to put in at this stage.  But I can give it some thought. 

I am enjoying the snow all right, but not with a shovel.  I got a snow blower some years ago and that is MUCH easier to handle!  The new knee handled everything just fine this morning, although it still stiffens up a bit.  I spent most of the drive into work thinking about the landing gear painting and assembly process!

cheers, Bob

  • Member since
    May 2006
  • From: Chapin, South Carolina
Posted by Shipwreck on Tuesday, January 27, 2015 6:58 AM

Bob, tying down the wheels is probably the best move for this bird. The front gear box is part of the flight deck which is a rather weak attachment. With too much weight on the nose, or too much downward force, it would be easy to punch gear box and flight deck out of joint with no way of repair!  One way of strengthening the join is to add styrene braces on top of the flight deck in places where it joins the fuselage.

I hope you are enjoying the snow. That means watching it and not going out to test your new knee with a shovel!

On the Bench:

Revell 1/96 USS Constitution - rigging

Kinetic 1/48 YF-104A 5-2957

Trumpeter 1/350 USS Hornet CV-8

Revell 1/48 B-1B Lancer Prep & Reasearch


  • Member since
    August 2013
Posted by RCH73 on Tuesday, January 27, 2015 5:43 AM

thanks, bvallot.  I'm working on the landing gear now so I have something to set it on!

cheers, Bob

  • Member since
    June 2013
Posted by bvallot on Monday, January 26, 2015 4:19 PM

Sweet job Bob! That's gonna look great with some Detailer on it.  =]

On the bench:  

Tamiya F4U-1  Kenneth Walsh


  • Member since
    August 2013
Posted by RCH73 on Sunday, January 25, 2015 4:54 PM

I realized that I did not include a photo of the Stainless Steel sections that I was so proud of:

 by robertholcomb73, on Flickr

This is a shot of the two port wing engines. 

 by robertholcomb73, on Flickr

cheers, Bob

  • Member since
    August 2013
Posted by RCH73 on Sunday, January 25, 2015 4:42 PM

Couldn't sleep early this morning for some reason so I got up and hit the workbench.  I sprayed the Stainless Steel on those panels around the exhaust system (and landing gear doors, which were in the exhasut path when closed) and the Aluminum on the control surfaces as I indicated yesterday; came out beautiful.  I was very pleased with that.  The lesson here is that the color of the Alclad II paints depend strongly upon what is the base coat underneath it, so plan carefully!

Here is the current state of affairs, with the masking all removed now.  Getting close. 

 by robertholcomb73, on Flickr

And the tail section:

 Untitled by robertholcomb73, on Flickr

There is a lot of little cleanup still to be done, and the next major step is to flip her over and install the landing gear.  It will have to be strong because I intend to secure it to the base by tying fishing line around each of the three wheels, so I plan to use epoxy on all the wheel and landing gear attachments.  I got the Eduard wheel kit to use with this version, because I liked the pattern on the tires better than the stock version in the kit, and also the fact that they have no center seam line in them.

Snow coming tomorrow, so most likely will not be driving into the office.  We like snow days around here...

cheers, Bob

  • Member since
    August 2013
Posted by RCH73 on Saturday, January 24, 2015 7:19 PM

OK, onward and upward.  I have now finished putting on the gloss black coat on top and bottom, masked the stainless steel panels and laid down the Polished Aluminum coat.

First, the gloss black coat:

 Untitled by robertholcomb73, on Flickr

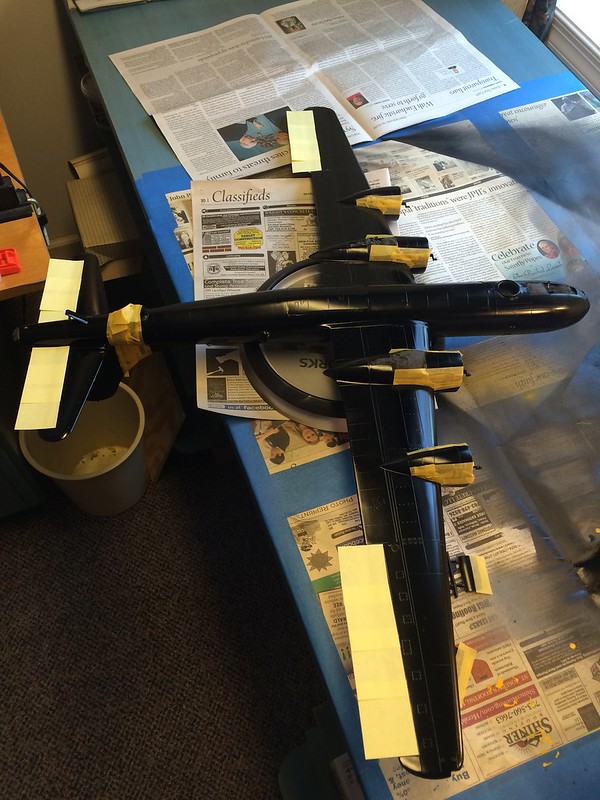
This photo is of the underside.  You can see the masking of the yellow stripe around the fuselage and also the masking of those panels that will be different than the Polished Aluminum.  That was a lesson learned from the last version.  I wanted to have three different shades of metal colors on the airplane:  the basic Polished Aluminum on most of it; some panels that were Stainless Steel in the exhaust train from the engines and engine nacelles (for better heat protection); and plain Aluminum for the fabric and dope-covered control surfaces.  On the last version I just painted those additional panels right over the base coat of Polished Aluminum, which was a big mistake.

All the Alclad II colors are happiest when they are over a coat of gloss black.  I think it is because of their relative thin-ness.  When I sprayed the Stainless Steel and Aluminium panels on the earlier version, the base coat was actually the Polished Aluminum, and so those colors did not come through in their expected rendering, and instead looked a lot like, well, Polished Aluminum. 

This time, I masked off the gloss black for those panels to get Stainless Steel and Aluminum, so they will have the proper undercoat. 

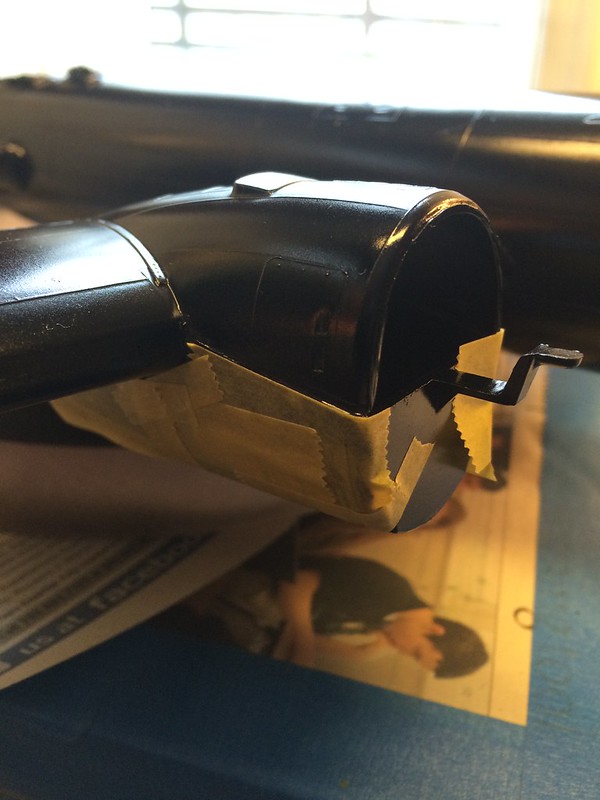
Here is a shot of the high-heat stainless steel panels masked on an engine nacell:

 by robertholcomb73, on Flickr

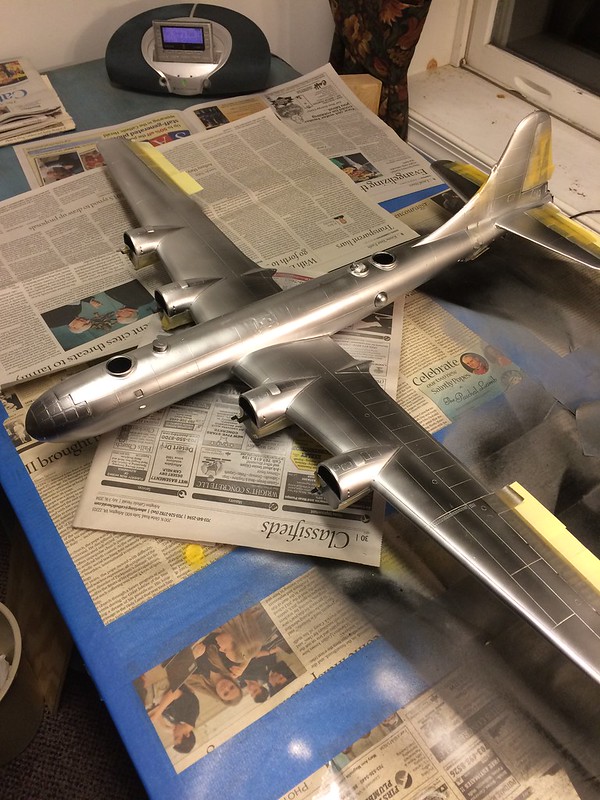
Here is the whole bird with the Polished Aluminum coat in place:

 by robertholcomb73, on Flickr

Tomorrow I will lay down the Stainless Steel panels and the fabric and dope-covered control surfaces. 

Stay tuned!

cheers, Bob

  • Member since
    August 2013
Posted by RCH73 on Wednesday, January 14, 2015 10:52 AM

Shipwreck:  no, I did not paint in the "hangar"; it was not big enough.  I made it 9 inches tall to clear the top of the tail when I had the model sitting on the lazy susan.  I only used the hangar for dust protection while it was drying.  

cheers, Bob

  • Member since
    May 2006
  • From: Chapin, South Carolina
Posted by Shipwreck on Wednesday, January 14, 2015 9:00 AM

Yep she's looking good Bob. With back to back builds you are now the expert B-29er! I am into my Enola Gay conversion. Currently focusing on the forward bomb bay. What happened to my work bench was that a 36x36 inch card table was added and over flow ends up on my office desk, which is next to my work bench. I will want the hanger/paint booth to be big enough to rotate the plane on a lazy susan. That will be greater than 40 inches square to accommodate the 36 inch wing span. This is one big bird!

Bob did you paint in your hanger, and if you did how tall did you make it?


On the Bench:

Revell 1/96 USS Constitution - rigging

Kinetic 1/48 YF-104A 5-2957

Trumpeter 1/350 USS Hornet CV-8

Revell 1/48 B-1B Lancer Prep & Reasearch


  • Member since
    August 2013
Posted by RCH73 on Wednesday, January 14, 2015 4:47 AM

One alternative to building the whole enchilada is to buy the Eduard photoetched kit of the detailed interior and only build a cutaway fuselage half.  The size of the kit is daunting, and I have had to modify my whole workbench area to try to handle it.  Sometimes I think the 1/72nd scale would have worked just fine...

cheers, Bob

  • Member since
    February 2012
  • From: Olmsted Township, Ohio
Posted by lawdog114 on Tuesday, January 13, 2015 7:33 PM

Awesome!  I wish I had the room to build the one in my stash....

Joe

 "Can you fly this plane and land it?...Surely you can't be serious....I am serious, and don't call me Shirley"


  • Member since
    August 2013
Posted by RCH73 on Tuesday, January 13, 2015 7:00 PM

looking good!  Got the black undercoat on and the yellow stripe.  Next is to tidy up the stripe a bit, and mask off the black stripes for and aft of the yellow. 

 Untitled by robertholcomb73, on Flickr

On to the alclad coat!

cheers, Bob

  • Member since
    August 2013
Posted by RCH73 on Sunday, December 28, 2014 12:04 PM

Thanks!  You may have just averted a catastrophy!,  i appreciate the tip.

  • Member since
    February 2014
  • From: N. MS
Posted by CN Spots on Sunday, December 28, 2014 11:50 AM

Yes. Airbrushing Future or paint will work too in a pinch just make sure it's dry.  It doesn't take much.  I made the mistake once of painting one sitting on a towel that I just folded up, sat the plane on and started spraying.  Whole thing looked like an armpit when I was done.

  • Member since
    August 2013
Posted by RCH73 on Sunday, December 28, 2014 8:39 AM

CN Spots:  Had not thought of that.  Just spray hair spray on the t-shirt and let it dry before I wad it up and use it for cushioning? 

cheers, Bob

  • Member since
    February 2014
  • From: N. MS
Posted by CN Spots on Saturday, December 27, 2014 7:40 PM

If you are going to leave the t shirt in there, hit it with some hair spray to keep the lint down.

Glad to see you're doing better!

  • Member since
    August 2013
Posted by RCH73 on Saturday, December 27, 2014 11:44 AM

 My recovery from the knee surgery has progressed to the point that I can move about a bit and so I am back at the workbench!  First order of business was to prep the B-29 for priming.  I have attached the wings and horizontal stabilizers, and the cockpit windscreen and nose glass.  After masking (the Eduard kit for the cockpit glass is a wonderful thing!) I painted the windscreen frames in interior green, to be the background color if viewed from inside.  I am about ready to wipe it down very thoroughly all over, then spray the primer coat on it.  Due to the size I got a spray can of primer rather than using the airbrush; we'll see how that comes out. 

One thing I could have done better the last time around was to keep the aircraft surface dust-free during the painting process.  This time around I decided I would make a thin plastic "hangar" that I could put the bird in while it dries to keep everything dust-free:

 Untitled by robertholcomb73, on Flickr

You can see the bird inside in this picture.  I have it resting on a lazy susan, cushioned with an old t-shirt.

 by robertholcomb73, on Flickr

I made it large enough so I could lift it up and place it down over the bird without disturbing it with plenty of clearance.  I built the frame out of scrap wood and then stapled clear plastic film over it.  It was so big I felt like I was building a barn...

Onward and upward.  Should get the primer coat on tomorrow. 

cheers, Bob

  • Member since
    August 2013
Posted by RCH73 on Thursday, December 11, 2014 3:45 PM

Well God bless you, Shipwreck, and the others of the forum.  Sounds like the voice of experience right there! The surgery was successful, and they had me walking up stairs today on my crutches.  That means I go home tomorrow, and I can get back to the workbench soon!  Got a little behind the power curve on the pain meds last night but fixed it today so I'm feeling much better.  Can't wait to get home!

cheers, Bob

  • Member since
    May 2006
  • From: Chapin, South Carolina
Posted by Shipwreck on Thursday, December 11, 2014 3:38 PM

Bob, I pray that the surgery was successful. I know that is a tough one that can wear the enamel off of your teeth by gritting 'em. Let us know how it went when you get back to your computer. You should have a lot of time to work on that B-29.

On the Bench:

Revell 1/96 USS Constitution - rigging

Kinetic 1/48 YF-104A 5-2957

Trumpeter 1/350 USS Hornet CV-8

Revell 1/48 B-1B Lancer Prep & Reasearch


  • Member since
    February 2012
  • From: Olmsted Township, Ohio
Posted by lawdog114 on Thursday, December 11, 2014 12:17 AM

Good to have you back Bob.  I'm glad you and your family are doing better.  I look forward to seeing this one up and going again.  

Joe

 "Can you fly this plane and land it?...Surely you can't be serious....I am serious, and don't call me Shirley"


  • Member since
    August 2013
Posted by RCH73 on Monday, December 8, 2014 11:33 AM

bvallot:  thanks, I am glad to be back at the workbench myself!

cheers, Bob

JOIN OUR COMMUNITY!

Our community is FREE to join. To participate you must either login or register for an account.

SEARCH FORUMS
FREE NEWSLETTER
By signing up you may also receive reader surveys and occasional special offers. We do not sell, rent or trade our email lists. View our Privacy Policy.