SEARCH FINESCALE.COM

Enter keywords or a search phrase below:

Tamiya 1/48 Fairey Swordfish Mk.II

6476 views
68 replies
1 rating 2 rating 3 rating 4 rating 5 rating
  • Member since
    December 2010
  • From: Salem, Oregon
Posted by 1943Mike on Wednesday, June 1, 2016 10:24 AM

Jay Jay and Toshi,

Thanks to both of you. I'm always nervous about showing my work on this site. I've seen such masterful builds of both aircraft and ships on FineScale that I sometimes feel very much out of my depth when posting here. I am, however, gaining a bit of confidence as I move along and I am very, very grateful to all the members who comment on my work for being so encouraging. You're all such good company in the world of building plastic kits!

Mike

Mike

"Le temps est un grand maître, mais malheureusement, il tue tous ses élèves."

Hector Berlioz

  • Member since
    July 2014
Posted by modelcrazy on Wednesday, June 1, 2016 10:28 AM

Mike,

Don't ever be aprehinsive about posting a WIP on this forum, there are few forums equally as encouraging and helpful as FSM.

Steve

Building a kit from your stash is like cutting a head off a Hydra, two more take it's place.


http://www.spamodeler.com/forum/

  • Member since
    January 2015
Posted by BrandonD on Wednesday, June 1, 2016 4:16 PM

That's looking great! I don't see any rough edges, just an inspiration to build mine someday soon!

-BD-

  • Member since
    December 2002
Posted by Bossman on Wednesday, June 1, 2016 5:13 PM

Mike,

That engine is a gem.  I've seen this Tamiya kit built up very nicely before - It has a ton of detail that really shows - and its just an interesting aircraft.  Looks like youre headed for the same place with this one.

Chris

  • Member since
    December 2010
  • From: Salem, Oregon
Posted by 1943Mike on Wednesday, June 1, 2016 7:07 PM

Modelcrazy,

You said: "there are few forums equally as encouraging and helpful as FSM." I couldn't agree more!

BD and Chris,

Thanks for the kind words.

Mike

"Le temps est un grand maître, mais malheureusement, il tue tous ses élèves."

Hector Berlioz

  • Member since
    May 2013
  • From: Indiana, USA
Posted by Greg on Wednesday, June 1, 2016 8:09 PM

Bossman

So just one question . . .   remind me again what you you said was gonna be "rough" about these posts ?

My thoughts too.

This is looking very good, please do keep the WIP coming (or going, depending on one's perspective).

I'm intimidated by biplanes and have never tried one. Doesn't look like you're scared at all.

  • Member since
    December 2010
  • From: Salem, Oregon
Posted by 1943Mike on Wednesday, June 1, 2016 8:49 PM

Greg, thanks.

At my age it's better to attempt something knowing that failure on the first attempt is very much a possibility. So what? As long as I don't bankrupt myself buying too many kits that are destined for the trash heap, failing is, as far as I'm concerned, a real path to success. As long as one is persistent.

I really screwed up my first biplane (Accurate Miniatures 1/48 Grumman F3F-1) but I considered it a test bed so, in a way, I was happy even though I screwed up some important elements. 

Greg, what I'm saying is, if you want to build a biplane, build one. I bought two kits at the time I did the F3F - an F3F-1 which I built and an F3F-2 which is in my stash and I will probably build at some point in time. If you can afford it, buy two kits of the same plane. I've done that with other plastic kits - just to have extra parts or in case I screw up badly. The F3F-1 I built is considered one of the easiest biplanes to put together. It wasn't for me. But I learned a little.

Remember good old Teddy Roosevelt: "Far better is it to dare mighty things, to win glorious triumphs, even though checkered by failure... than to rank with those poor spirits who neither enjoy nor suffer much, because they live in a gray twilight that knows not victory nor defeat."

That's a little much when talking about plastic model kits but you get the idea.

Mike

Mike

"Le temps est un grand maître, mais malheureusement, il tue tous ses élèves."

Hector Berlioz

  • Member since
    July 2014
Posted by modelcrazy on Wednesday, June 1, 2016 11:13 PM

Oooh Mike I like that quote. I going to use that on my signature line!

Steve

Building a kit from your stash is like cutting a head off a Hydra, two more take it's place.


http://www.spamodeler.com/forum/

  • Member since
    December 2010
  • From: Salem, Oregon
Posted by 1943Mike on Sunday, June 5, 2016 1:24 PM

Another incremental, boring, painting update. Actually I did glue the rudder, elevator/horizontal stabilizer to the fuselage. The painting is taking longer than I'd anticipated for several reasons - mostly my having to repaint where I screwed up or my finger nails scratched a surface, etc., etc.

I must warn people who attempt to build this kit that the fit on most parts, although pretty good as far as I can tell, is very tight! As I mentioned above the enclosing of the pit in the fuse was, for me, a real challenge - very, very tiight. I had to do some sanding on the horizontal stab/elevators to get them to slide into the tail. That may have had something to do with my painting the parts first - it's a TIGHT FIT!

Next up some decaling and then on to more gluing in parts. I have a bad feeling about the section forward of the windscreen that holds the cabane struts. Without paint it was very, very tight. After having painted the struts it wouldn't go in at all. I've sanded/filed some styrene on the attachment points but it'll be scary for me when I have to attach that assembly in the near future.


Mike

"Le temps est un grand maître, mais malheureusement, il tue tous ses élèves."

Hector Berlioz

  • Member since
    July 2014
Posted by modelcrazy on Sunday, June 5, 2016 7:40 PM

Looking very good Mike, and thank you for the fit warning. 

Steve

Building a kit from your stash is like cutting a head off a Hydra, two more take it's place.


http://www.spamodeler.com/forum/

  • Member since
    March 2015
  • From: Streetsboro, Ohio
Posted by Toshi on Tuesday, June 7, 2016 8:58 AM

Thank you 1943Mike.  This is very informative and a very straight forward WIP thread.  You've given forum members the ins and outs (Positive and negative) on this build that will help future builds as such.  I'm learning a lot from your WIP.  Thank you sir and keep up with the very good posts.

Toshi

On The Bench: Revell 1/48 B-25 Mitchell


Married to the most caring, loving, understanding, and beautiful wife in the world.  Mrs. Toshi


  • Member since
    May 2013
  • From: Indiana, USA
Posted by Greg on Tuesday, June 7, 2016 9:40 AM

Mike, that is sound advice, thank you.

Great quote, indeed. Maybe even a wake-up call. Smile

  • Member since
    July 2014
Posted by modelcrazy on Tuesday, June 7, 2016 9:59 AM

Greg
Great quote, indeed. Maybe even a wake-up call.

I have tried many things in my life and too often "checkered by failure" but at least I have fewer regrets. This also applies to modeling as some of my builds reflect.

Steve

Building a kit from your stash is like cutting a head off a Hydra, two more take it's place.


http://www.spamodeler.com/forum/

  • Member since
    December 2010
  • From: Salem, Oregon
Posted by 1943Mike on Tuesday, June 7, 2016 1:58 PM

Toshi, Greg, and Modelcrazy,

I know that my building skills are still evolving so when I mention how tight the pit was in the fuselage, keep in mind that it may have been partly due to my less than perfect build of the cockpit. OTOH, I think that some of the "tight fit" issues I'm having are real and, although so far have not been a problem, I do hope it ends up being a little advanced warning to those who build this kit in the future.

Modelcrazy,

I'm glad you liked the quote I posted in my reply to Greg. I've been guilty of letting certain things go without the proper effort to see them through. As an example, I did a very tough hike in July of 2013 but was not happy with the atmospheric conditions at the time - too hazy for photographs. I tried reaching the top again in September but turned around about 2/3 of the way up since I wasn't feeling as well as I thought I should and, although the atmosphere was clear as a bell, the very top was covered in clouds. I didn't think I'd ever try it again.

However, last summer (July of 2015) my brother and I did it again. I just HAD to get a series of photos from which I could creat a summit panorama. Again, a strenuous hike but I'm so glad I perservered. Funny, when I did the hike last summer I beat my round trip time from two years before by over an hour.

The hike was to the top of Mt. St. Helens. My brother can be seen sitting down by himself with his daypack off to the right of the image.

Mike

Mike

"Le temps est un grand maître, mais malheureusement, il tue tous ses élèves."

Hector Berlioz

  • Member since
    July 2014
Posted by modelcrazy on Tuesday, June 7, 2016 4:58 PM

Mike,

That is a great picture!!! I can no longer hike mountains or even go for long walks due to my Pulmonary Fibrosis. I am glad I climbed a few while I was young though.

Steve

Building a kit from your stash is like cutting a head off a Hydra, two more take it's place.


http://www.spamodeler.com/forum/

  • Member since
    December 2010
  • From: Salem, Oregon
Posted by 1943Mike on Wednesday, June 15, 2016 3:16 PM

Another update. Not exciting. It took me a while though. I'm always slow with decals. I do need to tell the truth though, I used and ruined two decals from my kit and there were no extras. Fortunately Big Smile I'd bought another kit because I like this plane a lot and thought I'd do another MkII with invasion stipes or some other kinds of markings (I also bought some 1/48 AM decals for the MkII). So, I just ripped into the new box and used (thank goodness, successfully) those decals.

The picture that I'm posting with this missive has my usual comments where I screwed up. I wish I could redo some of the parts but, alas, they're on to stay. Please don't get me wrong, I'm enjoying all the work I put into this aircraft and even with my errors I like how it's turning out so far. A long way to go though.

Mike

Mike

"Le temps est un grand maître, mais malheureusement, il tue tous ses élèves."

Hector Berlioz

  • Member since
    July 2014
Posted by modelcrazy on Wednesday, June 15, 2016 3:30 PM

That is funny Mike, I like the picture details. Despite your "screw-up's" I think it is turning out fantastic! I'm constantly breaking off wee pieces and having to glue them back on or replace them with a scratched piece (because I dropped it and can’t find it).
I can't even see the windscreen and never would have known if you hadn't pointed it out. Sometimes a plastic polish can help, but not with CA. I use Meguiars Plastic Polish and it works wonders.
As far as the difference in sheen, can you go over the whole thing with Future then spray the flat? I don't know and I'm sure someone will know better, but that seems like that would work.


Steve

Steve

Building a kit from your stash is like cutting a head off a Hydra, two more take it's place.


http://www.spamodeler.com/forum/

  • Member since
    December 2010
  • From: Salem, Oregon
Posted by 1943Mike on Wednesday, June 15, 2016 5:49 PM

Steve,

I may, with the top part of the the upper wings, do exactly that. Spray the whole wing with Future first. I'm not sure though since I hand applied the Future to that area to begin with I wonder if I'd have to hand apply it for the rest of the wing. No biggie either way.


Mike

"Le temps est un grand maître, mais malheureusement, il tue tous ses élèves."

Hector Berlioz

  • Member since
    December 2002
Posted by Bossman on Thursday, June 16, 2016 7:51 PM

Mike, the Swordfish is looking very nice.

I use brushed on future as a gloss coat over brush painted MM acrylics all the time.  Then I usually coat everything with spray-on Testors dullcoat.  I agree w/ MC.  I'd brush or spray future over the whole wing surface just to make the finish uniform.  

In the past, when I've sprayed dullcoat over a mixed-finish surface - there has been a noticable difference in the dullcoated surface finish.   

Love this paint scheme on the Swordfish - very nice indeed !

Chris

  • Member since
    December 2010
  • From: Salem, Oregon
Posted by 1943Mike on Thursday, June 16, 2016 8:01 PM

Chris,

Thanks for the information regarding your experience with airbrushing a dullcoat. I'll spray the the whole wing with Future and, when cured, I'll go over the whole wing with the flat clear.

Thanks,

Mike

"Le temps est un grand maître, mais malheureusement, il tue tous ses élèves."

Hector Berlioz

  • Member since
    March 2015
  • From: Streetsboro, Ohio
Posted by Toshi on Thursday, June 16, 2016 9:31 PM

That is a fantastic view of St. Helens!  Also, you're doing a phenomenal job on your build, I'm beyond impressed sir!  Great job my friend!

Toshi

On The Bench: Revell 1/48 B-25 Mitchell


Married to the most caring, loving, understanding, and beautiful wife in the world.  Mrs. Toshi


  • Member since
    December 2010
  • From: Salem, Oregon
Posted by 1943Mike on Monday, June 27, 2016 6:32 PM

Although it doesn't look like I've done much, I've actually put in a lot of time A) correcting some mistakes and, B) touching up and repainting, using more setting solution on some decals, and spaying the wings again with both Future and, when cured, MM flat clear. As usual I've managed to create a few "accidents" along the way but, in general, she's coming along to my satisfaction.

Note: When those of you who are going to build this puppy get around to it, be very meticulous in your dry fitting of certain very important sections - such as the top center wing unit. Make sure to dry fit it with part A10 before you get out the CA.

One of the things I'll not be able to correct in this build is my use of CA when putting on the windscreen. As if that was not bad enough, I didn't protect it enough when I was spraying my MM flat clear on the fuselage. Oh well, it's now one frosty little windscreen Smile.

I have some PE to worry about in the next few sessions with my stringbag. Wish me luck.


Mike

"Le temps est un grand maître, mais malheureusement, il tue tous ses élèves."

Hector Berlioz

  • Member since
    February 2012
  • From: Olmsted Township, Ohio
Posted by lawdog114 on Monday, June 27, 2016 10:37 PM
Coming along nicely........looks like your in the homestretch eh Mike?

 "Can you fly this plane and land it?...Surely you can't be serious....I am serious, and don't call me Shirley"


  • Member since
    December 2010
  • From: Salem, Oregon
Posted by 1943Mike on Monday, June 27, 2016 11:28 PM

Lawdog,

If by the home stretch you mean I've got most of the build ready to put together, yep.

I do have worries about the Tamiya PE set for this kit. Only because I managed to screw up the PE for the AM 1/48 Grumman F3F-1 that I built a couple of years ago. It was supposed to be the "easy" solution to rigging biplanes. Nothing, I repeat, Nothing is foolproof in my hands Big Smile. However, this time I'm going to take my sweet time and try to make it work.

The painting (and repainting, and decaling, and Futuring, and sealing with flat clear) has taken me longer than I thought it might.

Onward and upward.

Mike

"Le temps est un grand maître, mais malheureusement, il tue tous ses élèves."

Hector Berlioz

  • Member since
    November 2014
Posted by Ahrenisavagabond on Tuesday, June 28, 2016 12:48 PM

Lawdog,


I just saw your airbrush booth, that looks nice! I'm gonna have to steal your ideal about using the small duct piping. Can I ask where you got that?


  • Member since
    December 2010
  • From: Salem, Oregon
Posted by 1943Mike on Tuesday, June 28, 2016 6:08 PM

Ahrenisavagabond,

I certainly can't speak for Lawdog but if, by chance, you meant my cheap, ugly, sagging spray/paint booth, Big Smile the ducting is just 4" dryer ducting. I can't remember where I bought it - probably either Walmart or Amazon. My booth is just poster board that I cut to make reasonably sized booth. It's 30" wide inside x 14 1/2" at the rear and 18 1/2" at the front inside height. It's put together with duct tape. (Remember, duct tape is your friend!).

I bought some LED light banks (battery powered so I use rechargeables in it) on Amazon to furnish some working illumination. I use a 12" x 12" air filter on the back of the booth to trap some of the paint. They're cheap filters and I can turn it 90° whenever one section of the filter looks like it's getting some build up.

Hope this helps.

Mike

"Le temps est un grand maître, mais malheureusement, il tue tous ses élèves."

Hector Berlioz

  • Member since
    December 2010
  • From: Salem, Oregon
Posted by 1943Mike on Saturday, July 9, 2016 10:09 PM

Well, this is embarrassing Embarrassed. I've screwed up my stringbag's rigging on the wings beyond the point of redemption.

I apologize to those of you who were following along thinking that I'd put this kit together in a manner that was reasonably competant. I did try. Unfortunately my skills at prefitting, double checking, looking for tripwires in the building process was not up to snuff. I've been hoisted by my own petar.

I'm going to carry on and see how it looks if I can attach the wings after adding the armament. I say "if" because there's an even chance that I'll not be able to attach the wings without knocking several pieces off several times.

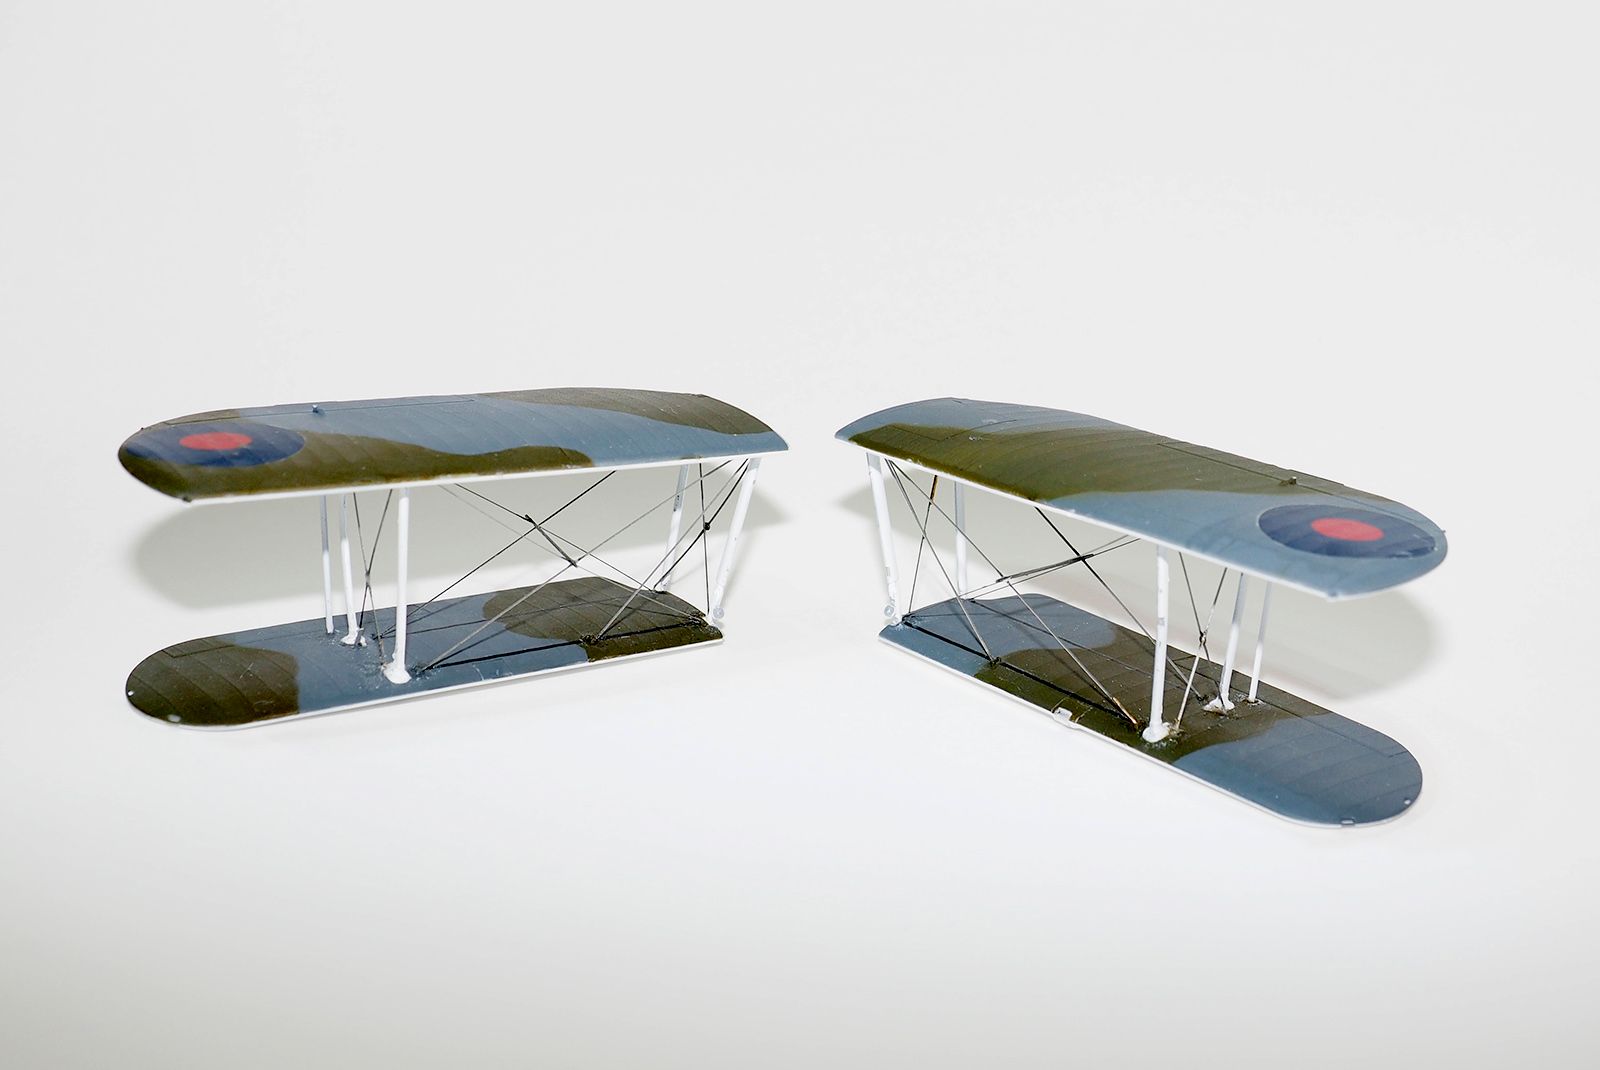
The rigging of my wings is a nightmare. I ended up not having some of the kit PE sections reach the holes into which they were supposed to fit. In those instances I more or less gave up the hope for finishing this aircraft in a manner that would be satisfactory to me. I added some plain, round (the PE braces are flat) copper wire to extend the rigging. It doesn't look at all acceptable. Nonetheless, as I've just said, I'll attempt to finish it.

I'll post a picture of my disasterous wing rigging that I've struggled with over the last couple of days. You won't have to strain your eyes to see lots of glue and scratches some of which I may be able to take care of before I'm done. In addition, I'm sure that the styrene struts were not placed correctly as hard as I tried. That added to my frustration by making the wings slightly catawampus.

Oh well, I will continue to work on this now ruined kit with some knowledge of how to best proceed on my next build of this aircraft.

Mike

"Le temps est un grand maître, mais malheureusement, il tue tous ses élèves."

Hector Berlioz

  • Member since
    July 2014
Posted by modelcrazy on Saturday, July 9, 2016 10:31 PM

LOL Mike, 

You may not have gotten the rigging correct but you picture taking ability is great. I don't see the issue with the pictureI see, maybe a little rough at the attachment points but all in all what I see looks fine. Biplanes are a tough proposition for anyone. 

Steve

Building a kit from your stash is like cutting a head off a Hydra, two more take it's place.


http://www.spamodeler.com/forum/

  • Member since
    March 2015
  • From: Streetsboro, Ohio
Posted by Toshi on Saturday, July 9, 2016 11:05 PM

So far, your build looks really good.  I don't build bi-planes so I don't know anything about rigging.  All of my builds have some type of issues.  We can only learn from them and move forward of which you're doing a great job on.

Toshi

On The Bench: Revell 1/48 B-25 Mitchell


Married to the most caring, loving, understanding, and beautiful wife in the world.  Mrs. Toshi


  • Member since
    December 2010
  • From: Salem, Oregon
Posted by 1943Mike on Saturday, July 9, 2016 11:30 PM

Thanks guys. I'll just keep plodding along on this kit hoping to learn enough to avoid the same problems when I build my next one.

Mike

"Le temps est un grand maître, mais malheureusement, il tue tous ses élèves."

Hector Berlioz

JOIN OUR COMMUNITY!

Our community is FREE to join. To participate you must either login or register for an account.

SEARCH FORUMS
FREE NEWSLETTER
By signing up you may also receive reader surveys and occasional special offers. We do not sell, rent or trade our email lists. View our Privacy Policy.