SEARCH FINESCALE.COM

Enter keywords or a search phrase below:

Tamiya 1:48 Birdcage Corsair F4U-1 [Complete]

16908 views
84 replies
1 rating 2 rating 3 rating 4 rating 5 rating
  • Member since
    December 2002
  • From: NYC, USA
Posted by waikong on Friday, August 13, 2021 10:18 AM
This is just an amazing display of modeling skills. Even if I had the skills to do what you do (which I don't!), I wouldn't have the patience. Beautiful work, truly. I am curious as to how you did the antenna to the rudder, that detail have always eluded me, and I think yours is the best I've seen in 1/48.

My website: http://waihobbies.wkhc.net


  • Member since
    June 2017
Posted by Chemteacher on Thursday, August 5, 2021 10:23 PM
My goodness that is incredible. Beautiful job.

On the bench: Revell-USS Arizona; Airfix P-51D in 1/72

  • Member since
    November 2008
  • From: Central Florida
Posted by plasticjunkie on Thursday, August 5, 2021 9:12 PM

I don't know how I missed this build. The level of detail you added is simply outstanding. Beer

 GIFMaker.org_jy_Ayj_O


Too many models to build, not enough time in a lifetime!!

  • Member since
    June 2013
Posted by bvallot on Thursday, August 5, 2021 3:02 PM

Thank you Aggieman! =] Always happy to see you around. What do you think about UT making the move to the SEC??

On the bench:  

Tamiya F4U-1  Kenneth Walsh


  • Member since
    June 2013
Posted by bvallot on Thursday, August 5, 2021 2:54 PM

Hoss WA

Wow. I'm in awe of this masterpiece. I just added this kit to my stash. Amazing detail and weathering. Congratulations. 


Thank you very much Hoss! You're not so bad you're self. I need to pick your brain about some lighting/scenery setups. I'm a big fan of how you do that. I'd eventually like to reshoot some of my more recent builds.

On the bench:  

Tamiya F4U-1  Kenneth Walsh


  • Member since
    June 2013
Posted by bvallot on Thursday, August 5, 2021 2:50 PM

Thanks TJ. I've been itching to pick that fight for a while now. =]

On the bench:  

Tamiya F4U-1  Kenneth Walsh


  • Member since
    June 2013
Posted by bvallot on Thursday, August 5, 2021 2:49 PM

keavdog

Well done.  Never realized the Corsair had a belly window.  Looks like it was deleted on later models.


Thanks keavdog! It certainly did. It went through some experimental test phases the way all aircraft do. I believe it was deleted after the F4U-1A variant when it was deemed unnecessary due to changes in the PTO later in the war. Many crews would paint over it actually. So look carefully on early Corsairs when building a particular aircraft. =]

On the bench:  

Tamiya F4U-1  Kenneth Walsh


  • Member since
    June 2013
Posted by bvallot on Thursday, August 5, 2021 2:42 PM

Postal
What a stunning job mate. Amazing job on the weathering.
 

Thank you Postal. I did my very best. That's about ten years in the making. Time flies by fast. It sure doesn't feel like it's been that.

On the bench:  

Tamiya F4U-1  Kenneth Walsh


  • Member since
    January 2015
  • From: Katy, TX
Posted by Aggieman on Sunday, August 1, 2021 9:07 PM

Simply beautiful work, all the way around. 

  • Member since
    July 2019
Posted by Hoss WA on Sunday, August 1, 2021 5:46 PM

Wow. I'm in awe of this masterpiece. I just added this kit to my stash. Amazing detail and weathering. Congratulations. 

  • Member since
    November 2003
  • From: Naples, FL
Posted by tempestjohnny on Thursday, July 29, 2021 6:46 AM
Excellent finish. The aerial wire was well worth the time


  • Member since
    April 2003
  • From: USA
Posted by keavdog on Wednesday, July 28, 2021 11:25 PM

Well done.  Never realized the Corsair had a belly window.  Looks like it was deleted on later models.

Thanks,

John

  • Member since
    October 2009
  • From: Gold Coast, Australia
Posted by Postal on Wednesday, July 28, 2021 9:40 PM
What a stunning job mate. Amazing job on the weathering.
  • Member since
    June 2013
Posted by bvallot on Wednesday, July 28, 2021 8:55 PM

Completion. And about time too, right?

Here's a couple of quick pics of some loose ends to illustrate more of what's going on with some details.

Windshield

 Untitled by Britt Vallot, on Flickr

Everything is here. It was rather difficult to photograph the mirror. I need to readdress my light set up. I may fine tune this process a bit, but I was happy with getting to this point with the mirror instead of just using a PE part and painting it silver.

Engine

 Untitled by Britt Vallot, on Flickr

I finally got around to remaking the govenor module that I accidently popped off a while ago. Never could find it, so I had to remake that as well. It's so damn tiny but it came together in about 25 minutes start to finish. Contrast that with completing the radio aerials...1 hour 40 minutes.

 Untitled by Britt Vallot, on Flickr


And here is a little walkaround... =]


 Untitled by Britt Vallot, on Flickr

 Untitled by Britt Vallot, on Flickr

 Untitled by Britt Vallot, on Flickr

 Untitled by Britt Vallot, on Flickr

 Untitled by Britt Vallot, on Flickr

 Untitled by Britt Vallot, on Flickr

 Untitled by Britt Vallot, on Flickr

 Untitled by Britt Vallot, on Flickr

 Untitled by Britt Vallot, on Flickr

 Untitled by Britt Vallot, on Flickr

 Untitled by Britt Vallot, on Flickr

 Untitled by Britt Vallot, on Flickr

 Untitled by Britt Vallot, on Flickr

 Untitled by Britt Vallot, on Flickr

 Untitled by Britt Vallot, on Flickr

 Untitled by Britt Vallot, on Flickr

 Untitled by Britt Vallot, on Flickr

 Untitled by Britt Vallot, on Flickr

 Untitled by Britt Vallot, on Flickr

 Untitled by Britt Vallot, on Flickr

 Untitled by Britt Vallot, on Flickr

And here's a little fun trying to recapture this snapshot in time.

 Untitled by Britt Vallot, on Flickr

 Untitled by Britt Vallot, on Flickr

 Untitled by Britt Vallot, on Flickr

And that's a wrap! 

This was a much longer time to complete this build than it usually takes me. Even with all the extra work something like this generally ought to still come in around the 6 month time frame. I've been hitting that pretty consistently. Don't let the extra work spook you from getting after it. It's all worth it in the end. =] If there's any questions about anything at all, by all means please ask. I'm happy to share and discuss. That is why we're here.

Thanks for watching. 


On the bench:  

Tamiya F4U-1  Kenneth Walsh


  • Member since
    June 2013
Posted by bvallot on Wednesday, July 28, 2021 8:54 PM

 Repeat deleted 

On the bench:  

Tamiya F4U-1  Kenneth Walsh


  • Member since
    June 2013
Posted by bvallot on Wednesday, July 28, 2021 8:52 PM

repeat deleted. 

On the bench:  

Tamiya F4U-1  Kenneth Walsh


  • Member since
    June 2013
Posted by bvallot on Wednesday, July 28, 2021 5:58 AM

Thanks John and TJ, and thanks for tagging along. Sorry I drug this out for a year =]

And thank you Joe. I am happy with it. Still looking forward to that true PTO treatment for the next Corsair.


I'm working on the last post now. Piecing together pictures and making some edits. =] Almost done.

On the bench:  

Tamiya F4U-1  Kenneth Walsh


  • Member since
    February 2012
  • From: Olmsted Township, Ohio
Posted by lawdog114 on Sunday, July 11, 2021 11:30 PM

Perhaps one of the best Corsairs I've seen.  Perfect weathering.  

 "Can you fly this plane and land it?...Surely you can't be serious....I am serious, and don't call me Shirley"


  • Member since
    November 2003
  • From: Naples, FL
Posted by tempestjohnny on Sunday, July 11, 2021 7:14 AM

keavdog

What a fantastic build Britt - really fun to watch.  The finish looks really nice.


Ditto


  • Member since
    April 2003
  • From: USA
Posted by keavdog on Saturday, July 10, 2021 5:44 PM

What a fantastic build Britt - really fun to watch.  The finish looks really nice.

Thanks,

John

  • Member since
    June 2013
Posted by bvallot on Saturday, July 10, 2021 2:37 PM

Joe, I can't really put it into words well enough to say how good it feels to hear something like that. Thank you very much is a start. It was about ten or so years ago when I started lurking around in the Finescale forum for whatever trick or format I could pick up. I approach the WIPs  as a way to pay it forward and stir up discussion about what we're all seeing and doing. 

I'm glad I can share something of use. =]

I still need to jump in the auto section and peep you out!

On the bench:  

Tamiya F4U-1  Kenneth Walsh


  • Member since
    March 2012
  • From: Corpus Christi, Tx
Posted by mustang1989 on Saturday, July 10, 2021 10:04 AM

I've always enjoyed following your builds and it was you that made me look at my whole painting/ paint prep methods and really concentrate on getting better at it. For that.....I cannot thank you enough. This is looking splendid Britt. You sir...............are tha freekin' MAN!!! 


 Forum | Modelers Social Club Forum (proboards.com) 

  • Member since
    June 2013
Posted by bvallot on Friday, July 9, 2021 10:21 PM

Thanks Andy. It's good to see you on here again. Sorry it's been 3 months before reaching out. I'm finding it pretty difficult to get on the finescale at all much less get any bench time in.

Gearing up

So this next segment is going to be a bit heavy to drop in some places. If I move past anything too quickly please don't be afraid to ask.

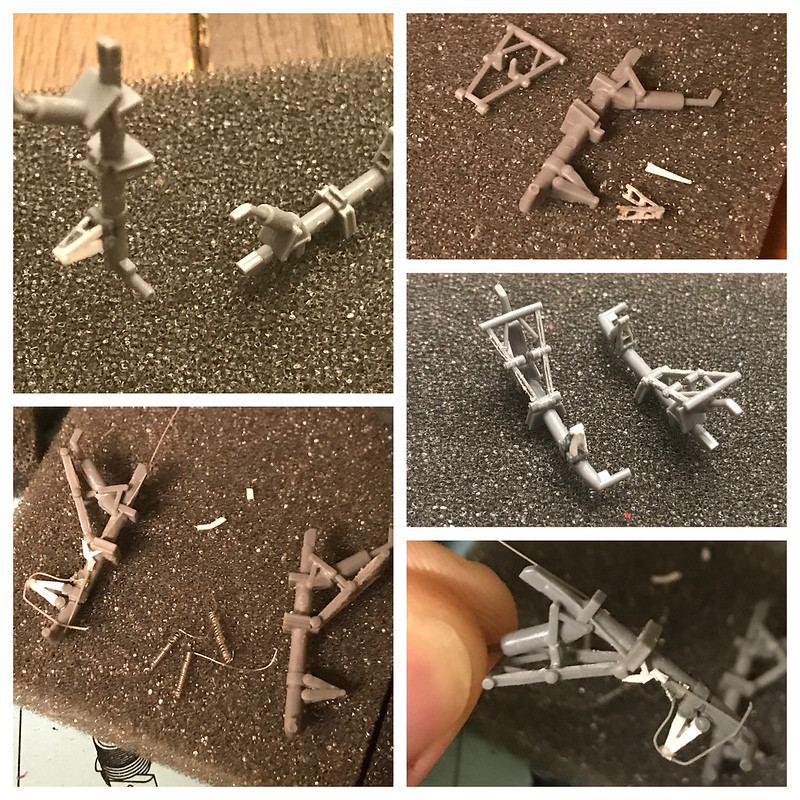
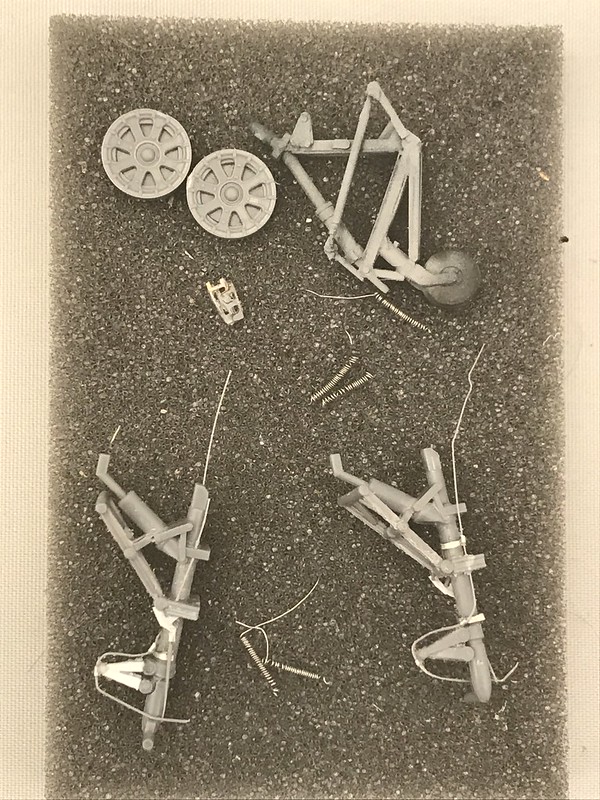
I addressed the landing gear for this kit and found that Tamiya's engineering keeps all of this pretty simple and hard to make a mess of it. I was originally going to use more PE parts here but I kept finding that they all lack any depth that is needed even at this scale. So I scratched all the add ons. Who here is surprised. With a new sharp No. 11 blade,  I slowly began to carve out the features of the oleo scissors based on photos. You'll note where one is white. I apparently snipped off a pair a while back for some stupid reason and had to scratch one out. Nothing too bad. The tiny extras are built from very tiny plastic strips that I cut out with the same No. 11 blade and some pulled sprue. This all goes together with some Tamiya ETC to bond it all together without any huge blobs of glue poking out anywhere against all this tiny detail. For kicks I also carved out the bracing that folds up the gear struts. The real thing has a bit of an I-beam look about  it with a flange created for stregnth. I VERY very carefully carved with a new No. 11 blade to create this space. Totally not necessary but I wanted to try it. Also, you'll note the springs that are made to look like actual springs. This was another feature I absolutely could not walk away from without owning it. A small (I think it was 0.4mm) aluminum tube (...brass would be stronger) was used as a frame while I coiled very fine silver wire...like the tiniest I could find. I kept this tight and clipped away the appropriate size needed. Boom! Springs... =]

 Untitled by Britt Vallot, on Flickr

 Untitled by Britt Vallot, on Flickr

 Untitled by Britt Vallot, on Flickr

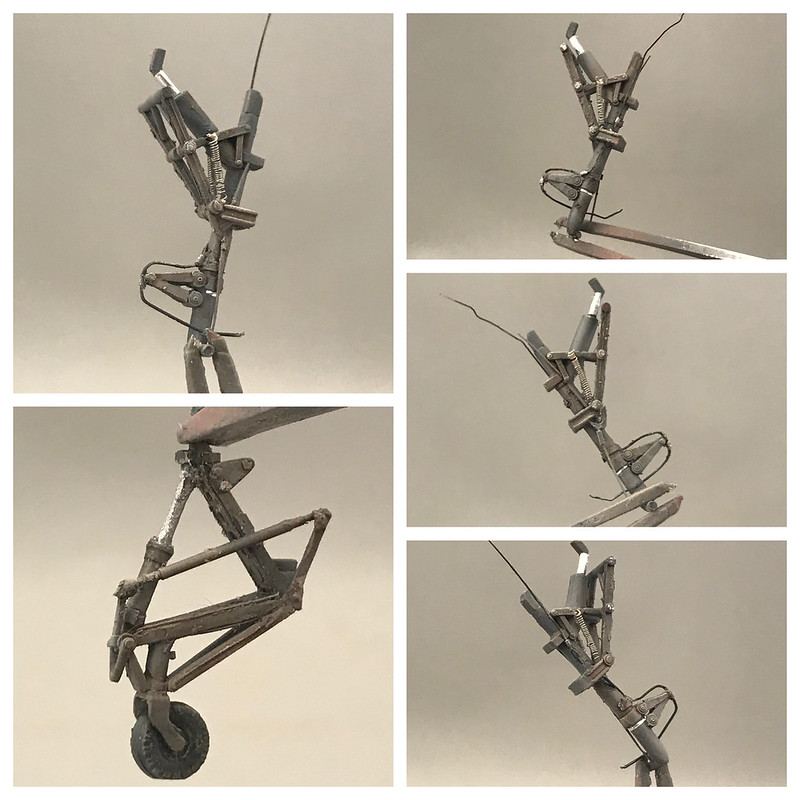
After primer and paint I added some thin cuts of aluminum foil to the oleo struts. I used the duller side up. It gives a more realistic look of being used and weathered. The oleo struts that Tamiya has with the kit look really weighted down. I had considered lengthening these since I won't be adding a drop tank or bombs, but honestly with the time I'm finding available I doubt I would be able to fix any problems I might create with changing it. At least not the way I'd want to go about fixing it. And Tamiya's got a great fit here so why mess with success. I do admit I conceded here. Foil also went on the top piston that retracted and lowered the gear struts. 

 Untitled by Britt Vallot, on Flickr

 Untitled by Britt Vallot, on Flickr

 Untitled by Britt Vallot, on Flickr

 Untitled by Britt Vallot, on Flickr

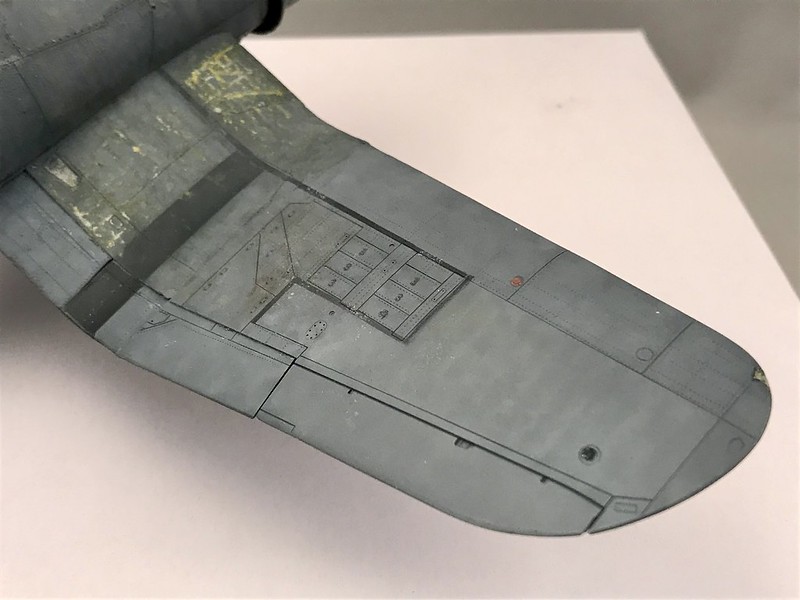
I want to keep things in a mostly chronological order to have the flow of the build easy to follow. The doors to the gear bay came next. Riveted, primed, painted in salmon primer color, chipping solution, undersurface color, chipped, and then clear coated for weathering. 

 Untitled by Britt Vallot, on Flickr

One neat feature I had to include and would've missed if not for the diligence of Dana Bell in his in depth look into the Birdcage Corsair was the "Captain" "Walsh" painted on the forward gear door on the gear struts. Which reminds me I need to include a picture of that with the finished photos. This was done with a sharpened Black watercolor pencil. I'm going to add a little bit of extra weathering to this to obscure his name as seen in photos.

Weathering 2.0

I'm going to skip the obligatory clear coat pic. Just assume I did it. From the clear coat I added some extra weathering apart from what I've tried to achieve with the painting process itself. Mostly oils here that I've mixed up and thinned with a low odor thinner. I loosen it up a little more for panel lines and rivets along the center of the fuselage underside and inboard wings. A semigloss coat goes on next for better workability with oils. I apply a slightly thicker application on top for the blue-grey paint where I'm picking out the ribbing within the structure. All of this was done with the intent of being very subtle. I'm trying to keep in step with what I'm seeing in photos of the aircraft Walsh had.

 Untitled by Britt Vallot, on Flickr

 Untitled by Britt Vallot, on Flickr

 Untitled by Britt Vallot, on Flickr

A quick look at the victory flags. I cut these out separately to leave the spacing observed in photos.

 Untitled by Britt Vallot, on Flickr

 Untitled by Britt Vallot, on Flickr

 Untitled by Britt Vallot, on Flickr

 Untitled by Britt Vallot, on Flickr

Much of what's happening hear is within the realms of normal weathering techinques.

Birdcage canopy

I turned my attention to the canopy next as I had some high hopes for making some magic here. I still have a few pictures to take of the finished canopy with the mirror and cable rigging that operated the sliding back and forth to open and close it. That'll come later. I kept with my usually black lead foil technique for interior framing. The knobs and pulley features are all scratched out of plastic rod and sanded into shape before cutting them from their original length.

Kind of explains itself.

 Untitled by Britt Vallot, on Flickr

 Untitled by Britt Vallot, on Flickr

 Untitled by Britt Vallot, on Flickr

This all got masked with Tamiya tape on top and primed and painted. Still a few more things to show on this but I'll stop here for now.

Odds and ends

I'm beginning to wrap up loose ends here toward this stage of the build. All the big stuff is mostly complete. I turned my attention to the prop. I wanted an appropriately weathered prop for the PTO and I wanted to try again to better reveal some of what occurs with the usage and maintenance of these aircraft. I wanted a prop that wasn't straight black as that's just never the case. I wanted to see some faded greys within the already faded black as well. The last thing I decided I'd do this time around was to incorporate the oily sheen that's left from hands and fingers while turning or manuervering around the prop. So here's that.

 Untitled by Britt Vallot, on Flickr

 Untitled by Britt Vallot, on Flickr

I first start off by sanding down my blades to be razor thin. They don't need to be paddles. Tamiya offers a great prop already in my opinion, but it can still use some help. Primer then Alclad aluminum. I used NATO Black as it starts out as a really good faded black already and then sponge in some lighter tones to follow. If I get too far away from what I want, I can just spray on some more NATO Black to correct. Yellow tips get masked and painted. Then a clear coat for detail around the prop hub. I typically use the Detailer for spots around this. All this is sealed away in flat coat. This time I took a fine tip brush to haphazardly paint on some finger marks with a Light Sheen coat from Alclad to show a difference in reflectivity. When done right this element can add a lot of life to your subject. I've been experimenting more and more with this over my past few builds. This photo here doesn't do it justice. I'll have better pics later.

 Untitled by Britt Vallot, on Flickr

I cut out the back quarter panels of glass from clear plastic sheet. I believe it's the 0.4mm thickness. I use it for things like this or for gunsight glass. Any kind of glass...it's great. I needed the same thickness for the Squadron replacement canopy otherwise it would look ridiculous. I curve the cut "glass" over the round surface of a paint brush to convince it to bend a little. =] Masked and painted.

The gunsight was addressed as well. I intended to go with the kit piece which is an early Mk.8 gunsight but of course I dropped it and could never find it again. So I made another one. Cut, sanded, glued and painted. These pictures suck and I'm sorry but I was rushing to get through some of this. They are blown up and heavily pixalated. But you get the idea.

Bringing it back to the landing gear...

I epoxied these into place so they wouldn't ever move ever. Mission accomplished! You can see how this all comes together with the little add ons to bring it more to life.

 Untitled by Britt Vallot, on Flickr

 Untitled by Britt Vallot, on Flickr

 Untitled by Britt Vallot, on Flickr

 Untitled by Britt Vallot, on Flickr

Signal light cut off, reformed from clear sprue.

 Untitled by Britt Vallot, on Flickr

 Untitled by Britt Vallot, on Flickr

 Untitled by Britt Vallot, on Flickr

 Untitled by Britt Vallot, on Flickr

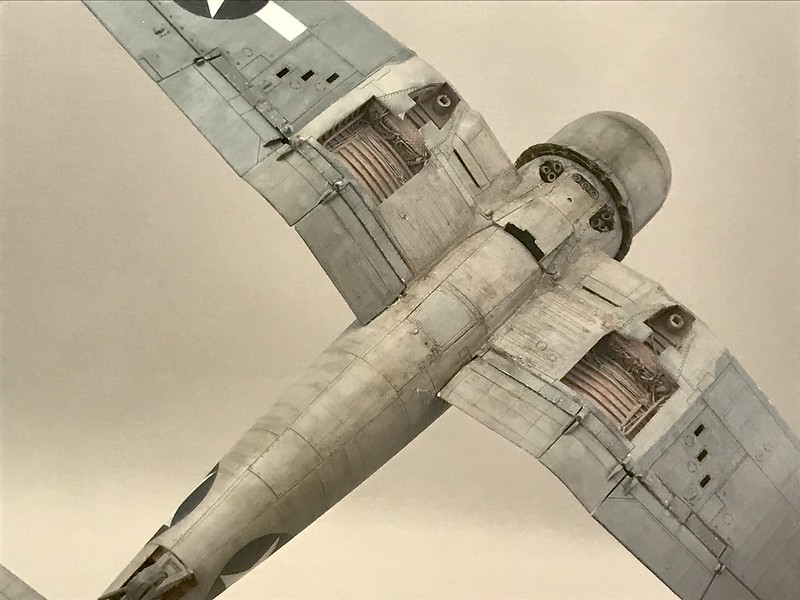
Exhaust stains added. I stopped at this fuselage vent as I've noticed over and over again how this deflected a considerable amount of engine soot and lead staining along the undersurface of the fuselage. I tapered a small amount that I let find it's way along the wing root and kept that lightly down toward the tail.

 Untitled by Britt Vallot, on Flickr

Getting closer!! =]

 Untitled by Britt Vallot, on Flickr


On the bench:  

Tamiya F4U-1  Kenneth Walsh


  • Member since
    September 2014
Posted by rooster513 on Thursday, March 18, 2021 2:19 PM

Another absolute beauty! I really enjoy your WIPs, they are always so informative. And the paintwork is top notch!

-Andy

  • Member since
    June 2013
Posted by bvallot on Thursday, March 18, 2021 1:39 PM

Here's a quick update.

I'm trying to wrap up some loose ends before putting down my gloss coat to seal all this away and set up for further weathering. I've finally addressed my flaps which are in the upright postion. Many Corsairs in the PTO were seen with the flaps up. A few snips and some glue and you can reposition the kit parts to allow them to fit into the slots Tamiya has for you to fit these into the wings. For good measure, I've welded this nice and tight with an epoxy so that these little SOBs never move or nudge out of position. One important nuance to this is that the flaps should line up in a nice, even curve into the fuselage. Don't let there be any steps visible.

 Untitled by Britt Vallot, on Flickr

 Untitled by Britt Vallot, on Flickr

Some other things going here include a little of Tamiya's weathering compound (light sand) over some of the upper surface on the doped fabric and along the bottom of the fuselage. This time around I tried putting this down before any gloss coat or subsequent layers. Since the paint is flat, the surface isn't perfectly smooth which allows this to stick. I didn't go for anything to heavy. I can add additional layers later on if need be. I mostly wanted to get the paint itself looking a little beat from the sun and the coral taking its toll on the underside.

 Untitled by Britt Vallot, on Flickr

 Untitled by Britt Vallot, on Flickr

Next came the flap guards which fold down while the flaps are up to protect the gearing within them. Simple enough to scratch out. Rivets added and a slight cut into the guard to encourage a bend to reveal individual flaps throughout the bend in the wing just aft of the wheel bay.

 Untitled by Britt Vallot, on Flickr

 Untitled by Britt Vallot, on Flickr

Once that was tied up, I turned my attention to the black painted line on the fueslage to indicate the foot hold for the pilot. I hate decals for most things and especially items like this when the decal is thick and/or wide. This is easy to mask and paint so why not, right? I use NATO Black from Tamiya's flat selection as it comes off as a faded looking flat black which is perfect for a weathered black appeal. Straight, hard looking Flat Black doesn't work as well here.

 Untitled by Britt Vallot, on Flickr

 Untitled by Britt Vallot, on Flickr

Some other odds and ends include the taped gun ports at the leading edge of the wings for the 50 cals. A little trick many of the marine units would play on their Japanese adversaries was to "tape" an additional fourth gun port next to the outboard gun to give the appearance of having eight 50 cal machine guns instead of the actual six. The picture I'm using for this particular Corsair that Walsh flew has the extra gun port taped off and looks like this.

 Untitled by Britt Vallot, on Flickr

 Untitled by Britt Vallot, on Flickr

 Untitled by Britt Vallot, on Flickr

 Untitled by Britt Vallot, on Flickr

That's where it stands for now. =] Dotting i's and crossing t's right now before moving on. Thanks for following along.

On the bench:  

Tamiya F4U-1  Kenneth Walsh


  • Member since
    June 2013
Posted by bvallot on Thursday, March 18, 2021 1:34 PM

delete post

On the bench:  

Tamiya F4U-1  Kenneth Walsh


  • Member since
    June 2013
Posted by bvallot on Thursday, March 18, 2021 12:46 PM

Much appreciated DM1975. =] I believe the whole point of this forum is to share thoughts and ideas so that each of us grow our craft and improve. Much of what you see here I've picked up from other modelers on the Finescale and over time I've done what I could to add to it. So I'm happy to light your fire! Most of the big work is done now for this Corsair, but I still have a few tricks to drop. I hope I don't let you down.

cbaltrin, wpwar11 thank you very much! I'm working as quick as I can to get this one off my bench. I have a lot to pick up and organize. =]

On the bench:  

Tamiya F4U-1  Kenneth Walsh


  • Member since
    January 2020
  • From: Maryland
Posted by wpwar11 on Friday, March 12, 2021 4:52 PM

Damn fine work.  Bravo.

  • Member since
    May 2004
  • From: Land of Lakes
Posted by cbaltrin on Friday, March 12, 2021 3:36 PM

What he said! Can't wait to see finished product!

Aggieman
Your work on the Corsair is simply astounding!  

On the Bench: Too Much

JOIN OUR COMMUNITY!

Our community is FREE to join. To participate you must either login or register for an account.

SEARCH FORUMS
FREE NEWSLETTER
By signing up you may also receive reader surveys and occasional special offers. We do not sell, rent or trade our email lists. View our Privacy Policy.