SEARCH FINESCALE.COM

Enter keywords or a search phrase below:

Tamiya 1:48 Birdcage Corsair F4U-1 [Complete]

16910 views
84 replies
1 rating 2 rating 3 rating 4 rating 5 rating
  • Member since
    March 2012
  • From: Corpus Christi, Tx
Posted by mustang1989 on Monday, July 6, 2020 7:40 AM

Damn IT boy!!!! Really throwing it all down on this build. Fantastic progress Britt.


 Forum | Modelers Social Club Forum (proboards.com) 

  • Member since
    November 2003
  • From: Naples, FL
Posted by tempestjohnny on Monday, July 6, 2020 4:26 AM
Britt. Watching your scratchbuilding skills is amazing.


  • Member since
    June 2013
Posted by bvallot on Saturday, July 4, 2020 9:40 PM

Thanks Pilot John. The 1:32 builds could certainly accomadate that. They shove it all in there in seems. =]

Thanks Keavdog. Happy to hear it and happy to have you.

richs26, I was pretty sure there was a couple still around. Thanks for the update. I was happy to see one up in the air today during the flyover in DC for today's celebrations. That siholuette is so beautiful and so distinct.

RickS and Radmax8, I do appreciate it. I still don't count myself in that number yet. Those higher caliber modelers still make me drool and wonder how they do it. But thanks and happy to have you on board. =]

I've been slow with the progress guys. Sorry about that. I do have some things more or less wrapped up with the cockpit and I'm nearly ready to close it up. Some steps just can't be rushed.

Thanks everyone. Happy 4th of July!!

On the bench:  

Tamiya F4U-1  Kenneth Walsh


  • Member since
    February 2005
  • From: Cleveland, OH
Posted by RadMax8 on Monday, May 18, 2020 10:53 PM

Always fun to watch your builds, Britt. And a reminder that I've got about 1/4 of the skill and mechanical know-how that you posses!

I've built two of these Corsair kits (in the later -1D guise) and I agree, they're a great starting point. 
I'll be watching this one come together!

  • Member since
    April 2020
Posted by RickS on Monday, May 18, 2020 1:37 PM
Holy smokes! The level of detail is astonishing! I assume you must have an actual Corsair in your backyard as a reference! LOL
  • Member since
    September 2005
  • From: North Pole, Alaska
Posted by richs26 on Sunday, May 17, 2020 9:20 PM

[quote user="BrandonK"]

Amazing work as usual. This will certainly be a top notch build. I love watching you scratch stuff up, so many good ideas.

I understand that there are no flyable birdcage Corsairs left and only one true birdcage left in the world and it is too far gone to restore. That's a shame.

BK

Actually there are three left, with 2270 being restored in Australia, 2449 being restored in California, and 2465 on display at the USN Naval Museum in Pensacola.  Edit: Joe Baugher has it listed at the Museum, but it is not listed as on display online.


WIP:  Monogram 1/72 B-26 (Snaptite) as 73rd BS B-26, 40-1408, torpedo bomber attempt on Ryujo

Monogram 1/72 B-26 (Snaptite) as 22nd BG B-26, 7-Mile Drome, New Guinea

Minicraft 1/72 B-24D as LB-30, AL-613, "Tough Boy", 28th Composite Group

  • Member since
    April 2003
  • From: USA
Posted by keavdog on Sunday, May 17, 2020 4:31 PM

Catching up on this one.  Fantastic details.  Following from here on.  Really appreciate the detailed write ups.  

Thanks,

John

  • Member since
    May 2012
  • From: Pennsylvania
Posted by pilotjohn on Sunday, May 17, 2020 3:32 PM

All I can say is; awesome!  It makes you wonder if they released a see-through fuselage side this build would be special indeed.

John


  • Member since
    June 2013
Posted by bvallot on Saturday, May 16, 2020 7:19 PM

Back with an update. It's been tricky trying to create some time for this build, but that always seems to be my excuse. I did manage to get through what I wanted out of the tail gear section and continued work on the cockpit.

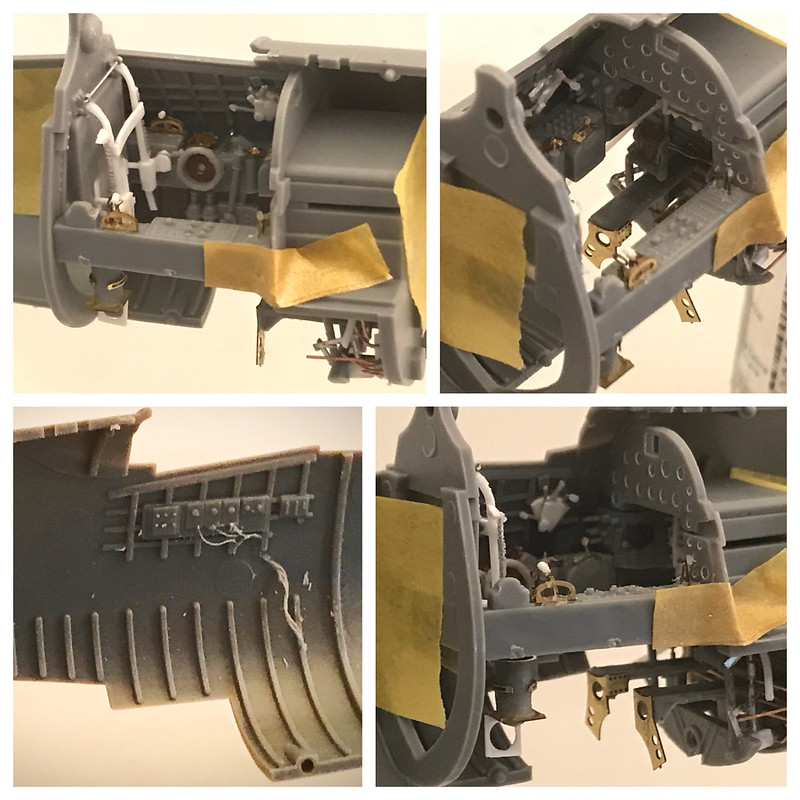
Here is more of the cockpit coming together. I'm taking my time here to ensure all the add ons are lining up and have space enough to fit properly.

 Untitled by Britt Vallot, on Flickr

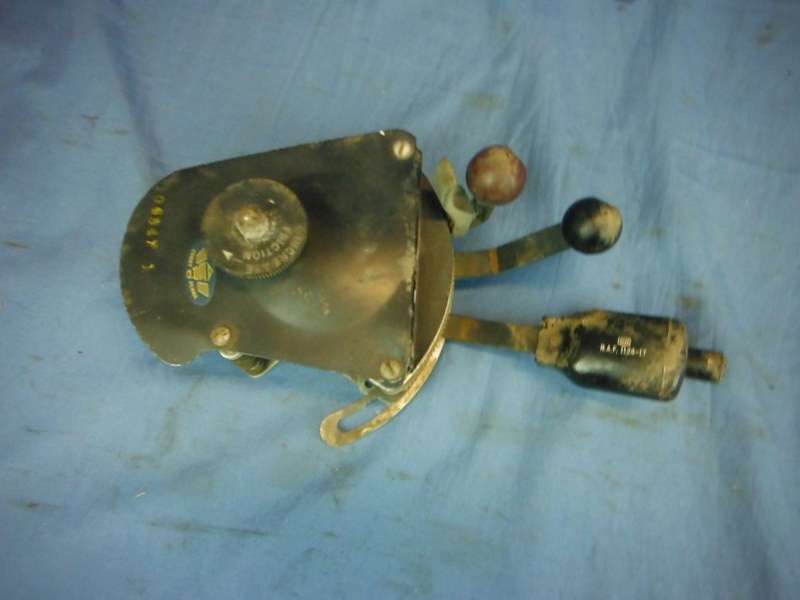
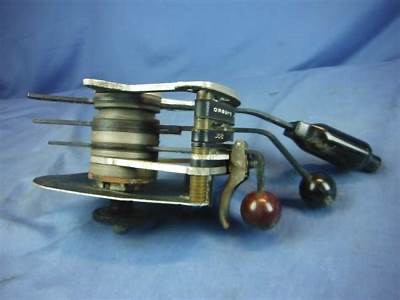
I fought real hard not to cut all this side wall detail out. It's really not all too bad. I did have redo the throttle quadrant. That just wasn't going to cut it. What you see here is pretty simple. I cut and trimmed the kit piece down and built back up from it. Thin cuts of plastic card make up the body of this device. There's a small rectangular shim to give some space to separate where the different levers will fit in and another small cone shaped layer on top of it. I also added a cone shaped piece of lead foil to make up the rear portion and provide some depth. Here's some examples of the real thing.

 Untitled by Britt Vallot, on Flickr

 Untitled by Britt Vallot, on Flickr

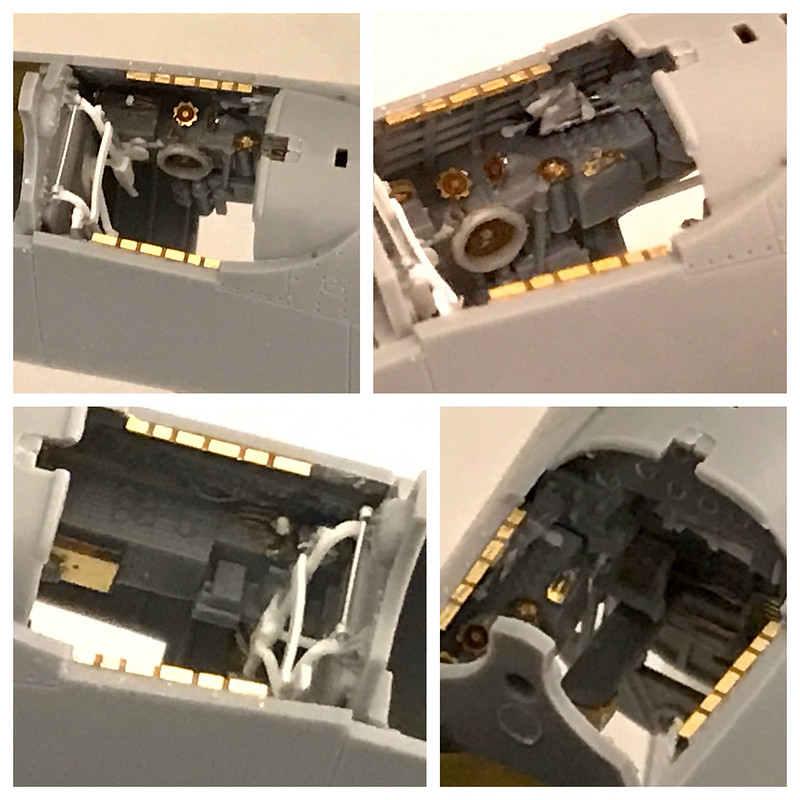
I hope you can see well enough how that's coming together here. Hopefully, after some primer this will be better viewed.

Moving on, I started dry fitting the fuselage halves together. 

 Untitled by Britt Vallot, on Flickr

There are four long stubs poking out of the left side IP. This is where the throttle quadrant controls will pass through the IP to control the engine. I ended up getting just a bit too much CA on here when gluing my slide tubes to make up the controls and I've since cut them off. I'll be reattached to the IP and match them to the throttle later on. They are too small and delicate to do it more than once without making a bigger mess.

The Tail Gear

I'm a sucker. I'll just tell you up front. Many of you can breeze past this part if you'd like and it won't hurt my feelings a bit. This largely will go unseen, but I feel the need to develop any exposed opening on an aircraft. So here it is. 

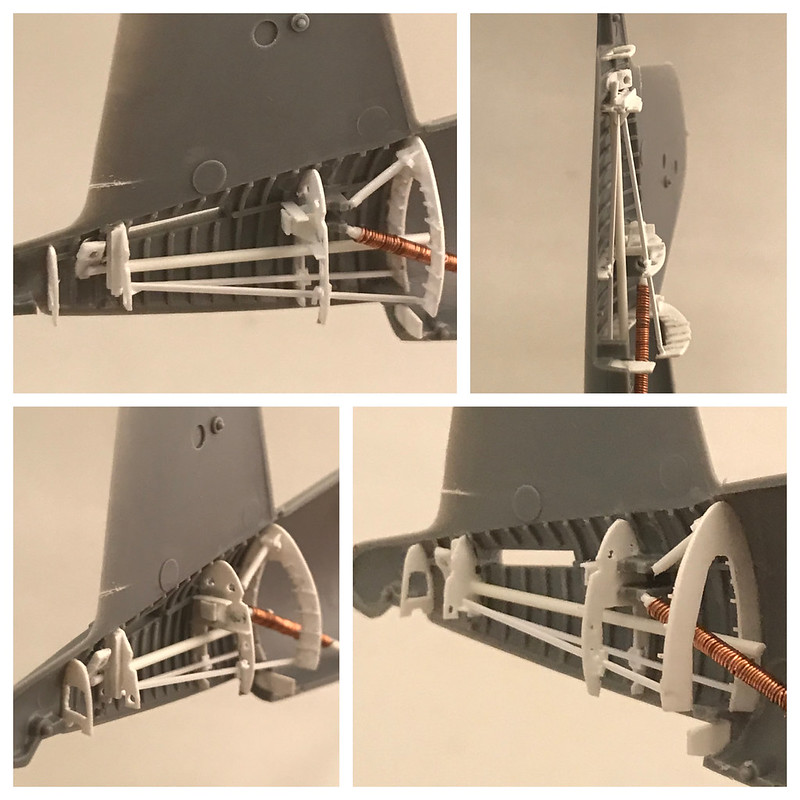
Working up the ribbing and various bulkheads isn't real hard. It just takes some eyeballing and lots of sanding. Having some specs on hand can help, but it's important to realize that the kit itself has it's own thickness to account for and at the end of the day you have to make fits according to what is in front of you. Here's what I have to share. Much of this gets overwhelming to look at so I've broken it down into a few parts.

 Untitled by Britt Vallot, on Flickr

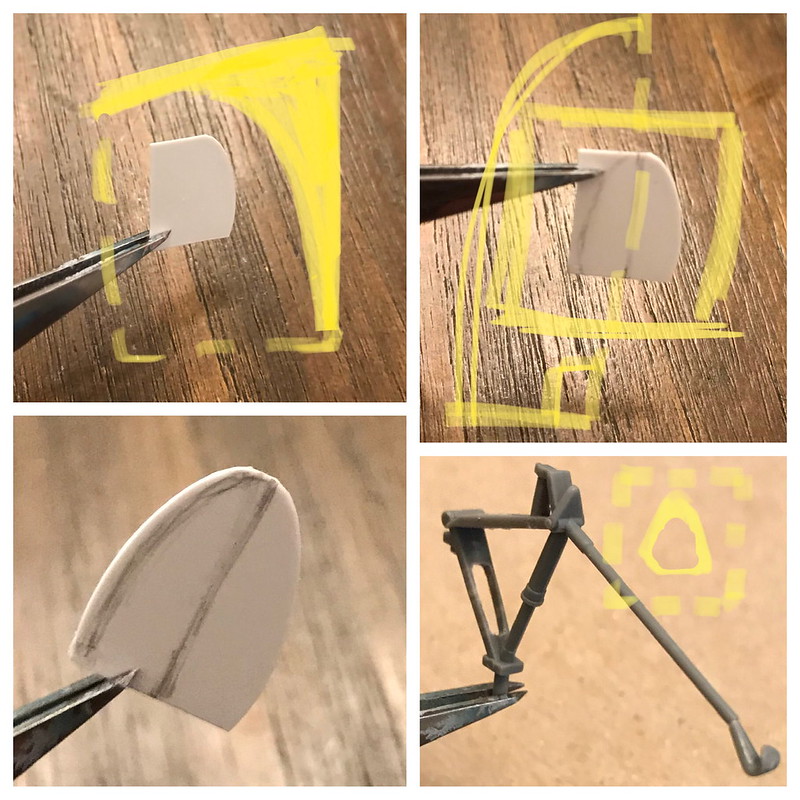
Easy enough to see what's going on here. I added some coaching marks to help explain. You're essentially finding one side of that curve for the fuselage half and then mirroring it. Nothing fancy about it. I find this to be quite effective. Start a little larger at first as it's easier to take it off than put it on. =] For the tail hook...many of these got removed to lessen the weight once they were committed to forward island bases. I checked through photos and found in enough of them that Walsh had his removed as well. So--snip! The triangular shape you see in front of it should be hollowed out. Tamiya has molded it as a solid piece but the real thing is basically a band of metal that's bent forming the triangle you see here. I have no name for it and can not quite come up with a possible function for it. Anybody out there with an answer...I'll be grateful to hear it. (Edit - After more digging for various other parts of the build I stumbled upon a name for this. I've seen it labeled as a turning mechanism. Possibly for other vehicles to push/pull it into place)  But nonetheless, this is the true shape of it. This might actually be a little undersized, but it was strong and I left it as I was able to carve and sand it proper. I didn't want something flimsy that would later pop off. 

 Untitled by Britt Vallot, on Flickr

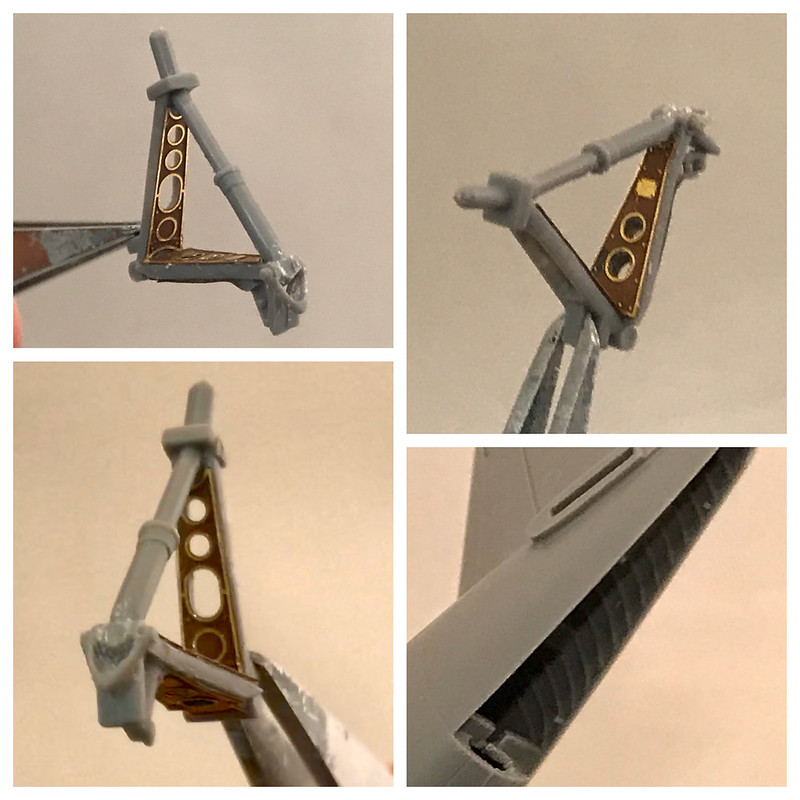
Next, I utilized some of the PE for the tail gear itself. It requires a bit of drilling and cutting but nothing so extreme. Pretty self explantory. I resisted the urge to cut the upper section out and add some side strips instead of laying the upper PE on top. An I-beam shape is more accurate but I didn't want to chop this up and make it weaker possibly when having to add it later. Did that once on a mustang and found it harder to fix after the fact. It tucks away pretty well and is still and nice addition.

Next comes the framework that all of this sits in.

 Untitled by Britt Vallot, on Flickr

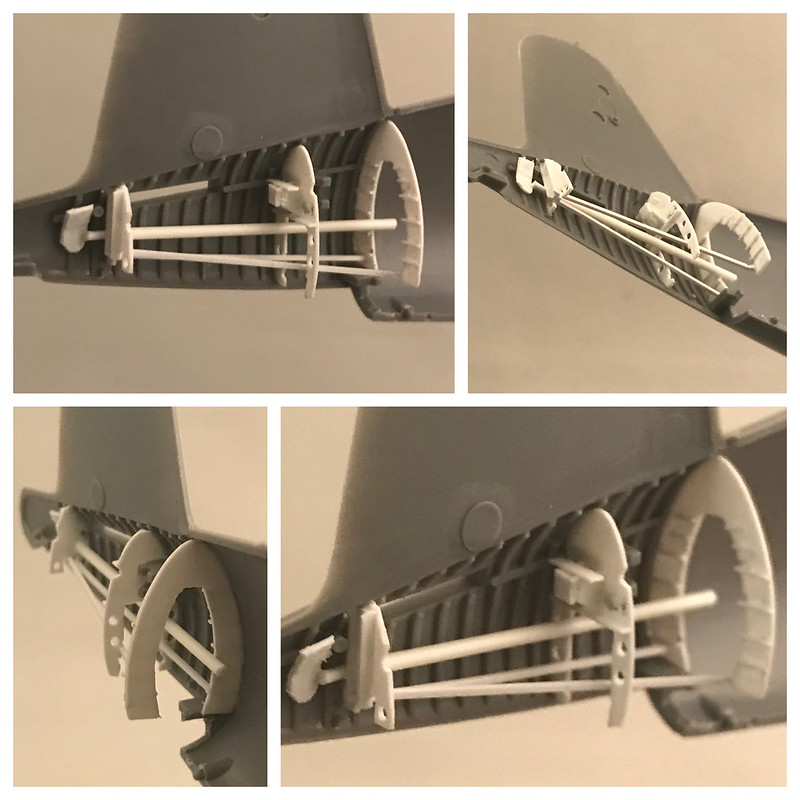
This speaks for itself. I'm just building up what I see on the real thing. If there's any specific questions, then please stop me. That's what WIPs are for! =]

Much of this is just made from various thicknesses of plastic card/strips, c channel in there, some rods of various thicknesses, etc. 

Intermediate step to check my math.

 Untitled by Britt Vallot, on Flickr

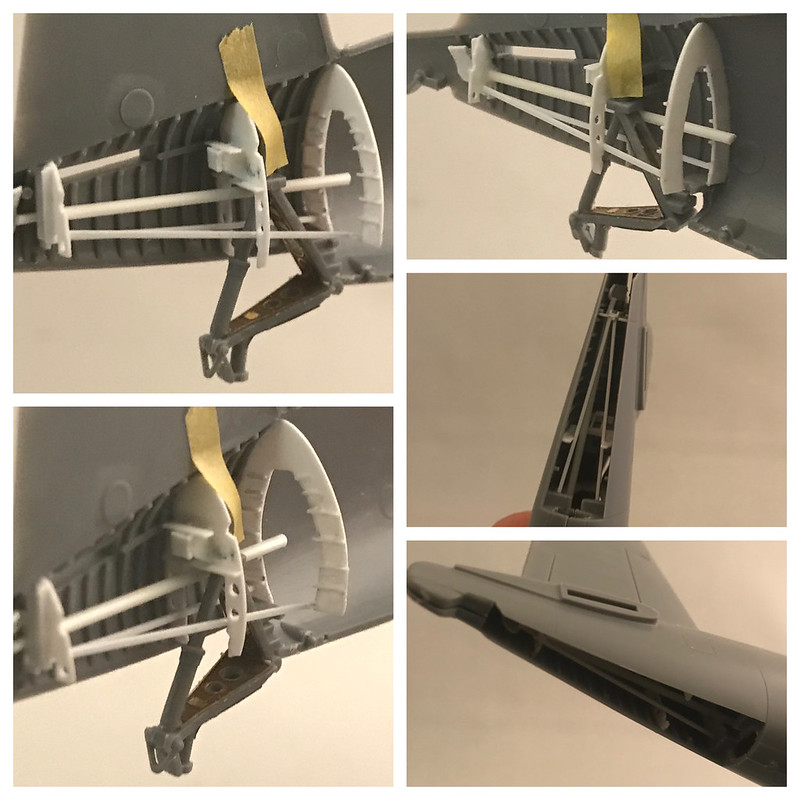
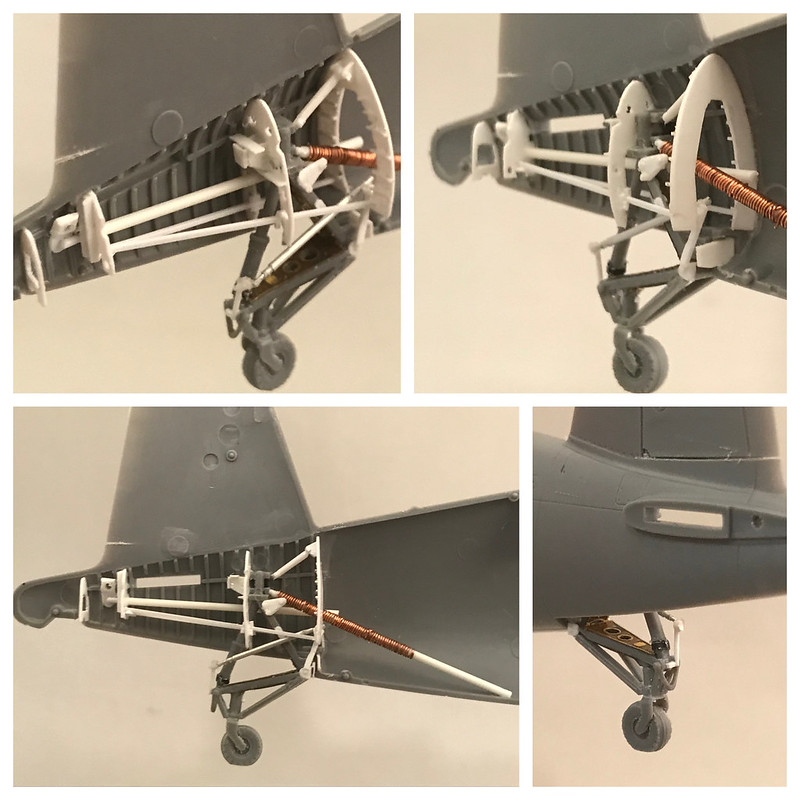
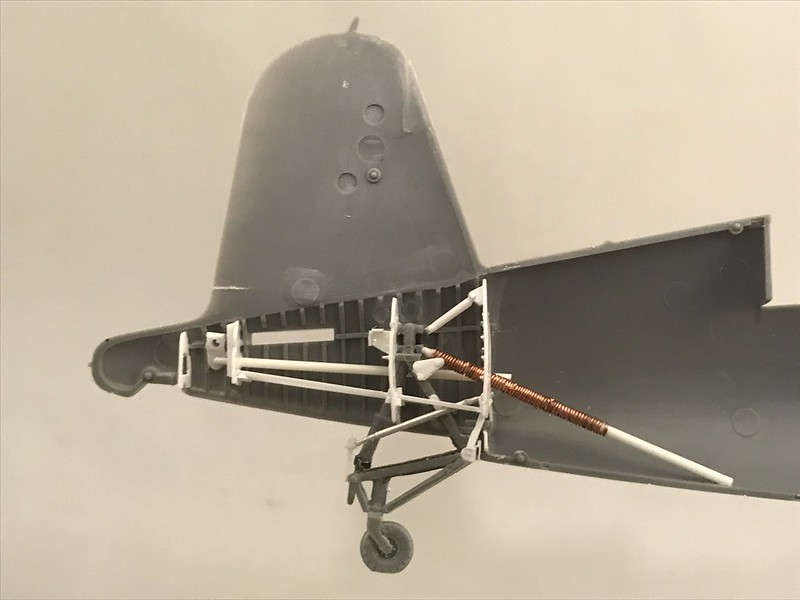
A few extra parts to liven things up. Everything seen here is amounts to rudder control (box behind middle bulkhead minus the wiring for it...comes later after priming), elevator controls (long rod--interesting note at the end), tail gear retraction, and stearing for the tail gear. 

 Untitled by Britt Vallot, on Flickr

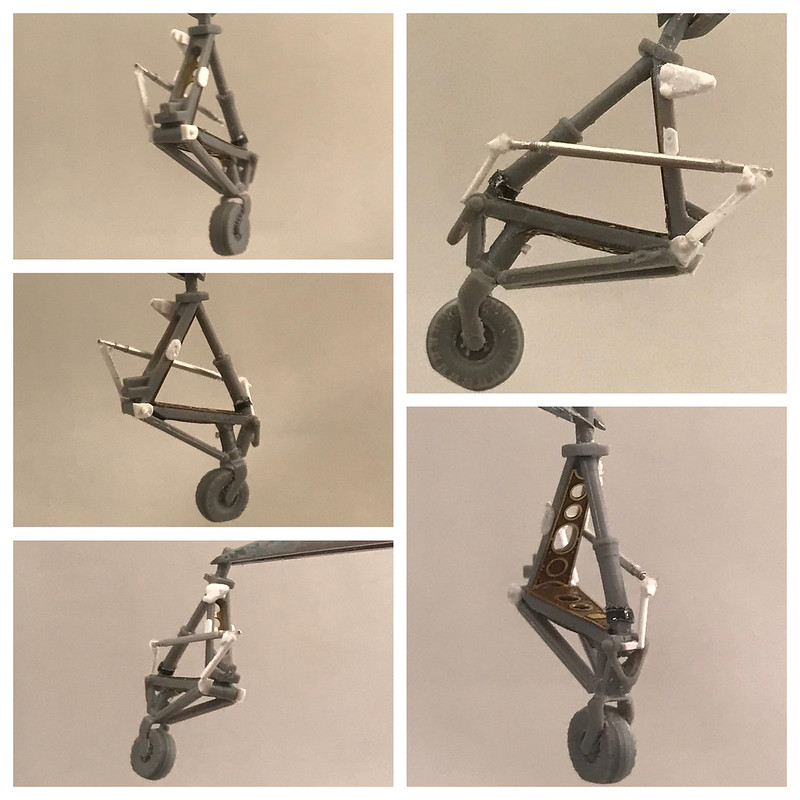
I continued to dress up the tail gear itself. One major addition or rather subtraction is the carving out wheel. This part is obviously molded solid and likely for reasons of the molding technology but it should be a thin flat metal housing that the wheel fits onto. Opening this up isn't hard and makes a huge difference. I started with my No. 11 exacto knife and began drilling a small hole that I slowly used to get leverage to carve out the insides. Nothing to it. Just slow working the blade to trim away what doesn't belong. I even cut away a small groove from off the tire so I can drop some detailer wash in later to create some shadow. I also cut the tire off after finishing so that I can reposition it. I currently have it facing backwards to show a corsair that was backed into its place on the PSP matting. Just a simple thing to add interest.

 Untitled by Britt Vallot, on Flickr

The other notable feature here is what operates the tail hook. The Eduard PE gives you a flat piece that resembles this shape, but blah--screw that. The actual object is some small, hydraulic driven tube that builds up easy enough with slide tubes. I secure this with a white glue which provides a little wiggle room for movement that CA will not. When test fitting it can be a huge pain to watch tiny pieces fly off to never be found again...even when they are right in front of you...without carpet...and a clean work area...mostly clean. So the white glue is strong and flexible and a big part of my build process. And if something needs correcting, it can be pulled off and cleans right up. Any other time I can build something out of plastic I usually try to. That allows me to weld it all together with the Tamiya Extra Thin Cement and keep it strong and lasting.

Here's the next progression of how this is shaping up.

 Untitled by Britt Vallot, on Flickr

Again, any questions out there about any of this please don't hesitate to ask. I plan to stop here as this is sufficiently busy. Rest assured, none of this will be visible after all your hard work. Even those pesky little flashlights will find it hard to search out this area of the build.

 Untitled by Britt Vallot, on Flickr

This is set of views is to give you a picture of where we're at with the scratch building add ons. Not too bad and worth the time. You know, if you're a masochist.

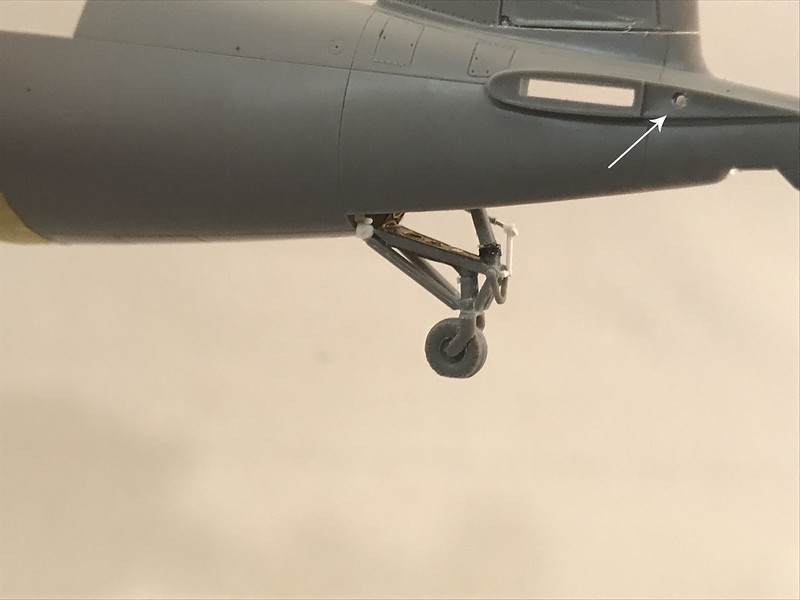
One extra point I wanted to share was a happy little accident I stumbled onto with Tamiya's engineering. On the inside of the tail section where the elevator bar is received by the fuselage tail, you can see a small nub protrude. This nub actually lines up perfectly with what controls the elevators. I naturally jumped on the opportunity to drill this out and line it up with the actual elevator control on the inside and I plan to place a brass rod through it and into the elevators which will be moved into a forward stick position making them droop. =] 

 Untitled by Britt Vallot, on Flickr

This corresponding position on the elevator is perfectly aligned. It was like they were asking me to do it. =]

 Untitled by Britt Vallot, on Flickr

 Untitled by Britt Vallot, on Flickr

That concludes this section. All that's left before prime and paint is to add the hoses and wiring in the cockpit and solve my exhaust stack problem. Thanks for watching.

On the bench:  

Tamiya F4U-1  Kenneth Walsh


  • Member since
    June 2013
Posted by bvallot on Thursday, May 7, 2020 10:17 AM

You're a sweetheart Greg. Ha. Thanks!

glenva, that's really amazing to hear. And encouraging too. I've been finding the same myself with regards to my role in what I do for work that the team you're a part of is responsible for the success you see. Anytime I hear praise about our group I find myself more considerate and more deliberate about sharing the efforts of others from our team. A lot of the leadership and management books and coursework I've been into lately discuss the same...getting the focus off of "you" and on to the other moving parts of your team/unit/dept/whatever. And Walsh is living in a time before all this kind of talk is being iterated. I think you might be right about more people from his generation being like that. They generally had larger families back then. Not much time for "I, I, I" when you've got a handful of siblings with which to contend.

Thanks for sharing that story. It reinforces a lot of what I've been thinking and feeling for some time. I think it's good to have a gut check every now and then. It's too bad we don't have more guys like that around these days.

Glad to have you on board Hoss! =]

On the bench:  

Tamiya F4U-1  Kenneth Walsh


  • Member since
    July 2019
Posted by Hoss WA on Saturday, May 2, 2020 4:52 PM

Wow. Amazing detail work. I'm following along closely and hope to learn something. The Corsair is one of my favorite planes and Tamiya's kit is on my list. 

  • Member since
    March 2017
Posted by glenva on Friday, May 1, 2020 7:41 PM

It was such a long time ago I pretty much forgot alot of the details.  But, I distinctly recall he didn't  talk about himself but recounted a number of stories about what he saw other guys do.  I think that was typical of his generation.  He said the bravest guy he ever saw was a Navy Air Wing Commander who orbited over a particularly hot target vectoring folks on to individual targets.  Japanese kept rolling in on him and he stuck to his job.  

Col Walsh was just a class guy.  I am glad you are honoring his memory.  

By the way, I built the same kit of his airplane three years ago.  It wasn't even near the work yours is.  Can't wait to see the finished product.  

  • Member since
    May 2013
  • From: Indiana, USA
Posted by Greg on Thursday, April 30, 2020 5:43 AM

You still have my full attention.....


  • Member since
    June 2013
Posted by bvallot on Wednesday, April 29, 2020 10:07 PM

Hey there Tosh! Glad to see you. I hope you're staying strong.

I have a quick update to wrap up this section of the cockpit. I'll move on to the fuselage halves afterwards then tidy up the rear landing gear and then address the exhaust stacks before priming/paint.

I just completed the frame for the seat for this Birdcage. As most of you know there was no floor to the Corsair and as such the seat was mounted to the framing and armor plating behind it. Tamiya's solution for this highly unseen area of the cockpit is acceptable, but if I'm ever only going to get to build just one more of these beautiful birds, then it's going to be the best one I can make. =] Scratching this part really isn't so bad provided you keep in scale. My first attempt just wasn't quite cutting it and the already crammed cockpit got even stuffier with my pudgy framework. I went as small as I could, appropriately, as seen in the pics below.

 Untitled by Britt Vallot, on Flickr

In the top corner, you'll see the yellow semicircle denoting the shape that the bottom joints for holding the seat shape up into. This is very small and I apologize for the poor quality photo. My cameras white balance just can't keep up with this. I've sanded this into shape while on the strip of plastic tubing so that I can sand it down as small as I can. I'll cut it last once I have my shape. The flat part is front facing for the seat backing. The rest of this builds up pretty much just like you see.

 Untitled by Britt Vallot, on Flickr

The side bars along the seat were put together with a small tube (I eventually went with .4mm slide tube) with a smear of CA and thinnly pulled sprue to coil around it tightly. Tightly in spacing, not so tight as to pull and break it. These were my first attempts. I've included it just to show that these things don't always come out right the first time. ;)

 Untitled by Britt Vallot, on Flickr

Here again was the first attempt. After looking at it I realized it was way to big and the side bars and very top bar were out of proportion to the rest of the frame which I thought was more or less acceptable. I was using the smallest plastic rod I had...which was .020in rod or .5mm....and it was too big! So I broke out the albion slide tube which I hestiate to do but it was the only thing on hand small enough to get the job done. The top bar was again the .4mm with the caps at .6mm. The result is much happier.  Crisis averted. 

 Untitled by Britt Vallot, on Flickr

 Untitled by Britt Vallot, on Flickr

A few extra details went on to tie this up. I usually wait to place all the small PE throttles and knobs and such, but I can grip this plenty easy to fiddle with it as needed. One tip to note is that the knobs of the levers are flat as can be and an easy fix is a tiny drop of CA glue to give it some body. I do this with a smear of CA over the tip of my No. 11 exacto blade and make a couple of passes over the tip of the knob. Let it dry for a moment and make a few more passes until you're happy with what you've got. Simple enough. There's a few more add ons here with hoses and a few more to place that I'll have to wait to add later. But this part is pretty much set. I'll point out a few things that are extra here when I start to paint. Some of this will be too difficult to see.

 Untitled by Britt Vallot, on Flickr

On the bench:  

Tamiya F4U-1  Kenneth Walsh


  • Member since
    December 2018
Posted by Tosh on Wednesday, April 29, 2020 9:19 PM

Absolutely AMAZING!

Be safe, Stay healthy, Toshi

Reside in Streetsboro, Ohio


  • Member since
    June 2013
Posted by bvallot on Wednesday, April 29, 2020 7:44 PM

Glad to have you all aboard. Joe, it never fails...anytime I get back on here, I'm about ten or twelve builds behind you. I try breezing through what I've missed, but I know I'm missing out. Glad to see you around though.

damouav, you probably already know but the 1:32 Tamiya Corsair is a dream to build. They sure did it right. I'm hoping to put this scale on par with that one as best I can.

Thanks Don and Greg. It's good seeing y'all too.

BK I wasn't aware of that but I suppose it's no surprise. That's part of the reason I got into modeling these planes. I wanted my son to know about these men and their sacrafices, and also the aircraft that helped them do it. 

Pilotjohn, I've seen two of your builds! Glad to have you on with us.

RickS, I started out stalking the pages of this forum and others for at least a year before getting brave enough to jump in it. I know just what you mean. I'm still trying to get as good as some of these guys out there. They've got tricks that I just haven't learned how to utilize well enough and I end up having to just get there my own way. I hope I don't let you down.

Rooster, glad to have you. =] 

glenva, that's amazing to hear. I absolutely love hearing from the guys on this forum that have stories like this one to share. I would love to hear more if you've got more to say. You can lay it right here on this thread if you'd like.

I hope to be back a little later with an update.


On the bench:  

Tamiya F4U-1  Kenneth Walsh


  • Member since
    March 2017
Posted by glenva on Tuesday, April 28, 2020 6:13 PM

I had the honor of escorting Col. Walsh for "The Gathering of Eagles" meeting at Maxwell, AFB back in '94.  He was one of the nicest, humblest men I got to meet during my time in the service.  During his presentation he really didn't talk about his achievements but gave some of the other pilots that flew off Guadalcanal a whole lot of credit.  He as truly an American hero and I treasure the time I got to spend with him.  If anyone deserves being honored through a good build, he sure does.  Good luck with it.  He was a hell of a man.  

  • Member since
    September 2014
Posted by rooster513 on Tuesday, April 28, 2020 5:53 PM

Really looking forward to seeing this one! Your WIP’s never disappoint!

-Andy

  • Member since
    April 2020
Posted by RickS on Tuesday, April 28, 2020 11:00 AM

Just saw this thread, and had to look in for 2 reasons... 1) the Corsair is my favorite airplane from WW2, and 2) I also have a Tamiya 1/48 F4U-1 to build (not the birdcage version), once my knowledge and skill level increases. As a kid, I remember Tamiya kits being the absolute best, and it was a rare treat that I could manage to scrape up enough chores and allowance money to get one. LOL It flat out amazes me the level of detail some of you modelling masters can achieve! I'll be watching this build.

  • Member since
    May 2012
  • From: Pennsylvania
Posted by pilotjohn on Tuesday, April 28, 2020 9:51 AM

Awesome workmanship!

John

  • Member since
    June 2014
Posted by BrandonK on Tuesday, April 28, 2020 9:48 AM

Amazing work as usual. This will certainly be a top notch build. I love watching you scratch stuff up, so many good ideas.

I understand that there are no flyable birdcage Corsairs left and only one true birdcage left in the world and it is too far gone to restore. That's a shame.

BK

On the bench:

A lot !! And I mean A LOT!!

2024 Kits on deck / in process / completed   

                         14 / 5 / 2  

                              Tongue Tied

  • Member since
    May 2013
  • From: Indiana, USA
Posted by Greg on Tuesday, April 28, 2020 9:46 AM

Oh boy, looks like this will be a doozy of a WIP.

So far it looks like 1/32nd detail in 1/48th to me.

Yes

  • Member since
    November 2009
  • From: Twin Cities of Minnesota
Posted by Don Stauffer on Tuesday, April 28, 2020 8:42 AM

That engine is truly beautiful!


Don Stauffer in Minnesota

  • Member since
    January 2017
Posted by damouav on Tuesday, April 28, 2020 4:46 AM

Great start, will be following along.

The F4U IS one of my favourite birds to model, looking at a 1/32 Tamiya as one of my future builds...

Thanks for posting.

In Progress
1/48 Tamiya P47-D Bubbletop
1/48 Hobby Boss TBF-1C Avenger (on hold)
Pending
1/48 Roden S.E.5a
1/48 Airfix Walrus
  • Member since
    February 2012
  • From: Olmsted Township, Ohio
Posted by lawdog114 on Tuesday, April 28, 2020 2:18 AM

Nice to see you back Britt. I do miss your WIP threads. Your scratchbuilding  skills are second to none. I will be following along. Walsh's birdcage is on my shortlist too. 

 "Can you fly this plane and land it?...Surely you can't be serious....I am serious, and don't call me Shirley"


  • Member since
    June 2013
Tamiya 1:48 Birdcage Corsair F4U-1 [Complete]
Posted by bvallot on Monday, April 27, 2020 11:15 PM

Hello everyone. It's a been a while again. I started fooling around with one of my next builds on the list and with all this disruption to my normal busy work schedule I figured I might just be able to squeeze a WIP out of it. I plan to do this post in the same manner as my others where I'll show some easy ways to kick up the detail a few notches and improve on different features of the kit so that we have a nicer looking aircraft. Much of this is within all skillset's reach. It just takes an eye to realize it and a will to do it. Some things will require some better tools. I was hardheaded about a lot of scratchbuilding years ago and tried to do more with less which can help make you savy, but ultimately save yourself some grief at some point down the road and pick up a set of whatever it is you need. It can go a long way to a more consistent and much nicer build.

So here goes...

The Kit

 s-l1000 by Britt Vallot, on Flickr

Tamiya's 1:48 Birdcage Corsair. By all measures it's a very solid kit. It's quite accurate and well-engineered with a few tricky spots to navigate. Very fun to build and there's plenty of after market goodies out there to display your build in a variety of means.

The Man

Kenneth Walsh

 Untitled by Britt Vallot, on Flickr

There's much to be said about Walsh. He was actually the first Marine ace in the Corsair in the PTO. By late 1942, Corsairs were being delivered to the Pacific where they were sorely needed to help with escort missions around the many island chains. Wildcats didn't possess the fuel capability needed for long escort missions and it was the Corsair and Lightning that filled the gap until later variants of the Mustang would arrive late in the war. Practically day 1, Walsh and the marines of VMF-124 were thrust into the thick of it. They were quick learners and eager to lay out tactics for the Corsair against the Japanese air superiority. His Medal of Honor flight was on August 30, 1943 where Walsh was in a huge aerial battle against 50 Japanese aircraft. Walsh took down 4 himself before eventually having to ditch his aircraft. He was originally assigned as an escort for B-24s when he began having engine trouble which caused him to set down at a nearby base and grab an immediate replacement. While trying to catch up to his group he came across a handful of Zeros attacking B-24s and dropped two of the Zeros while by himself. After continuing on, he hears a radio distress call where Zeros were attacking another part of the B-24s and Walsh engages and takes two more Zeros down. Walsh ended the war with 21 totals kills. 

 Untitled by Britt Vallot, on Flickr

The Engine

Anytime I get the opportunity to feature the engine I am sure to upgrade this part in some way or another. If there are too many shape issues to overcome or if sanding and cutting will take too long and become too much hassle, I'll turn to AM for a handsome replacement. That tends to be the case with radial engines and as they're quite visible I like to display as much detail as I can cram in there. A while back I found an Aries R-2800 (early) engine on ebay for about $10 which is quite a steal. I knew there would be some modifications to make in attaching the engine to the fuselage but after opening the box and sizing it up I realized I'd have to make a few more. I originally intended to fashion some exhaust stacks as well, but I've recently scrapped that idea as the dimensions of the kit and default thickness of the plastic won't allow a clean transition and the fact that they will be hidden behind cowling piece that shields them. So for sake of contrustion ease I'll come up with an easier solution. There's a Quickboost engine fitted for the Tamiya kit that will work just fine for most. I was looking to replace the kit part exhaust stacks in some way while I bumped up the detail around the cowl flaps so I opted for something different. The detail of the Aires engine is very nice and makes a nice addtion to your Corsair. 

 Untitled by Britt Vallot, on Flickr

 Untitled by Britt Vallot, on Flickr

I'm throwing the Vector cowling set into this build as well. One part lazy on my end and not wanting to scratch out 20 different sets of cowl flap actuators, and one part I want redemption from the first set I used years ago on my last Corsair where I didn't pay close enough attention to how the cowling ring mounts were spaced. Plus, I hadn't recognized that the cylinder heads attached just posterior to the mounts. The Quickboost engine I used sat a little bit too deep from this junction and there was too large a gap to properly connect them and it slipped my notice. So, this time around I'm going to get it right.

As I get closer to marrying the fuselage halves together, I'll go into more depth about how I'm attaching the engine.

 Untitled by Britt Vallot, on Flickr

 Untitled by Britt Vallot, on Flickr

 Untitled by Britt Vallot, on Flickr

I realized after reviewing these pictures that I've place the inter-ear oil drain pipes for the rear cylinders on the back end of the cylinder. They should be front facing. I was rushing through this part and wasn't paying attention obviously. There's a few things still to add here...rocker box oil sump at the very bottom middle front cylinder and the oil scavenge pump pipe and a few other random cables and such.

The Cockpit

I plan to walk through some of this a little bit as there's always more that can be done to tweak things but the Tamiya Corsair cockpit already is a pretty decent cockpit at 1:48. I wanted to see how Eduard's PE would match up for the detail set so I had grabbed one that I saw cheap on ebay about a year ago in anticipation of this build. I normally don't like how PE works for certain features within the cockpit because of its two dimensionality, but there are some things that are of use and the rest I plan to scratch out. 

First, I'll start with removing everything I plan to fix. Much of this gets to stay as I'm quite pleased with how Tamiya put this office together. It's really not too bad, and that's coming from me. If you've seen my previous WIPs you know I like to cut it all out lol. I started with the seat. I'll build up all of this myself which ought to really help tie all this together as the seat is always the most prominent feature.

 Untitled by Britt Vallot, on Flickr

Next, I went after the office chair and again I have to say I favor Tamiya's seat better than the PE. Didn't think it was going to go that way but I saw after some strategic sanding I could come out with a much better looking seat than what the PE offers. There's just not enough depth that comes out of the PE.

 Untitled by Britt Vallot, on Flickr

 Untitled by Britt Vallot, on Flickr

Next thing I focused on was the front of the cockpit below the IP. This region should come forward just a bit. It will hardly be seen when this is closed up but it will offer for a little extra detail to be seen that would most certainly be lost in the shadows. It's built up as seen below. The bottom frames are standing a little too proud here and I shaved them down later on you'll see.

 Untitled by Britt Vallot, on Flickr

I turned my attention to the rudder pedals and added the brake mechanism. This will likely not be seen well either but hey...you're not on this forum because you wanted to see snap-tite kits, right. Here is a simple arrangement I made from some slide tube and lead foil. Easy enough.

The chair was sanded after a few handy photos I managed to find of some cockpit photos of busted up Corsairs and the Eduard Brassin resin pieces believe it or not.

 Untitled by Britt Vallot, on Flickr

I later began to move through some of the PE pieces I would include as seen below. The primer that adheres to this actually does tend to give items like these a little bit of height. I think it's just enough that I'm fine with including it. Next, I moved on to getting the wiring rigged up for the front bulkhead below the IP. I had to change up the arrangement some for the bottom set to make room for the rudder pedals and feet stands. 

 Untitled by Britt Vallot, on Flickr

You can note the larger trim wheel got an extra strip of stretched sprue to wrap around the PE piece. I carefully curved and bent down a small length of stretched sprue and cut it at the appropriate length and glued it together with Tamiya Extra Thin Cement. Held it together with my fingers to keep it biting down while it fused.

 Untitled by Britt Vallot, on Flickr

Here is how all this is starting to set up. I've also filled in the holes that were left from cutting out the kit molded seat features. I also CAed the gaps and sanded this smooth. The semi-circle PE parts on both sides of the controls I believe are wing fold locking controls. There is a somewhat larger nob that I've tried to better represent here. The PE parts just don't quite get it done.

 Untitled by Britt Vallot, on Flickr

That's a wrap for now.

Comments and questions are always welcome. =]

On the bench:  

Tamiya F4U-1  Kenneth Walsh


JOIN OUR COMMUNITY!

Our community is FREE to join. To participate you must either login or register for an account.

SEARCH FORUMS
FREE NEWSLETTER
By signing up you may also receive reader surveys and occasional special offers. We do not sell, rent or trade our email lists. View our Privacy Policy.