SEARCH FINESCALE.COM

Enter keywords or a search phrase below:

Pearl Harbor 2016 No New Entries 11-10-2016

11046 views
123 replies
1 rating 2 rating 3 rating 4 rating 5 rating
  • Member since
    October 2008
  • From: Georgia
Posted by Rigidrider on Thursday, July 28, 2016 9:06 AM

Nice!

When Life Hands You A Bucket Of Lemons...

Make Lemonade!

Then Sell It Back At $2 Bucks A Glass...

  • Member since
    September 2011
Posted by fightnjoe on Thursday, July 28, 2016 11:33 PM

Doug you are on the list, welcome.  I look forward to seeing what you come up with.

Steve that is a great start.  Going to look fantastic.


More done on the SCR 274 and a bit to the plumbing on the interior of the fuselage.


Some paint is a good thing right?  Going blind with the white work.  Using the Testor small bottles I got some color on the different receiver and transmitter equipment.


The work on the interior of the fuselage begins with the different boxes and fittings for the starboard side.


The interior is coming right along with much more to do.  The wiring and fittings for the radio and then the different boxes and fittings for the port side of the fuselage are next up.


All comments, critiques, and criticism are encouraged.


Joe

Veterans,

Thank You For Your Sacrifices,

Never To Be Forgotten

Where you can find me:

Workbench on FaceBook  Google Plus  YouTube

  • Member since
    July 2014
Posted by modelcrazy on Friday, July 29, 2016 11:35 PM
That looks fantastic Joe, as usual. You really must have to do your homework.
Here’s the Zero for the last few days. I took Doug’s suggestion and drilled out the panes. That was easier than I thought it would be. I painted the entire surface with a greenish hue. I will add some silt to the frame and repaint. The seafloor ill also be a greenish color. That should be interesting with turquoise colored water, but before I add the resin I will add some coral and other sea life, maybe even add a fish or two LOL. No really, I’m serious.
I also made a larger base, I was not happy with the size of the other one.
 

Steve

Building a kit from your stash is like cutting a head off a Hydra, two more take it's place.


http://www.spamodeler.com/forum/

  • Member since
    April 2005
  • From: Australia
Posted by taxtp on Saturday, July 30, 2016 9:12 AM

Nice work on that Zeke MC.

Joe, I'd like to do a Hasegawa 1/72 SBD-3 please. I'll use Starfighter decals to replicate an aircraft from Pearl Harbour.

Cheers

Tony

I'm just taking it one GB at a time.

  • Member since
    July 2014
Posted by modelcrazy on Saturday, July 30, 2016 12:29 PM
A little more work on the Zeke. I added some silt to the sea floor by pouring thinned Mod Podge and spreading it.
And again.
Then I glued down the plane, added some color, sea life and sprinkled some Woodlands green over the entire base.
 
Next I will be painting the wall sides a greenish blue, hopefully the same color I can make the resin.


Steve

Steve

Building a kit from your stash is like cutting a head off a Hydra, two more take it's place.


http://www.spamodeler.com/forum/

  • Member since
    October 2008
  • From: Georgia
Posted by Rigidrider on Saturday, July 30, 2016 8:35 PM
MC, man I'm liking what your doing, cant wait till its done, I'll send a picture of mine soon as I can take one, I think I sent one in a few years ago.... what kind of resin are you going to use?

When Life Hands You A Bucket Of Lemons...

Make Lemonade!

Then Sell It Back At $2 Bucks A Glass...

  • Member since
    July 2014
Posted by modelcrazy on Saturday, July 30, 2016 10:02 PM

Doug, I'm using "Castin' Craft Polyester Casting Resin". I really like the stuff.

Here is where you have to be willing to screw up the entire project. The first layer turned out darker than I wanted, I'm thinking because I used too much dye and the dirt turned dark as soon as it was wet. I did notice though that everything seems to be settling down to the bottom which is good, though I doubt the bottom will get any lighter.  This may take quite a bit of resin which is one reason I started out with a smaller base at first. I need to shop around and see if I can get a large can of the stuff at a discount.

The subsequent layers will be lighter, and I think the reflection makes it look darker than it is.

Steve

Building a kit from your stash is like cutting a head off a Hydra, two more take it's place.


http://www.spamodeler.com/forum/

  • Member since
    September 2011
Posted by fightnjoe on Saturday, July 30, 2016 11:23 PM

Many many thanks.

List is updated folks and again I am humbled.  Thank you for joining me in this.


Joe

Veterans,

Thank You For Your Sacrifices,

Never To Be Forgotten

Where you can find me:

Workbench on FaceBook  Google Plus  YouTube

  • Member since
    September 2011
Posted by fightnjoe on Saturday, July 30, 2016 11:24 PM

Work continues.  Two updates in three days, wow.


Watching YouTube was good for me and I was able to make some decent progress.


The radio is 99% finished.


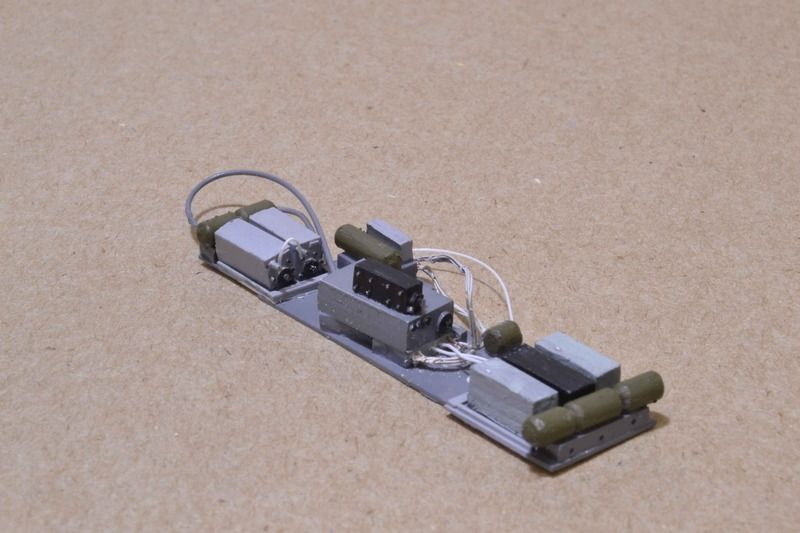
All that is left is the wiring after it is installed into the fuselage.


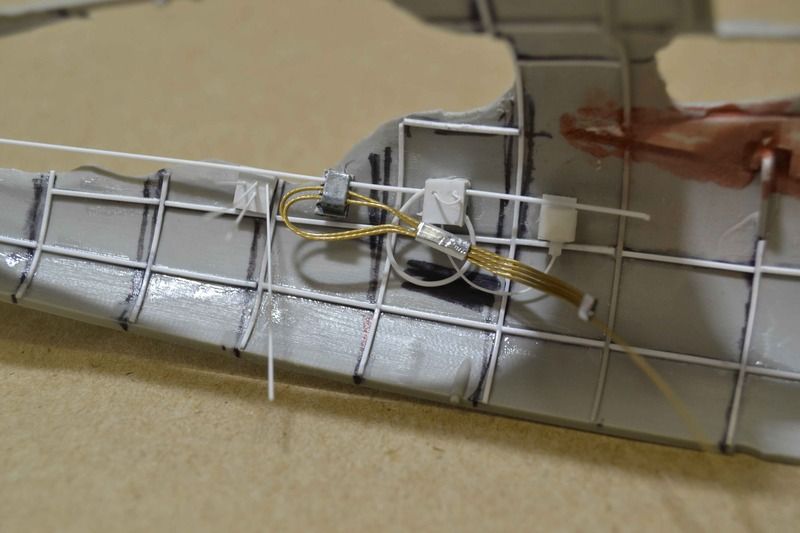
I was able to work a bit on the port side with the fabrication and addition of boxes and fittings.


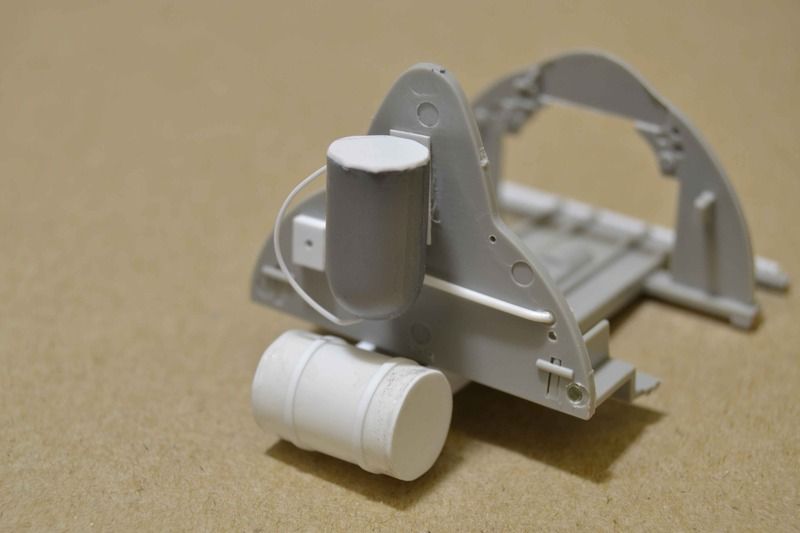
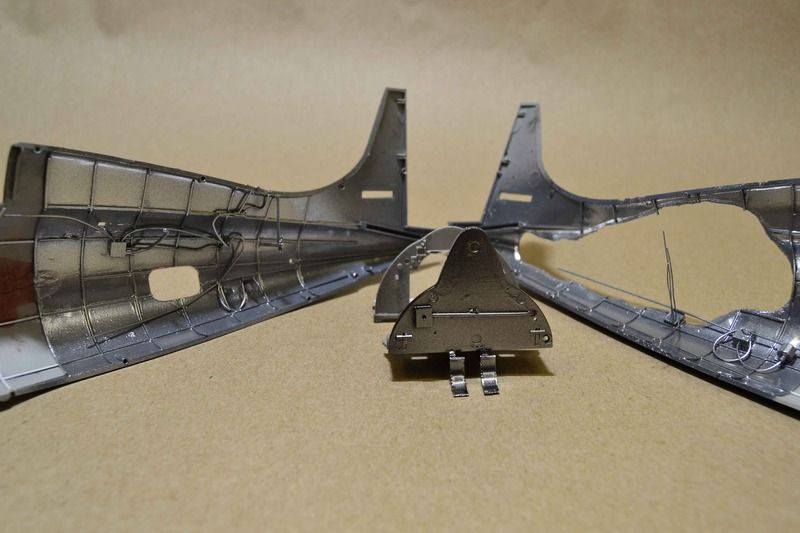
I worked a bit on the rear of the cockpit bulkhead.


I then threw some paint.  On the interior of the fuselage I sprayed Gloss Gray and then Alclad Chrome.  


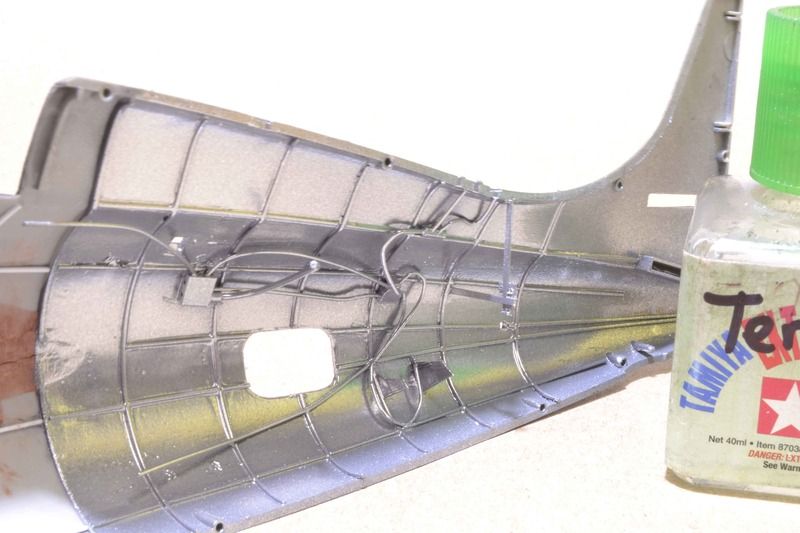
And then with the rear of the cockpit I sprayed Gloss Black and Alclad Chrome.  To show the comparison.


There we go.  i am thinking I can now move onto the cockpit.  


All comments, critiques, and criticism are encouraged.


Joe

Veterans,

Thank You For Your Sacrifices,

Never To Be Forgotten

Where you can find me:

Workbench on FaceBook  Google Plus  YouTube

  • Member since
    July 2014
Posted by modelcrazy on Sunday, July 31, 2016 1:20 AM

Your work just gets better and better Joe.

Steve

Building a kit from your stash is like cutting a head off a Hydra, two more take it's place.


http://www.spamodeler.com/forum/

  • Member since
    October 2008
  • From: Georgia
Posted by Rigidrider on Sunday, July 31, 2016 9:06 AM

Excellent work Joe! I am ALWAYS amazed by what you do . The cut aways I've seen you do in the past never cease to amaze....

Doug

When Life Hands You A Bucket Of Lemons...

Make Lemonade!

Then Sell It Back At $2 Bucks A Glass...

  • Member since
    July 2014
Posted by modelcrazy on Sunday, July 31, 2016 2:20 PM
OK this is better. Now I just need to purchase a 32 oz. can of resin from Michael’s, with a 40% coupon of course, next week and add some more layers. Now that the seafloor is the color it’s going to stay, a nice calming blue should do.
Update next week.
  

Steve

Building a kit from your stash is like cutting a head off a Hydra, two more take it's place.


http://www.spamodeler.com/forum/

  • Member since
    September 2011
Posted by fightnjoe on Monday, August 1, 2016 10:18 AM

MC beauty.  Absolute beauty.  


Many thanks for taking a look all.  For something that really has not progressed far I am recieving a great deal of kind comments.


Joe

Veterans,

Thank You For Your Sacrifices,

Never To Be Forgotten

Where you can find me:

Workbench on FaceBook  Google Plus  YouTube

  • Member since
    September 2014
Posted by rooster513 on Monday, August 1, 2016 10:28 AM

Another great start on the cutaway Joe!

MC, that is really really cool! This is shaping up to be something very specialYes

-Andy

  • Member since
    September 2011
Posted by fightnjoe on Tuesday, August 2, 2016 11:07 PM

Andy many thanks.


Joe

Veterans,

Thank You For Your Sacrifices,

Never To Be Forgotten

Where you can find me:

Workbench on FaceBook  Google Plus  YouTube

  • Member since
    July 2014
Posted by modelcrazy on Wednesday, August 3, 2016 9:00 PM
I bought some more resin today and added another layer. Once this is dry I add another tomorrow.

Steve

Building a kit from your stash is like cutting a head off a Hydra, two more take it's place.


http://www.spamodeler.com/forum/

  • Member since
    July 2014
Posted by modelcrazy on Friday, August 5, 2016 10:25 PM
Some more on the Zeke. I added another 2 layers and added some fish over the starboard wing. I will be adding a few more layers and adding a few more fish.
Fish

Steve

Building a kit from your stash is like cutting a head off a Hydra, two more take it's place.


http://www.spamodeler.com/forum/

  • Member since
    July 2014
Posted by modelcrazy on Saturday, August 6, 2016 9:36 PM
I added another layer to the Zeke. You probably can’t tell the difference though. I also added some more fish above the starboard wing. The resin is up to the tail fin now. I may have to buy one more can of resin to complete it.
The next installment will be the completion pics.
Steve

Steve

Building a kit from your stash is like cutting a head off a Hydra, two more take it's place.


http://www.spamodeler.com/forum/

  • Member since
    December 2002
  • From: Northern California
Posted by jeaton01 on Sunday, August 7, 2016 12:28 AM

Very convincing!

John

To see build logs for my models:  http://goldeneramodel.com/mymodels/mymodels.html


  • Member since
    October 2008
  • From: Georgia
Posted by Rigidrider on Sunday, August 7, 2016 5:00 PM

Well Im going to attempt to show my wip now, if I can remember how to do it, I had several images of ambulances at Pearl Harbor at the wars begining, and did have a 1940 Ford panel van, but ran across a 1937 Ford panel van on Ebay and it more fit the vision I have and another picture I found showing one very similar to this one. Well here goes...So far just the engine done.

I'm trying to stay as authentic to the era as possible, and was surprized to find that Ford engines of this class were medium green per a color chart from the time period. Any way... Its started, more to follow.

Thanks

Doug

When Life Hands You A Bucket Of Lemons...

Make Lemonade!

Then Sell It Back At $2 Bucks A Glass...

  • Member since
    July 2014
Posted by modelcrazy on Sunday, August 7, 2016 5:51 PM

Very intresting subject Doug. Nice work on that engine Yes

Steve

Building a kit from your stash is like cutting a head off a Hydra, two more take it's place.


http://www.spamodeler.com/forum/

  • Member since
    October 2008
  • From: Georgia
Posted by Rigidrider on Monday, August 8, 2016 11:04 AM

Thanks MC, man, that resin is looking better every time... how much will you wind up using? And the ripple effect... very cool, does that normally occur, or did you make it do that? Either way, very cool looking...

Doug


When Life Hands You A Bucket Of Lemons...

Make Lemonade!

Then Sell It Back At $2 Bucks A Glass...

  • Member since
    September 2011
Posted by fightnjoe on Monday, August 8, 2016 11:07 AM

Very cool guys.  

MC that looks very real to me.  Someday I can see me trying to screw up something like that myself.  Doug that is awesome.  Something not seen nor thought of very often.  The engine looks very good.


Now if PhotoBucket would cooperate I could update my progress.  As it is I am stuck in their virtual limbo.


Joe

Veterans,

Thank You For Your Sacrifices,

Never To Be Forgotten

Where you can find me:

Workbench on FaceBook  Google Plus  YouTube

  • Member since
    September 2011
Posted by fightnjoe on Tuesday, August 9, 2016 8:32 PM

Well folks here I am again and after a couple of days of fighting with Photobucket I can post an update.


First up I began working on the cockpit.  Here is the bare bones and the kit pieces in place.


Using these photos out of Squadron Signal Walk Around for the Wildcat I began to fabricate the sides.  This is for discussion only.  


I went off of them and this is what I ended up with.


I was pleased.  Then I turned the page and found these.  Again for discussion only.


At that point I noticed several big issues that I just could not live with.  I scraped some of the detail off and redid it.  Here is the result.


And the cockpit floor.


And there you have it.  


I like it.  


Next up is color for the pit.  


All comments, critiques, and criticism are encouraged.


Joe

Veterans,

Thank You For Your Sacrifices,

Never To Be Forgotten

Where you can find me:

Workbench on FaceBook  Google Plus  YouTube

  • Member since
    July 2014
Posted by modelcrazy on Tuesday, August 9, 2016 9:03 PM

Fantastic work as usual Joe!!. It must have just sucked to crank that landing gear up and down.

Steve

Building a kit from your stash is like cutting a head off a Hydra, two more take it's place.


http://www.spamodeler.com/forum/

  • Member since
    September 2011
Posted by fightnjoe on Wednesday, August 10, 2016 7:26 AM

MC many thanks and no doubt.


Joe

Veterans,

Thank You For Your Sacrifices,

Never To Be Forgotten

Where you can find me:

Workbench on FaceBook  Google Plus  YouTube

  • Member since
    September 2014
Posted by rooster513 on Wednesday, August 10, 2016 8:14 AM

More awesome work Joe!

-Andy

  • Member since
    July 2014
Posted by modelcrazy on Friday, August 12, 2016 8:58 AM
A quick update. The frame of the base was not behaving like I wanted. I poured the risen in shallow layers and thought if anything the sides would budge out. Did you know resin shrinks? Much to my chagrin, after a few days of hardening the sides of my base were collapsing inward.
While I was working on the U-boat, the fix came me. I will remove the sides and replace them with a thicker wood frame. The last layer will fill in the gap along the sides where you shouldn’t notice.


Well at least the resin on this build is turning out outstanding and the base is giving me fits. My last resin build (the Rufe) the resin was giving me fits. My next resin build (?) should be perfect.
  
Bowed sides.
  
Now the next pics should be finished pics....I hope.

Steve

Building a kit from your stash is like cutting a head off a Hydra, two more take it's place.


http://www.spamodeler.com/forum/

  • Member since
    September 2011
Posted by fightnjoe on Saturday, August 13, 2016 9:40 PM

MC I think you are right.  A firm wall and another pour should fix that with no one the wiser.


Just a brief update.


Attention is now turned to the cockpit fully.  With most of the parts fabricated I can throw a bit of paint on and then some detail painting.


Actually pretty happy with this but I do see some areas that will need a touch up.


I could not help myself and I jumped ahead a little and started working on the firewall as well.


Still a long way to go before I can turn my full attention to that.  Next up is to add some of the detail that I have not fabricated yet as well as working on the instrument panel.


All comments, critiques, and criticism are encouraged.


Joe

Veterans,

Thank You For Your Sacrifices,

Never To Be Forgotten

Where you can find me:

Workbench on FaceBook  Google Plus  YouTube

  • Member since
    September 2006
  • From: san francisco,ca
Posted by raider-hall on Saturday, August 13, 2016 11:11 PM
Rebuilding 1/350 Arizona waterliine.
JOIN OUR COMMUNITY!

Our community is FREE to join. To participate you must either login or register for an account.

SEARCH FORUMS
FREE NEWSLETTER
By signing up you may also receive reader surveys and occasional special offers. We do not sell, rent or trade our email lists. View our Privacy Policy.