SEARCH FINESCALE.COM

Enter keywords or a search phrase below:

Japanese Group Build VIII

23281 views
479 replies
1 rating 2 rating 3 rating 4 rating 5 rating
  • Member since
    August 2015
  • From: the redlands Fl
Posted by crown r n7 on Thursday, March 7, 2019 3:43 PM

MC I hear you, this is my entry its a old mold stright forward build. Lots of good builds here!!


 Nick.

  • Member since
    October 2008
  • From: italy
Posted by bsyamato on Friday, March 8, 2019 6:08 AM

Nice start Nick

Some day ago i see a propaganda film from japan in war time, at the end a group of raiden during take off with the real sound! but not able to find again :(


jgeratic

Cool, another Claude.

I built an AVI Claude for last year's group build.  It requires some work as they are short run kits, not really at the standard most modern kits are these days.

Speaking of the Claude, another new manufacture has one coming up in 1/72 scale - amazing amount of detail for that size:


regards,

Jack


I see the preìview but this brand seems out of my budget  :)  i'll take some more fujimi and avi in the future 


Heres more about the tandem Claude, scratched the IP and added some minimum deatil to the floor and drilled seats


At the next 

  • Member since
    November 2009
  • From: SW Virginia
Posted by Gamera on Friday, March 8, 2019 7:49 AM

Nick: I like the term 'classic'!!! 

Bsyamato: Keep up the good work! Yes

"I dream in fire but work in clay." -Arthur Machen


  • Member since
    August 2015
  • From: the redlands Fl
Posted by crown r n7 on Saturday, March 9, 2019 4:49 PM

bsyamato thank you I must look in to that vid. Your cockpit is moving along nicely.

Gamera ok classic its not the age its the milage...

my lastest pic with cocpit wings and stabilizer are in place next putty.


 Nick.

  • Member since
    January 2019
Posted by Edwin on Sunday, March 10, 2019 6:02 AM

So, the heat gun I ordered for bending the acrylic rod finally got in.  Haven't been able to progress much as I wanted to get the anchoring point for the rod done first before attaching wings to fuselage.  After the wings are attached would the tail portion then be worked on, as the wings help visually to get the stabilizers aligned.

I want the mounting rod to be at an angle, yet the attachment point to the plane needs to be square as I am anchoring a 3mm machine screw (with head cut off) into the top end of the rod, where it will screw into a nut cemented onto the inner surface of the bottom wing half, where I've drilled a 3mm hole for the screw to pass through. After deciding how high I want the plane to be above the mounting surface, I worked out the required angle and got the rod bent with the help of the heat gun.

Testing things out after that, it looks to be progressing in the right direction Big Smile

The 6mm rod looks a little thick for this 1/48 scale plane.  Other than that, happy with the attachment as it is secure and allows the plane to be unscrewed from the stand.

Will soon be able to attach the wings to the fuselage! Yeah

Ole
  • Member since
    October 2018
  • From: Central VA
Posted by Ole on Sunday, March 10, 2019 9:12 AM

Just noticed this GB. I know, I'm slow!

I need to complete a few things on the bench to make room (read 1/32 scale F-15E), and I will throw something in here as well. Not sure exactly what other than it will be 1/48 Tamiya.

  • Member since
    July 2014
Posted by modelcrazy on Sunday, March 10, 2019 10:31 AM

looks good Edwin, I like that idea.

Steve

Building a kit from your stash is like cutting a head off a Hydra, two more take it's place.


http://www.spamodeler.com/forum/

  • Member since
    January 2019
Posted by Edwin on Sunday, March 10, 2019 11:03 AM

modelcrazy

looks good Edwin, I like that idea.


Thanks Modelcrazy. It took me a few sessions over beers Beer to think through exactly how I wanted it Big Smile

As Hannibal Smith would say, “I love it when a plan comes together” Big Smile

  • Member since
    November 2009
  • From: SW Virginia
Posted by Gamera on Sunday, March 10, 2019 12:00 PM

Nick: Looks good. Always happy to see something up ready for paint. 

Edwin: The flying rod looks great!

Ole: We're here till the end of the year! 

"I dream in fire but work in clay." -Arthur Machen


  • Member since
    November 2009
  • From: SW Virginia
Posted by Gamera on Monday, March 11, 2019 11:19 AM

Bsyamato: Looking good! Yes

"I dream in fire but work in clay." -Arthur Machen


  • Member since
    October 2008
  • From: italy
Posted by bsyamato on Tuesday, March 12, 2019 12:41 PM

Well.. some more putty and ready for paint


At the next!

  • Member since
    October 2008
  • From: italy
Posted by bsyamato on Thursday, March 14, 2019 4:56 AM

More putty , and all main pieces on for the paint session!


At the next!

  • Member since
    November 2009
  • From: SW Virginia
Posted by Gamera on Thursday, March 14, 2019 11:24 AM

Nice! You're making great progress! 

"I dream in fire but work in clay." -Arthur Machen


  • Member since
    November 2009
  • From: SW Virginia
Posted by Gamera on Saturday, March 16, 2019 11:46 AM

Got a bit more done on Mecha-G. Sorry about the clutter in the background.

"I dream in fire but work in clay." -Arthur Machen


  • Member since
    July 2014
Posted by modelcrazy on Saturday, March 16, 2019 1:09 PM

That looks cool Gam.

Steve

Building a kit from your stash is like cutting a head off a Hydra, two more take it's place.


http://www.spamodeler.com/forum/

  • Member since
    March 2005
  • From: Lancaster, South Carolina
Posted by Devil Dawg on Saturday, March 16, 2019 3:06 PM

16 March 2019 – Well, it’s been two weeks since my last update, and work (that bad 4-letter word) has been keeping me away from the bench. But, I did get some time to get the fuselage halves together last weekend (09 March). The fit of this kit is just astounding, as I’ve test-fitted almost every major part, and love the precision of it all. The seams will hardly need any cleanup, if any is needed at all. They almost disappear once the glue is applied (I’m using Tenax 7R for the large & long glue areas, such as fuselage, wings, etc.).


 Tamiya did a great job on the engineering of this kit. Plus, with the moulds being new, that helps a lot, too. The seams almost disappear once the glue is applied. Just a little bit of sanding, then paint, should make everything look as it should.


You can see from the bottle of Model Masters paint in the background that, even though this is a 1/32nd-scale kit, it’s still small compared to most kits of that scale. The only reason you can see the top fuselage seam is because I painted the interior before gluing it together, and what you see is the paint that was left on the seams. Otherwise, the seams wouldn’t be showing up in the photo.


Here’s what’s in the fuselage so far. The cockpit will be assembled as a separate unit, then inserted and glued in place from the bottom, which I really like. Much easier than putting/gluing it all in one fuselage half, then trying to glue the other half on while praying that the cockpit doesn’t fall out of alignment, or, far worse, falls out! The two items that you you see in the fuselage are the oxygen tanks (black tanks with silver bottoms) on the left, and the hydraulic fluid tank (gold) on the right. Not sure these two will even be seen once the cockpit is on place, but I’LL know that they are there!


So, that’s it for now. With it being Saturday, I’m gonna try to get some more done on her today. The next major step is assembling the cockpit, which I am much looking forward to. That is probably my favorite part of building an aircraft – assembling the cockpit. Most of it is already spray-painted, but there will be some detail painting of the really small stuff. Look for another update soon.


Devil Dawg

On The Bench: Tamiya 1/32nd Mitsubishi A6M5 Model 52 Zeke For Japanese Group Build

Build one at a time? Hah! That'll be the day!!

  • Member since
    November 2009
  • From: SW Virginia
Posted by Gamera on Sunday, March 17, 2019 5:22 PM

DD: She's coming along great! That modern Tamiya engineering is out of this world!


Steve: Thanks! I was hoping to get some more work done on Mecha-G but ended up getting into some other stuff.


"I dream in fire but work in clay." -Arthur Machen


  • Member since
    October 2008
  • From: italy
Posted by bsyamato on Wednesday, March 20, 2019 11:16 AM

Lots of mechanism there Cliff :) you'll leave withouth paint?

As Dimensions he seems like an MG gundam kit , 1/100 scale

Nice updates on the Zero Yes

  • Member since
    November 2009
  • From: SW Virginia
Posted by Gamera on Wednesday, March 20, 2019 11:23 AM

He is sorta like a Gundam kit from what I've seen of them. 

I'm going to try airbrushing him with chrome or aluminum paint depending on what looks better and then brush-paint the black rubber areas back to black. 

"I dream in fire but work in clay." -Arthur Machen


  • Member since
    March 2005
  • From: Lancaster, South Carolina
Posted by Devil Dawg on Wednesday, March 20, 2019 10:41 PM

bsyamato

Nice updates guys Yes


Growing up the Claude:

Cockpit painted 


Seat belts and some drybrush to brighten up the too dark green..  


And close fuselage , the two cockpit was insert from the bottom


At the next! 

Looking great, BSYamato!

Devil Dawg

On The Bench: Tamiya 1/32nd Mitsubishi A6M5 Model 52 Zeke For Japanese Group Build

Build one at a time? Hah! That'll be the day!!

  • Member since
    March 2005
  • From: Lancaster, South Carolina
Posted by Devil Dawg on Wednesday, March 20, 2019 10:42 PM

Gamera

Got a bit more done on Mecha-G. Sorry about the clutter in the background.


Wow!! That is NEAT-O, Gamera!! Cool stuff!

Gary Mason


Devil Dawg

On The Bench: Tamiya 1/32nd Mitsubishi A6M5 Model 52 Zeke For Japanese Group Build

Build one at a time? Hah! That'll be the day!!

  • Member since
    March 2005
  • From: Lancaster, South Carolina
Posted by Devil Dawg on Wednesday, March 20, 2019 10:52 PM

20 March 2019 – Well, got the cockpit parts assembled (mostly) and painted. I first sprayed everything with a base coat of Testor Model Master Interior Green flat enamel. The instructions call for Tamiya XF-71 Cockpit Green, which I do not have. But, what I do have is many bottles of the many shades of military greens. So, I got on the internet to see if I could find any color pictures of an A6M5 cockpit. And, lo and behold, I found color pictures of an UNRESTORED A6M5 hanging from the ceiling of the National Air & Space Museum. Woo Hoo!! Now, I know that the colors on a computer monitor don’t always match real life, but without a real A6M5 to look at, this wuz just gonna hafta ta do. I brought up the cockpit pictures, compared the colors shown to all the different bottles of flat green paint that I had in stock, and found that Interior Green was an almost-perfect match – not exact, but close enough for me.

Getting back to the build: after spraying the Interior Green and letting it cure for a couple of days, I started the tedious but necessary task of hand-painting all of the little details, and gluing on a few of them here and there. I painted everything according to the Tamiya instruction booklet. The cockpit pictures previously mentioned didn’t show enough of the cockpit to let me verify if the instructions are correct. I do have the Squadron “A6M Zero In Action” book (published back in 1983), but no color pictures in it at all. The Tamiya instruction book has reference photos of three different Zeroes in the back of it, but they are all black & white photos. So, I’ll rely on the instruction book to be correct for the colors. Let me know whatcha think.

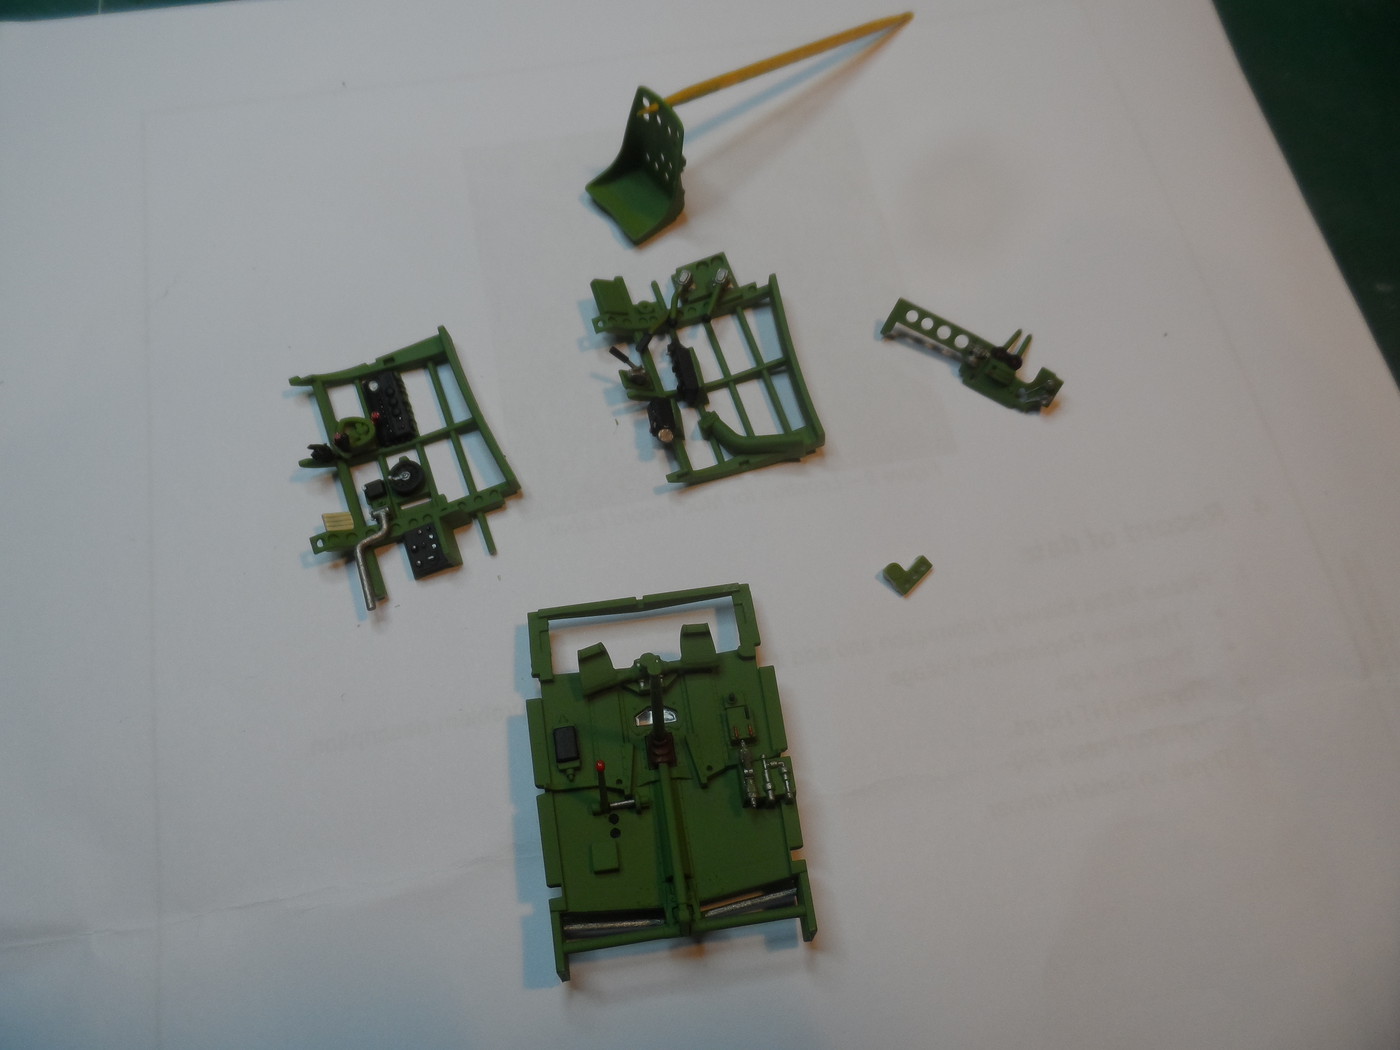
 These are the major assemblies of the cockpit. In all, there are about 25 parts shown here.


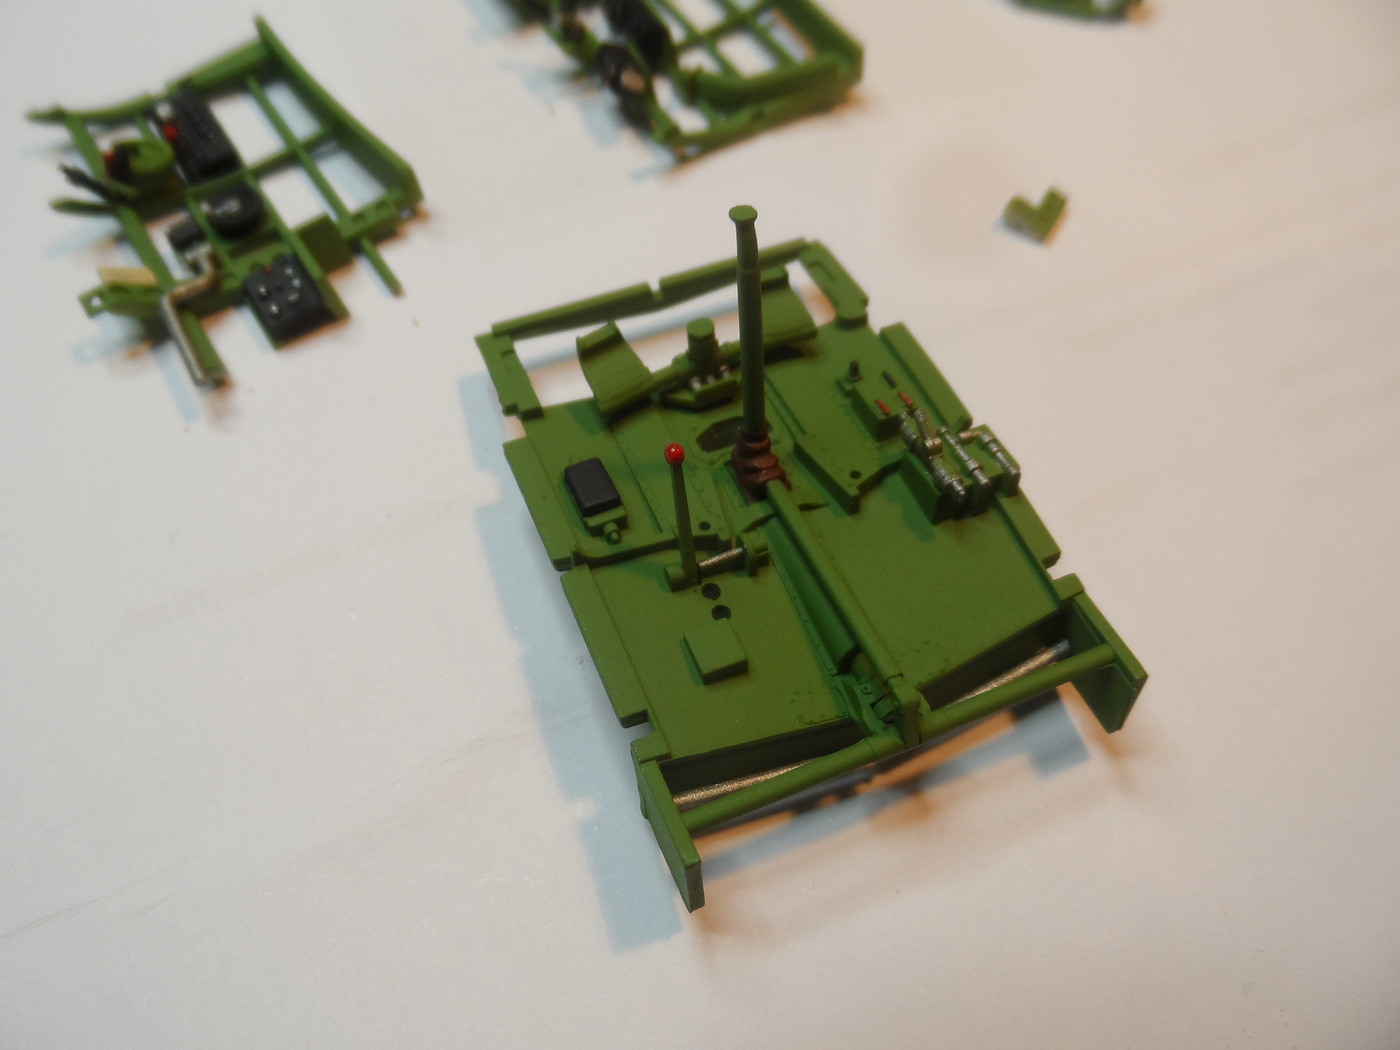
This is the cockpit floor. Seven parts are in this assembly. The fit of all parts has been outstanding.


Port side cockpit wall/assembly. Five parts represented here.


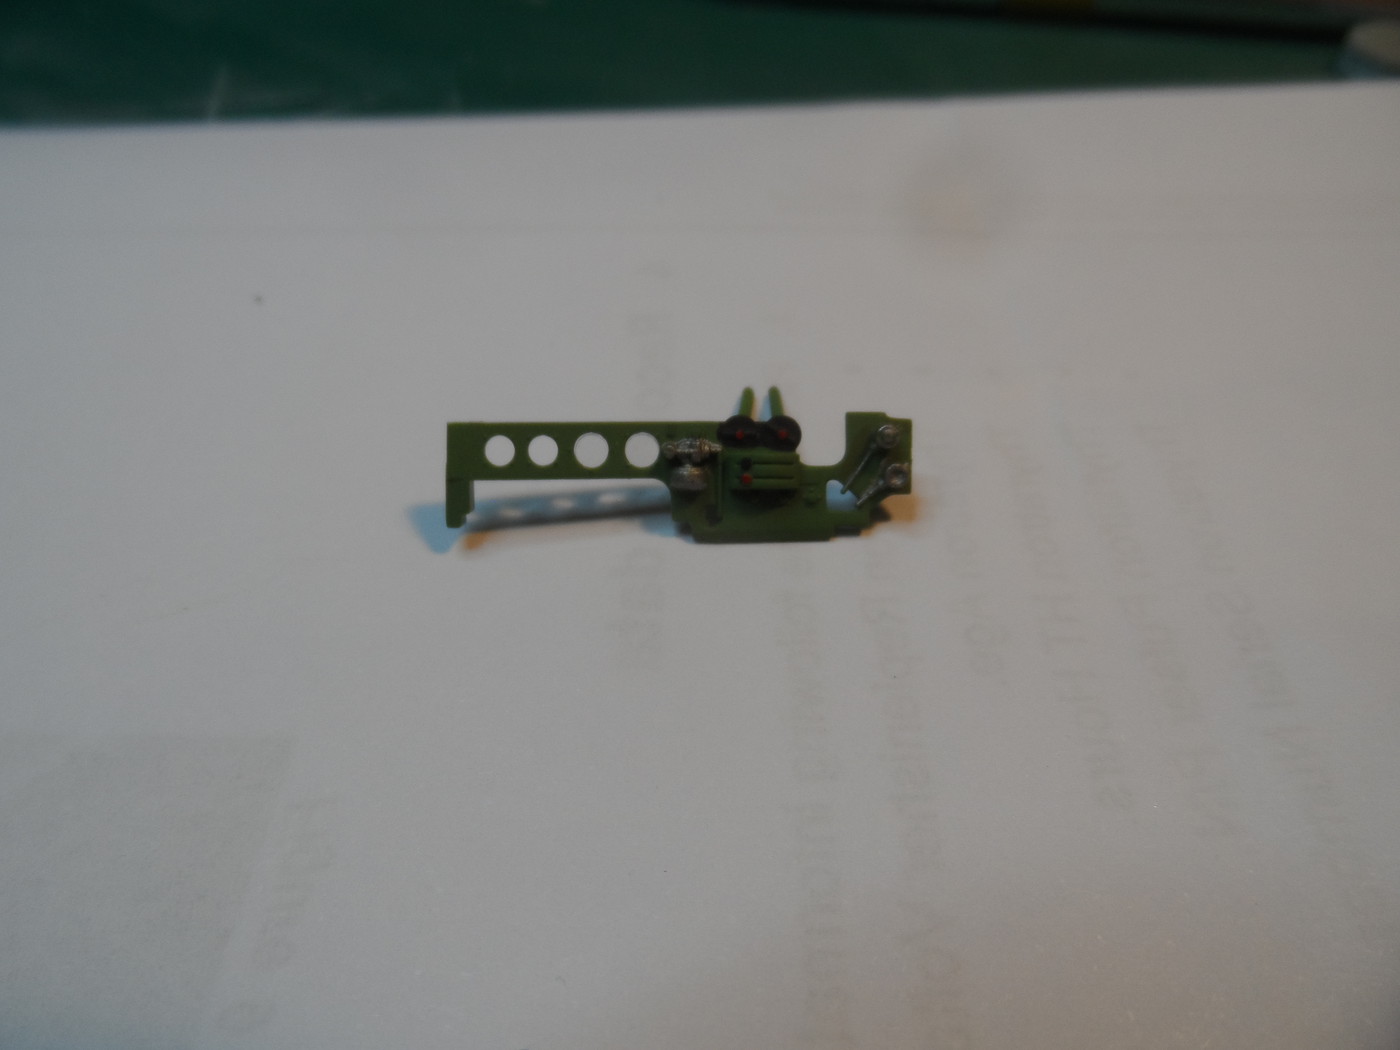
Starboard assembly. Eight parts shown here.


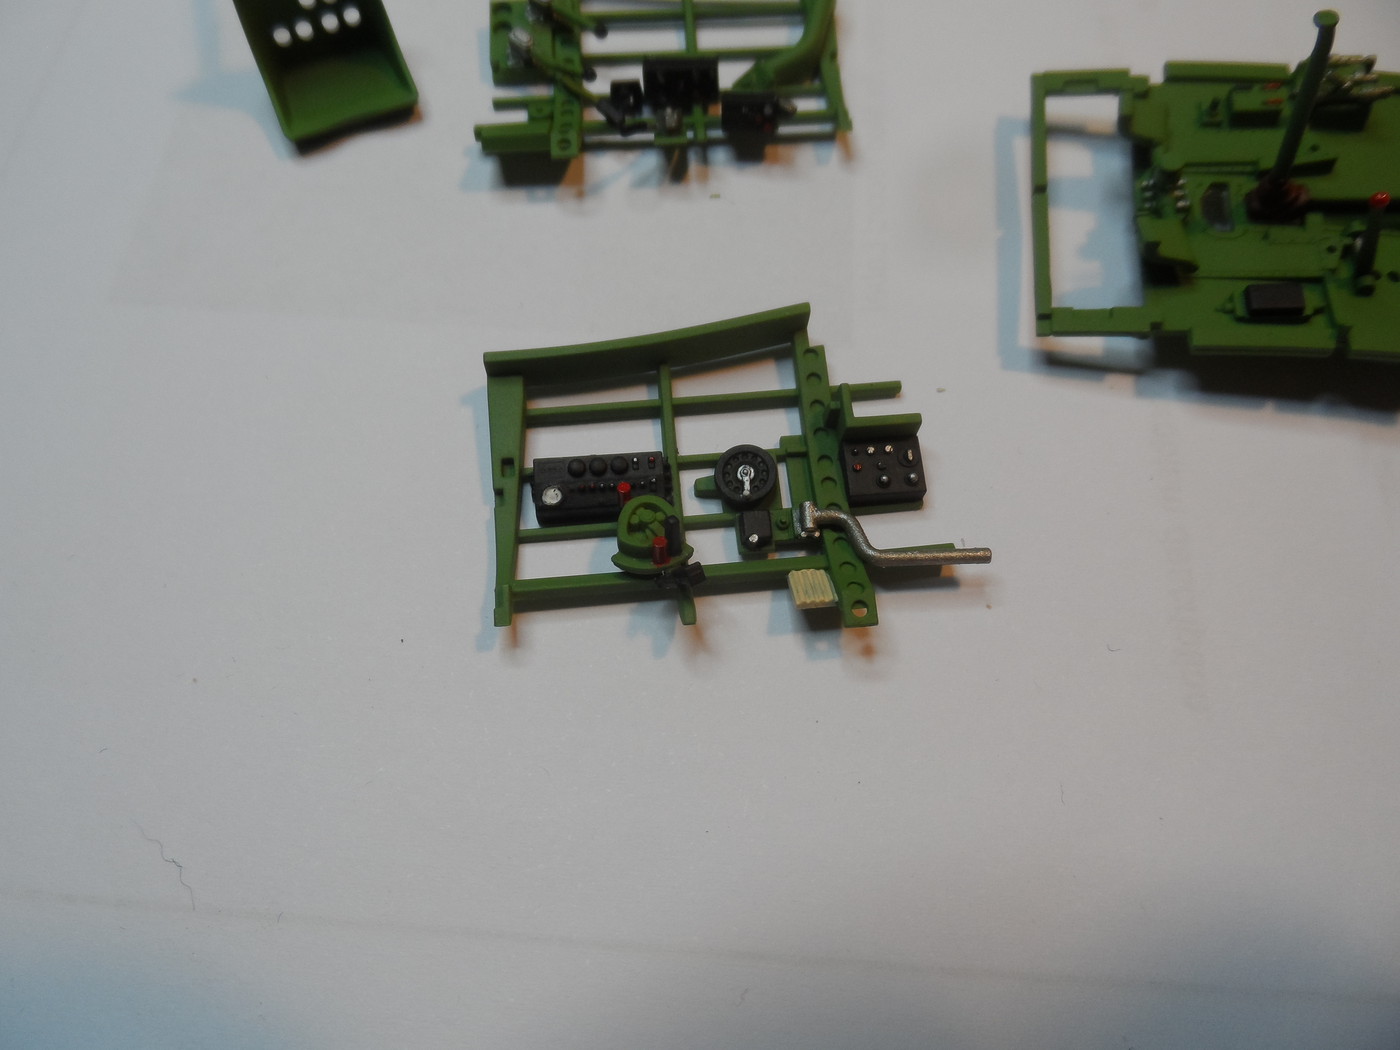
This is a horizontal shelf/arm rest that will be attached to the port side cockpit assembly. It had three parts. The two larger holes (on the right) actually have glass in them, and a set of dials (represented with decals) will be put on them soon.


A good modeling technique that I learned on my own by painting the cockpit details (and I’m sure this is probably already known by everyone else): If you use enamel paints for a base-coat, using acrylics to detail-paint is easier (much easier) than using enamels for the detail painting. I poured a small amount of acrylic paint into some old blister-pack gum wrappers (you know, like Dentine gum, etc.), added two drops of denatured alcohol to thin the paint a little, used a very small pointed-tip paint brush (0 size – Model Master 8832), and went at it. The results are very satisfactory to me. I’ve tried using toothpicks for this, but never had much luck with those.


Gary Mason


Devil Dawg

On The Bench: Tamiya 1/32nd Mitsubishi A6M5 Model 52 Zeke For Japanese Group Build

Build one at a time? Hah! That'll be the day!!

  • Member since
    November 2009
  • From: SW Virginia
Posted by Gamera on Friday, March 22, 2019 11:39 AM

Gary: Looks good!!! To my aging eyes the US interior green looks close enough to Mitsubishi interior green I can't tell the difference. Good to see the cockpit almost ready to assemble. 

"I dream in fire but work in clay." -Arthur Machen


  • Member since
    August 2015
  • From: the redlands Fl
Posted by crown r n7 on Friday, March 22, 2019 2:17 PM

wow lots of cool stuff here .....

starting with some ugly preshading on the Raiden.


 Nick.

  • Member since
    August 2015
  • From: the redlands Fl
Posted by crown r n7 on Tuesday, March 26, 2019 2:59 PM

gave the top and bottom coats of tamiya of J.N green and gray.


 Nick.

  • Member since
    December 2002
  • From: NYC, USA
Posted by waikong on Tuesday, March 26, 2019 4:48 PM

Nice progress on the Raiden, and l love the Godzilla. :)  

I actually made progress in the last 2 weeks on my 1/48 JGSDF Type 10 tank.

Camo being applied and masked with Silly Putty

Used some PE mesh to add details to the basket, just cause we can't build OOB anymore.

My website: http://waihobbies.wkhc.net


  • Member since
    November 2009
  • From: SW Virginia
Posted by Gamera on Tuesday, March 26, 2019 8:14 PM

Nick: Ohhhhhhh, the pre-shading looks perfect!!!

Waikong: Great job there on the camo, gotta love Silly Putty!

"I dream in fire but work in clay." -Arthur Machen


  • Member since
    August 2015
  • From: the redlands Fl
Posted by crown r n7 on Thursday, March 28, 2019 12:08 PM

bsyamato looking good cant wait for paint.

devil dawg thats very sharp detailing.

waikong many thanks good use of silly putty on the tank,very smooth finish.

gamera I appreciate your comments, that dinobot ? super job where did you get that.

my lastest pics painted the yellow lead edges what a pain next time paint the yellow 1st!! .I sprayed tamiya clear gloss time for decals and weathering.


 Nick.

  • Member since
    August 2015
  • From: the redlands Fl
Posted by crown r n7 on Friday, March 29, 2019 10:44 AM

decals and some more clear.


 Nick.

JOIN OUR COMMUNITY!

Our community is FREE to join. To participate you must either login or register for an account.

SEARCH FORUMS
FREE NEWSLETTER
By signing up you may also receive reader surveys and occasional special offers. We do not sell, rent or trade our email lists. View our Privacy Policy.