SEARCH FINESCALE.COM

Enter keywords or a search phrase below:

The Officially Shameless PBY/Halloween '09 GB

100959 views
939 replies
1 rating 2 rating 3 rating 4 rating 5 rating
  • Member since
    March 2006
Posted by simpilot34 on Wednesday, May 13, 2009 3:56 AM
Smile,Wink, & Grin [swg] Well Eric I guess you could look at it as you just have to fill a whole and not reopen a closed fuse!!Sign - Oops [#oops] I would rather fill a whole me self!!! Have a Make a Toast [#toast]!!
Cheers, Lt. Cmdr. Richie "To be prepared for war, is one of the most effectual means of preserving the peace."-George Washington
  • Member since
    January 2009
  • From: Central CA
Posted by Division 6 on Tuesday, May 12, 2009 11:03 AM

Looking Good.

I thought I posted a link to some good pix of the Torp mount a few pages back.


I had a slight setback.

I was about to seal up the fuselages and discovered I put the mounting hole on the wrong plane.Banged Head [banghead].

The up side is it kept me from accidentally sealing it up without weights in the nose.

Hope to get them sealed up this week after I get some weights.


Eric... 

  • Member since
    November 2008
  • From: Long Island, NY
Posted by Hot-Pb on Sunday, May 10, 2009 9:43 AM

 simpilot34 wrote:
Tony, that looks awesome!!!!!!Thumbs Up [tup]Bow [bow]Make a Toast [#toast] Looking forward to seeing the completed pics!!!! Well Done!!!

Thanks simpilot34. Of course the down side of finishing it off is figuring out where to display it! It's a beast. Big Smile [:D]

As an aside, I was looking for some pictures of how the PBY's mounted Mk. 13 torpedos and came across a copy of the PBY flight operating manual on Google Books. Has some great photos for reference if anyone finds it useful.

Also, I'm planning to use the Moskit metal exhausts and I notice they look a little bit too long. Anyone else used them? Do they need to be trimmed to fit properly?


cheers,

Tony

  • Member since
    March 2006
Posted by simpilot34 on Saturday, May 9, 2009 9:16 PM
Tony, that looks awesome!!!!!!Thumbs Up [tup]Bow [bow]Make a Toast [#toast] Looking forward to seeing the completed pics!!!! Well Done!!!
Cheers, Lt. Cmdr. Richie "To be prepared for war, is one of the most effectual means of preserving the peace."-George Washington
  • Member since
    November 2008
  • From: Long Island, NY
Posted by Hot-Pb on Saturday, May 9, 2009 7:10 PM

Hey all,

The Forum has been ominously silent of late. I hope the BVD hasn't completely drowned in torpedo juice. Anyhow, just to clear the cobwebs I figured I would post an update photo.  This build has taken me waaaay too long so I'm trying to make a push and finish it off this week so I can spend more time on my next build. Anyhow, here she be. Still have to seal the decals, do a wash, glue on some of the knick knacks (antennae, etc.) and then mount ordnance. I'll post photos of the completed build when it's all done. Whew...this one's been a slow haul.


Tony


  • Member since
    November 2008
  • From: Long Island, NY
Posted by Hot-Pb on Saturday, April 18, 2009 10:30 PM
 simpilot34 wrote:

Tony, hope all goes well shoehorning those 1830's!!!! Now that I see how you are going about enlarging the diameter, this is hindsight now but I would have quartered the cowl and shimmed the cuts then glue it all up and sand it back to shape. That way you will have an equal enlargement of the circumference. Just myMy 2 cents [2c] and a bit late now i know. Smile [:)]

NOW you tell me! Haha... 

  • Member since
    March 2006
Posted by simpilot34 on Saturday, April 18, 2009 8:34 PM

Bondo! Like Aaron said, two updates in as many days!!!!Thumbs Up [tup] Thats really great, considering I haven't even started!Boohoo [BH] Looking Great!!! Really can't wait to see 'er all painted up and lookin' pretty!!!!

Tony, hope all goes well shoehorning those 1830's!!!! Now that I see how you are going about enlarging the diameter, this is hindsight now but I would have quartered the cowl and shimmed the cuts then glue it all up and sand it back to shape. That way you will have an equal enlargement of the circumference. Just myMy 2 cents [2c] and a bit late now i know. Smile [:)]

Cheers, Lt. Cmdr. Richie "To be prepared for war, is one of the most effectual means of preserving the peace."-George Washington
  • Member since
    January 2009
  • From: Central CA
Posted by Division 6 on Saturday, April 18, 2009 8:54 AM

simpilot34, sfcmac, Glad you like it.

Everyones comments is a real motivation to get these models done.Big Smile [:D]

Bondo Glad to see the progress on your bird, your a real inspiration.

Lot a work to mod that plane and should really inspire others to try it. 

Hot-Pb glad you like the seats, they where inspired by the Netherlands plane that is on so many aircraft sites.

Love those engines, might have to pick up a set when I get to my 1/48.


Eric... 

  • Member since
    November 2008
  • From: Long Island, NY
Posted by Hot-Pb on Saturday, April 18, 2009 7:49 AM

Very nice work Eric and Bondo,  looks like we're getting some momentum on this build! I love the airline style seats in particular Eric, very nicely done! Thumbs Up [tup] And the tail mod is equally splendid Bondo, I really like the look of the rudder slightly off axis. Stop giving me ideas! This buid is slow enough as it is!

So I'm still plodding along on mine to get my Vector engines to fitt. I decided to move ahead and finish them off as intended rather than trying to sand the edges of the engines down. I went ahead and cut the cowl and am adding some styrene to enlarge its diameter, we'll see how it looks when I'm done. I do have a set of cowls from another kit that look more to size and if my adjustments of the PBY cowls don't look quite up to my tastes I'll try and modify them a bit...decisions decisions!


Tony

  • Member since
    October 2004
  • From: League City, Texas
Posted by sfcmac on Saturday, April 18, 2009 6:11 AM

 Top shelf stuff Eric!  Really inspirational all that scratch built stuff and it looks so darn good I'm jealous!

Bondo ! Two Updates in two days?  What in the world?  Real progress I wish I was able to be as diligant!  Hope this next week is a better one for both of us! Make a Toast [#toast]

  • Member since
    March 2007
  • From: Carmel, CA
Posted by bondoman on Saturday, April 18, 2009 1:22 AM

I roughed out the SLAFCO tail. Restructured the horizontal tailplanes, mounted the rudder and dryfitted all the parts.

  • Member since
    March 2006
Posted by simpilot34 on Friday, April 17, 2009 8:17 PM
Eric, she's really coming along now and looking great!!! Well done!!!!Thumbs Up [tup]
Cheers, Lt. Cmdr. Richie "To be prepared for war, is one of the most effectual means of preserving the peace."-George Washington
  • Member since
    January 2009
  • From: Central CA
Posted by Division 6 on Friday, April 17, 2009 5:54 PM

O.K. here's a small update.

I made the passanger seats and computers this morning.

Originally I made some seats a week ago but made them to small so that wasted half a day with assembly and painting.

Computer screens are pix clipped from a catalog. 

The tube on the left is for mounting the model on a brass rod for display.


Aft section has some strips of nonskid installed (600 grit wet/dry sandpaper painted black)

Items in view but not attaced yet, canvas tarp and re-breather dive tank. 

more stuff will be added later as I make it.


This one has some cargo in the aft section.

life boat, backpacks, sleeping bags, duffle bag and ladder.

This tiny stuff takes forever to make especially when parts decide to feed themselves to the carpet monster.


Eric... 

  • Member since
    January 2009
  • From: Central CA
Posted by Division 6 on Friday, April 17, 2009 1:51 PM

Way Cool!!!

Take lot's of pictures.


I'll have some updates later today or tomorrow.

At the moment I'm making some seats and computers for one of the planes.

Kind took a brake and was spending time on another project.Whistling [:-^]


Eric... 

  • Member since
    March 2006
Posted by simpilot34 on Friday, April 17, 2009 12:24 PM

Bondo, you are doing some amazing work on your supercat!!!! Really looking the part!!!! Thumbs Up [tup]Bow [bow]

If all goes well mates, yours truly might just be assisting in the restoration to static display of a Catalina at the RAAF Point Cook Museum here in Oz. The fuse sans wing is on display already but the wing is in the shops. Had no boody idea how big that wing is until I was close to it!!! Here is a pic of the fuse thats on display.

Cheers, Lt. Cmdr. Richie "To be prepared for war, is one of the most effectual means of preserving the peace."-George Washington
  • Member since
    October 2004
  • From: League City, Texas
Posted by sfcmac on Friday, April 17, 2009 9:32 AM

 Impressive stive there Bondo!  Just from looking at the picture(s)!  Very Cool!  Quite a show your giving us!!!  Congrats on the School trip as well!  You should well be proud of Miss Bondo Jr!

 Ah yes! The PBY's are buzzing!

 Eric have I missed any of your updates?

 Anybody?

 Well Bondo I think your work is grand and in 1/72 very tricky to get to look right. I have always found 1/72 to be a tough unforgiving scale so your talents in design are showing! Bow [bow]

  • Member since
    March 2007
  • From: Carmel, CA
Posted by bondoman on Friday, April 17, 2009 2:39 AM

Next, the cowlings.

  • Member since
    March 2006
Posted by simpilot34 on Sunday, April 12, 2009 9:12 AM
Welcome back Nam!!!! Glad to see you again!!!! Hope all goes well with the puter now!!!
Cheers, Lt. Cmdr. Richie "To be prepared for war, is one of the most effectual means of preserving the peace."-George Washington
  • Member since
    September 2012
Posted by namrednef on Sunday, April 12, 2009 7:02 AM


ARRRRRGH!Pirate [oX)] A great video that!

Ahem! Oops! Wrong GB!

The BVD has relocated Dell RU-235 Modeling Deccelarator closer to its wi-fi moorings. I should not be kicked off-line in mid page anymore!

Now to catch up......AGAIN!Banged Head [banghead]

(Heck! I haven't even read all of chukw's new build!)

Cheers to all you scrappers!

  • Member since
    June 2008
Posted by lewbud on Saturday, April 11, 2009 12:40 PM
 bondoman wrote:
 Hot-Pb wrote:

 Now the bad news. I had the intention of adding two Vector resin R-1830's to this. They are just gorgeous, little models in their own right. I have started assembling these, not done yet, and have come to the nasty realization that the engine cowlings are too small to fit once the pistons are installed. Waaaaaaaa!!! Boohoo [BH]

If I were you, I'd look around for replacement cowlings. Cowlings follow the engine, not the airframe so if you wiki airframes with 1830's; and there's one that's really obvious (the DC-3), you might find what you need.

http://en.wikipedia.org/wiki/Pratt_&_Whitney_R-1830

Or make them, which wouldn't be hard either. I really wouldn't chop the heads, they look great and better to work around them. If all else fails. make a rubdown of the kit cowls with tin foil, handle them with tweezers and promise yourself never to touch them. It works well.

Bondo,

When you speak clearly in the Queen's English, you make sense.  I don't think I'd have hit on the idea of using cowlings from another a/c (but then according to some, thinking's not my strong suit anyway).  Nice work on the Super Cat.  You gonna do a dio of the scene where she lifts off the lake just as the fisherman dive out of the boat?

Buddy- Those who say there are no stupid questions have never worked in customer service.

  • Member since
    March 2006
Posted by simpilot34 on Saturday, April 11, 2009 9:20 AM
Bondo that's excellent work mate!!!!! Looking forward to more pics!!!Thumbs Up [tup]
Cheers, Lt. Cmdr. Richie "To be prepared for war, is one of the most effectual means of preserving the peace."-George Washington
  • Member since
    March 2007
  • From: Carmel, CA
Posted by bondoman on Saturday, April 11, 2009 1:17 AM

I've been working on the SuperCat alot as she's at the top of the GB list.

Aaron- yes this is the next project that is done "in the dark."

In no particular order, I've made up a new rudder and started to put on ribs with the correct profile, minus the skin thickness. more about that later (Bondoskin). I could not find any drawings or other references for the SLAFCO PBY conversion.

Oh; Bondo thought and it's a rare good one. Remind the reprobates on the www at 11 pm what it is you're chattin to yourself abt! It's the PBY-5a converted to a SuperCat and featured in the movie "Always".

So the rudder is a shop-built item; I took the profile from the AM decal  sheet and the various thicknesses are only a match for where it meets the kit.

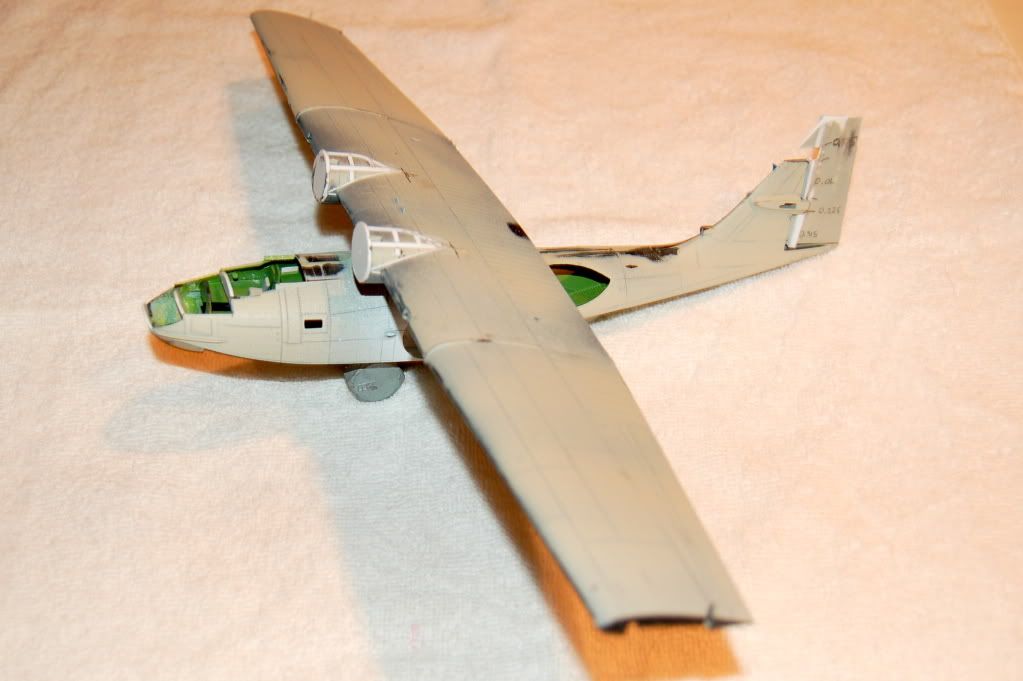
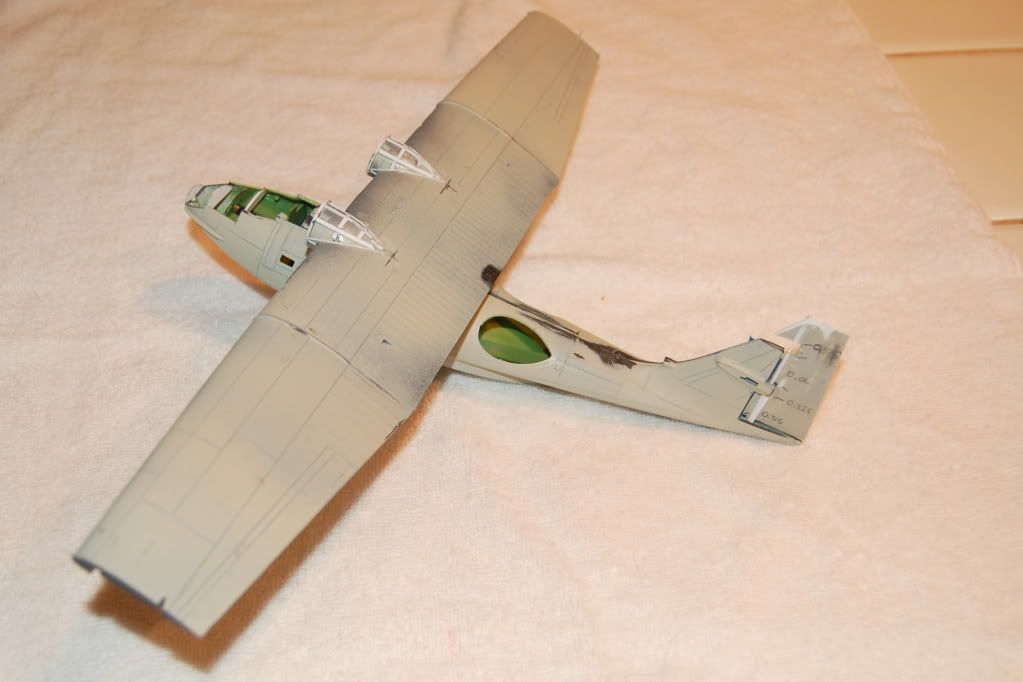
The nacelle modifications started with a set of R-2600's from an B-25 donor kit cheap off eBay. Measuring inside the Mitchell cowlings created plastic discs, glued to the nacelle after it had been cut back about two scale feet. Drawings and photos suggest that the SuperCat conversion moved the engines upwards a total of half the increased diameter of a R1830 to a R2600, ie about 5" and the bottom of the cowling remained in the same place in elevation. So I've built the nacelles up behind the new firewall discs on the top only. Final step is Bondoskin.

The deck forward of the cockpit loses it's turret and the fairweather deck that led to it. The Supercat has a very homade looking new nose over stringers and frames. I've made new ribs, and will be laying in Bondoskin.

Three locations of modification. The stumper is the cockpit, which is a pure POS. There is nothing at all about it that's salvagable, the floor is about 18" below the canopy, the seats are tiny and located under the deck tumble-home. At first I thought I'd litter it with beer cans and A1 jackets, but that's insulting to those who flew her, so I'm to paint the canopy black from the inside.

So what is Bondoskin? Something thats 0.050, malleable in three directions, and paintable. Dave, it's all your fault, Frank your thoughts, Aaron, drop that beer can, and Jeaton; you'd know.

Your faithful correspondent, Billybondo, USN


  • Member since
    March 2007
  • From: Carmel, CA
Posted by bondoman on Saturday, April 11, 2009 12:49 AM
 Hot-Pb wrote:

 Now the bad news. I had the intention of adding two Vector resin R-1830's to this. They are just gorgeous, little models in their own right. I have started assembling these, not done yet, and have come to the nasty realization that the engine cowlings are too small to fit once the pistons are installed. Waaaaaaaa!!! Boohoo [BH]

If I were you, I'd look around for replacement cowlings. Cowlings follow the engine, not the airframe so if you wiki airframes with 1830's; and there's one that's really obvious (the DC-3), you might find what you need.

http://en.wikipedia.org/wiki/Pratt_&_Whitney_R-1830

Or make them, which wouldn't be hard either. I really wouldn't chop the heads, they look great and better to work around them. If all else fails. make a rubdown of the kit cowls with tin foil, handle them with tweezers and promise yourself never to touch them. It works well.

  • Member since
    November 2008
  • From: Long Island, NY
Posted by Hot-Pb on Friday, April 10, 2009 6:56 AM
 lewbud wrote:

Tony,

Just checked with about everyone I could think of and no joy.  If you built divine scale (1/72), Quick Boost would have you covered.  Can you take the Dremel to the insides and thin it out enough?  This suggestion will hurt, but perhaps trimming the tops of the cylinders and thinning the cowls will get the engines to fit.  I know it's painful because you did a great job on the engines, but that might be your only way out.  Unless Quick Boost or NEOMEGA comes out with some 1/48 stuff real quick.

Thanks for looking lewbud. Trimming the cylinders is an option. Thinning the cowl unfortunately won't do it, pretty big difference. Jorge Wolf (Eric links to his site above) points out in his scartchbuilding of this kit that he ended up modifying the cowlings because his measurements showed that their outside diameter is smaller than the diameter of the real engine scaled down! I suspect most likely the Vector engines are scaled more accurately than the cowls in the kit.

Tony

  • Member since
    November 2008
  • From: Long Island, NY
Posted by Hot-Pb on Friday, April 10, 2009 5:28 AM
 Division 6 wrote:

Might have to do what this guy did to make them the correct size.


Eric... 

Hi Eric,

yeah...I came across that as well and I'm leaning in that direction. Getting the cuvature of the cowl right will be interesting.


Tony

  • Member since
    January 2009
  • From: Central CA
Posted by Division 6 on Thursday, April 9, 2009 11:33 PM

Might have to do what this guy did to make them the correct size.


Eric... 

  • Member since
    June 2008
Posted by lewbud on Thursday, April 9, 2009 10:57 PM

Tony,

Just checked with about everyone I could think of and no joy.  If you built divine scale (1/72), Quick Boost would have you covered.  Can you take the Dremel to the insides and thin it out enough?  This suggestion will hurt, but perhaps trimming the tops of the cylinders and thinning the cowls will get the engines to fit.  I know it's painful because you did a great job on the engines, but that might be your only way out.  Unless Quick Boost or NEOMEGA comes out with some 1/48 stuff real quick.

Buddy- Those who say there are no stupid questions have never worked in customer service.

  • Member since
    November 2008
  • From: Long Island, NY
Posted by Hot-Pb on Thursday, April 9, 2009 7:28 PM

Hiya folks, haven't posted an update in a while on this glacial build of mine. I've had to put it aside for a bit and am only now just getting back to it. So...good news first. I got the fuselage closed up and the wing mostly together and then filled and sanded most of the nasty gaps. I should be able to prime and pre-shade these soon and then assemble the wing to the body. Here are a couple of pics, the wing is just placed on top for now. Ghosh, the weight I had to add not to have this tailsit was horrid!

 Now the bad news. I had the intention of adding two Vector resin R-1830's to this. They are just gorgeous, little models in their own right. I have started assembling these, not done yet, and have come to the nasty realization that the engine cowlings are too small to fit once the pistons are installed. Waaaaaaaa!!! Boohoo [BH]


So anyone have any suggestions for me? I did a little search for cowling that might be slightly larger diameter with no luck. The other option might be to cut the existing cowlings and try and enlarge them with some plasticard. Anybody have some suggestions for me? Ghosh...where's the torpedo juice when ya need it.

 Tony

  • Member since
    March 2006
Posted by simpilot34 on Thursday, April 2, 2009 6:59 PM
Excellent site Eric!!!! Thanks for the link!!!!!!!!Thumbs Up [tup]
Cheers, Lt. Cmdr. Richie "To be prepared for war, is one of the most effectual means of preserving the peace."-George Washington
  • Member since
    November 2008
  • From: Long Island, NY
Posted by Hot-Pb on Thursday, April 2, 2009 5:28 PM
 Division 6 wrote:

Found something that might be of intrest to some of you.

Hit this link to Seawings.

Can't post a direct link for some reason so just follow this. 

On the side bar hit references

Next Flying Boats Manuals Gallery

Than PBY-5 Catalina 


There are some pix of installing Bombs and Torpedos as well as a lot of interiors.


No updates on my builds as I have been working on something else the last 2 weeks. 

Eric... 

What a splendid find Eric! Well done! This will be very useful for me.


Tony

JOIN OUR COMMUNITY!

Our community is FREE to join. To participate you must either login or register for an account.

SEARCH FORUMS
FREE NEWSLETTER
By signing up you may also receive reader surveys and occasional special offers. We do not sell, rent or trade our email lists. View our Privacy Policy.