SEARCH FINESCALE.COM

Enter keywords or a search phrase below:

~The Bear Trap GB~ December '09 to August '10

61935 views
276 replies
1 rating 2 rating 3 rating 4 rating 5 rating
  • Member since
    December 2007
  • From: Bridgeview, Illinois
Posted by mg.mikael on Tuesday, June 1, 2010 9:20 PM

It all started with someone giving me a 1/48 Mig-29 Ukrainian flight demo team kit(I'm on the dark-side so aircraft are foreign to meWink) and sooner or later I'm gonna end up building it for them as a gift, in the flight demo paint scheme(yes this is quite scary for me.) Due in part to the fact I haven't built a plane before(okay, I have built two planes before but one wasn't painted and the other one has it's obvious flaws) so I'm seeking someone who has built this Academy kit(preferably a WIP of some sort), but all I'm finding is folks building the old Monogram kit....I'm getting some info from those WIPS but since their not the same kit the info obviously lacks in areas.

If you got any websites or other help, every little bit would be appreciated.

"A good plan executed now is better than a perfect plan next week." - George S. Patton

  Photobucket 

  • Member since
    March 2010
  • From: New Zealand
Posted by Scorpiomikey on Tuesday, June 1, 2010 3:57 PM

No, im not so big on 48 scale atm, in NZ price makes them slightly prohibitive. Only reason ive got a heap of 48 kits is cos one of the old guys at the model club died and his stash got sold off at $20 a kit. Whats your questuion anyway? i might be able to help.

"I am a leaf on the wind, watch how i soar"

Recite the litanies, fire up the Gellar field, a poo storm is coming Hmm 

My signature

Check out my blog here.

  • Member since
    December 2007
  • From: Bridgeview, Illinois
Posted by mg.mikael on Tuesday, June 1, 2010 9:48 AM

Lookin' good so far, the kit doesn't seem to be putting up to much of a challenge.Yes

On a somewhat related note......(since your an aircraft guy) have you ever built the Academy 1/48 Mig-29?

"A good plan executed now is better than a perfect plan next week." - George S. Patton

  Photobucket 

  • Member since
    March 2010
  • From: New Zealand
Posted by Scorpiomikey on Monday, May 31, 2010 5:42 PM

Ok, heres what i started with. you can see a sample of the paint scheme on the harvard to the left of the picture.

Heres the cockpit. colour is slightly off but once its together you cant really tell.

Cockpit

Overview

Underside

Looking down the exhaust, i dry brushed silver over black to try and make it look at least a little bit realistic lol

Instrument panel

The only filling i had to do at this stage was here

And here

Had to do a bit of filling to fill in the hole on the belly for the gun pod because ill be using the center line tank for this build.

Heres the decals ill be using and the paint scheme

Ill be doing her as NZ1076 which is actually  harvad so im thinking of changing it to NZ7876 to designate a MIG, mainly cos NZ78xx never existed lol. as always comments and criticism are more than welcome.

"I am a leaf on the wind, watch how i soar"

Recite the litanies, fire up the Gellar field, a poo storm is coming Hmm 

My signature

Check out my blog here.

  • Member since
    December 2007
  • From: Bridgeview, Illinois
Posted by mg.mikael on Monday, May 31, 2010 4:52 PM

Great to have you aboard Scorpiomikey, will be lookin' forward to the updates. On a related note, roster has been updated.

"A good plan executed now is better than a perfect plan next week." - George S. Patton

  Photobucket 

  • Member since
    March 2010
  • From: New Zealand
Posted by Scorpiomikey on Monday, May 31, 2010 4:17 PM

Deffinatly im doing a 1:72 Zvezda Mig-21 PFM in RNZAF red checkers colours

"I am a leaf on the wind, watch how i soar"

Recite the litanies, fire up the Gellar field, a poo storm is coming Hmm 

My signature

Check out my blog here.

  • Member since
    December 2007
  • From: Bridgeview, Illinois
Posted by mg.mikael on Sunday, May 30, 2010 10:52 PM

Scorpiomikey

MG seems to be the only one taking part that i can see. On that note. can i join with my MIG21PFM? its a crossover from my Rocket power GB. Its definatly NOT in soviet colours. is that ok?

I guess the mujahideen got them......Blind Fold Seriuosly though alot of the "draftees" for this GB went MIA.

I checked the rules and your Mig-21PFM is in, it just squeaked by the rules, (being that I made no rule that said the vehicles had to be in any specific paint scheme.) Not to mention crossovers are also okay..... so should I sign you up?

"A good plan executed now is better than a perfect plan next week." - George S. Patton

  Photobucket 

  • Member since
    March 2010
  • From: New Zealand
Posted by Scorpiomikey on Sunday, May 30, 2010 9:05 PM

MG seems to be the only one taking part that i can see. On that note. can i join with my MIG21PFM? its a crossover from my Rocket power GB. Its definatly NOT in soviet colours. is that ok?

"I am a leaf on the wind, watch how i soar"

Recite the litanies, fire up the Gellar field, a poo storm is coming Hmm 

My signature

Check out my blog here.

  • Member since
    December 2007
  • From: Bridgeview, Illinois
Posted by mg.mikael on Saturday, May 29, 2010 3:34 PM

Work is moving along quite nicely after all that fender scratching. With the lower hull and upper hull finally put together(and the lower fenders all weathered up). Not to mention, the upper hull has finally been painted(along with the PE kit-supplied engine deck screens.)

I also started assembly of the turret....which needs a bit of work. Make sure you have putty on hand because the turret is made up of two piecesSad, thus some gap filling will be needed.

 Not to mention the turret shape is wrong.Dunce Yikes, Tamiya fell asleep at the switch on this one. After researching this problem I realized, the front of the turret, by the mantlet should not be so flat. Their should be subtle bulge/flar out, so to get this done(their is a resin turret avaible if you choose to go that route) I got the putty out again. Layering it on and then smoothing it out with my finger to get the basic shape, once dry(almost two days) I got out the sanding sponges and made it slick and smooth. Because I'm modeling an early T-72 I also had to fill in the smoke dispenser area and snorkel area.

I had time to scratch a unditching log too......okay, okay, I din't necessarily scratch it but I did go outside and harvest it.Wink There's really no comparison between a log made of styrene and an actual branch. To make this log, I simply found a branch that's same radius as the plastic, cut it off the bush, cut to size, filed down the edges, cut off any bumps (creates the effect of branches that were cut off), and then gave it a very light sanding. No weathering needed and I have a realistic unditching log. ACHTUNG! Use a dead branch if you haven't realized it already, if use a branch that's alive then you'll have to wait awhile to the branch dries out.

 I started work on the IR light and the other searchlights on the turret(alot of lenses being made)....so will have an update on those very soon. Thanks for looking!

"A good plan executed now is better than a perfect plan next week." - George S. Patton

  Photobucket 

  • Member since
    December 2007
  • From: Bridgeview, Illinois
Posted by mg.mikael on Saturday, May 22, 2010 2:58 PM

Good news, the fenders are all finished up!Cool So now the build construction will really quicken up in pace, since the majority of the scratching is done.

After the fenders were in place and the glue had dried, I went onto the bracket construction. If you cut the fenders out carefully(something I lacked the foresight to do) you can save time and use the fender brackets that already were part of the moldings. However I had to scratch my own, as you can see in the image below, this meant 3 parts were necessary to make up the bracket. You could always make it more complicated and get rid of the square corner by angling it with an extra piece(in effect creating a beveled edge) but this is your choice.

Once those were put together, six in total, and all different sizes according to the hull height in specific areas it's simply matter of attaching them. With the brackets finished I added the fender edge(this came from the kit piece with the side skirts, it was just a matter of cutting out the piece needed and scrapping the side skirts). With that done, I then did some light/electrical wiring with copper wire.


Finally it was a matter of priming everything for painting, using veneer meant I had to be a bit more generous on the primer on top and underside of the hull). After some drying time, I started adding on some of the detail pieces to the hull.

As always all comments, questions, and suggestions welcome!Smile

"A good plan executed now is better than a perfect plan next week." - George S. Patton

  Photobucket 

  • Member since
    December 2007
  • From: Bridgeview, Illinois
Posted by mg.mikael on Thursday, May 20, 2010 1:53 PM

The fenders are finally attached, woo hoo!Stick out tongue It was quite a bit of work but in the end it pays off.

After cutting the veneer and doing all the measurements, I first marked off where the fender brackets would be, after that I then made three lines(as is seen in reference photos) at an equal distance apart. To make these lnes I simply took a ruler and scribed them in(just don't go to deep or you could make the veneer crack.Blind Fold) As you can see I marked the fenders for every part and detail first so no mistakes would be made.....but even I still made a few very small mistakes here and there.Embarrassed 

 Attached the fenders using some crazy glue(for that instant bond) and Elmer's polyurathane glue(for that strong, lasting bond). Once the glue dried I simply puttied the bottom where any gaps may be and sanded smooth. Now onto making the hull-fender brackets....hopefully I can get these started later today.


Thanks for lookin'!!Smile

"A good plan executed now is better than a perfect plan next week." - George S. Patton

  Photobucket 

  • Member since
    December 2007
  • From: Bridgeview, Illinois
Posted by mg.mikael on Thursday, May 13, 2010 4:36 PM

Got another update....yeah, suprisingly quick. Wink

Anyways, got started on the fender construction. Meaning I had to fix the upper hull piece first. As you can see their's a gap(2mm to be exact) between the upper hull and lower hull so that gap obviously had to go. Presto! Wood venner fills in the gap, yes some people might say to use styrene, but wood venner with the paper backing work just as well. You can cut it would scissors, bend it, form it, scribe it, and pretty much anything(plus I had alot of it sitting around so that's why I decided to use it.) Though for my build I'll be using the paper back not the wood side, since I don't want wood grain showing up.

As for the fenders themselves, the basic shape has been cut now I have to cut to length and scribe in the detail. (The piece with the "x" is the wood grain side, it's very nice considering it's cherry venner so when sealed the color really pops, but for this build that's not an issue.)

Finally the one of the gas tanks themselves. Well just the top to be exact, still have to scratch the sides. Used venner here too, but used the wood grain side(sorta by accidentHuh?) however I have sanded it as smooth as it can be. I scirbed in the detail, added a styrene piece from the orginal piece, and added a putty to give the appearance of a weld seam.

 All comments, questions, and suggestions welcome!Smile

"A good plan executed now is better than a perfect plan next week." - George S. Patton

  Photobucket 

  • Member since
    December 2007
  • From: Bridgeview, Illinois
Posted by mg.mikael on Tuesday, May 11, 2010 11:08 AM

Thanks for the comments, FastEagle1! Lookin' forward to seeing your build re-started.

*********

Now here's that update that's been much delayed and long awaited. Tracks are all finished up, primed first then painted in my standard Tamiya acrylic flat earth, then washed in burnt umber, black, rust, and another burnt umber. Then drybrushed with two shades of darkened steel. The paint might have gone on well, but damn these rubberband tracks, as soon as you start moving them around the cracks and chips in the paint occur. It's nothing too serious, another wash can solve that problem, but these tracks are still very hellish.


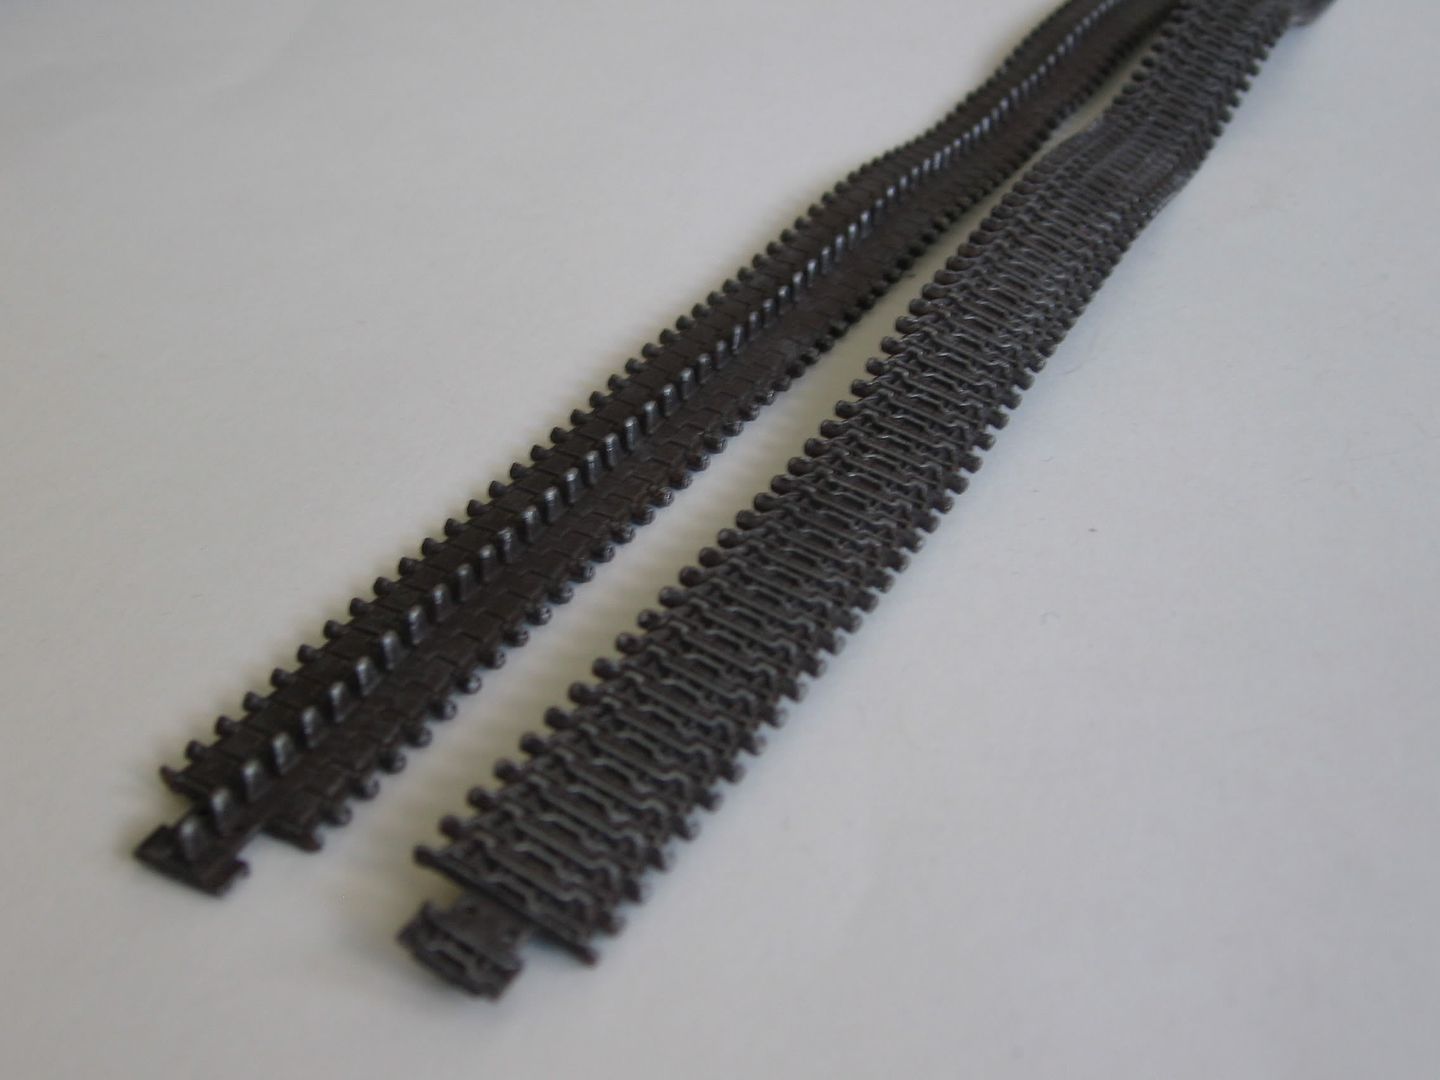
Rubberband tracks ease of assembly=yes(since your obviously not assembling indy links together), easy to attach ends together=NO. I didn't sew the ends, nor did I staple the ends, nor did I try to melt them together, I went the way of glue....to be exact super glue(for that instant bond) and Elmer's polyurethane glue(for that strong bond.) Even using this combination of glues didn't make it easy, I had to stretch and smash them to fit, suprinsgly they stuck together(after holding the ends for about 10 minutes apiece). In the end the join area is not perfect(paint started coming apart) so now more repairs are necessary. Either way my final opinion is that I'm an indy-track lover.

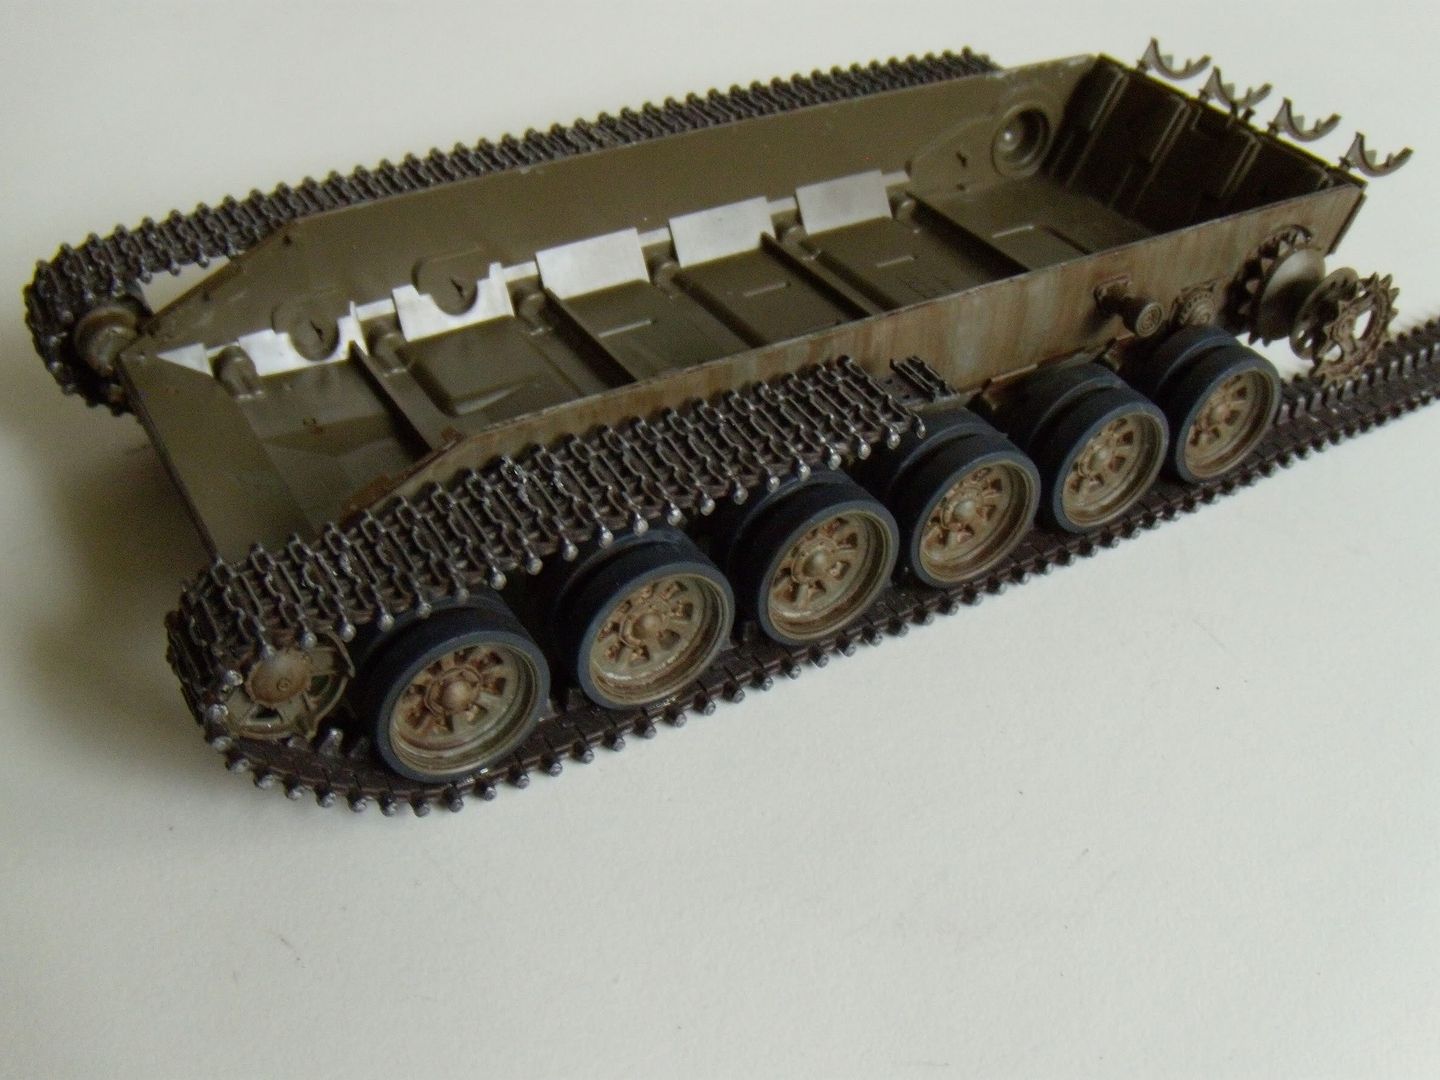
Weathering on the lower hull came before the track assembly. I wanted something different that fit the environemtn of Afghanistan a bit more So I went lighter on the burnt umber then usual, but extremely heavy on grime.....for that dusty/dry appearance.

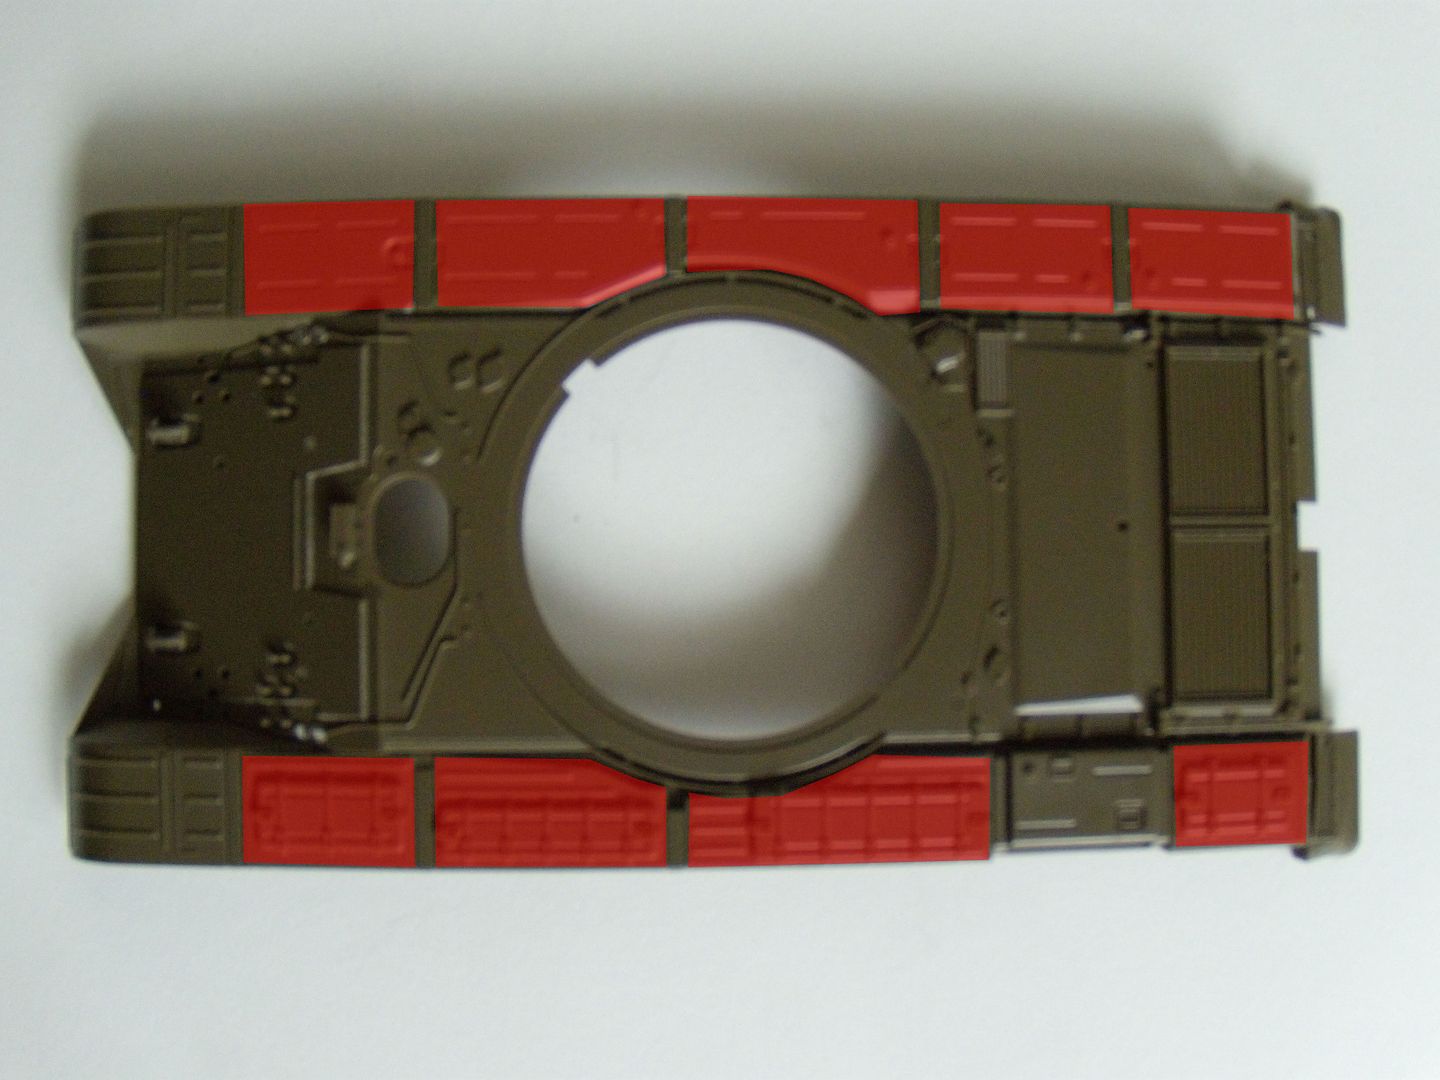
Upper hull is where the real work has to happen, the Tamiya T-72M1 kit is an eport version of a later model T-72. So I had to backdate the hull piece for what would likey have been seen in Afghanistan. Keep in minf all T-72 in the Soviet-Afghan War never saw combat, it was strictly there for field testing, so that said most didn't venture far from home base at the capital. Keeping that in mind I decided to scrap all the storage containers on the fenders of one side, and I decided to remove most of the fuel tanks also on the fenders. (lacking foresight, I removed too many fuel tanks, not realizing the tank still needs fuel to workDunce) That means I now have to scratch two fuel tanks on the fenders, in addition to the fenders on both sides I already have planned.


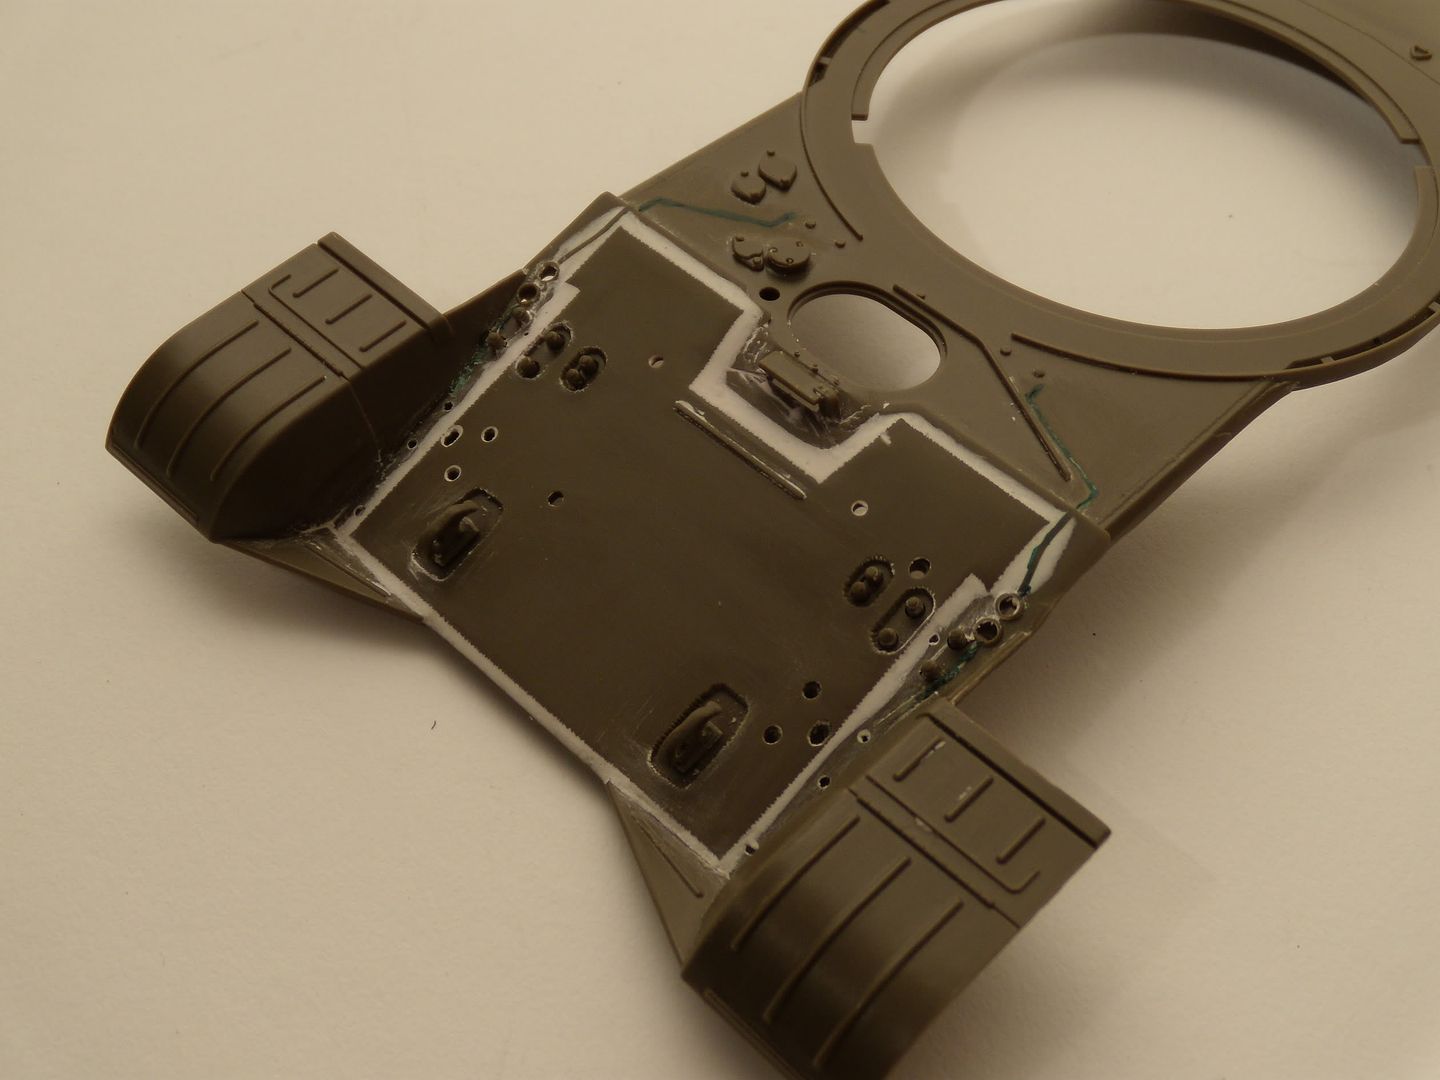
After, the fenders I had to fix the frontal add-on armor. T-72's in Afghanistan wouldn't have had this much later added armor. So that obviously had to go, but replacing the whole front with resin aftermarket parts was not something I wanted to flip the bill for, nor was sanding the plate off a reasonable option, so I decided to hide it. Yes, hide it by using putty along all the edges. A lot of putty to make the lower plate and “add-on” seem like just one plate. A couple of hours of sanding later the result is not half-bad.

As always all comments, questions, and suggestions welcome. PS: if you got a pic of T-72’s in Afghanistan please share, because I’m still looking for one(though I think chances are slim).

"A good plan executed now is better than a perfect plan next week." - George S. Patton

  Photobucket 

  • Member since
    December 2009
  • From: Fort Worth, Texas
Posted by FastEagle1 on Sunday, May 9, 2010 6:49 PM

WOW!  MG, that is beautiful!  

Glad to see you're back and doing well.  After the accident involving the Su-17 I decided to devote my attention to another project as a way to regroup and refocus (the Eduard Yak-3 is running on another thread).  I'll have it finished in the next week or so and will get back on track with this build.

I hope your finals went well and look forward to seeing your next update.

Take care!

  • Member since
    December 2007
  • From: Bridgeview, Illinois
Posted by mg.mikael on Thursday, May 6, 2010 9:44 PM

HELLO! HELLO! HELLO! I think I here my echo, where is everyone?! Over on my end, believe it or not I'll have a small update on my T-72 tommorrowWink, as for today here's some images of what I've built/worked on for my architectural class.

First image is the model, second image is a rendering of it on the site, third is a rendering in the interior. Hope you like.Smile


"A good plan executed now is better than a perfect plan next week." - George S. Patton

  Photobucket 

  • Member since
    December 2007
  • From: Bridgeview, Illinois
Posted by mg.mikael on Sunday, April 25, 2010 12:31 AM

Unfortunately, I wasn't able to attend AMPS this weekend.Crying Too much work for my architectural studies, okay maybe it wasn't too much work. But I did  wait to the last minute to write two 10-page research papers and build a 1/16 model of the building I designed.

As for the 1/16 model it's out of cherry veneer, plexi-glass, and mattboard. Along with a site plan of the land. I'll try to post some pics of my work here soon. Hope it impresses the architectural judges.Smile

"A good plan executed now is better than a perfect plan next week." - George S. Patton

  Photobucket 

  • Member since
    December 2007
  • From: Bridgeview, Illinois
Posted by mg.mikael on Saturday, April 17, 2010 1:47 PM

Good news my spring semester is almost over, just about two weeks left (but alot of deadlines and exams to study for.Blind Fold)

Nevertheless I do plan on attending AMPS in Auburn next Saturday, hopefully I might see some of my fellow FSM members there. Not to mention get some sweet deals on kits.Wink As for my T-72 build, the workbench will be back up and running by May 1st(yep, I know the date.) So I should have updates before not to long. Now let's see some other builders get  work done too!!!Cool

"A good plan executed now is better than a perfect plan next week." - George S. Patton

  Photobucket 

  • Member since
    December 2007
  • From: Bridgeview, Illinois
Posted by mg.mikael on Friday, April 2, 2010 4:37 PM

bondoman- Lookin' good, fit's in nicely with your An-12 in the background.Yes Will update the first page when I find some time this weekend.

Sherman1111- I really regret to hear that you will be dropping from this GB. Would have really loved to seen the "Ganef" all built up.

By the way I haven't been around here as much as I would like(that may or or may not be noticable) but I haven't heard of any censorship by FSM. Plus who's posting just to post....?

"A good plan executed now is better than a perfect plan next week." - George S. Patton

  Photobucket 

  • Member since
    June 2006
  • From: Sunny Califorina
Posted by Sherman1111 on Thursday, April 1, 2010 10:05 AM

Hi guys there sure are some great builds here, but I am going to have to drop out of this GB, I do not care for this formun any more due to censorship buy FSM and a few people that try to dominate the whole thing with nonsence just

to raise the count. It Just gets old after awhile'

Thanks

jd

  • Member since
    March 2007
  • From: Carmel, CA
Posted by bondoman on Sunday, March 28, 2010 12:23 AM

Yeah, finished! I'm no armor modeler, more aircraft and it sure shows! But I had fun with this little guy, a 1/72 Trumpeter BTR-80 that I didn't really do anything to except add an antenna.

"Bagram Airforce Base, Fall 1988"

http://i295.photobucket.com/albums/mm150/6134rdm/DSC_0147.jpg

http://i295.photobucket.com/albums/mm150/6134rdm/DSC_0143.jpg

Thanks for looking.

  • Member since
    December 2009
  • From: Fort Worth, Texas
Posted by FastEagle1 on Thursday, March 25, 2010 8:52 PM

Howdy MPH,

Thanks for the inquiry.  Yes, my little feline friend "lawyered up" and is denying any wrongdoing.  My other cat is staging a hunger strike in protest (little bugger).  Meanwhile, I'm tasting, er I mean testing, new merlot samples in a quest for more foil.  Stick out tongue

I wish you a speedy recovery and look forward to seeing some Su-25 action soon!

Onward!

  • Member since
    January 2004
  • From: Colorado
Posted by mph34 on Thursday, March 11, 2010 9:59 PM

Sorry I have been MIA for so long.  Between this broken ankle {almost ready to get rid of this boot} and work - I have been un-motivated and mentally blized to do anything. 

I should have at least kept an eye on the work that everyone else has been doing! Embarrassed

But thanks to 'sub revolution' {aka Tristan} for sending me the Squadron Su-25 book, I may have gotten the modivation to make it to the workbench.  That and do a better job of watching everyone else's progress.

Fast Eagle - sorry to hear about the 'supervisor' cuasing problems {isn't that the case of most supervisors - always screwing something up? Big Smile}   The cockpit  detailing is looking good - did the Merlot bottle get used on the 'supervisor' or did the Congressional hearings let her off with a warning?

  • Member since
    December 2007
  • From: Bridgeview, Illinois
Posted by mg.mikael on Saturday, March 6, 2010 8:43 PM

Unfortunatley I didn't get any work on my T-72 done today, I had some time but that time was used to go take some pics of an empty lot in the southside of Chicago. In other words the rough part of town aka 'da hood', luckily for me I went their early in the morning, snapped the pics, and got the hell out of there. Going home I did see a drug transaction go down in another empty lot just a few block away from where I snapped the pics.....so at least the trip wasn't a total waste, plus now I have a story to tell.Stick out tongue

The desolate lot I had to get pics of (suprisingly right by the University of Chicago)....

The rows and rows of public housing in the southside......

"A good plan executed now is better than a perfect plan next week." - George S. Patton

  Photobucket 

  • Member since
    December 2007
  • From: Bridgeview, Illinois
Posted by mg.mikael on Friday, March 5, 2010 11:13 AM

FastEagle1- That cockpit is coming along nicely! CoolThough I'm sorry to hear about the feline accident. Nevetheless, I'm sure you'll fix the problems and I'll be looking forward to the next update.Yes

******

Now, some of you guys may be wondering what may or may not have happened to my T-72. As for an answer.... it's still on the bench. I just haven't had the time to work on it duing weekdays or weekends.(that's also why I have been on the forums as much recently.) That's due in part to my architecture studies which have taken up 99% of my time lately, (midterms don't help either.Stick out tongue)

But alas, no worries spring break is coming soon so I should be able to find some time to build then.


"A good plan executed now is better than a perfect plan next week." - George S. Patton

  Photobucket 

  • Member since
    December 2009
  • From: Fort Worth, Texas
Posted by FastEagle1 on Sunday, February 28, 2010 9:50 AM

Good day everyone,

Progress continues on the big Suk, this time we're back in the front office:

The HUD control unit has been mounted onto a scratch-built instrument panel shroud and detailed with bits of copper wire.  The fabric cover was made by embossing the metal foil seal (donated by a bottle of Chateau Ste. Michelle Merlot) with a putty tool, cutting it to shape and securing with white canopy glue.  I'll paint this contraption with Vallejo acrylics. 

Now for a bit of bad news.  The Sukhoi suffered a set-back last night when my feline production supervisor slipped off the desk and took the model with her.  Fortunately, damage was limited to the wings but there is enough to push back it's first flight for a week or so.  Congressional hearings commence forthwith.  

  • Member since
    December 2009
  • From: Fort Worth, Texas
Posted by FastEagle1 on Sunday, February 21, 2010 2:10 PM

Thanks mg!

Progress continues...this time with the reconnaissance pod.  The Su-17M4R carried the KKR-1 pod on the centerline station and while the kit's pieces capture the correct shape, they lack a few details:

There is a cover over the forward camera bay and chaff dispensers towards the middle of the pod: 

The chaff dispensers in place:

A side view showing the details from the side: Evergreen channel used to box-in the chaff dispensers, and the vents and static dissipator on the aft-end.

Finally, a peek at the bird.  Much more work to complete before she heads to the paint-shop:

  • Member since
    December 2007
  • From: Bridgeview, Illinois
Posted by mg.mikael on Friday, February 19, 2010 11:08 AM

Lookin' good so far, FastEagle1. Always love to see some scratching!

"A good plan executed now is better than a perfect plan next week." - George S. Patton

  Photobucket 

  • Member since
    December 2009
  • From: Fort Worth, Texas
Posted by FastEagle1 on Wednesday, February 17, 2010 6:09 PM

Alright Gents,

....Live on stage 3, it's..... the long lost Sukhoi!  Now that my workbench is clear of all evidence of the last project the trusty Fitter is back on the desk and ready to rumble.  

I've separated the trailing links of the main gear and gave them "the business":

Next up are the flaps:

The fuselage is buttoned up and I  hope to have photo's of it by the weekend.

Until then, I'm going to imagine it's summer.


  • Member since
    December 2007
  • From: Bridgeview, Illinois
Posted by mg.mikael on Saturday, February 6, 2010 9:50 PM

M1Carbine-  Thanks for stopping by and checkin' out the build.

Got Hinomaru?- Glad to see you didn't leave us and that you'll be building soon. Guess I'm sorta in the same boat as you, except that I've had a large amount of course work everyday. I'm under this architectural instructor that works us to death(the fact he has a bad sense of humor doesn't help either.) The fact is I probably won't have any real free time to work on my T-72 untill spring break....Bang Head

"A good plan executed now is better than a perfect plan next week." - George S. Patton

  Photobucket 

  • Member since
    December 2007
  • From: Sudbury MA
Posted by Got Hinomaru? on Friday, February 5, 2010 9:16 PM

Hey all, remember me. I havn't jumped ship but I have had to work everyday from December 28th until yesterday. Boss decided to go on vaca and left me in charge. Which isn't a bad thing. Then last week I had some car repairs and the computer crashed same day. Car is now fine but the computer...... not so much. Clearly time for a new one. Anyway I am gonna spend all day Sunday modeling like a madman and hopefully take some pictures of some progress. For now I will go through the pages and update myself on what my fellow trappers have been up to.


                                                                         Andrew

Respect all, fear none.
JOIN OUR COMMUNITY!

Our community is FREE to join. To participate you must either login or register for an account.

SEARCH FORUMS
FREE NEWSLETTER
By signing up you may also receive reader surveys and occasional special offers. We do not sell, rent or trade our email lists. View our Privacy Policy.