SEARCH FINESCALE.COM

Enter keywords or a search phrase below:

IDF Group Build Mk. II 2010-2011

107435 views
398 replies
1 rating 2 rating 3 rating 4 rating 5 rating
  • Member since
    September 2006
  • From: Dripping Springs, TX, USA
Posted by RBaer on Wednesday, May 5, 2010 11:35 AM

You guys have been busy! Must have something to do with not having to build so many wheels........

I did get pics of my "raw materials"......

Sacrificial goats:

And sprues ( mixed bag here, it's a spare parts build)

And basic hull, started a couple of weeks ago, from yet more leftovers:

Still a couple of weeks before I get a real start on this one.


Apprentice rivet counter.

  • Member since
    October 2007
Posted by White_R34 on Friday, May 7, 2010 5:09 AM

WoW guys that some awesome detail on those aircraft interior and to RBaer you have been busy as well, love those two tanks man. I to plan on building one more Mk. IIID tank. Once I get the top of my WWII Panzerwerfer 42's upper hull built I'm going to start on some work for my Mk. IV APC.

Building the Impossible Is my main goal!!
  • Member since
    May 2009
  • From: Hobart, Tasmania
Posted by Konigwolf13 on Saturday, May 15, 2010 8:15 AM

Not alot more done so far but here is what I have done

Cockpit test fisted after applying needed parts to upper fuselage.


Wheel well test fitted into place before final painting of area.

Andrew

  • Member since
    October 2007
Posted by White_R34 on Wednesday, May 19, 2010 8:23 PM

Man that's some grate work your doing to that Jet. Ok guys for the last two weeks, I have bean working on making some line drawings to aid in my construction. I just want you guys to know I'm still in on this build. SO here's a photo of my drawing. I hope this weekend I can start putting plastic together.


Building the Impossible Is my main goal!!
  • Member since
    March 2008
  • From: Charleston, SC
Posted by kg4kpg on Thursday, May 20, 2010 8:35 PM

Update.  Cockpit and weights are in the closed fuselage.  Wings assembled.  Had to wash the plastic twice, barely holds the paint.  You guys look to be doing some fine work.  Chris

  • Member since
    February 2003
  • From: Rothesay, NB Canada
Posted by VanceCrozier on Thursday, May 20, 2010 9:13 PM

Want to keep my eyes on this one gang, I have an Avia kit that I may be able to contribute after ball season is over. Later,

On the bench: Airfix 1/72 Wildcat; Airfix 1/72 Vampire T11; Airfix 1/72 Fouga Magister

  • Member since
    October 2007
Posted by White_R34 on Friday, May 21, 2010 11:28 PM

Vance you have bean added to the list when you know the scale and type of aircraft let me know so I can add it to the list as well. An guys I love the work on the two aircraft. Stick out tongue

Building the Impossible Is my main goal!!
  • Member since
    May 2009
  • From: Hobart, Tasmania
Posted by Konigwolf13 on Saturday, May 22, 2010 4:57 PM

VanceCrozier

Want to keep my eyes on this one gang, I have an Avia kit that I may be able to contribute after ball season is over. Later,

Don't you guys always have a 'ball season? Football, baseball, basketball, add in the preseason games. LOL. Just start now you know you want to Wink

  • Member since
    October 2007
Posted by White_R34 on Monday, May 31, 2010 4:59 AM

Grate work guys, heres something I have bean workin on. It's not for this GB but it's and IDF tank. It's an IDF M113 AMEV.

Building the Impossible Is my main goal!!
  • Member since
    September 2006
  • From: Dripping Springs, TX, USA
Posted by RBaer on Thursday, June 3, 2010 11:09 AM

Nothing very involved at all, right?Cool

Looks good, following this one on  the "other" site as well.

I'm kind of in the same boat, finishing this up:

and then I'm into the M60A1 for this GB, I hope.....

Apprentice rivet counter.

  • Member since
    May 2009
  • From: Hobart, Tasmania
Posted by Konigwolf13 on Thursday, June 3, 2010 11:30 AM

White- NICE!!!

RBaer- Love the weathering. Nice and sutle dust. Finally got some more bench time with this build. Not much to report all still going together nice

Andrew

  • Member since
    April 2005
Posted by Thunderbolt379 on Monday, June 7, 2010 8:45 PM

RBaer -- STUNNING Magach, maybe in another ten years I'll be building them like that!

KW13 -- the Sufa is moving along, it's going to be a beautiful plane!

Well, I finally made a start -- the kit I chose to begin on is Hobbycraft's 1:48th scale Avia S-199 in Israeli markings. This is my first Hobbycraft project and I began it with trepidation after a  disastrous flirtation with their F4U-1D about two years ago, when I was seriously put off by bad engineering and a tendancy for liquid cement to melt the plastic completely away... This one seems to be a far superior product, thankfully, and I'm already contemplating doing another. Here's the box art:


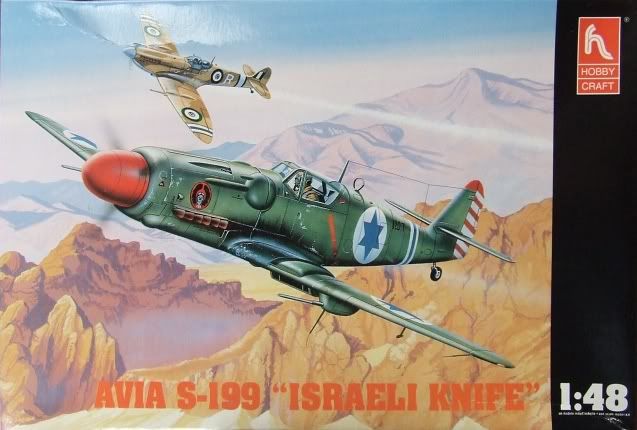
Hobbycraft had their artist play up the greenish tone of the paint, suggesting the mysterious RLM-68 primer that has been suggested for the colour in which they were delivered. The artist has also mixed and matched research sources, creating an image which reflects D-120 as presented at the IAF Museum in some details but not in others. I picked up Aeromaster's decal sheet, and they depict D-120 with the chin radiator, while Hobbycraft and the Museum display show her without the large scoop (I can't see if she has the small one in the museum shots i have on hand, but I believe it's an either-or situation.) Unless anyone has any suggestions, I'll follow the display aircraft in this detail.

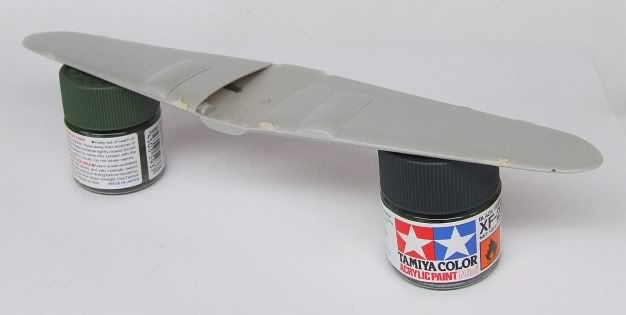
I began construction last night with the wing. It's the first time I've ever sanded the inside of parts... The locator holes for the scabbed-on bulges on the top surface were in the wheel wells, so I sanded the pins down a touch and added the bulges, then filled and sanded the holes so that the wheel wells will have a smooth appearance. It may not be properly detailed but it's better than a peg and hole showing. Here's the wing, with some filler in the leading edge:


The fit was quite good and the plastic seems to be responding well to liquid cement. Another modification I made before assembling the wing was to add the radiator inlet flap pitch jacks, from styrene rod. The box art shows two jacks, but my experience with 109s of all previous types suggests one is correct. I studied the photos of the Hatzerim exhibit and can't truthfully say I can see radiator detail on any of them, but the best photo seems to show one jack, to my eye. I may be seeing what i expect to see, of course, and I have no idea if the exhibit is in fact D-120, or simply an airframe finished in those markings. Anyway, I decided to add Messerschmidt-standard single jacks, thus:


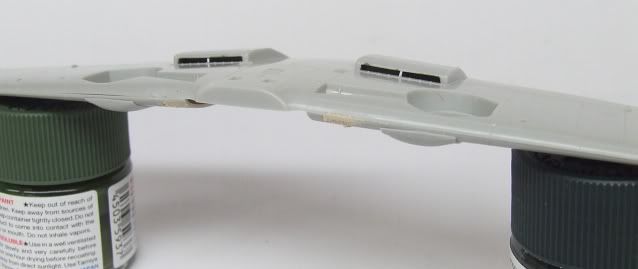
They're an up-detailing -- I just hope they're right.

More pics as the model progresses, Cheers, Mike/TB379

http://worldinminiature.blogspot.com/

  • Member since
    September 2006
  • From: Dripping Springs, TX, USA
Posted by RBaer on Tuesday, June 8, 2010 10:46 AM

T-bolt, KW, thanks. It's been fun, almost done and ready to  start the "clean" Magach.

Geting the bench prepared, lining up parts.....

Apprentice rivet counter.

  • Member since
    April 2005
Posted by Thunderbolt379 on Friday, June 11, 2010 5:44 AM

WIP: The office is now painted and ready for assembly. I checked my references but could not find a cockpit shot of the equivalent model of 109, so painted somewhat from memory. The instruments are brush painted in black, drybrushed in white, and Clear Parts Cement was used for the guage glasses.

Next up, assemble the fuselage.

Cheers, M/TB379

http://worldinminiature.blogspot.com/

  • Member since
    October 2007
Posted by White_R34 on Friday, June 11, 2010 1:07 PM

RBaers I love this tanks weathering as well. I'm dragging my feet right now on my project. I'm going to search my paint boxies so I can mix up some interior color so I can get back to work on thiat project. As for my Heavy APC I'm still asking around for a bit more info before I start on it.

Building the Impossible Is my main goal!!
  • Member since
    September 2006
  • From: Dripping Springs, TX, USA
Posted by RBaer on Friday, June 11, 2010 6:15 PM

White_R34

RBaers I love this tanks weathering as well. I'm dragging my feet right now on my project. I'm going to search my paint boxies so I can mix up some interior color so I can get back to work on thiat project. As for my Heavy APC I'm still asking around for a bit more info before I start on it.

Thanks.

Sometimes I like to make sure I have plenty of reference material also, and give it a good study, avoids errors later on.

Apprentice rivet counter.

  • Member since
    September 2003
  • From: Australia
Posted by Helo H-34 on Friday, June 11, 2010 11:23 PM

I didn't realize there was a IDF GB happening .

I'm a big fan of the Israeli Military...

I have a nice stash of IDF kits ;

I really like the Nord 2501 "Noratlas" in Isreali service , I kindly ask if I may join in with everyone else with Heller's 1/72 kit ...

I already have a Noratlas underway , she will be finished in the Sand/Brown and green camouflage , for this GB , I would like to build and finish one in an overall silver finish with EL-AL markings from the IsraDecal IAF-77 sheet . I do have some IDF and other builds on-going , so it may be a few months before I can get started , with the finish date Dec 2011 this will suit me .

Kind regards

                               John .


  • Member since
    April 2005
Posted by Thunderbolt379 on Sunday, June 13, 2010 7:14 AM

Jeez, Helo53, that's... Some stash! Some display case! Some passion! I desperately need to build a display case. I'll have a fair few finished items to go into it, and I don't like having finished models hanging around the workbench, they're too liable to get damaged and collect dust.

I'm putting the S-199 together and have a tech question for anyone here. The kit features what appears to be a stiffener along the centreline of the nose gundeck cover, the Hobbycraft artwork shows it but I've not verified it from any of my research photos yet. I'll go on to check late-build Bf 109s of different origin, but I'm wondering if it might be an inovation of the Czech factory (as opposed to a figment of Hobbycraft's research...)? Any advice would be greatly appreciated.

More WIP shots coming soon.

Cheers, Mike/TB379

http://worldinminiature.blogspot.com/

  • Member since
    September 2003
  • From: Australia
Posted by Helo H-34 on Sunday, June 13, 2010 5:26 PM

Hi Mike ,

I have the reference book , Avia S-199 in Israeli service 1948-1950 , by Alex Yofe and Lawrence Nyveen .

I'm not sure if this pic from the book is of any help...

There would be a hinge line where the two engine cover doors swing open and up ?

HTH .

Kind regards

                      John .

  • Member since
    April 2005
Posted by Thunderbolt379 on Sunday, June 13, 2010 6:53 PM

Thanks, John -- yes, it looks like the hinge line between the engine covers, but rather than engraving the outline of the flush hinge the way Tamiya (?) do, Hobbycraft have molded it standing proud of the surface (withought segmentation). That it appears in their box art suggests they had reason to think Avias showed this detail, as if the Czech engineers redesigned the hinge for some reason. I'm not sure what to do, leave it as is or scrape it away and scribe a plan line... I sure can't scribe the hinge detail, I'll make a mess if I try.

Seam work today, finishing around the gun deck panel -- I did the long side sams last night -- then rescribing panel lines acros the spine and belly, plus a bit more sanding of the wing junctures on the underside. There's a step at the wing root but I don't think it's worth doctoring, it's frankly less noticeable than if I started trying to plaster it over. Then I can add the horizontal tails and get the rear cockpit bulkhead painted and detailed, the canopy locking bar is not there and I could scratch it before adding the clear parts.

Shalom, Mike/TB379

http://worldinminiature.blogspot.com/

  • Member since
    April 2005
Posted by Thunderbolt379 on Tuesday, June 15, 2010 8:38 AM

Hi all,

I've made some progress on the S-199, the fuselage is together and the wings attached. Here's a shot of the cockpit snugged into the right fuselage half:


From there on it was a fairly quick job to close her up, though the seams took some attention, mostly with CA and adzing, though some putty was needed around the wing joints, notably on the bottom. Here's the trailing edge jointline:


And the leading and trailing joints mostly filled and smoothed:


The top wing joints have a small but definite step between the wing and fuselage, but I'm thinking of leaving it alone, as filling and sanding won't change the fact the parts don't line up as closely as they might, and there is otherwise no actual gap.

There'll be a fair bit of scribing to do to firm up panel lines the smoothing has largely blurred out, but nothing too complicated. I ended up scraping away that raised hinge line down the centre of the gun cowl, and flushing the part into the fuselage with CA. I have the horizontal tails still to attach, then return to the cockpit. I've scratchbuilt the canopy locking bar, and need to apply RLM 66 to the rear area before making up the canopy with the armour glass panel and getting all the clear parts into place. I have a mask set for the K-4 that should fit, it looks like the same canopy type.

Cheers, Mike/TB379

http://worldinminiature.blogspot.com/

  • Member since
    September 2006
  • From: Dripping Springs, TX, USA
Posted by RBaer on Tuesday, June 15, 2010 10:02 AM

Very nice!

I'm still in limbo......

Apprentice rivet counter.

  • Member since
    September 2003
  • From: Australia
Posted by Helo H-34 on Tuesday, June 15, 2010 9:15 PM

bondoman

 Thunderbolt379:

...my only experiences with Hobbycraft have not been very memorable, but theirs is the only Knife I'm aware of.


In 1/72 the AML S199 is a great little kit, with vac canopies, resin bits and a little PE. I liked it.

What's your plan for the green color? That's always a good debate.

http://i295.photobucket.com/albums/mm150/6134rdm/DSC_0939.jpg

(Tamiya) IJN Aircraft Grey and RAF Buff mixed 75/25, looked good to me.

Bondoman , I really like your 1/72 scale AML Avia S-199 .

I just ordered two of them from www.hannants.uk  ; I have Kopro's S-199 kit but I'm not sure how accurate it would be for the IAF ; I also ordered part 1 and 2 Israeli Armour in detail books . I haven't built armour kits in the past , attatching the tracks to all those wheels always seem's to scare me off starting an armour build .

Perhaps the books will inspire me .

                                                        John .


  • Member since
    April 2005
Posted by Thunderbolt379 on Tuesday, June 22, 2010 8:57 AM

Bondo -- your mix of Tamiya paints looks very good, my only question being which of their shades would be the "RAF Buff"? I'm not aware of an RAF paint of that name, but their "Middle Stone" may be close -- yet it looks yellowish in some ranges.

I just read an interesting colour mix for IDF armor, in FSM's Academy Merk IV review -- Tamiya Khaki for the base, followed by Buff as a highlight/fade color. That's a very different selection to the mix Academy recommended for earlier Merkavas, and I was wondering if anyone had any thoughts? I mean, it looks good, I just don't know if it looks accurate for the mysterious "Sinai Gray."

The S-199 is moving along, I've added the tail surfaces, supercharger intake and gun cover blisters (which needed filling around). There's a small intake under the right chin, just ahead of the wingroot and I can't see it in the Khaterim display... But the kit plans are adamant that S-199s would have had either the big chin radiator or the small scoop, one or the other, and D-120 as exhibited at Khaterin definitely does not have the large one. I've sprayed the rear cockpit area and am now at liberty to finish off the coaming and add the canopy. Rescribing panel lines blurred out by sanding will be a major round of work too.

Cheers, Mike/TB379

http://worldinminiature.blogspot.com/

  • Member since
    September 2006
  • From: Dripping Springs, TX, USA
Posted by RBaer on Friday, June 25, 2010 5:57 PM

Happy day! I'm calling my Magach 6B-Gal "done", so next on the bench (in between the various Shermans I always have going) will be my early Magach 6. Whoopie!

The "Gal":

Apprentice rivet counter.

  • Member since
    April 2005
Posted by Thunderbolt379 on Sunday, July 4, 2010 11:29 PM

Stupendous Gal, RBear! I hope mine end up looking so good some day.

Does anyone have a bookmarked link back to IDF 1? I need to check my paint mixing formula for the Merk II and I don't seem to have a record of it -- I must have included it in my later posts on the project.

Cheers, Mike/TB379

http://worldinminiature.blogspot.com/

  • Member since
    April 2005
Posted by Thunderbolt379 on Monday, July 5, 2010 1:30 AM

Yo, Bondo -- I've been trying to match the shade selection you used to mix the IAF Sinai Gray/48 shade and... it turns out there are THREE Tamiya Japanese Navy grays! XF-12 is the basic type, but they've more recently inroduced XF-75 IJN Gray (Kure Arsenal) and XF-77 IJN Gray (Sasebo Arsenal).

Do you remember which of these shades you used? Also, was the "RAF Buff" shade you used XF-57?

Cheers, Mike/TB379

http://worldinminiature.blogspot.com/

  • Member since
    April 2005
Posted by Thunderbolt379 on Monday, July 5, 2010 10:44 AM

WIP to report (no photos yet) --

I've made a start on the Merkava II from IDF 1, going back to the paintwork and doing the shade and fade highlights. I worked out the formula for the color and darkened it slightly for the shadow tint, applied under the nose and tail, and around the running gear, then mixed the fade tint for the topside as Tamiya XF-57 Buff 3:1 with Flat White then thinned it beyond the usual 2:1 and misted it on selectively.

I think this gives plenty of tonal variety to underlie the oil wash weathering which will be the next step.

I'm really glad to be able to complete this project and collect the badge from the original build!

Photos before long --

Cheers, Mike/TB379

http://worldinminiature.blogspot.com/

  • Member since
    September 2006
  • From: Dripping Springs, TX, USA
Posted by RBaer on Tuesday, July 6, 2010 4:34 PM

I was interested in that one also, glad you're back on it. Oddly enough, the Merk2 I had in progress back then is still, yep, in progress. I may actually have that one finished in a while, knock on wood.....

I was happy with the -Gal myself, thanks. figs are almost ready, and a base is started.

Apprentice rivet counter.

  • Member since
    April 2005
Posted by Thunderbolt379 on Saturday, July 10, 2010 8:23 AM

Thanks, RBear -- hey, let's finish them together. And speaking of progress, after the shade and fade coats the other day, I began the pinwash on the Merk today. I did a basic wash on the turret, hull and skirts, and have the wheels to go, then I'll get fancy with the drybrushing and pigments. In places I might tone back the pinwash, after the pristine hull this looks too dirty too soon! Here's the turret:


And mounted to the hull, with the mating surface cleaned up:


Lots more rust and dirt to go. I would not have expected rust in a desert country... Until during ODS I saw tanks splashing through endless mud in the wet season. So I guess corrosion for a hard-used AFV is as much a problem there as anywhere else.

Cheers -- all comments welcome -- Mike/TB379

http://worldinminiature.blogspot.com/

JOIN OUR COMMUNITY!

Our community is FREE to join. To participate you must either login or register for an account.

SEARCH FORUMS
FREE NEWSLETTER
By signing up you may also receive reader surveys and occasional special offers. We do not sell, rent or trade our email lists. View our Privacy Policy.