SEARCH FINESCALE.COM

Enter keywords or a search phrase below:

IDF Group Build Mk. II 2010-2011

107435 views
398 replies
1 rating 2 rating 3 rating 4 rating 5 rating
  • Member since
    October 2007
Posted by White_R34 on Saturday, November 27, 2010 9:12 PM

Hello every one< I hope you all had a verey nice Turkey day. Here some of my progress.

Building the Impossible Is my main goal!!
  • Member since
    October 2007
Posted by White_R34 on Saturday, November 27, 2010 9:21 PM

Here's the figuers I'm working on and some progress photos of my Achzarit IFV.

Building the Impossible Is my main goal!!
  • Member since
    October 2007
Posted by White_R34 on Monday, November 29, 2010 12:51 PM

Here's some more work on my Achzairt from 2 days ago.

I'm woring on cuttting this over sized part down and I'll have new photos of the thing later..

Now the LIC commanders cupola is next...

Building the Impossible Is my main goal!!
  • Member since
    October 2007
Posted by White_R34 on Friday, December 3, 2010 1:26 PM

Hello every on and how hs your holydays bean? Fine on my end. Here's some progress work on my set of RCWS. I now have three for my three IDF projects.

I'm close to the end of adding fine detail to this RCWS, so here's what I look's like so far...

Building the Impossible Is my main goal!!
  • Member since
    May 2009
  • From: Hobart, Tasmania
Posted by Konigwolf13 on Sunday, December 5, 2010 4:49 AM

Hi guys, kinda fell off the planet for a couple of months (ok about 5) been working on my Sufa a bit, finished getting the intake puttied and painted white just have to do the grey just on the inside. Nothing really photo worthy. should be there soon.

White, your build is amazing. I have dreams of onday scratching the interior of an ASLAV-25 and your a true inspiration.

Mike nice perservering on the BF -109errr S-199. I have a Hobby Craft A-4E/F that I'm not looking fwd to (I did the seat and the pit looks 60's airfix or worse).

Andrew

  • Member since
    October 2007
Posted by White_R34 on Saturday, December 25, 2010 7:12 AM

Hay Konigwolf I have some photos of a full scratch-built interior., of a LAV that I will use to help in one of my LAV projects. If you want I'll upload them to my open photobucket album and send you a link in (IM).

An thanks for your comments and getting inspiration from my work. Here's some of my interior and exterior scratch work on an M3A3 Bradley.

Scratch work on one M3A3 Bradley OIF

Go here to see all the projects I have on going Vincent White's full work bench

Building the Impossible Is my main goal!!
  • Member since
    May 2009
  • From: Hobart, Tasmania
Posted by Konigwolf13 on Saturday, December 25, 2010 7:35 AM

Vincent thanks for the links, would also love to see the LAV pics.

On a different note. My F-16 after making a start on it again I noticed a problem, the instuctions didn't give the part numbers for the nose gear housing to use and I used the wrong ones (then discovered the correct ones after all glued and dried to other parts). I emailed kinetic and they sent me out a replacement sprue for the part I needed (for the cost of postage, great friendly service from them). I got that Thursday so should be able to start again (again) this next week sometime. Pics soon

Andrew

  • Member since
    April 2005
Posted by Thunderbolt379 on Monday, December 27, 2010 1:31 AM

John -- I used your tip of double-coating the white to avoid bleed-under when I finally came to grips with the rudder of my S-199 today. Then I mixed the insignia red from Tamiya acrylics, 25 parts XF-7, 2 parts XF-3 and 1 part XF-1. Even so, it still seems a bit dark, yet the bare XF-7 seems too bright.

I also resprayed the spinner cone (over a satin white basecoat to aid luiminoscity, not that I can actually see any difference from the first time I sprayed it red, so maybe these paints are more opaque than I thought...):

I have the paints to mix the camo shade, and I'll sort out a lustre with satincoats of some sort, certainly 120.D in the museum today is high gloss. I'm hoping I might have this one done in the near future, and that's a good thing, because...

I just received in the post Aademy's M-51 Isherman and I must say it's a very sweet looking kit! It's rather calling to me, and if I can complete the Merk II from IDF I in time, I would love to throw the Isherman into the IDF II melting pot as well! Would that be okay, White?

Cheers, Mike/TB379

http://worldinminiature.blogspot.com/

  • Member since
    April 2005
Posted by Thunderbolt379 on Tuesday, December 28, 2010 2:03 AM

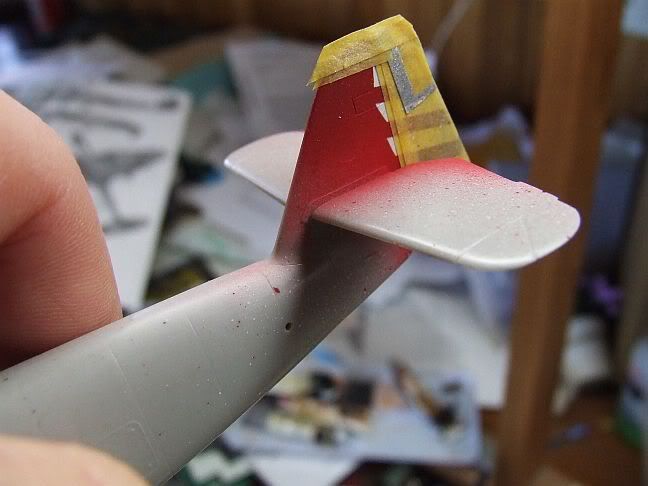
More progress to report today, I unmasked the tail stripes and found them very sharp, no bleedunder whatever. A tiny scuff in one or two places to be touched up later, that's all. Here's the unmasked tail:

And here's the remasked tail, ready for overall spraying:

I thought I would have had the paint on today, but this kit seemed to chuckle ominously, and at the first opportunity reminded me in no uncertain terms that it is a Hobbycraft kit, not a Hasegawa...

I thought all I had to do was add the tiny bits and get her into colour, but...

1) The canon gondolas feature two pegs that go into holes in the wing. The starboard gondola fits, the port doesn't (trim a peg, no big deal...) The canon barrels are so delicate they break as you're handling them, such as to rub down filler in their visible gaps... (One barrel reglued, the other completely off and both it and the stub drilled to be reattached with a wire pin... No bets will be taken as to whether the other one survives the painting procedure without similar surgery.)

2) Tailwheel attachment -- long or short? Fairing or not? Hobbycraft's committee-effect struck again here, as the hole in the fuselage was so large the tailwheel strut waggled in the hole, but the hole in the optional fairing was so small the strut would not pass through it (shave down strut, drill out fairing...)

3) Centreline droptank: I've seen this model built with the tank and I considered it: the adaptor fits the fuselage holes perfectly, but... The four pegs do not match up with the locators on the tank AT ALL. Sigh... I could source these parts as unused Hasegawa bits from a 109 K-4, but... The '48 war was a defensive one, Israel is a small country, it stands to reason the longrange tanks were removed to increase manoeuvrability when the planes arrived, so it's fair to depict the aircraft without it. The S-199 painted up as 120.D in the museum today is displayed without it.

So, at this point the canon gondolas are on, the tailwheel is mounted (short, with the fairing, mirroring Aeromaster's research), and the droptank is omitted. I have the aileron balance horns and fuselage gun muzzles to add, four tiny parts which will doubtless give me cause to profane, but hopefully I'll be painting again tomorrow.

I'm thinking of giving preshading a try, as a monochromatic bird it's a perfect canvas for getting that show-through effect. So, first thing, I'll load up some XF-1 and follow the panel lines. Then mix up Bondo's formula for Israeli camo, add gloss to bring up a sheen (unless I do some experiments with satin topcoat first...) and lay down the colour.

Cheers, thanks for looking, Mike/TB379

http://worldinminiature.blogspot.com/

  • Member since
    May 2009
  • From: Hobart, Tasmania
Posted by Konigwolf13 on Tuesday, December 28, 2010 3:27 AM

Nice going mike.

Well here's a pic of the manual, no parts call for the nose gear housing, why I got confused is that most of the parts used for this section are on the one sprue, but the F-16I uses different ones

The manual

the replacement sprue on the right and the correct parts I should of used on bottom right.

The bad bit. I was originally only going to replace the intake mouth and cut open and use the intake tube but since I got the whole sprue with part son it as well I figure why bother. I still need the vertical bar on the inside of the mouth but that shouldnt be to hard to remove.

Andrew

  • Member since
    October 2007
Posted by White_R34 on Wednesday, December 29, 2010 5:55 AM

Ok I'm only going to post a link to my latest work as this forum keeps frezzing up when I try to post any photos. An thounder go on and add your sherman project. I tryand add you newest build to the name list. here's that link to my latest work.

Project photos-Achzarit from White_r34

Building the Impossible Is my main goal!!
  • Member since
    April 2005
Posted by Thunderbolt379 on Wednesday, December 29, 2010 6:04 AM

KW -- a fair bit of plastic surgery but the replacement parts really ease the issue. I look forward to this one coming together, it's a kit that really caught my eye the moment it came out -- not the price tag, just the kit!

Progress on the Knife -- she's into colour! I tried my hand at preshading, it took raw courage to spray black freehand all over the plane.Hhere she is at that stage, looking like a zebraskin bathmat:

Then I used Bondo's formula and mixed XF-12 IGN Grey 3:1 with XF-57 Buff -- a shade that really fools the eye because suddenly you see a green. I'm not sure if it's as dark as the original, but it has the deceptive quality of Sinai Grey. I hosed it on in two light coats, and my brain must be used to a solid base colour because I virtually eliminated the preshading. Maybe it takes practice to know when to ease off! Here's the Knife as she stands:

Unfortunately the intensity of light rather defeats any nuance and she looks pale grey in these pictures. Hopefully I'll get better shots! When I look at her again tomorrow I'll make a hard comparison to the research pics of the preserved aircraft, and if necessary I'll repaint her with an adjusted mix, it's easy at this point.

I experimented with spraying Microscale Satincoat through the AB and it sprays like a charm, no tip-drying despite a fast drying rate on the surface, quick recoat time to build up the lustre, and easy cleanup with water. I'll satincoat the plane tomorrow, along with the small parts also now in camo, such as the canopy struts and gear bay doors. Mental note -- spray prop blades tomorrow. The airframe restored as 120.D has the blades in high gloss camo grey/green, and it's highly dubious whether that is the historic original... 112.D, Modi Alon's other plane in 101 Sq., 1948, was, I think, probably the previous markings for the same display airframe, and she was prepared at some time in the past with black blades with yellow spinners, after the western style. My gut feeling is that the Avias would more than likely have left the factory with RLM 70 blades, so that's where I'll go, as I'm endeavouring to finish her close to how she might have been in action.

A little bit of luck and I'll be decalling tomorrow.

Cheers, Mike/TB379

EDIT: Thanks, White! It'll be fun to bring that Sherman together, though I confess I might cheat and do her in a conventional desert tan/sand shade, like on the box -- this Sinai Grey is messing with my brain!

http://worldinminiature.blogspot.com/

  • Member since
    October 2007
Posted by White_R34 on Wednesday, December 29, 2010 7:24 AM

Hay thunder your going to have to go back and preshading once again. An when you put on the finel color shade., only use a realy thin cote. An don't paint to heavy over the shaded lines and spots. I had to learn that when for my first time I used that methid on my Merkava Mk.IIID for the last IDF Group Build.

Here's some of my work...

Building the Impossible Is my main goal!!
  • Member since
    October 2007
Posted by White_R34 on Wednesday, December 29, 2010 7:38 AM

Oh and I cast my own wheels, I save a lot of money that way.

Here I'm just making or pouring a new mold for more resin wheels/tires.

Building the Impossible Is my main goal!!
  • Member since
    April 2005
Posted by Thunderbolt379 on Thursday, December 30, 2010 5:58 AM

White, you're a builderr after my own heart -- I like a scratchbuilder who moulds and casts! I've done a fair bit with resin and rubber over the years and it's great to see the techniques applied!

You were absolutely right, I started over again today and redid the while thing. I compared my paintjob to the photos of the real airframe and the mix suddenly looked like a light green to me, so I began from scratch with a fresh preshading, here she is at that stage:

I was more careful this time, a lighter hand and followed the lines a bit more closely. Next, the colourcoat. I did some experimental mixing and this time worked with XF-22 RLM Grey. I duplicated Bondo's ratio of 3:1 with Buff, but it seemed a shade dark. It's hard to tell as apparent colour changes with lighting angle and the reflectivity of the surface, but my best guess was that it would be too dark. I lightened it just a fraction by biasing the mixing ratio to favour the Buff -- 2.5:1. In other words, 60% RLM Grey, 40% Buff. I over-ran the thinning by about 10% also, taking into account the summer conditions and the need for it to flow on smoothly as yesterday's paint was a bit rough to the touch.

I laid on a careful coat, making sure not to apply it heavily enough to obscure the preshading, but ensuring that any thin spots were adequately covered on a second small mixing. It was dry in no time and I unmasked the tail. Here she is at that point:

I must say I'm very happy with the sharpness of the masking, and only one or two tiny touchups were needed. The next job was the propellor, I mixed XF-27 RLM 70 6:4 with XF 1 Flat Black to bring the Tamiya shade into line with the enamel equivalents and painted the one-piece prop with three or four misted-on coats.

Next: the satin clearcoat. I loaded up with Microscale Satin, thinned about 60% with plain water, and I can only say that I am very happy indeed with the application. This is my first ever topcoated model, and it looks good to me. The satin behaved superbly, no tip-drying whatever, but drying so quickly on the model that I could literally handle it as it was being coated. I laid on two coats, thoroughly, and set the model aside to harden. I also coated the prop components, landing gear bay doors, antenna and canopy struts (all of which were correctly painted by that point, and yes, its easy to forget the small bits in the drama of the big job...) Here she is as she stands right now:

It looks a lot like RLM Grey in these pictures but the 40% Buff has warmed it a lot in reality, and it looks, to my eye, a pretty close approximation to the paint used on the museum example.

Next jobs: assemble the prop, paint the exhausts and tail wheel assembly, refit that broken canon barrel, paint the canon barrels, and of course... get decaling underway! The part I usually enjoy the best!

Cheers, I hope to have her finished real soon,

Mike/TB379

http://worldinminiature.blogspot.com/

  • Member since
    October 2007
Posted by White_R34 on Thursday, December 30, 2010 5:47 PM

Ahh you can still see the dark lines. Good work, you will get better the more times you do that trick.YesToast

Building the Impossible Is my main goal!!
  • Member since
    April 2005
Posted by Thunderbolt379 on Thursday, December 30, 2010 6:05 PM

Big Smile I was very happy to see it come together like that, and I'm sure I'll do this trick again in future!

I didn't get the prop assembled last night, I sprayed it on the sprue and when I removed the finished item I discovered there were some tight angles at the base of the blades where the paint hadn't found the plastic. GRRR, a tiny spot of extre airbrushing today to fix that... Hopefully she'll be well along by tonight!

Cheers, Mike/TB379

http://worldinminiature.blogspot.com/

  • Member since
    April 2005
Posted by Thunderbolt379 on Thursday, December 30, 2010 9:36 PM

SCREAM!!!

I was doing a bit more research, trying to verify Aeromaster's decision that 120.D had 'open' insignia and tailband on the fuselage... I have not yet been able to substantiate that, indeed every pic I've found of Avias frm the '48 war has had proper insignia, however I did come up with a frustrating tidbit on this website:

http://www.aeroflight.co.uk/waf/aa-mideast/israel/af/units/101sqn.htm

There's a photo of 120.D and the caption reads:

The Hatzerim museum Avia S 199 now appears in a strange
'biscuit' colour, rather than it's original light grey.

I guess all the agonizing was ultimately unnecessary, if this reference is correct then the odds favour the S-199s being delivered in plain old RLM-02 as many folks have said over the years... Except for those reports of it looking a lot greener at the time!

Well, I'm NOT spraying this thing again, so it'll be a depiction of 120.D as she appears today, in her 'strange biscuit colour' finish, after all the trouble I went to to replicate the darn thing!

I have another S-199 kit that I'll build one day in period-accurate finish. There were a couple of Avias in Israeli camo and I wanted to do one of those, so I guess I'll have to grab a third kit now!

Prop touched up and recoated, exhausts painted -- decals getting underway now, and the open insignia are a moot point because she doesn't feature them today!

Cheers, Mike/TB379

http://worldinminiature.blogspot.com/

  • Member since
    September 2003
  • From: Australia
Posted by Helo H-34 on Thursday, December 30, 2010 9:50 PM

Great work Mike ;

I'm really happy for you that the tail stripes came out so well .

'White' your workmanship is just amazing .

I haven't made much progress on my M19 Transporter and M113 , I did get two 1/72 scale Mach 2 Super Frelons for Christmas , one I'll build and finish in my favourite camo scheme of light green/sand/brown over light blue . The other I was wondering how difficult it would be to scratch build some of those "outrigger" style landing gear struts to replace the sponson style landing gear .

Anyway I have pleny of motovation to finish the two current builds , as I would like to do another Super Frelon , I really enjoyed the first one I built back in 2009 , with the Blue/Brown camouflage .

Keep up the great work everyone .

                                   John .

  • Member since
    September 2003
  • From: Australia
Posted by Helo H-34 on Friday, December 31, 2010 4:39 AM

Thunderbolt379

SCREAM!!!

I was doing a bit more research, trying to verify Aeromaster's decision that 120.D had 'open' insignia and tailband on the fuselage... I have not yet been able to substantiate that, indeed every pic I've found of Avias frm the '48 war has had proper insignia, however I did come up with a frustrating tidbit on this website:

http://www.aeroflight.co.uk/waf/aa-mideast/israel/af/units/101sqn.htm

There's a photo of 120.D and the caption reads:

The Hatzerim museum Avia S 199 now appears in a strange
'biscuit' colour, rather than it's original light grey.

I guess all the agonizing was ultimately unnecessary, if this reference is correct then the odds favour the S-199s being delivered in plain old RLM-02 as many folks have said over the years... Except for those reports of it looking a lot greener at the time!

Well, I'm NOT spraying this thing again, so it'll be a depiction of 120.D as she appears today, in her 'strange biscuit colour' finish, after all the trouble I went to to replicate the darn thing!

I have another S-199 kit that I'll build one day in period-accurate finish. There were a couple of Avias in Israeli camo and I wanted to do one of those, so I guess I'll have to grab a third kit now!

Prop touched up and recoated, exhausts painted -- decals getting underway now, and the open insignia are a moot point because she doesn't feature them today!

Cheers, Mike/TB379

Mike , you probably already have your own reference on the S-199 but I thought I might just post these pic's , they may be of some help ...

As you can see the position of the identification stripe is further up the fuselage on D-120 .

The pic's came from my Avia S-199 in Israeli Air Force Service 1948-1950 ; White Crow Publications .

HTH                                      John .

  • Member since
    April 2005
Posted by Thunderbolt379 on Friday, December 31, 2010 5:20 AM

Thanks John, I found one or two of those pics but these are a marvelous addition! Yes, I'd spotted the forward position of the fuselage band. I see also that 120 seems to have the full dark blue insignia, so I have no idea where Aeromaster got the impression the insignia were fuselage colour stars on a white background, and same with the band... There must have been a photo somewhere that suggested it, but it's not showed up yet.

Just getting to those decals now! Cheers, happy run-in to 2011! Mike/TB379

http://worldinminiature.blogspot.com/

  • Member since
    April 2005
Posted by Thunderbolt379 on Saturday, January 1, 2011 5:44 AM

More progress today on the Hobbycraft S-199. The Aeromaster decals are all on, the panel lines accented with Promodeller Weathering Wash and the whole thing given an extra coat of Microscale Satin to seal it up. Here she is:

I must say, I'm a big fan of the Microscale finishes and expect to use a lot of them in future!

The bird is probably a compromise, she's a bit more worn and weathered than a museum display should be, while not being in the correct shade for the '48 war. Still, not too bad, and she's been a valuable learning experience for me.

I'll get her legs under her and mount the prop next, then onto canopy, guns and antenna wire, a little dust on the wheels and she's done... I could stretch a point and add exhaust staining as if she's flown a display recently, it would be what the eye expects to see -- what do you guys think?

Cheers, Mike/TB379

http://worldinminiature.blogspot.com/

  • Member since
    September 2003
  • From: Australia
Posted by Helo H-34 on Saturday, January 1, 2011 1:37 PM

Your Avia S-199 is looking superb Mike , that Promodeller Weathering Wash sounds like good stuff , I'll have to look around for some to use on my builds .

It's a great way to start the new year when your able to finish up a difficult build ;

Looking forward to seeing her sitting on her landing gear .

                                                          John .

  • Member since
    April 2005
Posted by Thunderbolt379 on Sunday, January 2, 2011 7:17 AM

John -- many thanks, and I'm delighted to report that she's very nearly all done. But for a tiny touchup or two, rigging the antenna wire (will need fresh glue) and getting some .020" brass to replace the kit's grossly overscale pitot tube, this warbird is on the ramp! I'm thinking of writing up a complete list of everything that was wrong, every way this kit can bite you, it would be quite a document!

Here are a few quicky gallery shots, the proper ones will come when those last jobs are done. It's been a major learning process, both for the next time I do one of these and for techniques applicable across the board.

Cheers, Mike/TB379

http://worldinminiature.blogspot.com/

  • Member since
    October 2007
Posted by White_R34 on Monday, January 17, 2011 4:55 AM

Wow Thunder Love it man love it! You earned your badge for sure my friend! I'm looking for that same aircraft to do one my self. Thanks for joining this GB man.

At this time I'd Like to state for the record., I think I'm going nut's with all this fine detailed work, I have to do.

Building the Impossible Is my main goal!!
  • Member since
    April 2005
Posted by Thunderbolt379 on Monday, January 17, 2011 5:40 AM

White -- thanks, man, it was a pleasure, and as soon as I can get around to doing the missing antennas I'll do the proper gallery shoot, blue background and all.

GRIN -- your scratchbuilding is so darn good you make me want to get back into it. It takes time and patience but the result is unique and excellent!

I'm working on five models simultaneously, and if I can move a couple off the bench in the near future I think the M51 Isherman might enter the build phase. I also turned up an IDF M60 Blazer in my stash and would love to crank that one out too! Maybe for IFD III, along with that IAF Mustang that's up on the storage rack...

Cheers, M/TB379

http://worldinminiature.blogspot.com/

  • Member since
    October 2007
Posted by White_R34 on Monday, January 17, 2011 12:53 PM

An IDF III GB will be in the works. As of right now I have 11 kits unbuilt, both as israeli and converted armor. I need to ask is your IDF M60 the Academy kit with the Mine roller? As I'm looking for the wheels from that set up. Now I can scratchbuild them, I just was looking for the easy way out.

Oh and I'll be using them of the Mine roller set up on my next Merkava Mk.IIID project. Here's a photo of what I want to build.

With the turret from the lower tank image.

I also have an USMC M60, that I plan on building in to a IDF Bridge layer. I have more wild looking APCs on tap as well..

Building the Impossible Is my main goal!!
  • Member since
    February 2003
  • From: Rothesay, NB Canada
Posted by VanceCrozier on Monday, January 17, 2011 1:19 PM

Thunderbolt, love seeing that S199 built up. Ihave the same Hobbycraft kit sitting in the stash, waiting for me to pay it the attention it'll require. Encouraging seeing your pics! So, about that "all things wrong" manual before I start on mine... Wink

I haven't been following consistently, did you dare try the OOB decals or just go straight to the aftermarket?

On the bench: Airfix 1/72 Wildcat; Airfix 1/72 Vampire T11; Airfix 1/72 Fouga Magister

  • Member since
    September 2003
  • From: Australia
Posted by Helo H-34 on Monday, January 17, 2011 4:45 PM

Sadly no new progress on my M-19 and M113 , sorry about that Sad

I am putting together some 1/72 F-16's for the Korean War and Viper GB's ; One of the Hasegawa F-16C kits I'm back dating to an F-16A of the Phoenix Squadron 1995 which entered service still in the USAF color scheme....

I thought I might include the WIP pic's of this build as well .

White , I definitly will be part of IDF III GB , I have over 65 kits in the Israeli IDF/AF stash .

I would really like to contribute a lot more to the GB than I already have , I have a huge amount of respect and admiration for the IDF/AF .

Anyway I keep plugging away on my builds .

                    John .

  • Member since
    April 2005
Posted by Thunderbolt379 on Monday, January 17, 2011 5:05 PM

White -- Yes it's Academy but unfortunately it's not the edition with the mine roller... I was looking at that one a few days ago on eBay and thinking one day I'd have to add one of those evil-looking things to the stash.

Vance -- yes indeed, the all-things-wrong manual for the Hobbycraft S-199 is somwething I'm meaning to make up for my blog, I'd be delighted to post the list here as well. I'll say it was a kit that fought me all the way, but knowing what to expect now I'm confident to tackle it again in future. I would also consider the conversion set that's out there, I forget who makes it, a resin fuselage to which you attach Hasegawa Bf 109 G wings, tail, landing gear and canopy... It would doubtless come with its own problems, but it would avoid this batch! Decals -- no, I didn't touch the kit sheet at all, the markings came from the Aeromaster sheet (48-119). I just reviewed them on my blog as well -- not perfect but not bad.

Cheers, Mike/TB379

http://worldinminiature.blogspot.com/

JOIN OUR COMMUNITY!

Our community is FREE to join. To participate you must either login or register for an account.

SEARCH FORUMS
FREE NEWSLETTER
By signing up you may also receive reader surveys and occasional special offers. We do not sell, rent or trade our email lists. View our Privacy Policy.