SEARCH FINESCALE.COM

Enter keywords or a search phrase below:

Japanese GB 2011-2012

202811 views
2250 replies
1 rating 2 rating 3 rating 4 rating 5 rating
  • Member since
    October 2008
  • From: italy
Posted by bsyamato on Tuesday, September 27, 2011 10:47 AM

Bad things on the wings Trey but the kit not seems so bad Yes waithing for the exciting painting scheme you choiced Bow Down

till now only an otaki kit i remember seen, i like the otaki plastic smell Propeller

  • Member since
    March 2003
  • From: Rain USA, Vancouver WA
Posted by tigerman on Tuesday, September 27, 2011 11:43 AM

bsyamato

Bad things on the wings Trey but the kit not seems so bad Yes waithing for the exciting painting scheme you choiced Bow Down

till now only an otaki kit i remember seen, i like the otaki plastic smell Propeller

I might need to get me a little pick me up. LOL

   http://i7.photobucket.com/albums/y269/wing_nut_5o/PANZERJAGERGB.jpg

 Eric 

  • Member since
    December 2003
  • From: Los Angeles
Posted by dostacos on Tuesday, September 27, 2011 5:11 PM

Would like to join in with a Tamiya 1/48 Ki84 Hayate(Frank)

as there is lots of time, it may be worked into the diorama I want to do. Japanese airfield with the Frank, Japanese bulldozer, maybe a motorcycle with side car  etc


Dan support your 2nd amendment rights to keep and arm bears!
  • Member since
    October 2008
  • From: italy
Posted by bsyamato on Tuesday, September 27, 2011 5:36 PM

tigerman


 bsyamato:


Bad things on the wings Trey but the kit not seems so bad Yes waithing for the exciting painting scheme you choiced Bow Down

till now only an otaki kit i remember seen, i like the otaki plastic smell Propeller


I might need to get me a little pick me up. LOL

dunno why, but that smel hit me in some way Confused the kit was not so good as the smell, the f-16 1/48 was 

  • Member since
    October 2008
  • From: italy
Posted by bsyamato on Tuesday, September 27, 2011 6:41 PM

then nate updates

because without jap gray i mixed the humbrol 40 gloss with the mm matt white, near 50/50 and thinned a lot

this second hand seems not covered too many details Embarrassed another needed


  • Member since
    July 2003
  • From: Pennsylvania
Posted by jay12472 on Tuesday, September 27, 2011 7:01 PM

bsyamato Nice progress on the nick

I got some some pics taken of the George and Jack

first the George

Now for the Jack, I drilled out the holes on the bar in the back of the cockpit.  Also did some addition painting to the boxes on the sides of the seat

and the holes

Sorry the pics aren't the greatest

Jason

  • Member since
    March 2003
  • From: Rain USA, Vancouver WA
Posted by tigerman on Tuesday, September 27, 2011 8:28 PM

That's a good start on the two birds Jason.

   http://i7.photobucket.com/albums/y269/wing_nut_5o/PANZERJAGERGB.jpg

 Eric 

  • Member since
    August 2009
  • From: Borlando Fla home of the rat
Posted by TREYZX10R on Tuesday, September 27, 2011 9:27 PM

bsyamato that color looks great ,nice mix. Do you wet sand between coats at all?

Jason looking great ,like the worn away paint on the fuse nicely done!

I got the major components together and went back over the glue joints and wicked some Tenax in them,except for the wing problem the only major gap is on the bottom trailing edge of the wing /fuse joint. I'm going to go over the engine with another dry brush of silver and a wash to bring out the details .Even though most of it wo'nt be seen,what will be will need to have more defined detail I think.

  • Member since
    October 2008
  • From: italy
Posted by bsyamato on Wednesday, September 28, 2011 5:22 AM

thanx Jason, the george at good point too and good details on the jack Yes  but my subject is the ki-27 "nate" (never me know this plane before to see it on the icm catalogue) .


quote user="TREYZX10R"]

bsyamato that color looks great ,nice mix. Do you wet sand between coats at all?

..

[/quote]

nope, when needed i sand surfaces before the first layer if needed, in this case i sanded really ligthly and only in the putty zones. As you see in last picture details are  too tiny for all types of sandpaper Surprise 

Actually i use only matt enamels with brush and the gray i use as primer perform a good grip for other layers. waiting this afternoon to check as the mixed light gray  dryied .

Before to paint on the plane i put an hand of same gray on a test surface and try on it before second layer on the plane to avoid bad surprises Big Smile

nice progress on the tojo Beer you perfom even this kit in flight?


  • Member since
    July 2003
  • From: Pennsylvania
Posted by jay12472 on Wednesday, September 28, 2011 6:49 AM

oops sorry about that  bsyamato

Jason

Thanks everyone


  • Member since
    November 2009
  • From: SW Virginia
Posted by Gamera on Wednesday, September 28, 2011 7:45 AM

Noah: Sorry I missed your post yesterday. All the Japanese trainers I've seen were painted orange- were you looking for a different colour?

Dostacos: Sure! I'll add you to the roster. And the dio will be really cool if you decide to go though with it.

Bsyamato, Jason, Trey: Wow, great work guys- just keep doing what you're doing! Yes

"I dream in fire but work in clay." -Arthur Machen


  • Member since
    August 2011
  • From: Panhandle Fl
Posted by Noah T on Wednesday, September 28, 2011 9:12 PM

Gamera: Orange is what I'd like to try. The 'ol timer at the shop told me I was going to have to mix it, then later told me that Gunze 24 "is close" but that he didnt carry it. I'll try "close enough" if you guys think so too. Anybody know a better supplier then ebay?

And BTW I went through the stash and here is what I have for this build. Doubt i'll get through it and will probably pick up some more...


As far as updates I can post these It's my A6m5-k MPC 72nd.:


On the bench: 72nd scale P51D, P47D Razorback

---Everything Is What It Is, And Not Another Thing.---

  • Member since
    August 2009
  • From: Borlando Fla home of the rat
Posted by TREYZX10R on Wednesday, September 28, 2011 9:37 PM

Noah nice stash ya got going ca'nt wait to see some of them come together,progress is lookig great

I 've yet to tackle the bottom gap

did manage to fix the problem on the upper wing with some thin ca and some fine sanding

before

after

Cowl is on and I did take the time to 'knife'edge the cowl flaps so they were'nt as thick and out of scale.More fine sanding will be needed here as well

  • Member since
    November 2009
  • From: SW Virginia
Posted by Gamera on Thursday, September 29, 2011 9:29 AM

Noah: Well you can always use model car paint orange, it'll probably be gloss but a little matte overcoat will take care of that. Or at worst buy a bottle of red and yellow and dump half of each in an old paint bottle and mix. I'm not sure how the trainer orange would have aged in sunlight but I'm guessing it would lighten to more yellowish or tan.

Nice collection of models there, I didn't even know half of those existed! And great work- the Zero is coming along nicely.

Trey: Glad you were able to fix the short-shot wing. You've got your third model half done and I just sprayed the primer coat on the Suisei last night Yes

"I dream in fire but work in clay." -Arthur Machen


  • Member since
    August 2009
  • From: Borlando Fla home of the rat
Posted by TREYZX10R on Thursday, September 29, 2011 4:51 PM

Cliff great to hear ya got some primer shot.Just curious what you use for primer? Thanks the wing fix went better than I had hoped for.

I had to do a lot of trimmin' and fillin' on the gear. Since the kit was designed for a gear down only the fit was off of course

fixed the gap at the wing trailing edge and fuse joint,some fine sanding and the bottom will be ready

  • Member since
    October 2008
  • From: italy
Posted by bsyamato on Thursday, September 29, 2011 5:35 PM

jay12472

oops sorry about that  bsyamato

Jason

Thanks everyone


don't care about Big Smile without gears, canopy and the prop it's hard to discern between other similar types

Noah this piece of stash is great and wishing to see the only the middle of pile on the gb Stick out tongue

good progress on the zero, really intresti to see the two seats type Yes

Trey, the tojo is just ready for the paint Stick out tongue

I'm remixed more paint this night and did second layer , after retouched some mistakes.

in right order:

glued the two fixed pieces of the canopy (also a test fitting with gears

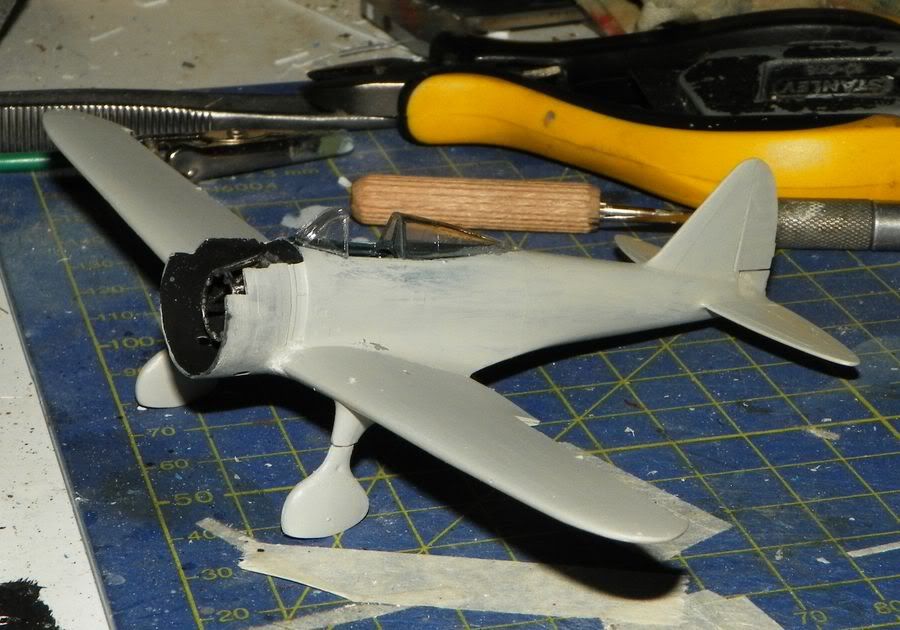
the first camouflage gray shown me some fault not seen before, as gears plastic retires.

the canopy fit not so perfect and frames lines is almost invisible, so i rescribbed with cutter, at least on the back canopy section

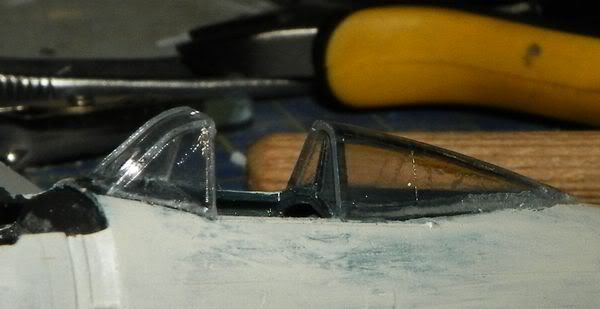
on the windscreen an hole for the gunsight is present.

the center canopy, only a final retouch with toothpick needed for remove excess paint. Inner frame dark gray as the cockpit.

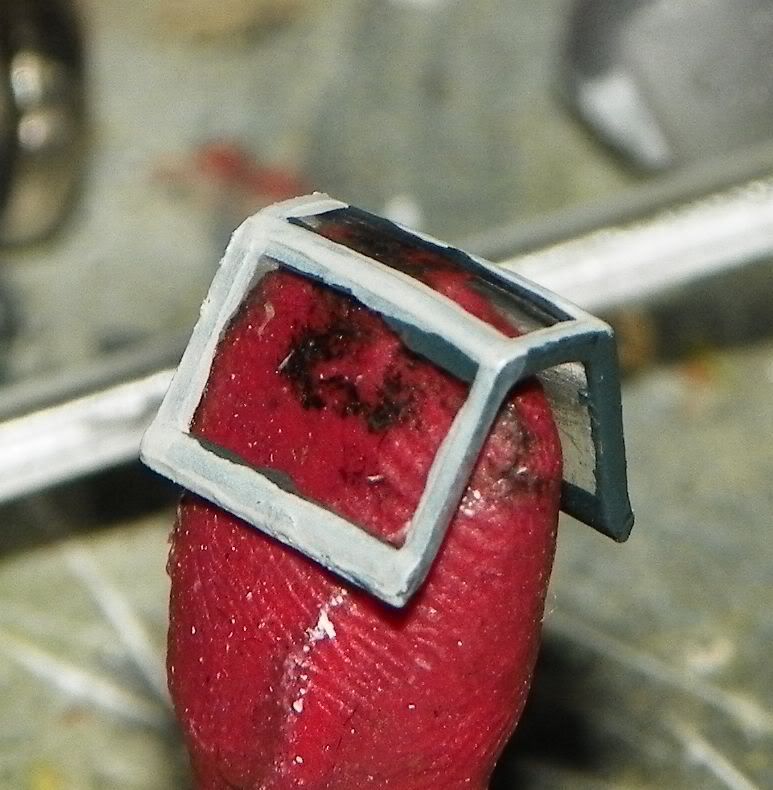
and the grayed other frames

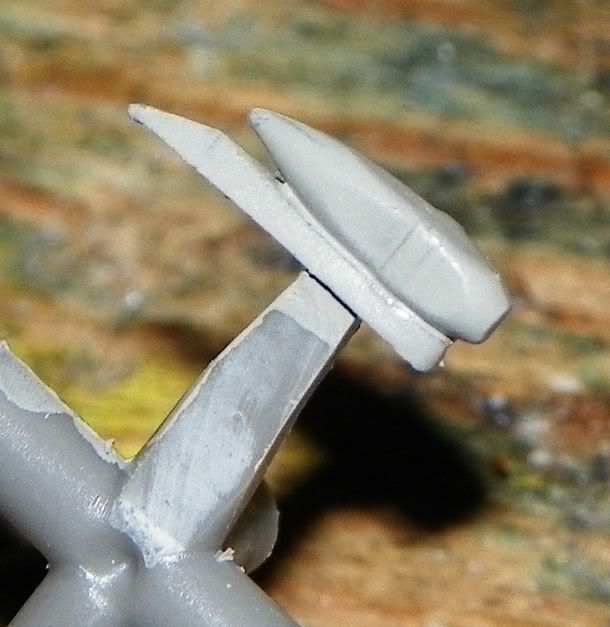
i painted this piece that goes on the right up wing, someone know what is the function? A cinematic camera?

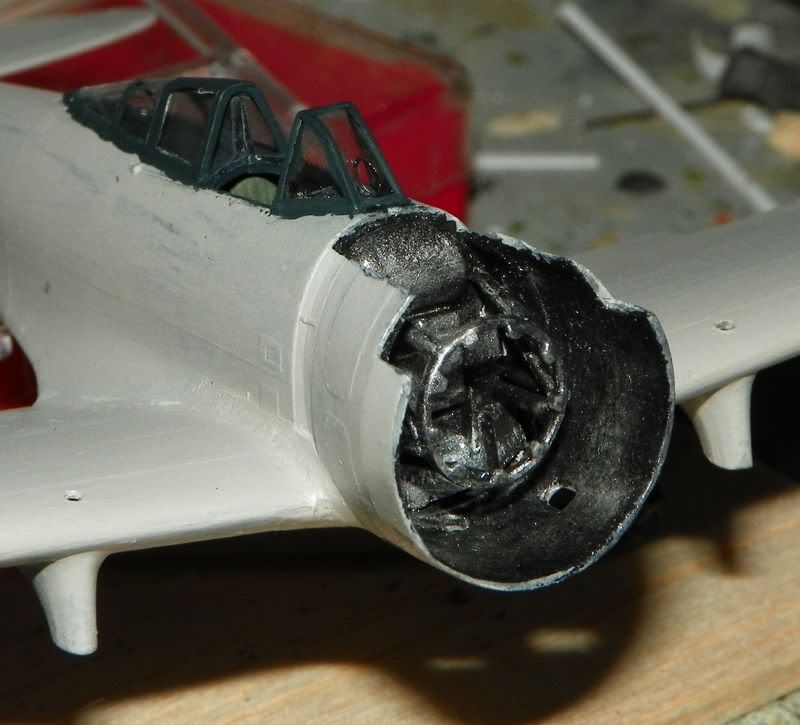
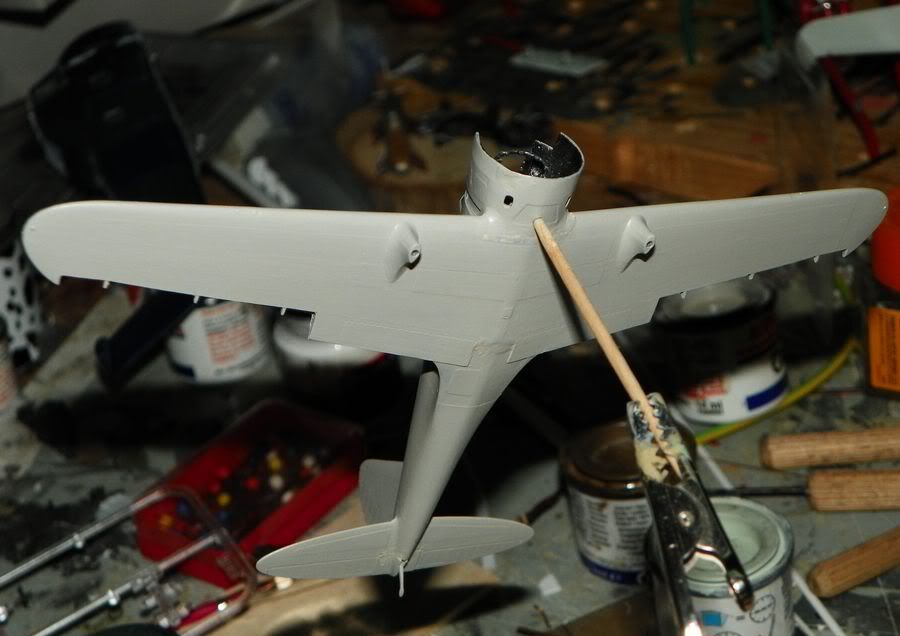
then the second camouflage gray layer

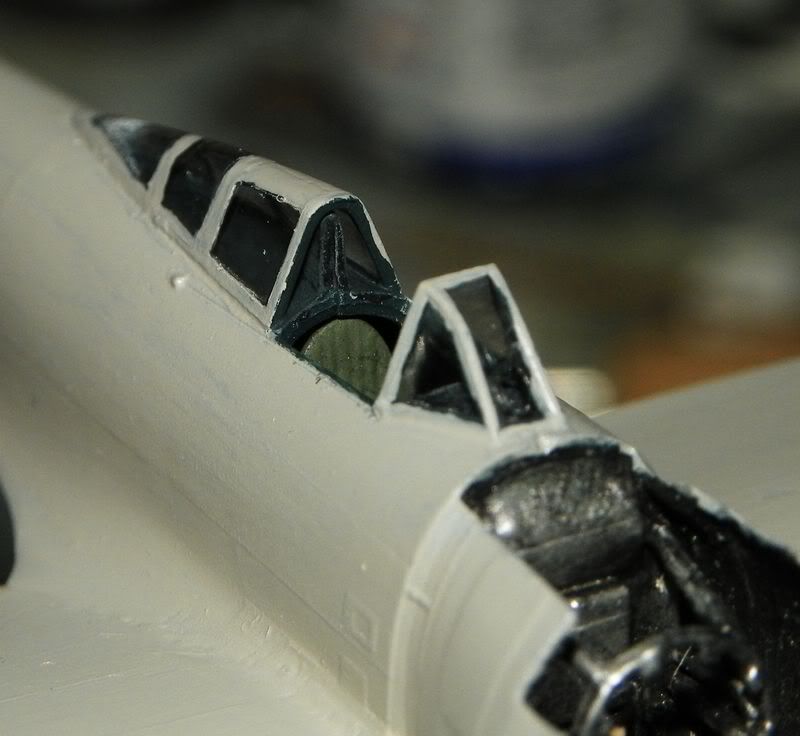
the bumps on the fuselage sides are the canopy opening stops.

the under wings joint will be the bad piece of this build Bang Head :


that's all for the night


  • Member since
    July 2007
  • From: Southern New Jersey
Posted by troublemaker66 on Thursday, September 29, 2011 6:29 PM

Bsyamato- You`re correct...that`s the gun camera.

Len Pytlewski

  • Member since
    July 2007
  • From: Southern New Jersey
Posted by troublemaker66 on Thursday, September 29, 2011 9:39 PM

Got a chance to do some work on my Emily. What a PITA with fit issues. Here`s a few pics...


Using caulk to fill gaps because of all the raised rivet detail...trying to do as little sanding as possible.


I`m hoping to get some paint on this beeotch tomorrow night. Thanks for looking.

Len

Len Pytlewski

  • Member since
    February 2011
  • From: Sedona AZ
Posted by AZKevin on Thursday, September 29, 2011 11:30 PM

Len, I think I've missed your ealier posts about this kit.  Is this the Hasegawa 1/72 Emily??  I have both the Emily and Mavis in my stash and would like your impressions before I bring them into the 'hanger'.  Thanks

Kevin

Kevin A. Lawton

Dept. of History

Dept. of Quaternary Sciences

Northern Arizona University

Flagstaff, AZ

  • Member since
    February 2011
  • From: Sedona AZ
Posted by AZKevin on Thursday, September 29, 2011 11:51 PM

I've seen Floquil 'Reefer Orange' used as well and it looks pretty good.  Hope so 'cause it's what I plan on using on my RS Models Ki-94-II.  Orange lower surfaces and Green upper surfaces.

Kevin

Kevin A. Lawton

Dept. of History

Dept. of Quaternary Sciences

Northern Arizona University

Flagstaff, AZ

  • Member since
    November 2009
  • From: SW Virginia
Posted by Gamera on Friday, September 30, 2011 9:41 AM

Trey: Wow she's lookin' good! Sometimes I prime and sometimes I don't, this kit had enough cut-out parts that have to be attached to the fusilage I figured I should prime it. I used Tamiya spray primer which is expensive but I was able to get a couple of bottles fairly cheap at a model show. It's great primer - goes on with a super silky smooth semi-gloss finish but this time the paint crazed at the wing roots. FIrst time I've ever had it happen with Tamiya primer. Though maybe I put it down too heavy so I sanded it off and sprayed again to get the same results. I'm going to really wash the model down good this time in case it's something on the plastic.

Bsyamato: She's really coming together! You've got much better eyes than me, it's a tiny plane even in 1/48th.

Lem: I have to admire you for tackling what's not the greatest kit. I'll build mine some day when I build up the guts. I'm afraid Carlos will be jealous though that you have the biggest 'floaty' thing.

Guys, my home computer finally went down, I think it's the power supply so I'm taking her into the shop. I'll see ya'll Monday on the work computer- keep up the good work!

"I dream in fire but work in clay." -Arthur Machen


  • Member since
    September 2003
  • From: Australia
Posted by Helo H-34 on Friday, September 30, 2011 7:35 PM

Hi Cliff and everyone else .

I should be able to make some more progress this weekend on my 1/72 Academy Zero and the 1/72 Hasegawa Ki-84 , Starter Truck and Fuel Truck finally arrived this morning , so I'm hoping to make start on those one's as well , particulary the two trucks .

It's a long weekend here in OZ , so I should be able to get a bit done .

Great work on everyone else's builds Yes

                        John .

  • Member since
    October 2008
  • From: italy
Posted by bsyamato on Friday, September 30, 2011 7:43 PM

Thanx len then need a drill on the head to simulate the glass opening Hmm 

the Emily really a pita, but i think they will pay you when finished Yes

AZKevin

Len, I think I've missed your ealier posts about this kit.  Is this the Hasegawa 1/72 Emily??  I have both the Emily and Mavis in my stash and would like your impressions before I bring them into the 'hanger'.  Thanks

Kevin

AZ i have the intention to get the mavis if i find it in some customer , what your opinion about the kit? i see some sprues picture and seems really old.

Thankss Gamera , yes the nate is the litter 1/72 ww2 fighter i never built (probably the ms-406 is shorter but the cockpit have a more human size) 

some little updates i did

the first red layer on front engine cover

after i passed the 2° and the 3° layer of gray on the whole surfaces, and with a miracle some details again i see Angel

then i refined the canopy frames with good picktooths .. "Samurai" brand!!

Gray layer hope is enough Embarrassed

that's all, tomorrow need to choice which individual plane to do.


  • Member since
    August 2011
  • From: Panhandle Fl
Posted by Noah T on Friday, September 30, 2011 8:23 PM

Helo: nice looking kits, I've never done a vehicle I'll be looking forward to see how those go.

AZKev I was looking at the Reefer Orange and thought maybe the MM "Int'l Orange" might be a tad closer to the box pics. I can't find a good pic of the Gunze 24 that was reccomended to me and there isn't a ton of it on ebay. I may get get all three and show the difs.... Lack of the color is having me looking at getting the heavy construction done and whatever else I can find to do.

Here is a pic of the resin parts:


On the bench: 72nd scale P51D, P47D Razorback

---Everything Is What It Is, And Not Another Thing.---

  • Member since
    July 2007
  • From: Southern New Jersey
Posted by troublemaker66 on Friday, September 30, 2011 8:45 PM

[quote user="bsyamato"]

Thanx len then need a drill on the head to simulate the glass opening Hmm 

the Emily really a pita, but i think they will pay you when finished Yes

AZKevin:

Len, I think I've missed your ealier posts about this kit.  Is this the Hasegawa 1/72 Emily??  I have both the Emily and Mavis in my stash and would like your impressions before I bring them into the 'hanger'.  Thanks

Kevin

Cool! Never got paid by a model before...Stick out tongue

Kevin-  The best part of this Emily kit was the box art. Tons of flash, bad fits and vague instructions at times. The clear parts are really thick and don`t fit very well in there openings. It`s a cool subject though and I know better modelers here could do it justice. I built a Modelcraft Twin Mustang a while back and that`s thee worst kit I ever built...the Emily is in the top 5 of the worst for me. This is strictly my opinion. I`m sure someone will come along and tell us how the Emily "fell together" for them.....Big Smile

Len Pytlewski

  • Member since
    August 2009
  • From: Borlando Fla home of the rat
Posted by TREYZX10R on Friday, September 30, 2011 9:30 PM

Bsyamato that second coat did the trick! The canopy cleaned up nicely too! I like the samarai toothpicks thats awesome! LMFAO !!!

Len great progress ,hope the caulk works for ya, I find it so hard to not damage detail when sanding but I'm sure you'll pull it off!

John great score with the trucks!! I'm really looking forward to seeing them come together

I sprayed the NMF used TS-30 silver leaf as I did on the Zero. I had to go back over with a second coat as I missed some deep scratches and had to put pack some rivets and panel lines that dissapeared during sanding.

  • Member since
    August 2011
  • From: Panhandle Fl
Posted by Noah T on Friday, September 30, 2011 9:43 PM

Damn Trey Bling Bling!


On the bench: 72nd scale P51D, P47D Razorback

---Everything Is What It Is, And Not Another Thing.---

  • Member since
    March 2003
  • From: Rain USA, Vancouver WA
Posted by tigerman on Saturday, October 1, 2011 12:13 AM

Trey, that looks great. I probably asked this before, is that an enamel?

   http://i7.photobucket.com/albums/y269/wing_nut_5o/PANZERJAGERGB.jpg

 Eric 

  • Member since
    August 2009
  • From: Borlando Fla home of the rat
Posted by TREYZX10R on Saturday, October 1, 2011 12:48 AM

lol thanks Noah ya gotta luv da bling

Eric thanks and its Synthetic Lacquer

  • Member since
    March 2003
  • From: Rain USA, Vancouver WA
Posted by tigerman on Saturday, October 1, 2011 2:12 AM

Thanks, I was afraid of that.

   http://i7.photobucket.com/albums/y269/wing_nut_5o/PANZERJAGERGB.jpg

 Eric 

JOIN OUR COMMUNITY!

Our community is FREE to join. To participate you must either login or register for an account.

SEARCH FORUMS
FREE NEWSLETTER
By signing up you may also receive reader surveys and occasional special offers. We do not sell, rent or trade our email lists. View our Privacy Policy.